World War II: Great Britain
Aircraft of Great Britain in WWII.
Hosted by Rowan Baylis
Eduard Spitfire Mk. I
Merlin
Staff MemberSenior Editor
AEROSCALE
#017
_VISITCOMMUNITY
United Kingdom
Joined: June 11, 2003
KitMaker: 17,582 posts
AeroScale: 12,795 posts
Posted: Saturday, September 26, 2020 - 07:55 AM UTC
[quote]
Quoted Text

If you're going to animate your model's control surfaceI presume that these controls could be positioned and left in those positions when the aircraft is sitting parked/idle; accurate?


Hi Curt

Not all of them - the elevators on early model Spits drooped without a lock. Later models were balanced.

All the best

Rowan
Merlin
Staff MemberSenior Editor
AEROSCALE
#017
_VISITCOMMUNITY
United Kingdom
Joined: June 11, 2003
KitMaker: 17,582 posts
AeroScale: 12,795 posts
Posted: Saturday, September 26, 2020 - 08:04 AM UTC
Hi again

Following on from the talk of control surfaces - don't be tempted to "drop the flaps" on a Spit unless you're modelling a specific scene such as servicing. Pilots faced being put on a charge or picking up the tab at the mess if they didn't raise the flaps after landing.

All the best

Rowan
Jessie_C
_VISITCOMMUNITY
British Columbia, Canada
Joined: September 03, 2009
KitMaker: 6,965 posts
AeroScale: 6,247 posts
Posted: Saturday, September 26, 2020 - 10:59 AM UTC

Quoted Text


Quoted Text

If you're going to animate your model's control surfaces, now you can pose the cockpit controls accordingly


Truly outstanding info, Jessie, THANK YOU SO MUCH!!! The photo helped a ton as well. Fantastic! Can I ask whether you know how far the circular yoke tilts in either direction for maximum deflection of the ailerons, and, for that matter, how far, in approximate degrees, the ailerons move, at maximum deflection? I know this is digging into the weeds, but just in case you may have this level of knowledge, it might be worth it in terms uf ultimate detail on the model. In addition, since the control surfaces are all manually linked to the cockpit controls, I presume that these controls could be positioned and left in those positions when the aircraft is sitting parked/idle; accurate?


Check the 2:40 mark of this video to see the pilot carry out a full-deflection control check.
A Spitfire's controls will generally remain in the position the pilot left them, but also if an erk moves them externally, they'll stay that way. Unless the girder-work control lock is installed in the cockpit.

But of course the elevators always drop to full nose-down unless the control lock is installed.
cabasner
_VISITCOMMUNITY
Nevada, United States
Joined: February 12, 2012
KitMaker: 1,083 posts
AeroScale: 25 posts
Posted: Saturday, September 26, 2020 - 12:53 PM UTC

Quoted Text


Check the 2:40 mark of this video to see the pilot carry out a full-deflection control check.
A Spitfire's controls will generally remain in the position the pilot left them, but also if an erk moves them externally, they'll stay that way. Unless the girder-work control lock is installed in the cockpit.

But of course the elevators always drop to full nose-down unless the control lock is installed.


Jessie, thanks again! That video is about as perfect an illustration as one could get about maximum control deflection in a Spitfire. I now know how to position my cockpit controls to match what the plane's control surfaces look like externally. And thanks, too, to Rowan about the limited conditions under which a Spitfire's flaps are made to be deflected. Really good to know...I'd rather have any future builds look like they would when parked.
Heatnzl
#435
_VISITCOMMUNITY
Nelson, New Zealand
Joined: February 14, 2013
KitMaker: 480 posts
AeroScale: 478 posts
Posted: Saturday, September 26, 2020 - 01:26 PM UTC
This little gem pre-flight is a blessing for those who like detail.

Cheers

Karl.
BlackWidow
_VISITCOMMUNITY
European Union
Joined: August 09, 2009
KitMaker: 1,732 posts
AeroScale: 1,336 posts
Posted: Sunday, September 27, 2020 - 04:00 AM UTC
Wonderful! Thanks Karl!
Jessie_C
_VISITCOMMUNITY
British Columbia, Canada
Joined: September 03, 2009
KitMaker: 6,965 posts
AeroScale: 6,247 posts
Posted: Sunday, September 27, 2020 - 05:14 AM UTC
A Spitfire IX starring in a walkaround, start-up and flight. Note how little the pilot needs to move the controls during flight.
Merlin
Staff MemberSenior Editor
AEROSCALE
#017
_VISITCOMMUNITY
United Kingdom
Joined: June 11, 2003
KitMaker: 17,582 posts
AeroScale: 12,795 posts
Posted: Monday, September 28, 2020 - 08:07 AM UTC

Quoted Text

UGH!!! ROOFING!!! Been there!

Best of LUCK, and a MINIMUM of HEADACHES with your experience!

VR, Dennis


Hi again

Well - Day 1 went pretty amazingly - the guys got far more done than I thought was possible and should be finished tomorrow - a day earlier than they'd warned the job might last. It's just as well, because bad weather's set to roll in on Wednesday. I guess that'll be a chance to see if the new roof leaks...

All being well, I'll be back at the workbench on Thursday, snug and dry...

All the best

Rowan
Merlin
Staff MemberSenior Editor
AEROSCALE
#017
_VISITCOMMUNITY
United Kingdom
Joined: June 11, 2003
KitMaker: 17,582 posts
AeroScale: 12,795 posts
Posted: Thursday, October 01, 2020 - 04:52 AM UTC
Hi again

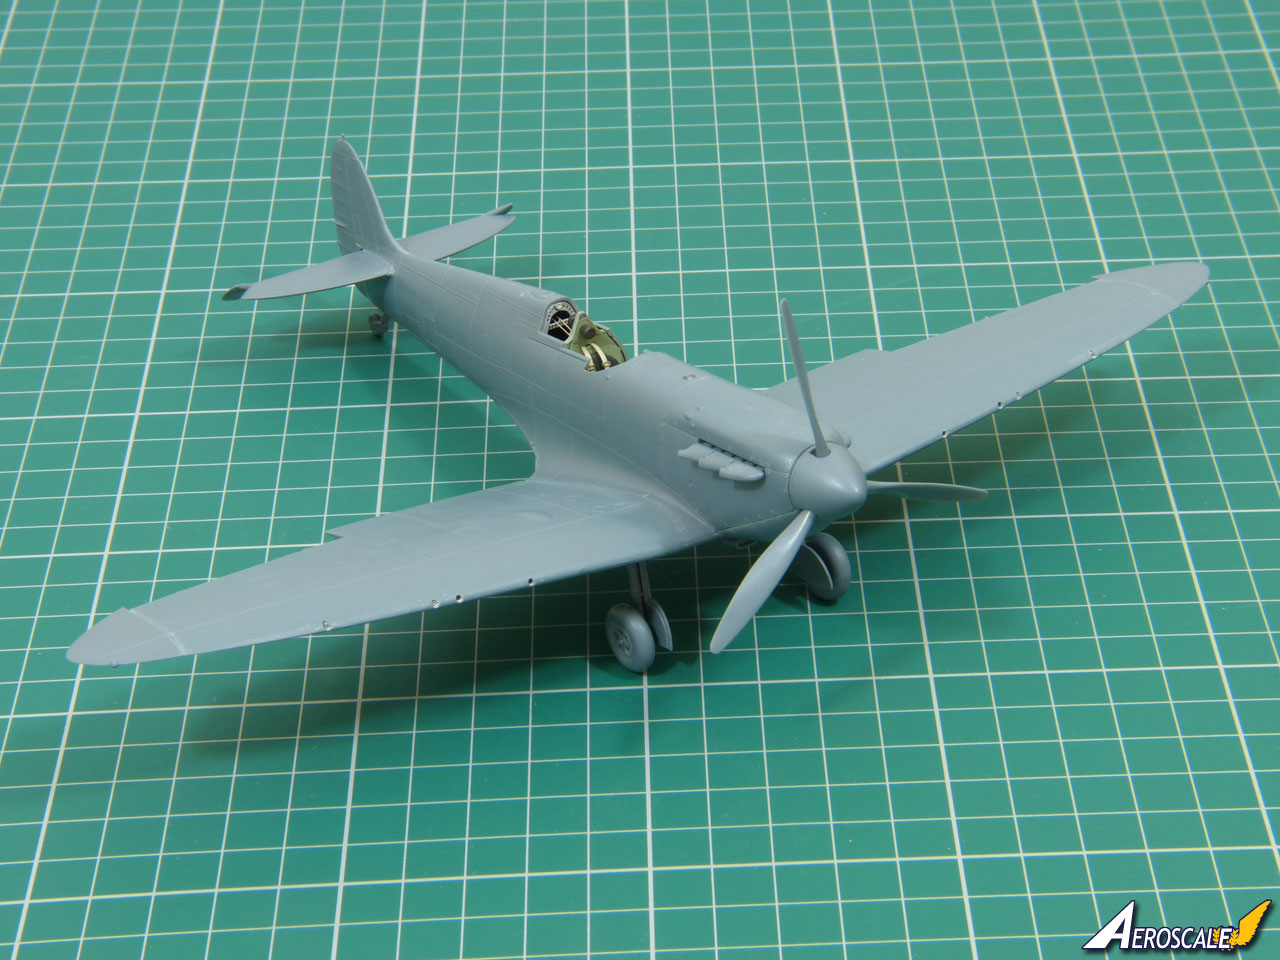
It was nice to get back to the workbench today after a week away from the builds. To get back in the groove and regain a bit of momentum I pushed ahead and got the Spits standing on their undercarriages with their props etc. dry-fitted:


I'll flatten the tyres a little to give a bit of sense of weight - at the moment the models look like they're standing on tip-toe. In fact, I'll leave the wheels and exhausts dry-fitted, because Eduard are sending Brassin versions for review and I'll see how they look when installed. I think there's no doubt they'll be a very worthwhile improvement.

All the best

Rowan
M4A1Sherman
_VISITCOMMUNITY
New York, United States
Joined: May 02, 2013
KitMaker: 4,403 posts
AeroScale: 254 posts
Posted: Thursday, October 01, 2020 - 09:17 PM UTC
Hi, Rowan & Everyone else!

Rowan- You're absolutely right when it comes to "flattening" model aircraft Tires/Tyres. I've been doing so since the mid-late 1960s. This practice DOES do away with that "toy-like appearance" we serious modelers strive to eliminate when we build our models.
I like assemble and "flatten" the Tires near the very end of my building process- It avoids many a minor catastrophe.

The following is meant only to be helpful for newer modelers, or for those experienced modelers who have previously shied away from "flattening" model Tires. For simplicity's sake alone, I will make use of the American spelling of "Tires/Tyers"

Everyone has their own methods, but I personally like to attach my Landing Gears permanently, then my Wheels/Tires/Landing Gear Legs assemblies. I make sure that these parts are all oriented/positioned properly. Nothing detracts more from the "stance" of a particular model than an improperly installed set of Landing Gears.

Once these have all dried properly, I have a sheet of sand paper or emery paper tacked onto a perfectly level spot on one of my workbenches. I place my aircraft on the sand paper/emery paper, along with a short, silent prayer. Now comes the "VERY CAREFULLY" part:

I then VERY CAREFULLY hold BOTH Main Landing Gear "Legs" just above the Tires, maintaining contact with the tops of the Tires at the bottoms of my thumbs and forefingers. My Tail Wheel or Nose Wheel IS NOT in contact with the abrasive at this point. IT IS IMPORTANT that the Tail Wheel or Nose Wheel is in CONSTANT CONTACT with the workbench's FLAT table surface. This is why a PERFECTLY LEVEL table-surface is important. if not, it will have a directly NEGATIVE EFFECT upon the "flat" areas of your Tires. ALL of your tires need to be "flattened" along the same "plane". (No pun intended) This sounds more complicated than it actually is, in practice. Speaking of "practice", try this method on an old "junker" BEFORE you do this on your most recent "prized possession"...

I take a calm breath, and then I VERY gingerly start to move the model, while holding BOTH Main Gears WITH BOTH HANDS in a GENTLE "FIGURE-8"-fashion, maintaining constant contact between the bottoms of the Tires and the "abrasive".

DO NOT sand each Gear SEPARATELY, otherwise an UN-EVEN "stance" will be your net result. You don't want a "cock-eyed"-looking airplane, do you?

Keep the "figure-8" small; no more than 2-3 inches in breadth. This will keep you from putting undue stress on your model's Landing Gear Legs. GENTLY execute 5 or 6 "figure-8s" to begin with, and then "test" the "stance/look' of your aircraft by placing your model on a clear section of your level table. If necessary, repeat the process until you're satisfied with your model's "look". DO NOT OVERDO.
ALWAYS remember: "Less is More"...

Once you're satisfied with the "flattening" of your Main Landing Gears' Tires, it's time to move on to your Tail Wheel or Nose Wheel-

Now THIS IS IMPORTANT:

The Tail Wheel or Nose Wheel assemblies are INHERENTLY WEAKER than your Main Gears, so an EVEN LIGHTER TOUCH is required in "flattening" THESE Tires.

In the case of Nose Wheels, orient your aircraft with your Nose Wheel(s) in direct contact with your abrasive, and with your Main Gears' Tires placed on your clear, flat table surface. I like to hold my Nose Wheel(s) between my thumb and my forefinger right at the Hub(s)- Better control and much less of a chance in breaking your Nose Gear's Landing Strut. Keep your free hand OFF the model, and ever so GENTLY repeat the "figure-8" sanding process with your Nose Gear's Tire(s). Remember that it is the Main Landing Gear which supports most of the weight of ANY aircraft, so TAKE IT EASY with the Nose Gear.

With Tail Wheels, bear in mind that the Tail Wheel of your aircraft will necessarily be much smaller than your Main Gear's Wheels/Tires, THEREFORE even less sanding/"flattening" will be required. DO "flatten" the Tail Wheel's Tire in order to complete the impression of "weight" in your model. VERY FEW "figure-8s" will be required in order to "flatten" this Tire. I would only venture 3-4 of these in order to achieve a convincing "look". Bear in mind that the Tails of aircraft are usually much lighter in weight than their Noses...

PRACTICE on a junker until you get a "feel" for the job at hand. Above all, "Less Is More"...

Thanks for reading, and STAY HEALTHY...

VR, Dennis
Merlin
Staff MemberSenior Editor
AEROSCALE
#017
_VISITCOMMUNITY
United Kingdom
Joined: June 11, 2003
KitMaker: 17,582 posts
AeroScale: 12,795 posts
Posted: Friday, October 02, 2020 - 05:53 AM UTC
Hi Dennis

It's also worth pointing out to anyone trying sanding flat spots on tyres for the first time that the mainwheels on many vintage aircraft weren't perpendicular to the ground; the Spitfire and Bf 109 are classic examples.

I'm not sure if it's still available, but I reviewed CB Model Products' excellent Scale Aircraft Wheel Sander back around 10 years ago.

All the best

Rowan
M4A1Sherman
_VISITCOMMUNITY
New York, United States
Joined: May 02, 2013
KitMaker: 4,403 posts
AeroScale: 254 posts
Posted: Friday, October 02, 2020 - 08:25 AM UTC
Hello to All!

Yes, Rowan is exactly right- Many other aircraft also share the Spitfires' and Bf.109s', (as well as other aircraft) Landing Gear's more obvious characteristics, which we refer to as "camber", and to some small extent in aircraft, there is some small amount of "toe-in". These characteristics do, in some ways, "parallel" in the world of automobiles. "Caster" is also there, but NOT in the Main Landing Gear on aircraft. Seeing as this is a discussion concerning mainly model aircraft, I will refrain from discussing "Toe-out on Turns"- THAT is a subject for another time and place. As to the other terms, "caster", "camber" and "toe-in", please do me the honor of permitting me to explain myself...

On aircraft, "Caster" isn't required in the Main Landing Gear, because the Wheels/Tires remain in a more or less "fixed fore-and-aft" position. This is why we have Nose or Tail Wheel assemblies. In automotive applications, "caster" IS required, as the Wheels/Tires have to be able to swivel AND RETURN to a "fore and aft" orientation upon completion of any turns to the right or left. The same "castering"-principles can be found in your neighborhood shopping establishments when you use a shopping cart.

With aircraft, where Nose Wheel assemblies and Tail Wheels are concerned, there will necessarily be a measure of "caster", because this is a part of "steering geometry", no matter what. On aircraft however, "caster" is most noticeable in the "slant" of the Nose Wheel and Tail Wheel LEGS. In either case, Nose Wheel assemblies and Tail Wheels steer the aircraft to the right or left, and "caster" allows these to return to the "fore-and-aft" position once steering-pressure is released or eased up on the Rudder Pedals.

Many larger aircraft will show "camber" in DOUBLE Nose Wheel assemblies, when one is facing the aircraft fore OR aft. The "camber" shows up in the spacing of the Wheels/Tires being further apart at the top than at the bottom; this also aids in the actions of steering, along with "caster".

"Toe-in" in the Main Landing Gear Wheel/Tire assemblies is required for the same exact reasons as one finds on autos. As the speed of ANY driving or flying machine increases on the road or the runway surfaces, the Wheels/Tires have a tendency to SPLAY OUTWARDS at the front due to friction while moving forward. "Toe-in" counteracts this "splaying", and keeps the vehicle in question tracking more or less in a "straight line", with the Driver or Pilot(s) making the necessary steering corrections, manually...

Who would have thought that "playing around" with a model airplane or model "wheeled-thingie" could become so involved..?

I have to say though, that once one understands the basics of steering-geometry, one may become more "attuned" to what your car's steering wheel is trying to tell you as you're tooling along...

Hope I didn't bore anyone too badly as I was not trying to show off...

STAY HEALTHY, All!

VR, Dennis

PS- Proper Wheel-alignment and maintaining proper tire-pressures can save you untold sums in repairs/replacements, fuel-savings and less tire-wear, as well...
Merlin
Staff MemberSenior Editor
AEROSCALE
#017
_VISITCOMMUNITY
United Kingdom
Joined: June 11, 2003
KitMaker: 17,582 posts
AeroScale: 12,795 posts
Posted: Tuesday, October 06, 2020 - 07:46 AM UTC
Hi again

No fresh progress pics yet, but I did have a play with the Spits on Sunday and they're basically ready to start throwing paint at. All being well, I'll get started painting the exteriors on Thursday - but there could be builders doing another job on the house. If so, I probably won't get much done.

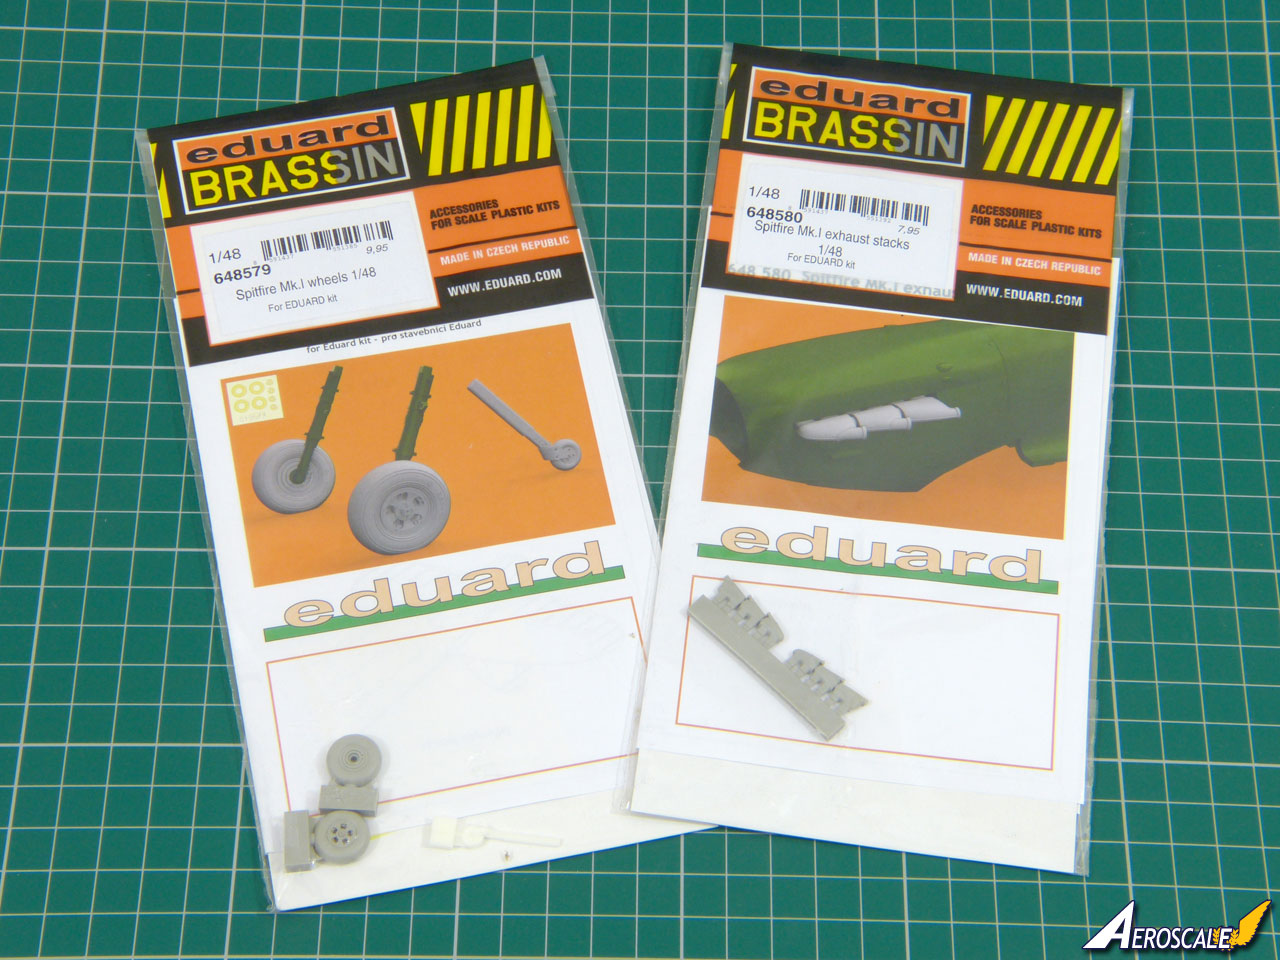
Meanwhile, Eduard have sent a couple of Brassin treats for one of the Spits (thanks to Andy Brazier for forwarding the samples ).


Based on first inspection, the mainwheels and exhausts are obvious improvements on the kit parts (the mainwheels are in a totally different league!), while the difference in the tailwheel is more subtle. I'll post reviews this week - maybe that'll be a good little job for Thursday if I'm lumbered with builders!

All the best

Rowan
M4A1Sherman
_VISITCOMMUNITY
New York, United States
Joined: May 02, 2013
KitMaker: 4,403 posts
AeroScale: 254 posts
Posted: Tuesday, October 06, 2020 - 10:19 PM UTC
Hello, All!

That's "good", Rowan- "LUMBERED" with builders..." I like that...
Merlin
Staff MemberSenior Editor
AEROSCALE
#017
_VISITCOMMUNITY
United Kingdom
Joined: June 11, 2003
KitMaker: 17,582 posts
AeroScale: 12,795 posts
Posted: Thursday, October 08, 2020 - 07:21 AM UTC

Quoted Text

Hello, All!

That's "good", Rowan- "LUMBERED" with builders..." I like that...


Hi again

Sadly, I did end up "lumbered" - well, I say sadly, but Castle Aeroscale is 180+ years old and it's work that needs doing as a priority!

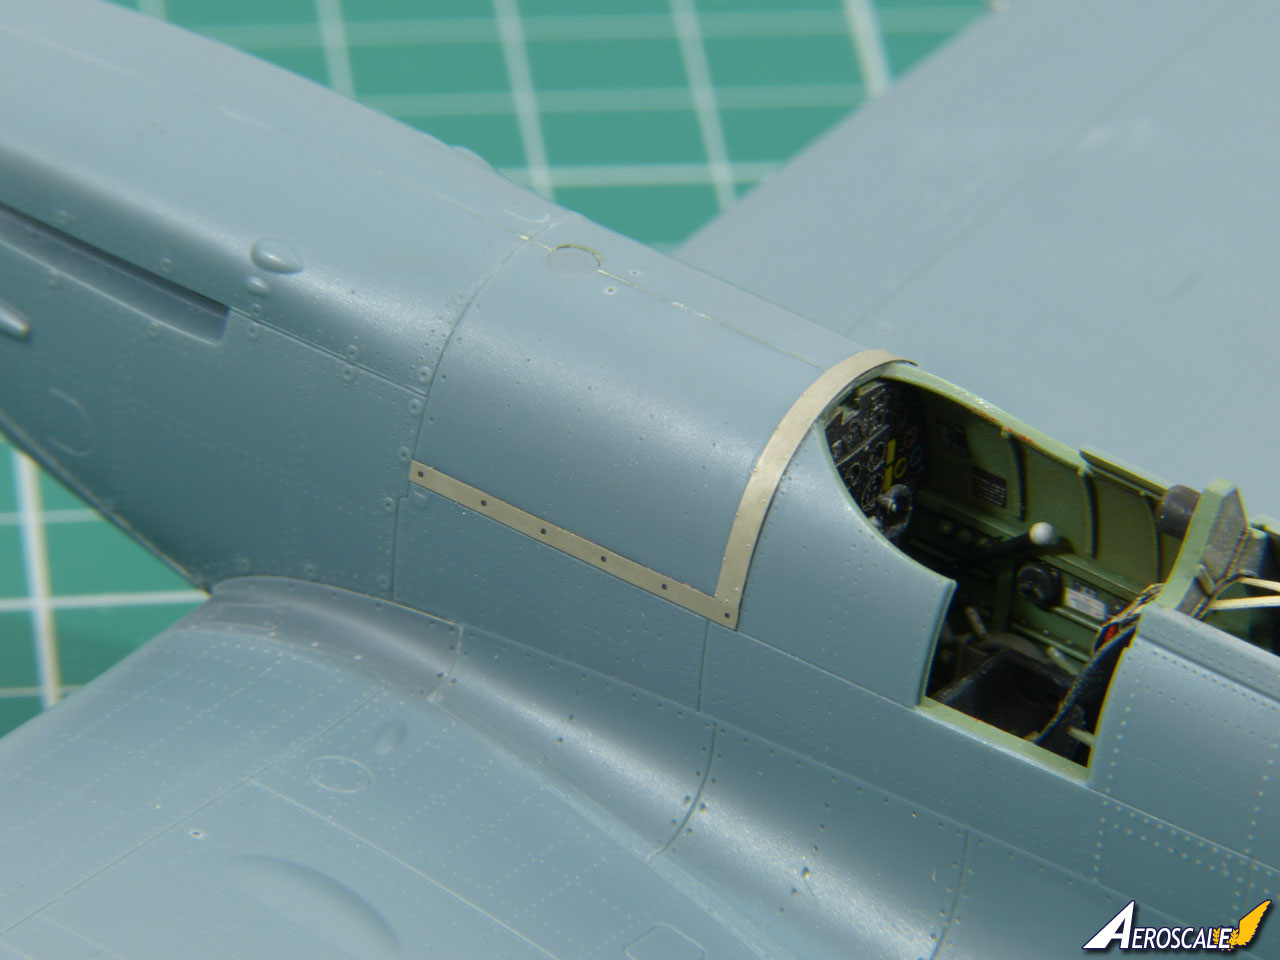
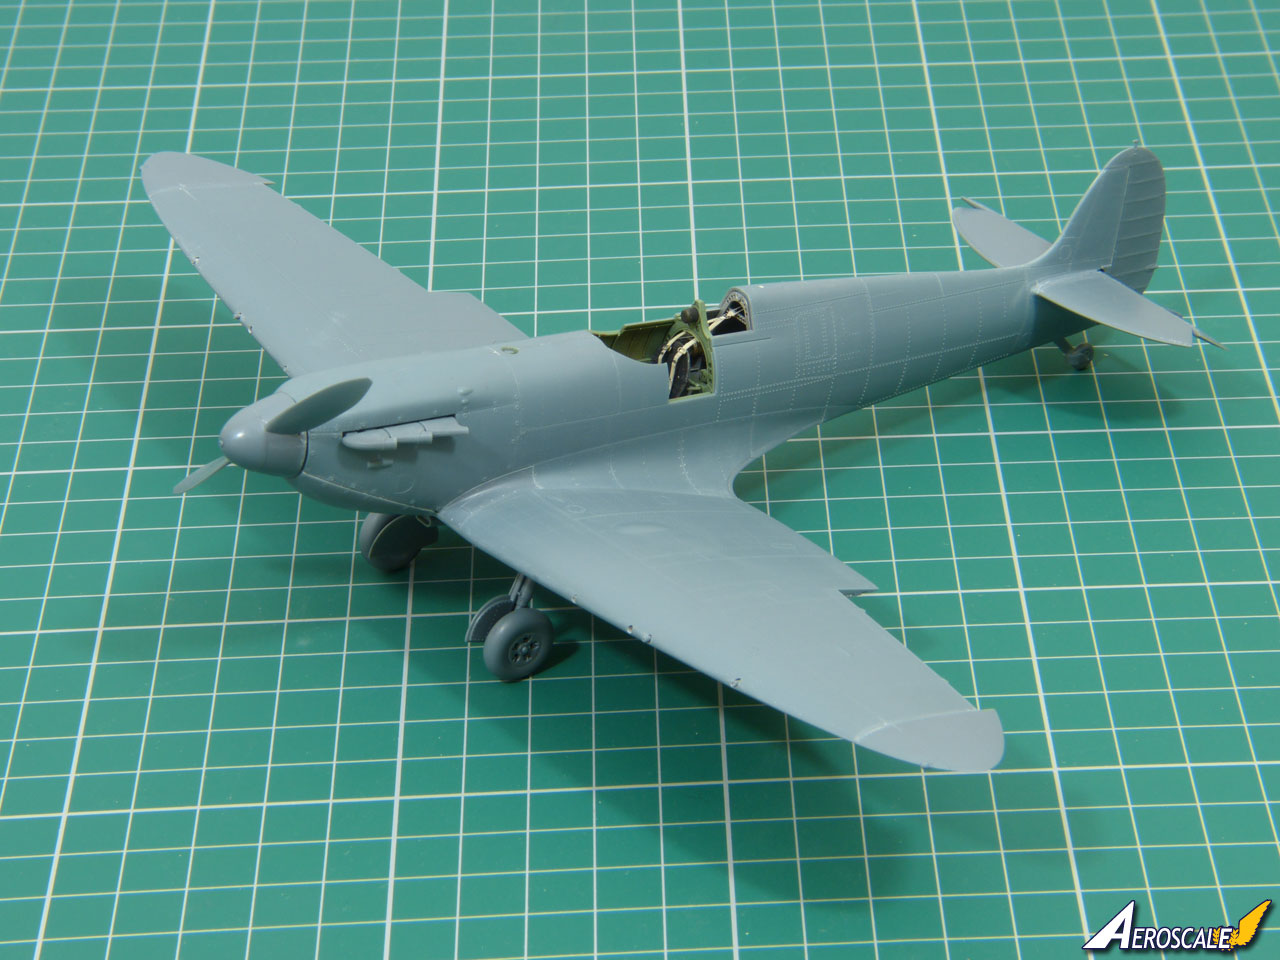
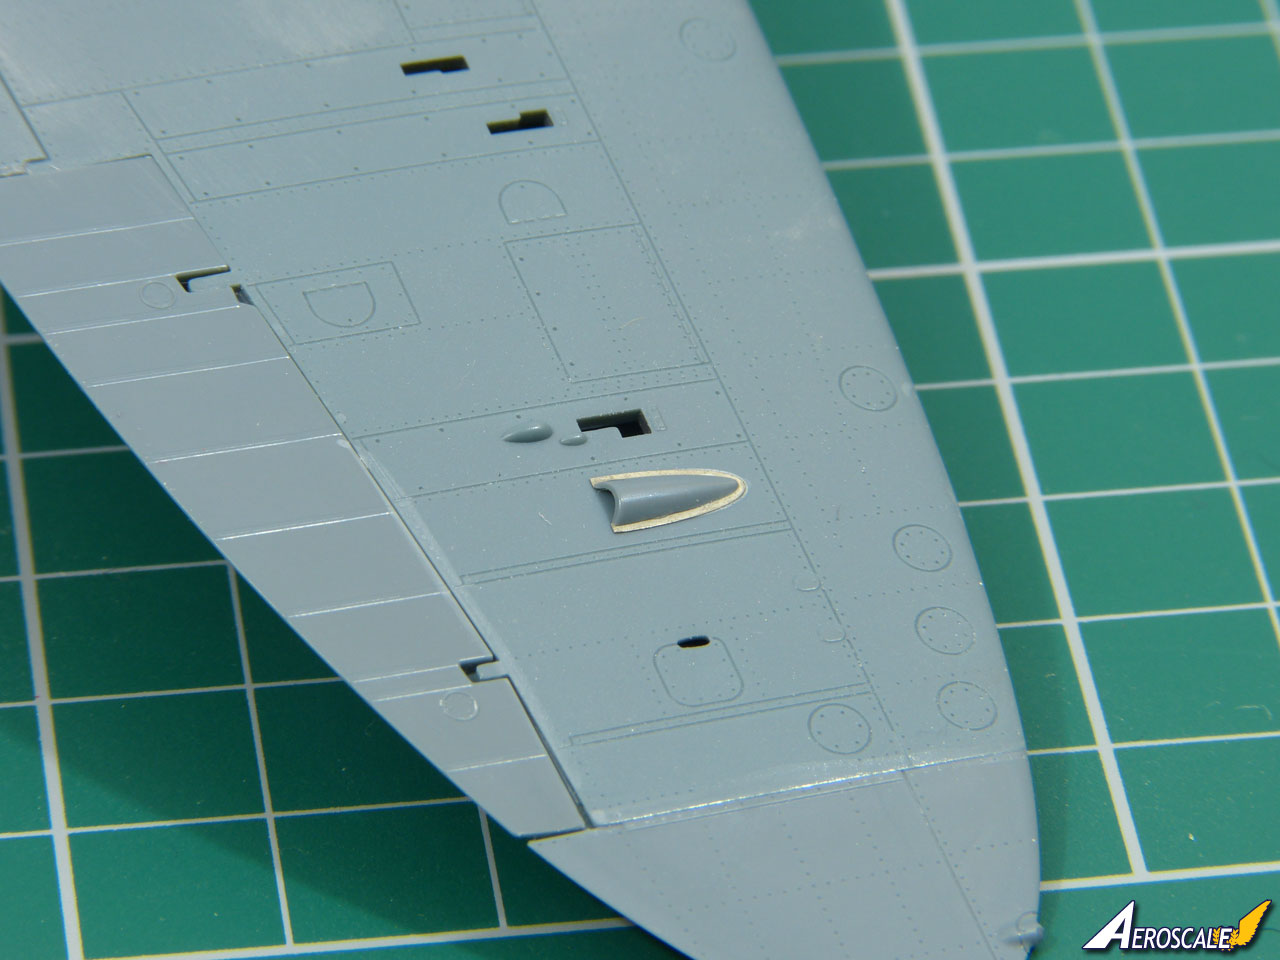
So - no real update. But I did shoot a couple of pics to illustrate points in the kit that beginners might need to consider; namely - photo-etch.

The way Eduard have designed things, you can't avoid using at least some photo-etched parts (a lot of the cockpit details etc. are optional).

For early aircraft, you'll need to add the external strengthening strips around the fuel tank:


While the hot air vents under the wings of the later machines include etched mounting plates:


It'll be interesting to see what Eduard do with the Weekend Edition boxings that can't be far off. Normally, they come without etched parts.

Anyway, back to the ProfiPack kit - Eduard could have made life easier if they'd supplied the parts ready-coated with contact-adhesive - something they pioneered a few years ago but, nevertheless, anyone unused to working with etched parts shouldn't have too much trouble, so long as they're careful (particularly with the strengthening strips).

All the best

Rowan
M4A1Sherman
_VISITCOMMUNITY
New York, United States
Joined: May 02, 2013
KitMaker: 4,403 posts
AeroScale: 254 posts
Posted: Thursday, October 08, 2020 - 08:43 AM UTC
Hi, Rowan!

I took "lumbered" as a joke; I meant no offense. Unfortunately, roofing can get VERY EXPENSIVE in a remarkably short time. Hope everything works out well for you and that the "lumbering" doesn't put a terrible strain upon your wallet...

RE: PE... There have always been modelers who can't get enough of PE for any modeling project; for other modelers, ANY PE has always been anathema. I personally can't get along without PE, unless there is NONE to be had for my subject. If that's the case, there will be a judicious use of my scratch-building, painting and MAGNIFIER-skills!

Rowan, your PE-work is outstanding!

Has anyone heard or read anything more about EDUARD's "future" 1/48 P-40B/C, F4F Wildcat, or P-51B/C kits at all..? I know their F-6D "Photo" Mustang is due out soon. I believe in November..?

Hopefully, that 1/48 Spitfire Mk.V of EDUARD's will be coming right along, too!

Stay Safe and Healthy, Everyone!

VR, Dennis
SteveAndrews
_VISITCOMMUNITY
England - South East, United Kingdom
Joined: August 16, 2010
KitMaker: 693 posts
AeroScale: 551 posts
Posted: Thursday, October 08, 2020 - 06:30 PM UTC
Hi folks,

Rowan, that's some neat PE work. I hope the roofing project doesn't go on for too long and you are soon back at the bench.

I have mixed feelings about PE. Some of the near microscopic details we get these days are just too small and fiddly for me to work with. On the other hand PE seems ideal for representing things made from metal sheet like we can see on your Spitfire.

Good luck with all your projects big and small,

Steve.
M4A1Sherman
_VISITCOMMUNITY
New York, United States
Joined: May 02, 2013
KitMaker: 4,403 posts
AeroScale: 254 posts
Posted: Thursday, October 08, 2020 - 09:48 PM UTC
Good Morning, Everyone!

Hello, Steve- I agree with your observation regarding PE to some extent. My OLD Mk.I eyeballs just aren't what they used to be since I entered my "40's" back in 1993!

Having said that, a lighted magnifier and the EXTENSIVE use of PE, especially in Cockpits and other highly-detailed areas of model aircraft, I've found that I've had to resort to these two facets of model-building MORE and MORE as time went on. For me at least, this "twin-pronged" ATTACK has been an absolute boon to my modeling. Pre-painted PE such as that which EDUARD sells, has provided me with plenty of great alternatives to "fabrication" and/or painting my own "microscopic" details. My eyes and sometimes, my shaky, numb and tingling hands and fingers, (which are the symptoms of diabetic neuropathy), preclude the "abilities" which I used to take for granted. My sometimes low sugar-levels can also cause blurred vision and crankiness, which cuts down on my level of patience with PE...

Oh, well...

Everyone, please understand that I AM NOT going to fault anyone over their shying AWAY from PE- Using PE can be pretty darned frustrating at times, even for an experienced old BUZZARD such as myself. (Refer to the diabetic neuropathy, above) All of these above-mentioned things have significantly cut down on my "seat time" behind my workbenches. However I'll keep modeling and using PE until I can't, anymore...

STAY SAFE & HEALTHY, Friends!

Thanks for reading...

VR, Dennis
Merlin
Staff MemberSenior Editor
AEROSCALE
#017
_VISITCOMMUNITY
United Kingdom
Joined: June 11, 2003
KitMaker: 17,582 posts
AeroScale: 12,795 posts
Posted: Friday, October 09, 2020 - 07:06 AM UTC
Hi guys

My take is that photo-etch is wonderful - when used appropriately. I'm going right back to Harry Woodman's articles introducing the medium in the 1970s (and, actually, if you read them, we've actually lost some ease of use over the years!) - but, simply stated, there are some things that photo-etch is ideal for, and others where it's a bad choice.

I judge every build objectively - and if I reckon I can achieve the same or better result through modifying a kit part or scratch-building extra detail, then that's what I'll do.

All the best

Rowan
Jessie_C
_VISITCOMMUNITY
British Columbia, Canada
Joined: September 03, 2009
KitMaker: 6,965 posts
AeroScale: 6,247 posts
Posted: Friday, October 09, 2020 - 07:53 AM UTC

Quoted Text

It'll be interesting to see what Eduard do with the Weekend Edition boxings that can't be far off. Normally, they come without etched parts.


I'll bet they'll just avoid those variants which need PE.
M4A1Sherman
_VISITCOMMUNITY
New York, United States
Joined: May 02, 2013
KitMaker: 4,403 posts
AeroScale: 254 posts
Posted: Friday, October 09, 2020 - 08:22 AM UTC
Hello, Jessie!

Well then, if that's the case, EDUARD's "bread & butter" (i.e, PE and other A/M parts) will have left the scene. And that means, NO MORE EDUARD...

VR, Dennis
Jessie_C
_VISITCOMMUNITY
British Columbia, Canada
Joined: September 03, 2009
KitMaker: 6,965 posts
AeroScale: 6,247 posts
Posted: Friday, October 09, 2020 - 08:32 AM UTC

Quoted Text

Hello, Jessie!

Well then, if that's the case, EDUARD's "bread & butter" (i.e, PE and other A/M parts) will have left the scene. And that means, NO MORE EDUARD...

VR, Dennis


No, they'll never stop selling PE sets. But their Weekend kits are supposed to be able to build without anything extra. If the buyer wants to be silly enough to throw PE at it, then Eduard will be more than happy to sell it
M4A1Sherman
_VISITCOMMUNITY
New York, United States
Joined: May 02, 2013
KitMaker: 4,403 posts
AeroScale: 254 posts
Posted: Friday, October 09, 2020 - 11:40 PM UTC
Fine with me; it's my prerogative to remain silly, then...

As I said above; some like PE, some don't. I find it useful...

Stay Safe & Healthy!

VR, Dennis
BlackWidow
_VISITCOMMUNITY
European Union
Joined: August 09, 2009
KitMaker: 1,732 posts
AeroScale: 1,336 posts
Posted: Friday, October 09, 2020 - 11:57 PM UTC
Concerning PE parts I'm with Steve. I use only a minimum of them and only if they are usefull and visible in the end. It's not enough for me to know they are somewhere in there. With my current Airacobra double build Eduard offers many PE parts which make no sense to me. So I have used only a few of them in the cockpit. But on the other hand the kit offers stump parts for the .50's, the 37 mm cannon and the exhaust stacks. Here I put more attention on than on "invisible" PE parts. Okay, those kits have the standard of the 1990's ....

Dennis, if you can't wait for a decent Mk. V, have a look at the one from Airfix (No. A05125). Have it in my stash, though not built yet. But if it goes together like their Mk. XII and Hurricane Mk. I, it will be a great kit. You'd had to get the PE parts extra though. But as Jessie wrote Eduard is willing to sell them to you to make some more Kcs (= Czech Kroners) ....
Merlin
Staff MemberSenior Editor
AEROSCALE
#017
_VISITCOMMUNITY
United Kingdom
Joined: June 11, 2003
KitMaker: 17,582 posts
AeroScale: 12,795 posts
Posted: Saturday, October 10, 2020 - 07:11 AM UTC

Quoted Text

...their Weekend kits are supposed to be able to build without anything extra. If the buyer wants to be silly enough to throw PE at it, then Eduard will be more than happy to sell it


Hi Jessie

I love it - all this debate on the basis of 5 etched parts.

"Silly enough" is a bit harsh. But, I totally agree with you that the point of Weekend kits is that they are simpler than ProfiPack boxings and more akin to other manufacturers' releases.

Hence my wondering aloud what the Weekend Spit Mk I releases will be like, seeing as Eduard have designed things to require a little bit of photo-etch for both the early and late versions. They can't ignore both - that'd be shooting themselves in the foot.

So - my hunch is a small etched fret with each.

That would make sense financially as a "taster" in their Weekend kits of what else is available in their range, whether it's photo-etch or Brassin parts - a painless entry into the world of aftermarket upgrades.

I should probably make clear - my primary interest from the 1980s was short-run resin and vacuform kits, so I welcome seeing some of what that did well being adopted as "mainstream" - albeit with higher production standards.

All the best

Rowan