World War II: Great Britain
Aircraft of Great Britain in WWII.
Hosted by Rowan Baylis
Eduard Spitfire Mk. I
Jessie_C
_VISITCOMMUNITY
British Columbia, Canada
Joined: September 03, 2009
KitMaker: 6,965 posts
AeroScale: 6,247 posts
Posted: Saturday, October 10, 2020 - 07:15 AM UTC

Quoted Text


Hi Jessie

"Silly enough" is a bit harsh.


Yes it is. I had intended it to read as light-hearted banter, but that so rarely comes across in plain text.

Weekend kits are perfectly adequate as they are, but adding photo-etch as the builder's taste desires is an entirely legitimate way to build them and Eduard is delighted to assist
Merlin
Staff MemberSenior Editor
AEROSCALE
#017
_VISITCOMMUNITY
United Kingdom
Joined: June 11, 2003
KitMaker: 17,582 posts
AeroScale: 12,795 posts
Posted: Saturday, October 10, 2020 - 07:51 AM UTC
Hi Jessie

Where I'm totally with you is if anyone feels dragged down a path towards adding upgrades that they're not experienced enough to use. The "my model isn't worthy" notion is toxic - and I've seen really enthusiastic modellers totally demoralised at club meets by thoughtless comments by so-called "experts".

I'll use what works for me in upgrade sets and pass on items that don't offer an improvement that justifies the work.

There's a classic example in the Spit Mk I; Eduard include etched undercarriage locks, but drilling holes in the styrene parts is a lot less hassle and good enough for me.

All the best

Rowan
Jessie_C
_VISITCOMMUNITY
British Columbia, Canada
Joined: September 03, 2009
KitMaker: 6,965 posts
AeroScale: 6,247 posts
Posted: Saturday, October 10, 2020 - 02:16 PM UTC
PE has its strengths and weaknesses. I find that it works best for flatish details such as instrument panels, seatbelts and apliqué details like strengthening strips, or perforated spoilers and the like.

Eduard has been doing some very adventurous things using simple folds which make 3D detail easy to achieve.

It's absolutely worst at portraying items which are made of tubing in real life. Remember Airwaves and their etched pitot tubes which looked like cardboard cutouts?
M4A1Sherman
_VISITCOMMUNITY
New York, United States
Joined: May 02, 2013
KitMaker: 4,403 posts
AeroScale: 254 posts
Posted: Sunday, October 11, 2020 - 02:01 AM UTC
Thank You, Jessie!

I don't normally use an ENTIRE PE set, either. Mainly what is necessary for "open" Cockpit "realism". The Instrument Panel, Throttle Quadrants, you know, all the widgets and gidgets that make the Pilot's "Office" look REAL. Yes, there are times when RESIN stuff comes into play, as well. I've used all kinds of resin Cockpits, such as the ones AIRES makes!

That, and if my subject has a Radial Engine(s), then of course there are details such as Fuel Lines, Wiring Harnesses, etc. Externally, some aircraft have EXTERNAL Rudder, Elevator and Aileron Actuating Rods and that sort of thing. As I said, I often do not use the entire PE set, especially Gun Bays, open Radio Compartments, extra "Panels" and such. I DO like "open" Engine Cowling "cooling" Flaps and if a PE set supplies Brake Details, better Landing Gear Doors and such, I will use them, to a certain extent. IF there is really no advantage to using etched Landing Gear Doors, Panels, etc over what is already supplied in the kit, I won't waste my time with the PE parts.

Also, just as an example, on one of my TAMIYA 1/48 Spitfires, I used an EDUARD PE set for the Cockpit and a "LOOK" resin Instrument Panel, plus EDUARD resin Wheels, Tires and Exhausts. Otherwise, she's an "out-of-the-box-build". The Spit is such a beautifully-designed Fighter that I would NEVER mar her aesthetic features by "opening up" Gun Bays and removing Engine Panels to show off the Merlin between them. Same goes for a P-51 or a P-47. I like to display the vast majority of my airplanes as "ready for flight"...

I certainly hope this clarifies some of my meanings in what I've written in my previous posts...

VR, Dennis
Removed by original poster on 10/11/20 - 14:12:44 (GMT).
M4A1Sherman
_VISITCOMMUNITY
New York, United States
Joined: May 02, 2013
KitMaker: 4,403 posts
AeroScale: 254 posts
Posted: Sunday, October 11, 2020 - 02:11 AM UTC

Quoted Text

Hi Jessie

Where I'm totally with you is if anyone feels dragged down a path towards adding upgrades that they're not experienced enough to use. The "my model isn't worthy" notion is toxic - and I've seen really enthusiastic modellers totally demoralised at club meets by thoughtless comments by so-called "experts".

I'll use what works for me in upgrade sets and pass on items that don't offer an improvement that justifies the work.

There's a classic example in the Spit Mk I; Eduard include etched undercarriage locks, but drilling holes in the styrene parts is a lot less hassle and good enough for me.

All the best

Rowan


AGREED!
M4A1Sherman
_VISITCOMMUNITY
New York, United States
Joined: May 02, 2013
KitMaker: 4,403 posts
AeroScale: 254 posts
Posted: Sunday, October 11, 2020 - 02:49 AM UTC

Quoted Text

PE has its strengths and weaknesses. I find that it works best for flatish details such as instrument panels, seatbelts and apliqué details like strengthening strips, or perforated spoilers and the like.

Eduard has been doing some very adventurous things using simple folds which make 3D detail easy to achieve.

It's absolutely worst at portraying items which are made of tubing in real life. Remember Airwaves and their etched pitot tubes which looked like cardboard cutouts?


I'm not crazy about the older AIRWAVES PE sets, either. If I can replicate tubing with brass, copper or aluminum wire, then that's what gets used.

Just as a simple counter-point, here's another example:

I used an older EDUARD B-17 PE Engine set, which is comprised of the "cardboard cutout"-type of PE Jessie described in her post. I agree completely; the stuff looks LOUSY. However, in the MONOGRAM/REVELL B-17G's case, with my Engine Cowlings being completely "buttoned up", the "cardboard cutout"-effect is very minimal, in that the Wiring Harness has very little visual exposure. But still, I wanted to convey the IMPRESSION that there are Wiring Harnesses present in this particular model. Sort of a "trompe l'oeil"-effect, if you will. I saved the PE Engine Cowling Flaps for a future effort.

I also have to agree completely with Rowan about modelers being intimidated by some of the "stellar" models that have been built by some really talented people out there. It's happened to me, too.

But the REAL crusher is that which some self-proclaimed "experts" will knock a possibly "less-experienced" modeler's efforts. That modeler put forth their best work, and their efforts should be commended rather than the opposite. The negatives are just WRONG. No one likes a "wet blanket". It's one of several reasons why I don't go to contests. Modeling should be fun, and should NOT be an activity which promotes deadlines and pressures which prove to be stressful, with negative criticism piled on top of it all. I can say more on that subject, but I won't.

On to better and happier discussions! Rowan's Spitfires are coming along VERY NICELY, and I look forward to each and every one of his builds' serial-"installments"!

STAY HEALTHY!

VR, Dennis
M4A1Sherman
_VISITCOMMUNITY
New York, United States
Joined: May 02, 2013
KitMaker: 4,403 posts
AeroScale: 254 posts
Posted: Sunday, October 11, 2020 - 05:38 AM UTC

Quoted Text


Quoted Text

...their Weekend kits are supposed to be able to build without anything extra. If the buyer wants to be silly enough to throw PE at it, then Eduard will be more than happy to sell it


Hi Jessie

I love it - all this debate on the basis of 5 etched parts.

"Silly enough" is a bit harsh. But, I totally agree with you that the point of Weekend kits is that they are simpler than ProfiPack boxings and more akin to other manufacturers' releases.

Hence my wondering aloud what the Weekend Spit Mk I releases will be like, seeing as Eduard have designed things to require a little bit of photo-etch for both the early and late versions. They can't ignore both - that'd be shooting themselves in the foot.

So - my hunch is a small etched fret with each.

That would make sense financially as a "taster" in their Weekend kits of what else is available in their range, whether it's photo-etch or Brassin parts - a painless entry into the world of aftermarket upgrades.

I should probably make clear - my primary interest from the 1980s was short-run resin and vacuform kits, so I welcome seeing some of what that did well being adopted as "mainstream" - albeit with higher production standards.

All the best

Rowan


RE: "Silly"- I took it just as Jessie wrote it; that is, as a bit of "banter"...

The stuff from the late '70s-'80's really wasn't that bad. For example, MONOGRAM'S A-26B Invader STILL compares favorably with ICM's 2019-release. The only REAL difference is in the raised panel-detail on the MONIGRAM kit, and RECESSED panel-detail on the ICM offering. Granted, the ICM kit has benefited in sharper, and somewhat better-defined Slide-Molded execution and detail, with the added plus of EXCELLENT Clear parts. Having said that, the ICM offering IS a better kit, but the MONOGRAM kit will still build into a great model, depending on the builder's expertise. This last is not meant to be "snooty".

My opinion on the EDUARD "Weekend" kits is this:

Yes, for someone who literally wants to complete a model "straight-out-of-the-box", it can, and has been done. I however, literally "work at a snail's pace". I could spend an ENTIRE WEEKEND just looking the parts and the Instructions over before I even remove the first part from the sprue. And most times, not even then. I've gone MONTHS before I've even opened a "new" kit just newly arrived in my mail. So, adding PE and resin parts into the mix adds not one iota of difference for me because I DO NOT and WILL NOT work under any time constraints. I had ENOUGH of that noise back in the '80s and '90s when I was building custom-jobs on consignment. I was buried in work, and I was working 60-70 hours per week on my "regular" job. So finally, I had to tell my customers flat out, "SIX MONTHS wait-time, take it or leave it..."

I don't know if any of you who are following this thread have an EDUARD "Weekend" kit in your possession, but I have the 1/48 EDUARD "Weekend Edition" Spitfire Mk.IXc Early Version, #84137. What came in the box was the kit, of course, Instructions, essentially a "Zoom" PE set #49646, a Mask set #EX413, and a set of decals to complete ONE aircraft, Mk.IXc, Codes WD W, Ser. EN354, flown by 1st Lt. Leonard V. Helton, 4FS, 52FG, USAAF, Tunisia, 1942. (Now WHAT did I do with those Instructions..?)
I also obtained the resin EDUARD "Brassin" #648305 Spitfire Mk.IX Top Cowl "Early" Upgrade for a song, on Ebay, in order to not have to deal with that pesky Top Cowl-problem we discussed earlier in this thread.

So are the EDUARD "Weekend" kits really "minimalist"..? I'd have to vote "NAY". This one at least, included a set of EDUARD Canopy Masks and a "Zoom" PE set, which provides a complete set of Seat Belts, Head and Seat Armor Plates, a few Cockpit "doo-dads", optional Wheel Covers, a Canopy Locking and Release Device, a few Under-Wing details and EDUARD's usual two-piece Instrument Panel, which I'm sure you're all familiar with, by now.

Am I going to splurge and buy EDUARD's gorgeous resin Cockpit for this one? Probably not, simply because there is PRECIOUS LITTLE to be seen once the airplane is buttoned-up, even with the Pilot's Door open and the Canopy Hood in the "open"-position, as well. The purchase of the regular EDUARD PE set for this kit is a definite "MAYBE". (see above) EDUARD's "Brassin" resin Wheels, Exhausts and Prop are more than likely "in the cards", as the saying goes... Do I envision EDUARD's "Weekend" Mk.I (a projected Mk,II and a Mk.V) to be laid out more-or-less in the same fashion? Probably, yes... We'll see...

Has anyone heard anything about EDUARD's "forthcoming" P-51B/C Mustang, F4F Wildcat or P-40B/C, yet..? An all-new P-40E/K would be nice. That HASEGAWA P-40 series ALSO has pesky seams to fill...

VR, Dennis
Merlin
Staff MemberSenior Editor
AEROSCALE
#017
_VISITCOMMUNITY
United Kingdom
Joined: June 11, 2003
KitMaker: 17,582 posts
AeroScale: 12,795 posts
Posted: Thursday, November 05, 2020 - 07:56 AM UTC
Hi again

Sorry for the long delay in posting an update. I have been tinkering as and when I've had time. Things should move along a bit quicker now we've got our second Covid-19 lockdown here in the UK, because I'll be on part-time furlough for the next month.

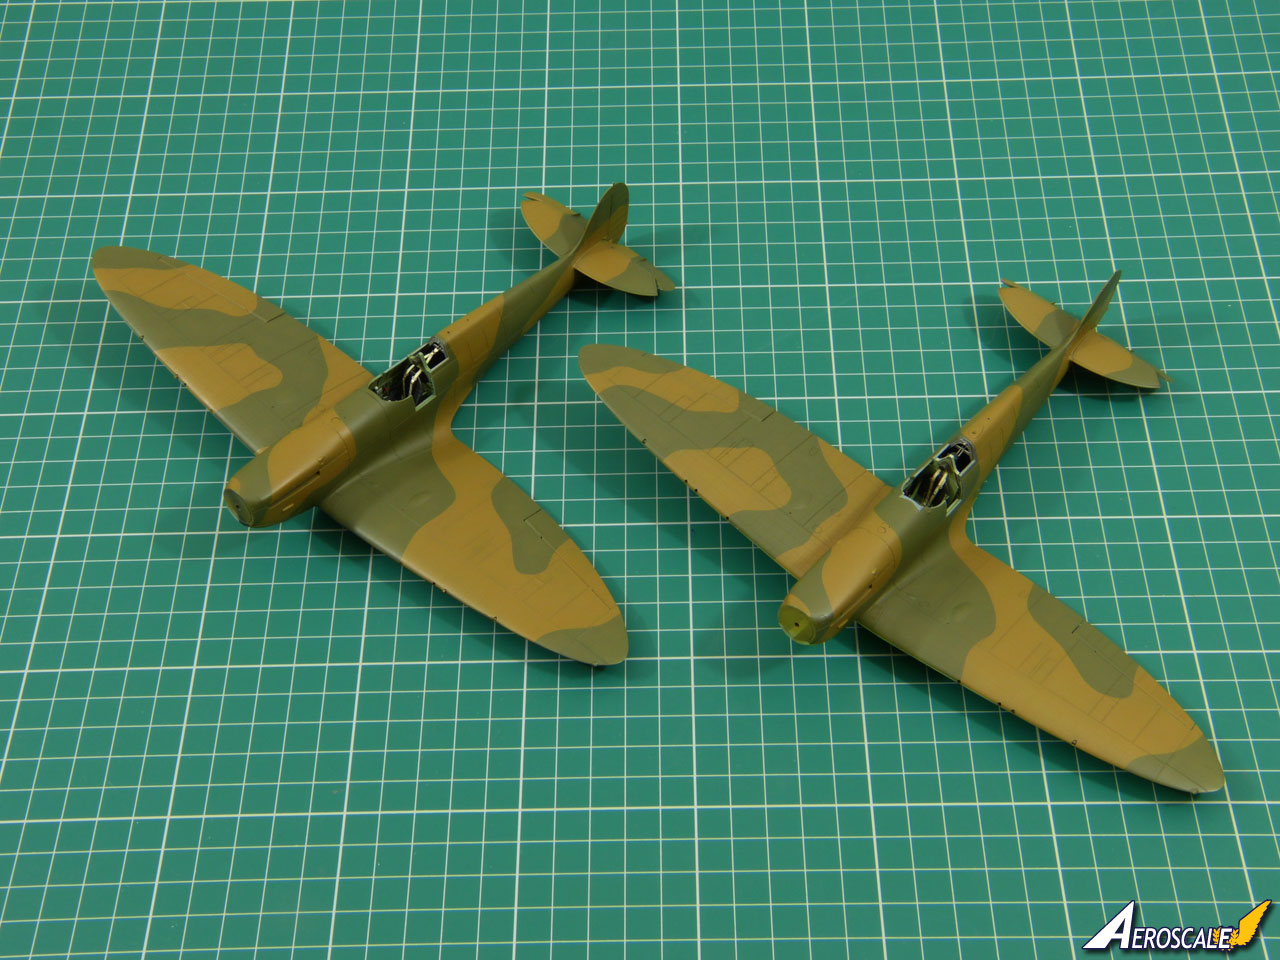
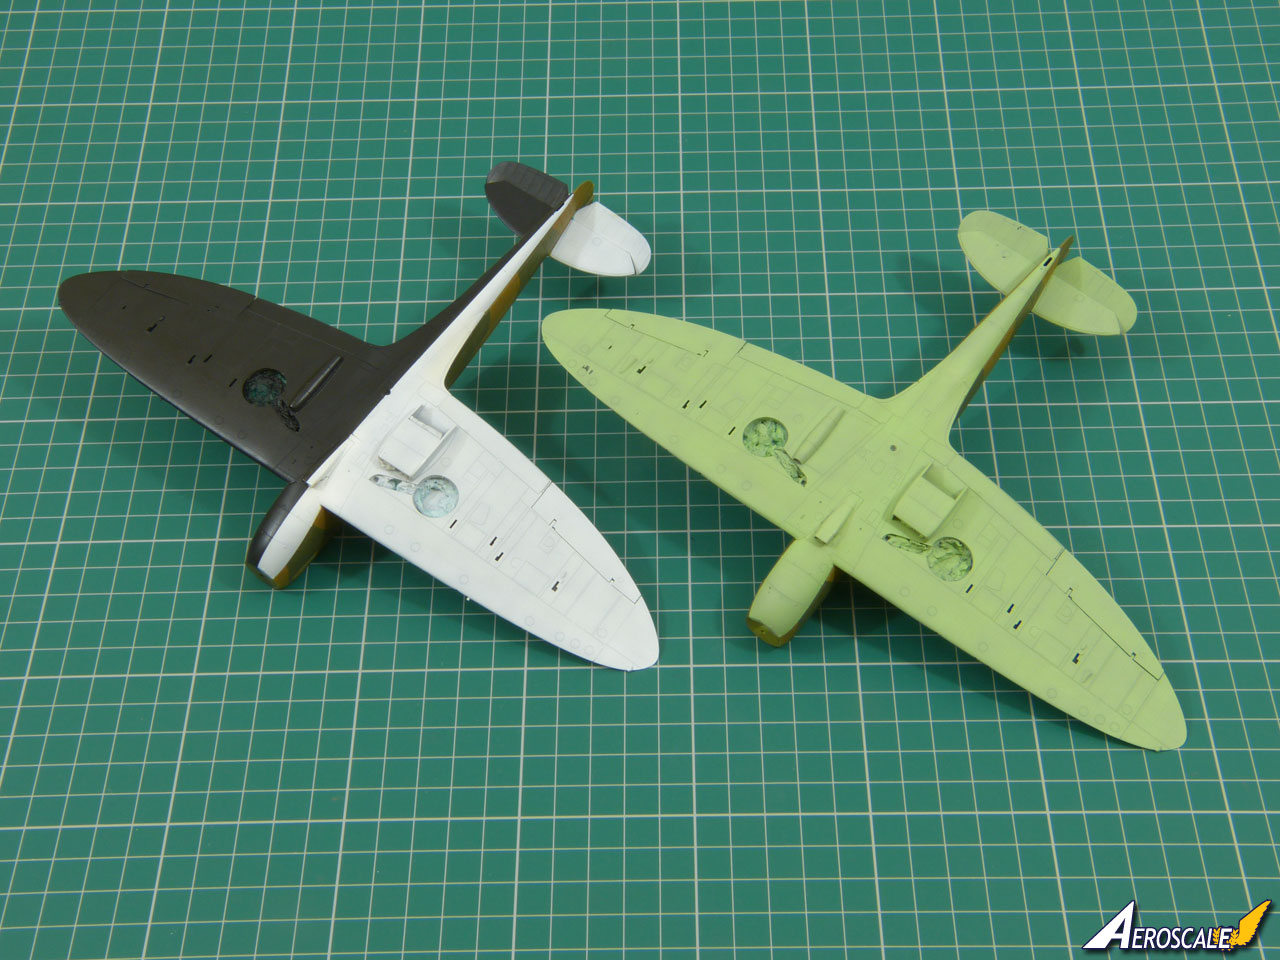
Anyway - here's the current state of play:


The basic colours are on. I removed the masks today and, as you can probably see, there are a couple of areas to fix. I used WEM's Duck-Egg Green for the undersides of the Battle Of Britain aircraft and it's lifted in a couple of small spots. It could be because I thinned it with Driers to speed things up - this isn't something recommended by the manufacturer.

I ended up using Gunze Sangyo paints for the topsides on both kits instead of my original plan to compare different manufacturers' paints - time's pressing and I just want to get on.

More soon. Take care and stay safe.

All the best

Rowan
betheyn
Staff MemberSenior Editor
AEROSCALE
#019
_VISITCOMMUNITY
England - South East, United Kingdom
Joined: October 14, 2004
KitMaker: 4,560 posts
AeroScale: 2,225 posts
Posted: Thursday, November 05, 2020 - 09:13 AM UTC
Looking good so far Rowan. Just the dangly bits, decals and dull coat and they are done then .
Andy
Merlin
Staff MemberSenior Editor
AEROSCALE
#017
_VISITCOMMUNITY
United Kingdom
Joined: June 11, 2003
KitMaker: 17,582 posts
AeroScale: 12,795 posts
Posted: Thursday, November 05, 2020 - 09:44 AM UTC

Quoted Text

Looking good so far Rowan. Just the dangly bits, decals and dull coat and they are done then .
Andy


Cheers Andy

The dangly bits and dull coat should be no problem - and it really will need a full-on dull coat to replicate the early WWII finish.

The fuselage code decals could be fun over the correctly raised rivets that Eduard have reproduced in places. I'd normally trim away any excess carrier film to minimise the chances of silvering, but I'll try the decals as supplied for the sake of the review. Eduard's own-brand decals worked amazingly well over the exhaust vents on their Fw 190 that I built, so fingers crossed these perform equally well here.

All the best

Rowan
cabasner
_VISITCOMMUNITY
Nevada, United States
Joined: February 12, 2012
KitMaker: 1,083 posts
AeroScale: 25 posts
Posted: Thursday, November 05, 2020 - 02:56 PM UTC
Rowan,

Great looking progress on your Spitfires! I am anxiously waiting to start my own Eduard Mk. 1 Spits, but I'd decided to build the Tamiya Mk. 1 first, since I feel like I didn't want to go 'backwards' in quality if I built the Eduard planes, THEN the Tamiya! I have a question about the Sky color of the underside of one of your planes. I have the Tamiya XF-21 Sky paint, which I used to paint the wheel wells of my plane. However, my impression is that XF-21 is far too 'green' to be accurate. I see that the WEM paint you chose to use for one of your models appears to be a bright greenish tint as well. I'd been planning to use a Mission Model paint color, their version of Sky, which is far more subdued in terms of green saturation. Obviously you must feel the brighter green is an accurate depiction of the real Battle of Britain Spitfires, but I'm curious about what resources you used to come up with the proper tint of the underside color. Thanks!
M4A1Sherman
_VISITCOMMUNITY
New York, United States
Joined: May 02, 2013
KitMaker: 4,403 posts
AeroScale: 254 posts
Posted: Friday, November 06, 2020 - 02:24 AM UTC
Hi, Rowan & Everyone Else!

It's great to see you back with the continuum of your beautiful EDUARD Spitfire Mk.I builds!!!

I really like the results of your use of GUNZE SANGYO paints on the Upper Surfaces of both planes! Did you use "pre-cut" masks to achieve the camouflage patterns, or did you make your own masks, OR, did you do them "freehand"..? I'm really interested to know, as there are "pre-cut" masks available out there, and I'm thinking that I might want to try them, in lieu of creating my own TIME-CONSUMING masks... Also, were there "hard edges" to the two camouflage paints at their separation, or was there a faint nuance of a "fuzzy edge" on the real 1:1 planes? Which GUNZE SANGYO paints have you used? There are SO MANY of them to choose from!

In this VERY INTERESTING discussion, I see that Curt has expressed his opinion regarding the "greenish" shade of SKY Type S(?)/"DUCK EGG GREEN"; I'm inclined to agree that this shade seems to be a bit "greenish" for my tastes, as well.

PLEASE bear in mind that I'm NOT saying that this shade is WRONG! On the contrary, I'm just trying to establish which paint I should use when the time comes. In real 1:1 life, paint manufacture was anything but an exact science well into the 21st Century. It STILL isn't. For example, automobile paints can have up to a half-dozen different alternates for ONE specific color!

Perhaps it's just the lighting..? Is it my computer..? Or maybe, it's merely my old "Mk.I eyeballs" playing tricks on me???

I always liked the TESTORS Model Master II Enamel #2049 RAF SKY "TYPE S" (ANA 610). At first glance, it seems a bit too light when seen fresh in the bottle, but upon drying, it DOES darken just a bit... So, I'm kind of in a quandary here, and I would be most happy to get a few more opinions on the matter. I DO want to complete several "BoB" Spitfire Mk.Is, Hurricanes and a Defiant, and post-"BoB", a few other RAF aircraft, besides...

Also, I have a few questions regarding the "earlier" RAF Underside Colors, which I would like to express to everyone in this thread- (Please forgive my ignorance on this subject; I am CERTAINLY NO EXPERT when it comes to RAF and Fleet Air Arm colors!)

I'm very well aware of "AZURE" being used on certain RAF aircraft during certain phases of and in certain theaters of the war. My question relates to the use of the color, "SKY BLUE":

Was "SKY BLUE an Official RAF Color, or an "in-theater substitution", OR was "SKY BLUE" an ERROR which has been propagated by numerous artists, illustrators AND model manufacturers..? Please help a confused American out!

In addition to the above questions, was "AZURE" ever OFFICIALLY used on RAF Fighter aircraft's Undersides based in ENGLAND proper, i.e, Spitfires, Hurricanes, Defiants, etc, before, DURING and after the "Battle of Britain"..?

Thanks Very Much for reading, and Everyone please STAY SAFE & HEALTHY!

VR, Dennis
Merlin
Staff MemberSenior Editor
AEROSCALE
#017
_VISITCOMMUNITY
United Kingdom
Joined: June 11, 2003
KitMaker: 17,582 posts
AeroScale: 12,795 posts
Posted: Friday, November 06, 2020 - 08:40 AM UTC
Hi Curt and Dennis

To misquote Star Trek, the whole point here is:

"It's Sky, Jim - but not as we know it..."

In the summer of 1940, when the change in regulations came through regarding underside colours, squadrons were left to make their best interpretation as to what the intended colour actually was. Eye-witness accounts of the resulting paint jobs refer to vivid "Eau de Nil" (rather like what we've got here) through to "sky blue" almost as dark as the later official Azure Blue.

So - as a recap of my earlier posts - the underside colour on my BoB Spit isn't intended to even remotely replicate the accepted later "standardised" Sky (I've added the "" because even that varied a lot in period accounts); in fact, I chose this scheme specifically because it doesn't.

@ Dennis - re: the camouflage pattern. I masked it with Tamiya's flexible tape and masking fluid. Every photo I've checked of BoB Spits shows a sharp definition between the top-side colours. I don't use commercial masks, because there's clearly a difference in photos between individual aircraft - which I interpret as evidence of manufacturers using multiple masks which were cut to roughly the same pattern, but which weren't even close to identical. (The official patterns are so generic, there's enormous scope for variation.)

All the best

Rowan
cabasner
_VISITCOMMUNITY
Nevada, United States
Joined: February 12, 2012
KitMaker: 1,083 posts
AeroScale: 25 posts
Posted: Friday, November 06, 2020 - 11:07 AM UTC

Quoted Text

Hi Curt and Dennis

To misquote Star Trek, the whole point here is:

"It's Sky, Jim - but not as we know it..."

In the summer of 1940, when the change in regulations came through regarding underside colours, squadrons were left to make their best interpretation as to what the intended colour actually was. Eye-witness accounts of the resulting paint jobs refer to vivid "Eau de Nil" (rather like what we've got here) through to "sky blue" almost as dark as the later official Azure Blue.

So - as a recap of my earlier posts - the underside colour on my BoB Spit isn't intended to even remotely replicate the accepted later "standardised" Sky (I've added the "" because even that varied a lot in period accounts); in fact, I chose this scheme specifically because it doesn't.

@ Dennis - re: the camouflage pattern. I masked it with Tamiya's flexible tape and masking fluid. Every photo I've checked of BoB Spits shows a sharp definition between the top-side colours. I don't use commercial masks, because there's clearly a difference in photos between individual aircraft - which I interpret as evidence of manufacturers using multiple masks which were cut to roughly the same pattern, but which weren't even close to identical. (The official patterns are so generic, there's enormous scope for variation.)

All the best

Rowan


Hi Rowan,

Thanks for your response on my underside color question. PLEASE don't misunderstand my question, or my prior post, as being even remotely critical of the underside Sky color choice you made! I would never negatively comment, or even imply some kind of criticism of something as absolutely personal as WWII airplane colors. Rather, my question was about how you had come to choose the color that you did, and that's all. I have absolutely no basis for my own desire to make my Sky underside color something perhaps less saturated, but if, in fact, the color that you have on yours is based on something that could be interpreted as you did, I'd be inclined to paint mine in a similar fashion. That's why I was asking.

That said, I've just gotten to th point of glueing my Tamiya Spitfire fuselage together, as well as the wings, and have just joined the fuselge and wings together. I am thrilled that this kit's parts go together was amazingly well as they do...presumably the Eduard parts are as good if not better in terms of fit. In fact, a week ago, I decided to get another 'The Few' kit, so now I'll have 2, one to build, and one to potentially keep for the future, or, if I decide I want my own squadron of differently marked Spitfires, I'll have enough plastic to do so!

Looking forward to seeing you move to completion on yours!
Merlin
Staff MemberSenior Editor
AEROSCALE
#017
_VISITCOMMUNITY
United Kingdom
Joined: June 11, 2003
KitMaker: 17,582 posts
AeroScale: 12,795 posts
Posted: Friday, November 06, 2020 - 11:04 PM UTC
Hi Curt

Don't worry - I didn't take your question as any sort of implied criticism. Other versions of Sky would almost certainly be less saturated - just as you suggest. In fact, in one eye-witness account of a Royal Navy aircraft post-war, the viewer described Sky as "off-white"! So, there was clearly huge scope for variation, even after the colour became more standardised.

For me, this painting job is something of an experiment - a chance to explore one of the brighter initial interpretations of the colour which have been widely reported from the summer of 1940. According to the references I've read, the paint was often mixed in small batches at unit level, without a guide to precise colour ratios - and even resorting to substitute colours if it was necessary. Hence the wide range of hues noted at the time, from bright Eau de Nil, through to strong Sky Blue(s).

Who knows if the colour I've chosen is correct for this particular airframe? Eduard call out Duck Egg Green for this scheme - not Sky, like some of their other markings options, so it's a good excuse to try a non-standard finish. And, in fact, the more I look at it through my Mk. I Eyeballs, I'm beginning to accept it as perfectly plausible.

All the best

Rowan
M4A1Sherman
_VISITCOMMUNITY
New York, United States
Joined: May 02, 2013
KitMaker: 4,403 posts
AeroScale: 254 posts
Posted: Friday, November 06, 2020 - 11:11 PM UTC
Good Morning, Everyone!

Thanks Rowan, for explaining your processes regarding RAF SKY/SKY "Type S"- It's enlightening! What I MAY do is add just a couple of very small drops of TESTORS Model Master II RAF Interior Green into the mix of my aforementioned MM II SKY "Type S" in order to achieve my personally desired effects. This, taking under consideration of your explanation of the 'leeway" given to the RAF Squadrons in Service at the time of the Battle. I had no idea that this was the actual case!

Thank You also, for sharing with all of us your actual technique in the masking and painting of the Upper Surfaces of your two Spit Mk.Is. They BOTH came out BEAUTIFULLY!

A few more questions:

Was the same "leeway" or "interpretation" of color given to RAF Squadrons in Service at the time of the Battle, in the use/mixing of RAF DARK GREEN and RAF DARK EARTH as was given to the use/mixing of "SKY"..? Or, were both colors already formulated by British paint manufacturers to RAF Specs..?

I like the MM II RAF DARK GREEN "straight out of the bottle" as my BASE color, which matches rather nicely to your GUNZE DARK GREEN. On the other hand, the TESTORS MM II RAF DARK EARTH seems a little bit drab to my eye, so I like to add a drop or two of TESTORS FLAT MILITARY BROWN out of the 1/4 ounce jars to this BASE color in order to "liven-up" my mix a bit. Once again, this is my BASE color. I like to "post-shade" these colors, as I do with most of my camouflaged aircraft. There seem to be as many variations in actual color "in the field" as there are in Nature, itself, even on ONE aircraft!

Classic examples of the above can be readily seen in the book "Aircraft Pictorial #9, AIRCRAFT PAINTING GUIDE" Vol. One, by Dana Bell, from CLASSIC WARSHIPS PUBLISHING. The book covers US Army Aviation Camouflage from the 1930s up to the close of World War II. The aircraft in the book are depicted mostly in color, interspersed with a few Black and White photos. It also depicts some of the WILDEST weathering effects I've ever seen in one volume! I would imagine that the "weathering-fiends" would love to hold this book up in defense of their going "overboard" with weathering. I personally don't like to take weathering to an extreme; I like to display most of my model aircraft with just enough weathering to carry the impression that they are "in use", but still relatively new to their service lives.

Sorry to have wandered off base, again.

Color-interpretation is subjective at best, as I've often said in other forums. Saying THIS has gotten me into trouble elsewhere on the Kit Maker Network. I will not mention names...

So Rowan, if you would be so kind as to enlighten me regarding RAF DARK GREEN and RAF DARK EARTH, I would be most grateful...

Stay Healthy, All!

VR, Dennis
Jessie_C
_VISITCOMMUNITY
British Columbia, Canada
Joined: September 03, 2009
KitMaker: 6,965 posts
AeroScale: 6,247 posts
Posted: Saturday, November 07, 2020 - 06:28 AM UTC
Hi Dennis,

There was no such thing as "Sky Type S". That's a misinterpretation of the Technical Order which specified smooth, semi-gloss paints to add a few knots to the top speed (as opposed to the then-current matte colours) shortly after the battle. It was intended to read "Dark Green, Dark Earth and Sky (type "S") and referred to all 3 colours.
Sadly someone interpreted it to be a part of the colour name for Sky, and this got repeated, quoted, re-repeated and re-quoted again and again until it's become as much a part of Spitfire legend as the dreaded 'bakelite' seat.
Merlin
Staff MemberSenior Editor
AEROSCALE
#017
_VISITCOMMUNITY
United Kingdom
Joined: June 11, 2003
KitMaker: 17,582 posts
AeroScale: 12,795 posts
Posted: Saturday, November 07, 2020 - 10:00 AM UTC
Hi again

Going back to Dennis's question about Dark Earth and Dark Green - these were established colours, so there wasn't a similar scope for variation in 1940. Obviously, there could still be minor differences between paint batches - plus the way the paint was stored and applied and its subsequent exposure to the elements could always mean individual aircraft differed in appearance.

Following on from Jessie's post, both my kits will sport a full-on matt finish. That in itself will make an interesting change from the sheen I aim for on later WWII RAF aircraft.

All the best

Rowan
M4A1Sherman
_VISITCOMMUNITY
New York, United States
Joined: May 02, 2013
KitMaker: 4,403 posts
AeroScale: 254 posts
Posted: Saturday, November 07, 2020 - 12:03 PM UTC
Hi, Jesse!

THANK YOU SO MUCH for clarifying the whole RAF SKY "Type S" MESS- Hey! That RHYMES! I know, bad joke... 😜

Ah-haaa! So (Type S) refers to the SHEEN of ALL THREE COLORS, POST the Battle of Britain! Wow! I'll keep that in mind once my exterior painting gets underway. I'll be using TESTORS 1960 CLEAR Lacquer Spray (Lusterless) in order to achieve that "dead-matte" quality. I've had very good luck with this "rattle-can" spray paint. IMHO, it's the best Clear Flat Coat money can buy.

Tell me Jesse, where do you get all of your RAF information? You must have some very good reference material or favorite sites on line. I have to admit, I've been so involved in the US military aircraft model-scene that I've shamefully neglected much of what else is available, out there...

I loved your various posts about the Spitfires, and your info will come in very handy, indeed...

Thanks Again for taking the time to help an old "Yank" out!

STAY SAFE & HEALTHY!

VR, Dennis
M4A1Sherman
_VISITCOMMUNITY
New York, United States
Joined: May 02, 2013
KitMaker: 4,403 posts
AeroScale: 254 posts
Posted: Saturday, November 07, 2020 - 12:32 PM UTC
Hi, Rowan!

Thank You Very Much Also, for clarifying my questions regarding RAF DARK GREEN and RAF DARK EARTH. I had already suspected that the RAF had to contend with variations in these colors. This would have been just as the USAAF had to deal with the varying shades of our OLIVE DRABS and MEDIUM GRAYS. The Bu.Aero of the US NAVY/US MARINE CORPS would have virtually been up against the same thing with their own specialized BLUES, GRAYS and WHITES...

OK, this makes it all simpler- Select the colors you like (within REASON, of course) and fly with them! Yes, I know, ANOTHER bad joke. 😜

Once Again, Thank You!

STAY SAFE & HEALTHY!

VR, Dennis
Jessie_C
_VISITCOMMUNITY
British Columbia, Canada
Joined: September 03, 2009
KitMaker: 6,965 posts
AeroScale: 6,247 posts
Posted: Saturday, November 07, 2020 - 03:11 PM UTC

Quoted Text

Ah-haaa! So (Type S) refers to the SHEEN of ALL THREE COLORS, POST the Battle of Britain!


Correct. After the RAFwaffe examined captured German aircraft, they were quite impressed by the smooth surface finish and the extra speed it allowed the German aircraft to achieve. They very quickly had the paint companies make 'type S' paints for fighters, replacing the then-current dead matte colours they'd been using.


Quoted Text

Tell me Jesse, where do you get all of your RAF information? You must have some very good reference material or favorite sites on line.


That and I'm an Air Force brat. Also back in the day I was a member of the RCAF reserve.
M4A1Sherman
_VISITCOMMUNITY
New York, United States
Joined: May 02, 2013
KitMaker: 4,403 posts
AeroScale: 254 posts
Posted: Sunday, November 08, 2020 - 02:40 AM UTC
Good Morning Jesse and Everyone Else!

Thanks Very Much for providing me with further information, i.e, the RAFwaffe-link! That link made for some very interesting reading...

What did you do while serving in the RCAF? What was it like growing up as an RCAF "brat"..? Did you get "into" modeling scale aircraft at an early age?

I started back in 1958 when I was 5 years old! I had already learned how to read simple things by that age, so following instructions posed no problems for me. Mamma took me on a shopping trip, groceries, dairy products, a chicken from the poultry "emporium" (slaughterhouse) and a few household items and sewing materials. Inevitably, we wound up at the Woolworth 5 & 10-cent Store. We had already established that I could get a small toy. Of course, I gravitated towards the toy-section. My young eyes fell upon, for the very first time... MODELS!

I stared and stared. This was an entirely new world to discover for a five-year-old! By this time, Mamma had caught up to me. I realized that I would have to put one of these things together, after having looked at some of the illustrations on several of the model boxes. I KNEW I would just have to have a model AIRPLANE! I pointed to some big model. (I forget what it was, but it might have been one of the old "box-scale" AURORA Airliners)

After looking at the price-tag, Mamma said that "Der Nickelaus" was coming soon. ("Santa Claus", "Father Christmas", "S'viatiy Nikolai"- Yes, we spoke Ukrainian, as well; mostly though, so Mamma and Oma ["Grandma"in German] could understand, we spoke our Southern Low-German dialect at home) I was to pick something much smaller. I duly found something "much smaller". Mamma thought I would mess up the ENTIRE HOUSE if she bought me the model glue.

My first model was the VERY OLD 1/72nd scale LINDBERG "Me.109" (Bf.109; the box-top illustration looked like an "F" or "G"-version), but to my chagrin, there was actually what appeared to be an Fw.190D/Ta.152 in the box! I didn't know what it was because I was just a little tyke, at the time.

In any case, there I was with my little "not-an-Me.109". I shrugged my shoulders and went on. But HOW to put this thing together without any glue, whatsoever??? I could follow the simple instructions well enough, but I KNEW I would need some kind of an ADHESIVE to keep all of those little pieces together...

"Mamma! I' brauch' 'n' kleist!!!"

Mamma handed me some "Scotch Tape"... No glue; SCOTCH TAPE!!!

(sigh)

Imagine my frustration in trying to put this thing together! It kept falling apart! Finally, Mamma saw what a hard time I was having with the tape. (Poor kid, right?) She promised me that when Papa was off from work on Saturday morning, we would go back to Woolworth's and I could pick another small model, and THIS TIME, she , or Papa, would buy the model AND the glue to put it together with! RAPTUROUS JOY!!!

And "The rest is History", as the saying goes...

THANKS Once Again for your help Jesse, and to Rowan!

STAY SAFE & HEALTHY, ALL!

VR, Dennis
Merlin
Staff MemberSenior Editor
AEROSCALE
#017
_VISITCOMMUNITY
United Kingdom
Joined: June 11, 2003
KitMaker: 17,582 posts
AeroScale: 12,795 posts
Posted: Sunday, November 08, 2020 - 10:13 AM UTC
Hi again

So - after all the talk of period-correct matt finishes, my next task will be to apply a really good gloss-coat! In my experience Eduard's decals are really good at snuggling down - but raised rivets etc. always present a challenge.

I re-sprayed the offending patches of... let's call it Eau de Nil and the kit's sitting in my paint dryer. My next day off work is Tuesday, so I'll start gloss-coating then.

All the best

Rowan
M4A1Sherman
_VISITCOMMUNITY
New York, United States
Joined: May 02, 2013
KitMaker: 4,403 posts
AeroScale: 254 posts
Posted: Sunday, November 08, 2020 - 11:33 AM UTC
Hi. Rowan!

Great work! I'm very much looking forward to your next "installment"!

VR, Dennis