Early Aviation
Discuss World War I and the early years of aviation thru 1934.
A right Royal Fokker!
Holdfast
Staff MemberPresident
IPMS-UK KITMAKER BRANCH
#056
_VISITCOMMUNITY
England - South West, United Kingdom
Joined: September 30, 2002
KitMaker: 8,581 posts
AeroScale: 4,913 posts
Posted: Tuesday, May 30, 2006 - 11:51 PM UTC

Quoted Text

Mal,
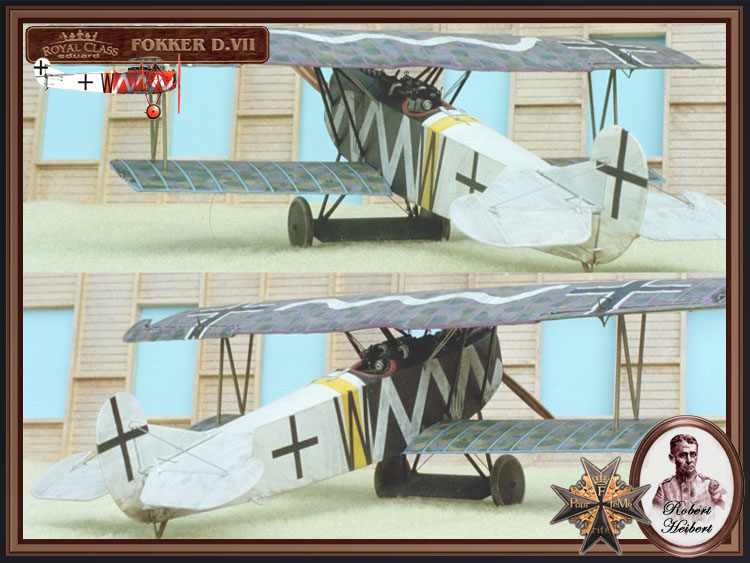
Although I would be honored to be included in the same class, I was not the one who did that great shadow effect on the doped wings. That would be Lars Qvarfordt (Repainted) who did that. It was most impressive too.


Oooops, my apologies to Lars, so many great names

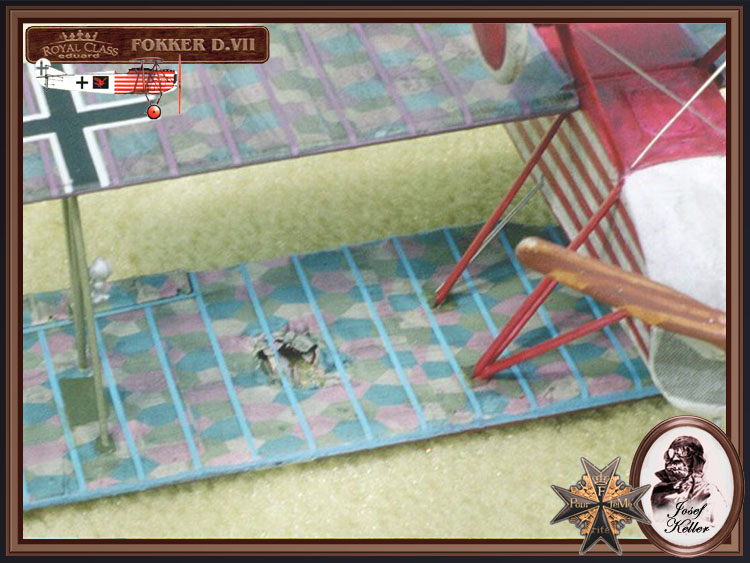
Thanks for the link Stephen, I like the toned down lozenge decals

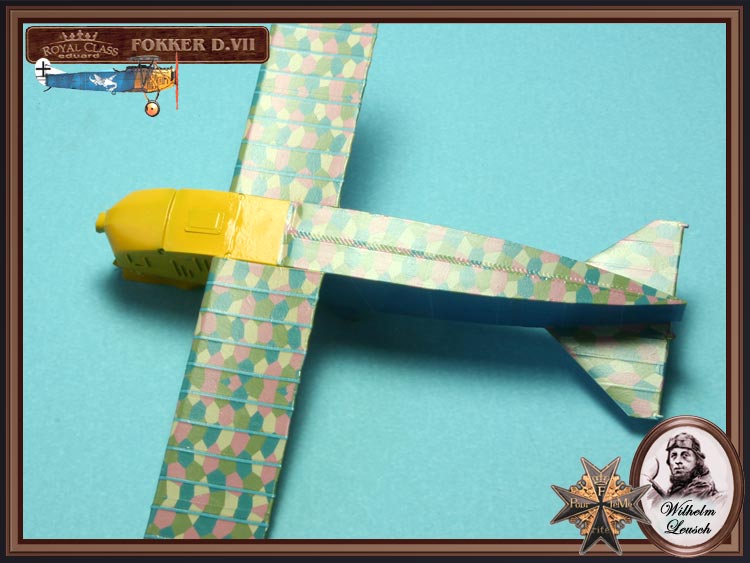
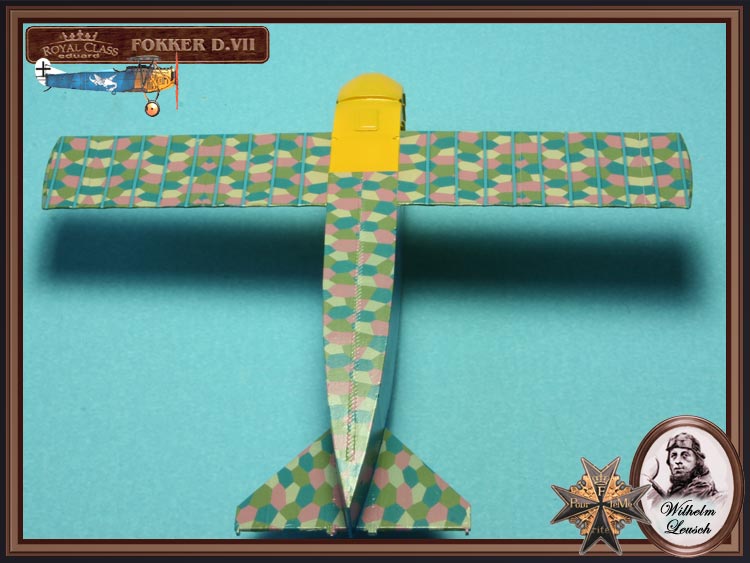
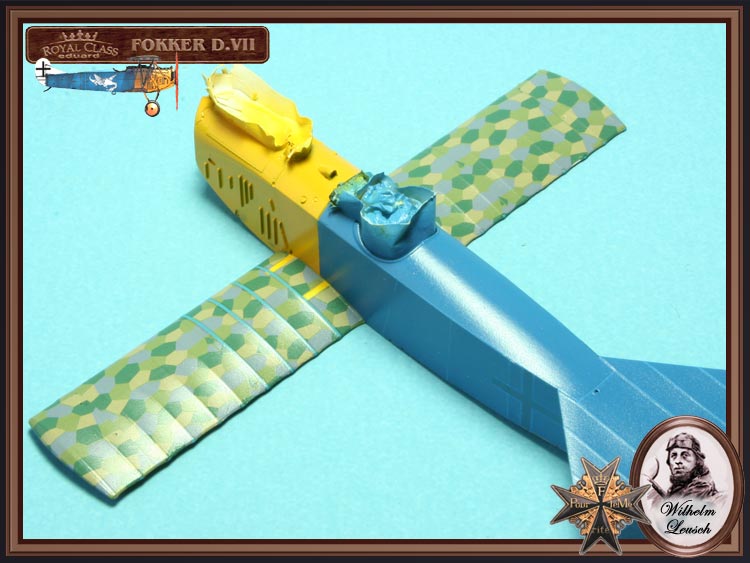
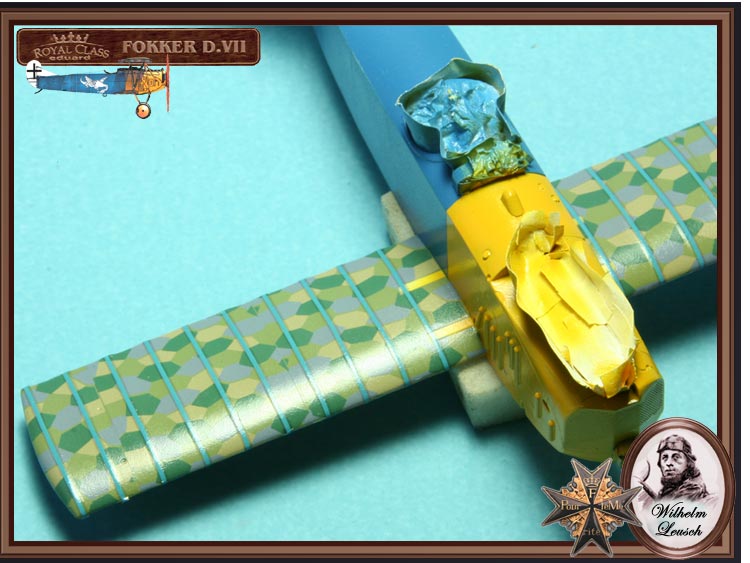
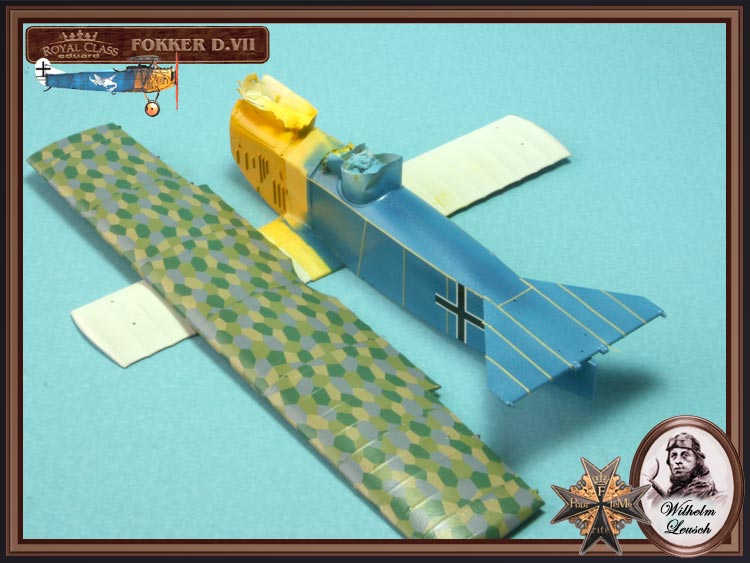
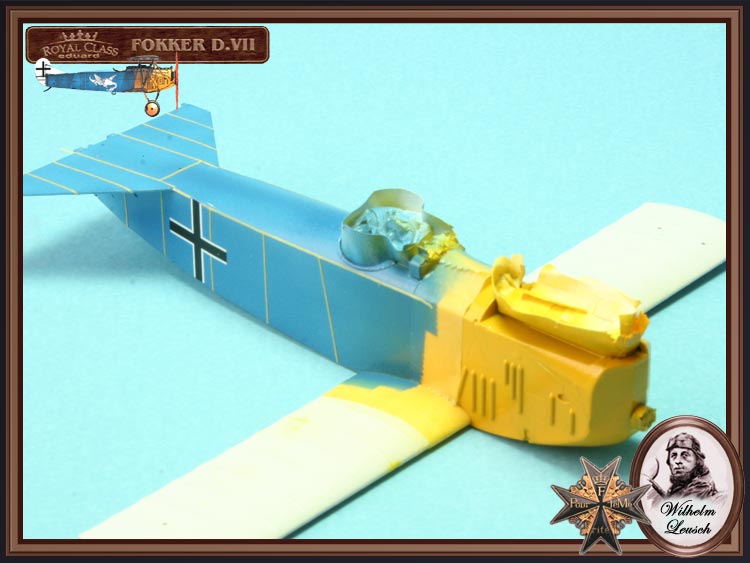
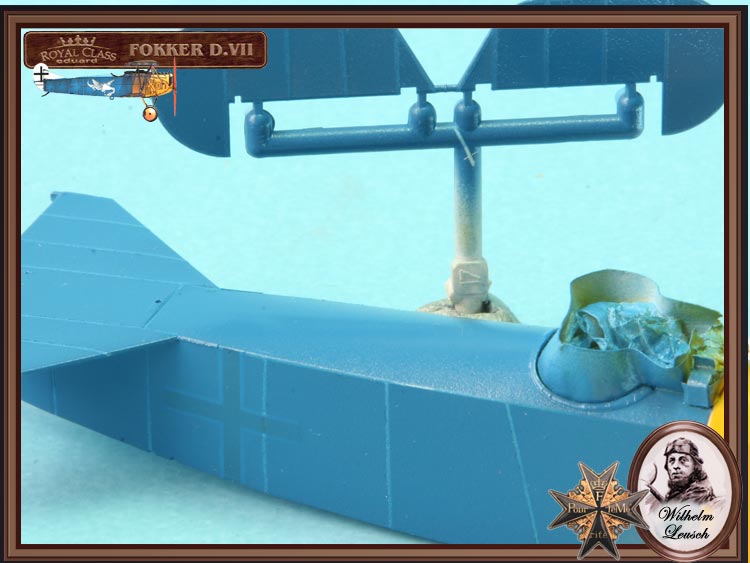
I haven't done anymore to my Fokker yet, but I intend to finish the upper wing lozenge decals and finish applying the strips of tape over the ribs and fuselage formers. I must remember to do the elevators which are still in my spray booth. It will be a real pain f I go to spray the fuselage and then realise there not ready Tomorrow night, or maybe Friday (I finish work early ) I'll have a go at building the guns. Rolling the etched jackets seems like fun.

Yes Jean-Luc, it is a bit weird watching someone else do esentially what you are doing. I'm also getting hooked on WW 1 aircraft, it's a whole new ball game and I like the colourful schemes and I'm looking forward to having a go at something more complicated and with lots of rigging I'm thinking that I might have a WW 1 aircraft on the go at all times but not 30 odd lick WW II
Mal
JackFlash
_VISITCOMMUNITY
Colorado, United States
Joined: January 25, 2004
KitMaker: 11,669 posts
AeroScale: 11,011 posts
Posted: Wednesday, May 31, 2006 - 01:36 PM UTC

Quoted Text

"...Quick quiz...
1. what is LCT and what was it used for?
2. what is a sure sign for Benzine poisioning?"


1. Liquid Carbon Tetrachloride was used for cleaning all machine parts.
2. black skin under all finger and toenails.

Two of the most frequent forms of safety hazards encountered by ground crew when working bare handed on aircraft from WWI and the golden age of aviation.


Here is a bit on the kit provided national markings and serial numbers for the Albatros / Johannistahl built airframes.

The crosses apply nicely but do benefit from sol & set as well. All of the small serial numbers (in white and black characters) for the ailerons, struts fin , rudder and wheels are represented by one aircraft “Fok. (Alb) 8425/18" The problem is that this is a serial for a late model OAW (Schneidemuhl) machine not an Albatros (Johannistahl) machine. Fortunately Eduard has included individual numbers in very small characters to build your own serial should you desire.
JackFlash
_VISITCOMMUNITY
Colorado, United States
Joined: January 25, 2004
KitMaker: 11,669 posts
AeroScale: 11,011 posts
Posted: Thursday, June 01, 2006 - 01:22 PM UTC
News of the day...page one.
"Der Taglich Zeitungen und Blatter" 1 Nov. 1918.

Translated, "...The boys of Jasta R0002 pose for the camera with a souvenir of their recent sorties over the lines. Left to right, Ltn. des Res. Malincrodt Maifeld, Oblt. Stefan Löwenson, Haupt. Püssinfüss und Ltn. des Res. Johann Frommhertz."


JackFlash
_VISITCOMMUNITY
Colorado, United States
Joined: January 25, 2004
KitMaker: 11,669 posts
AeroScale: 11,011 posts
Posted: Friday, June 02, 2006 - 02:07 AM UTC
Greetings all;
Here is an image of a 1/16 scale scratchbuilt Fokker D.VII (under construction) done by artist Steve Anderson.


JackFlash
_VISITCOMMUNITY
Colorado, United States
Joined: January 25, 2004
KitMaker: 11,669 posts
AeroScale: 11,011 posts
Posted: Friday, June 02, 2006 - 09:06 AM UTC
Here is a bit of a taste. My builds of;

The Jasta 46 scheme I chose.


The Jasta 43 scheme of Ltn. Keller.
TedMamere
_VISITCOMMUNITY
Moselle, France
Joined: May 15, 2005
KitMaker: 5,653 posts
AeroScale: 4,347 posts
Posted: Friday, June 02, 2006 - 10:29 AM UTC
Hi Stephen!

Wow! These are truly amazing models! You did a great job on very colorfull and complicated paintschemes!
I noticed you placed "rib decals" on the leading edges of the wings. Was it that way on all Fokkers or just on these planes?
I also noted you painted the Jasta 46 plane in black rather than red. Is the latter color, as in the kit's instructions, wrong?

Jean-Luc
JackFlash
_VISITCOMMUNITY
Colorado, United States
Joined: January 25, 2004
KitMaker: 11,669 posts
AeroScale: 11,011 posts
Posted: Friday, June 02, 2006 - 08:36 PM UTC

Quoted Text

Hi Stephen!
Wow! These are truly amazing models! You did a great job on very colorfull and complicated paintschemes! I noticed you placed "rib decals" on the leading edges of the wings. Was it that way on all Fokkers or just on these planes? I also noted you painted the Jasta 46 plane in black rather than red. Is the latter color, as in the kit's instructions, wrong?

Jean-Luc


Thanks Jean-Luc

The leading edge tapes were on all production Fokker D.VII types.(On all WWI aircraft actually.) The protected the leading edge union seam of the upper and lower fabric surfaces it even extended to the trailing edge seams as well.

On the red vs black

Pages 32 - 33. While flying Fokker D.VII types, Jasta 46 was commanded by Ltn Otto Creutzmann (8 victories) as a part of Jagdgruppe 2. The pilot of this aircraft is unknown but it was photographed in British hands post war. The lower wing crosses should be further out by one half of a rib space. There is evidence that The unit may have had black not red forward fuselages. The top wing is in 5 colour lozenge while the bottom wing is in four colour. By the way Greg VanWyngarden believes that the forward fuselage is black not red.


TedMamere
_VISITCOMMUNITY
Moselle, France
Joined: May 15, 2005
KitMaker: 5,653 posts
AeroScale: 4,347 posts
Posted: Friday, June 02, 2006 - 09:15 PM UTC
Hi all!

Stephen, your latest pictures have motivated me to apply the rest of the decals!


I had to trim the crosses as the black and white are slightly offset on the sheet...


... but overall, they worked very well and I'm happy how the plane looks like with the dragons! Below is a picture of the current status of the model. I will paint the rest of the detail parts (wheels, propeller, landing skid etc...) while the decals are setting. I think I will wait 24 hours before I coat and weather the model.


Jean-Luc
Holdfast
Staff MemberPresident
IPMS-UK KITMAKER BRANCH
#056
_VISITCOMMUNITY
England - South West, United Kingdom
Joined: September 30, 2002
KitMaker: 8,581 posts
AeroScale: 4,913 posts
Posted: Friday, June 02, 2006 - 11:59 PM UTC
Looking good Jean-Luc
I have finished the main painting wich has gone quite well. I'm not sure if my highlighting of the ribs and fuselage formers is a good thing or not. Applying the tape over all the neccesary locations took some time. The difficult part was masking the fuselage cross, over the fuselage former it crosses, after first spraying over the cross, so that it shows as a highlight as well. In a similar fashion as is depicted in the profile in the instructions. I have startted adding the rest of the lozenge decals and I will finish those tomorrow.


Mal
JackFlash
_VISITCOMMUNITY
Colorado, United States
Joined: January 25, 2004
KitMaker: 11,669 posts
AeroScale: 11,011 posts
Posted: Sunday, June 04, 2006 - 03:35 AM UTC
Tragedy!!!! While on a familarization flight a rookie pilot ventured off on a balloon strafe and took a dud archie shell through the wing. The rookie was lucky to get back behind his airfield but nosed over on landing...

BadBoyFLSTC
_VISITCOMMUNITY
California, United States
Joined: November 20, 2005
KitMaker: 96 posts
AeroScale: 53 posts
Posted: Sunday, June 04, 2006 - 05:58 AM UTC
STEPHEN! WHAT HAVE YOU DONE!?!!!!!!

Nils
Torque
_VISITCOMMUNITY
Georgia, United States
Joined: July 03, 2003
KitMaker: 83 posts
AeroScale: 0 posts
Posted: Sunday, June 04, 2006 - 06:14 AM UTC
Nice work guys. Love the photos of the DVII's
TedMamere
_VISITCOMMUNITY
Moselle, France
Joined: May 15, 2005
KitMaker: 5,653 posts
AeroScale: 4,347 posts
Posted: Sunday, June 04, 2006 - 10:34 AM UTC
Hi Stephen!

Nice battle damage effect!
I suppose you know what will come next? Questions of course! :-) How did you do that? How did you get that fabric effect? Do you have ref pics of battle damage on WW1 planes? Ok, I know the last question is a stupid one, I know you have some!
On the first picture in particular, one can also notice the wings are perfectly aligned on your model. I hope I can get mine the same way...

Jean-Luc
JackFlash
_VISITCOMMUNITY
Colorado, United States
Joined: January 25, 2004
KitMaker: 11,669 posts
AeroScale: 11,011 posts
Posted: Sunday, June 04, 2006 - 02:30 PM UTC

Quoted Text

Hi Stephen! Nice battle damage effect!
I suppose you know what will come next? Questions of course! :-) How did you do that? How did you get that fabric effect?


Why yes I do...and its a great way to open up a new topic ! Realistic damage in scale.


Quoted Text

Do you have ref pics of battle damage on WW1 planes? Ok, I know the last question is a stupid one, I know you have some!


It is one of my favorite subjects.


Quoted Text

On the first picture in particular, one can also notice the wings are perfectly aligned on your model. I hope I can get mine the same way...
Jean-Luc


One of my favorite "tricks" is to use childrens Lego blocks in a temporary jig built around the kit while the wing dries in place. Thanks for noticing by the way.
TedMamere
_VISITCOMMUNITY
Moselle, France
Joined: May 15, 2005
KitMaker: 5,653 posts
AeroScale: 4,347 posts
Posted: Sunday, June 04, 2006 - 04:55 PM UTC
Hi all!

Thanks for the reply Stephen, I hope you will start a "battle Damage" Thread. Would be also a cool idea for a Campaign!

Let me introduce you Jack! :-) Jack is my test model. You can notice the stigmatas of several builds on it! I applied the two lozenge spare decals of the kit on the wings to test a mixture I made. I wanted to have a translucent but flat mix. I used Tamiya Smoke, Clear Red and Clear Yellow (gives brown) for the translucent part, Flat base to achieve a Matt finish and Future because the paint was too thick.


As it seemed to work quite well, I decided to spray the stuff on the model. Below you can see the difference between the left side (natural decals) and the right side (with shadows).


I also did the underside the same way.


To do the fuselage, I choosed another approach as Mal and used Post'it to add subtle variations on the fabric. I can't wait to see how Mal's fuselage will look like. Maybe I'll use the same technique for the next one!


The Plane is almost finished and I have to add some wash and of course glue the upper wing in place!


I also started to work on a small base to put the plane on.


I think I will finish my Fokker this week... si tout va bien!

Jean-Luc
Holdfast
Staff MemberPresident
IPMS-UK KITMAKER BRANCH
#056
_VISITCOMMUNITY
England - South West, United Kingdom
Joined: September 30, 2002
KitMaker: 8,581 posts
AeroScale: 4,913 posts
Posted: Monday, June 05, 2006 - 02:43 AM UTC
Wonderful pics Stephen, I have been trying to find some leggo to help get my wings aligned, but no luck, I might have to buy some
Superb work Jean-Luc, looking really good. I will try and take some pics tomorrow, I have completed the lozenge decals and have applied the rib tapes to the underside of the bottom wing.
Stephen, are you saying that tapes were applied to the complete edges of all wings? That does make lots of sense.
Mal
JackFlash
_VISITCOMMUNITY
Colorado, United States
Joined: January 25, 2004
KitMaker: 11,669 posts
AeroScale: 11,011 posts
Posted: Monday, June 05, 2006 - 04:04 AM UTC

Quoted Text

"...Stephen, are you saying that tapes were applied to the complete edges of all wings? That does make lots of sense. Mal


Thats the ticket Mal.

Jean-Luc, Very interesting approach to texturing the lozenge. On the fuselage Very interesting. I have seen similar approaches to the shading but never tried it myself, I look forward to the finished effort!
TreadHead
_VISITCOMMUNITY
Colorado, United States
Joined: January 12, 2002
KitMaker: 5,000 posts
AeroScale: 370 posts
Posted: Monday, June 05, 2006 - 05:39 AM UTC
OK!!!.....Stephen.

To avoid any misunderstandings........I admire your talent GREATLY. But come on Pard'...please don't stack these things up on us!....OK?

First we have the "using clear decal film" thingie.

Then, we have the "fabric effect" thingie..!

and following in a close second we have the " Lego Block wing jig" thingie!!

Pleeeeese Stephen.....cough up this stuff or I swear, I'll send a whole Jasta air wing over to your place and randomly bomb your Koi pond!!!!

Tread.
JackFlash
_VISITCOMMUNITY
Colorado, United States
Joined: January 25, 2004
KitMaker: 11,669 posts
AeroScale: 11,011 posts
Posted: Monday, June 05, 2006 - 07:27 AM UTC

Quoted Text

OK!!!.... Stephen. To avoid any mis-understandings... I admire your talent GREATLY. But come on Pard'... please don't stack these things up on us!....OK?


Just think of it as a stack of unbuilt kits. With the promise of bigger and better things to come.


Quoted Text

First we have the "using clear decal film" thingie.

Then, we have the "fabric effect" thingie..!

and following in a close second we have the " Lego Block wing jig" thingie!!


Actually, first it was the texturing fabric effect thingie. Then it was the Lego thingie...(I have always toughted them though.) Finally it was the clear decal thingie.


Quoted Text

Pleeeeese Stephen.....cough up this stuff or I swear, I'll send a whole Jasta air wing over to your place and randomly bomb your Koi pond!!!!
Tread.


The Koi pond... well its too late there too. This last weekend we had the Air Wing Jasta over for target practice and we had a ribs and fish barbeque afterward. Didn't you get the memo? Nils showed up and did his imitation of Elton John what a gas. Jean-Luc showed up with his girlfriend...who looked a lot like Angelina Jolie without makeup...and they did a great set of ABBA tunes. I didn't know he could sing truthfully. Mal dropped by and brought his buddies from the female auxiulary squad of H.M. pink berets. The gals from the Royal Sussex Rail way and Sappers Troops were a big hit in their pink bikinis and berets. The Koi pond went south when we ran short of trout for the barbeque. But you know the flavor of barbequed Koi is down right delicate. If I get enough copies back from King Soopers (local grocery chain here in Colorado.) I'll send you a few!
TedMamere
_VISITCOMMUNITY
Moselle, France
Joined: May 15, 2005
KitMaker: 5,653 posts
AeroScale: 4,347 posts
Posted: Monday, June 05, 2006 - 12:37 PM UTC
Hi Stephen!


Quoted Text

Jean-Luc showed up with his girlfriend...


In fact she will become my wife in a couple of weeks...


Quoted Text

who looked a loy like Angelina Jolie...


... and she's also pregnant! I guess this makes me some kind of Brad Pitt! :-)

What's new on the Fokker front? Mine has got legs and some armament...


I will paint the propeller and the engine radiator next and glue the small detail parts after that. Seems the last piece that will be put in place will be the upper wing.

Jean-Luc
JackFlash
_VISITCOMMUNITY
Colorado, United States
Joined: January 25, 2004
KitMaker: 11,669 posts
AeroScale: 11,011 posts
Posted: Monday, June 05, 2006 - 01:10 PM UTC
Greetings all;
Just for comparison.
Holdfast
Staff MemberPresident
IPMS-UK KITMAKER BRANCH
#056
_VISITCOMMUNITY
England - South West, United Kingdom
Joined: September 30, 2002
KitMaker: 8,581 posts
AeroScale: 4,913 posts
Posted: Tuesday, June 06, 2006 - 01:53 AM UTC
Yep them girls are kinda cool in them pink bikinis and berets, and without them too Stunning Dr 1 Stephen.

Jean-Luc, looking stunning. I intend to shade the wings, but I wasn't sure which way to go and I was going to use Tamiya "smoke". You have given me a heads up and I think something more along similar lines to you would be the way to go. I might have to experiment now..........................thanks
Congratulations on your marriage, where do I send the card and what is the exact date. At what age do you intend to start teaching the rug rat the art of model making? Congratulations on that event as well

I have completed the rib tapes, less the wing edge tapes as of this evening. In fact the last photo was taken immeadiately after the last one went on, so they are still drying out
When applying the rib tapes I didn't use any setting solutions. This was so I would have more time to position them. If I was still messing about and they were starting to adhere I simply flooded on water, with the brush which ment I could float them into position. When there I simply dried the brush, on a tissue, and used the dryish bristles to whick away the water, setting the position. This worked very well


Mal
JackFlash
_VISITCOMMUNITY
Colorado, United States
Joined: January 25, 2004
KitMaker: 11,669 posts
AeroScale: 11,011 posts
Posted: Thursday, June 08, 2006 - 07:44 AM UTC
Greetings all;
Rumaging through some of my older images I found a couple shots of my Eduard mid-production OAW build and thought you might find them interesting. This will be one that will go in the same diorama as the Albatros build I have done on this thread.

TedMamere
_VISITCOMMUNITY
Moselle, France
Joined: May 15, 2005
KitMaker: 5,653 posts
AeroScale: 4,347 posts
Posted: Friday, June 09, 2006 - 12:51 AM UTC

Quoted Text

Congratulations on your marriage, where do I send the card and what is the exact date. At what age do you intend to start teaching the rug rat the art of model making? Congratulations on that event as well


Hi all!

Thanks Mal! I will tell you the date once it's done! As for the "rug rat" (don't know exactely what that means), I think as soon as possible! :-)

I managed to get the upper wing glued in place...


I started with the "N" struts and then the fuselage struts. Eduard have made a kit with an overall very precise fit.


I think I will keep a rather flat finish for my model. it's probably more accurate for a fabric like finish.


I also applied tinted varnish (flat) on my base.


Sadly I'm very busy at the moment. In fact more than I expected. We are having an "Open Door" day at school on sunday and I will have to work this week-end... very unusual for me! I think progress will be slow on my Fokker in the next days...

Jean-Luc
Merlin
Staff MemberSenior Editor
AEROSCALE
#017
_VISITCOMMUNITY
United Kingdom
Joined: June 11, 2003
KitMaker: 17,582 posts
AeroScale: 12,795 posts
Posted: Friday, June 09, 2006 - 01:42 AM UTC
Hi guys

I think it's time to say I'm officially dropping out with my "also ran" update of the original release. It never felt quite right to include it anyway, with the original streaky lozenge decals - and I honestly haven't had time to do anything to it at all!

Jean-Luc, I won't waste the brilliant templates you sent me - when I DO get a chance to work on the kit, I'll use them to portray the model in it's new guise.

All the best

Rowan