

Early Aviation
Discuss World War I and the early years of aviation thru 1934.
Discuss World War I and the early years of aviation thru 1934.
Hosted by Jim Starkweather
A right Royal Fokker!

JackFlash

Joined: January 25, 2004
KitMaker: 11,669 posts
AeroScale: 11,011 posts
Posted: Friday, June 09, 2006 - 05:32 AM UTC
Jean-Luc, very nice indeed. It is coming together impressively.

Merlin

#017


Joined: June 11, 2003
KitMaker: 17,582 posts
AeroScale: 12,795 posts

Posted: Friday, June 09, 2006 - 11:08 AM UTC
Cheers Stephen
- and very true! I've got too many kits on my Shelf of Shame already, so I won't let the D.VII join them. I WILL finish it - but there's no way I can hope to get it ready in time for the Royal Build.
All the best
Rowan
- and very true! I've got too many kits on my Shelf of Shame already, so I won't let the D.VII join them. I WILL finish it - but there's no way I can hope to get it ready in time for the Royal Build.
All the best
Rowan

Holdfast
#056

Joined: September 30, 2002
KitMaker: 8,581 posts
AeroScale: 4,913 posts
Posted: Saturday, June 10, 2006 - 12:17 AM UTC
Now it really is looking good, Jean-Luc  I'm assuming that you didn't use any form of jig to fix the top wing? Because I haven't got any Leggo I was considering simply gluing in the "N" struts, when dry, turning the model over, onto the top wing and gluing them into place, then attaching the other struts. Is this what you did?
I have been adding the rib tapes gradually through the week and still have about 1/2 of the top wing to go. I was over at my Mothers today, tidying up her garden for when she gets home frome her 3 week trip to visit my Uncle in Canada. Consiquently I haven't managed to finish the rib tapes, but I should get them done tomorrow. It's then just the rest of the decals, adding some "gung" and finishing off. I hoping that I will finish next week end if not sooner
Mal
I'm assuming that you didn't use any form of jig to fix the top wing? Because I haven't got any Leggo I was considering simply gluing in the "N" struts, when dry, turning the model over, onto the top wing and gluing them into place, then attaching the other struts. Is this what you did?I have been adding the rib tapes gradually through the week and still have about 1/2 of the top wing to go. I was over at my Mothers today, tidying up her garden for when she gets home frome her 3 week trip to visit my Uncle in Canada. Consiquently I haven't managed to finish the rib tapes, but I should get them done tomorrow. It's then just the rest of the decals, adding some "gung" and finishing off. I hoping that I will finish next week end if not sooner
Mal


TedMamere

Joined: May 15, 2005
KitMaker: 5,653 posts
AeroScale: 4,347 posts

Posted: Saturday, June 10, 2006 - 01:13 AM UTC
Quoted Text
Because I haven't got any Leggo I was considering simply gluing in the "N" struts, when dry, turning the model over, onto the top wing and gluing them into place, then attaching the other struts. Is this what you did?
Hi Mal!
The answer is yes! That's exactely what I did! :-) I used CA glue to attach the "N" struts. But you have to be very precise! If the upper wing is offset, it will be very difficult to attach the fuselage struts. I had to trim one of the "V" struts slightly so it would fit.
I've added the (very) small detail parts on my model and basically only have to make paint touch ups and add the control cables...
Jean-Luc


BadBoyFLSTC
Joined: November 20, 2005
KitMaker: 96 posts
AeroScale: 53 posts

Posted: Saturday, June 10, 2006 - 04:55 AM UTC
Not to add to you pressure Rowan, but I spent $100 on the kit and am watching all of the builds very closely. I even bought a couple of CD's from Stephen to help. Time line doesn't matter to me though, as long as you can pass on some sage knowledge to us new guys (who hasn't built a model in quite some time). I'll take this opportunity to thank all of you guys for doing this, and for sharing it with everyone.
Nils
Nils
TedMamere
Joined: May 15, 2005
KitMaker: 5,653 posts
AeroScale: 4,347 posts
Posted: Saturday, June 10, 2006 - 10:25 AM UTC
Quoted Text
I'll take this opportunity to thank all of you guys for doing this, and for sharing it with everyone.
And I thank you for reading the thread and for your kind words!
 I'm looking forward to see your build! Have you already choosed a paintsheme? It's probably one of the most diffucult task of the kit! :-)
 Jean-Luc
Holdfast
#056
Joined: September 30, 2002
KitMaker: 8,581 posts
AeroScale: 4,913 posts
Posted: Saturday, June 10, 2006 - 01:49 PM UTC
Quoted Text
I'll take this opportunity to thank all of you guys for doing this, and for sharing it with everyone.
Nils,
Thanks, the sharing is all part of the fun, if a little nerve wracking, as it's my first WW 1 subject. However the kit is very well enginered and a very good start on the WW 1 road
The decals are probably the hardest part, as they are so prominant, but they seperate from the backing sheet very quickly and you have time to position them.Quoted Text
Have you already choosed a paintsheme? It's probably one of the most diffucult task of the kit!
I think Jean-Luc sums it up quite well
Mal
JackFlash
Joined: January 25, 2004
KitMaker: 11,669 posts
AeroScale: 11,011 posts
Posted: Saturday, June 10, 2006 - 02:02 PM UTC
Matching readers to posts there are many like Nils who are cataloging the builds here. But its great to get feedback, thanks Nils!
Also this thread is no where near finished folks. Not only do we have the anticipated finish of Mal and Jean-Luc's birds, but we have more topics to touch on concerning the Fokker D.VII and some of its frontline activities. Also our own Merlin has not dropped out completely remember he is working on posting some review text for future builders.
Here is a bit of fun. In the last months of the war what was the biggest problem that this type encountered concerning repairs?
More Fokker D.VII types were written off in the last months of the war due to poor quality bungee shock chords failing on normal landings.
TedMamere
Joined: May 15, 2005
KitMaker: 5,653 posts
AeroScale: 4,347 posts
Posted: Sunday, June 11, 2006 - 01:28 AM UTC
Hi all!
I did the final detail job on the plane. For example painting the front radiator. I painted it black, masked it, and drybrushed it with Tamiya silver...

... I think I can say the model is finished although I want to weather it a little more...

... and I probably forgot to do one or two things (just noticed something on the pics !)...
!)...

... but the end of the build is near! I added the grass on my base and have to wait until the white glue dries...

... then I can shoot some pictures!
Jean-Luc
I did the final detail job on the plane. For example painting the front radiator. I painted it black, masked it, and drybrushed it with Tamiya silver...
... I think I can say the model is finished although I want to weather it a little more...
... and I probably forgot to do one or two things (just noticed something on the pics
!)...... but the end of the build is near! I added the grass on my base and have to wait until the white glue dries...
... then I can shoot some pictures!
Jean-Luc
Merlin
#017
Joined: June 11, 2003
KitMaker: 17,582 posts
AeroScale: 12,795 posts
Posted: Sunday, June 11, 2006 - 02:42 AM UTC
Hi Jean-Luc
I'm guilty of not paying enough attention to your progress here - that looks superb!
All the best
Rowan
I'm guilty of not paying enough attention to your progress here - that looks superb!
All the best
Rowan
TedMamere
Joined: May 15, 2005
KitMaker: 5,653 posts
AeroScale: 4,347 posts
Posted: Sunday, June 11, 2006 - 10:04 AM UTC
Quoted Text
I'm guilty of not paying enough attention to your progress here
Ok Rowan... let me think after a punishment for you then! :-)
But I think you have an excuse. You must look after Steffen's FW 190 who wants to down your I-16!

Jean-Luc
Holdfast
#056
Joined: September 30, 2002
KitMaker: 8,581 posts
AeroScale: 4,913 posts
Posted: Monday, June 12, 2006 - 12:08 AM UTC
Stunning Jean-Luc, looks wonderful.
I need to know how you painted your spinner. I have ideas but yours does look pretty damn good
No more pics from me yet. I have made progress but I had a "run in" with a few yobs on Saturday evening (they had air rifles out on the street so you have to sort out the idiots don't you) That was after I had been over to my mums, with SWMBO, to tidy her garden as she is away in Canada for 3 weeks. Other yobs had stolen her newly fitted fence panels  You can imagine that I wasn't in the mood to do any modelling.
However I did manage to get some done on sunday and I finished the rib tapes and applied most of the edging tapes. Done a little more of that tonight and will finish tomorrow night, after work. I will do the neccesary decalling through the week and hope to be ready for some weathering type airbrush work on Friday, when I finish work early. That should, hopefully, leave me in the situation of being able to finish over the week end
Mal
I need to know how you painted your spinner. I have ideas but yours does look pretty damn good
No more pics from me yet. I have made progress but I had a "run in" with a few yobs on Saturday evening (they had air rifles out on the street so you have to sort out the idiots don't you
) That was after I had been over to my mums, with SWMBO, to tidy her garden as she is away in Canada for 3 weeks. Other yobs had stolen her newly fitted fence panels You can imagine that I wasn't in the mood to do any modelling.However I did manage to get some done on sunday and I finished the rib tapes and applied most of the edging tapes. Done a little more of that tonight and will finish tomorrow night, after work. I will do the neccesary decalling through the week and hope to be ready for some weathering type airbrush work on Friday, when I finish work early. That should, hopefully, leave me in the situation of being able to finish over the week end
Mal
JackFlash
Joined: January 25, 2004
KitMaker: 11,669 posts
AeroScale: 11,011 posts
Posted: Monday, June 12, 2006 - 04:52 AM UTC
Quoted Text
Stunning Jean-Luc, looks wonderful.
I need to know how you painted your spinner. I have ideas but yours does look pretty damn good
No more pics from me yet. I have made progress but I had a "run in" with a few yobs on Saturday evening (they had air rifles out on the street so you have to sort out the idiots don't you
However I did manage to get some done on sunday and I finished the rib tapes and applied most of the edging tapes. Done a little more of that tonight and will finish tomorrow night, after work. I will do the neccesary decalling through the week and hope to be ready for some weathering type airbrush work on Friday, when I finish work early. That should, hopefully, leave me in the situation of being able to finish over the week end
Mal
Hey Mal, Forgive my ignorance...by spinner I assume you mean propeller? "Yobs?" Young Obstinate Bas...ds? Sounds like your making fine progress at any rate. All the best to you and your family.
TedMamere
Joined: May 15, 2005
KitMaker: 5,653 posts
AeroScale: 4,347 posts
Posted: Monday, June 12, 2006 - 11:01 AM UTC
Quoted Text
"Yobs?" Young Obstinate Bas...ds?
Hi Mal and Stephen!
Thanks Stephen for the translation! Remember I'm French! :-)
Mal, I brush painted the wooden propeller blades (
 ) with a mix of Tamiya and Prince August Acrylics. I finally applied Tamiya clear tinted with brown pastel... I must be honest, it looks better on the pics than in reality I think. I still have to find the right technique to simulate wood. The round metal plate is the kit's PE part with a little wash.
I think you took the right decision not to work on your model after your "Yobs" adventures. The kit, while not difficult to build, require concentration and calm as there are really small parts to deal with. I think it is very important to be "cool" while building Eduards Fokker! Otherwise it can end up in areal mess...
Good luck finishing the kit Mal!
Jean-Luc
Holdfast
#056
Joined: September 30, 2002
KitMaker: 8,581 posts
AeroScale: 4,913 posts
Posted: Monday, June 12, 2006 - 11:59 PM UTC
No worries and the yobs are well sorted. It's a great shame that the law doesn't allow one to give them a good slappin' then the problem would be gone for good they've seen the error of their ways although a couple of 'em think that an air rifle isn't dangerous, because one of them was shot in the leg, by his brother, and it was an accident!!? Apperently they think that if you get shot by accident, even in the eye, it's ok? Yesterday a 6 year old girl was shot in the face with an air pellet.
Anyway that's in the past, I have just a couple more lengths of rib tape to add to the edge of the ailerons. I'll do that tomorrow evening after work, and that's all the taping done. There wasn't enough spare to do the the wing edges and the undersurface of the tail plain, so I elected to do the wing edges. It has been lots of fun!!
Thanks for the explanation of the wooden prop, I think I'll have to have a practice
If I can get the decals finished by Friday I'll have a good chance of finishing over the week end, yobs and gate allowing (I need to make a front gate).
Mal
they've seen the error of their ways although a couple of 'em think that an air rifle isn't dangerous, because one of them was shot in the leg, by his brother, and it was an accident!!? Apperently they think that if you get shot by accident, even in the eye, it's ok? Yesterday a 6 year old girl was shot in the face with an air pellet. Anyway that's in the past, I have just a couple more lengths of rib tape to add to the edge of the ailerons. I'll do that tomorrow evening after work, and that's all the taping done. There wasn't enough spare to do the the wing edges and the undersurface of the tail plain, so I elected to do the wing edges. It has been lots of fun!!
Thanks for the explanation of the wooden prop, I think I'll have to have a practice
If I can get the decals finished by Friday I'll have a good chance of finishing over the week end, yobs and gate allowing (I need to make a front gate).
Mal
JackFlash
Joined: January 25, 2004
KitMaker: 11,669 posts
AeroScale: 11,011 posts
Posted: Tuesday, June 13, 2006 - 12:50 AM UTC
Quoted Text
"... I have just a couple more lengths of rib tape to add to the edge of the ailerons. I'll do that tomorrow evening after work, and that's all the taping done.
Hey Mal no rib tapes on the ailerons. Just on the wooden portions of the wings.
Quoted Text
"...There wasn't enough spare to do the the wing edges and the undersurface of the tail plain, so I elected to do the wing edges. It has been lots of fun!!
Good call. No rib tapes on the tail plane either.
Quoted Text
"...Thanks for the explanation of the wooden prop, I think I'll have to have a practice
Painting a propeller is fairly easy to do. After getting a base coat on the propeller the laminations can be painted in about 30-40 minutes. Look at some images of real aircraft. Though the Fokker Dr.I used very light and dark laminations on some propellers most were not too drastic in tones. Also in the image I have provided there should be three dark and three or four light laminations. note how it curves on the blade paddle faces.

BadBoyFLSTC
Joined: November 20, 2005
KitMaker: 96 posts
AeroScale: 53 posts
Posted: Tuesday, June 13, 2006 - 12:54 AM UTC
Jean-Luc,
I have not chosen a paintscheme as yet. I am thinking of going out of kit with a Strike Eagle set. You have all been a great help to me though as to the construction as well as to how you weather and paint the different parts. As I said, I also had gotten a couple of Stephen's CD's. This may have confussed me more though, as Stephen is such a great historian of WW1 aircraft that I have become afraid I will put the wrong engine in, or the wrong prop on. As I bought the whole kit, and have three aircraft to do, it's easy to get mixed up and install the wrong dash panel or something. Oh well, I'm sure I'll sort it out, and yes I would be honored to post the pictures for all of your reviews (good or bad).
Nils
JackFlash
Joined: January 25, 2004
KitMaker: 11,669 posts
AeroScale: 11,011 posts
Posted: Tuesday, June 13, 2006 - 01:10 AM UTC
No worries Nils;
Just treat each component like a model unto itself. Step by step gets you there. looking at it from an overall point of view does muddle things. But when you work on each indidvidual kit it will be easier for you to see.
For instance, when your working on the instrument panels do your research and compare. The plastic item is used for the Fokker Schwerin and OAW types. The etched metal version is seen on the Alb. built variants. When you set aside the parts you wont need for a specific build it keeps them from being introduced accidentally later
A build of a thousand parts begins with the first step.
TedMamere
Joined: May 15, 2005
KitMaker: 5,653 posts
AeroScale: 4,347 posts
Posted: Wednesday, June 14, 2006 - 12:17 AM UTC
Hi all!
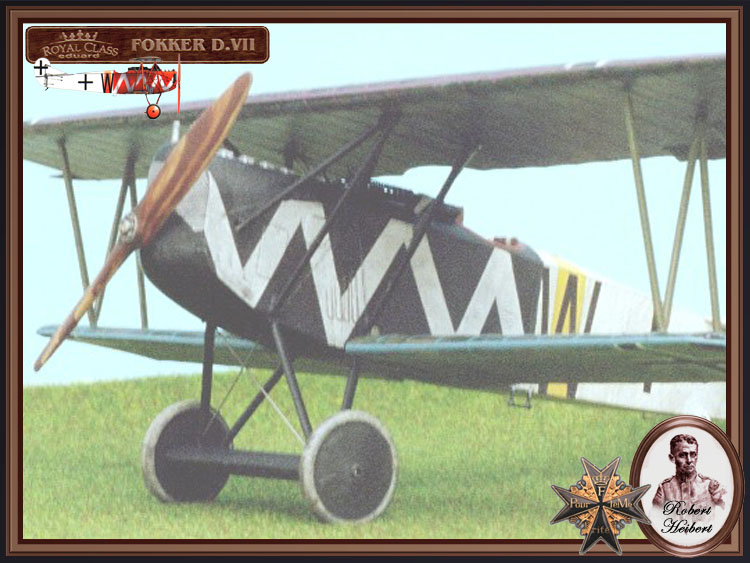
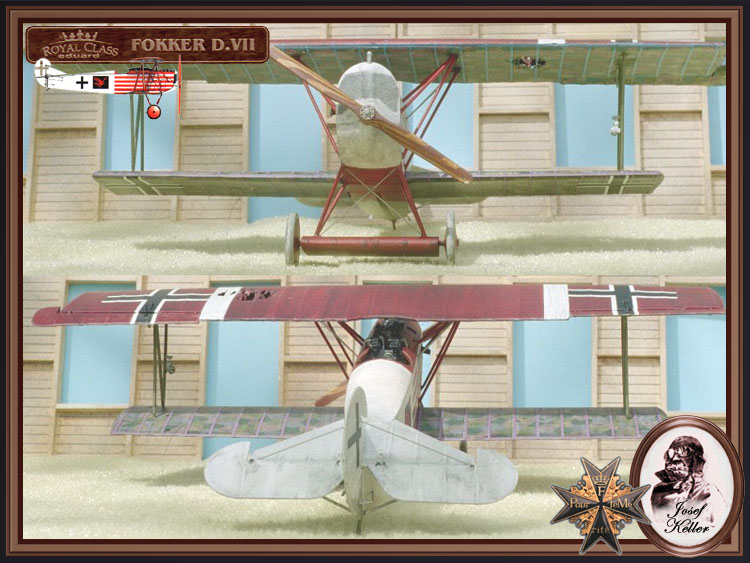
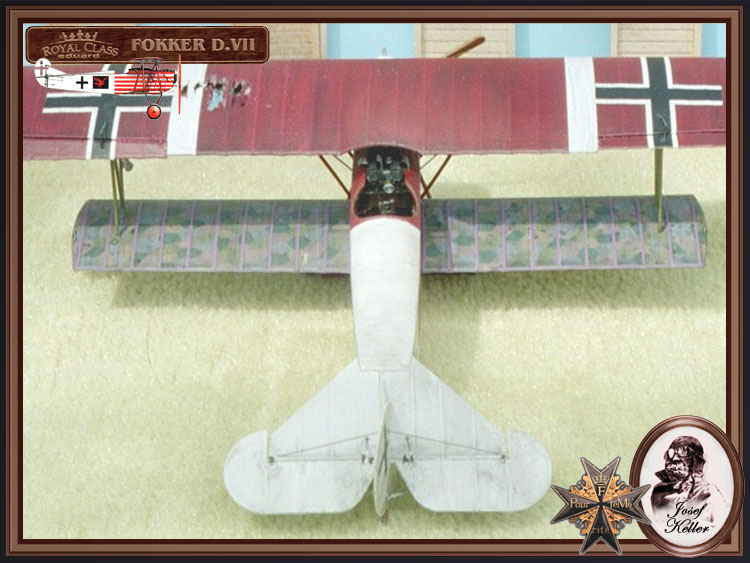
Here are some more pics of Hugo Schäfer's plane...


Time for a conclusion concerning Eduard's model:
The kit is pretty easy to build if you take your time and work in sessions, especially for the numerous lozenge and rib tape decals. The fit of the model is absolutely top class! Everything goes together with no particular problem. The only problem I found were all the optional parts on the sprues. It can be quite confusing if you don't have the appropriate references as the instructions are sometimes not very clear in that matter. Other than that, it was a very enjoyable build and Eduard should be complimented for their work.
I was so impressed by the quality of the Fokker kit that I purchased the Camel Combo and Nieuport 11 & 17 "escadrille" boxes from the same manufacturer. And I'm tempted by the F.2B Brisfish as well!
Eduard's WWI kits are definitely recommended.
Jean-Luc
Here are some more pics of Hugo Schäfer's plane...
Time for a conclusion concerning Eduard's model:
The kit is pretty easy to build if you take your time and work in sessions, especially for the numerous lozenge and rib tape decals. The fit of the model is absolutely top class! Everything goes together with no particular problem. The only problem I found were all the optional parts on the sprues. It can be quite confusing if you don't have the appropriate references as the instructions are sometimes not very clear in that matter. Other than that, it was a very enjoyable build and Eduard should be complimented for their work.
I was so impressed by the quality of the Fokker kit that I purchased the Camel Combo and Nieuport 11 & 17 "escadrille" boxes from the same manufacturer. And I'm tempted by the F.2B Brisfish as well!
Eduard's WWI kits are definitely recommended.
Jean-Luc
Holdfast
#056
Joined: September 30, 2002
KitMaker: 8,581 posts
AeroScale: 4,913 posts
Posted: Wednesday, June 14, 2006 - 01:38 AM UTC
Quoted Text
Hey Mal no rib tapes on the ailerons. Just on the wooden portions of the wings.
Oh !!llocks, I should have even more fun getting them off
 Errr, just tried to remove the tape decals I put on the aileron edges and I think I might totally destroy all the decals if I attempt it, so looks like my particular D.VII was slightly different, doh!
Quoted Text
Painting a propeller is fairly easy to do. After getting a base coat on the propeller the laminations can be painted in about 30-40 minutes.
Great...........what base colour, yellow?
Jean-Luc, simply superb
There has just been another delay introduced on me
my youngest daughter has past her driving test today Guess who is going car shopping on Saturday I can see her ending up with Citreon, just so I can get back and get on with the Fokker Mal
JackFlash
Joined: January 25, 2004
KitMaker: 11,669 posts
AeroScale: 11,011 posts
Posted: Wednesday, June 14, 2006 - 04:16 AM UTC
Quoted Text
Oh !!llocks, I should have even more fun getting them off
No worries Mal, If it gets to you I may have some spare aileron decals.
Quoted Text
Great...........what base colour, yellow?
Sail or sand makes a great start.
Quoted Text
Jean-Luc, simply superb
I heartily concure nicely done Jean Luc!
Quoted Text
There has just been another delay introduced on me
Mal
The last real foreseen terrorfest I have in my life will be to teach my daughter to drive...arggggggg!
Holdfast
#056
Joined: September 30, 2002
KitMaker: 8,581 posts
AeroScale: 4,913 posts
Posted: Thursday, June 15, 2006 - 02:52 AM UTC
Quoted Text
No worries Mal, If it gets to you I may have some spare aileron decals.
Thanks Stephen, but I am going to live with it, I have added the wing crosses now anyway. I did think of adding small pieces of lozenge decal to cover the edges but decided that I was enjoying it all too much to ruin the pleasure doing that
On the bright side I didn't know about the rib taping on the edge of the wings when I started and that's done I have also done most of the other decals, including that nice dragon. I will take pics tomorrow, after work.Quoted Text
The last real foreseen terrorfest I have in my life will be to teach my daughter to drive...arggggggg!
LOL, women should be banned from driving
:-) , the same goes for anyone who buys a BMW, 'cos, in England at any rate, they either think that they own the road or seem to forget how to drive completely. This is a fact I witness every day Mal
JackFlash
Joined: January 25, 2004
KitMaker: 11,669 posts
AeroScale: 11,011 posts
Posted: Thursday, June 15, 2006 - 07:17 AM UTC
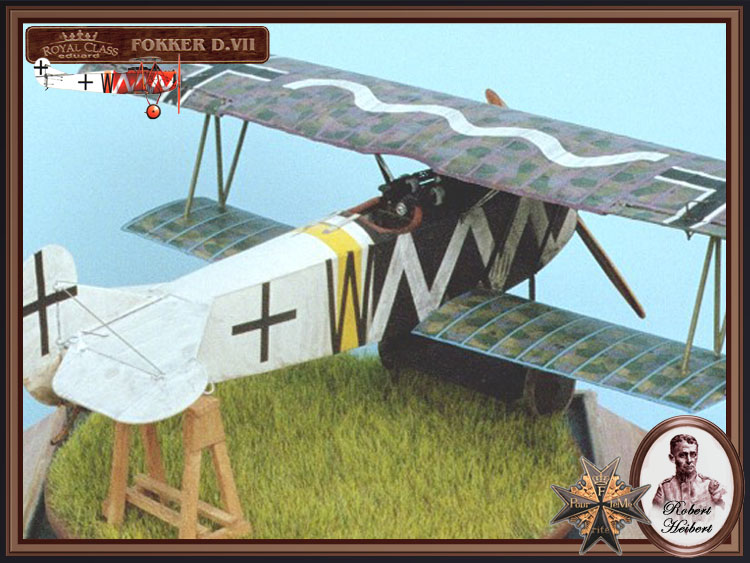
Greetings all here are the installations of my finished birds. First Jasta 46

JackFlash
Joined: January 25, 2004
KitMaker: 11,669 posts
AeroScale: 11,011 posts
Posted: Thursday, June 15, 2006 - 07:20 AM UTC
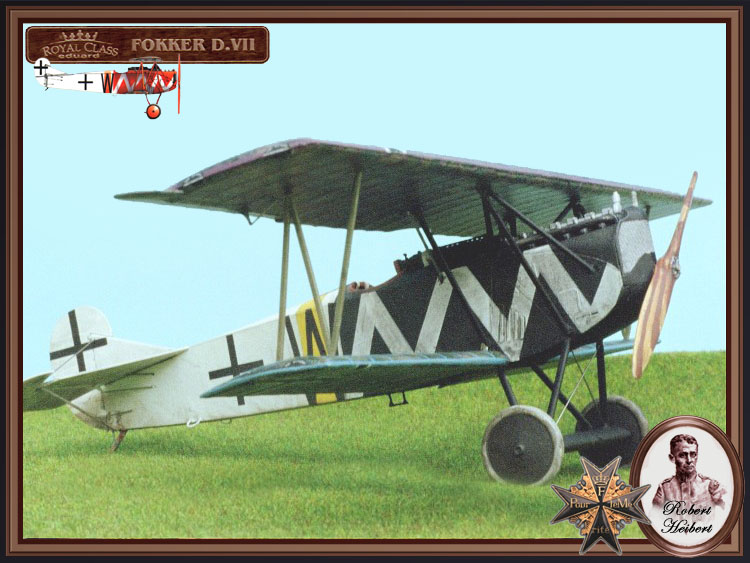
Here is the another Jasta 46 image.
JackFlash
Joined: January 25, 2004
KitMaker: 11,669 posts
AeroScale: 11,011 posts
Posted: Thursday, June 15, 2006 - 07:27 AM UTC
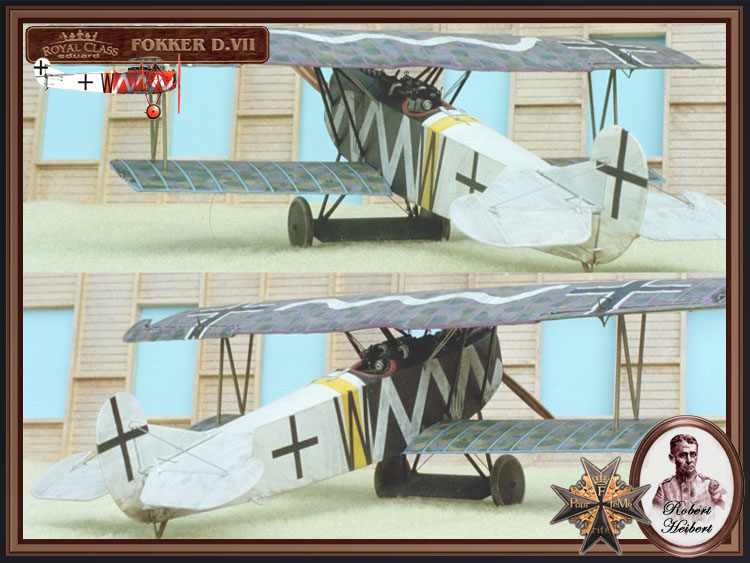
Here is the Jasta 43 build.

 |

WEB HOSTING BY


Copyright ©2021 AeroScale and Kitmaker Network, a subsidiary of Silver Star Enterprises
All Rights Reserved. Please read our Conditions of Use and Privacy Policy.
All Rights Reserved. Please read our Conditions of Use and Privacy Policy.