Wayne
It aint mine its just one i found through google [i edited my last post]
Sebastian
Air Campaigns
Want to start or join a group build? This is where to start.
Want to start or join a group build? This is where to start.
Hosted by Frederick Boucher, Michael Satin
Duel - Newtothegame & Bilko vs. Wad-Ware
rommel93

Joined: May 10, 2006
KitMaker: 169 posts
AeroScale: 27 posts

Posted: Thursday, July 27, 2006 - 09:57 AM UTC
newtothegame

Joined: October 05, 2003
KitMaker: 588 posts
AeroScale: 468 posts

Posted: Thursday, July 27, 2006 - 07:53 PM UTC
Looking forward to the pictures Wayne! Sounds like everything is going great with it, and I can't wait to see.
My hope is to get a little done on mine this weekend, so I can finally have at least a cockpit to share...
Hope all is well.
Leon
My hope is to get a little done on mine this weekend, so I can finally have at least a cockpit to share...
Hope all is well.
Leon
Wad_ware

Joined: September 09, 2002
KitMaker: 537 posts
AeroScale: 437 posts

Posted: Friday, July 28, 2006 - 08:15 AM UTC

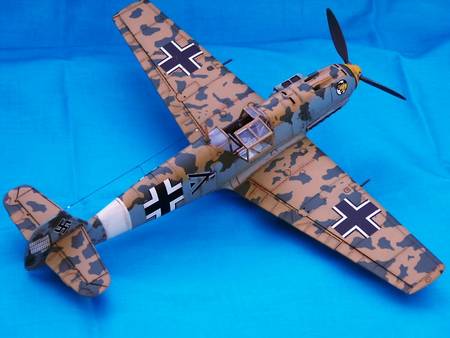
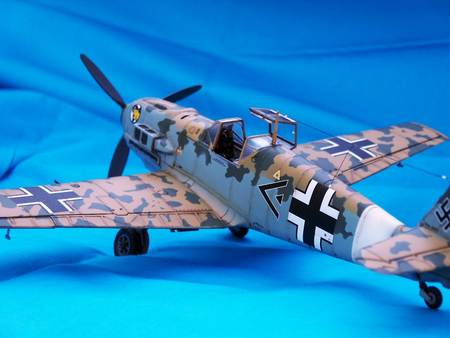
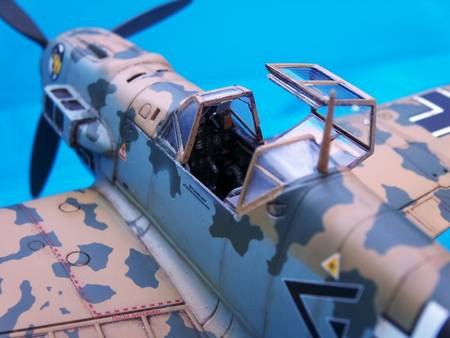
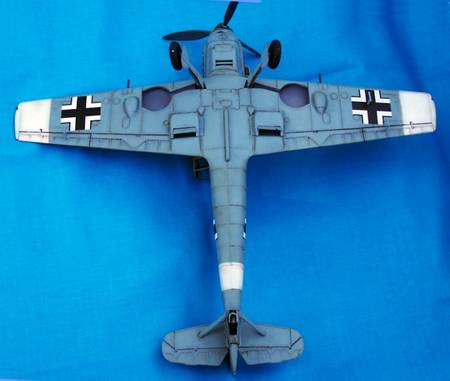
 I am thrilled to present my completed Afrika Korps Bf-109E

I really liked this old Matchbox kit. There were some minor fit problems here and there but overall it was a very fun build.
 I'll be circling overhead waiting for that big dogfight
Wayne


rommel93

Joined: May 10, 2006
KitMaker: 169 posts
AeroScale: 27 posts

Posted: Friday, July 28, 2006 - 10:12 AM UTC
Hi
It looks really good for an antique :-) :-) :-) :-)
It looks really good for an antique :-) :-) :-) :-)
Posted: Friday, July 28, 2006 - 10:58 AM UTC
Hi Wayne!
That's a very nice model! Congratulations!
The paint job is fantastic and the result you achieved with the old Matchbox kit is spectacular. I have one request though: could you shoot a profile picture of the right side of the plane (the one without the filter) so I can add it to the "Duel" table as finished entry! This would be great
I'm happy to have such high quality models built for the "Duel" Campaign. Thank you very much!
Jean-Luc
That's a very nice model! Congratulations!

The paint job is fantastic and the result you achieved with the old Matchbox kit is spectacular. I have one request though: could you shoot a profile picture of the right side of the plane (the one without the filter) so I can add it to the "Duel" table as finished entry! This would be great

I'm happy to have such high quality models built for the "Duel" Campaign. Thank you very much!
Jean-Luc

newtothegame

Joined: October 05, 2003
KitMaker: 588 posts
AeroScale: 468 posts

Posted: Friday, July 28, 2006 - 07:40 PM UTC
Looks great Wayne! I really like it. You did a really nice job with all of it. I like the preshading and really like the look it gives to the bottom. What did you use for the antennae wire? Anyway, really nice work. Hopefully, you'll have some enemy planes up there too some day... 
Hope all is well. (And looking forward to your next project)
Leon

Hope all is well. (And looking forward to your next project)
Leon

Wad_ware

Joined: September 09, 2002
KitMaker: 537 posts
AeroScale: 437 posts

Posted: Saturday, July 29, 2006 - 12:59 AM UTC
Thanks everyone 
This was an old kit but it sure was fun to build. Speaking of antiques tho... My wife and I were out today and hit a few antique stores. One place actually had 5 or 6 old models in there. I was drooling over one. I can't remember the brand now for sure. It was something like AMC, AMT?? It was a 1/24th Bf-109G. They were asking $95 for that thing. WOW
All the other models were not selling for any less than $80. I know some old unbuilt models are highly collectible but that really threw me when I looked at the price tags
Thanks Jean-Luc - I am really happy with the way my 109 came out. I have the profile pic for you. I've got it posted here. It is in my gallery so if you need the link to it or anything at all just ask. Let me know if the pic is OK for I would be glad to take more if you wanted somthing different than what I have here.

Leon - Thanks too. I appreciate all the comments. This was my first time with preshading and using an oil wash. I am really happy with the results. I used fly tying thread for the antennea wire. That always works really well for me. It is really strong and doesn't fray.
I'll be waiting. I have been up practicing my air-loin rolls and my loop-de-loops :-) :-) I'll be ready for anything you and Brian can throw at me later on
Good modeling,
Wayne


Quoted Text
It looks really good for an antique
This was an old kit but it sure was fun to build. Speaking of antiques tho... My wife and I were out today and hit a few antique stores. One place actually had 5 or 6 old models in there. I was drooling over one. I can't remember the brand now for sure. It was something like AMC, AMT?? It was a 1/24th Bf-109G. They were asking $95 for that thing. WOW
All the other models were not selling for any less than $80. I know some old unbuilt models are highly collectible but that really threw me when I looked at the price tags
Thanks Jean-Luc - I am really happy with the way my 109 came out. I have the profile pic for you. I've got it posted here. It is in my gallery so if you need the link to it or anything at all just ask. Let me know if the pic is OK for I would be glad to take more if you wanted somthing different than what I have here.

Leon - Thanks too. I appreciate all the comments. This was my first time with preshading and using an oil wash. I am really happy with the results. I used fly tying thread for the antennea wire. That always works really well for me. It is really strong and doesn't fray.
Quoted Text
Hopefully, you'll have some enemy planes up there too some day
I'll be waiting.
 I have been up practicing my air-loin rolls and my loop-de-loops :-) :-) I'll be ready for anything you and Brian can throw at me later on
Good modeling,
Wayne

Posted: Saturday, July 29, 2006 - 09:42 AM UTC
Quoted Text
Thanks Jean-Luc - I am really happy with the way my 109 came out. I have the profile pic for you. I've got it posted here. It is in my gallery so if you need the link to it or anything at all just ask. Let me know if the pic is OK for I would be glad to take more if you wanted somthing different than what I have here.
It's perfect!

newtothegame

Joined: October 05, 2003
KitMaker: 588 posts
AeroScale: 468 posts

Posted: Wednesday, August 02, 2006 - 04:42 AM UTC
Finally, I have a little more progress to show on my Martlet. I invite you to come take a tour of the cockpit with me...  I know, I always go overboard with the number of cockpit pictures, but it is by far my favorite part of building. Sometimes I wish it ended at cockpits (right before dealing with seams :-) ) Anyway...
The tamiya wildcat cockpit is really nice, but has a full floor, so I cut that out (only needed a little removed from the floor and then some removed from the instrument panel. I am thinking of adding a 'portion' of a tank under the removed floor to give the appearance that I did a lot of scratch building below the new cavern created.

Seatbelts where scratch built from wine bottle foil. This was one of my first times of using it, and I really liked how posable it was.

The tamiya kit ip is raised detail. I decided to punch out instruments from a spare p-47 decal and put them in one by one. The picture doesn't show it well, but they were then 'glassed' over with future. I opted for this method rather than a pe ip because I liked some of the raised detail on the actual panel.

I used an eduard zoom pe set, which has some nice little additions like handles, and radio (I think) box fronts, etc. I didn't use all parts, but am really happy with these cheaper 'zoom' sets.

Painting is done with model master (interior green), tamiya (black), testors (silver), and cheap wal-mart acrylics (rest). Honestly, I really wasn't sure on the main color (I.G.) and really doubt my choice, but in the end I just decided to take a leap of faith and go for it.

So there you go. For what it's worth, it's done. Now to the dreaded join everything and take care of the seams...
Hope all is well.
Leon
 I know, I always go overboard with the number of cockpit pictures, but it is by far my favorite part of building. Sometimes I wish it ended at cockpits (right before dealing with seams :-) ) Anyway...
The tamiya wildcat cockpit is really nice, but has a full floor, so I cut that out (only needed a little removed from the floor and then some removed from the instrument panel. I am thinking of adding a 'portion' of a tank under the removed floor to give the appearance that I did a lot of scratch building below the new cavern created.

Seatbelts where scratch built from wine bottle foil. This was one of my first times of using it, and I really liked how posable it was.

The tamiya kit ip is raised detail. I decided to punch out instruments from a spare p-47 decal and put them in one by one. The picture doesn't show it well, but they were then 'glassed' over with future. I opted for this method rather than a pe ip because I liked some of the raised detail on the actual panel.

I used an eduard zoom pe set, which has some nice little additions like handles, and radio (I think) box fronts, etc. I didn't use all parts, but am really happy with these cheaper 'zoom' sets.

Painting is done with model master (interior green), tamiya (black), testors (silver), and cheap wal-mart acrylics (rest). Honestly, I really wasn't sure on the main color (I.G.) and really doubt my choice, but in the end I just decided to take a leap of faith and go for it.


So there you go. For what it's worth, it's done. Now to the dreaded join everything and take care of the seams...
Hope all is well.
Leon

Lucky13

Joined: June 01, 2006
KitMaker: 1,707 posts
AeroScale: 1,119 posts

Posted: Wednesday, August 02, 2006 - 05:03 AM UTC

Wad_ware

Joined: September 09, 2002
KitMaker: 537 posts
AeroScale: 437 posts

Posted: Wednesday, August 02, 2006 - 08:05 AM UTC
Well done on the cockpit  That is some nice work. That is a little ingenuity using the wine bottle foil to make the harnesses.
Just curious how you may be able to fit the wine may into the campaign.


You might want to save that to calm your nerves before our duel :-) :-) :-)
I will be looking forward to more progress and good modeling,
Wayne

 That is some nice work. That is a little ingenuity using the wine bottle foil to make the harnesses.
Just curious how you may be able to fit the wine may into the campaign.


You might want to save that to calm your nerves before our duel :-) :-) :-)
I will be looking forward to more progress and good modeling,
Wayne

newtothegame

Joined: October 05, 2003
KitMaker: 588 posts
AeroScale: 468 posts

Posted: Wednesday, August 02, 2006 - 04:10 PM UTC
Thanks Jan and Wayne, I appreciate the comments. As for the wine foil - great stuff. I got the idea from Mal's spitfire online build. That thing has been a great resource for me in so many ways. Cheers to Mal. 
Leon

Leon
newtothegame

Joined: October 05, 2003
KitMaker: 588 posts
AeroScale: 468 posts

Posted: Saturday, August 19, 2006 - 05:05 AM UTC
Baby steps forward...
One of my only complaints about the tamiya wildcat is the exhaust tubing. Using the kit pieces results in a situation where it is quite obvious they don't really go anywhere and are just some inserts that sit on top of of some plastic. Here is a picture of the wildcat that I did previously to show what I mean:

Disclaimer: (I know there are probably better modelers than I who have come up with an easier solutions, or are able to use the original tamiya pieces to a better effect)
Anyway, I decided to try to fix the problem this time around. I bought some plastic tubing, heated it over a candle and slowly, through presure, tried to reshape it into the rough shape of the exhausts. Then I used a file to further shape it and cut longer 'inserts' that are really hollow and more tube-like when compared to the tamiya pieces. Then I ground out a longer place for them to go in the lower wing/fuselage piece.
Picture:

Now when the cowling is placed on, I believe it looks more like the exhaust actually go into the cowling and don't abruptly end.

Of course this took me a long time and is still far from perfect, so if anyone has a better / quicker method I would love to hear it.
Thanks, (and I may finish this thing sometime this year...
Leon
One of my only complaints about the tamiya wildcat is the exhaust tubing. Using the kit pieces results in a situation where it is quite obvious they don't really go anywhere and are just some inserts that sit on top of of some plastic. Here is a picture of the wildcat that I did previously to show what I mean:

Disclaimer: (I know there are probably better modelers than I who have come up with an easier solutions, or are able to use the original tamiya pieces to a better effect)
Anyway, I decided to try to fix the problem this time around. I bought some plastic tubing, heated it over a candle and slowly, through presure, tried to reshape it into the rough shape of the exhausts. Then I used a file to further shape it and cut longer 'inserts' that are really hollow and more tube-like when compared to the tamiya pieces. Then I ground out a longer place for them to go in the lower wing/fuselage piece.
Picture:

Now when the cowling is placed on, I believe it looks more like the exhaust actually go into the cowling and don't abruptly end.

Of course this took me a long time and is still far from perfect, so if anyone has a better / quicker method I would love to hear it.
Thanks, (and I may finish this thing sometime this year...

Leon

john17

Joined: January 23, 2003
KitMaker: 920 posts
AeroScale: 50 posts

Posted: Saturday, August 19, 2006 - 07:46 AM UTC
Leon:
I'm probably the farthest thing from an expert, but I think your solution for the kit exhaust pieces looks damn fine. They are a far cry better than the kit pieces you showed.
I hope to get up the guts to make scratchbuilt improvements on my models in the future. It really helps personalize the piece.
Great job Leon. Good luck as you proceed with your build.
Your enemy is one cool looking hombre. Hopefully you'll meet the match head on when you're done. Can't wait to see the finished piece.
Cheers,
John
I'm probably the farthest thing from an expert, but I think your solution for the kit exhaust pieces looks damn fine. They are a far cry better than the kit pieces you showed.
I hope to get up the guts to make scratchbuilt improvements on my models in the future. It really helps personalize the piece.
Great job Leon. Good luck as you proceed with your build.
Your enemy is one cool looking hombre.
 Hopefully you'll meet the match head on when you're done. Can't wait to see the finished piece.
Cheers,
John

Wad_ware

Joined: September 09, 2002
KitMaker: 537 posts
AeroScale: 437 posts

Posted: Saturday, August 19, 2006 - 10:48 AM UTC
That is some very good thinking and nice scrach building there Leon. What you have done really does look good and very much better than the original kit parts. Once you get that all painted up it will look great.  Everything good is worth the time it took to get there ;-)
Keep up the good work and good modeling,
Wayne
 Everything good is worth the time it took to get there ;-)
Keep up the good work and good modeling,
Wayne
newtothegame

Joined: October 05, 2003
KitMaker: 588 posts
AeroScale: 468 posts

Posted: Sunday, August 20, 2006 - 04:25 AM UTC
Thanks John and Wayne. It is really nice to know that the extra work was worthwhile. It actually was a lot of fun to try out the new technique of heating and reshaping the plastic tubing.
Thanks again.
leon
Thanks again.
leon
bilko

Joined: April 22, 2003
KitMaker: 584 posts
AeroScale: 96 posts

Posted: Saturday, August 26, 2006 - 06:26 PM UTC
Wayne & Leon
You have both been very busy since my last visit.
Wayne you should be justifiably proud of the 109.
Leon you are working your way towards an excellent Martlet.
In the little extra time I have worked on my Tomahawk I have started scratch building the reflector gunsight that the RAF (and RAAF) Tomahawks were fitted with.
time has run our for me and I leave here in 3 weeks for my new office, so my model room is just about entirely packed. Trouble is I have just remembered I forgot to photgraph my work before packing it
  .
.
I will be on my own for 3 - 4 months without SWMBO, 2 kids and dog
  or my computer (son has to do his assignments). So plenty of modelling time
  as long as I can squeeze some of my gear into the car to take with me.
Added benefit is that the are 2 LHSs, 1 in the town I am moving to and another about 15 minutes up the road (Plus a few in Brisbane itself 35 km away)
Nuts and bolts is that I am going to have to withdraw from this Duel - even if I do get the Tomahawk finished I won't be able to photograph it or post any updates etc.
Brian

You have both been very busy since my last visit.
Wayne you should be justifiably proud of the 109.
Leon you are working your way towards an excellent Martlet.
In the little extra time I have worked on my Tomahawk I have started scratch building the reflector gunsight that the RAF (and RAAF) Tomahawks were fitted with.
time has run our for me and I leave here in 3 weeks for my new office, so my model room is just about entirely packed.
 Trouble is I have just remembered I forgot to photgraph my work before packing it
  .
.I will be on my own for 3 - 4 months without SWMBO, 2 kids
 and dog
  or my computer (son has to do his assignments). So plenty of modelling time
  as long as I can squeeze some of my gear into the car to take with me.
Added benefit is that the are 2 LHSs, 1 in the town I am moving to and another about 15 minutes up the road (Plus a few in Brisbane itself 35 km away)
Nuts and bolts is that I am going to have to withdraw from this Duel - even if I do get the Tomahawk finished I won't be able to photograph it or post any updates etc.
Brian


Wad_ware

Joined: September 09, 2002
KitMaker: 537 posts
AeroScale: 437 posts

Posted: Sunday, August 27, 2006 - 08:48 AM UTC
Hi Brian and thanks for the compliment. I am very happy with how my 109 came out for the duel. And by looking at Leon's work on his other models, he is going to make a great adversary for me.
Sorry to hear you are going to have to drop out of the duel. I am sure we will get together again sometime in later builds or campaigns.
Wayne

Sorry to hear you are going to have to drop out of the duel. I am sure we will get together again sometime in later builds or campaigns.

Wayne

newtothegame

Joined: October 05, 2003
KitMaker: 588 posts
AeroScale: 468 posts

Posted: Monday, August 28, 2006 - 04:10 AM UTC
Brian, Sorry to hear you are dropping out. I hope you have a good couple months. If / when you do finish the tomahawk please post pictures even if this duel is far over (I would love to see it someday).
Leon
Leon
newtothegame

Joined: October 05, 2003
KitMaker: 588 posts
AeroScale: 468 posts

Posted: Thursday, December 28, 2006 - 11:26 PM UTC
Probably not going to finish, but baby steps forward. Camo is painted. I am now worried about the time to let enamel set before clear and then time for clear to set before decals. I often read online about a 2 day period for both...
Anyway, where I am at.


Hope all is well.
Leon
Anyway, where I am at.


Hope all is well.
Leon
bilko

Joined: April 22, 2003
KitMaker: 584 posts
AeroScale: 96 posts

Posted: Saturday, December 30, 2006 - 09:44 AM UTC
Wayne & Leon
It seems that I told a little fib saying I was withdrawing from this Duel. I have been on my own for 3 months without wife, kids and dog to pester me. Only troubles were that work kept me very busy and the packers sent the Tomahawk into storage. However they did leave me with (by mistake) the Revell 1/32 Fiesler Storch so................ I changed sides (Jean-Luc said I could) and here it is..
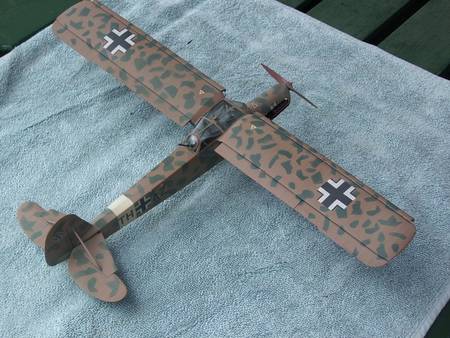
and
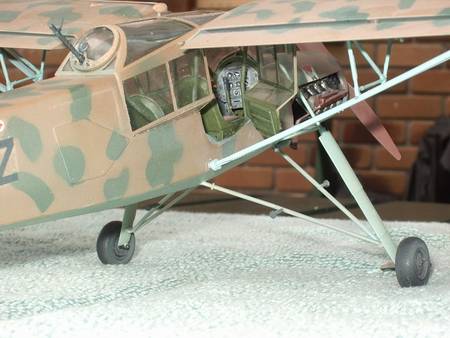
I have posted five (5) pics in the Duel in the Sky Gallery but I see that there are only a couple of other pics in there - Have I missed a post somewhere in the last few months and posted in the wrong place??
Leon your Martlet is coming along nicely - I really like the broken background that you have used .
.
Wayne I am glad to see that your 109 scored MOM.
Brian
It seems that I told a little fib saying I was withdrawing from this Duel. I have been on my own for 3 months without wife, kids and dog to pester me. Only troubles were that work kept me very busy and the packers sent the Tomahawk into storage. However they did leave me with (by mistake) the Revell 1/32 Fiesler Storch so................ I changed sides (Jean-Luc said I could) and here it is..

and

I have posted five (5) pics in the Duel in the Sky Gallery but I see that there are only a couple of other pics in there - Have I missed a post somewhere in the last few months and posted in the wrong place??
Leon your Martlet is coming along nicely - I really like the broken background that you have used
 .
.Wayne I am glad to see that your 109 scored MOM.
Brian

newtothegame

Joined: October 05, 2003
KitMaker: 588 posts
AeroScale: 468 posts

Posted: Monday, January 01, 2007 - 08:15 AM UTC
Bryan,
Your build looks great. Nice job. I'm glad you were able to stay in the duel. I put decals on my Martlet today and believe it should be done by the 'new' deadline. I am right now trying to figure out a way to fade the decals a little. Anyway, nice work and glad you made it.
Leon
Your build looks great. Nice job. I'm glad you were able to stay in the duel. I put decals on my Martlet today and believe it should be done by the 'new' deadline. I am right now trying to figure out a way to fade the decals a little. Anyway, nice work and glad you made it.
Leon
Posted: Monday, January 01, 2007 - 12:38 PM UTC
Hi Brian!
That's a very nice "Storch"! The camouflage looks excellent!
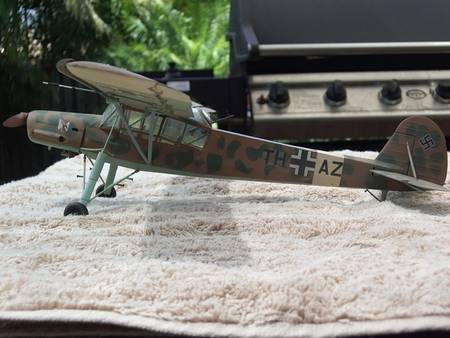
Could you please shoot a left side picture of your model for the "Duel" table?
Thanks a lot for your participation!
Jean-luc
That's a very nice "Storch"! The camouflage looks excellent!

Could you please shoot a left side picture of your model for the "Duel" table?
Thanks a lot for your participation!
Jean-luc

bilko

Joined: April 22, 2003
KitMaker: 584 posts
AeroScale: 96 posts

Posted: Monday, January 01, 2007 - 07:03 PM UTC
Leon
It is hard to see from my photos - but what I tried with the Storch was a misting of Tamiya buff over all surfaces (more on the top and sides) in an attempt to make it appear dusty and blend the decals in with the cammo scheme.
I think it worked OK where the decals had settled properly - but on each side I stuffed up the lettering forward of the cross and they both silvered - not too badly. BUT when I sprayed the buff it seemed to exaggerate the silvering. Next time I won't try the shortcut of only putting gloss down where the decals are intended to go , I'll just do the whole thing.
Jean-Luc - thanks for your comments. I have sent a PM about the photo.
Brian
It is hard to see from my photos - but what I tried with the Storch was a misting of Tamiya buff over all surfaces (more on the top and sides) in an attempt to make it appear dusty and blend the decals in with the cammo scheme.
I think it worked OK where the decals had settled properly - but on each side I stuffed up the lettering forward of the cross and they both silvered - not too badly. BUT when I sprayed the buff it seemed to exaggerate the silvering. Next time I won't try the shortcut of only putting gloss down where the decals are intended to go
 , I'll just do the whole thing.
Jean-Luc - thanks for your comments. I have sent a PM about the photo.
Brian

bilko

Joined: April 22, 2003
KitMaker: 584 posts
AeroScale: 96 posts

Posted: Saturday, January 06, 2007 - 06:22 AM UTC
Jean-Luc
Photo from Port quarter attached for the Duel gallery.
Sorry for the background - it is amazing what you can get up to whilst cooking a lazy sunday morning brunch on the BBQ. :-)
Brian

 |


