Duel - Newtothegame & Bilko vs. Wad-Ware
Washington, United States
Joined: October 05, 2003
KitMaker: 588 posts
AeroScale: 468 posts
Posted: Saturday, June 03, 2006 - 07:37 AM UTC
For this duel, Bilko (P-40) and I (F4F Martlet) are going up against Wad_Ware (Bf 109E).
My build 'pieces'

As you can see, I have the Tamiya kit for the base, the true details cockpit set, the eduare pe set (mostly for the seatbelts and instrument panels), squadron canopies, and aeromaster decals.
This will be my first attempt at a conversion and I will be relying on a great article by Scott Spencer from the FAA SIG Reference site (link below) that explains what needs to be done to the Tamiya kit to model the various Martlets or atleast come fairly close. I'm sure I will be asking many technique questions along the way, so thanks in advance for any guidance you can give

.
Martlet Article Hope all is well, and I look forward to hearing more from Bilko and Wad_Ware.
Leon
Queensland, Australia
Joined: April 22, 2003
KitMaker: 584 posts
AeroScale: 96 posts
Posted: Saturday, June 03, 2006 - 03:53 PM UTC
Go Leon!! Looks like a fair bit to keep you entertained there.
I have actually started the Trumpeter P40B - got 1/2 the engine done. Bit of a bother actually - you have to build the engine - which is pretty nice - just for somewhere to hang the exhaust pipes. The engine covers are all moulded in 1 piece so no easy show off the engine option. And the exhaust pipes are all 2 piece

. That is the job when I get off here - cleaning up the remaining 11 of these lettle critters

I will break out my camera soon and take a photo of the box and the work so far.
Over to you Wayne.
Brian

Queensland, Australia
Joined: April 22, 2003
KitMaker: 584 posts
AeroScale: 96 posts
Posted: Sunday, June 04, 2006 - 06:13 PM UTC
couple of pics as promised


and it is a long weekend this weekend (Queen's birthday) so hopefully I will be able to score a FULL day of building.
Brian
Illinois, United States
Joined: September 09, 2002
KitMaker: 537 posts
AeroScale: 437 posts
Posted: Monday, June 05, 2006 - 07:09 AM UTC
Hmmmmmmmm.... two against one I see
All I can say is.
check your six
.for I am coming right around on your tails with all guns blazing

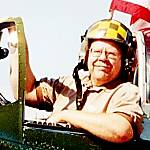
Glad to see the duel is getting started. I don't have any progress pics to post yet but hopefully before long I will get some. I've been getting along pretty good with my 109. I did have a little bit of a head start. I started working on this a ways back but has been sitting in the box for about 6 to 7 months or so. Here is a scan of your enemy. Take a good look... for this may be the only really good look you get before ending up spiriling down into the hot African sands

This one should be a lot of fun to paint, especially in 1/32nd scale.
Good modeling,
Wayne


If the enemy is in range, .....so are you!
California, United States
Joined: November 20, 2005
KitMaker: 96 posts
AeroScale: 53 posts
Posted: Monday, June 05, 2006 - 09:54 AM UTC
What book is that a scan of Wayne? That is an awesome paint scheme.
Nils
Washington, United States
Joined: October 05, 2003
KitMaker: 588 posts
AeroScale: 468 posts
Posted: Monday, June 05, 2006 - 07:09 PM UTC
Brian, Looking good so far. I hope you have a good weekend of modeling, too, because I am really excited to see your progress. Plus, I am such a slow builder, we will need you up there in the air to fight off Wayne.
Wayne, As I have mentioned to you before, I can't wait to see you get to the painting steps. I think that scheme will be great!
Hope to crack mine open this weekend and really dig in.
Leon
Illinois, United States
Joined: September 09, 2002
KitMaker: 537 posts
AeroScale: 437 posts
Posted: Tuesday, June 06, 2006 - 08:33 AM UTC
I really like that paint scheme too.
It is from a book called "Aircraft of World War II" by Bill Gunston. It was originally published by Octopus Books in 1980 but the issue I have was published 1997 by Chancellor Press.
I found this at a flea market one day and it was a great find. It has great pics like the one of the 109 on tons of WWII aircraft along with semi-brief histories of the different versions of the aircraft.
If you can find a copy of this book possibly on eBay?? at a good price it would be a good purchase.
-update- I just went and checked on ebay and did find a couple of these books. They have the same title and author. The cover looks different than mine but it is probably just a different year release of the same book I have. They were all at pretty low prices too. Check the eBay stores too. I didn't go into there and there might be more in there also.
Wayne
If the enemy is in range, .....so are you!
Colorado, United States
Joined: January 12, 2002
KitMaker: 5,000 posts
AeroScale: 370 posts
Posted: Tuesday, June 06, 2006 - 06:35 PM UTC
Howdy fellas,
Interesting group of AC in your 'Duel'...I will be watching your individual progress's {should that be hyphenated?} as well as the other Duels out there.
Also interesting is the scale of two of the choices...1/32nd, kewl.
I just love the larger scales.
And as to your choice of paint scheme there Wad_ware, I think attempting that superb suit of clothes would actually be easier in the larger scale.......for your sake anyway.
Best of luck, and as newtothegame mentioned..."
can't wait to see you get to the painting steps"
Tread.
You're a better man than me, Gunga Din!
Illinois, United States
Joined: September 09, 2002
KitMaker: 537 posts
AeroScale: 437 posts
Posted: Saturday, June 10, 2006 - 04:15 AM UTC
I really got some great work done on my 109 these last few weekends here are a couple quick sloppy pics of my progress. It is getting late and dark so my lighting really sucks and can't get any good close ups yet of the cockpit yet.
I had started this kit way back in the prehistoric days. And it has been sitting in the box for about 6 to 7 months. At that time all I had done was pretty much just the cockpit and some interior stuff. And I had started a little bit on the power plant.
This is an old Matchbox kit but I went ahead and picked up the eduard PE set for the interior and exterior that goes for the Hasegawa kit. In some places the PE parts fit right on the matchbox kit really well. Other places it just didn't work. It is kind of a hybrid original/PE cockpit and I think it came out pretty good. I hope I am giving credit to the correct person and please correct me if I am wrong... but this is the first kit I tried glazing over the dials with future that Mal did a feature/tip on a ways back. That works GREAT and those dials really look like glass.
I have some seam work to do now around the wings and some of the body. There were slight fit problems but should be no real trouble to fix it. Plus I need to seriously start trying to figure out how to scratch build me a sand filter for this beast if I am wanting to get this thing airborn to clear the skys of my arch enemies Newtothegame and Bilko.
The engine is now mainly done along with other misc. parts.


Good modeling
Wayne
If the enemy is in range, .....so are you!
Moselle, France
Joined: May 15, 2005
KitMaker: 5,653 posts
AeroScale: 4,347 posts
Posted: Saturday, June 10, 2006 - 10:20 AM UTC
Hi Wayne!
Looks very good do far! I like Matchbox (three color!) kits. They remember me my early days of modeling. I once built this kit and it was my first "serious" one I remember.
Too bad I didn't kept the tropical filter of my Hasegawa 1/32 kit!
But maybe someone has the part in his spare box and can send it to you! Who knows?
The decals look pretty bad as they really show the age of the kit. I hope you don't have to use some of them!
Good luck over the desert!
Jean-Luc

Better think one hour and build five minutes...
Than think five minutes and build an hour!
Illinois, United States
Joined: September 09, 2002
KitMaker: 537 posts
AeroScale: 437 posts
Posted: Saturday, June 10, 2006 - 05:36 PM UTC
Thanks Jean-Luc,
So far this has been a very enjoyable kit to put together. When I opened the box for the first time I saw the different colored sprues and thought that was rather odd. But I am sure there must have been some reason behind it

Thanks for thinking about me even if you still don't have your extra sand filter lying around. That would be so excellect if there is somebody who might have one still sitting around in their spare parts. This gives me a chance anyway to build up on my scratch building skills which at this time are very limited

Yes, the original decal sheet if obviously really old. I have all ready got me a new set of decals for my kit so no problem there.
Quoted Text
Good luck over the desert!
That's what Newtothegame and Bilko need when I come soaring out of the sun
:-) :-)
If the enemy is in range, .....so are you!
Washington, United States
Joined: October 05, 2003
KitMaker: 588 posts
AeroScale: 468 posts
Posted: Sunday, June 11, 2006 - 02:50 AM UTC
Wayne, Other than the fact that your bird will probably have been patroling the sky for awhile by time ours (at least mine) gets up there, I'm not worried at all...

Seriously, though, your build looks great so far. The engine and tires really stand out. Nice work.
Leon
Illinois, United States
Joined: September 09, 2002
KitMaker: 537 posts
AeroScale: 437 posts
Posted: Sunday, June 11, 2006 - 07:02 AM UTC
Thanks Leon,
I am having fun with this kit. The engine is coming along really good. It is mostly done but still not quite totally happy with it. I want to 'dirty' it up a little bit and make it look more than just painted pieces of plastic
I would like some advice from the color experts. My decal sheet has some paint schemes for JG27 which this particular scheme is also from but not represented on my decal sheet. For these schemes the colors call for me to use Hellblau for the underside and sides of the plane. Sand gelb and the the black green for the spots.
The book I made my scan out of shown here for my scheme makes the main body color look like one of the lighter luftwaffe grays.
Of the two choices, luftwaffe light gray or hellblau, which is the historically correct choice?
Good modeling,
Wayne
If the enemy is in range, .....so are you!
Germany
Joined: September 07, 2005
KitMaker: 5,609 posts
AeroScale: 5,231 posts
Posted: Sunday, June 11, 2006 - 12:32 PM UTC
Quoted Text
Of the two choices, luftwaffe light gray or hellblau, which is the historically correct choice?
Hi Wayne
first a warning: There are people out there that could go into great detail on such a theme without ever touching a model :-) :-)
As for your question: Neither, when talking about standards.
The desert camo first consisted of two colours (after the european camo scheme was dropped) It is RLM 79 (a sandy light brown for above) and RLM 78 (a light bluish colour for below) Later dark green blotches were added with RLM 80.
Now here is were the fun begins. There is some dispute whether the ground crew used italian colours for a quick change to desert camo. This could have either been in Africa where LW supply would have been scarce or in the italian supply distribution centers. As you maybe know the Italians had 3 or 4 different sand yellow/brown colours (giallo mimetico I-IV IIRC) and also some underside colour.
So you have the coice: RLM 65 (re-done euro scheme with the bottom side left as it was), RLM 78 (standard) or something Italian maybe also other military colours but we get into great speculation here
HTH
cheers
Steffen
DULCE ET DECORUM EST PRO HOBBY MORI
Queensland, Australia
Joined: April 22, 2003
KitMaker: 584 posts
AeroScale: 96 posts
Posted: Sunday, June 11, 2006 - 01:34 PM UTC
Wayne
After consulting the authoratative Airfix instructions I can tell you that the JG27 colours were Humbrol 119 upper (Matt Light Earth) and 65 lower (Matt Aircraft Blue) - no need to worry about FS and RAL etc :-) They are the colours I used on my Bf 109F-4 a few years ago and it looks OK to me.
Anyway the reason I am here is to make sure that you do NOT control the skies. I have had an enjoyable day and a half of modelling out of this 3 day weekend (we won't go into the bodily harm caused in the other day and a half of torture -

I mean laying pavers)


I have not bothered with any great painting detail for the engine as it is impossible to see once the cowling is placed on. On top of the Humbrol tin are the 4 seat belts - my first time with etch buckles etc.
This is where I am at - ready to glue fuselage halves together. No pic of drybrushing of cockpit and also instrument panel - camera not getting on with me :-)
More on Thursday/Friday as I have the days off.
Brian
Illinois, United States
Joined: September 09, 2002
KitMaker: 537 posts
AeroScale: 437 posts
Posted: Monday, June 12, 2006 - 06:38 AM UTC
Thanks Steffen and Brian for the help on the colors. That really does help me a lot

Brian, your P-40 is starting to take shape and looking good.
Be awfully careful who you share these pictures with tho..
There may be enemy spies checking out for weaknesses and flaws in your aircraft
:-)

hmmmmmmmm... verrrrry interestinc
I have been trying to get some good close up shots of my cockpit too but just have had no luck getting anything worth a darn
Will keep trying tho
Good modeling,
Wayne
If the enemy is in range, .....so are you!
Washington, United States
Joined: October 05, 2003
KitMaker: 588 posts
AeroScale: 468 posts
Posted: Monday, June 12, 2006 - 09:57 PM UTC
Looks like it is coming along nicely Brian. You guys are going to be done months and months before I am. I am just about done with the changes to the cowling (hopefully will post some pics soon). Yep, that's right all of this time and just the cowling...
I hope you guys are able to get the cameras working; I would really love to see the detail work.
Hope all is well.
Leon
Washington, United States
Joined: October 05, 2003
KitMaker: 588 posts
AeroScale: 468 posts
Posted: Tuesday, June 13, 2006 - 02:06 AM UTC
OK, Finally calling the calling the cowling done. This is my first time doing a conversion, so I will probably show lots of those changes and ask for advice quite often. Anyway, here are the changes I believe I need to make (taken from the Scott Spencer article mentioned and linked in my first post)
"To build this version, you will need to remove the external carburetor scoop (it sands off easily) and the two internal intercooler scoops. Fill and re-scribe the cowl flaps into a single large flap, or use the KMC FM-2 cowling...."
Scoops Removed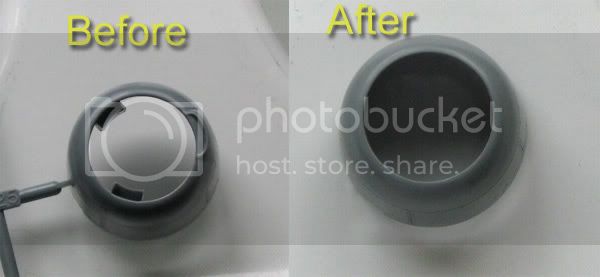 Cowl Flaps filled and new large, single one scribed
Next step...
"Remove the magnetos from the engine crankcase (they were in the rear on this version)..."
I need help with this one....Here is the kit piece...

My guess is that I need to remove what is indicated by arrows 1,4,5,&6. Is that correct? Do you think 2 & 3 stay? Thanks for any help advice.
Leon
Queensland, Australia
Joined: April 22, 2003
KitMaker: 584 posts
AeroScale: 96 posts
Posted: Tuesday, June 13, 2006 - 05:54 PM UTC
Leon
Nice neat work on the cowl. As for your second question - i.e. removing the magnetos I must confess to being blissfully ignorant of what is what under the bonnet. you will have to find a mechanical person to answer that. (As a mechanic I make a good lawyer - or is that an oxymoron)
As you are building a British machine I am assuming that you know what a bonnet is :-) - Anyway the rough translation is hood I believe
I am sort of rushing the Tomahawk a bit because I am going on holidays on Saturday for 3 weeks

but no modelling will be done
Brian
Illinois, United States
Joined: September 09, 2002
KitMaker: 537 posts
AeroScale: 437 posts
Posted: Wednesday, June 14, 2006 - 05:01 AM UTC
Nice smooth start on the Marlet Leon.
No need rush on anything since there is still a lot of time left for the duel.
It goes the same for me as it does Brian. I can't answer your question for the magnetos but I am sure there is someone here who definitely can.
I finally came up with a couple pics of my 109 cockpit that aren't too bad so I thought I'd go ahead and post them. Once I stared at the pics for a while I noticed that I havn't painted the leather pad on the bottom front of the gun sight.... easy fix. Plus I realize now that I made a mistake on color for the control panel. That should have been the same gray that I painted the rest of the interior. For some reason I made the darn thing flat black. Oh well.... that one I think is going to have to stay that way. I don't know if I have a good enough hand to try to repaint that thing since it is all ready in the body. That might be kind of tricky, but.... I may try
This old matchbox kit did not have a clear piece for the gunsight. It was black plastic so I just had to paint the sight part of it white.


If the enemy is in range, .....so are you!
Washington, United States
Joined: October 05, 2003
KitMaker: 588 posts
AeroScale: 468 posts
Posted: Thursday, June 15, 2006 - 06:37 AM UTC
Thanks guys. I appreciate the comments. I think I got it figures out, or atleast have decided to plow forward and possibly be 'mostly correct.'
Wayne, the cockpit looks great. Personally I wouldn't touch the ip; I think you are correct and trying to fix it would cause problems. It looks like the combo of the eduard set and the kit cockpit gives some nice details. and the future 'glass' on the dials looks good.
Hope all is well with both of you.
Leon
Illinois, United States
Joined: September 09, 2002
KitMaker: 537 posts
AeroScale: 437 posts
Posted: Monday, July 03, 2006 - 07:44 AM UTC
I have a small progress update but nothing that warrants any more pics yet
I have all the main body together and am getting real close to at least putting on my first base coat. But first I still have to see about making me a sand filter.
I had to do a lot of seam filling on this old Matchbox kit. I don't know if the original fit wasn't that good, or if the pieces had just kind of lost their shape for sitting in the box for so many years before I bought it, or some of both
All the cowl pieces did not fit on the plane very well at all without a lot of gaps. I was hoping to be able to leave the front cowling unglued so the engine could be viewed. Things just did not look good at all so I had to glue all the pieces on and fill the gaps. So all that work I did on the engine and guns was really a waste of time. At least I know what they look like in there. I think I have all that looking pretty good now tho
Once I make my attempt at the sand filter I'll take a pic or two and see what everyone thinks on how it looks for scale and mainly if it looks like a darn sand filter :-)
Good modeling
Wayne
If the enemy is in range, .....so are you!
Washington, United States
Joined: October 05, 2003
KitMaker: 588 posts
AeroScale: 468 posts
Posted: Thursday, July 06, 2006 - 07:08 AM UTC
Sounds good Wayne. Too bad about having to hide the engine...oh well. I have very little progress to report too - I have the engine done, but that is it. Maybe I'll try to get a picture or two just to show something
.
Well, I hope all is well, and I look forward to the sand filter.
Leon
Illinois, United States
Joined: September 09, 2002
KitMaker: 537 posts
AeroScale: 437 posts
Posted: Thursday, July 06, 2006 - 08:37 AM UTC
Here is my attempt at a sand filter. I think it came out fairly well and is a reasonable facsimile of one. If one gets down to rivet counting and exact scale measurements I am sure it probably isn't 'correct'. It sticks out like a sore thumb obviously since it is white and the rest of the model is different colors. Once it is painted up I think it should look pretty good.

If the enemy is in range, .....so are you!
Illinois, United States
Joined: February 01, 2006
KitMaker: 853 posts
AeroScale: 137 posts
Posted: Thursday, July 06, 2006 - 08:54 AM UTC
@#$^& the rivet counters
Your sand filter looks good to me. I love the camo scheme you chose. Can't wait to see the finished product.
Si Vis Pacem, Parabellum - If you want peace, Prepare for war.
Democracy - two wolves and a sheep voting on what to have for lunch.
Liberty - two wolves and a sheep with an assault rifle.