Air Campaigns
Want to start or join a group build? This is where to start.
P51 campaign proposal for 2010
mykroft
_VISITCOMMUNITY
Ontario, Canada
Joined: November 14, 2009
KitMaker: 270 posts
AeroScale: 264 posts
Posted: Thursday, December 23, 2010 - 04:34 AM UTC

Quoted Text

Hey Adam, I use Gunze H58 Interior Green acrylic, maybe you can source that somewhere close by and give it a try, otherwise Tamiya XF5 Flat Green mixed with a bit of yellow to get the desired tone does the job for me.

Cheers, D


Thanks, I'll give that mix a shot as I haven't been able to fund Gunze locally.
lampie
#029
_VISITCOMMUNITY
England - East Midlands, United Kingdom
Joined: December 23, 2005
KitMaker: 6,249 posts
AeroScale: 3,270 posts
Posted: Thursday, December 23, 2010 - 05:08 AM UTC
Well, I got the white bands on the horizontal stabilisers done and the black bands on the wings sprayed easily enough, Miracle Masks are winging their way in my direction and should be here anytime, so just the checkerboard around the cowling to paint.. that shouldn't be too hard...........should it????


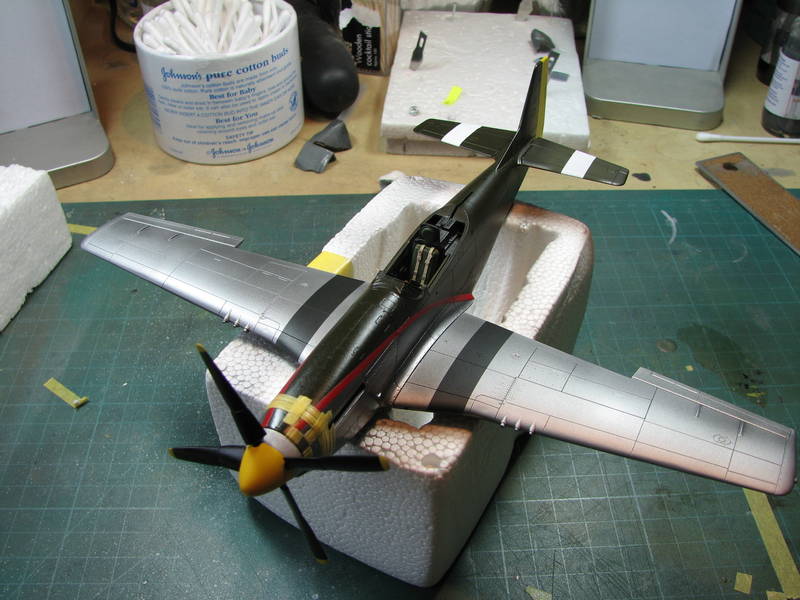
Somedays, I begin to doubt my already slender grasp on sanity even more,, I must be off my head attempting this, but decals just wouldn't look right...

First thing that jumps out is that the "squares" on the checkerboad cowlings aren't really squares at all, so each mask is going to have to be cut individually.
Modelling being what it is, we always seem to strive for straight edges on checkerboards and invasion stripes etc. In actual service, the painting was very different.
Check out the variation on these two 55thFG Mustangs cowlings....


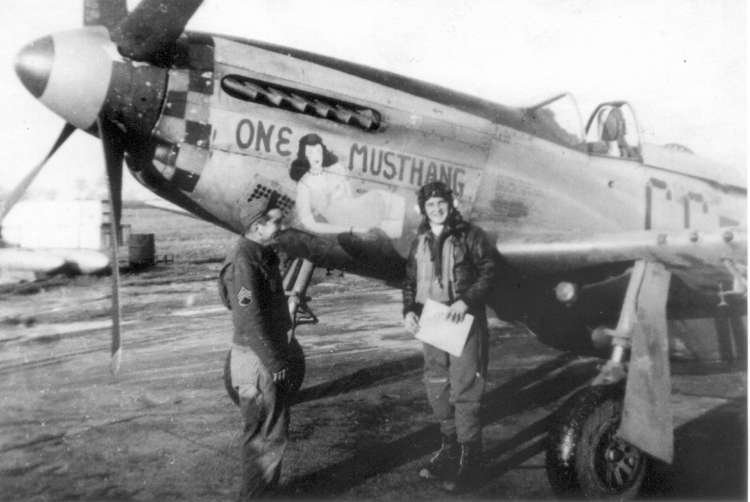
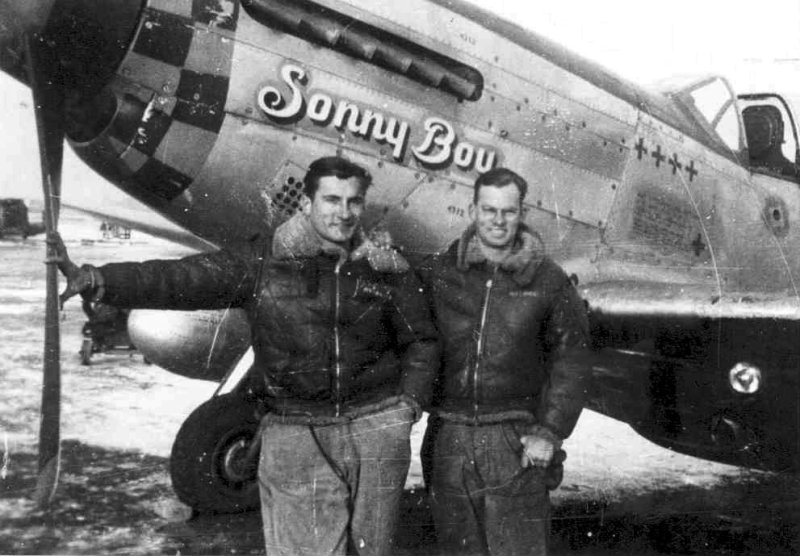
Makes you feel a bit better knowing you haven't got to strive for that perfect checkerboard, especially as it ain't going happen no matter how hard you try.

So, after a couple of days messing around with Tamiya tape and being very close to giving up on painting the cowling and using the decals I think I've found the best way ( for me) to nail this.
First I traced the decal


Then marked out the edges of the "squares". Using thin strips of tape I cut a piece which, going from top to bottom on the photo, covers 2 squares. After checking it was the right length I then cut it in half leaving the "green" part of checkerboard exposed.
I did this for 3 or 4 "squares" to see how it was going to work out.


I reckon thats going to do the trick, so off with the temporary masking and on goes the yellow base coat.


The next few sessions at the bench are going see much more cutting of Tamiya tape and general cursing, but fingers crossed it'll turn out ok in the end. So far so good anyway.

Right,, My brain hurts......I'm off down the pub..have a good Christmas everyone

Nige
AussieReg
Staff MemberAssociate Editor
AUTOMODELER
#007
_VISITCOMMUNITY
Victoria, Australia
Joined: June 09, 2009
KitMaker: 8,156 posts
AeroScale: 3,756 posts
Posted: Thursday, December 23, 2010 - 10:49 AM UTC
Yet another great tutorial from Nigel "Now My Brain Hurts" Julian !

Excellent work mate, I'm sure you have saved a few of us some headaches on future builds.

Enjoy the pub, and Merry Christmas all you Stang-o-philes !

Cheers, D
Keeperofsouls2099
_VISITCOMMUNITY
Florida, United States
Joined: January 14, 2009
KitMaker: 2,798 posts
AeroScale: 2,443 posts
Posted: Thursday, December 23, 2010 - 03:08 PM UTC
Nige excellent work as always
md72
#439
_VISITCOMMUNITY
Washington, United States
Joined: November 05, 2005
KitMaker: 4,950 posts
AeroScale: 3,192 posts
Posted: Friday, December 24, 2010 - 06:16 PM UTC
Progress of sorts, happy enough with the seams, I've moved onto primer.


It'll be a day or two before I can handle it. Takes the primer aove 2 days to cure. I did notice that my home made holding jiog cracke the glue joint on the wing so I'm taking 2 steps forward, and one step back.
lampie
#029
_VISITCOMMUNITY
England - East Midlands, United Kingdom
Joined: December 23, 2005
KitMaker: 6,249 posts
AeroScale: 3,270 posts
Posted: Saturday, December 25, 2010 - 10:54 PM UTC
Part 2 of "Now my brain hurts"....
4 hours of masking, followed by about 2 minutes of spraying, but the checkerboard and prop are finished.
It wasn't easy, but the results more than justify taking the time to paint this area rather than using the decals and then attempting to match the green of the prop decal with a custom mix.( The colour for the prop green is only available from Taimya as a spray can,,,thanks Mr Tamiya )
Would I do it again?,,,probably,,but not for a while


The Mustangs looking really colourful now. I can feel the urge to build the staff car that came with it coming on!


Next job, national insignia and squadron markings using the Miracle Masks that Santa Mal dropped down the chimney on Christmas Eve

Nige
AussieReg
Staff MemberAssociate Editor
AUTOMODELER
#007
_VISITCOMMUNITY
Victoria, Australia
Joined: June 09, 2009
KitMaker: 8,156 posts
AeroScale: 3,756 posts
Posted: Sunday, December 26, 2010 - 08:15 AM UTC
Excellent work Nige, definitely worth the effort to get that result !!

Now sit back with a cold frothie and just look at it from all angles for a while and that headache will magically fade away.

Cheers, D
lampie
#029
_VISITCOMMUNITY
England - East Midlands, United Kingdom
Joined: December 23, 2005
KitMaker: 6,249 posts
AeroScale: 3,270 posts
Posted: Sunday, December 26, 2010 - 08:38 AM UTC
Cheers D,
It wasn't a long headache by any standards, but it lasted longer that Australia's first innings in the 4th test.......
I'll err,,,,,,,,,,,,,,,,,,,,,,,,,,,,,,,,,,,,get me coat
Nige
AussieReg
Staff MemberAssociate Editor
AUTOMODELER
#007
_VISITCOMMUNITY
Victoria, Australia
Joined: June 09, 2009
KitMaker: 8,156 posts
AeroScale: 3,756 posts
Posted: Sunday, December 26, 2010 - 09:56 PM UTC
Update time. As expected all of the work required to make the wings fit, and give them some dihedral, has resulted in more issues downstream. The horizontal tailplane is now 5mm too short between the tails.

I added a couple of shims of various thickness to each end to make it slightly over-length.

Then I sanded a slight "scallop" into each end to fit the curve of the tails and glued it in place.

And so basic assembly is complete and (barely) acceptable.

So now I embark on the filling, sanding, puttying, sanding, priming, sanding, swearing, puttying, sanding etc, etc

Cheers, D

P.S. Nige, don't expect any more compliments or encouragement from me if THAT is the thanks I'm gunna get !!
mtnflyer
_VISITCOMMUNITY
Alberta, Canada
Joined: March 08, 2009
KitMaker: 394 posts
AeroScale: 360 posts
Posted: Monday, December 27, 2010 - 04:16 AM UTC
Splendid job Damian. Like you say, There's some filling and sanding to do, but, if you attack it on New Years Eve you'll stay out of trouble.

Mine has a little more paint on it from yesterday.


I'm always way to heavy with application, and need to lighten up a bit. There's only two colors left to do; the blue rudder and the sky fuse band. Then I'll have to learn how to weather, as I'm looking for a well beat-up plane.

Nigel - I'm really liking your paint. Great Job!
SGTJKJ
#041
_VISITCOMMUNITY
Kobenhavn, Denmark
Joined: July 20, 2006
KitMaker: 10,069 posts
AeroScale: 3,788 posts
Posted: Wednesday, December 29, 2010 - 10:11 PM UTC
Nice double Mustang, Damian. Looks nice despite all the issues you had with the kit. Will this be the nightfighter version with the radar dome?

Great job on the masking as always, Nige. It really creates a nice result. I admire your patience!

Nice job so far, Guy. Looking forward to see more.
Keeperofsouls2099
_VISITCOMMUNITY
Florida, United States
Joined: January 14, 2009
KitMaker: 2,798 posts
AeroScale: 2,443 posts
Posted: Thursday, December 30, 2010 - 01:39 PM UTC
amazing work guys!
@D man you got guts taking that thing on mine would have seen lighter fluid by now
@Nige your paint work inspires me as always

@mtnflyer great camo job crisp lines
mykroft
_VISITCOMMUNITY
Ontario, Canada
Joined: November 14, 2009
KitMaker: 270 posts
AeroScale: 264 posts
Posted: Saturday, January 01, 2011 - 06:46 AM UTC


And it's ready for paint. One mistake though, wasn't paying enough attention and used the wrong exhausts. And that's why I prefer exhausts which can be installed late in the build.
thegirl
_VISITCOMMUNITY
Alberta, Canada
Joined: January 19, 2008
KitMaker: 6,743 posts
AeroScale: 6,151 posts
Posted: Monday, January 03, 2011 - 04:55 AM UTC
You guy's are just giving her on your projects !

Mark , nice to see you make it this far in the build , looking forward to she her with some paint tossed on . Any planes on which markings you are going with ?

Nigel , always impressed with the masking you do . Checkers turn out super !

For a project which has hit you hard Damian , you are doing a fantastic job on getting her together .

Guy , camo looks great ! In time you will get a feel of the airbrush on how to mist your cote's

Looking good so far Adam . Are you changing the markings now that different exhaust is in place ?


A reminder , we only have a few weeks left to go until the closing date .

lampie
#029
_VISITCOMMUNITY
England - East Midlands, United Kingdom
Joined: December 23, 2005
KitMaker: 6,249 posts
AeroScale: 3,270 posts
Posted: Monday, January 03, 2011 - 10:36 AM UTC
Keep battling away at the F-82 fella its looking the business!
You've got a lot more patience than I have forsure

Great job on the camo masking Guy, and looking forward to seeing some paint on yours Adam.

I managed to get the last of the markings painted on tonight. Just a couple of bits of OD to touch up,( been waiting until everything was painted before doing this), and it'll be time for the handfull of decals and it'll be heading for the home stretch.


Nige
Bigrip74
_VISITCOMMUNITY
Texas, United States
Joined: February 22, 2008
KitMaker: 5,026 posts
AeroScale: 2,811 posts
Posted: Monday, January 03, 2011 - 10:59 AM UTC
@ Guy: DITTO what Nige said.

@ Nige your build is looking nice and I like the stand, I guess that I will save the foam packing from now on.

Bob
md72
#439
_VISITCOMMUNITY
Washington, United States
Joined: November 05, 2005
KitMaker: 4,950 posts
AeroScale: 3,192 posts
Posted: Monday, January 03, 2011 - 04:14 PM UTC
Thanks Terri, I'm planning on Maj. Bud Anderson's Old Crow (III) overall NMF with OD nose.

I'm planning on using Floquil's Old silver for the main finish. Does anyone know if I have to use Floquil's airbrush thinner or can I use plain old Testors airbrush thinner on this stuff??
mykroft
_VISITCOMMUNITY
Ontario, Canada
Joined: November 14, 2009
KitMaker: 270 posts
AeroScale: 264 posts
Posted: Tuesday, January 04, 2011 - 03:15 AM UTC
@Terri: No, the exhausts are incorrect for all the marking options I've got so I'm just going to have to live with it.

I've got most of the paint laid now, just need to mask & paint the exhausts and put a coat of Future down so I can start decalling.


Naseby
_VISITCOMMUNITY
Slovakia
Joined: October 15, 2010
KitMaker: 825 posts
AeroScale: 476 posts
Posted: Tuesday, January 04, 2011 - 07:00 PM UTC
Nigel and Adam, looking forward to see your Mustangs when finished. I was looking into the gallery of this campaign and I have to say there were a LOT of great model buit in this campaign. And it isnt over yet!
mykroft
_VISITCOMMUNITY
Ontario, Canada
Joined: November 14, 2009
KitMaker: 270 posts
AeroScale: 264 posts
Posted: Wednesday, January 05, 2011 - 10:52 AM UTC
And we're done.


This is my first campaign and I'm pretty glad to be done. The build went well aside from one little oops on my part. I'm surprised how well the Hasegawa decales went on, I've had lots of issues in the past with their older sheets and this kit dated back to the early '90's.
Red4
_VISITCOMMUNITY
California, United States
Joined: April 01, 2002
KitMaker: 4,287 posts
AeroScale: 1,164 posts
Posted: Thursday, January 06, 2011 - 12:34 AM UTC
I'm coming late to the party, but I'm here. I started off with the ICM P-51B/C...which ended up in the scrap heap. Twisted fuselage, warped wing etc. Nothing to save accept the smaller pieces...Sooooo, I switched gears and went with Monograms old standby in 1/72 scale. Will get some pics posted a little later this morning. This one is going to be bare bones, wheels up so I can hang it from my ceiling with my fledgling air force. Considering all I had for a cockpit was a peg to slide the seat onto, I think I made the right call. And...I don't have a lot of time left to build a new cockpit. Back soon. "Q"
Red4
_VISITCOMMUNITY
California, United States
Joined: April 01, 2002
KitMaker: 4,287 posts
AeroScale: 1,164 posts
Posted: Thursday, January 06, 2011 - 04:44 AM UTC
Here's where I stand. Fuselage and wings assembled last night. Gear doors glue in place. I need to fill all the edges around them with putty and sand smooth. Will be adding the horizontal stabs today and getting the rest of it ready for paint. I plan on using some decals I bought from Squadron for .50 cents awhile back, albeit they are for a "D" model Mustang. There are a couple of colorful birds on the sheet. More to follow soon. Thanks,
"Q"


Bigrip74
_VISITCOMMUNITY
Texas, United States
Joined: February 22, 2008
KitMaker: 5,026 posts
AeroScale: 2,811 posts
Posted: Thursday, January 06, 2011 - 09:10 AM UTC
Mat, you were robbed, I only paid .10 for mine from Squadron along with some other goodies.

Bob
md72
#439
_VISITCOMMUNITY
Washington, United States
Joined: November 05, 2005
KitMaker: 4,950 posts
AeroScale: 3,192 posts
Posted: Thursday, January 06, 2011 - 09:40 AM UTC
I panicked and ran as far away from that kit as I could years ago. Good luck with it…
Red4
_VISITCOMMUNITY
California, United States
Joined: April 01, 2002
KitMaker: 4,287 posts
AeroScale: 1,164 posts
Posted: Thursday, January 06, 2011 - 11:18 AM UTC

Quoted Text

Mat, you were robbed, I only paid .10 for mine from Squadron along with some other goodies. Bob

Maybe it was a dime. I know I bought 10 sets of them though. It's been awhile since I bought them ..so I forget...old age you know.. lol

Quoted Text

I panicked and ran as far away from that kit as I could years ago. Good luck with it…

Nah..piece of cake. Just takes a little love and lots of sand paper. It definitely won't be a contest goer, but will hang from my ceiling. Thanks for the well wishes/luck. "Q"