P51 campaign proposal for 2010
California, United States
Joined: April 01, 2002
KitMaker: 4,287 posts
AeroScale: 1,164 posts
Posted: Friday, January 07, 2011 - 09:36 AM UTC
"Don't fear the night, fear what hunts at night"

#439
Washington, United States
Joined: November 05, 2005
KitMaker: 4,950 posts
AeroScale: 3,192 posts
Posted: Friday, January 07, 2011 - 09:42 AM UTC
Painting the inside of the canopy black is a great idea for kits like this one. IIRC, the 'cockpit' was a pair of pegs you glued the pilot's butt to.

One of the reasons I got rid of this one...
Hanger Queens in Waiting:
Monogram 1/72 F8F-1
Corsair the Sky Pirate - 1/72 Ace A-7D
Century Series - Airfix 1/72 F-105G
Anti Shipping - Academy 1/72 PBJ-1D
Academy 1/72 F-84E
California, United States
Joined: April 01, 2002
KitMaker: 4,287 posts
AeroScale: 1,164 posts
Posted: Friday, January 07, 2011 - 09:55 AM UTC
There is just a peg to mount the seat to and that's it. I have/had several kits that are along the same lines with minimal interior details. I figure with it hanging from the ceiling, there won't be much chance to really critique it. lol..

All the other featureless interior kits I got will meet the same fate.

"Q"
"Don't fear the night, fear what hunts at night"
Texas, United States
Joined: February 22, 2008
KitMaker: 5,026 posts
AeroScale: 2,811 posts
Posted: Friday, January 07, 2011 - 11:46 AM UTC
Matt, how much putty did it take to fill in the gear doors?
Bob
If it aint broke dont fix it.
#439
Washington, United States
Joined: November 05, 2005
KitMaker: 4,950 posts
AeroScale: 3,192 posts
Posted: Friday, January 07, 2011 - 04:03 PM UTC
It isn't all lost yet:
Primer is on, cockpit is painted, just have to get the silver on..

Hanger Queens in Waiting:
Monogram 1/72 F8F-1
Corsair the Sky Pirate - 1/72 Ace A-7D
Century Series - Airfix 1/72 F-105G
Anti Shipping - Academy 1/72 PBJ-1D
Academy 1/72 F-84E
California, United States
Joined: April 01, 2002
KitMaker: 4,287 posts
AeroScale: 1,164 posts
Posted: Friday, January 07, 2011 - 05:37 PM UTC
Quoted Text
Matt, how much putty did it take to fill in the gear doors? Bob
Hi Bob. Not much at all. It did take three applications as I kept finding low spots, but the Tamiya basic putty dries pretty quick so things moved along well. I finished masking the canopy in preparation for painting soon. Should be able to do that tomorrow. Thanks again for the question. "Q"
"Don't fear the night, fear what hunts at night"
Removed by original poster on 01/08/11 - 11:23:59 (GMT).
England - North East, United Kingdom
Joined: May 22, 2008
KitMaker: 649 posts
AeroScale: 434 posts
Posted: Friday, January 07, 2011 - 11:26 PM UTC
Alberta, Canada
Joined: January 19, 2008
KitMaker: 6,743 posts
AeroScale: 6,151 posts
Posted: Saturday, January 08, 2011 - 03:19 PM UTC
Cool a late comer !
I look forward to your take on the old Monogram kit , Matthew
nice to see that you haven't toss in the towel Mark , looking good so far

Mike , which detail set are you using ? Nice progress so far by the way
AussieReg
 Associate Editor
#007
Victoria, Australia
Joined: June 09, 2009
KitMaker: 8,156 posts
AeroScale: 3,756 posts
Posted: Saturday, January 08, 2011 - 10:39 PM UTC
Ok guys, this F-82 is taking waaaaaaaay too much time, a lot more than it deserves, so I have made an executive decision to speed things up.
There will be no stores or drop tanks, and the undercarriage will be up. I spent another couple of hours today filling and sanding, and I think by the end of tomorrow night I might even be ready to put some black undercoat on it !!
I had a play with the canopy today, in scale terms it is about 12 inches thick and guess what ? The fit is shocking. What a surprize !!
I have had a stern word with the decals, and if they even hint at misbehaving they will be cremated with no hesitation and some "What-If" decals from the spares library will be glad to replace them.
Wish me luck, I think I'm gunna need it !!

ON the bench
Revell 1/24 '53 Corvette (building as '54)
Revell 1/24 BMW 507 Coupe and Cabrio
Italeri 1/48 Me262 B-1a/U1 Nightfighter
Monogram 1/24 '57 Chevy Nomad
Dragon 1/350 USS Frank Knox DD-742
Queensland, Australia
Joined: November 06, 2008
KitMaker: 363 posts
AeroScale: 51 posts
Posted: Sunday, January 09, 2011 - 12:41 AM UTC
Hi everyone. I feel that I must extend my apologies to everyone here because it seems that I won't be able to submit anything for this campeign before the due date. University, the weather (it's been raining here almost constantly for the past month) and being side-tracked by other interests all seem to have contributed to this, but I'm also finding it hard to get back into the hobby as I am starting from scratch and I don't have too much money to play with.
Hopefully I'll be able to get something at least started within the next month, but it won't be in time for this campaign I don't think.
New Hampshire, United States
Joined: November 09, 2008
KitMaker: 615 posts
AeroScale: 459 posts
Posted: Sunday, January 09, 2011 - 02:40 AM UTC
P-61 Black Widows, the Group Build
Veni, Vidi, Velcro; I came, I saw, I stuck around
England - North East, United Kingdom
Joined: May 22, 2008
KitMaker: 649 posts
AeroScale: 434 posts
Posted: Sunday, January 09, 2011 - 04:23 AM UTC
Hi
Thanks Terri, the detail set is the Eduard colour Zoom etch. I used colour Zoom etch on my recent HEIII build and was impressed with it, so I thought I'd give it a go on a couple of fighters. I'm doing a RAF Thunderbolt Mk II with coloud Zoom etch at the moment as well.
thanks
Mike
California, United States
Joined: April 01, 2002
KitMaker: 4,287 posts
AeroScale: 1,164 posts
Posted: Sunday, January 09, 2011 - 11:23 AM UTC
"Don't fear the night, fear what hunts at night"
Texas, United States
Joined: February 22, 2008
KitMaker: 5,026 posts
AeroScale: 2,811 posts
Posted: Sunday, January 09, 2011 - 12:01 PM UTC
@ Matt: that isjust waaaaaaaaaaay! too pretty for a 1/72 speed build bird.
@ Damain: how about a truthful review for everyone to really know the virtures of this kit ( and name the maker )

Bob
If it aint broke dont fix it.
California, United States
Joined: April 01, 2002
KitMaker: 4,287 posts
AeroScale: 1,164 posts
Posted: Sunday, January 09, 2011 - 12:11 PM UTC
"Don't fear the night, fear what hunts at night"
Ontario, Canada
Joined: November 14, 2009
KitMaker: 270 posts
AeroScale: 264 posts
Posted: Sunday, January 09, 2011 - 01:20 PM UTC
California, United States
Joined: April 01, 2002
KitMaker: 4,287 posts
AeroScale: 1,164 posts
Posted: Sunday, January 09, 2011 - 01:44 PM UTC
Thanks Adam, much appreciated. "Q"
"Don't fear the night, fear what hunts at night"
#439
Washington, United States
Joined: November 05, 2005
KitMaker: 4,950 posts
AeroScale: 3,192 posts
Posted: Sunday, January 09, 2011 - 03:31 PM UTC
Matt, Looks really good. It's amazing what can be done with a lot of care and patience one these old kits.
Hanger Queens in Waiting:
Monogram 1/72 F8F-1
Corsair the Sky Pirate - 1/72 Ace A-7D
Century Series - Airfix 1/72 F-105G
Anti Shipping - Academy 1/72 PBJ-1D
Academy 1/72 F-84E
South Australia, Australia
Joined: August 14, 2007
KitMaker: 5,926 posts
AeroScale: 2,201 posts
Posted: Sunday, January 09, 2011 - 07:58 PM UTC
That ceiling must be getting full by now Q...
You may be right, I may be crazy.
AussieReg
Associate Editor #007
Victoria, Australia
Joined: June 09, 2009
KitMaker: 8,156 posts
AeroScale: 3,756 posts
Posted: Tuesday, January 11, 2011 - 10:03 PM UTC
Ok guys, I got to the point of near enough is good enough on this build, so today it got PAINT !! Don't get too excited, it's primer at this stage, but it's a major step forward since we only have a couple of weeks to go.
Here's how I mask the inside of my canopies, and it gives something to hold them as well, old business cards and blue-tac . . . .

Here are a couple of views waiting for the airbrush to get loaded up . . .
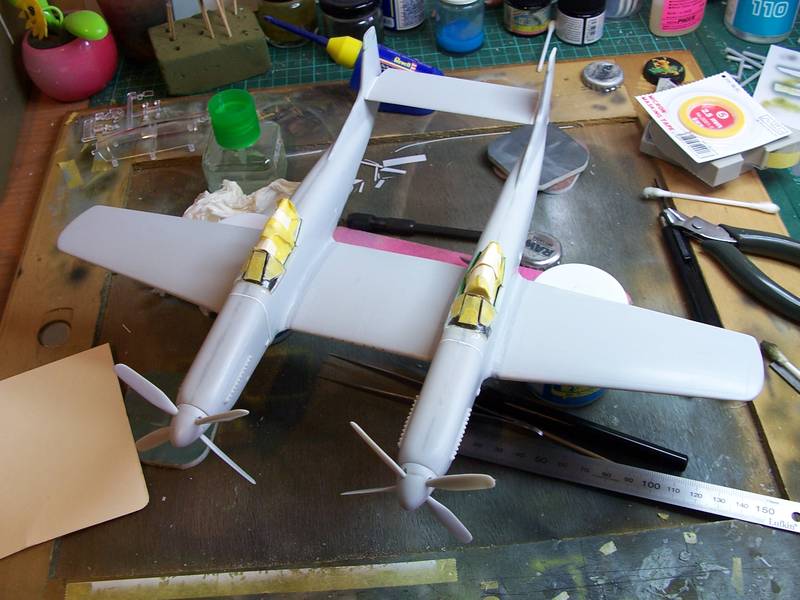
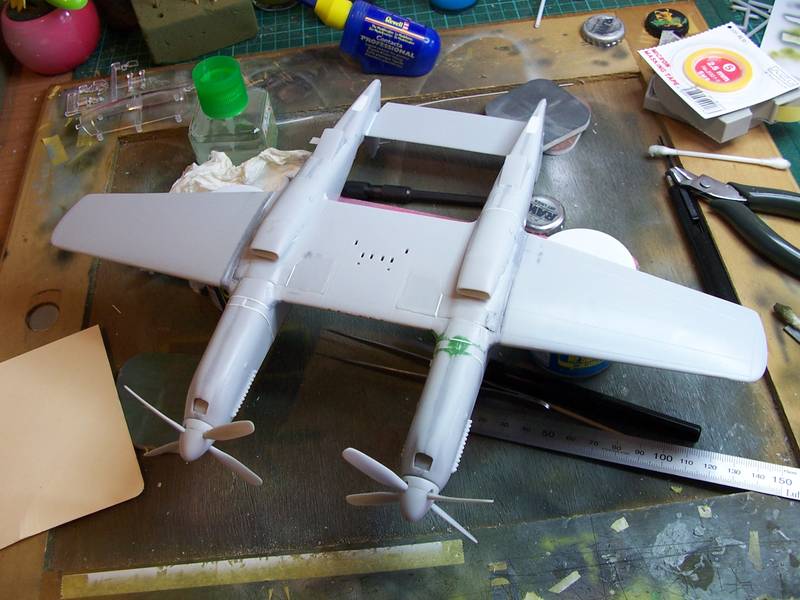
And here it is as it stands tonight . . . . .
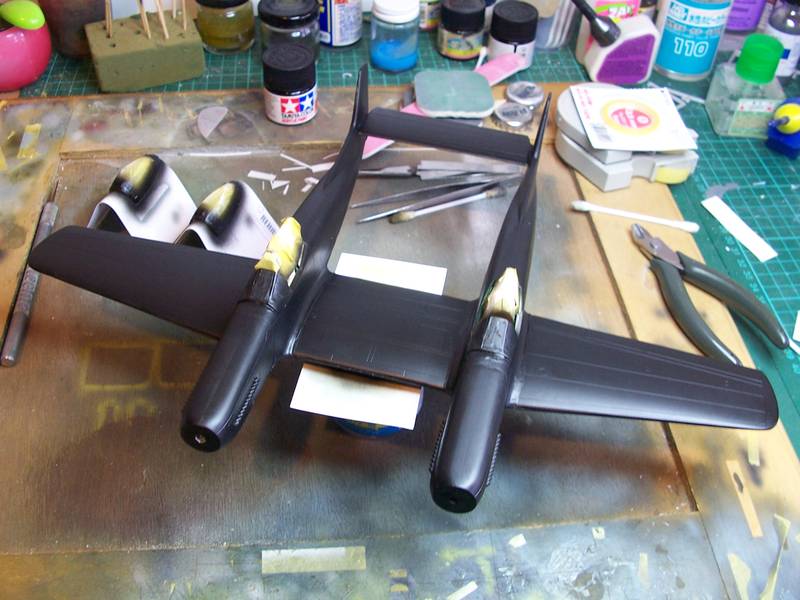

Please don't look too closely, there's a bucketload of points where the Alclad is going to yell at me, but I just don't have the time or the inclination to go any further with this one.
Tomorrow will see Reg's very first "Alclad Adventure", who knows how that episode will end ??
Cheers, D
ON the bench
Revell 1/24 '53 Corvette (building as '54)
Revell 1/24 BMW 507 Coupe and Cabrio
Italeri 1/48 Me262 B-1a/U1 Nightfighter
Monogram 1/24 '57 Chevy Nomad
Dragon 1/350 USS Frank Knox DD-742
Slovakia
Joined: October 15, 2010
KitMaker: 825 posts
AeroScale: 476 posts
Posted: Wednesday, January 12, 2011 - 12:13 AM UTC
Damian you made it! Wish I had your power and will. Seems like it was worth it, the twins look great.
New Hampshire, United States
Joined: November 09, 2008
KitMaker: 615 posts
AeroScale: 459 posts
Posted: Wednesday, January 12, 2011 - 12:45 AM UTC
D, that thing looks great in the pictures

I think you have done a tremendous job on it. My hat's off to you

P-61 Black Widows, the Group Build
Veni, Vidi, Velcro; I came, I saw, I stuck around
California, United States
Joined: April 01, 2002
KitMaker: 4,287 posts
AeroScale: 1,164 posts
Posted: Wednesday, January 12, 2011 - 12:48 AM UTC
Looking good Damian. When I am working on something that I know isn't going to be my best work, whether it is due to the kit, or something I just don't feel like dealing with....I keep this phrase in mind.."Finished is better than perfect". Looking forward to seeing your Twin-Stang finished. Keep at it.
"Q"
"Don't fear the night, fear what hunts at night"
#029
England - East Midlands, United Kingdom
Joined: December 23, 2005
KitMaker: 6,249 posts
AeroScale: 3,270 posts
Posted: Wednesday, January 12, 2011 - 12:49 AM UTC
D that is looking the business, despite the hard time your giving yourself over it, I reckon you'll get a great sense of satisfaction when you finally beat it into submission.
Ok, I'm done with my entry,
This is the 1:48th Tamiya "staff car" boxing built straight out of the box with the only addition being some Eduard seat belts.
Red band, checkerboard nose, prop band all painted on.
National markings and squadron code letters painted on using Miracle Masks supplied by Mal (Holdfast)
Only decals are the noseart/horses on the rudder/kill markings/stencils.


 GREAT
GREAT campaign Terri!
Lets do it again soon
SPAM CANS In Heaven II
Nige

It's not the same, better, but not the same...