KotS GB 2011 Albatros D.Va wing_nut
New Jersey, United States
Joined: June 02, 2006
KitMaker: 1,212 posts
AeroScale: 468 posts
Posted: Saturday, April 30, 2011 - 10:37 AM UTC
England - South East, United Kingdom
Joined: November 06, 2005
KitMaker: 1,667 posts
AeroScale: 1,551 posts
Posted: Saturday, April 30, 2011 - 11:27 AM UTC
Marc,
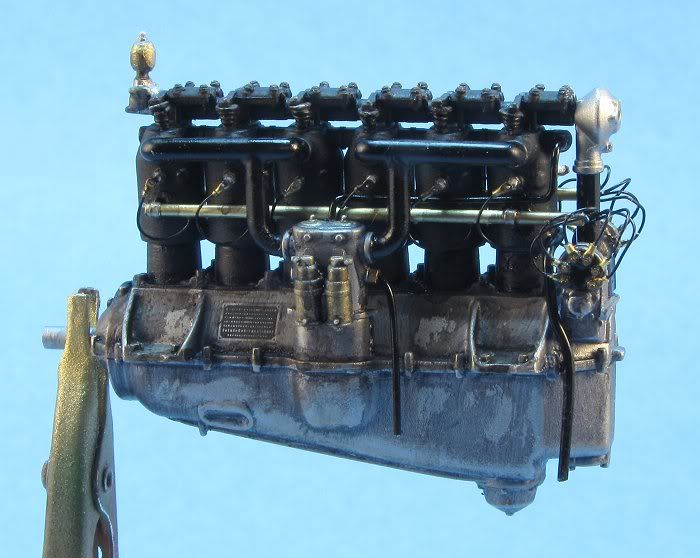
that is looking really nice and grimy, I love those plugs and leads... just one tiny point *float chambers* are downside up.
Still can't cure the AMS even with sausage finger implants & olde eyes.
Alberta, Canada
Joined: July 26, 2010
KitMaker: 1,032 posts
AeroScale: 1,025 posts
Posted: Saturday, April 30, 2011 - 04:08 PM UTC
Quoted Text
Marc,
that is looking really nice and grimy, I love those plugs and leads... just one tiny point *float chambers* are downside up.
Marc,
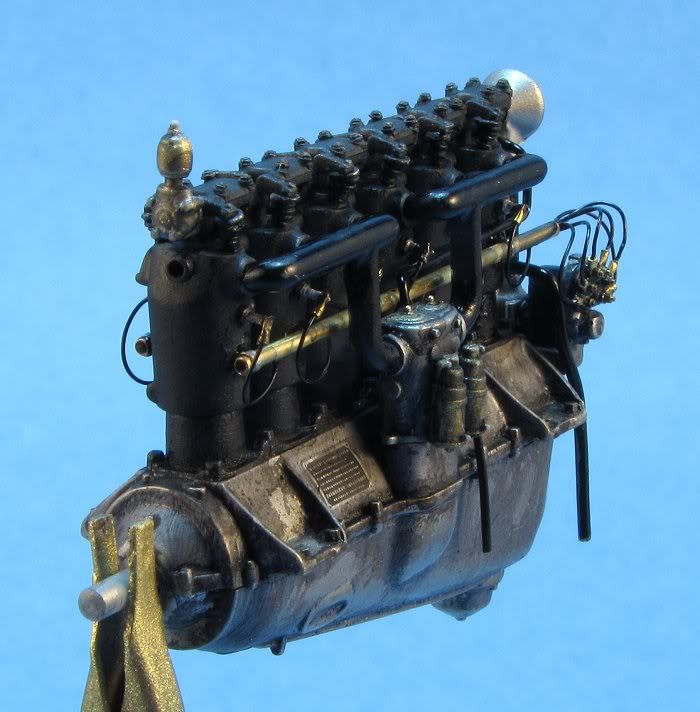
Must comment on your engine; simply the best blend of detail and some dirtied up realism I've yet seen. It is, in a word, superb. I asked you earlier about the plugs. How or where did you get the leads, both at the plug and Mag end? The plug leads and nuts/bolts on the other end are perfect, how did you do it!?
By the way, I had the same comment entered on mine; those bloody Float Chambers really want to be upside down. Hope you weren't distracted by my earlier buffoonery in mounting them inverted but it's a really easy fix.
Looking forward to more, very nice build!!
Cheers,
Lance
cHEERS,
Officially Retired as of 20 August 2013 and looking forward to some un-interrupted bench time. Currently starting Roden's Nieuport 28 and hoping to follow that with another WNW Fokker DVII.
New Jersey, United States
Joined: June 02, 2006
KitMaker: 1,212 posts
AeroScale: 468 posts
Posted: Sunday, May 01, 2011 - 04:13 AM UTC
Keith, Lance... thanks so much for the comments.
Keith, thanks for pointing that out. All taken care of. And Lance you are right, it does just seem to want to go that way

But you are wrong about it being an easy fix. You forgot to tell me that when it gets pried off it goes flying past your head, followed by the large BURP of the carpet monster. I had to hand vac 1/2 the room and go through a mountain of dog hair and other carpet crap but i did manage to get the CM to cough up the part. The taking off and gluing back part did only take a few seconds though.

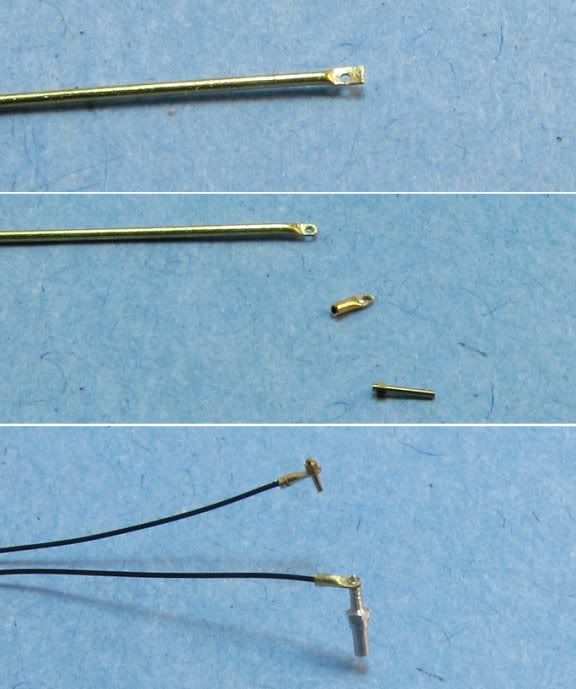
The connectors are made from 0.5 mm brass tube. Flatten one end. Mark and drill for a hole. Sometimes you actually get it centered

#80 works but heck if I can find it so this was #79. I use a sanding stick to round it off around the hole. For the magneto end I glued in a Scale Hardware 0.5mm bolt head w/stud then trimmed the length for the hole drilled in the mag.
Alberta, Canada
Joined: July 26, 2010
KitMaker: 1,032 posts
AeroScale: 1,025 posts
Posted: Sunday, May 01, 2011 - 03:34 PM UTC
Marc,
Thanks for sharing the technique, definitely one I'll use, and soon.
As for the quick fix on the float chambers, I didn't tell you the whole story!! (sounds much the same as yours) This place is no stranger to the dreaded CM, and let me tell you about dog hair!
Still can't forget dropping the completed control stick, pushing back my chair to look for it, and hearing the faintest "click"as I stepped on it and completely destroyed the kit hand grip complete with scratch gun triggers.
All this to say," what could possibly go wrong - go wrong - go wrong?"
Still, beautiful work all round, keep those updates coming.
Cheers,
Lance
Officially Retired as of 20 August 2013 and looking forward to some un-interrupted bench time. Currently starting Roden's Nieuport 28 and hoping to follow that with another WNW Fokker DVII.
New Jersey, United States
Joined: June 02, 2006
KitMaker: 1,212 posts
AeroScale: 468 posts
Posted: Monday, May 02, 2011 - 12:28 PM UTC
Lance I wish i could say I have no idea what you're talking about. When I drop things, which is often, I do some wild gyrations in my chair trying to get low enough to see the floor but not move the chair or my feet until I know they are clear. A hidden camera would likely get something that would be You Tube worthy.
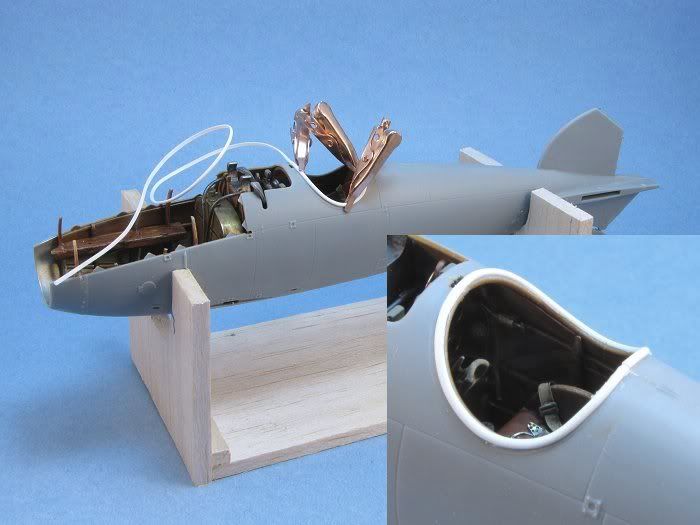
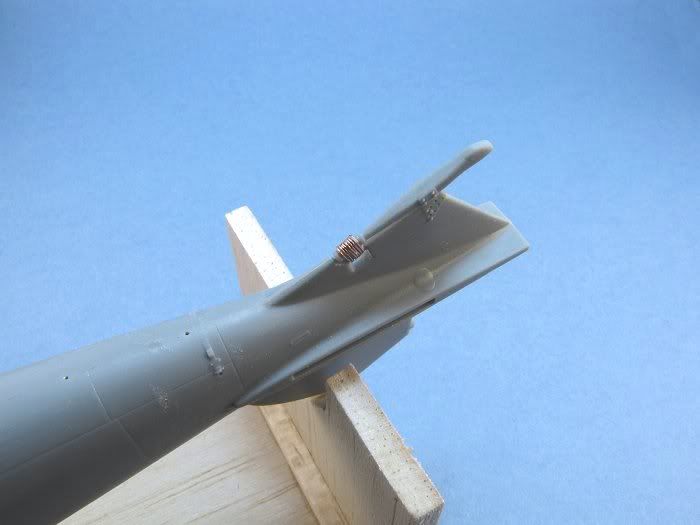
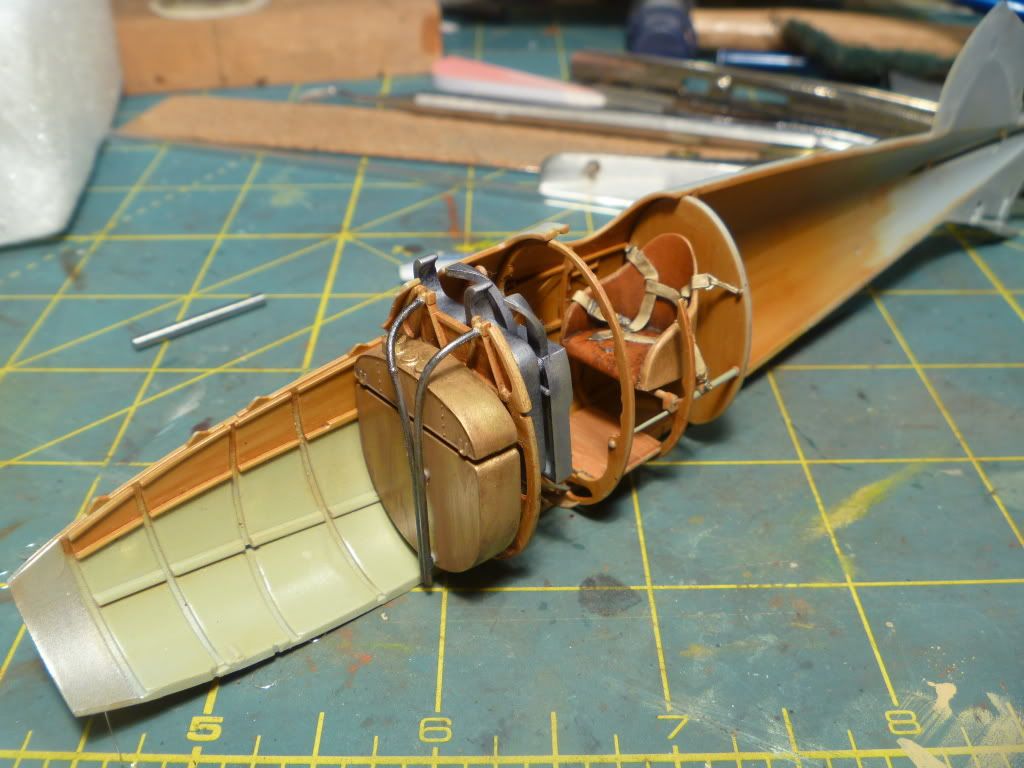
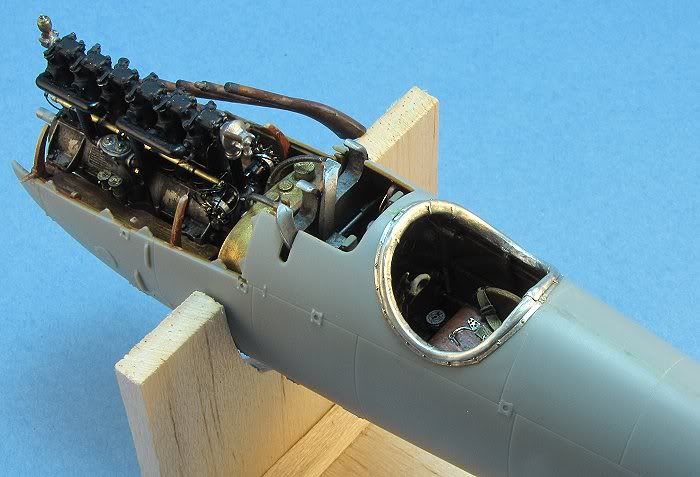
Nice to start working on something that's is not engine. Pic #1-I added some Plastruct 1/2 round around the cockpit since the coaming doesn't look as thick as in some ref pics. I pulled it over a finger nail a few time to get is flexible. This will be covered with thin lead foil to replicate the folds form the leather gathering on the coaming. Pic #2- I cut out the shock absorber (?) for the tail skid to clean the seam inside the notch and wrapped it with some wire as long as i had the piece out.
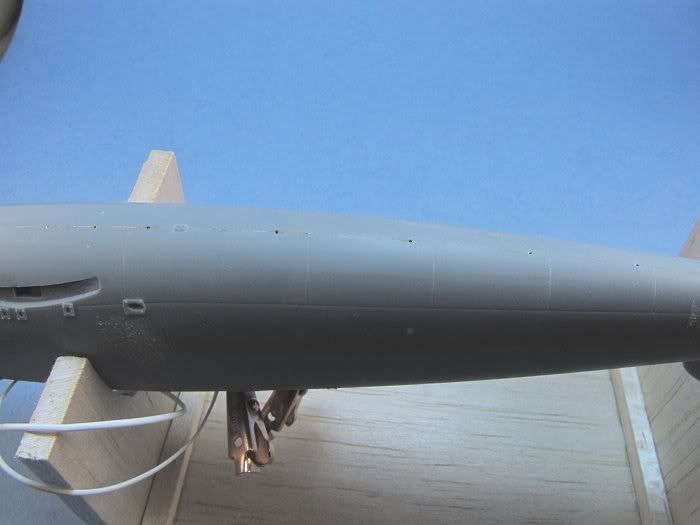
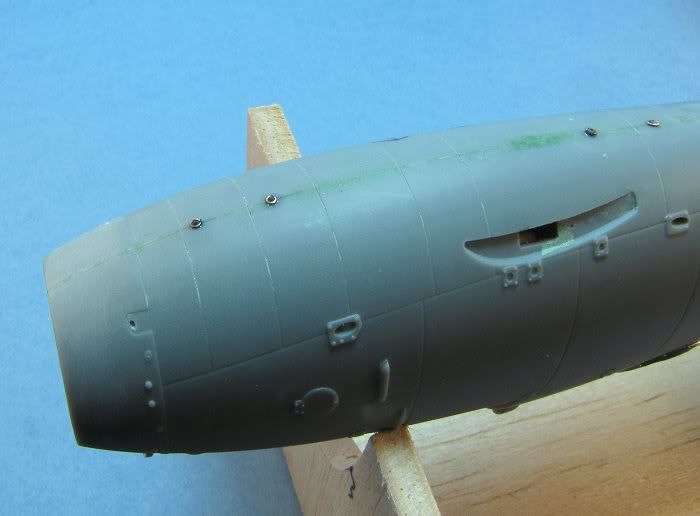
I have a question for pic #3. is that series of holes down the centerline on the bottom of the fuselage supposed to be there? If yes... for what purpose? drainage?
England - South East, United Kingdom
Joined: November 06, 2005
KitMaker: 1,667 posts
AeroScale: 1,551 posts
Posted: Monday, May 02, 2011 - 07:56 PM UTC
Marc, looking really good and yes I agree with your observation on the coaming padding, on my first DVa I left it as is, on the second I thickened the inside lip and will add some to the outer when I resume work on her.
In answer to your question, yes and yes, they were small grommets in front of every bulkhead/former and in other points for drainage. whilst on the subject, I'd just point out, there should be exit points for the gun cartridges just ahead and to the left of the rear most underside access panel and the foremost access panel is located too far back, it should sit under the sump/oil pump of the engine
See Jamo's pics here (I am not sure if I posted this link before but beware AMS OVERLOAD possibilities)
http://s1011.photobucket.com/albums/af234/Jamo_kiwi/Albatros%20DV/Keith
Still can't cure the AMS even with sausage finger implants & olde eyes.
New Jersey, United States
Joined: June 02, 2006
KitMaker: 1,212 posts
AeroScale: 468 posts
Posted: Tuesday, May 03, 2011 - 02:24 AM UTC
Thanks Kieth. You posted that aircraft on a different site but this one has some different pics. Are you referring to the 2 pipes next to the round access door on the centerline? I iwll add those when I put the round doors back that were sanded off to ease the seam repair.
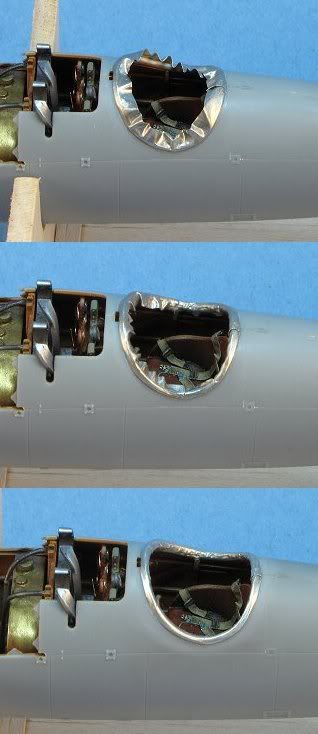
I dry fit a bunch of stuff to get an overall look at it and a question about the ammo chutes by the guns came up. Those photos answered the question. The answer being... Yes, they should be in contact with the side of the gun without a gap. Wish I had done that before it was all together. Gotta figure a way to fix those gaps now

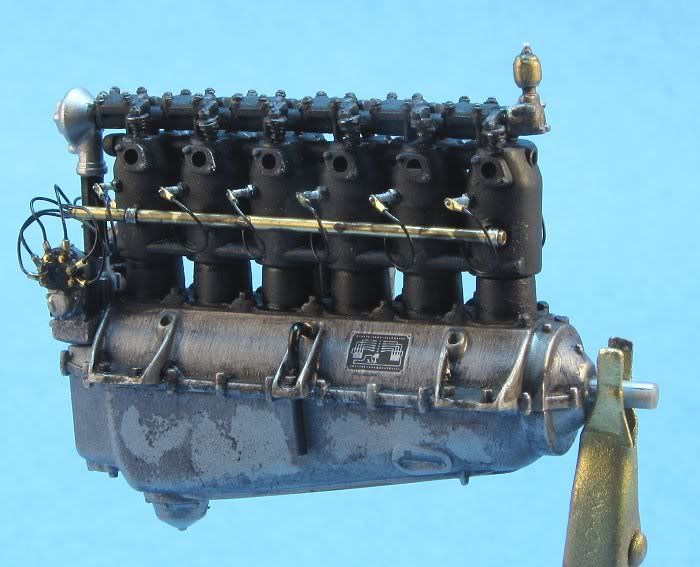
AMS overload? i did a part count on the engine so far. Kit part...18
, has turned into 140..so far. (a diminutive inner voice shouts "help me!")
Anyway... finished the coaming. Some of the rougher spots got filed and sanded to smooth them out a bit.
England - South East, United Kingdom
Joined: November 06, 2005
KitMaker: 1,667 posts
AeroScale: 1,551 posts
Posted: Tuesday, May 03, 2011 - 03:11 AM UTC
Hi Marc,
Yes Jamo took those shots especially with the AMS afflicted modeller in mind and it was wonderful of him to share with us.
Yes thats the fellows, I think WNW may have cast them as bumps on the fuselage...though I'm not sure
memory loss.....whats my name again?

A good idea on the coaming padding, it looks like it will turn out quite excellent.
The belt chutes from the maxims, yes not a great fit, done that way I think to make fitting the maxims themselves easier. I cheated a little with the DVA, and fitted the cover over the left one, it wasnt cmmonly fitted to DVa's apparantly but my pilot had one fitted especially.
the other is covered by the etch plate so its no real worry...relax and find something else to worry over.
great update, keep em coming
K
Still can't cure the AMS even with sausage finger implants & olde eyes.
New Jersey, United States
Joined: June 02, 2006
KitMaker: 1,212 posts
AeroScale: 468 posts
Posted: Tuesday, May 03, 2011 - 03:33 AM UTC
Again thanks Kieth.
You mention etched plates. I was wondering about after market detailing sets for this kit. I looked and came up empty. have I just looked in the wrong place?
England - South East, United Kingdom
Joined: November 06, 2005
KitMaker: 1,667 posts
AeroScale: 1,551 posts
Posted: Tuesday, May 03, 2011 - 04:48 AM UTC
Eduard do a set but its marketed for the DIII as do Part of Poland, Toms Modelworks and HGW I think is their name, they do belts too in a set.. But theres a wealth of other bits on the frets, if you are ever contemplating a Roden Albi it is well worth getting Eduards, theirs has prepainted fuel control bezels, far easier than painting your own... WNW's decals though are exquisite.
K
Still can't cure the AMS even with sausage finger implants & olde eyes.
Alberta, Canada
Joined: July 26, 2010
KitMaker: 1,032 posts
AeroScale: 1,025 posts
Posted: Tuesday, May 03, 2011 - 08:17 AM UTC
Quoted Text
Eduard do a set but its marketed for the DIII as do Part of Poland, Toms Modelworks and HGW I think is their name, they do belts too in a set.. But theres a wealth of other bits on the frets, if you are ever contemplating a Roden Albi it is well worth getting Eduards, theirs has prepainted fuel control bezels, far easier than painting your own... WNW's decals though are exquisite.
K
I have both the Eduard and Tom's Model Works Sets. The Eduard DIII Set is really excellent; have it for the DIII I'm working on and got 2 more to have on hand for the future DV and DVa. The Tom's Set, #514, is quite a bit smaller; has belt ends and buckles only, Rad top and bottom, and Spandau jackets along with numerous small widgets and hatch covers. Significantly the metal is soft brass, very thin, and thus easier to work with then the Eduard (nickel alloy?) stuff.
I really was pleased with the Eduard seat belts, you can take a peek at the finished product on my KoTS DIII build.
Cheers,
Lance
Officially Retired as of 20 August 2013 and looking forward to some un-interrupted bench time. Currently starting Roden's Nieuport 28 and hoping to follow that with another WNW Fokker DVII.
United States
Joined: February 13, 2008
KitMaker: 36 posts
AeroScale: 35 posts
Posted: Thursday, May 05, 2011 - 10:17 AM UTC
Marc,
I have been auditing your AMS Class with great admiration and much trepidation and wish to take the class for full credit. ;-)
I really like how you painted the fuel tank. Could you tell us what colours you used and any weathering you did on it?
Also do you have any better photos of it?
Oh yea, and what was the thickness of the lead foils you used for the valve spring caps and cockpit coaming?
Taking notes as fast as I can and hope to pass the mid-terms when they get hear.
Dave
United States
Joined: February 13, 2008
KitMaker: 36 posts
AeroScale: 35 posts
Posted: Thursday, May 05, 2011 - 10:46 AM UTC
Marc and Keith, et al.
I just found the firing order of the 180 h.p. Mercedes D.III Aero Engine!!!
It is: 1, 5, 3, 6, 2, 4. This is found on page 8 of the Ministry of Munitions "Report on The 180 H.P. MERCEDES Aero Engine", dated March, 1918.
I hope this helps get your motors running properly.

Dave
New Jersey, United States
Joined: June 02, 2006
KitMaker: 1,212 posts
AeroScale: 468 posts
Posted: Thursday, May 05, 2011 - 01:49 PM UTC
Keith, Lance... thanks for the feedback on the AM stuff.
I just found the firing order of the 180 h.p. Mercedes D.III Aero Engine!!!
It is: 1, 5, 3, 6, 2, 4. No wonder it won't start... I had 1 and 3 backward
Davis, thanks so much for the compliments. The best shot I have of the tank is below. It is painted with Model Master non-buffing brass metalizer weathered with an acrylic burnt sienna wash with a touch of retarder in it so it won't dry too fast.
The thinnest foil I have collected is about .004". No clue what bottle of wine I got that from. That was used for the coaming. The springs covers are with foil from Grey Goose vodka that's about .006. Still real thin but at 50% thicker than the other one it is noticeable. Should have another update later
New Jersey, United States
Joined: June 02, 2006
KitMaker: 1,212 posts
AeroScale: 468 posts
Posted: Friday, May 06, 2011 - 04:11 AM UTC
A light evening at the bench, if you can call straining to see .4 mm brass rivets, light.
I worked on the elevator hinges covering the them with lead foil and putting brass bolts for each. Small pieces of brass tube were glued to the controls horns and the pipes at the front of the vert stab (for lifting?) where replaced. Evergreen strips were used to tighten the gaps at the outer parts of the elevator.
The cockpit coaming was finished off with a thin strip of foil glued around the edge then drilled for the afore mentioned rivets. I lost more rivets than I used since they would tweezerpult into oblivion when trying to get them in the holes. The engine is just there for the photo-op but I didn't realize the exhaust pipes fell off.
I made the grommets for the drains out of wire but there are a little big and I may re-do them.
Alberta, Canada
Joined: July 26, 2010
KitMaker: 1,032 posts
AeroScale: 1,025 posts
Posted: Friday, May 06, 2011 - 05:04 AM UTC
Marc,
The coaming is absolutely beautiful work. I may have to switch wine preferences to get some foil...the SE Australian stuff I like has plastic shrink wrap. On the other hand a bottle of Grey Goose is always handy to have in the cabinet!
Looking forward to more progress, this is one very nice build you have going.
Cheers,
Officially Retired as of 20 August 2013 and looking forward to some un-interrupted bench time. Currently starting Roden's Nieuport 28 and hoping to follow that with another WNW Fokker DVII.
New Jersey, United States
Joined: June 02, 2006
KitMaker: 1,212 posts
AeroScale: 468 posts
Posted: Wednesday, May 11, 2011 - 01:23 AM UTC
Sorry Lance, missed your post. Thanks for the comments on the coaming. And I agree it is always nice to have a bottle of something handy

I am rapidly approaching the steps in the build I have been sort of fearing... rigging and lozenges decals. I am getting my head around the rigging but I have a decal question.
I know they go down in sections chord-wise but without any clear areas to worry about silvering... What is the best for surface prep? The bare plastic? i am guessing a no to that. A quality primer like Mr. Surfacer 1200 that will be flat? Or a gloss surface like any other decal?
Then... working with the panels form the center out to the tips? Bottom 1st to allow a little wrap around of the front LE?
Arizona, United States
Joined: December 12, 2008
KitMaker: 1,423 posts
AeroScale: 1,319 posts
Posted: Wednesday, May 11, 2011 - 01:40 AM UTC
Quoted Text
I am getting my head around the rigging but I have a decal question.
I know they go down in sections chord-wise but without any clear areas to worry about silvering... What is the best for surface prep? The bare plastic? i am guessing a no to that. A quality primer like Mr. Surfacer 1200 that will be flat? Or a gloss surface like any other decal?
Then... working with the panels form the center out to the tips? Bottom 1st to allow a little wrap around of the front LE?
I would recommend a gloss cote, gloss white or grey. I would work from the inside out, and do the top first. When you do the bottom, you can even it all up with the decal for a nice clean edge. Some people give the bare plastic a cote of future, but I prefer a gloss painted surface.
Good luck, this is really coming along nicely. I like the drain holes, the coming is really a nice touch. Looking forward to more.
Best
Mark
We few, we happy few........
England - South East, United Kingdom
Joined: November 06, 2005
KitMaker: 1,667 posts
AeroScale: 1,551 posts
Posted: Wednesday, May 11, 2011 - 01:41 AM UTC
Marc go for a high gloss, a tan/khaki colour hides any tiny gaps etc.
yes from the centre out, but remember to trim the tiniest edge off if its WnW loz, theres a thin bleed edge that shows otherwise. I'm not entierly sure though if the top wing has a central joint or a central panel of cloth. try the TVAL site to see how they did their replica.
no real overlap as the front edge was genearally taped over I believe
Still can't cure the AMS even with sausage finger implants & olde eyes.
New Jersey, United States
Joined: June 02, 2006
KitMaker: 1,212 posts
AeroScale: 468 posts
Posted: Wednesday, May 11, 2011 - 02:14 AM UTC
Mark, Kieth... thanks for the help. I think I am ready to dive in.
Mark, I needed up doing the drains again smaller... about half that size. The rings are about 1/32 inch now. I tweezerpulted about 15 into space before I got all 9 down.
Alberta, Canada
Joined: July 26, 2010
KitMaker: 1,032 posts
AeroScale: 1,025 posts
Posted: Wednesday, May 11, 2011 - 02:58 PM UTC
Quoted Text
Mark, Kieth... thanks for the help. I think I am ready to dive in.
Mark, I needed up doing the drains again smaller... about half that size. The rings are about 1/32 inch now. I tweezerpulted about 15 into space before I got all 9 down.
Marc,
"Tweezerpult"..................absolutely perfect term for that dreaded phenomenon!
I have spent the last two days of my project time available with one of my (NOT) favorite phases of my build; the Photo Etch thing. Thus I can easily relate; some day I'll invest in a metal detector and make a fortune on all the componenets I've "pulted" to various seemingly inaccesable locations, some I suspect further then one could possibly accept without the use of explosives!!!
Hang in there , it's looking great and I took your lead and did the drain hole thing on mine as yours really caught my eye.
I am also considering going back and trying the foil trick on the coaming, if only to justify a good bottle of Red in the next few days!
Cheers
Lance
Officially Retired as of 20 August 2013 and looking forward to some un-interrupted bench time. Currently starting Roden's Nieuport 28 and hoping to follow that with another WNW Fokker DVII.
New Jersey, United States
Joined: June 02, 2006
KitMaker: 1,212 posts
AeroScale: 468 posts
Posted: Sunday, May 15, 2011 - 04:16 AM UTC
I swear I responded to your last comment Lance. I remember saying that it is good to have a bottle of anything handy
I must have walked away without hitting the YES button.
If you go for a bottle take a look at the Italian reds. They seem to still be using the foil, at least on the slightly higher end stuff.
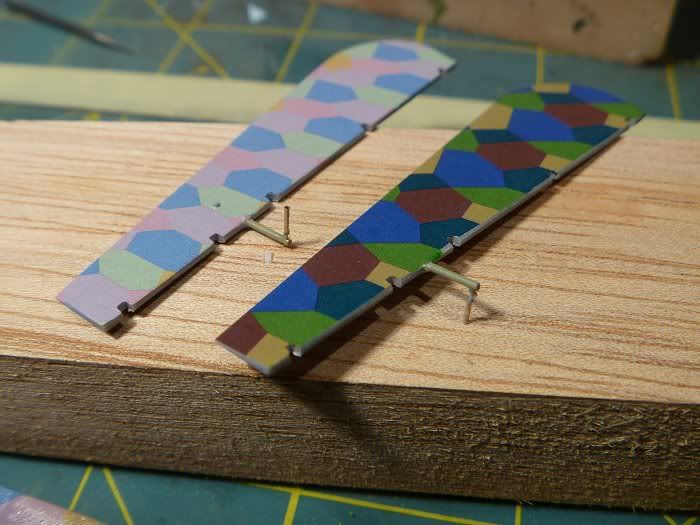
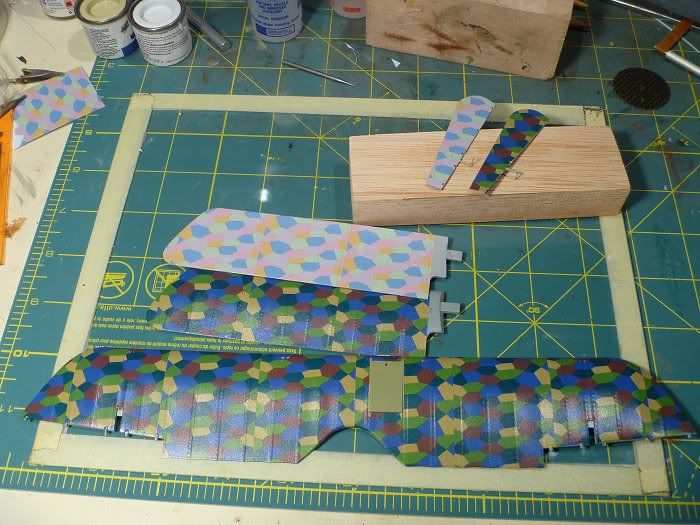
Started declaring. Now that I have gotten this far, I really hope I've done it right. I think so. But as usual... questions...
I am also going to use the Micropsculpt woven linen texture decals. Would this be the last step and go over the rib tape and the markings/crosses? Or since the crosses are painted on the fabric, would that fill the cloth texture enough that it would be smoother and it would be best to put the crosses on top of the linen texture?
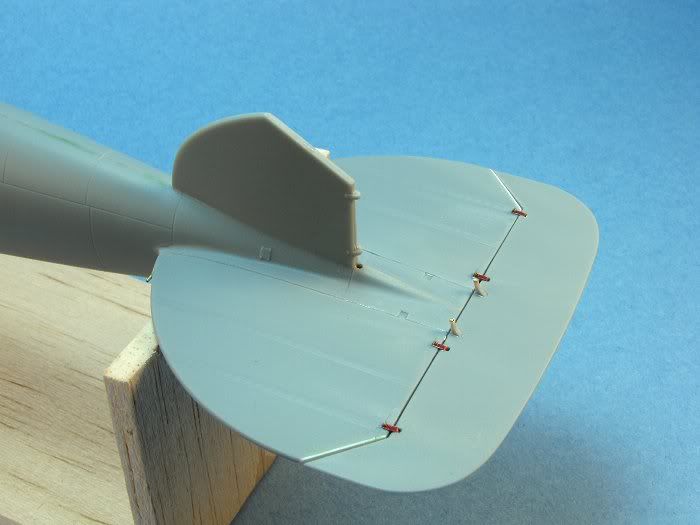
The aileron close-up shows the improved control horns
Colorado, United States
Joined: January 25, 2004
KitMaker: 11,669 posts
AeroScale: 11,011 posts
Posted: Sunday, May 15, 2011 - 03:50 PM UTC
Quoted Text
Great thread "Lozenge 201"... was there a "101"? This will help immensely when I get to the point of putting the lozenge on the wings of the DVa.
Some questions though... of course.
So the bolt is 52-54(ish)" wide and laid down chord wise. The mismatch of the fabric edge will likely fall in between the rubs and will not be covered by rib tape. I am assuming that's what the reference points on the WNW instruction sheet are pointing to. What are modelers doing to represent that seam? Just the mismatch in the decal or simulating that seam some how? I am thinking of a fine riveter and running along one side and picking out the detail with a wash.
Which brings me to rib tape. I've read all the threads about it and seen a bunch of photos but just not 100% sure about the trailing edge (TE). Does the tape wrap around the TE so its on both the top and bottom? or is it all on the top or all on the bottom.
Here is the link to
German Lozenge 101. Yes I believe the tapes were one piece around the profile of the wing rib. AND! There were also leading edge and trailing edge tapes that ran the whole profile of the top and bottom wings. The ailerons, elevators and rudder did not have tapes.
". . .The most important thing is to know why you build and then get the most that you can out of building." via D.D.
Västra Götaland, Sweden
Joined: February 19, 2010
KitMaker: 1,473 posts
AeroScale: 1,450 posts
Posted: Monday, May 16, 2011 - 01:12 AM UTC
A very beautiful project, Mark loads of good ideas to super detailing. Thanks for posting.
Mikael
_________________________________________________________
Just finished the Wingnut Wings Taube. On to the Junkers D.1