KotS GB 2011 Albatros D.Va wing_nut
Alberta, Canada
Joined: July 26, 2010
KitMaker: 1,032 posts
AeroScale: 1,025 posts
Posted: Monday, June 06, 2011 - 03:54 AM UTC
Quoted Text
Great stuff, Marc! I mean; WOW!
Its wonderful using your post as a learning emporium, you have such great ideas. And as far as the Uni-thread rigging goes, thats what I'll be using. I am a fly tyer, so I already have miles of the stuff.
Marc,
I echo Guy's remarks. It is looking very nice to say the least and it's given me no end of inspiration and hints. Anyone interested in a firesale deal on 650 yards of regular monofil fishing line; I'll be looking for some of that fly tying stuff after the previous comments.
Cheers,
Lance
Officially Retired as of 20 August 2013 and looking forward to some un-interrupted bench time. Currently starting Roden's Nieuport 28 and hoping to follow that with another WNW Fokker DVII.
Arizona, United States
Joined: December 12, 2008
KitMaker: 1,423 posts
AeroScale: 1,319 posts
Posted: Monday, June 06, 2011 - 04:07 AM UTC
Hi Marc:
Great job so far, very impressive with the radiator handle. Top notch work.
Best
Mark
We few, we happy few........
Kentucky, United States
Joined: July 02, 2010
KitMaker: 175 posts
AeroScale: 174 posts
Posted: Monday, June 06, 2011 - 06:41 AM UTC
Hi Marc
Big mistake on my part not checking out your build sooner. Extremely well done and most informative regarding tips and tricks.
Did you make those turnbuckles or purchase them from another party?
"I took German in school...but I can't understand the way these foreigners speak it." The Dawn Patrol (1938)
Dennis O'C
New Jersey, United States
Joined: June 02, 2006
KitMaker: 1,212 posts
AeroScale: 468 posts
Posted: Monday, June 06, 2011 - 10:23 AM UTC
Thanks so much for all the positive feedback. I really appreciate it.
Guy I picked up same great tools while at the fly tying counter. Some of the best tweezers and and some rally well made hemostats and not expensive at all.
Dennis glad you are finding the stuff useful. The turnbuckles are made form .5mm Lion Roar brass tubing and eyelets made from he Ultra ire was was originally going to use for the rigging.
I can't find the .5mm tubing anywhere any more. The guy I got it form on ebay said they stopped making it. And I wouldn't be the least surprised if Bob of Bob's Buckles bought up the supply.
I just order this to see if it is a viable alternative. Look pretty good. And if you Google "Polyimide".... Jeez this is some tough stuff.
http://www.smallparts.com/dp/B0013HUD4C/ref=sp_dp_g2c_asinNew Jersey, United States
Joined: June 02, 2006
KitMaker: 1,212 posts
AeroScale: 468 posts
Posted: Tuesday, June 07, 2011 - 02:53 AM UTC
[size=20pt]HELP![/size]
So the font size thing didn't work so...
HHHHHHHHHHEEEEEEEEEELLLLLLLLLLPPPPPPPPPP
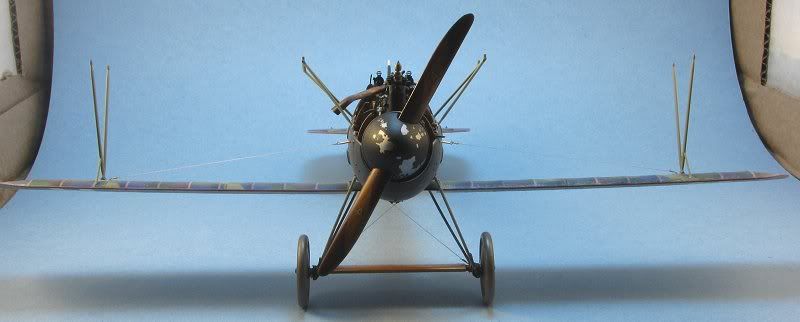
I did a test fit of the upper wing and have a big problem. The wing practically rests on the fuselage. No way the guns will fit underneath. I immediately went the the WNW site to look and the finished model pics and my eye went right to this one...
This photo is being used for discussion purposes only
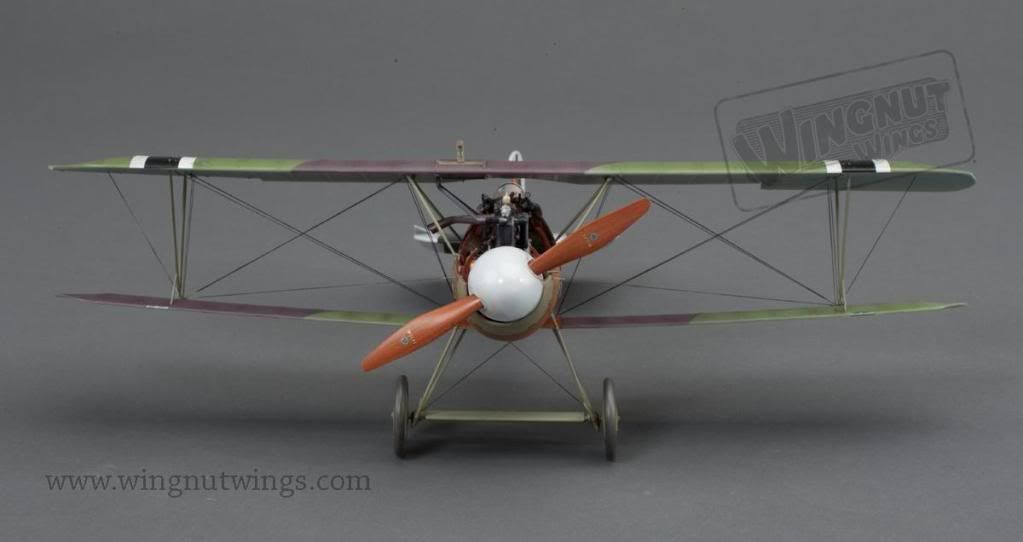
My lower wing are flat and maybe even a tiny bit of antral. The weight of the upper wing pushes them down even more. The fit everywhere else in the kit was so good and the wing joint so tight I just figured it was right. Any suggestions before I try to rip the wings off? And even if they did come off... then what. I've come to far so there's no turning back now ; There's always a crash diorama

Kentucky, United States
Joined: July 02, 2010
KitMaker: 175 posts
AeroScale: 174 posts
Posted: Tuesday, June 07, 2011 - 06:18 AM UTC
Hi Marc

Boy, do I know how you feel!!

Would the cabine struts give enough support to the center of the upper wing such that you could raise, glue and bind the lateral part of the lower wings by the interplane struts to create the dihedral shown in the WNW photo?
"I took German in school...but I can't understand the way these foreigners speak it." The Dawn Patrol (1938)
Dennis O'C
Alberta, Canada
Joined: July 26, 2010
KitMaker: 1,032 posts
AeroScale: 1,025 posts
Posted: Tuesday, June 07, 2011 - 07:23 AM UTC
Marc,
OUCH!!!!
However don't give up; the quality of your work thus far more then confirms you've got the skills to put this setback right.
On reading your entry the first thing I did was rip open the box of my kit, clip a lower wing off the sprue, and try a dry fit. There but for the grace of fortune would I have been! Nice tight fit but that could result from any amount of a 5-10 degree spread from anhedral to dihedral if you weren't forewarned and on it from the start. I noted that the female portion of the wing/fuselage joint is fairly thick on the bottom surface but very thin on the upper, and that is a flaw in the kit that could, and did, bite you.
My thoughts, pull the wings, set the correct dihedral, and touch her back up. As you've seen, and kindly encouraged on my DIII Build, had I corrected the fit and alignment of the engine frame component rather then bending and squeezing, compounding problems that have me repairing a split joint, badly fitting coaming, and engine panels that required re-shaping and mods would probably not be a factor, or at least be less severe.
Just my well intentioned thoughts but a crash diorama would be a terrible diservice to a beautiful piece of work. As a wise man once said to me, "take raw courage into your heart and anything is possible"!
Hope this is helpful, or at least encouraging. On reviewing the updates almost daily I see more setbacks/problems then good news however in the vast majority of cases the situations get fixed and with great results.. Remember Tom Wolfe (The Right Stuff)? At the risk of being overly dramatic your work shows you've got it. I'll look forward to your next updates and know they'll portray a happy ending.
Cheers and hang in there!
Lance
Officially Retired as of 20 August 2013 and looking forward to some un-interrupted bench time. Currently starting Roden's Nieuport 28 and hoping to follow that with another WNW Fokker DVII.
New York, United States
Joined: July 13, 2010
KitMaker: 125 posts
AeroScale: 19 posts
Posted: Tuesday, June 07, 2011 - 08:01 AM UTC
sorry to hear that about the wings, but a good warning before I do mine. What did you use for the turn-buckles?
England - South East, United Kingdom
Joined: November 06, 2005
KitMaker: 1,667 posts
AeroScale: 1,551 posts
Posted: Tuesday, June 07, 2011 - 08:32 AM UTC
the wing root issue has had much deliberation in various posts in the past. I honestly hadnt realised you didn't know.
A bit late to point out my way of eradicating the issue now though, all I can think is judicial use of heat and or flexing the wings close to the roots to try to lift them. Keeping the kit raised on its wingtips and the fuselage weighted/pressed down once done to try to make it permanent. I realised when building mine but still had to flex the lower wings up to get the sit right.
Keith
Still can't cure the AMS even with sausage finger implants & olde eyes.
New Jersey, United States
Joined: June 02, 2006
KitMaker: 1,212 posts
AeroScale: 468 posts
Posted: Tuesday, June 07, 2011 - 12:17 PM UTC
The crash dio was a sick joke mad in a moment of despair

Couldn't bring myself to do it.
For grins, I decided to give the wings a little wiggle. I glued them with some thin CA and I am guessing due to the tight fit it didn't penetrate too deeply. The wings come off without a hitch. So Keith, it's not too late after all. I would really love to hear your suggestions. My though was change the angle of the tab by shaving off a wedge on one side and adding one to the other.
New Jersey, United States
Joined: June 02, 2006
KitMaker: 1,212 posts
AeroScale: 468 posts
Posted: Tuesday, June 07, 2011 - 04:21 PM UTC
Quoted Text
sorry to hear that about the wings, but a good warning before I do mine. What did you use for the turn-buckles?
Sorry I missed your post. Take a look at my answer to Dennis in the post just before I yelled for HELP.
England - South East, United Kingdom
Joined: November 06, 2005
KitMaker: 1,667 posts
AeroScale: 1,551 posts
Posted: Tuesday, June 07, 2011 - 07:42 PM UTC
Marc.
Exactly what to do yes but you may need to shave the inner upper edge of the wingroot opening too (ensure its totally paint free) as it seems to push the wing down. Also open up the hole in the fuselage for the locating stub on the inner bottom edge so the stub can pivot some without taking too much out of the locating stub itself. Fiddoly I know, Stand her on wingtips and tail and weigh down the fuselage while she resets (not heavily of course.)
I think it was my or Oeffags excellent green and white build where this was discussed in detail, if I can find it I'll copy a link laters
K
Still can't cure the AMS even with sausage finger implants & olde eyes.
Västra Götaland, Sweden
Joined: February 19, 2010
KitMaker: 1,473 posts
AeroScale: 1,450 posts
Posted: Tuesday, June 07, 2011 - 11:36 PM UTC
Hi Marc Ouch!!!
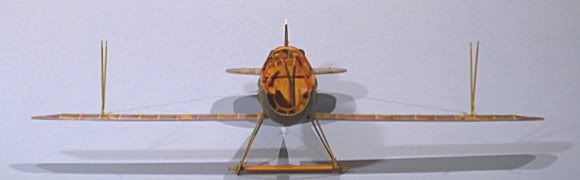
As Kornbeef indicated, I've been in your position myself and he was very kind to give me some sound advice at the time here's a link to my buildthread, if its of any use to you...
WNW DVa build I think the tip of using paintjars to get the alignments right is very useful.
Best of luck
Mikael
_________________________________________________________
Just finished the Wingnut Wings Taube. On to the Junkers D.1
New Jersey, United States
Joined: June 02, 2006
KitMaker: 1,212 posts
AeroScale: 468 posts
Posted: Wednesday, June 08, 2011 - 05:09 AM UTC
Mikael that is a really nice looking bird. Love those colors.
Be impatient can be a bad thing and can come back and bite you on the rump more times than not. I can be an impatient person. And it worked our for me this time. I looked at the wing root and came up with what seemed to be a logical course of action.
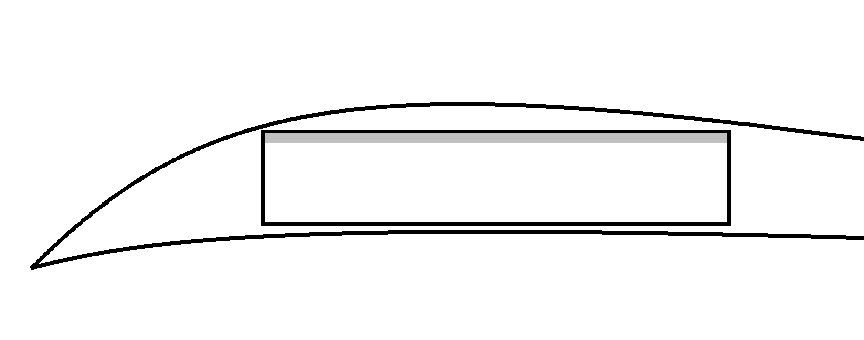
First I trimmed the top edge of the hole in the wind slot indicate by the gray line. Keith, I must have known you were going to say that
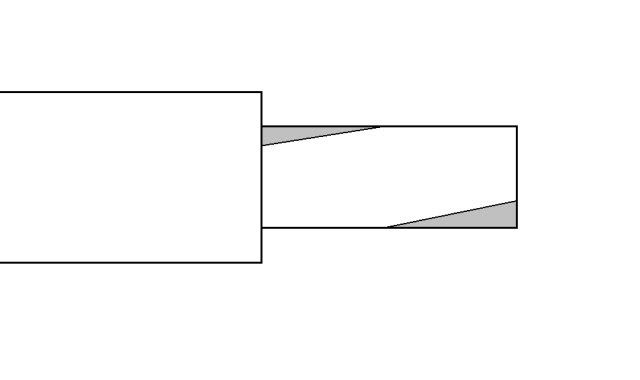
Then I trimmed the gray areas away on the tab on the wing. My though was to allow that tab room to rotate on its axis and still keep it as solid as possible.
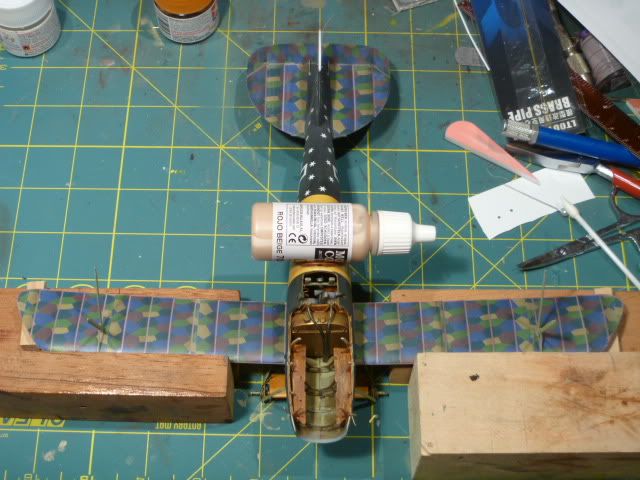
It all looked good in the dry fit so I made a jig taping 2 blocks of wood to the cutting mat, with 2 blocks standing at the front edge to press the wing leading edge against to keep them straight. The fuselage is set along a line to keep every saqure... note how the rudder lines up. Small block under the tips to hold the dihedral. The LG was off the mat about 3/16" so I weighted the fuselage to push it down. The wing was glued in with some slow cure CA to have a bit of work time to get it all set up.
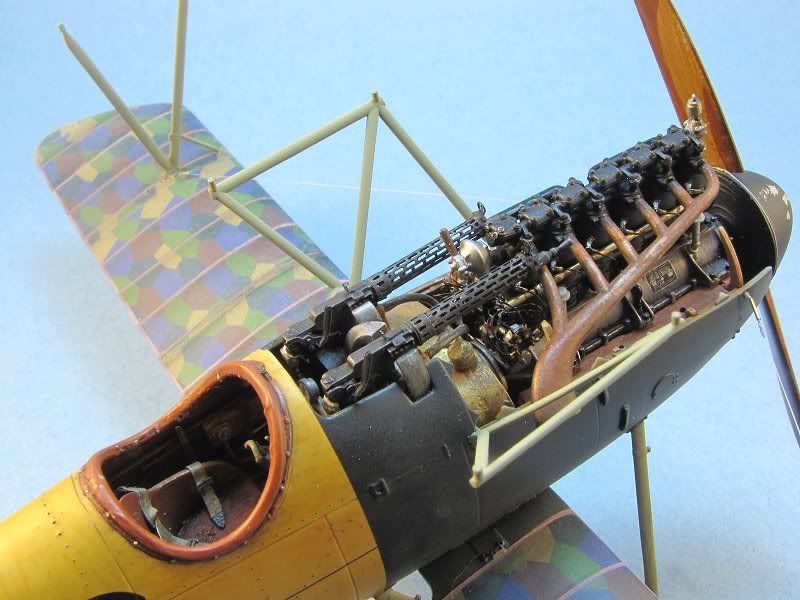
The last thing I did was to redo the nose cables while in the jig and got them real tight to help add some support. No photo of the result but it looks pretty good.
Västra Götaland, Sweden
Joined: February 19, 2010
KitMaker: 1,473 posts
AeroScale: 1,450 posts
Posted: Wednesday, June 08, 2011 - 07:46 AM UTC
Nice save and very well executed by the looks of it that jig and jar will do the trick.
Thank You BTW

yours will be stunning I'm sure!
Mikael
_________________________________________________________
Just finished the Wingnut Wings Taube. On to the Junkers D.1
South Australia, Australia
Joined: August 14, 2007
KitMaker: 5,926 posts
AeroScale: 2,201 posts
Posted: Wednesday, June 08, 2011 - 09:43 AM UTC
Hi Marc.
I use invisible mending thread that I paint with an old paint marker XF-56 metallic grey. The thread is very supple and just 0.12mm in diameter. The paint brings it up to about 0.15mm which is perfect for me. The thread is also very strong polyester and can be heat-shrunk if you get your tension wrong.
Good luck...
You may be right, I may be crazy.
South Australia, Australia
Joined: August 14, 2007
KitMaker: 5,926 posts
AeroScale: 2,201 posts
Posted: Wednesday, June 08, 2011 - 09:48 AM UTC
Bloke who told you they don't make 0.5mm Brass Tube anymore was not being truthful..
http://www.ebay.com.au/itm/Griffonmodel-GCP-BHP02-Brass-Pipe-R0-5mm-I0-33mm-/220742391163?pt=LH_DefaultDomain_0&hash=item336545957bGood reliable seller. I use it all the time. Get loads of trunbuckles from one length of pipe. Easy to cut with a ruler and No.11 blade. Just role it on your cutting mat and voila. Just be careful to cover where you are cutting with your finger or watever so the tiny brass tube doesn't get Mach1 syndrome and disappear forever.
You may be right, I may be crazy.
England - South East, United Kingdom
Joined: November 06, 2005
KitMaker: 1,667 posts
AeroScale: 1,551 posts
Posted: Wednesday, June 08, 2011 - 11:30 AM UTC
excellent recovery, glad to see you worked out pretty much as I did what to do.
Albion metals do '5 tubing so someones spinning bulldoo your way... :-) DUCK!
Still can't cure the AMS even with sausage finger implants & olde eyes.
Colorado, United States
Joined: January 25, 2004
KitMaker: 11,669 posts
AeroScale: 11,011 posts
Posted: Wednesday, June 08, 2011 - 05:56 PM UTC
Officially the dihedral is 2 degrees. Nice recovery!
". . .The most important thing is to know why you build and then get the most that you can out of building." via D.D.
New Jersey, United States
Joined: June 02, 2006
KitMaker: 1,212 posts
AeroScale: 468 posts
Posted: Thursday, June 09, 2011 - 12:40 AM UTC
Seems I am saying thank you an awful lot around here.
I just mentioned to someone in a PM that the out pouring of support in this forum is just great. From general encouragement to "Need help? Here's what I do..." stuff. You all really made a new guy to the forum feel welcome from the get go. I may have to keep building bipes to have an excuse to keep hanging around.
So once again, thanks for the comments on the wing save,
Stephen... thanks for the actual number, I think that's just about what I got.
Thanks for the info about the tubing. Knowing Griffon makes it is any other product to search for and I found a US distributor for the Albion tubing. Due to my impatience once again i have 3 feet of that plastic stuff in the mail. I'll find a use for it. I can always build and air wing of WWI birds.
I am going to finish up the guns and get them in and the wings goes on... maybe tonight.
Alberta, Canada
Joined: January 19, 2008
KitMaker: 6,743 posts
AeroScale: 6,151 posts
Posted: Friday, June 10, 2011 - 12:20 PM UTC
I'm speechless !
Beautifully done so far sir

New Jersey, United States
Joined: June 02, 2006
KitMaker: 1,212 posts
AeroScale: 468 posts
Posted: Saturday, June 11, 2011 - 12:09 AM UTC
Hi Terri... thanks so much.
New Jersey, United States
Joined: June 02, 2006
KitMaker: 1,212 posts
AeroScale: 468 posts
Posted: Saturday, June 11, 2011 - 10:59 AM UTC
Trying to get the last bits done so I can get the upper wing installed. I made a jig for the cabanes by laying out the holes pattern from the wing to a piece of .030 plastic sheet and gluing on some strips square to the leading edge and thrust line. Makes for an easy visual reference so the cabanes are set just right.
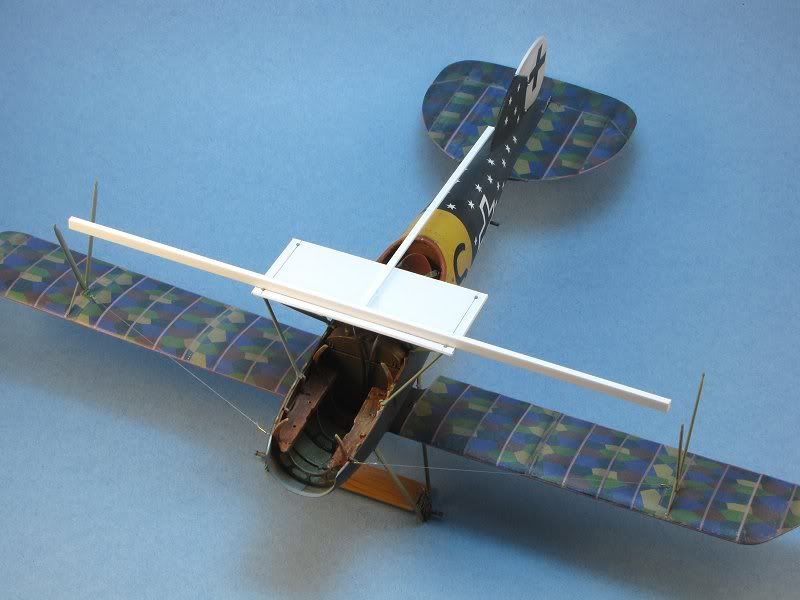
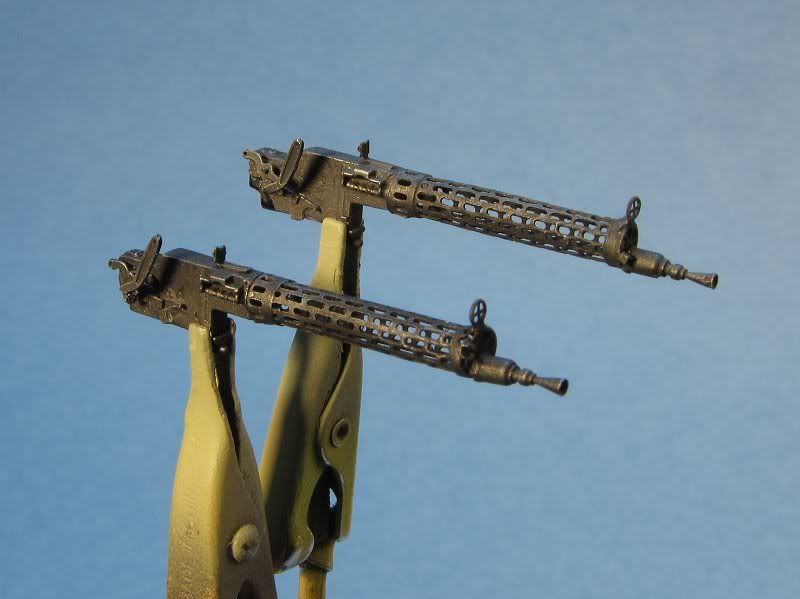
The Aber set for the Spandaus is awesome. And a final mock up before everything is glued in place for the wing install.
The "new" lower wings with some dihedral.
Colorado, United States
Joined: January 25, 2004
KitMaker: 11,669 posts
AeroScale: 11,011 posts
Posted: Saturday, June 11, 2011 - 01:44 PM UTC
Marc just a quick heads up. The cocking handles on your Spandaus were never used on Albatros D. V or Va types. They were only on post March 1918 Fokker and Roland D. types. The actual cocking arrangement for the Albatros D types has been described as "T" shaped rods accessible to the pilot in the cockpit.
Click here. Quoted Text
". . .Step 7.) Concerning the twin Spandau Maxim machine guns, you may want to alter the cocking handle assembly (PE D 5 x 2 )by modifying a simple lever with a rounded knob protruding at a 90 degree angle to the right. It is confirmed by photographic evidence that none of the D.V types had the 1918 spade shaped cocking handle and no picture of a D.Va exists with them either. The Albatros fighters used "T" shaped cocking handles in the cockpit leading from the cocking levers on the right side of the gun breeches and worked via a linkage system. . . "
". . .The most important thing is to know why you build and then get the most that you can out of building." via D.D.
Alberta, Canada
Joined: July 26, 2010
KitMaker: 1,032 posts
AeroScale: 1,025 posts
Posted: Saturday, June 11, 2011 - 03:40 PM UTC
Marc,
I just entered a request for you to "tip in" on a request I had earlier under "Wheel Covers' ; basically how do you get the chipped/worn off paint effect such as that on your spinner? I can not locate an earlier query I made or, (really scary) the reply I got from someone herein.
Maybe I need a break!? So much info and stuff to learn.!
Cheers,
Lance.
Officially Retired as of 20 August 2013 and looking forward to some un-interrupted bench time. Currently starting Roden's Nieuport 28 and hoping to follow that with another WNW Fokker DVII.


