

Stephen, thanks for the link to "101"
Mikael, thanks for stopping by and for the comments.
Early Aviation
Discuss World War I and the early years of aviation thru 1934.
Discuss World War I and the early years of aviation thru 1934.
Hosted by Jim Starkweather
KotS GB 2011 Albatros D.Va wing_nut

wing_nut

Joined: June 02, 2006
KitMaker: 1,212 posts
AeroScale: 468 posts
Posted: Monday, May 16, 2011 - 04:53 AM UTC

Mgunns
Joined: December 12, 2008
KitMaker: 1,423 posts
AeroScale: 1,319 posts

Posted: Monday, May 16, 2011 - 08:31 AM UTC
 HI Marc:
I like your improved Control horns and your lozenge. Is that the LVG sheet or is it the wingnut sheet lozenge sheet? Looks good so far. Looking forward to how the control horns play out as you progress.
Best
Mark
wing_nut
Joined: June 02, 2006
KitMaker: 1,212 posts
AeroScale: 468 posts
Posted: Monday, May 16, 2011 - 09:20 AM UTC
Thanks Mark. It is the WNW sheet.
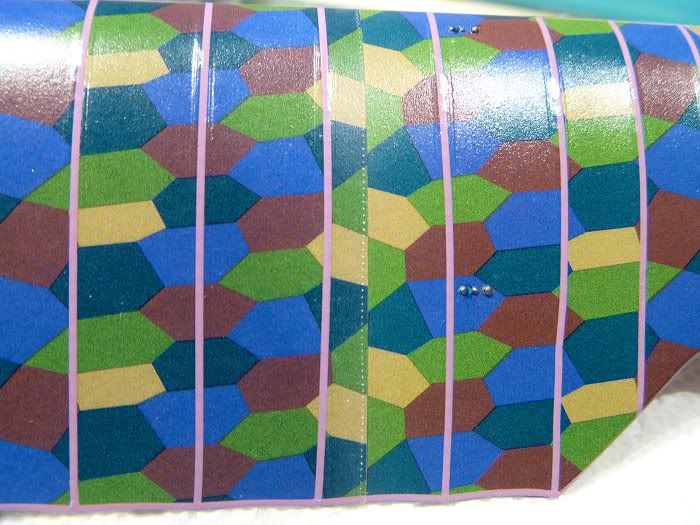
A note to anyone else that may use this set. When trimming off the thin bleed edges take off enough to include the very small tip of the brown (?) lozenge that is just visible at the edge. This too can give the impression of a "line" albeit no where near as bad as the bleed edge.
A note to anyone else that may use this set. When trimming off the thin bleed edges take off enough to include the very small tip of the brown (?) lozenge that is just visible at the edge. This too can give the impression of a "line" albeit no where near as bad as the bleed edge.
wing_nut
Joined: June 02, 2006
KitMaker: 1,212 posts
AeroScale: 468 posts
Posted: Tuesday, May 17, 2011 - 01:29 AM UTC
OK... which one of you didn't tell me that putting down all the rib tape was going to take so long and be that tedious? C'mon... fess up! So, it was all of you eh?

Man am I glad that's over I gotta get a seal coat on there before anything happens to the tape. I took a very fine riveting wheel and went down one side of the fabric seams and highlighted with some contrasting paint. What do you think? Still need to do the bottom wings so I'll snap a pic or 2.
Man am I glad that's over
I gotta get a seal coat on there before anything happens to the tape. I took a very fine riveting wheel and went down one side of the fabric seams and highlighted with some contrasting paint. What do you think? Still need to do the bottom wings so I'll snap a pic or 2. mtnflyer

Joined: March 08, 2009
KitMaker: 394 posts
AeroScale: 360 posts
Posted: Tuesday, May 17, 2011 - 02:17 AM UTC
Marc
I really like the effect of your seam riveting idea. It looks very cool.
I'm too inexperienced to know much about rib tape, but I suspect that unless a robot was applying it in real life, the tape wouldn't be all that straight. To my eye, you've achieved that effect admirably. Well done!!!
I really like the effect of your seam riveting idea. It looks very cool.
I'm too inexperienced to know much about rib tape, but I suspect that unless a robot was applying it in real life, the tape wouldn't be all that straight. To my eye, you've achieved that effect admirably. Well done!!!
Mgunns
Joined: December 12, 2008
KitMaker: 1,423 posts
AeroScale: 1,319 posts
Posted: Tuesday, May 17, 2011 - 03:39 AM UTC
Hi Marc:I like the riveting tool effect. Very nice. Yes, the rib tapes are tedious, but do enhance when done. I like the card idea as well.
Best
Mark
wing_nut
Joined: June 02, 2006
KitMaker: 1,212 posts
AeroScale: 468 posts
Posted: Wednesday, May 18, 2011 - 04:52 AM UTC
Thanks Mark. Ya know... getting old sucks. I saw your comment about liking the card idea and I had no idea what the heck you were talking about. Today I remember my bit about getting a "card" at Hallmark. Scary ain't it
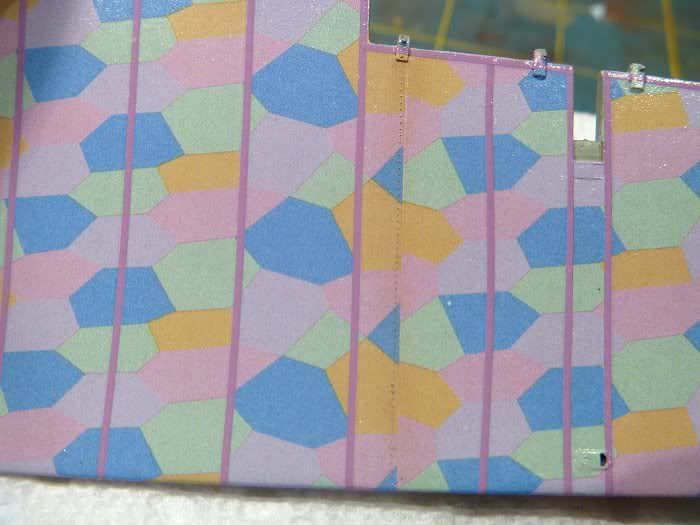
Started put on the Microsculpt texture decals. It says it's for 1/48 but seeing in on a 1/32 scale wing I think it would be too big. But I really like the overall effect. More obvious on the lighter bottom side. The photo understates the upper wigs and exaggerate the underside. It looks better in the here and now than in the pics.
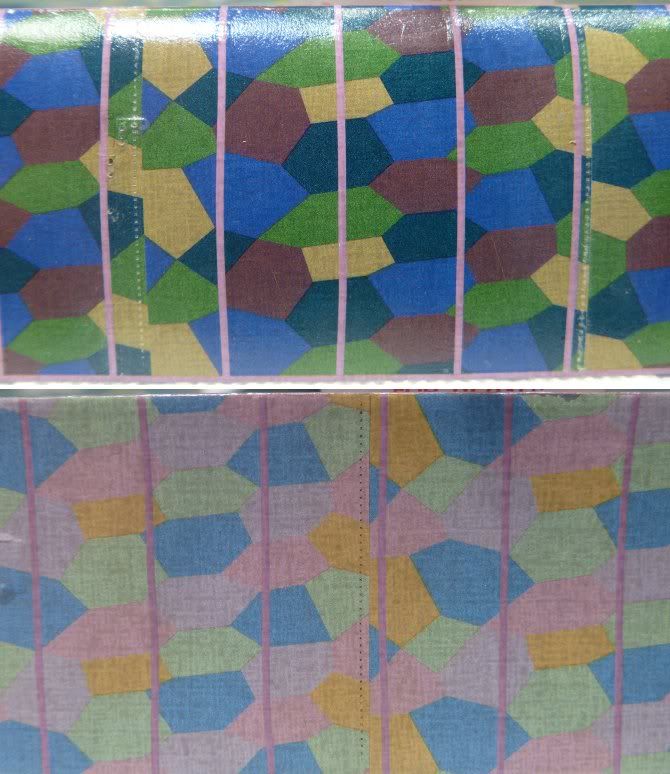
Started put on the Microsculpt texture decals. It says it's for 1/48 but seeing in on a 1/32 scale wing I think it would be too big. But I really like the overall effect. More obvious on the lighter bottom side. The photo understates the upper wigs and exaggerate the underside. It looks better in the here and now than in the pics.
mtnflyer
Joined: March 08, 2009
KitMaker: 394 posts
AeroScale: 360 posts
Posted: Wednesday, May 18, 2011 - 05:02 AM UTC
Marc, I can clearly see what your up to in the photos, and it looks great. I'm anxsciously waiting for further updates and photos of the whole project.
Outstanding work!!
Outstanding work!!

lcarroll
Joined: July 26, 2010
KitMaker: 1,032 posts
AeroScale: 1,025 posts

Posted: Wednesday, May 18, 2011 - 05:39 AM UTC
Marc,
VERY nice! Like the riviting effect on the seams and also the textured decal results. I have some of that product and am glad I got it after seeing these results. Two questions if I may:
Riveting wheel? Where can I get one and what size/spec?? ......and
How can you be complaining about the effects of age, I'm the ultimate victim and jealously retain that honor unless someone else is about to turn 67 (or more) in less then two weeks!!
Keep the updates coming, you've got a beautiful build going here.
Cheers,
Lance
wing_nut
Joined: June 02, 2006
KitMaker: 1,212 posts
AeroScale: 468 posts
Posted: Wednesday, May 18, 2011 - 09:46 AM UTC
Guy, Thanks for the comments.
Lance... well let me be the 1st to say HAPPY BIRTHDAY. Let's have a party

And blow the froth off a few

For the rivet wheels... I have 2. I used both and you can't tell the difference form looking at the pattern really.
The one with the short black handle was purchased on ebay a while back so I don't have details but it was for 1/72 scale. The teeth look square but the points are actually machines to make round impressions. I think it was about $20. The plastic one is made by Trumpeter and is less than $10. It come with 4 wheels A-D. I used A, the smallest wheel.
The one with the small wheel is easiest to use since it is much more exposed but the Trumpeter works pretty well once you get the hang of it.
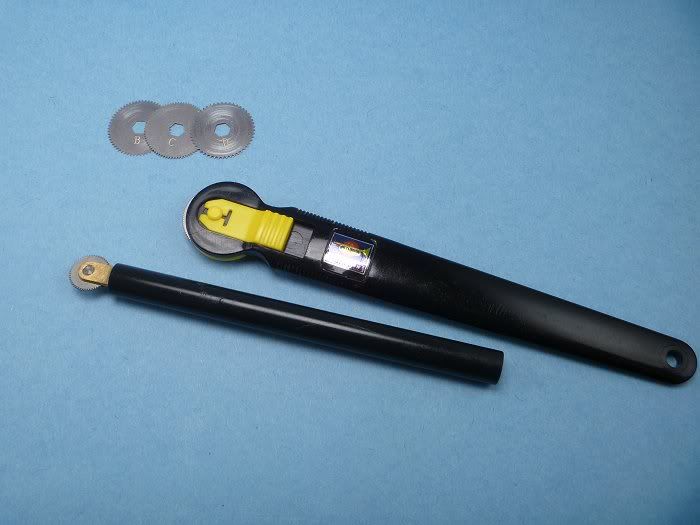
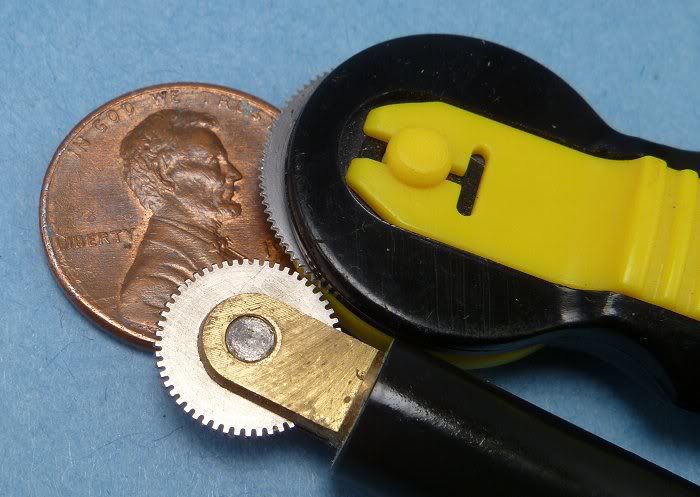
There is a line called Rosie the Riveter available from www.umm-usa.com. Price but maybe the best out there. If you go there, check out the JLC saw. Maybe one of the best and most used and useful tools on my bench.
Lance... well let me be the 1st to say HAPPY BIRTHDAY. Let's have a party
And blow the froth off a few
For the rivet wheels... I have 2. I used both and you can't tell the difference form looking at the pattern really.
The one with the short black handle was purchased on ebay a while back so I don't have details but it was for 1/72 scale. The teeth look square but the points are actually machines to make round impressions. I think it was about $20. The plastic one is made by Trumpeter and is less than $10. It come with 4 wheels A-D. I used A, the smallest wheel.
The one with the small wheel is easiest to use since it is much more exposed but the Trumpeter works pretty well once you get the hang of it.
There is a line called Rosie the Riveter available from www.umm-usa.com. Price but maybe the best out there. If you go there, check out the JLC saw. Maybe one of the best and most used and useful tools on my bench.
lcarroll
Joined: July 26, 2010
KitMaker: 1,032 posts
AeroScale: 1,025 posts
Posted: Wednesday, May 18, 2011 - 10:59 AM UTC
Marc,
I checked out the site you provided; lots of neat stuff including your black handle 1/72 riviting tool. I'm wondering if the larger scale/spaced Rosie the Riviter tools might be appropriate for nail lines on natural wood panels; could possibly provide a recess for some dark (grey or rust) wash to really enhance the woodgraining.
Also really like the look of the JLC Saw. I'll be ordering both right away, thanks for the quick reply/info.
Cheers,
Lance
wing_nut
Joined: June 02, 2006
KitMaker: 1,212 posts
AeroScale: 468 posts
Posted: Wednesday, May 18, 2011 - 01:46 PM UTC
I was going to try one of the larger wheels on the Trumpeter tool for the nails on the plywood and fill the dents with a dark gray or black.
When you order the saw get extra blades They are super thin.... thin enough to separate ailerons and flaps on a 1/48 wing. They have some flex bu will break and when they do, make little saws that are as useful as the full saw. I iwll break them on purpose to get a shape saw I need sometimes. Check out how I opened up a louver on an Bf-109E-4. That is one of the best scribers I have ever used.


When you order the saw get extra blades They are super thin.... thin enough to separate ailerons and flaps on a 1/48 wing. They have some flex bu will break and when they do, make little saws that are as useful as the full saw. I iwll break them on purpose to get a shape saw I need sometimes. Check out how I opened up a louver on an Bf-109E-4. That is one of the best scribers I have ever used.
lcarroll
Joined: July 26, 2010
KitMaker: 1,032 posts
AeroScale: 1,025 posts
Posted: Wednesday, May 18, 2011 - 04:08 PM UTC
Quoted Text
I was going to try one of the larger wheels on the Trumpeter tool for the nails on the plywood and fill the dents with a dark gray or black.
When you order the saw get extra blades They are super thin.... thin enough to separate ailerons and flaps on a 1/48 wing. They have some flex bu will break and when they do, make little saws that are as useful as the full saw. I iwll break them on purpose to get a shape saw I need sometimes. Check out how I opened up a louver on an Bf-109E-4. That is one of the best scribers I have ever used.
Marc,
Great minds thinking alike! Exactly what I had in mind with a larger scale, just not sure of what scale might work. The reason I didn't order immediately is just that; I may get one of the sets or a multi-accessory version like yours to ensure I have the right scale "wheel" for the nail application.
As for the saw, I intended to order the extra blades; very resonable. Your photos of the 109 vent are the final straw; got to get this tool!
Lance
Mgunns
Joined: December 12, 2008
KitMaker: 1,423 posts
AeroScale: 1,319 posts
Posted: Thursday, May 19, 2011 - 02:13 AM UTC
Hi Marc: I agree about the age thing. I do like the microsculpt effect. I did use it to good effect on the underside of my Hobby Craft SPAD 13. The riveting tool is neat too, and I am looking forward to getting one of those per your recommendation.:[]-- Happy Birthday soon to be Lance. I am 5 years behind you.
Best
Mark
lcarroll
Joined: July 26, 2010
KitMaker: 1,032 posts
AeroScale: 1,025 posts
Posted: Friday, May 20, 2011 - 07:22 AM UTC
Quoted Text
:[]-- Happy Birthday soon to be Lance. I am 5 years behind you.
Best
Mark
Marc and Mark,
Thanks for the Birthday wishes. Nice to know some folks are in much the same position in this race called life. On the brighter side we are fortunate to have our hobby to keep looking forward to.............I've seen far too many buddies who just turned to vegetables at this point or earlier and I much prefer our approach!
Cheers! (and many more Birthdays to you both as well)
Lance

JackFlash
Joined: January 25, 2004
KitMaker: 11,669 posts
AeroScale: 11,011 posts
Posted: Friday, May 20, 2011 - 02:37 PM UTC
Birthdays and saw blades. I love it!
wing_nut
Joined: June 02, 2006
KitMaker: 1,212 posts
AeroScale: 468 posts
Posted: Friday, May 20, 2011 - 04:59 PM UTC
Quoted Text
Birthdays and saw blades. I love it!

lcarroll
Joined: July 26, 2010
KitMaker: 1,032 posts
AeroScale: 1,025 posts
Posted: Saturday, May 21, 2011 - 01:47 AM UTC
Quoted Text
Quoted TextBirthdays and saw blades. I love it!
Hey! Quit laughing at the oldsters.................in my case Birthdays and sawblades are tremendously exciting!! (by comparison a larger/ more expensive tool - Airbrush for example) could be terminal!
Cheers,Ya'all!
wing_nut
Joined: June 02, 2006
KitMaker: 1,212 posts
AeroScale: 468 posts
Posted: Saturday, May 21, 2011 - 08:40 AM UTC
I am gonna be 56. While not with ya...I am closer than I am far away.
Wait... what?
Wait... what?
wing_nut
Joined: June 02, 2006
KitMaker: 1,212 posts
AeroScale: 468 posts
Posted: Monday, May 23, 2011 - 09:17 AM UTC
It is so nice doing something that is NOT A DECAL! While the crosses on the wings set I started on the wood fuselage.
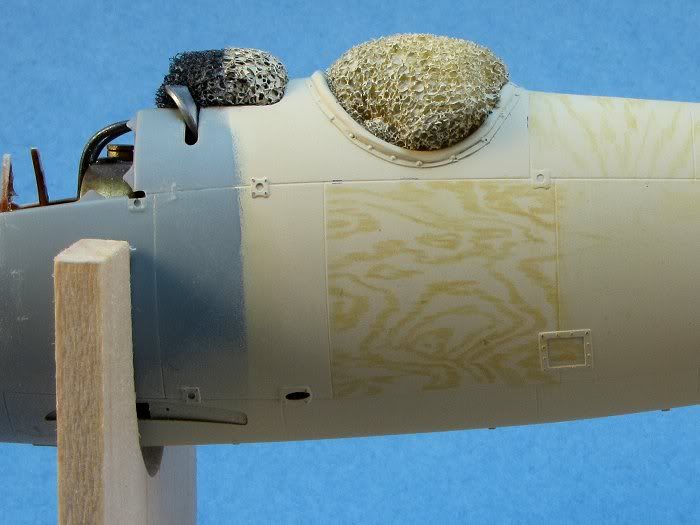
Since my brush painting of the grain was too inconsistent I had to come up with something that would work for me. When I build and weather my armor i am a fan of saying, "Nothing looks more like dirt than real dirt." So I use really dirt. So here I am using real wood grain. First the fuselage was given a primer coat of Mr. Surfacer 1200 that was lightly sanded. Next 2 coats of Tamiya Wood Deck Tan Lightened with white about 2 to 5. The pics below show the next steps, on the other side of the fuselage.
Tape off the panel to be "grained" to protect from the pen going over the edge. You'll see in a sec.
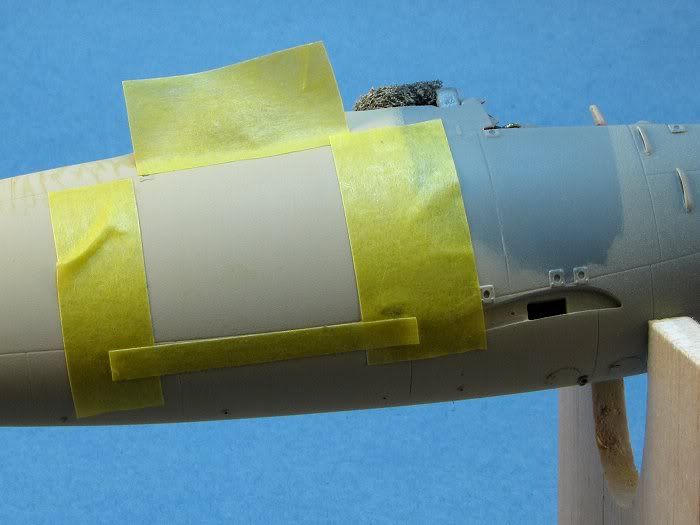
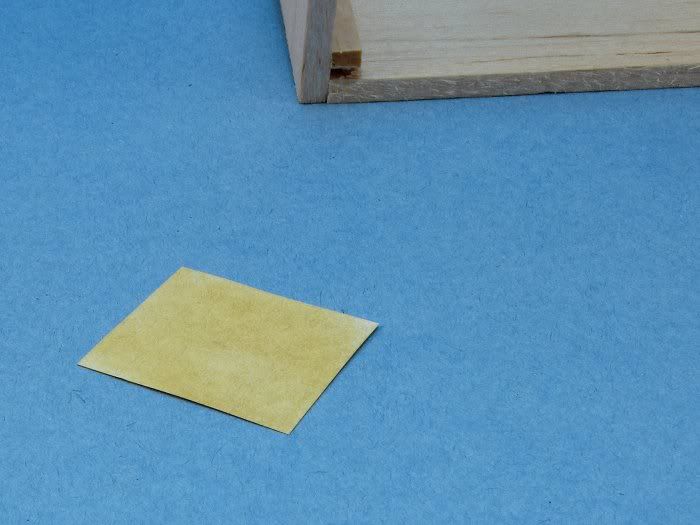
After print the photos of the plywood i took at Lowe's to what I felt was a nice size for the grain, a piece a bit larger than the panel was cut out. The back was covered with a good solid coat of Wood Mig pigment. Blow off the excess.
Hold the paper on the panel and go over the grain with a ball point pen. Use blue or a colored ink so you can see where you've been easier. A piece of tape just on the bottom acts as a hinge so the paper can be pulled back to see if you missed a spot.
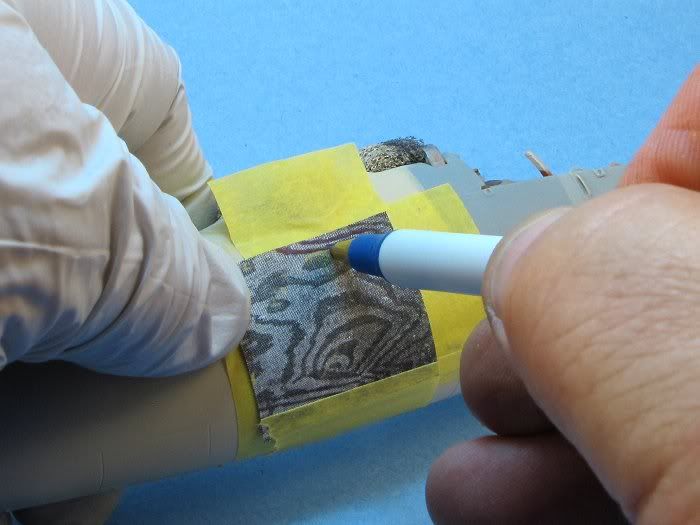
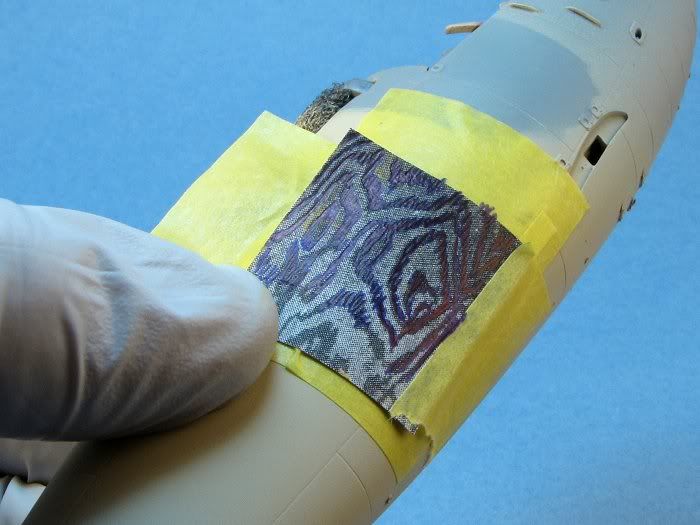
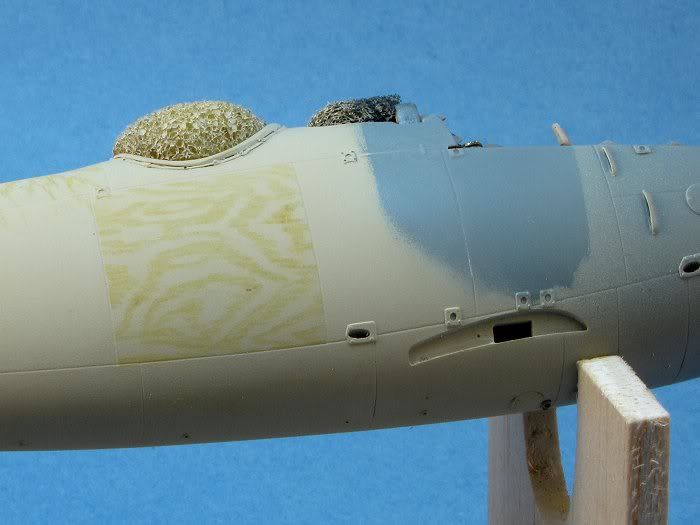
After the panel is done and all the tape has been removed, a light brushing with a stiff brush will blend it sightly so it's not so intense. You can it in the top photo on the spine behind the cockpit.
Since my brush painting of the grain was too inconsistent I had to come up with something that would work for me. When I build and weather my armor i am a fan of saying, "Nothing looks more like dirt than real dirt." So I use really dirt. So here I am using real wood grain. First the fuselage was given a primer coat of Mr. Surfacer 1200 that was lightly sanded. Next 2 coats of Tamiya Wood Deck Tan Lightened with white about 2 to 5. The pics below show the next steps, on the other side of the fuselage.
Tape off the panel to be "grained" to protect from the pen going over the edge. You'll see in a sec.
After print the photos of the plywood i took at Lowe's to what I felt was a nice size for the grain, a piece a bit larger than the panel was cut out. The back was covered with a good solid coat of Wood Mig pigment. Blow off the excess.
Hold the paper on the panel and go over the grain with a ball point pen. Use blue or a colored ink so you can see where you've been easier. A piece of tape just on the bottom acts as a hinge so the paper can be pulled back to see if you missed a spot.
After the panel is done and all the tape has been removed, a light brushing with a stiff brush will blend it sightly so it's not so intense. You can it in the top photo on the spine behind the cockpit.

wolfpack6
Joined: August 07, 2004
KitMaker: 179 posts
AeroScale: 80 posts

Posted: Monday, May 23, 2011 - 10:31 AM UTC
Fantastic idea Marc!
I love simplicity, and you just made my life easier with this time saver.
I love simplicity, and you just made my life easier with this time saver.

JackFlash
Joined: January 25, 2004
KitMaker: 11,669 posts
AeroScale: 11,011 posts
Posted: Monday, May 23, 2011 - 12:55 PM UTC
Nicely done Marc! I look forward to seeing the finished product.
mtnflyer
Joined: March 08, 2009
KitMaker: 394 posts
AeroScale: 360 posts
Posted: Monday, May 23, 2011 - 02:43 PM UTC
Marc!!! You are a pure genius. Thankyou for this. 

OEFFAG_153

Joined: February 19, 2010
KitMaker: 1,473 posts
AeroScale: 1,450 posts
Posted: Monday, May 23, 2011 - 08:16 PM UTC
Now that is a very interesting tecnique very nicely done Marc this thread is really developing into a great tutorial on various hints and tips!
Mikael
Mikael
wing_nut
Joined: June 02, 2006
KitMaker: 1,212 posts
AeroScale: 468 posts
Posted: Tuesday, May 24, 2011 - 12:27 AM UTC
Thanks so much for the encouragement guys, it's really appreciated.
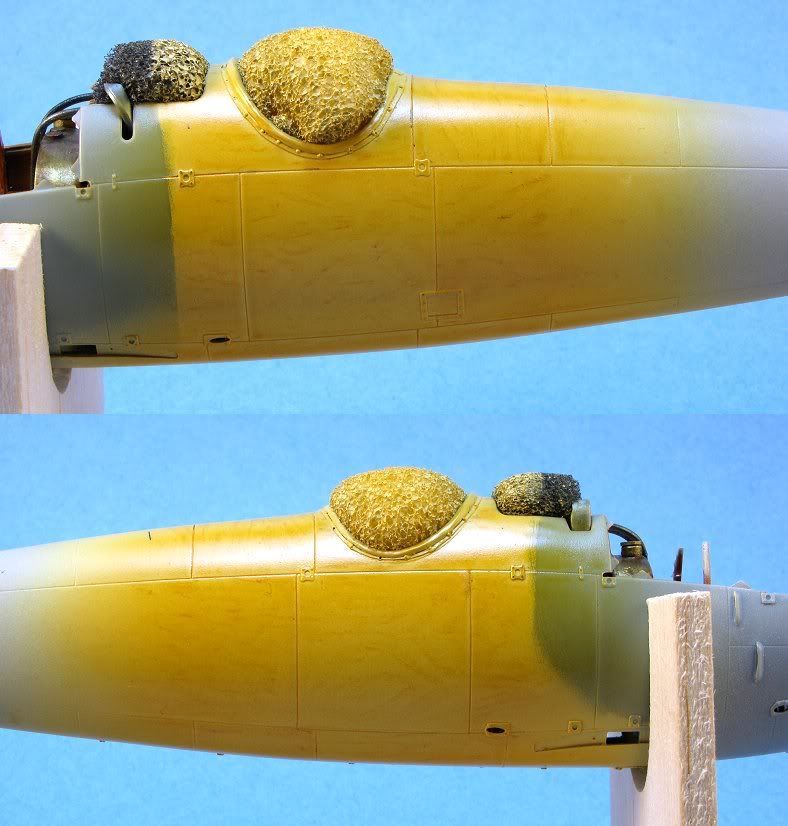
Here is the finished wood grain.. Before sealing with a 70/30 mix clear yellow/orange I took a brown art pencil and lightly make little marks along one side of each of the bands.
The grain pattern shows up in the flesh better than the photo. Any suggestions how to a pic that shows that better?
Here is the finished wood grain.. Before sealing with a 70/30 mix clear yellow/orange I took a brown art pencil and lightly make little marks along one side of each of the bands.
The grain pattern shows up in the flesh better than the photo. Any suggestions how to a pic that shows that better?
 |

WEB HOSTING BY


Copyright ©2021 AeroScale and Kitmaker Network, a subsidiary of Silver Star Enterprises
All Rights Reserved. Please read our Conditions of Use and Privacy Policy.
All Rights Reserved. Please read our Conditions of Use and Privacy Policy.