

Looks great. I have to agree with you 100% about the front formers & engine mounts. A day of rest and my hands have finally stopped shaking from the ordeal.
And thanks for the "photo reminder" that I have to paint the lower half of the engine bay formers gray/green.
Early Aviation
Discuss World War I and the early years of aviation thru 1934.
Discuss World War I and the early years of aviation thru 1934.
Hosted by Jim Starkweather
KoTS GB 2011 Albatros D.III lcarroll

wing_nut

Joined: June 02, 2006
KitMaker: 1,212 posts
AeroScale: 468 posts
Posted: Wednesday, April 27, 2011 - 01:53 AM UTC

lcarroll

Joined: July 26, 2010
KitMaker: 1,032 posts
AeroScale: 1,025 posts

Posted: Friday, April 29, 2011 - 12:22 PM UTC
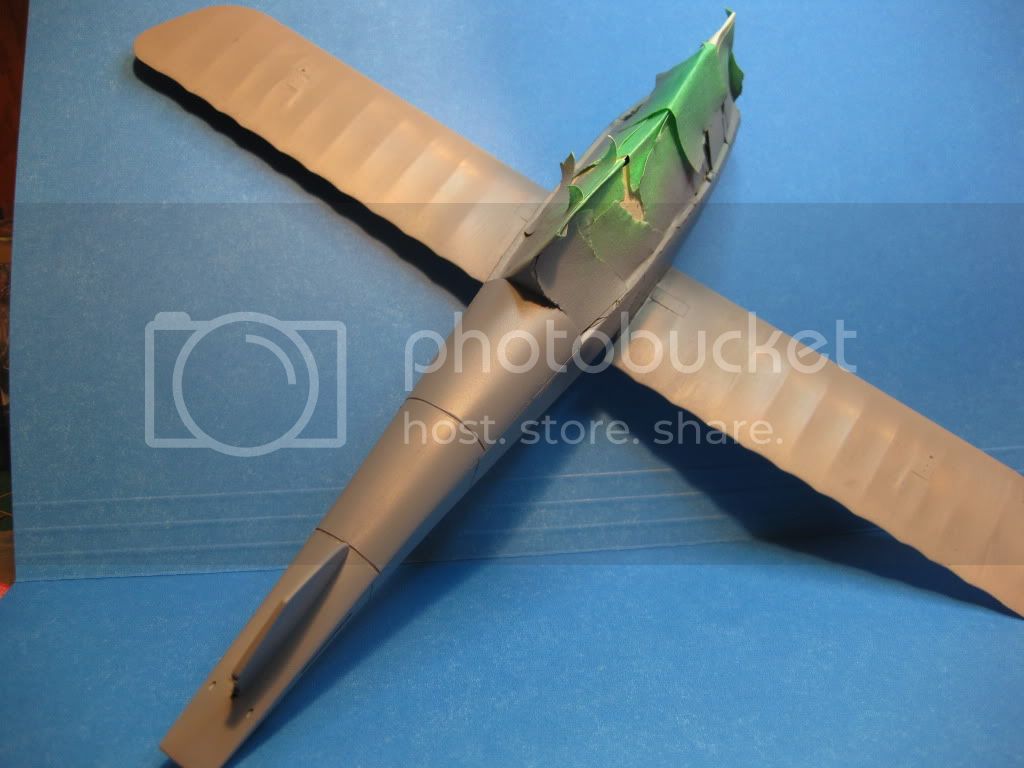
Just a short update; got all the last minute items installed in the cockpit to the point where it was time to "button her up". As predicted, lots of issues with fit encountered at this stage. The right and left halves have met and are permanently mated however no small amount of filling and sanding to be done to say the least.. Part of the problem may have been induced by my decision to attach the lower wing to the left Fus. side; that to enable the control cable rigging. I have a suspicion that the assembly would have fitted better had the wing been added after the two halves were mated however it's now done and if finished properly will not affect the outcome. Also have cut the engine top panels away to enable a proper fit, surprisingly nice fit once in place.
I'll get the filling/sanding to the point where a coat of primer is in order and then drop a few photos on the thread. In the interim I badly need to do some experimeting with some woodgrain for the exterior and try some scrap pre-shading as well.
Cheers,
Lance
I'll get the filling/sanding to the point where a coat of primer is in order and then drop a few photos on the thread. In the interim I badly need to do some experimeting with some woodgrain for the exterior and try some scrap pre-shading as well.
Cheers,
Lance
mtnflyer
Joined: March 08, 2009
KitMaker: 394 posts
AeroScale: 360 posts
Posted: Friday, April 29, 2011 - 01:17 PM UTC
Hi Lance.
I'm hoping you can show us a photo of the fuse mated together. I was wondering how the mate was going to work out for you after you put the wing on first. As you know, I'm building basically the same kit, and predict that I'll be having issues as well. I'm glad you crossed the barrier first, as I can now learn.
Also, have you done anything with the guns? I'm using the Aber AM kit, and am having a hoop of a time. First time trying things is proving to be frustrating.
Yours is coming along just fine.
lcarroll
Joined: July 26, 2010
KitMaker: 1,032 posts
AeroScale: 1,025 posts
Posted: Saturday, April 30, 2011 - 10:05 AM UTC
Quoted Text
Hi Lance.
I'm hoping you can show us a photo of the fuse mated together. I was wondering how the mate was going to work out for you after you put the wing on first. As you know, I'm building basically the same kit, and predict that I'll be having issues as well. I'm glad you crossed the barrier first, as I can now learn.
Also, have you done anything with the guns? I'm using the Aber AM kit, and am having a hoop of a time. First time trying things is proving to be frustrating.
Yours is coming along just fine.
Guy,
Will do, I just finished sanding the first application of filler and applied the second. Once dry I'll be cleaning it up and hopefully won't require another filling. I'll post a couple of photos before priming which will show you where I encountered the problems by virtue of where and how much filling had to be done. I hope it helps you reducing the problems you may encounter. As I said earlier my right fuselage half was twisted/ warped slightly which may have caused or at least compounded the problem.
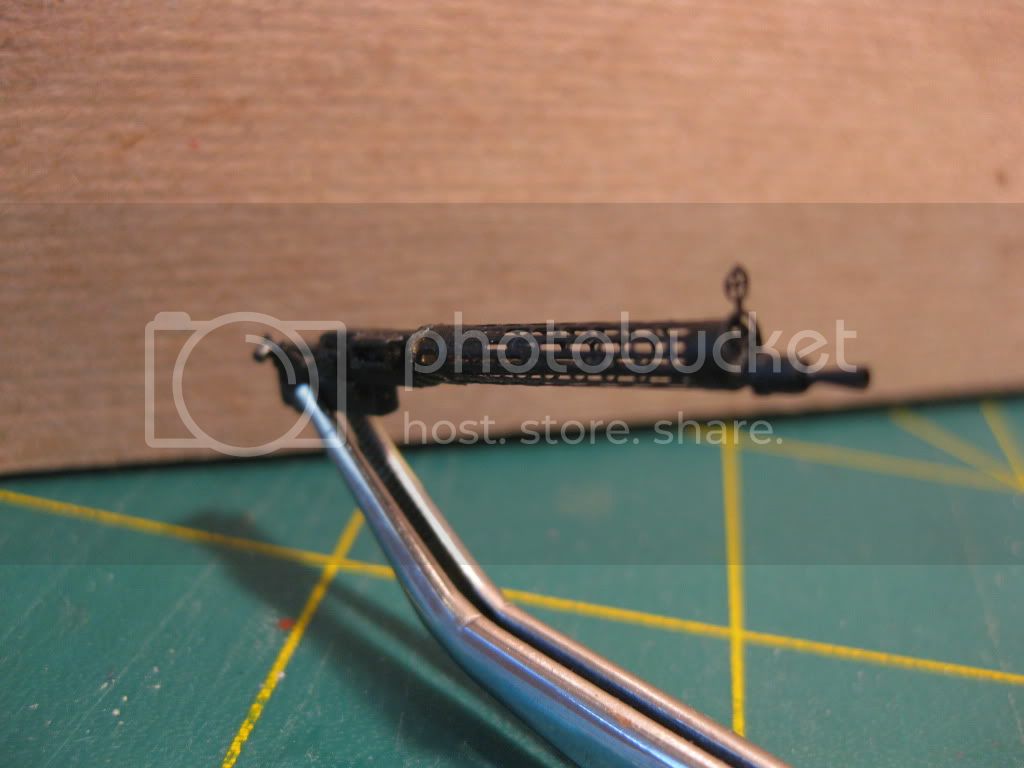
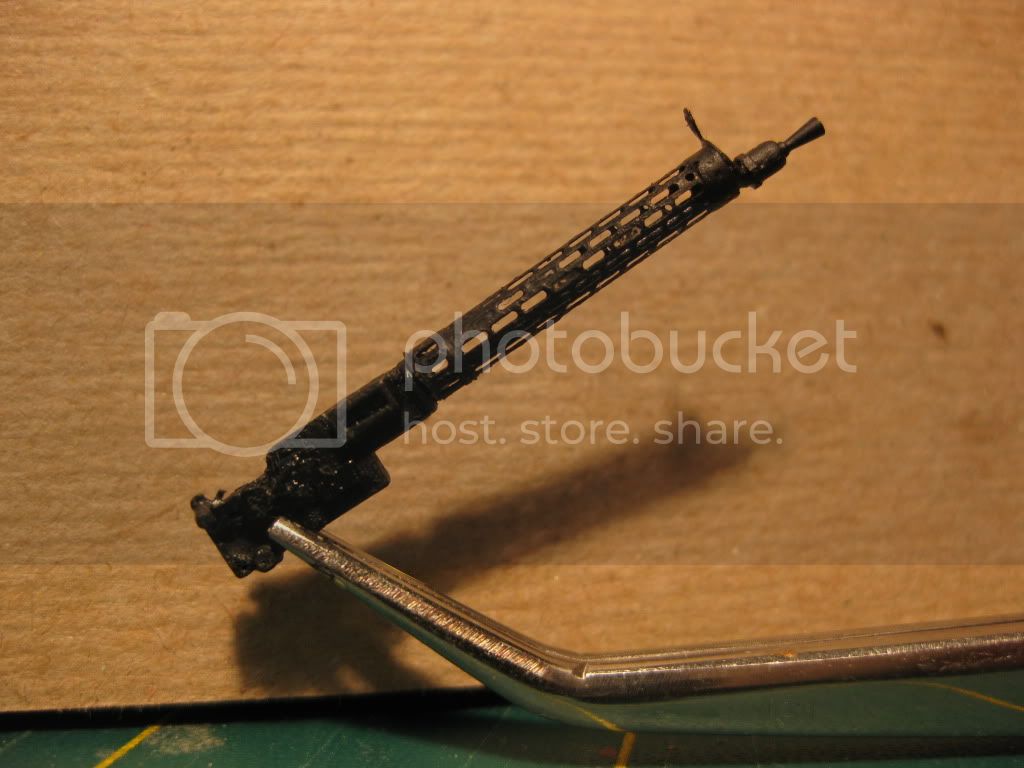
As for the guns, I havn't started but plan on using one of the "Master" sets I bought recently. I believe they are roughly the same as the Aber Set you have, gun jackets cast round ie. no rolling required and beautiful little cast brass barrels as well.looking forward to trying them.
I'll try to get the photos on here late tonite or tomorrow.
Cheers,
Lance
lcarroll
Joined: July 26, 2010
KitMaker: 1,032 posts
AeroScale: 1,025 posts
Posted: Tuesday, May 03, 2011 - 04:20 AM UTC
Quoted Text
Hi Lance.
I'm hoping you can show us a photo of the fuse mated together. I was wondering how the mate was going to work out for you after you put the wing on first. As you know, I'm building basically the same kit, and predict that I'll be having issues as well. I'm glad you crossed the barrier first, as I can now learn.
Also, have you done anything with the guns? I'm using the Aber AM kit, and am having a hoop of a time. First time trying things is proving to be frustrating.
Yours is coming along just fine.
Guy, (and All)
Finally have a photo or two per your request and an update. The few snags I've encountered have been partly resolved, but as you will see, still a fair distance from where I'm at to succesful completion!
First, it took 3 applications and sandings to get the filler to the point where a coat of primer could be applied. I also sanded away a lot of the raised detail as it will be replaced by the Eduard and , to a lessor extent, Tom's Model Works Photo Etch components. Here's a few shots of the filler prior to finishing; how ugly can it get?!
Once sanded and completed you can see the amount of filler required (and 3 layers) to cover the gaps in the mis-aligned fuselage halves.
At this stage the grey primer was applied to highlight any scratches or flaws. The biggest set back at this point is the loss of some of the recessed panel lines and particularly the nasty results of attempting to rescribe them. More filler required at this point as you will discern in the following views!
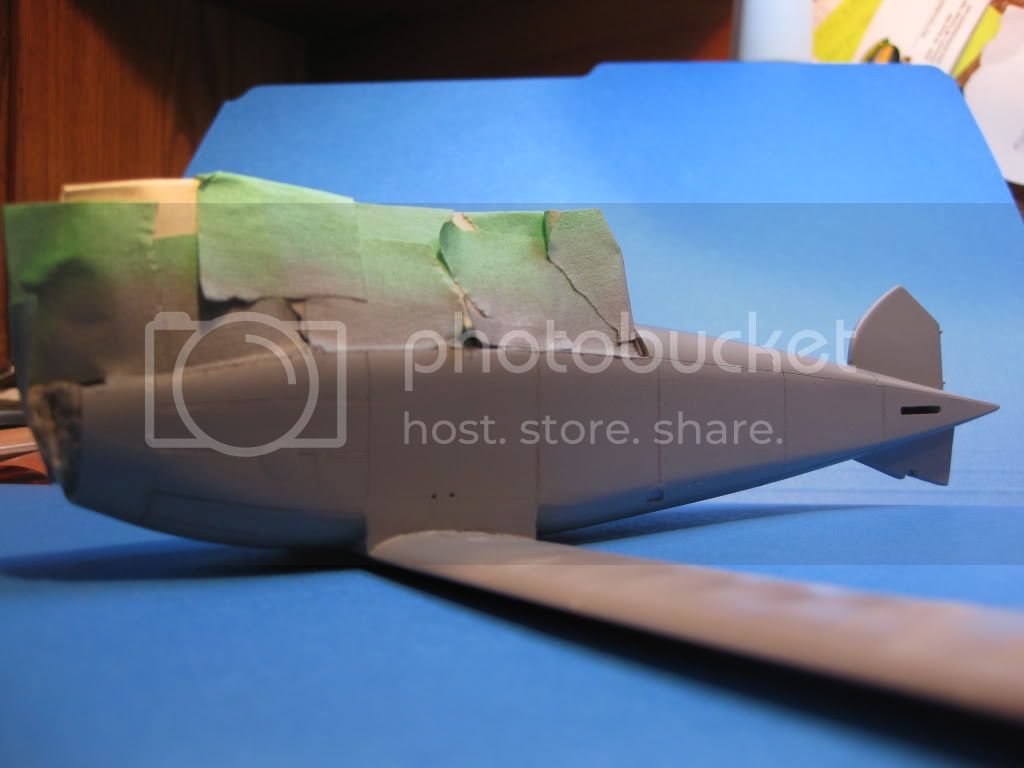
At this point I'll be spending more then just a few hours re-scribing some of the lost panel lines, filling in the points where they have run past their terminal points, and filling and sanding the scratches that the primer has highlighted. Once that is complete I'll touch up the primer, enter a short update, and get on with drilling all the rigging points and mounting the PE bits prior to spraying the wood base color and making a final decision on painted woodgrain vs. decaled woodgrain.
Confidence is still high however this kit has turned into a bit of a "bear"!
Cheers,
Lance

Kornbeef

Joined: November 06, 2005
KitMaker: 1,667 posts
AeroScale: 1,551 posts

Posted: Tuesday, May 03, 2011 - 04:58 AM UTC
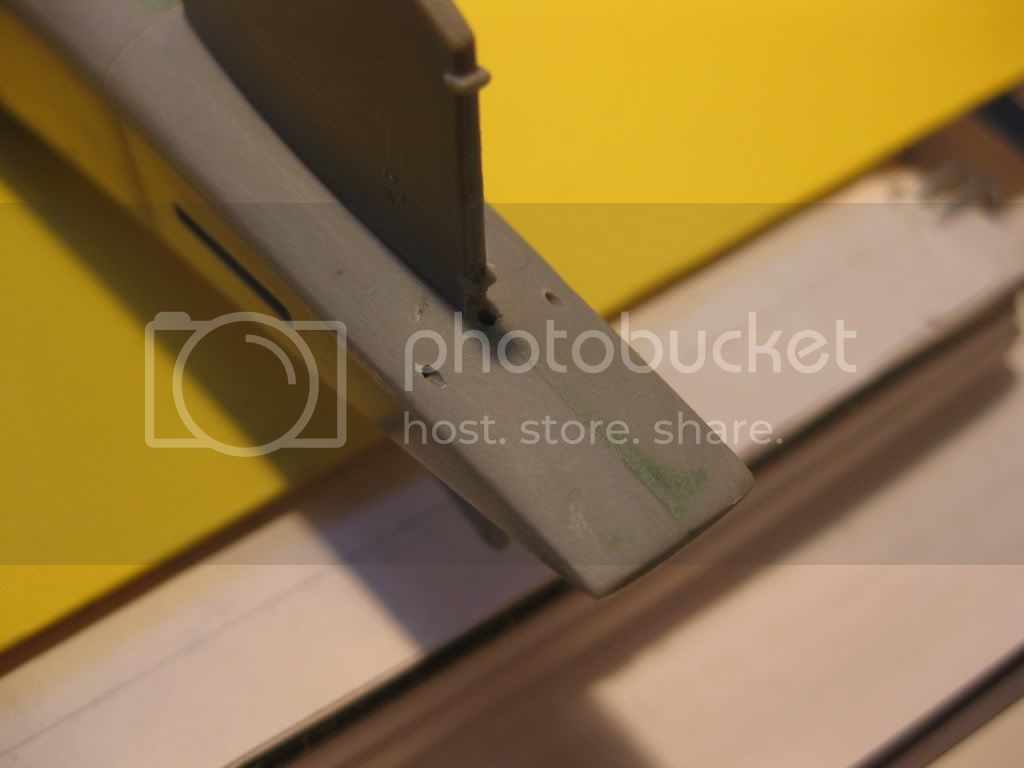
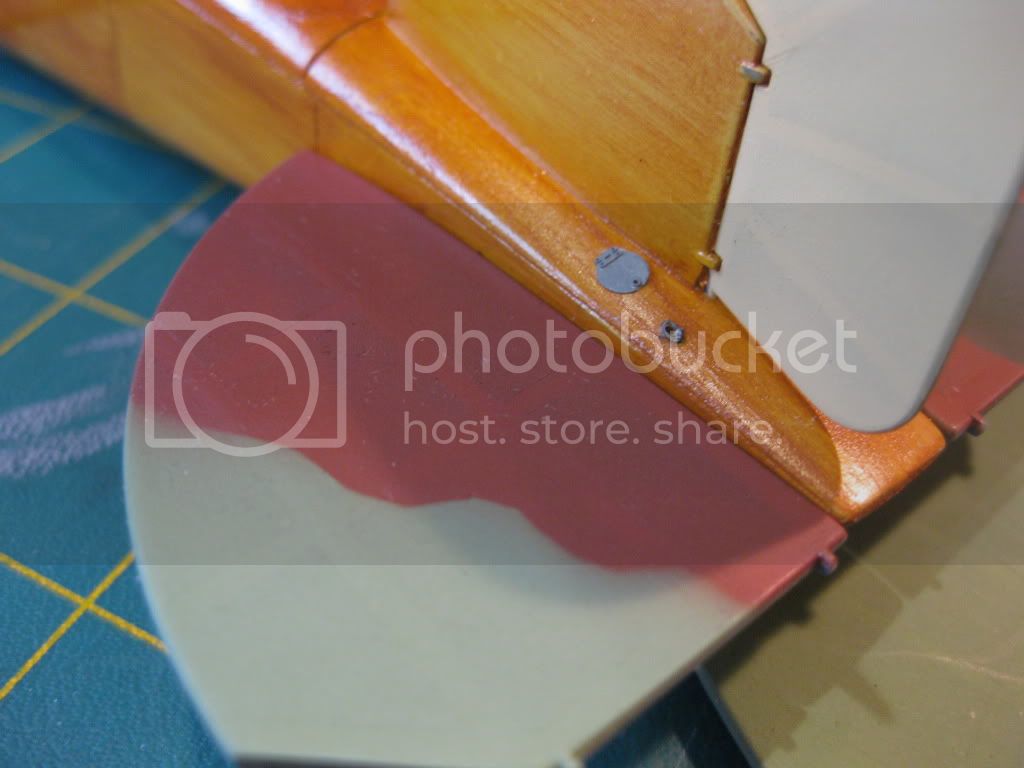
Lance, hi again, glad to see you spotted the front nose cowl runs around the fuselage and not how Roden show it as part of the lower nose panel. One thing i want to point out before you get too far though...well 2 actually.
1. see the two indent/holes on the fuselage sides above the wing? They should be much lower, theyre rigging points and sit an inch or so above the wing top surface, also there should be four. those two are the outer ones and are holes and have a rim, the two inner ones between them are rigged to the skin
2 Don't over worry about filling just yet....wait till you gat the coaming and cowls in place..
Keith.
lcarroll
Joined: July 26, 2010
KitMaker: 1,032 posts
AeroScale: 1,025 posts
Posted: Tuesday, May 03, 2011 - 07:59 AM UTC
Quoted Text
Lance, hi again, glad to see you spotted the front nose cowl runs around the fuselage and not how Roden show it as part of the lower nose panel. One thing i want to point out before you get too far though...well 2 actually.
1. see the two indent/holes on the fuselage sides above the wing? They should be much lower, theyre rigging points and sit an inch or so above the wing top surface, also there should be four. those two are the outer ones and are holes and have a rim, the two inner ones between them are rigged to the skin
2 Don't over worry about filling just yet....wait till you gat the coaming and cowls in place..
Keith.
Keith,
Thanks for the "heads up". I spent a few minutes doing a photo search just after posting this update; had picked up on the location of the two rimmed holes in the DIII Datafile Special on Pg.16. Excellent shot of the much lower placement in the photo of Franz Hilger and a better one on Pg. 41 (#106) Such excellent Publications, I would be lost without them.
I am hoping to paint the coaming and engine cowls before installation to eliminate the requirement for more masking and reduce the overspray hazard.............will see how that looks once I get closer.
Things are going very slowly as I'm also getting familiar with the new airbrush. When I started back into the hobby I retired my 25 year old Paasche, gave away the "vile" Aztec I'd recieved as a well meant gift years ago and invested in an Iwata Highline. So many things to fine tune but very impressive.
Keep that eagle eye sharp; all suggestions and comments, as you say, are most welcome.
Cheers,
Lance
lcarroll
Joined: July 26, 2010
KitMaker: 1,032 posts
AeroScale: 1,025 posts
Posted: Wednesday, May 04, 2011 - 04:09 PM UTC
Another quick update before I'm off to work for 3 days (8 more left!!)
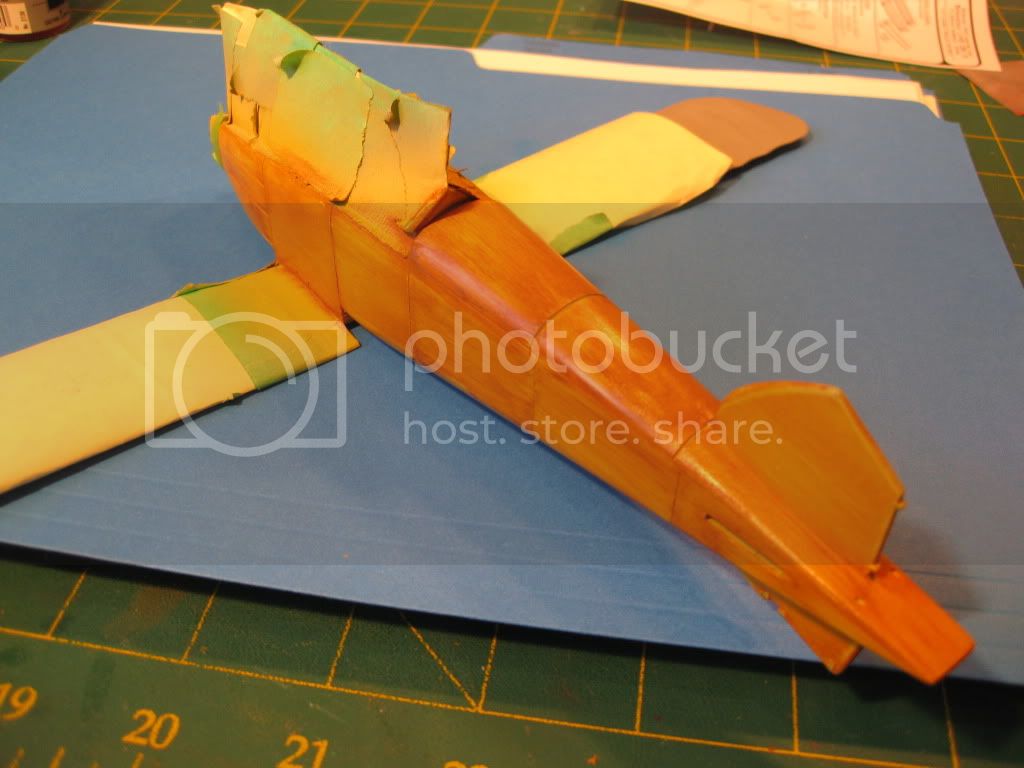
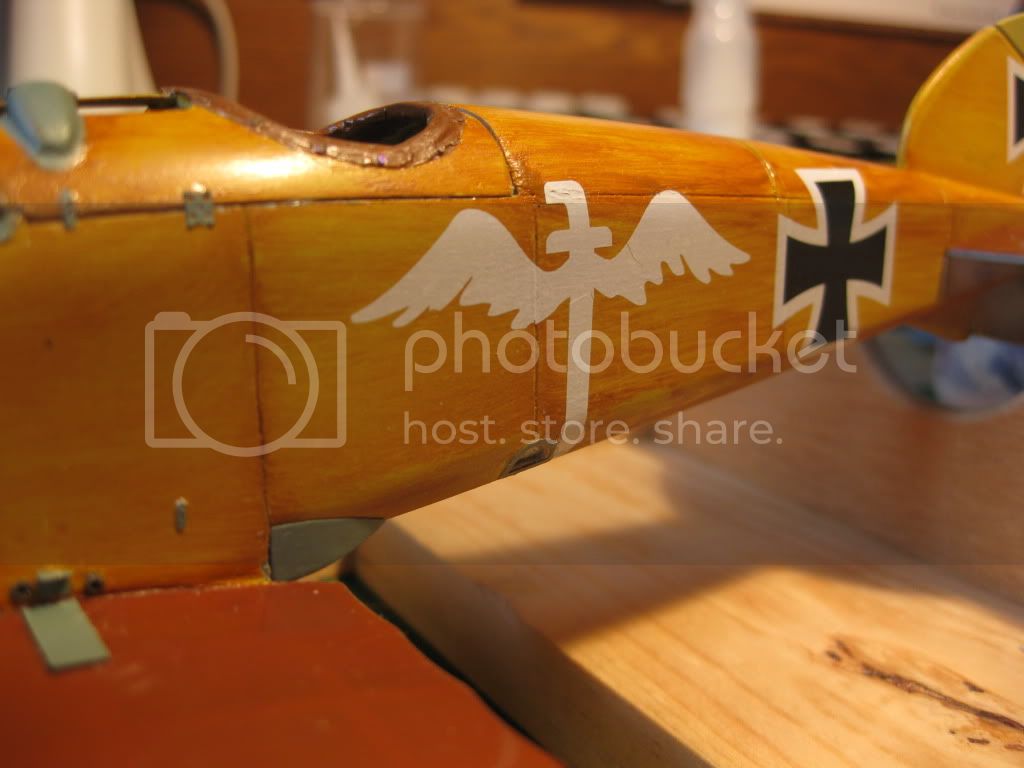
The fuselage was sprayed with a coat of Humbrol Oak, allowed to dry over night, and then the woodgraining exercise completed.
I used the same technique as the inner walls, water color (Grumbacher Raw Sienna) worked with various damp / dry brushes and, when dry, sanded very lightly with very fine wet and dry sandpaper. Following that I airbrushed a thin coat of 50/50 mix Tamiya clear yellow to seal the pattern and lend the proper golden tone.
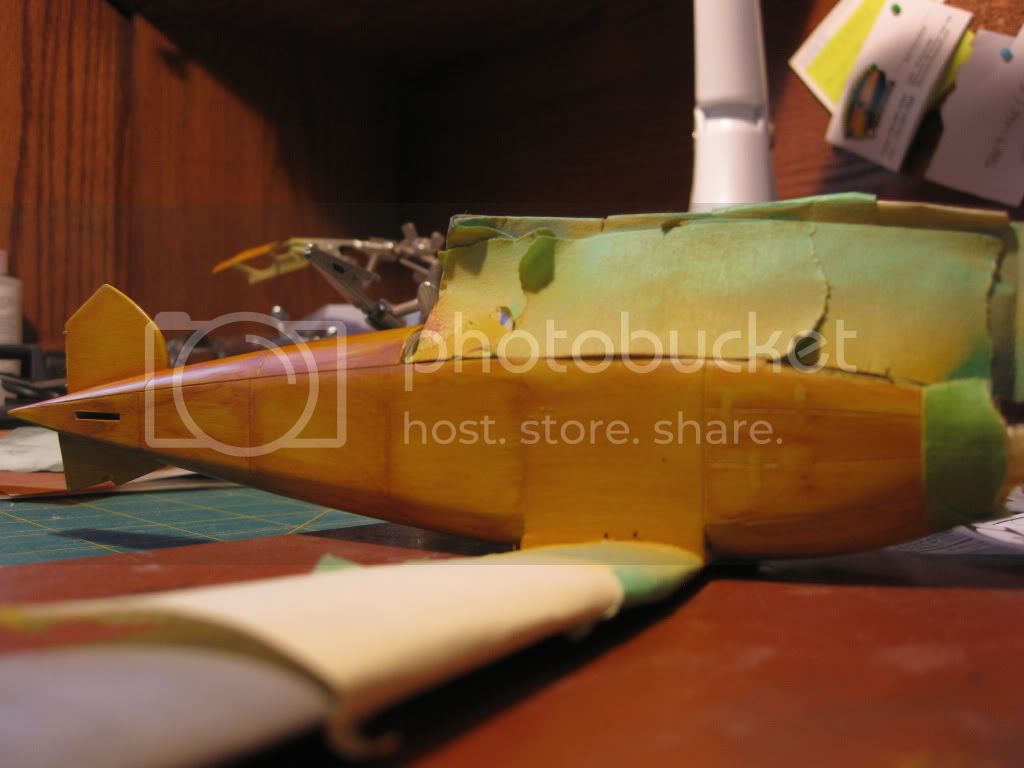
I've elected to leave the Photo Etch and rigging work until completion of the wood graining and paneling which will follow next in the sequence.
I am only modreately pleased with the woodgrain results at this stage however for my first attempt I'll accept it. (definitely a strong de-briefing on technique will be self administered for the rest of the project!)
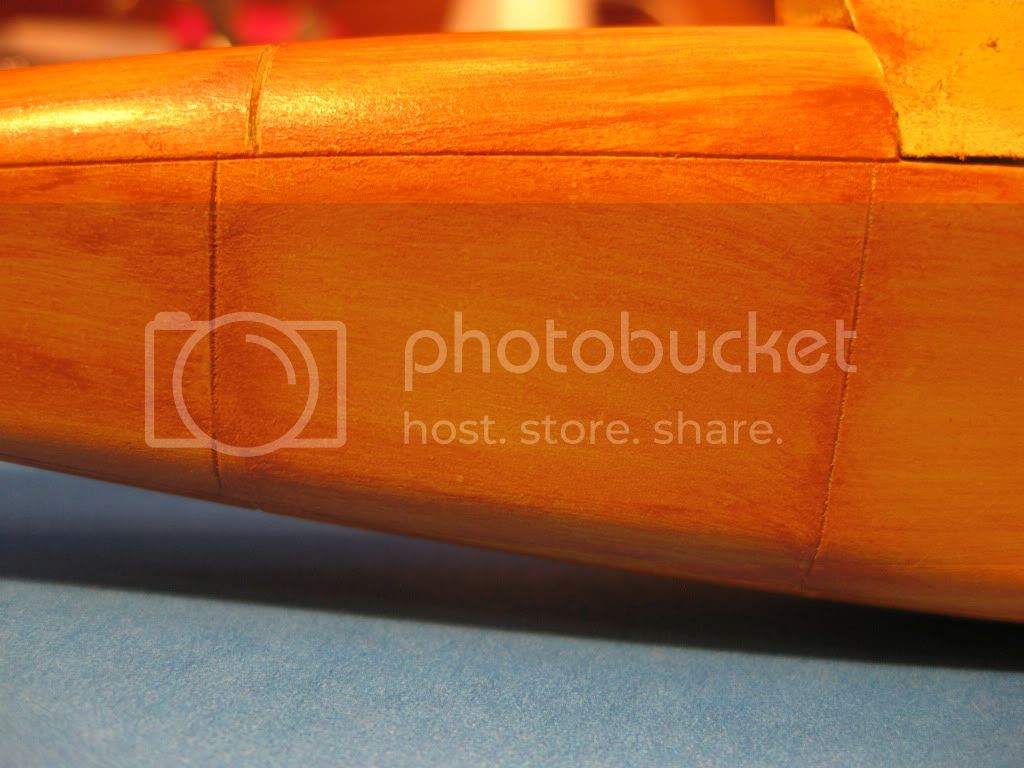
The lighting really changes the tone and appearance in the photos, this one coming off much "redder" then the actual. The following pair are more like the real effect............

The final step in this stage is a coat of clear overcoat to provide a complete and high gloss finish coat; that will be sprayed tomorrow A.M. and allowed to cure for several days before the masking is pulled, coaming, a lot of PE Components, and engine panels installed and prep work for the rigging done.
I've also gathered up all the "stuff"required to do up the Spandaus...........something completely different that I am looking forward to a lot.
Be back in earnest in 3-4 days but will check for responses. As my new mentor Keith says, "All comments good or bad welcome! "
ADDED BY EDIT.......OMG!!! he screams as he rushes to determine if the "green bits" and scratches in the photos are as bad as they appear on the real item. They are not discernable to the naked eye; these little digital cameras are incredible to say the least. Whew......breathes heavy sigh of relief!
Cheers,
Lance
The fuselage was sprayed with a coat of Humbrol Oak, allowed to dry over night, and then the woodgraining exercise completed.
I used the same technique as the inner walls, water color (Grumbacher Raw Sienna) worked with various damp / dry brushes and, when dry, sanded very lightly with very fine wet and dry sandpaper. Following that I airbrushed a thin coat of 50/50 mix Tamiya clear yellow to seal the pattern and lend the proper golden tone.
I've elected to leave the Photo Etch and rigging work until completion of the wood graining and paneling which will follow next in the sequence.
I am only modreately pleased with the woodgrain results at this stage however for my first attempt I'll accept it. (definitely a strong de-briefing on technique will be self administered for the rest of the project!)
The lighting really changes the tone and appearance in the photos, this one coming off much "redder" then the actual. The following pair are more like the real effect............
The final step in this stage is a coat of clear overcoat to provide a complete and high gloss finish coat; that will be sprayed tomorrow A.M. and allowed to cure for several days before the masking is pulled, coaming, a lot of PE Components, and engine panels installed and prep work for the rigging done.
I've also gathered up all the "stuff"required to do up the Spandaus...........something completely different that I am looking forward to a lot.
Be back in earnest in 3-4 days but will check for responses. As my new mentor Keith says, "All comments good or bad welcome! "
ADDED BY EDIT.......OMG!!! he screams as he rushes to determine if the "green bits" and scratches in the photos are as bad as they appear on the real item. They are not discernable to the naked eye; these little digital cameras are incredible to say the least. Whew......breathes heavy sigh of relief!
Cheers,
Lance

thegirl
Joined: January 19, 2008
KitMaker: 6,743 posts
AeroScale: 6,151 posts
Posted: Thursday, May 05, 2011 - 01:14 AM UTC
Wow Lance , you really have made some excellent head way on your build !
The wood graining on the fuselage looks good , looking forward to your next up-date
The wood graining on the fuselage looks good , looking forward to your next up-date
lcarroll
Joined: July 26, 2010
KitMaker: 1,032 posts
AeroScale: 1,025 posts
Posted: Thursday, May 05, 2011 - 04:16 AM UTC
Quoted Text
Wow Lance , you really have made some excellent head way on your build !
The wood graining on the fuselage looks good , looking forward to your next up-date
Terri,
Thanks for the kind words. I got the clear gloss top coat on an hour ago, will let it cure for a few days and then she should progress pretty quickly. The overcoat has smoothed out the finish nicely and toned down the panel lines, I am looking forward to this all coming together.
Cheers,
Lance
wing_nut
Joined: June 02, 2006
KitMaker: 1,212 posts
AeroScale: 468 posts
Posted: Friday, May 06, 2011 - 03:04 PM UTC
Excellent progress Lance. The wood grain is good because it looks like wood.
lcarroll
Joined: July 26, 2010
KitMaker: 1,032 posts
AeroScale: 1,025 posts
Posted: Tuesday, May 17, 2011 - 03:42 PM UTC
Marc,
Thanks for the vote of confidence. Been slowly grinding away at some of the more tedious portions; more to follow imminently.
Cheers,
Lance
Thanks for the vote of confidence. Been slowly grinding away at some of the more tedious portions; more to follow imminently.
Cheers,
Lance
lcarroll
Joined: July 26, 2010
KitMaker: 1,032 posts
AeroScale: 1,025 posts
Posted: Wednesday, May 18, 2011 - 04:14 AM UTC
Finally, more progress to report. Can't believe it's been two weeks since my last "milestone".
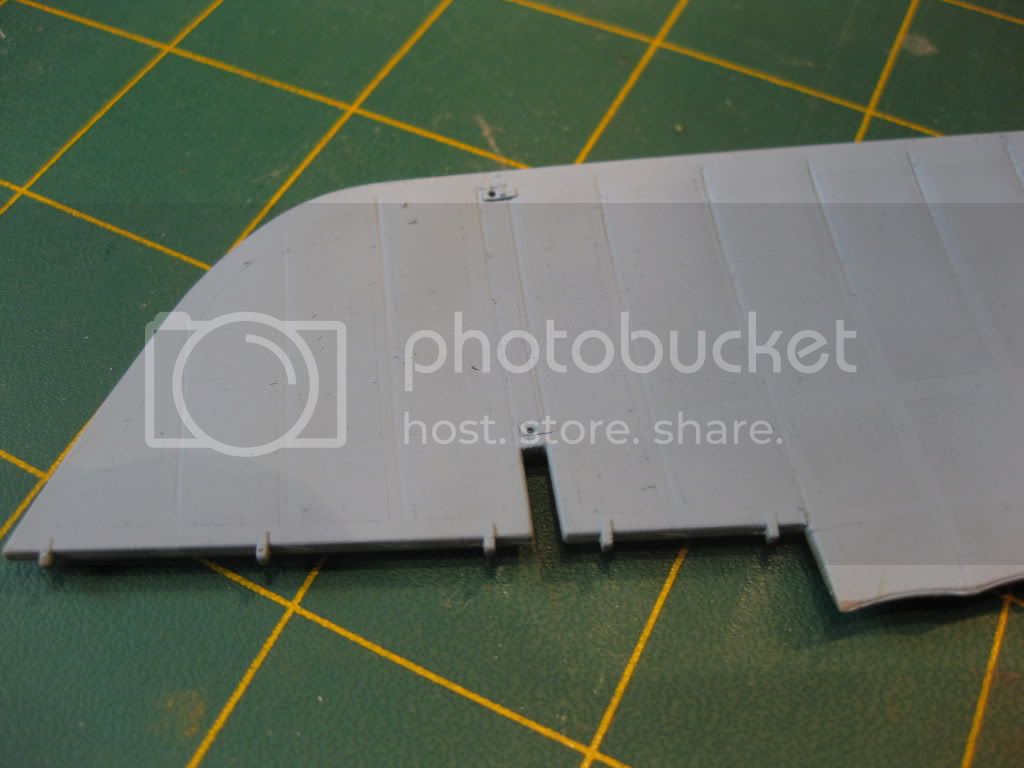
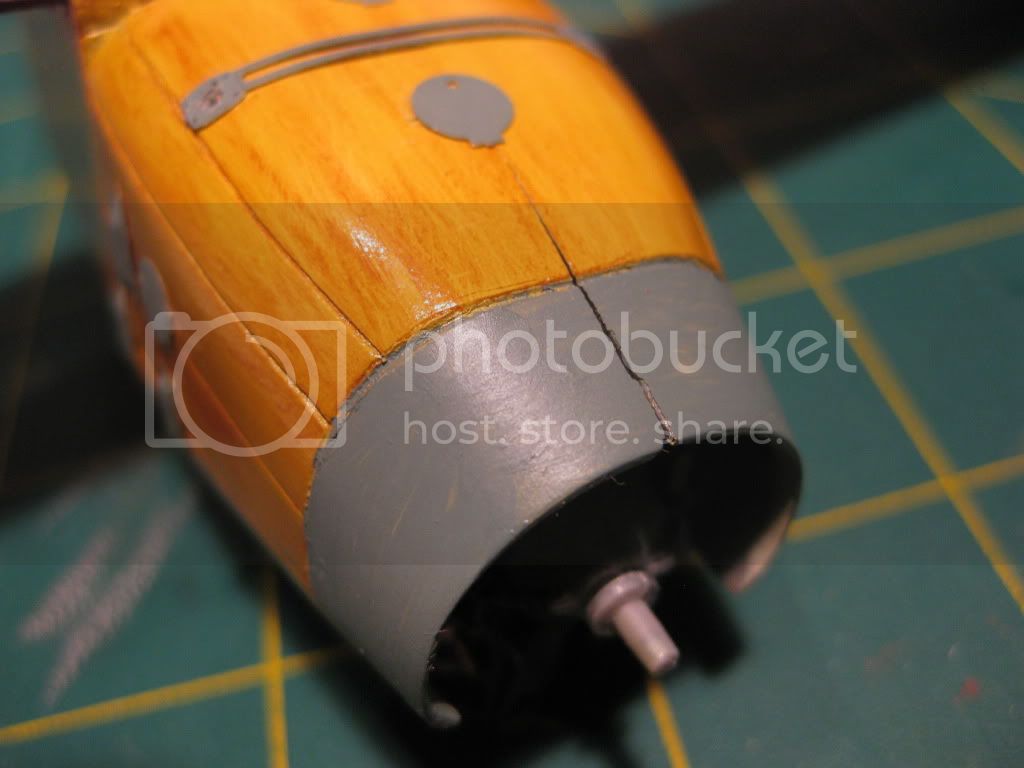
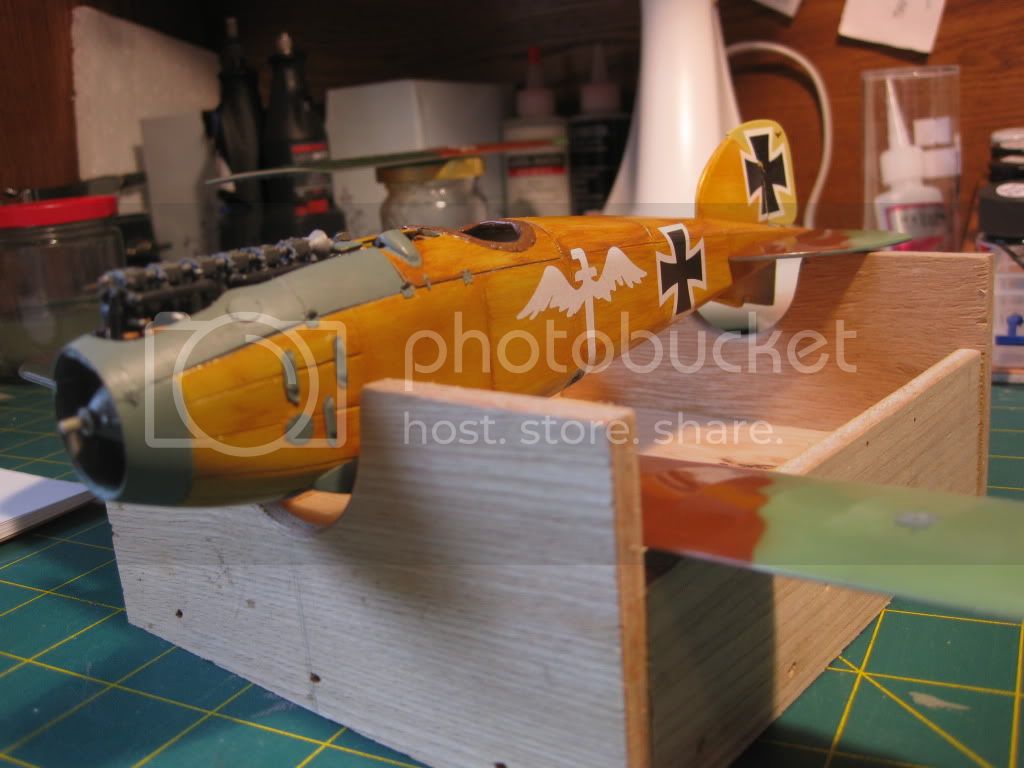
With the coat of gloss top coat (Model Master Clear) on the fuselage well dried the next step completed was the addition of Photo Etched panel covers, grommets, and cooling louvres. A mix of Eduard's excellent DIII Set and Tom's Model Works Set was used. The Eduard product is much more detailed however even when annealed does not match the pliability of the Tom's components supplied on a fret of very soft and workable yellow brass parts.
At this point, having sanded away all but a vague outline of the nose area covers and louvres I discovered that the Eduard cooling louvres did not at all provide a good representation; possibly my efforts to bend the components to achieve the 3D effect were in error. After several attempts to manufacture replacements success was achieved using .002 brass sheet stock (K&S Engineering #258 Brass Shim Set purchased at a Hobby Shop) The brass was burnished over the mould provided by the vents on a WNW DVa and the technique produced some satisfactory results. Once painted with the green-grey mix and installed they fit the bill nicely.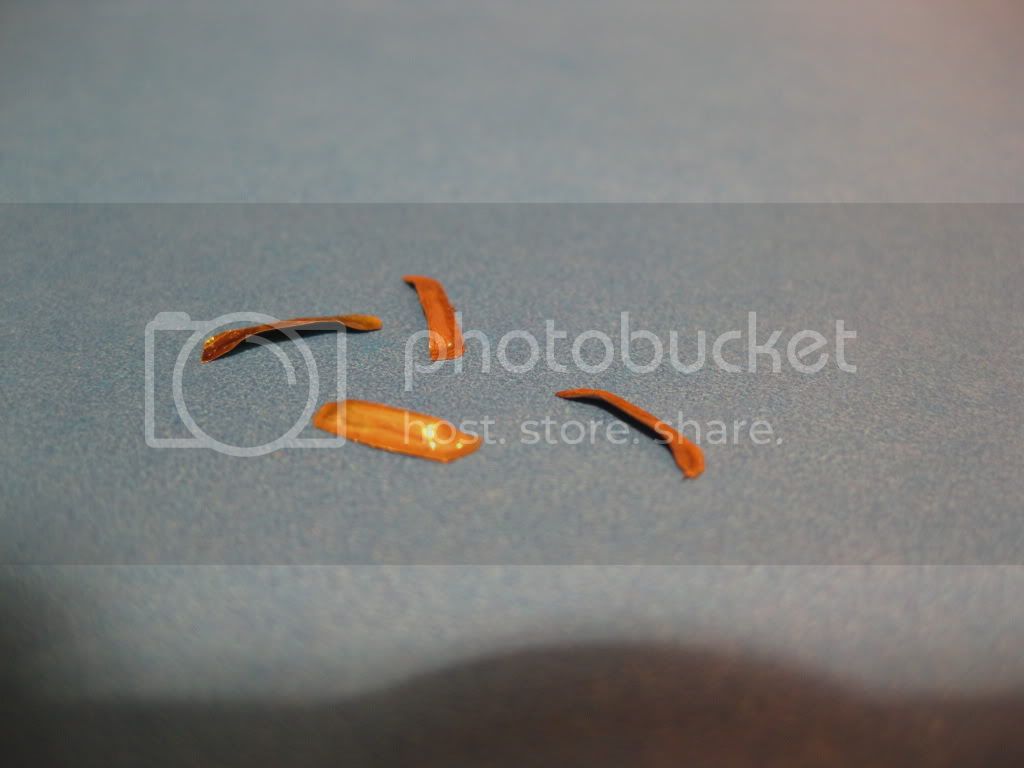
I made the 6 required plus 2 spares which, given the loss of one during the handling required during the Pre-shading and painting stages, came in quite handy! Below is a photo of the installed products.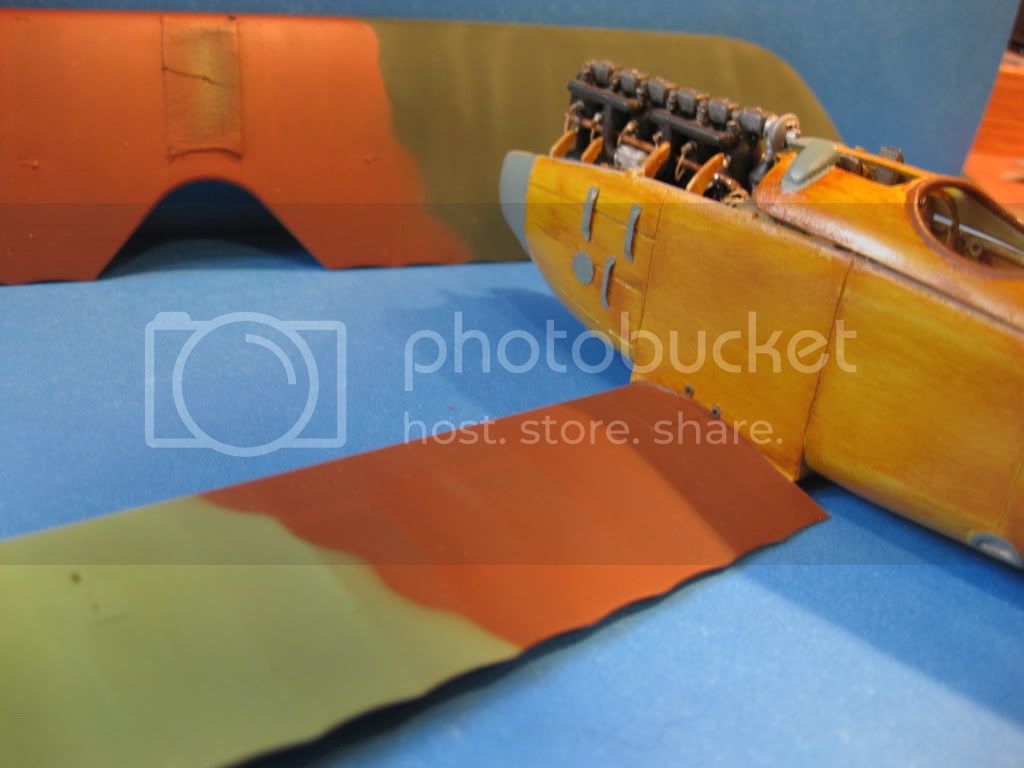
A light additional coat of clear gloss will be applied after a quick grey-green touch up and should smooth out the seams nicely.
Next step, Pre-Shading.
mtnflyer
Joined: March 08, 2009
KitMaker: 394 posts
AeroScale: 360 posts
Posted: Wednesday, May 18, 2011 - 04:47 AM UTC
Quoted Text
The brass was burnished over the mould provided by the vents on a WNW DVa
Lance, I'll be adding that neat idea to my tickle trunk. Your louvres look really good. The Eduard set is what I have to work with, and I no what you mean that its a tough stuff to work with. In my opinion, Eduard should be using a slightly softer alloy.
Keep at it, it looks good. Looking forward to more. Guy
lcarroll
Joined: July 26, 2010
KitMaker: 1,032 posts
AeroScale: 1,025 posts
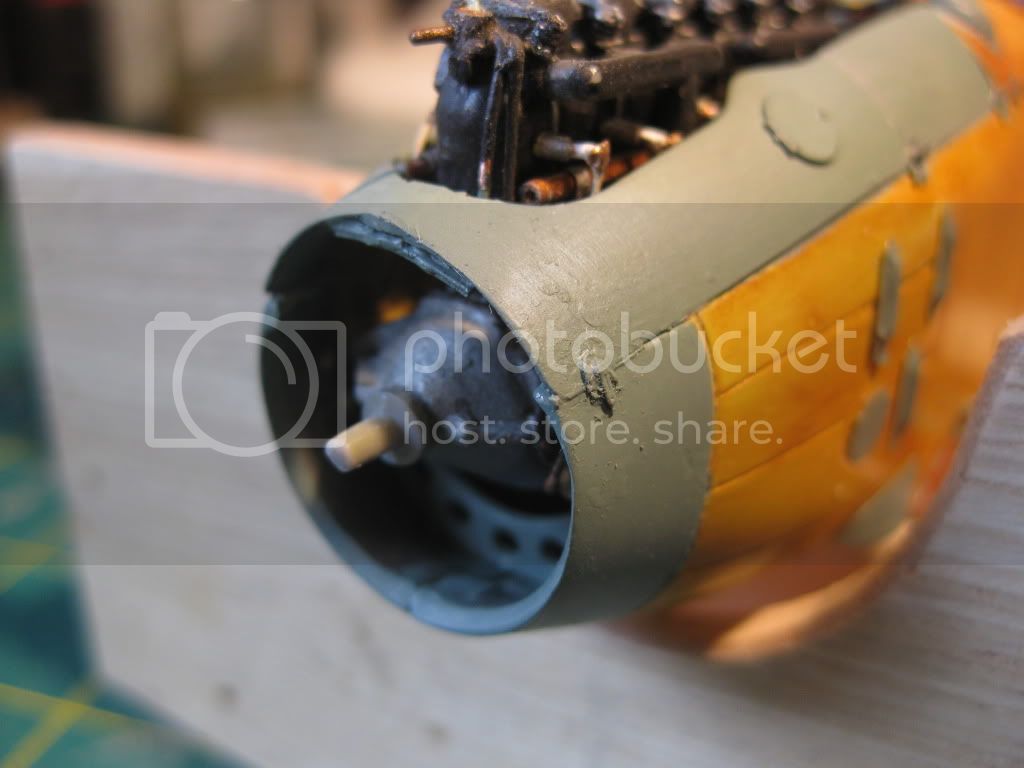
Posted: Wednesday, May 18, 2011 - 05:20 AM UTC
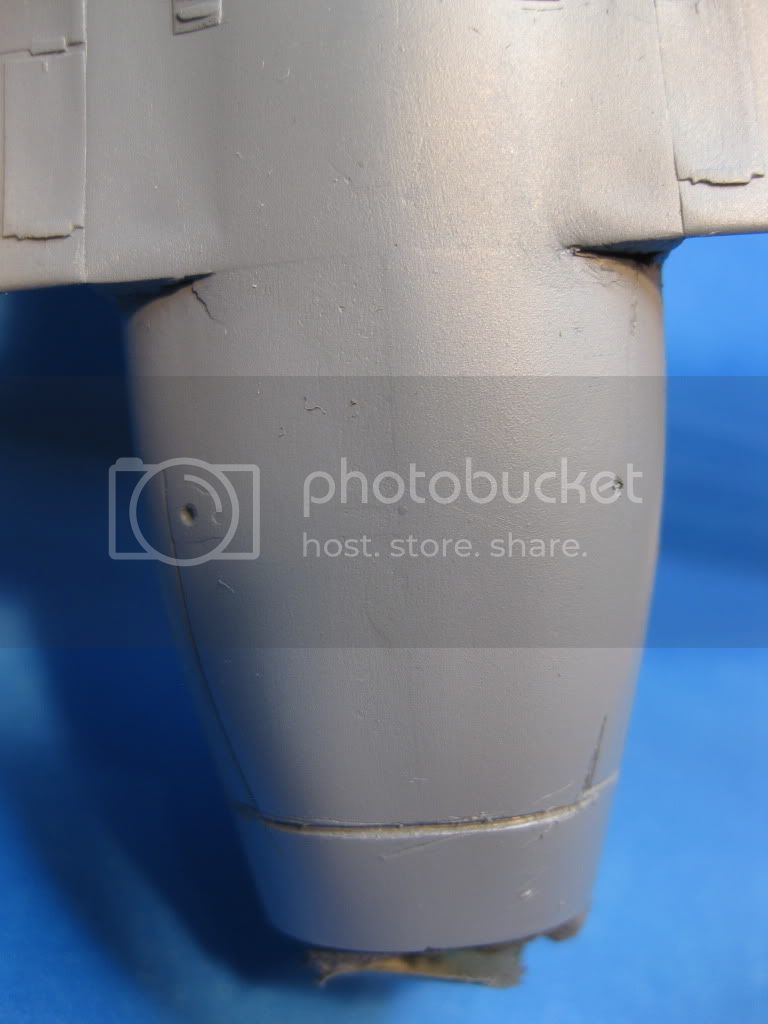
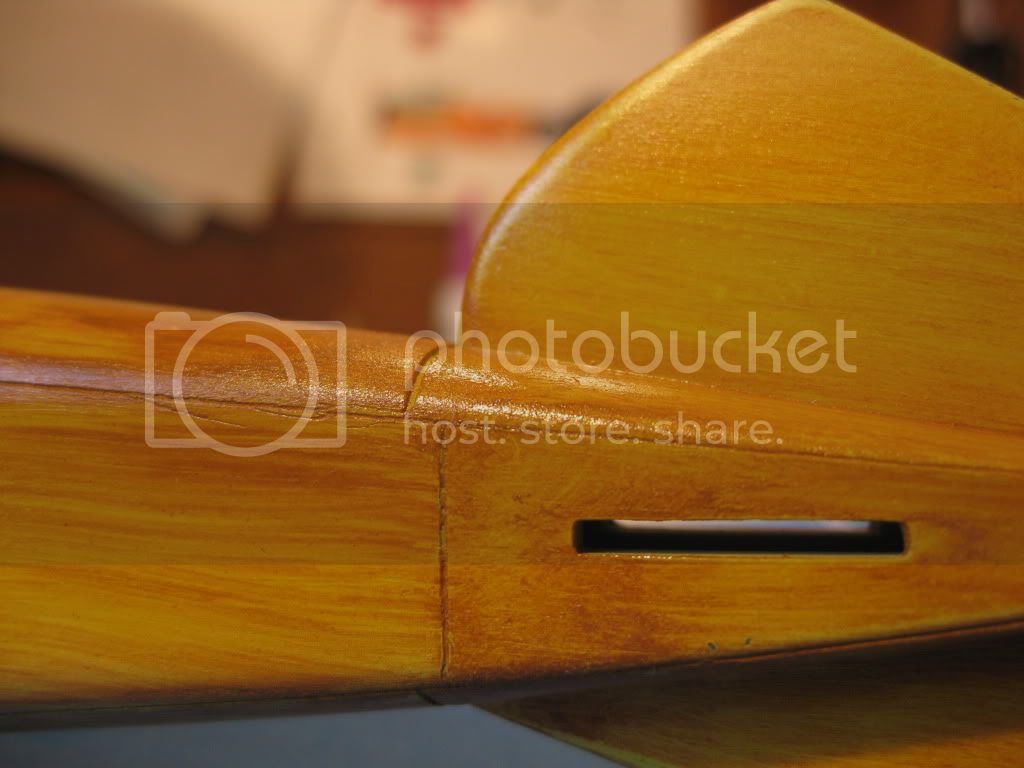
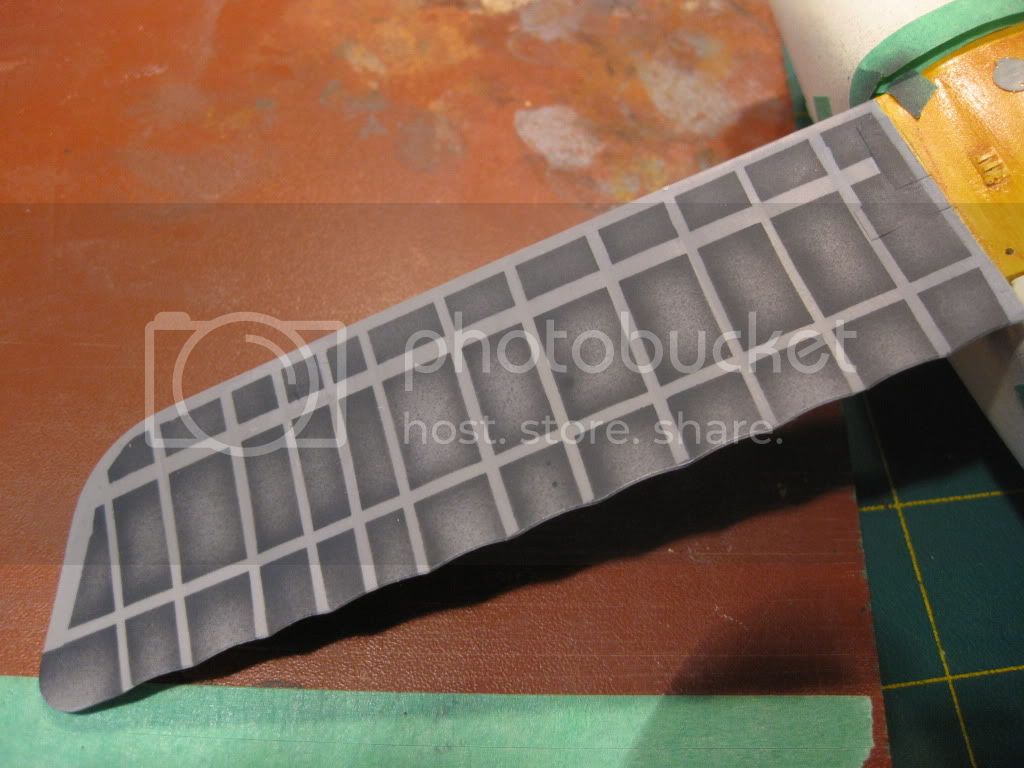
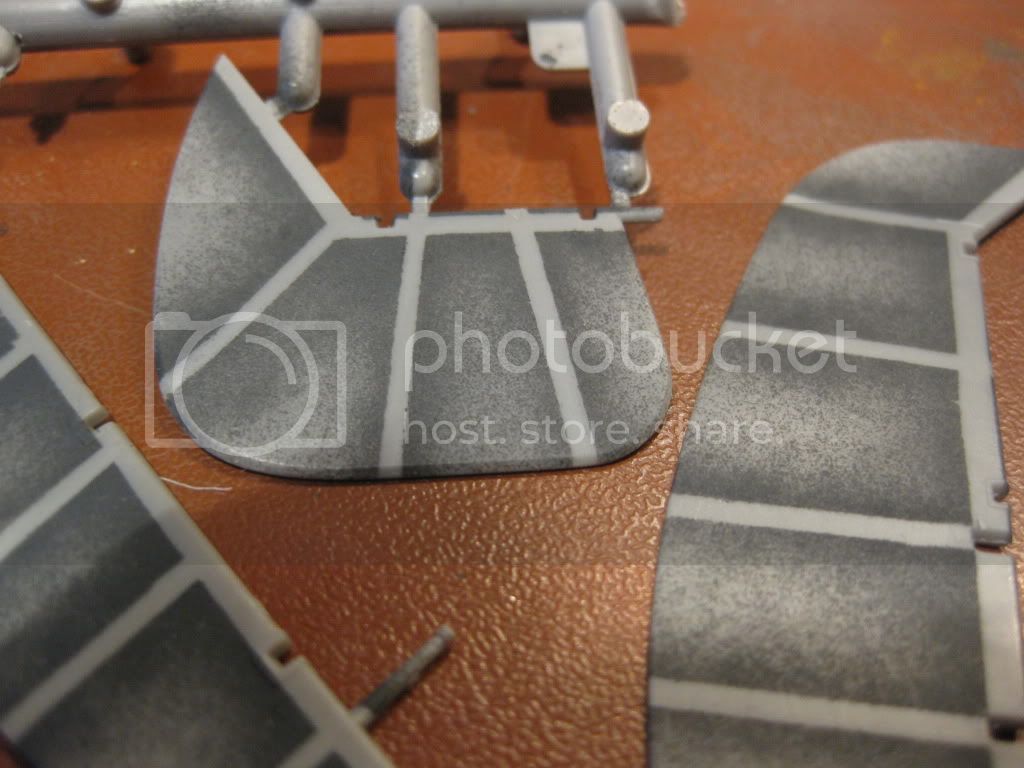
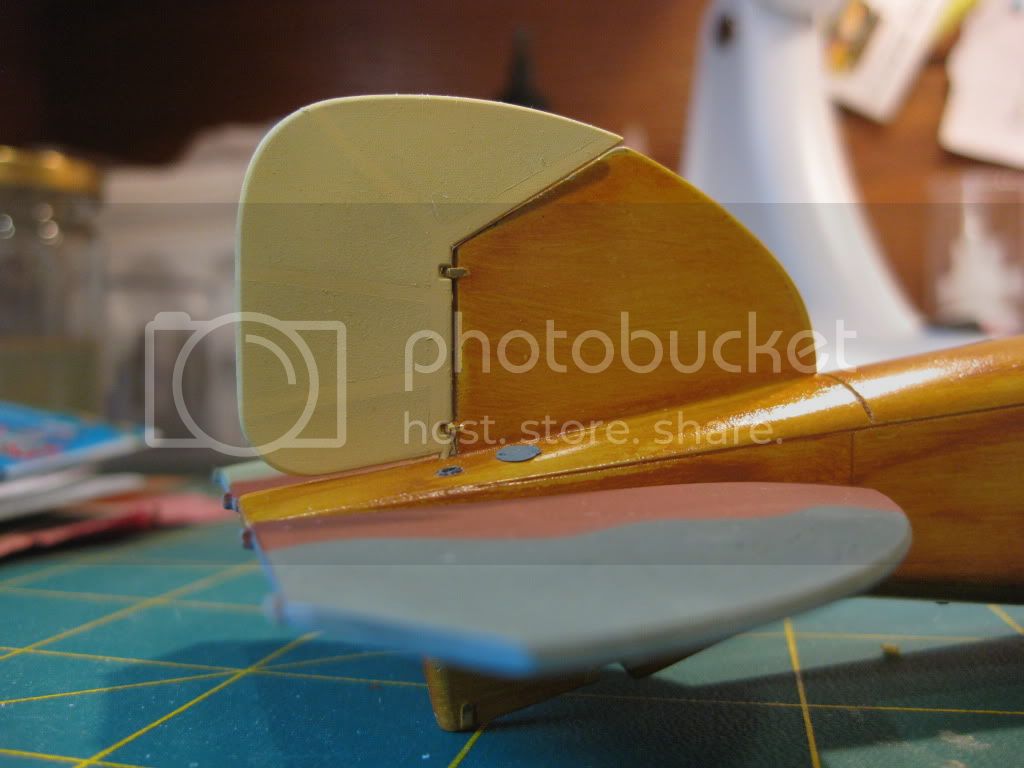
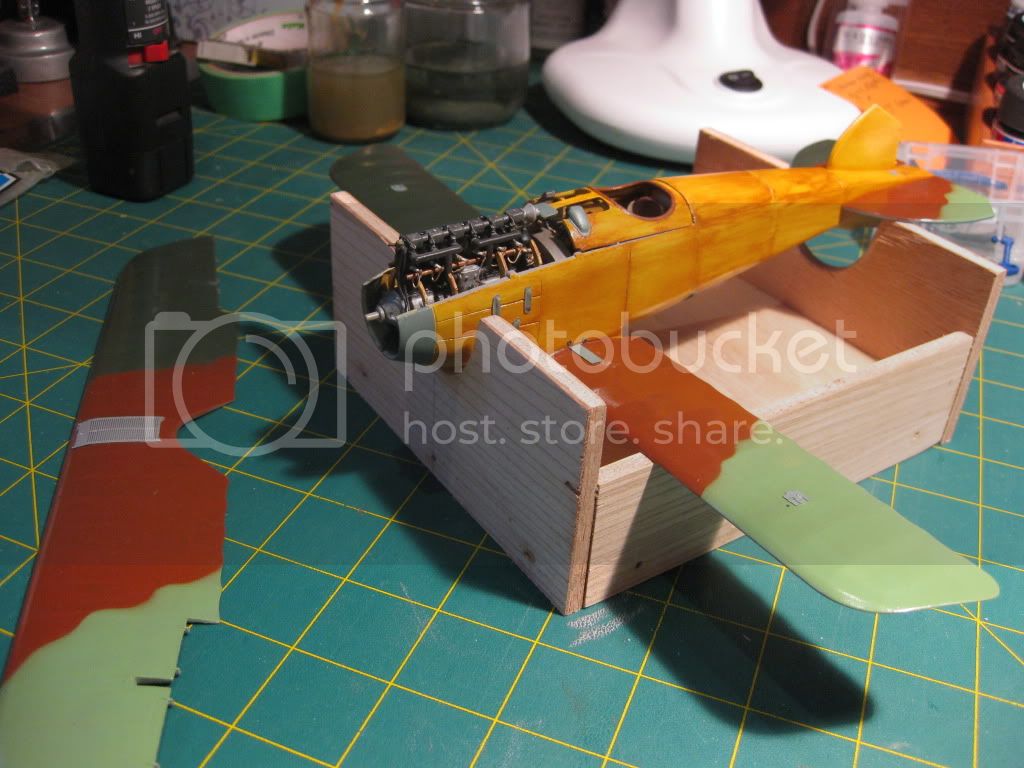
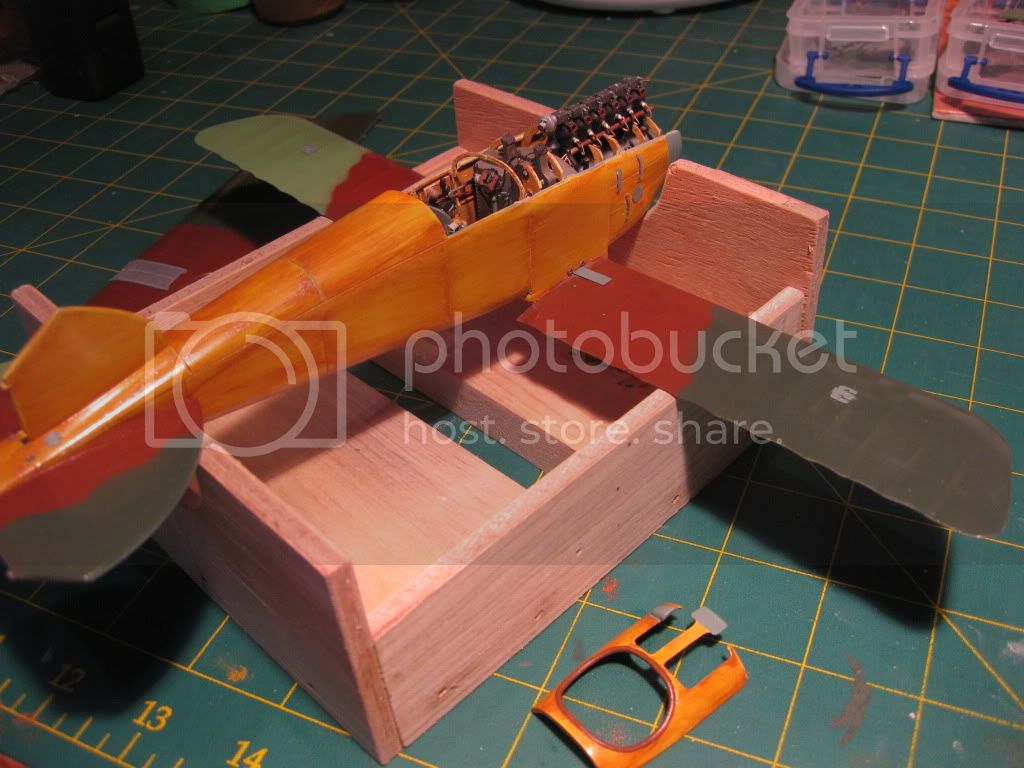
Those with a good eye will note in the preceeding entry that several components are missing from the engine; both the air pump at the front top and the handle on the mechanism at the back end were broken off during the process, thankfully retrieved, and will be re-installed later in the build. The cockpit area panel was "posed" for the photos as were the elevator and rudder.
This was for me my first attempt at the Pre-shading technique. After reviewing the many excellent articles and directions on the Site a two day marathon of taping was completed. Once ready for the airbrush a 50/50 mix of MM Engine Grey and Interior Black was applied. At this point I confirmed my choice of an Iwata Airbrush..after lots of basic training on scrap components I was ready to roll. Can't say enough good things about the beast (HiLine HPC Plus) especially the MAC Valve that allows adjustment of the air pressure thus volume at the brush itself.
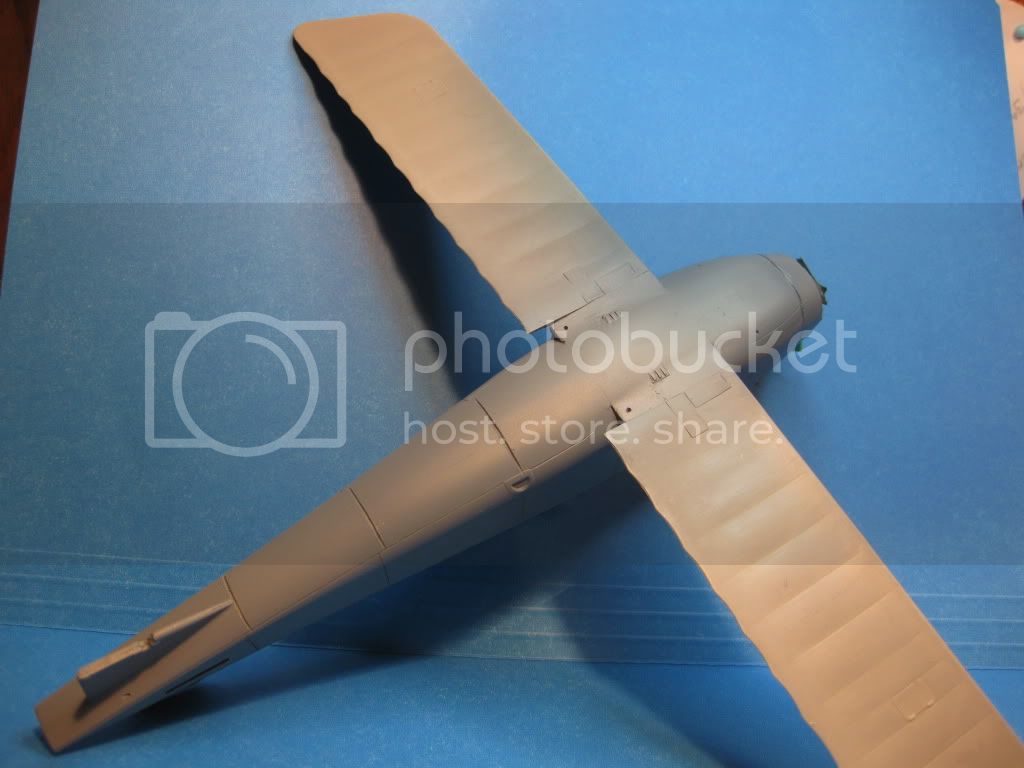
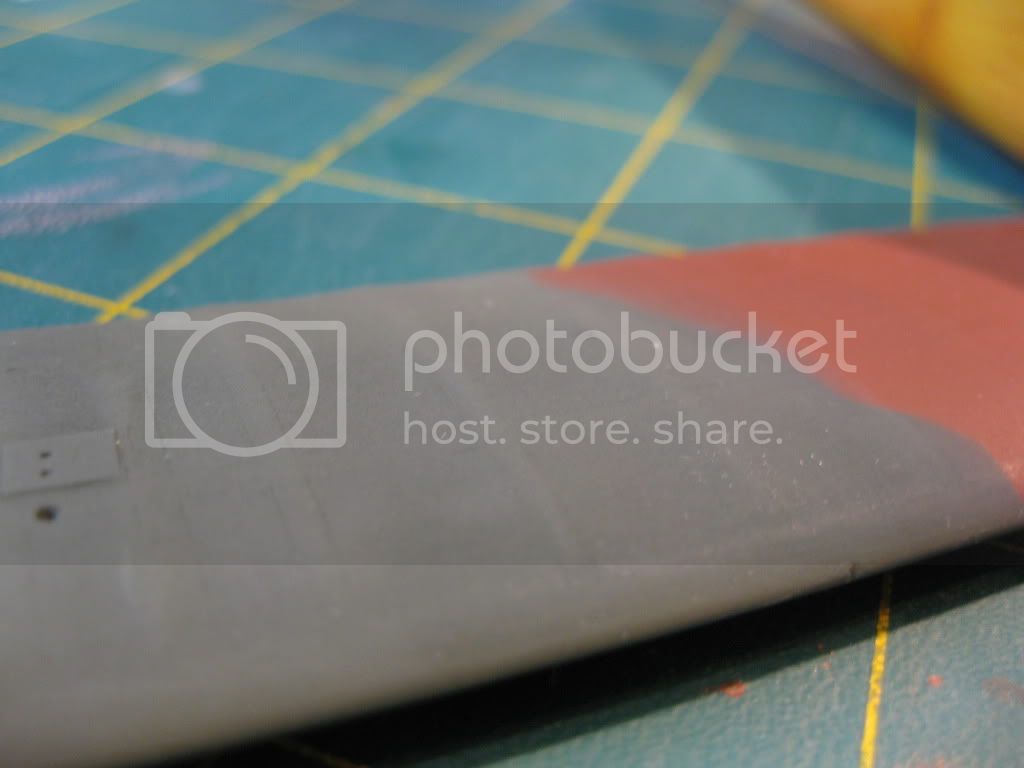
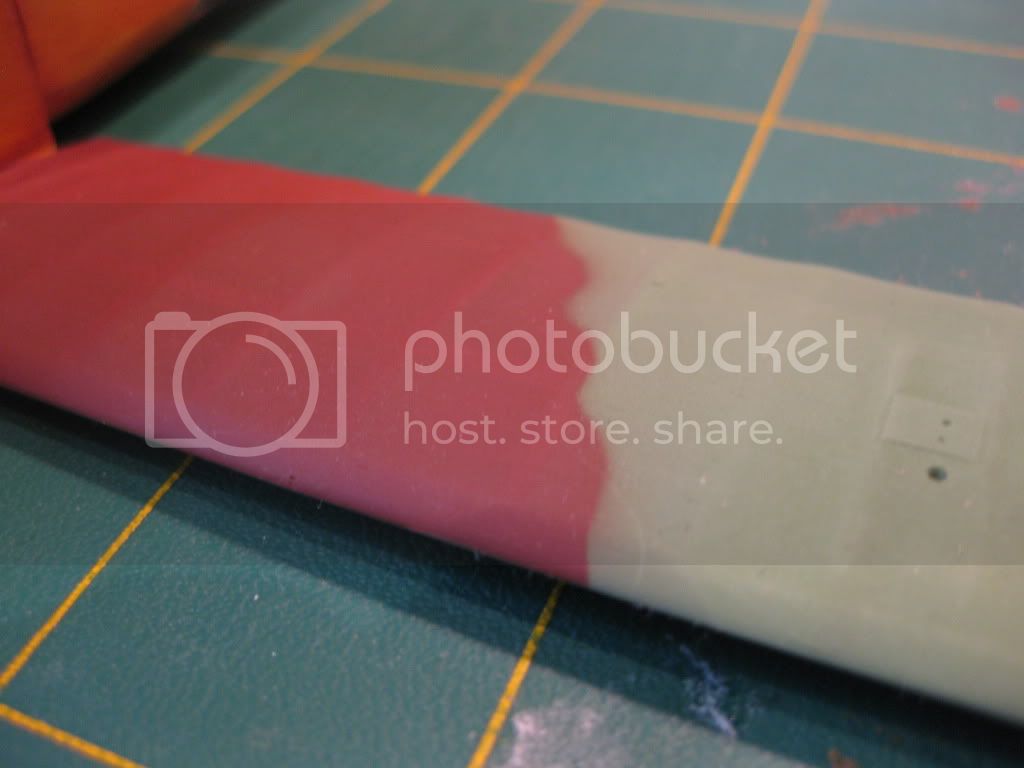
Although I speculated that the solid mostly dark colors used on the flying surfaces would fully cover the pre-shading on the upper surfaces the results were very pleasing, mostly a very subtle outline resulted where I didn't apply too much color. More practice and experience will no doubt produce better overall results. Colors used were Model Master enamels Pale Green #1716, Burnt Sienna, and a true find in my old stock, Humbrol German Green HG 8 which is at least 20 years old! Still as good as new and behaved better then the MM Products once thinned at about 40%. I don't think it's available any longer. For the under-surfaces I used Humbrol WWI Blue 2 parts to 1 part white, a mix I'd noted down years ago in an article which described it as Älbatros Underside Blue. The photos depict it much lighter then it really is however the Pre-shading certainly satisfied my expectations. Great technique that resulted solely from the learning opportunities on Aeroscale.
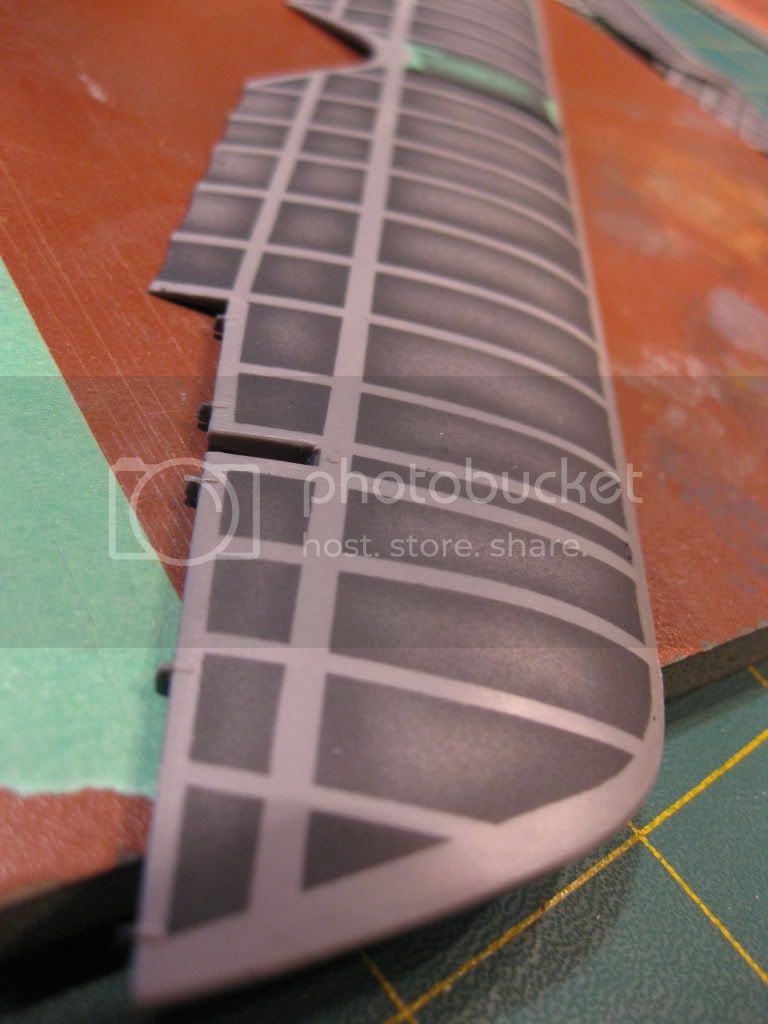
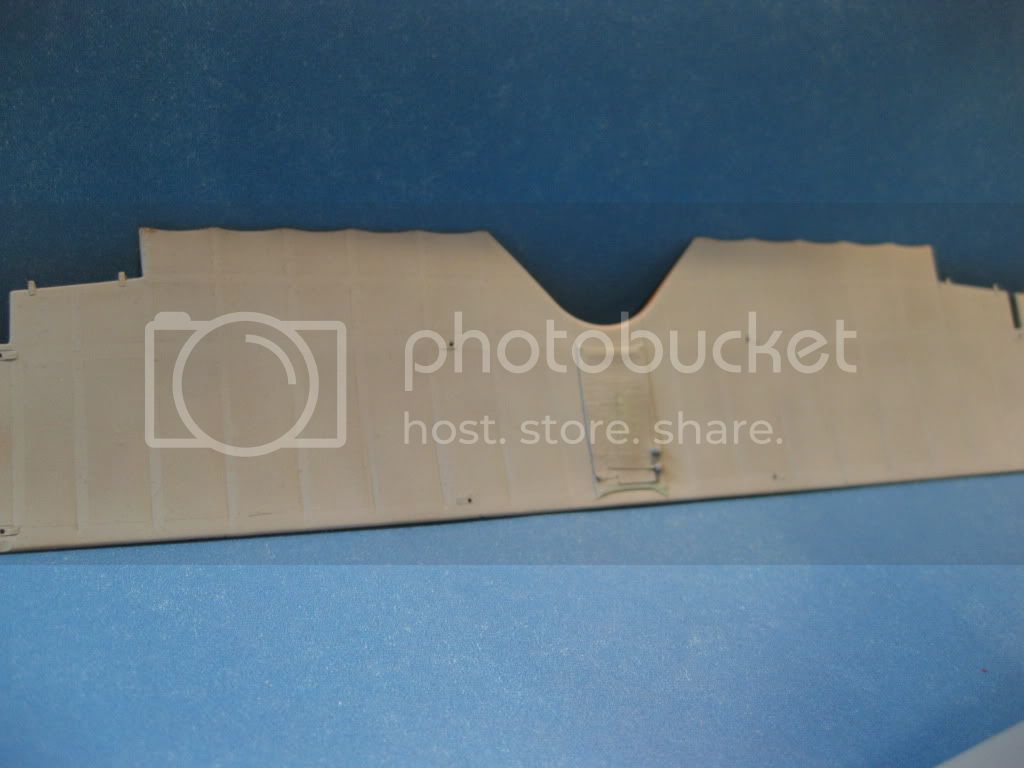
Once the Pre-shading had dried for several days the colors were oversprayed. Note that the PE components for the wings were left for addition after the color coats were completed. The rigging holes etc. were also delayed as I thought the tiny components would suffer from any over-painting beyond the one coat after installation.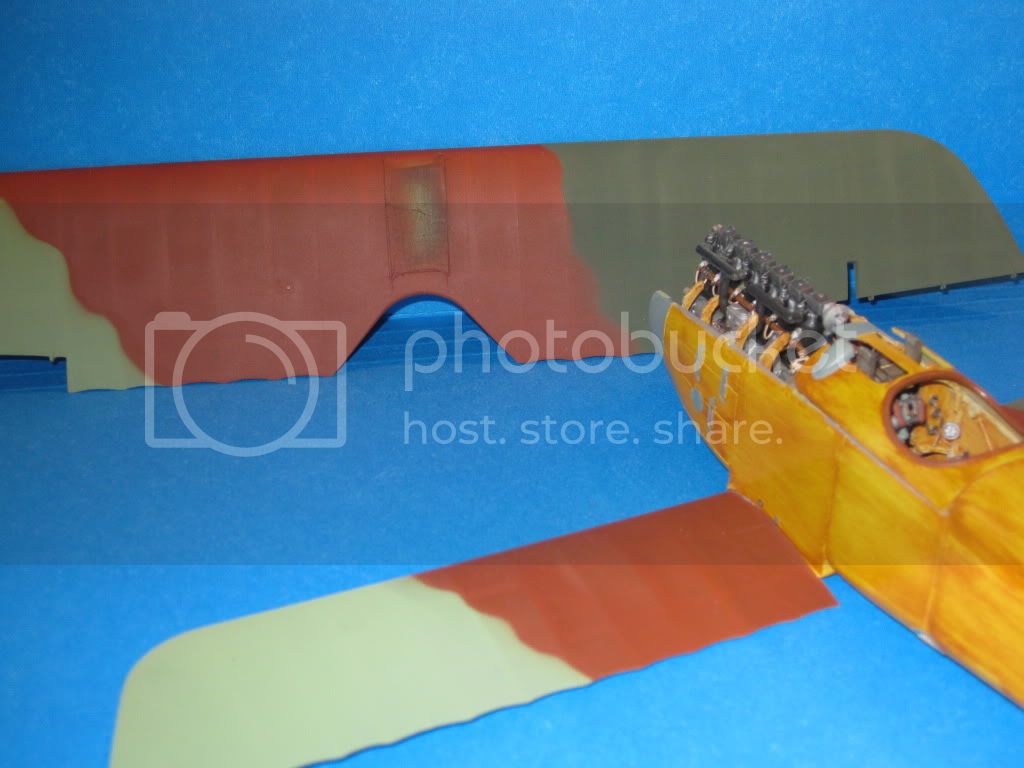
At this point the only significant set back bared it's ugly teeth; the warped fuselage half re-surfaced when the popped glue seam under the nose section was discovered.
Not a major set back however blending the paint and woodgrain back over the repair will no doubt produce a tense moment or two!
Next will be a coat of gloss overcoat on the flying surfaces, addition of the rest of the PE, panels installed (still have the two manual pumps to insert into the cockpit) and replacing a few PE parts that have mysteriously "pulted" themselves off into oblivion. I'm also considering adding to the leather cockpit coaming before installation. Last at that stage will be drilling and installation of the rigging components. Despite my earlier plans to complete the Master Spandaus that too is a future step.
All in all, still enjoying the build; a good kit however several nasty surprises along the road to completion, not the least being the efforts to bend and maintain the warped fuselage component into submission. At this point I'm a happy modeller as I can see the satisfactory end result albeit several miles down a possibly rocky road. Still learning lots and appreciative of all the hints, suggestions, and encouragement I've recieved. Please keep em coming.
As the great author once said (possibly commenting on AMS), "more of which later"!
Cheers,
Lance
This was for me my first attempt at the Pre-shading technique. After reviewing the many excellent articles and directions on the Site a two day marathon of taping was completed. Once ready for the airbrush a 50/50 mix of MM Engine Grey and Interior Black was applied. At this point I confirmed my choice of an Iwata Airbrush..after lots of basic training on scrap components I was ready to roll. Can't say enough good things about the beast (HiLine HPC Plus) especially the MAC Valve that allows adjustment of the air pressure thus volume at the brush itself.
Although I speculated that the solid mostly dark colors used on the flying surfaces would fully cover the pre-shading on the upper surfaces the results were very pleasing, mostly a very subtle outline resulted where I didn't apply too much color. More practice and experience will no doubt produce better overall results. Colors used were Model Master enamels Pale Green #1716, Burnt Sienna, and a true find in my old stock, Humbrol German Green HG 8 which is at least 20 years old! Still as good as new and behaved better then the MM Products once thinned at about 40%. I don't think it's available any longer. For the under-surfaces I used Humbrol WWI Blue 2 parts to 1 part white, a mix I'd noted down years ago in an article which described it as Älbatros Underside Blue. The photos depict it much lighter then it really is however the Pre-shading certainly satisfied my expectations. Great technique that resulted solely from the learning opportunities on Aeroscale.
Once the Pre-shading had dried for several days the colors were oversprayed. Note that the PE components for the wings were left for addition after the color coats were completed. The rigging holes etc. were also delayed as I thought the tiny components would suffer from any over-painting beyond the one coat after installation.
At this point the only significant set back bared it's ugly teeth; the warped fuselage half re-surfaced when the popped glue seam under the nose section was discovered.
Not a major set back however blending the paint and woodgrain back over the repair will no doubt produce a tense moment or two!
Next will be a coat of gloss overcoat on the flying surfaces, addition of the rest of the PE, panels installed (still have the two manual pumps to insert into the cockpit) and replacing a few PE parts that have mysteriously "pulted" themselves off into oblivion. I'm also considering adding to the leather cockpit coaming before installation. Last at that stage will be drilling and installation of the rigging components. Despite my earlier plans to complete the Master Spandaus that too is a future step.
All in all, still enjoying the build; a good kit however several nasty surprises along the road to completion, not the least being the efforts to bend and maintain the warped fuselage component into submission. At this point I'm a happy modeller as I can see the satisfactory end result albeit several miles down a possibly rocky road. Still learning lots and appreciative of all the hints, suggestions, and encouragement I've recieved. Please keep em coming.
As the great author once said (possibly commenting on AMS), "more of which later"!
Cheers,
Lance
wing_nut
Joined: June 02, 2006
KitMaker: 1,212 posts
AeroScale: 468 posts
Posted: Wednesday, May 18, 2011 - 09:01 AM UTC
It all looks great Lance. Too bad about he split seam but you got the skills to take of that.
I wish you had posted how you did the air scoops with the .002 brass sooner. I have done that with lead foil for small air scoops on Spitfires and P-39s but for some reason I never thought of it when I was very tediously hollowing the molded scoop on the DVa with a blade point. After seeing yours,ow that yours, I may still do it.
I wish you had posted how you did the air scoops with the .002 brass sooner. I have done that with lead foil for small air scoops on Spitfires and P-39s but for some reason I never thought of it when I was very tediously hollowing the molded scoop on the DVa with a blade point. After seeing yours,ow that yours, I may still do it.
mtnflyer
Joined: March 08, 2009
KitMaker: 394 posts
AeroScale: 360 posts
Posted: Wednesday, May 18, 2011 - 10:48 AM UTC
Lance; I can see the effect of your preshading just barely under the color coat, and I think its something I'll try as well. Hope I can raise the effect to the level you have.
With your photos up close and personal, I can see what a fine job you did on the doped plywood skin. Well done, indeed.
Looks like you and I are learning this business together, on the same airplane, and I believe we are both showing the best in ourselves for now. The only way to go is up.
With your photos up close and personal, I can see what a fine job you did on the doped plywood skin. Well done, indeed.
Looks like you and I are learning this business together, on the same airplane, and I believe we are both showing the best in ourselves for now. The only way to go is up.

Mgunns
Joined: December 12, 2008
KitMaker: 1,423 posts
AeroScale: 1,319 posts

Posted: Thursday, May 19, 2011 - 02:23 AM UTC
 Hi Lance:
Bummer about the split. I hate it when that happens. I am sure you will do justice to the repair. I like your sublte shading especialy on the rudder. Looks quite convincing. Looking forward to more updates.
Best
Mark
lcarroll
Joined: July 26, 2010
KitMaker: 1,032 posts
AeroScale: 1,025 posts
Posted: Friday, May 20, 2011 - 07:34 AM UTC
Mark, Marc, and Guy,
Thanks for the comments guys. Got the second coat of gloss on her this morning and will have to let it dry out for at least a day. With our "banner " weather I'm being chased outdoors to complete the annual Spring clean-up (Summer comes late here and is far too short) however hope to get some of the un-attached stuff like guns, struts etc. going this weekend. Also need to take some time to place orders for some of the tools etc. we've been discussing. So much to do, so little time. Hopefully WNW will drag their feet a little on their new releases and I can afford to upgrade on a few basic tools etc. before the "frenzy" hits home!
Cheers,
Lance
lcarroll
Joined: July 26, 2010
KitMaker: 1,032 posts
AeroScale: 1,025 posts
Posted: Wednesday, May 25, 2011 - 04:55 PM UTC
Thought I'd provide a very short Sitrep on the build; have Family arriving for tomorrow thus the desk will be shut down and secured for 4-5 days lest tiny hands intrude on the project!
Progress has been limited as other "things" get undue priority. The over-coats of gloss worked well, the Photo Etch parts have all been painted and approx. half are installed, and the struts, guns, etc are all either complete or lacking only a final touch-up. I also took an hour or so of precious time to construct a support/assembly jig as illustrated; seems almost every time I looked in on someone else's build I noticed that most folks are using some version of these handy little products. Makes far too much sense and I'm already very pleased with the control and convenience it provides. Makes up for having only two hands and ten fingers!
The gloss coats further enhanced/emphasized the pre-shading and I'm now even happier with the results. Also, I've replaced the "pulted" brass louvres that were previously lost during other handling; one left to paint.
Last, the Master Spandaus have been completed; they may get a bit more "hi-liting" before installation. Although they are a very nice product I beleive the Aber Set would have been a better choice as I had to do some fairly intense "scratching" to replicate the not supplied widgets of the cocking levers etc. on the breeches.
Next in the plan is to finish the Photo Etch additions , add the decals, get a coat of semi gloss over the whole thing, and then drill and attach the turnbuckles etc . I am a little apprehensive about final assembly; this is my first 1/32 Bipe and the struts compared to 1/48th kits seem very shaky and fragile indeed. Also can see the need for "pinning" the landing gear struts as they too appear really fragile.
More to follow in 5-6 days.
Cheers,
Lance

warreni

Joined: August 14, 2007
KitMaker: 5,926 posts
AeroScale: 2,201 posts

Posted: Thursday, June 02, 2011 - 06:23 AM UTC
Hey Lance!
"Sow's ear of a D.III"? You mean the kit is a pain in the bottom because you are doing a great job on it. I can't seem to get used to doing all the painting etc before assembling the wings etc. Is not like that with more modern aircraft and AFVs..
Keep it up mate. Not far to go to the rigging.

"Sow's ear of a D.III"? You mean the kit is a pain in the bottom because you are doing a great job on it. I can't seem to get used to doing all the painting etc before assembling the wings etc. Is not like that with more modern aircraft and AFVs..
Keep it up mate. Not far to go to the rigging.
Mgunns
Joined: December 12, 2008
KitMaker: 1,423 posts
AeroScale: 1,319 posts
Posted: Thursday, June 02, 2011 - 07:04 AM UTC
HI Lance:This is coming along nicely. The landing gear is shakey and rigging it will stabilize it quite a bit. The jig is neat idea, I have seen those as well and will have to put one together as I can see how handy it is.
Looking forward to more.
Best
Mark
lcarroll
Joined: July 26, 2010
KitMaker: 1,032 posts
AeroScale: 1,025 posts
Posted: Thursday, June 02, 2011 - 09:34 AM UTC
Mark, Warren,
Thanks for the encouragement Guys. The Sow's Ear comment is mostly from the addition of the cockpit/coaming panel and presently the 2 engine top panels. Neither a pretty task as the fit isn't great. In the case of the cockpit upper panel trimming and/or extension is touchy due to the several stage woodgraining already applied, think I'll just live with the gaps as they are fairly minor though far from perfect. The engine panels are grey - green only thus I can add a bit to them to close the gaps and not have to re-invent the proverbial wheel.
As for the jig/support Mark I can't recommend it enough; really makes things easier when all fingers and thumbs are needed.
Should be able to get some progress and Pics out real soon.
Cheers,
Lance
lcarroll
Joined: July 26, 2010
KitMaker: 1,032 posts
AeroScale: 1,025 posts
Posted: Friday, June 03, 2011 - 11:44 AM UTC
The title of this update could be "A not so very good terrible awful very bad day" which I remember reading to my kids years ago. Although all obstacles encountered thus far have been worked through or around the PITA index is starting to be a factor!
First update item was the addition of a metal foil coaming to enlarge the thinner one moulded on the kit and add a few wrinkles for realism. That part went reasonably well and, for a first effort, I'm content with the results. I'll be using this technique gleaned from a fellow KoTS Builder a lot in the future. Although the addition of tacks was a little tense and 3 or 4 times as many as were used are somewhere in this house (the dreaded "pulting phenomenon" ) I still have a good stock remainung. Copper State 1/48th bolts were used for this step.
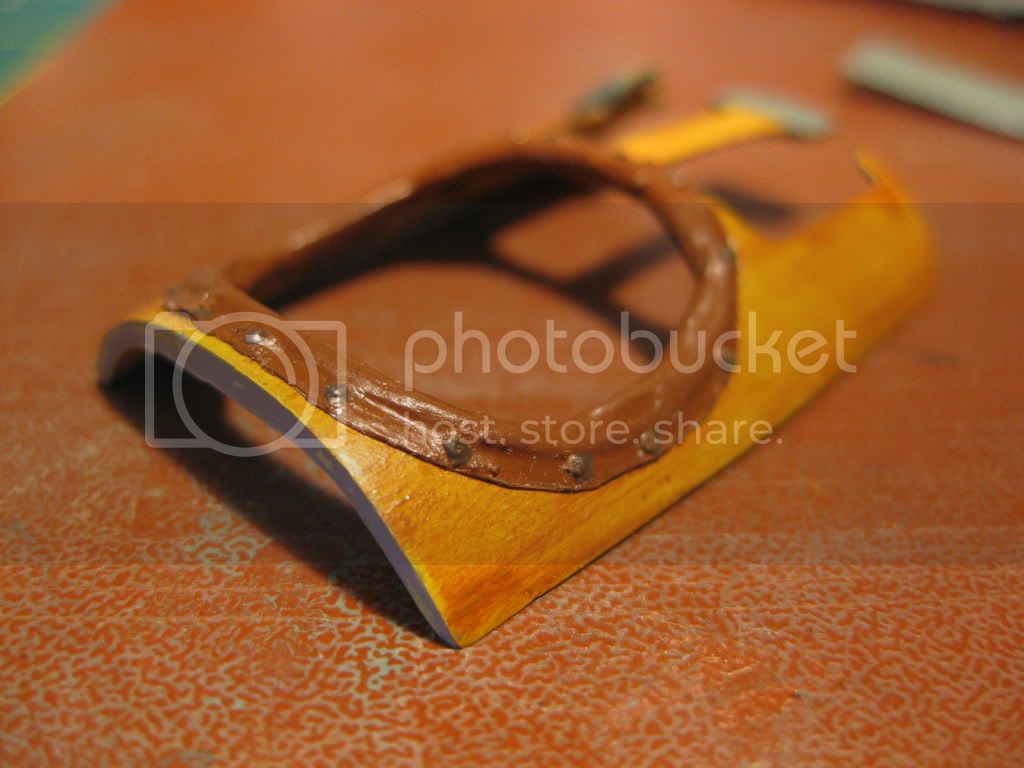
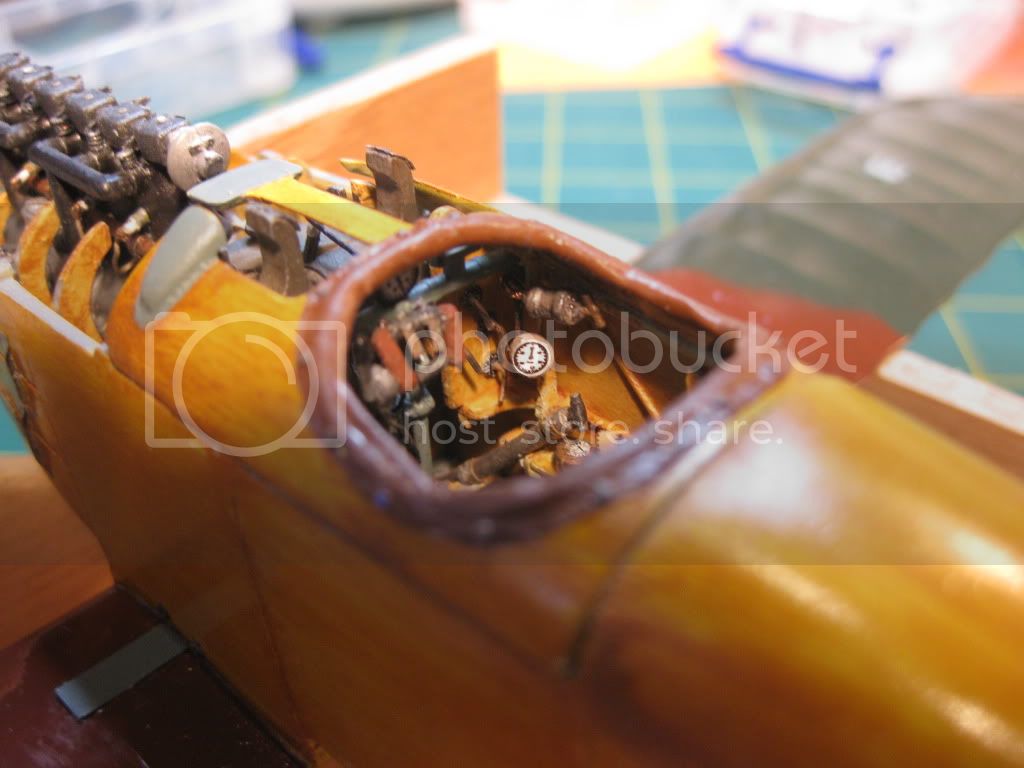
The fit of the cockpit panel with the coaming installed was fairly poor however, as mentioned in an earlier comment, I elected to accept the small gaps rather then attempt rebuilding or modifying due to the completed woodgraining. The original panel had been cut into three portions to separate the cockpit panel from the upper engine cover panels.
It was at this point that a 1-2mm gap between the front of the cockpit panel and the two engine panels popped into view. Extensions were added to the engine panels, sanding and painting completed and on they went however they required no end of trimming to get a decent fit and had to be glued on in two stages with some bending and lots of pressure.

After installing the left panel my sense of humour got a real test when a large gap at the front top join materialised. I elected to continue on with the second panel and shimmed, inserted an extension, filled and sanded and last repainted the front top of the cowlings which went very well.
To this point the air pump on the engine front is still set aside, as it's been inadvertantly removed so many times I intend to re-install it only as the absolutely last step in this build!!
Having reached this point, and today being stormy, I decided to devote the rest of the day to a few PE additions and then get the decals started. What could be better!?
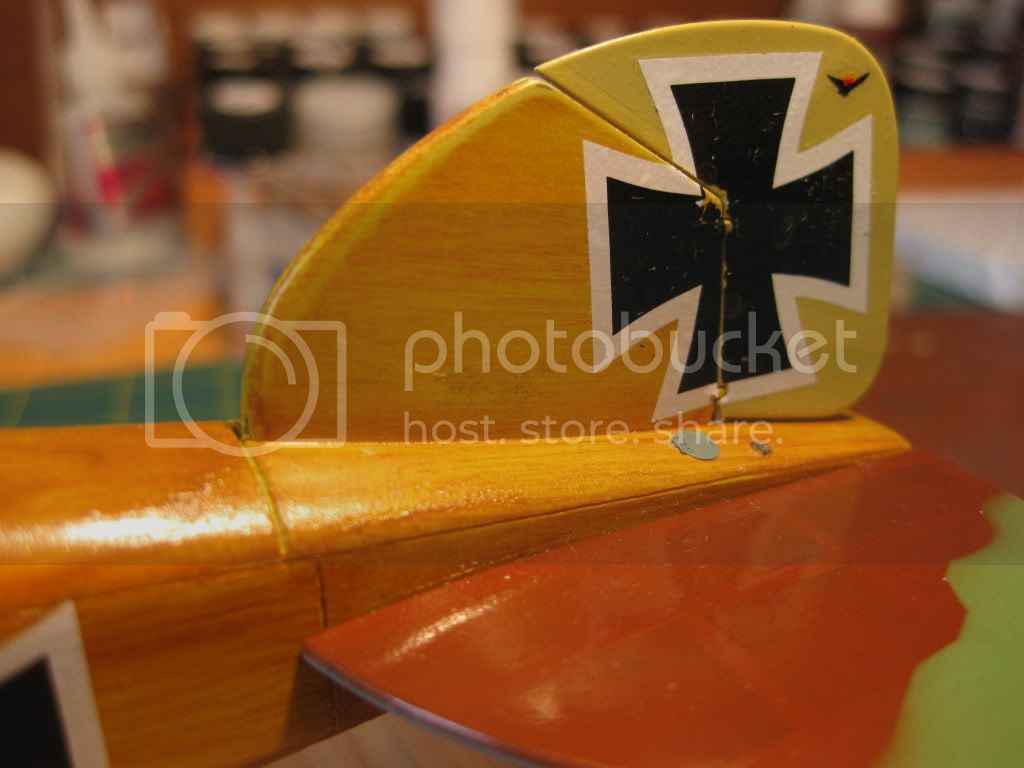
My most significant emotional experience occurred with the first decal..I chose the lower under wing cross to start as it's been a year or 6 since my last decal was applied and I figured if anything went wrong it would be least visible. The Kit Decals proved to be either the worst I've worked with in almost 60 years of kit bashing or perhaps older then me............brittle, slid off the paper in pieces, and so delicate that even slight pressure to position them resulted in fragmentation. The bottom cross was lost however I have lots of spares. The rest were applied with cautious use of setting and solvent solutions and will suffice however some paint touchups will be in order. The cross on the vertical stab/rudder really got messy however paint will easily cover the problem. At this point I've only got the port side of the fuselage done and will let them cure/dry overnight before proceeding further.
Overall, not a great experience the past few days with today being a real test. Still very much liking this build but it "ain't been pretty" !! I'll be completing the decaling and getting a coat of s/gloss over them next, then time to get drilling and installing eyebolts/turnbuckles in preparation for the rigging and final assembly. All weathering will be added just prior to final assembly.
Thanks for looking, all comments welcome. I believe I'll just have a good scotch and sleep on this til tomorrow, it's been a jungle here!!
Cheers,
Lance
First update item was the addition of a metal foil coaming to enlarge the thinner one moulded on the kit and add a few wrinkles for realism. That part went reasonably well and, for a first effort, I'm content with the results. I'll be using this technique gleaned from a fellow KoTS Builder a lot in the future. Although the addition of tacks was a little tense and 3 or 4 times as many as were used are somewhere in this house (the dreaded "pulting phenomenon" ) I still have a good stock remainung. Copper State 1/48th bolts were used for this step.
The fit of the cockpit panel with the coaming installed was fairly poor however, as mentioned in an earlier comment, I elected to accept the small gaps rather then attempt rebuilding or modifying due to the completed woodgraining. The original panel had been cut into three portions to separate the cockpit panel from the upper engine cover panels.
It was at this point that a 1-2mm gap between the front of the cockpit panel and the two engine panels popped into view. Extensions were added to the engine panels, sanding and painting completed and on they went however they required no end of trimming to get a decent fit and had to be glued on in two stages with some bending and lots of pressure.
After installing the left panel my sense of humour got a real test when a large gap at the front top join materialised. I elected to continue on with the second panel and shimmed, inserted an extension, filled and sanded and last repainted the front top of the cowlings which went very well.
To this point the air pump on the engine front is still set aside, as it's been inadvertantly removed so many times I intend to re-install it only as the absolutely last step in this build!!
Having reached this point, and today being stormy, I decided to devote the rest of the day to a few PE additions and then get the decals started. What could be better!?
My most significant emotional experience occurred with the first decal..I chose the lower under wing cross to start as it's been a year or 6 since my last decal was applied and I figured if anything went wrong it would be least visible. The Kit Decals proved to be either the worst I've worked with in almost 60 years of kit bashing or perhaps older then me............brittle, slid off the paper in pieces, and so delicate that even slight pressure to position them resulted in fragmentation. The bottom cross was lost however I have lots of spares. The rest were applied with cautious use of setting and solvent solutions and will suffice however some paint touchups will be in order. The cross on the vertical stab/rudder really got messy however paint will easily cover the problem. At this point I've only got the port side of the fuselage done and will let them cure/dry overnight before proceeding further.
Overall, not a great experience the past few days with today being a real test. Still very much liking this build but it "ain't been pretty" !! I'll be completing the decaling and getting a coat of s/gloss over them next, then time to get drilling and installing eyebolts/turnbuckles in preparation for the rigging and final assembly. All weathering will be added just prior to final assembly.
Thanks for looking, all comments welcome. I believe I'll just have a good scotch and sleep on this til tomorrow, it's been a jungle here!!
Cheers,
Lance
lcarroll
Joined: July 26, 2010
KitMaker: 1,032 posts
AeroScale: 1,025 posts
Posted: Friday, June 03, 2011 - 12:00 PM UTC
Meant to include in the previous update that the brass cooling louvres don't hold enamel well at all. Probably should have been primed first but I will be cleaning them up and doing some touch up painting once the need to "handle" the fuselage is reduced along with a general cleanup and touch up of the joins etc. The camera is scary, as it picks up things that I honestly can't discern without a magnifying glass.
To this point this little devil has been a stark awakening on how much I need to re-learn and indeed learn in this hobby I've returned to. Bottom line though, I'm having a ball!
Cheers
To this point this little devil has been a stark awakening on how much I need to re-learn and indeed learn in this hobby I've returned to. Bottom line though, I'm having a ball!
Cheers
 |

WEB HOSTING BY


Copyright ©2021 AeroScale and Kitmaker Network, a subsidiary of Silver Star Enterprises
All Rights Reserved. Please read our Conditions of Use and Privacy Policy.
All Rights Reserved. Please read our Conditions of Use and Privacy Policy.