Early Aviation
Discuss World War I and the early years of aviation thru 1934.
KoTS GB 2011 Albatros D.III lcarroll
warreni
_VISITCOMMUNITY
South Australia, Australia
Joined: August 14, 2007
KitMaker: 5,926 posts
AeroScale: 2,201 posts
Posted: Monday, June 20, 2011 - 09:50 AM UTC
Hmmm.. I have never had a problem with WNW D.Vs.. but the Bristol Fighter wasn't very cooperative..

Lance, may I suggest instead of the three hour trip to get the paint pen just order one via the Internet or over the phone? They make painting the rigging a breeze.
Good luck finding an XF-56 Metallic Grey one Lance as they are sold out everywhere I look.. Gundam markers have the colour you want.

lcarroll
_VISITCOMMUNITY
Alberta, Canada
Joined: July 26, 2010
KitMaker: 1,032 posts
AeroScale: 1,025 posts
Posted: Monday, June 20, 2011 - 02:41 PM UTC
Mikael,
First and foremost Thank you for taking the time to draft such a long and helpful reply.
As it turned out the problem I had, though as described, was not as severe as I first thought. I had the top wing mounted on the cabanes and square, and the model locked into the assembly jig. I took it out of the jig and bent the lower wings very carefully in the hope that they will retain some of the straightening effect. I then reinstalled the beast into the jig and installed the V Struts gluing with CA only the lower wing attachment points. The jig ensured that the alignment was correct. Once that was done I pulled her out of the jig and (Great minds think alike) turned her on her back, taped the upper wing to the work surface, and started working on the upper attachments. The change in weight and gravity seemed to help even more and I had to remove only approximately 1-2 mm from one of the V Struts and now shes attached and, in fact, half rigged at this point. All appears true except a very small bend in one aft member of a v strut which lessened once the rigging to the front point was tensioned.
Having said all this it's possible that I'll get up tomorrow and find it's "sprung" apart. If so you will hear the screams all the way to Sweden!!
In all, been a very reasonable day and certainly ended much better then it started. I'll post an update with photos once the rigging is complete and I start to get the "bits and pieces"attached. Again, thanks for the help.
Cheers,
Lance
lcarroll
_VISITCOMMUNITY
Alberta, Canada
Joined: July 26, 2010
KitMaker: 1,032 posts
AeroScale: 1,025 posts
Posted: Monday, June 20, 2011 - 02:54 PM UTC

Quoted Text

Hmmm.. I have never had a problem with WNW D.Vs.. but the Bristol Fighter wasn't very cooperative..

Lance, may I suggest instead of the three hour trip to get the paint pen just order one via the Internet or over the phone? They make painting the rigging a breeze.
Good luck finding an XF-56 Metallic Grey one Lance as they are sold out everywhere I look.. Gundam markers have the colour you want.


Warren,
Wish I could just order for delivery. Canada is presently the victim of a full Postal Service Strike, even if ended by Government intercession the backlog
will be significant. Actually I do most of my shopping by I'net/mail and this strike has put a real cramp into my activities.
Given the situation I did some experimenting and am using a thinned down mix of Model Master enamel "Engine Grey" which is what I used to use on my 1/48 kits years ago. Seems to look pretty good at this point.
What are the "Gundam Markers" you mentioned? Never run across them. I will look for the metallic grey Tamiyas you mentioned next trip to the big lights. If I find some I'll grab a few and send one to you; least I can do in return for all the time you've spent "coaching" me!

Cheers,
Lance
warreni
_VISITCOMMUNITY
South Australia, Australia
Joined: August 14, 2007
KitMaker: 5,926 posts
AeroScale: 2,201 posts
Posted: Monday, June 20, 2011 - 04:46 PM UTC
Ah.. I forgot about the strike. I have a few things held up in Canada at the moment.
The Gundam Markers are made by GSI Creos, same people who make Gunze paints (I think). Go [url=http://www.1999.co.jp/eng/10016450]here/url] for a look. I like to help as I am just a beginner and am devising and testing new techniques all the time. I tried using acrylic paint on an acrylic paint base to do my wood effect on the D.Va and it has come out great on the prop. I can get acrylic paints in tubes at my local $3 shop and they are much less messy than oil paints.
OEFFAG_153
_VISITCOMMUNITY
Västra Götaland, Sweden
Joined: February 19, 2010
KitMaker: 1,473 posts
AeroScale: 1,450 posts
Posted: Tuesday, June 21, 2011 - 03:24 AM UTC
Ah – great that you were able to solve the issues – hope nothing has sprung open (once rigging is in place, I find it usually holds things pretty much in place.

Oh – and Gravity is a great thing – it does solve a lot of problems – sometimes (can also cause a lot of trouble too)

Mikael
wing_nut
_VISITCOMMUNITY
New Jersey, United States
Joined: June 02, 2006
KitMaker: 1,212 posts
AeroScale: 468 posts
Posted: Tuesday, June 21, 2011 - 07:28 AM UTC
Lance the chipping looks real good. I really like the look of the 2 colored chipping on the wheels covers.

Also sorry to hear to the wing woes. I almost got the say I feel your pain but I got lucky. (wiping sweat off forehead to one side with a "Phew!") I'll chalk it up to beginner luck.

Good luck finding an XF-56 Metallic Grey one Lance as they are sold out everywhere I look.

Just came form my LHS, which is always pretty well stocked, and the Tamiya products re getting very thin. Lots and lots of empty slots in the paint rack... fillers non-existent etc. They have tried several suppliers and can't get the y stuff in.
warreni
_VISITCOMMUNITY
South Australia, Australia
Joined: August 14, 2007
KitMaker: 5,926 posts
AeroScale: 2,201 posts
Posted: Tuesday, June 21, 2011 - 08:51 AM UTC
XF-56 has been out of stock for years down here. But the Gundam markers do the job. I have started ordering almost all my stuff from overseas with our dollar as strong as it is. When I can get stuff to me here in Australia including postage for less than I pay at the LHS you know you are being ripped off...
lcarroll
_VISITCOMMUNITY
Alberta, Canada
Joined: July 26, 2010
KitMaker: 1,032 posts
AeroScale: 1,025 posts
Posted: Wednesday, June 22, 2011 - 03:10 AM UTC

Quoted Text

Ah – great that you were able to solve the issues – hope nothing has sprung open (once rigging is in place, I find it usually holds things pretty much in place.

Oh – and Gravity is a great thing – it does solve a lot of problems – sometimes (can also cause a lot of trouble too)

Mikael


Mikael,
All's well so far. Have completed the wing rigging; the control and landing gear portions are next in line and, other then a very minor "bowing" of one V Strut, no disasters as yet. I'm going to leave well enough alone on the slightly bent strut as most would not notice it I think. As for gravity it will be interesting to see if there is an effect once she's completed and standing upright instead of laying mostly on her back as at present.
More to follow.

Cheers,
Lance
lcarroll
_VISITCOMMUNITY
Alberta, Canada
Joined: July 26, 2010
KitMaker: 1,032 posts
AeroScale: 1,025 posts
Posted: Wednesday, June 22, 2011 - 03:22 AM UTC

Quoted Text

Lance the chipping looks real good. I really like the look of the 2 colored chipping on the wheels covers.

Also sorry to hear to the wing woes. I almost got the say I feel your pain but I got lucky. (wiping sweat off forehead to one side with a "Phew!") I'll chalk it up to beginner luck.

Good luck finding an XF-56 Metallic Grey one Lance as they are sold out everywhere I look.

Just came form my LHS, which is always pretty well stocked, and the Tamiya products re getting very thin. Lots and lots of empty slots in the paint rack... fillers non-existent etc. They have tried several suppliers and can't get the y stuff in.


Marc/Warren,
The chipping is one of the few things that's gone right, I'm pretty content with it. It's heavy on the wheel covers per the photos in the WNW Instruction booklet. I suspect it was so pronounced from the flexing effect on the spoked wheel.
As for the paint pens etc. I never "clued in" until you mentioned it; the quake would have an effect on the Tamiya products. What a terrible run the Japanese are having; will probably be decades before their recovery is complete.
The wing problems are more or less solved and I've used the Model Master Engine Grey paint thinned down on the wires. Looks OK to me, will post an update and a few more pics probably tomorrow. I'll definitely get some of the paint pens though once the mail strike is ended.
Cheers,
Lance
lcarroll
_VISITCOMMUNITY
Alberta, Canada
Joined: July 26, 2010
KitMaker: 1,032 posts
AeroScale: 1,025 posts
Posted: Wednesday, June 22, 2011 - 03:52 PM UTC
Very little time available today, first sunny and rain free day in almost two weeks thus lots to catch up on in the yard.
In the limited time available got lots of touch up painting done, the wing rigging completed and the empenage surfaces on, hopefully it won't get "dinged " while I'm working on the gear.
Being the proverbial "sucker for punishment" I've decided that I'll add a hand carved prop to the mix. I did these for several of my 1/48 scale kits 10 years ago and hopefully can remember enough of the basics to pull it off.
These are the "plugs" that form the first step in the process.


The plywood is 1/8th inch birch from MidWest Hobbys, normally destined for the RC Aircraft genre. I've prepared a number of "plugs" as the scale is new to me and I want to use both the 3 and 5 layer ply to compare the effect. Also I recall it took me several attempts to get a good result thus a few "tactical spares" are prudent.

In both cases I've laminated the stock and will have to thin it down as the 1/8 inch thicknes is about 1/16th to 1/24th too thin for the scale.
The 3 and 5 Lam. stocks follow.

In summary, as Mr. Bean surged succesfully past the wing and rigging challenge his confidence went into inertial overshoot mode and he proceeded to set himself up for yet another fall. Just love this hobby; (note: I'm keeping the kit prop close at hand as I was not born yesterday.) Things can, after all, go wrong - go wrong - go wrong- - - - "dial tone" !!)

Cheers,
Lance

wing_nut
_VISITCOMMUNITY
New Jersey, United States
Joined: June 02, 2006
KitMaker: 1,212 posts
AeroScale: 468 posts
Posted: Friday, June 24, 2011 - 01:10 AM UTC
First, picture Homer Simpson with half closed eyes drooling...

Mmmm hand carved props.

Something I want to try and willbe watching yours. Is there a tutorial out there on the process? You said you've done this before but will the plywood make it harder to carve by nature of the alternating grain? Midwest makes mahogany strips that I an thing would lam nicely with some basswood.
lcarroll
_VISITCOMMUNITY
Alberta, Canada
Joined: July 26, 2010
KitMaker: 1,032 posts
AeroScale: 1,025 posts
Posted: Friday, June 24, 2011 - 04:23 AM UTC

Quoted Text

First, picture Homer Simpson with half closed eyes drooling...

Mmmm hand carved props.

Something I want to try and willbe watching yours. Is there a tutorial out there on the process? You said you've done this before but will the plywood make it harder to carve by nature of the alternating grain? Midwest makes mahogany strips that I an thing would lam nicely with some basswood.


Marc,
It's done and proved not difficult at all. I've got photos ready and will follow this reply with a brief update. Not much accomplished other then the prop; I'm about to remove and re-do the elevator control cables for the 3rd time as I'm not at all happy with the results. (out with the guitar wire on this go around!)
I read a "thread" on carving props years ago, probably on the Aerodrome but havn't gone back looking for it. The idea first occurred to me when I found some custom made props being marketed by, I believe, Tom's Model Works; if not them then probably Copper State. They were pricey (at that time)and to the best of my memory a 2 blade was $10-15 and 4 blade $20-25.
Yes, the plywood is hard to carve. I limit the carving to minimum and rely on sanding/filing almost exclusively. Your idea on doing your own laminating is really a good one and would reduce the carving obstacle big time. It would also eliminate the one draw back of the plywood appearance which you touched on; each layer is 90 degrees opposite the next in grain direction which isn't bad but is visible if you really look hard.
I'll get the update going right away and beam me back if I've missed something or you want more info.

Cheers,
Lance
lcarroll
_VISITCOMMUNITY
Alberta, Canada
Joined: July 26, 2010
KitMaker: 1,032 posts
AeroScale: 1,025 posts
Posted: Friday, June 24, 2011 - 05:06 AM UTC
Brief (Progress - wise) Update as promised; this one on the hand carved prop.
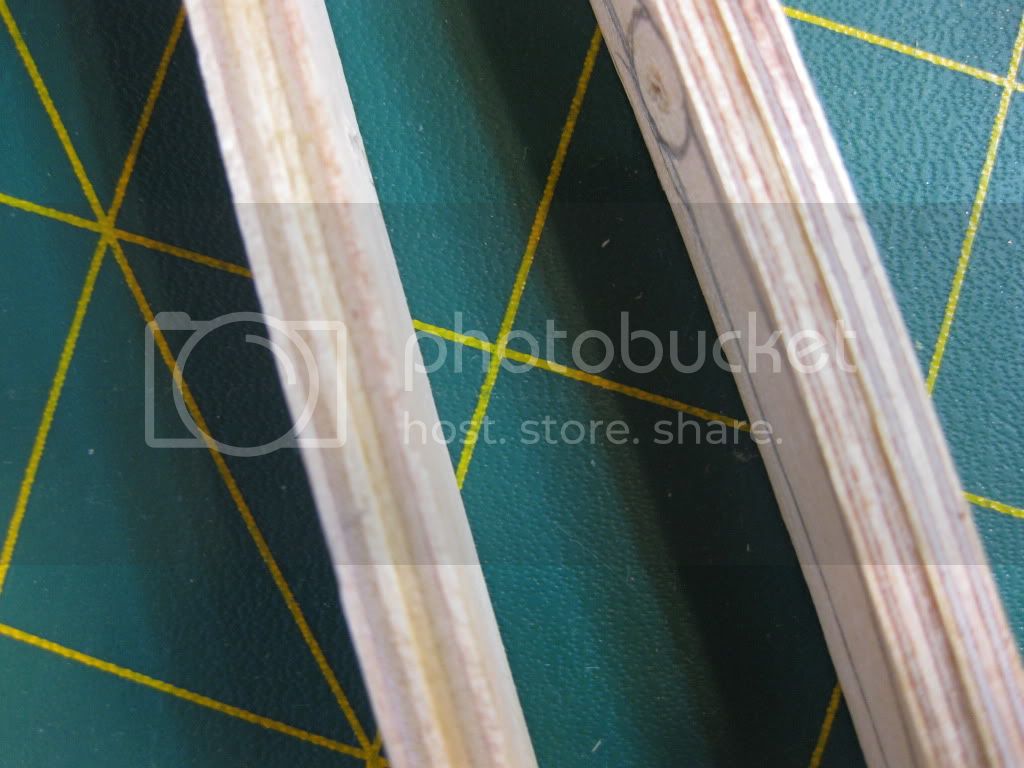
To begin the wood used on this one was the Midwest 1/8 inch 5 laminates birch ply sold to the flying model community in most LHS's. I tried the 5 ply versus the 3 ply first and it went so well I had no need to do a 3 ply at this point. As stated earlier the ply had to be doubled to get another 1/16 inches of thickness and then reduced to the proper thickness. The 5 ply is on the right.

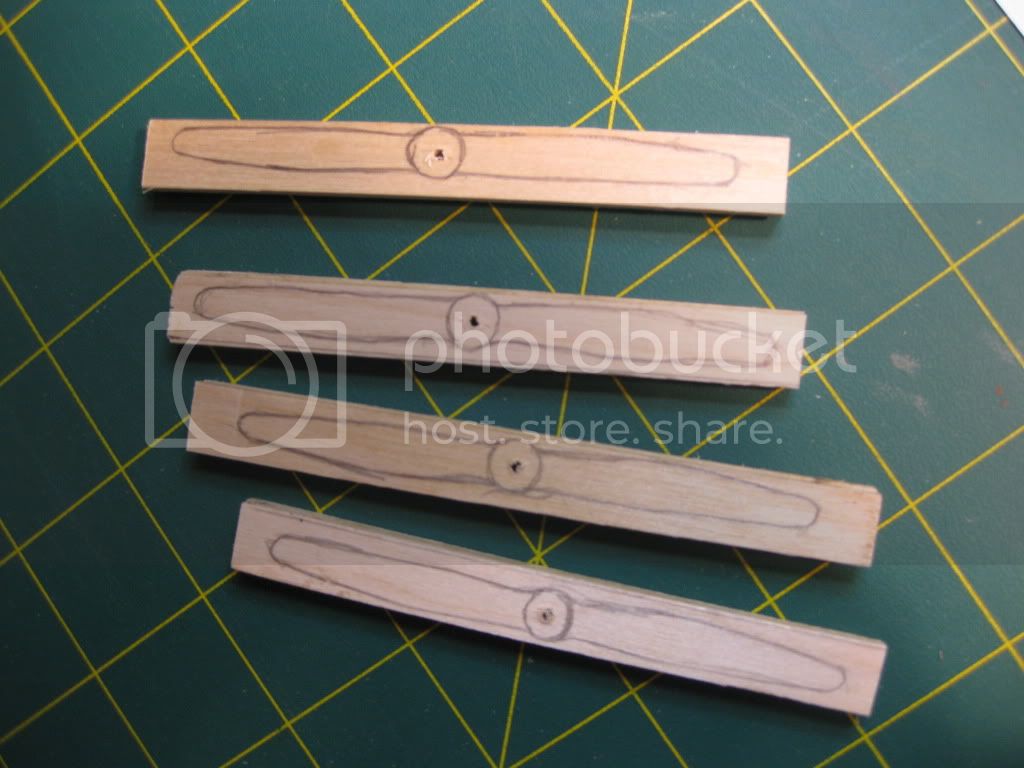
Next step is to draw the rough outline on the front or face of the "plug" as I call them or blank.

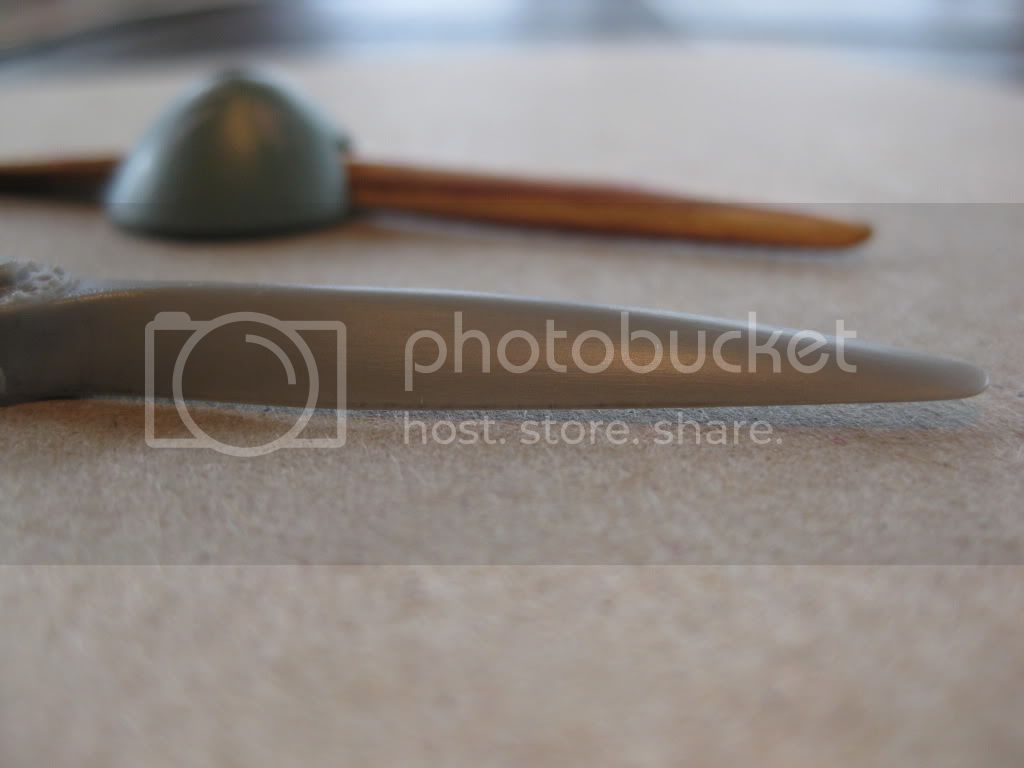
The first thing I do at this stage is to drill out the centre hole and then the fun begins. I am fortunate in that I do a lot of woodworking thus have a couple of pretty handy tools available. As mentioned previously the carving is kept at a minimum; I use sanding and filing - a longer process but easier on the hands and much easier to control and not remove too much stock. First the thickness is achieved using the "El-Cheapo" Bench Belt Sander. Then the front profile is achieved using a small drum on an oscillating drum sander. (I believe a dremel with their small rasps and their mineature sanding drums would work as well or better and will try it in future.) Next the side profile is added. I didn't anticipate a lot of interest in the technique thus didn't do photos step by step. The side profile is to taper the blade thickness from hub to tip; the taper is more pronnounced on the top or front then the back face of the prop. This photo shows the basics if you look real hard. The kit prop was included for reference.


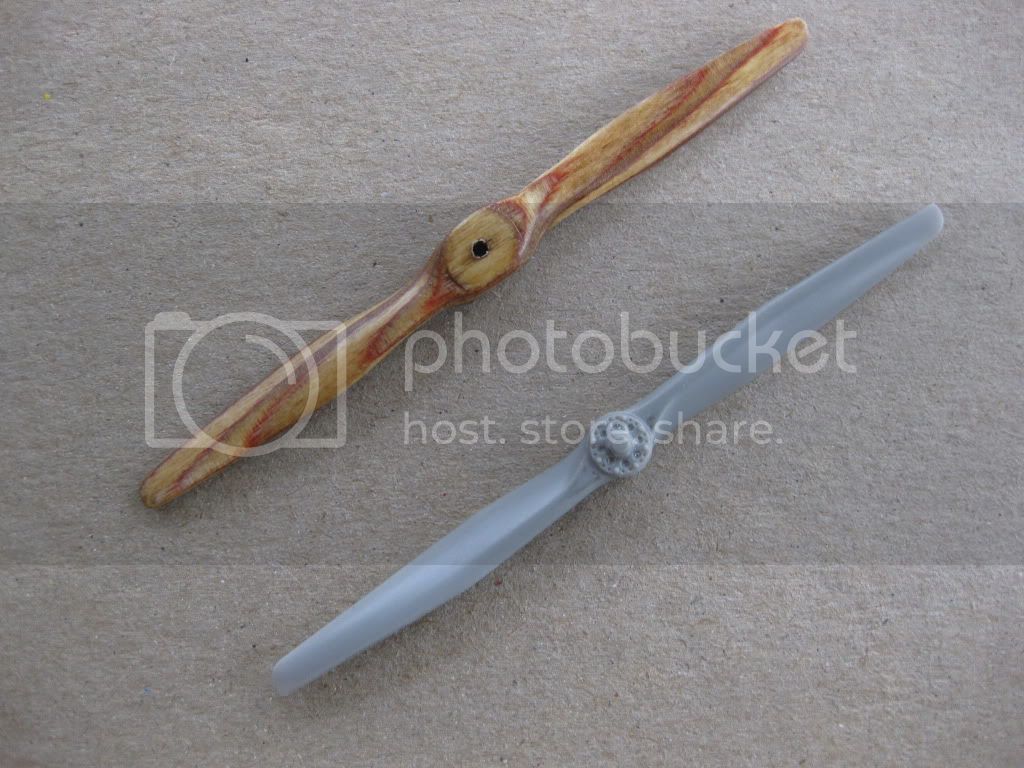
At this point I switch to the "Handraulic" technique and refine the profiles and then smooth out the finish. Once happy with the completed raw product a woodstain (golden oak in this case) and one coat of furniture durathane is applied. After an overnite drying I do a quick wet sand with very fine grit and add a coat of Model Master Acrylic semi gloss clear.
So here's the results. I'm very pleased with this phase of the build and once the Axial Prop Logos are added it should look pretty "real".


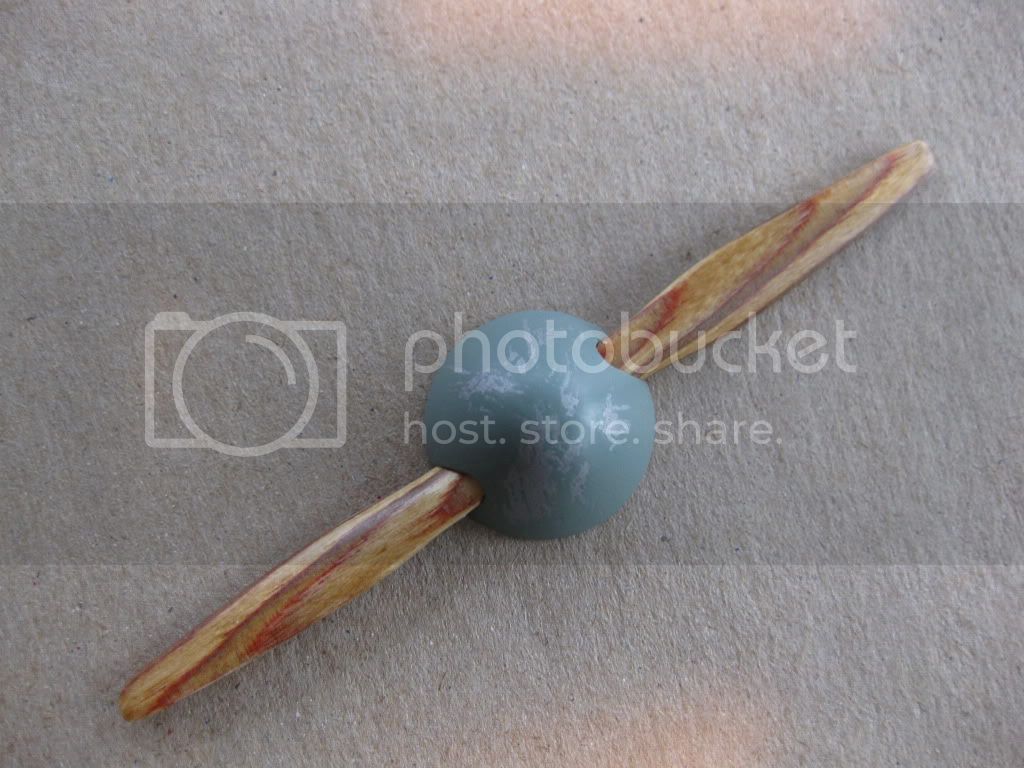
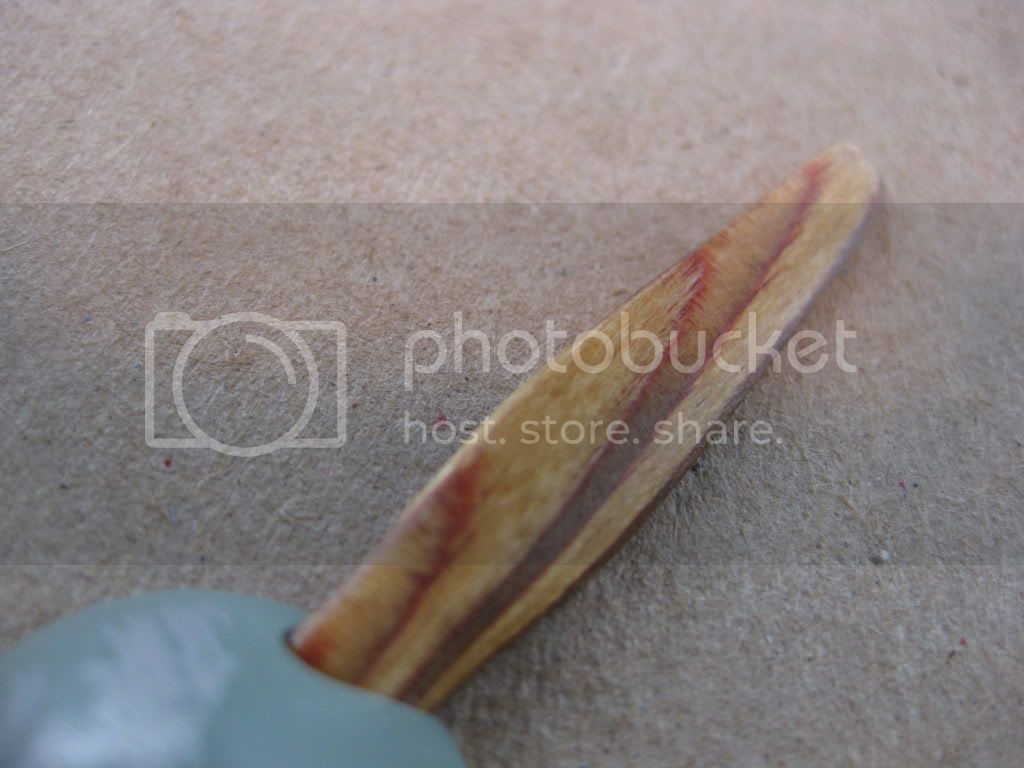
All in all it took me under 2 hours start to finish. The critical point by the way is close to the hub; I work with sandpaper wrapped around a dowel or screwdriver shaft at that point. In this case it's relatively easy as the spinner covers over the hub and the extreme tapers.
If there's enough interest out there I'll do a complete thread next carving. For now I really want to complete this beast and I'm behind on a book review I promised to Stephen.
Last, I hesitate to add that I'm planning a second build for the KoTS Campaign........got to do better then this beast and badly need to do a WNW Kit before I get turned off or jump off a cliff!! As someone else says often and well, "must build OOB, must build OOB"etc.

Cheers,
Lance
wing_nut
_VISITCOMMUNITY
New Jersey, United States
Joined: June 02, 2006
KitMaker: 1,212 posts
AeroScale: 468 posts
Posted: Saturday, June 25, 2011 - 12:25 AM UTC
Outstanding. The plywood looks pretty good. noticeable in a close up but must look terrific from a proper viewing distance.

And oh yeah... what the heck is an OOB? The 1st syllable in a German rank
thegirl
_VISITCOMMUNITY
Alberta, Canada
Joined: January 19, 2008
KitMaker: 6,743 posts
AeroScale: 6,151 posts
Posted: Saturday, June 25, 2011 - 01:11 AM UTC

Quoted Text

Outstanding. The plywood looks pretty good. noticeable in a close up but must look terrific from a proper viewing distance.

And oh yeah... what the heck is an OOB? The 1st syllable in a German rank


OOB = Out Of Box

Very nice job on the prop . One of these days I will be trying that myself ......
Kornbeef
_VISITCOMMUNITY
England - South East, United Kingdom
Joined: November 06, 2005
KitMaker: 1,667 posts
AeroScale: 1,551 posts
Posted: Saturday, June 25, 2011 - 05:34 AM UTC
Hey Talkin about me are ya?

lcarroll
_VISITCOMMUNITY
Alberta, Canada
Joined: July 26, 2010
KitMaker: 1,032 posts
AeroScale: 1,025 posts
Posted: Saturday, June 25, 2011 - 11:25 AM UTC
Marc, Terri,
Thanks for the positive comments. The cross grain effect is virtually invisible to the naked eye thus it does the job nicely. I've thought more about laminating stock as opposed to using plywood and intend to try it. The results may be the same but I think it would be easier and quicker to work with. Terri, from the work I've seen you do you would have no trouble with this little addition to your skills. Give it a try!

Keith,
Now what makes you think the OOB comment was aimed at you, the most conventional and conformal member of our little society?

Bummer Weekend; working both days thus no progress til next week.

Cheers All,
Lance
OEFFAG_153
_VISITCOMMUNITY
Västra Götaland, Sweden
Joined: February 19, 2010
KitMaker: 1,473 posts
AeroScale: 1,450 posts
Posted: Sunday, June 26, 2011 - 08:49 PM UTC
Hi Lance,

That ply prob is looking very sharp indeed  – keep it up

Mikael
Kornbeef
_VISITCOMMUNITY
England - South East, United Kingdom
Joined: November 06, 2005
KitMaker: 1,667 posts
AeroScale: 1,551 posts
Posted: Sunday, June 26, 2011 - 09:12 PM UTC
yes looking good red team.
lcarroll
_VISITCOMMUNITY
Alberta, Canada
Joined: July 26, 2010
KitMaker: 1,032 posts
AeroScale: 1,025 posts
Posted: Monday, June 27, 2011 - 08:17 AM UTC
Mikael, Keith,
Thanks for looking and for the positive feedback. The prop is one of the very few parts of this build that went well for me from start to finish. She's now on "short final" and if I can get a good day or two in she'll be done.

Cheers,
Lance
Kornbeef
_VISITCOMMUNITY
England - South East, United Kingdom
Joined: November 06, 2005
KitMaker: 1,667 posts
AeroScale: 1,551 posts
Posted: Monday, June 27, 2011 - 09:44 AM UTC
Lance, you whet your teeth very well on this, when the time comes to start your first WNW you will just love it.
lcarroll
_VISITCOMMUNITY
Alberta, Canada
Joined: July 26, 2010
KitMaker: 1,032 posts
AeroScale: 1,025 posts
Posted: Monday, June 27, 2011 - 10:50 AM UTC
Thanks Keith and yes, I am very much anticipating the next build. Have 5 WNW's to choose from and seem to be suffering from a dose of Albie Fever at present. DV or Va ?? ( the Encore DII's staying in the box for a while Thank You!!) If I do break away from the Albies I'm thinking Pup.

Cheers,
Lance
CaptainA
_VISITCOMMUNITY
Indiana, United States
Joined: May 14, 2007
KitMaker: 3,117 posts
AeroScale: 2,270 posts
Posted: Tuesday, June 28, 2011 - 09:28 AM UTC
Which 5?

You will love the WNW Albies. D.V or D.Va should be based on your decal selection. So many to choose from. Love them all.
lcarroll
_VISITCOMMUNITY
Alberta, Canada
Joined: July 26, 2010
KitMaker: 1,032 posts
AeroScale: 1,025 posts
Posted: Wednesday, June 29, 2011 - 03:11 AM UTC

Quoted Text

Which 5?

You will love the WNW Albies. D.V or D.Va should be based on your decal selection. So many to choose from. Love them all.


Carl,
I have both Albies, the Pfalz, SE5a, and the Pup.
I was leaning towards the Pup as a change of pace however the Albatros's have always been my favorite. I have the Pheon Sheet # 1 and a " Plan " which will cover both versions however want to take a re-look at the Black Beauties Sheet that recently came out. My objective is to cover the main basic schemes in four projects (DII, III, V, and Va with Lozenge, Green - brown, brown plus 2 greens, and green - mauve flying surfaces all displayed and at least two inmainly woodgrain. I suspect it won't end there as the choices are virtually endless and results theoretically should improve with experience.
Only another scale modeler could understand the angst mixed with excitement this quandry generates!

Cheers,
Lance
wing_nut
_VISITCOMMUNITY
New Jersey, United States
Joined: June 02, 2006
KitMaker: 1,212 posts
AeroScale: 468 posts
Posted: Friday, July 01, 2011 - 12:31 PM UTC

Quoted Text

Thanks Keith and yes, I am very much anticipating the next build. Have 5 WNW's to choose from and seem to be suffering from a dose of Albie Fever at present. DV or Va ?? ( the Encore DII's staying in the box for a while Thank You!!) If I do break away from the Albies I'm thinking Pup.

Cheers,
Lance


I can understand the "Albie Fever" While I was ordering the Roland, my finger moved of its own accord and bought another DVa Yup, it really happened that way.