_GOTOBOTTOM
Early Aviation
Discuss World War I and the early years of aviation thru 1934.
KoTS GB 2011 Albatros D.III lcarroll
lcarroll
_VISITCOMMUNITY
Alberta, Canada
Joined: July 26, 2010
KitMaker: 1,032 posts
AeroScale: 1,025 posts
Posted: Friday, July 01, 2011 - 03:19 PM UTC

Quoted Text


Quoted Text

Thanks Keith and yes, I am very much anticipating the next build. Have 5 WNW's to choose from and seem to be suffering from a dose of Albie Fever at present. DV or Va ?? ( the Encore DII's staying in the box for a while Thank You!!) If I do break away from the Albies I'm thinking Pup.

Cheers,
Lance


I can understand the "Albie Fever" While I was ordering the Roland, my finger moved of its own accord and bought another DVa Yup, it really happened that way.


Marc,
Yup!!
Been there, done that, got the WNW Pfalz DIIIa Kit sitting here to prove it! Somehow got added when ordering a "sample" of WNW Lozenge. Must be a sickness! Still pondering the next build.
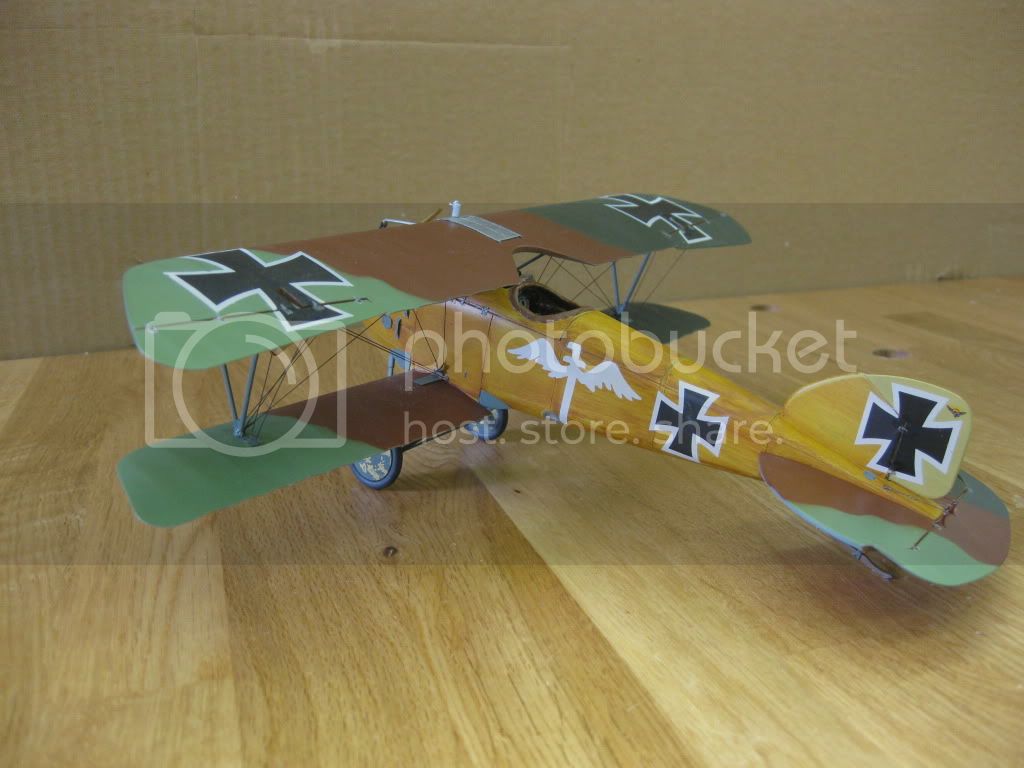
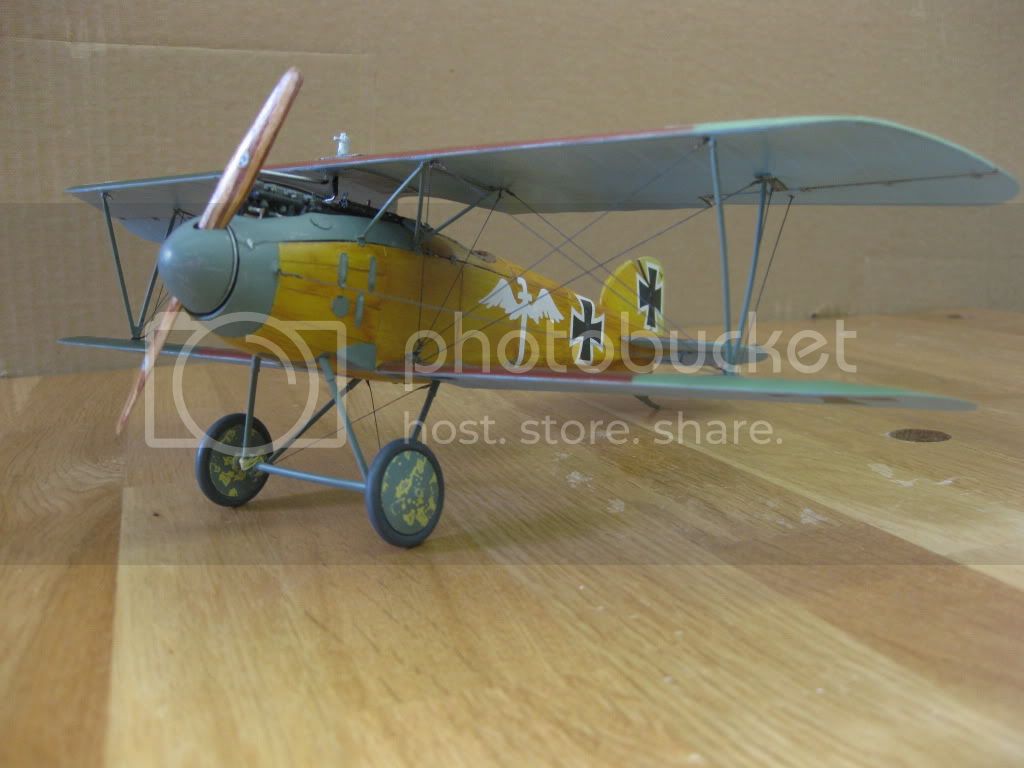
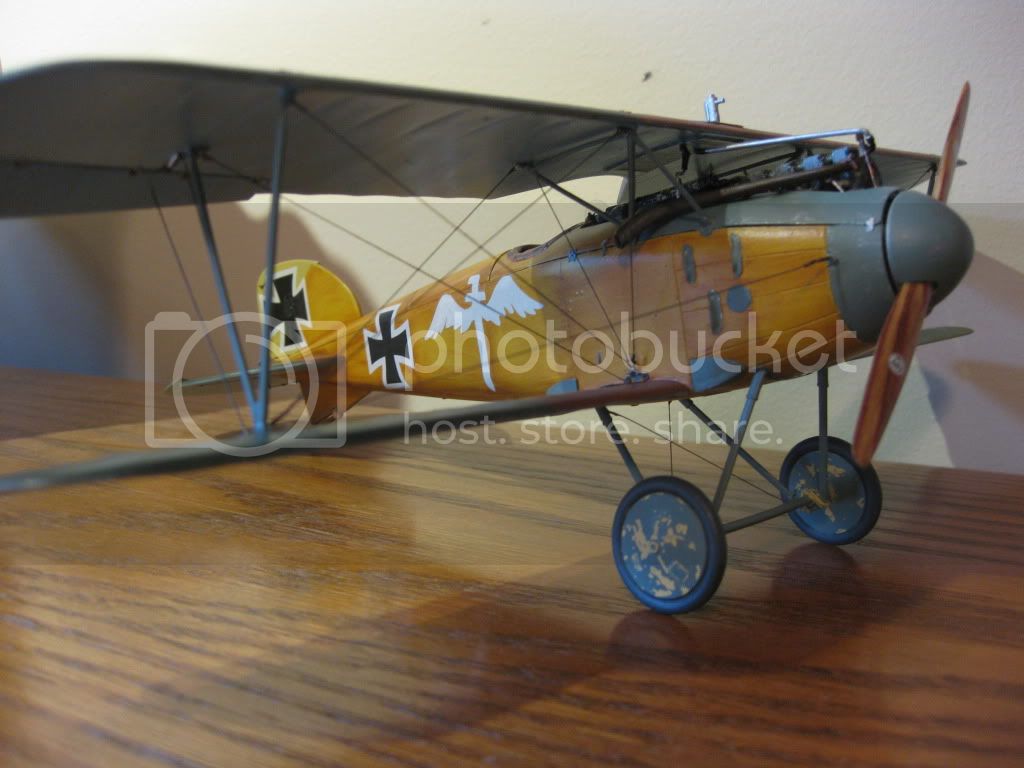
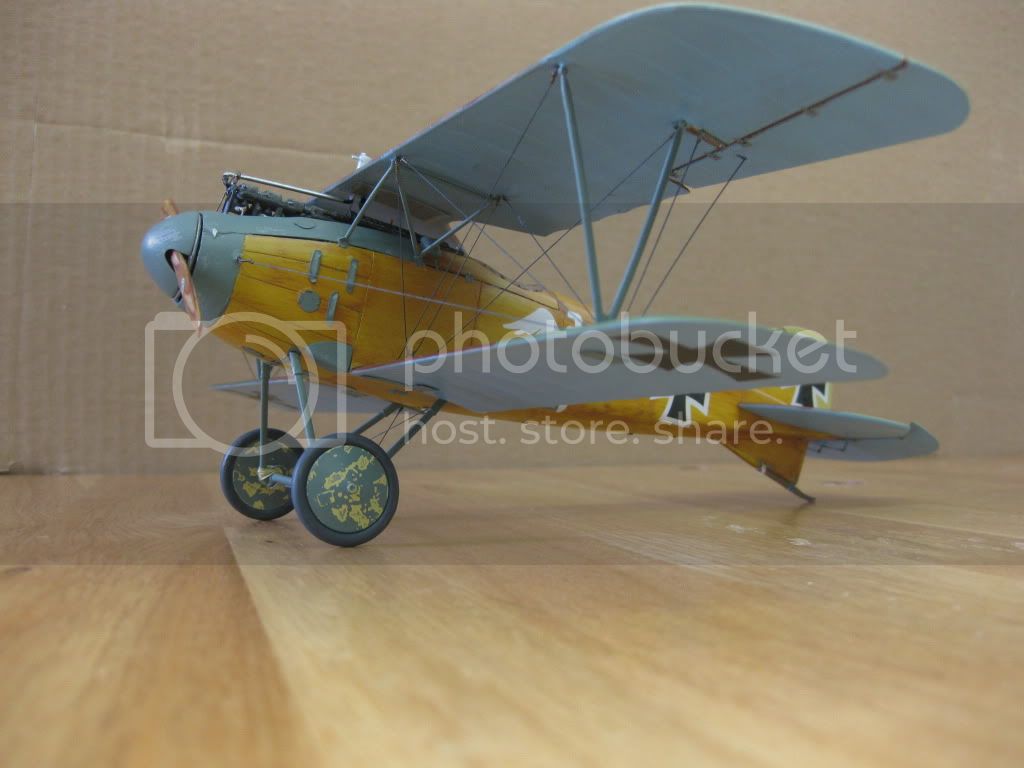
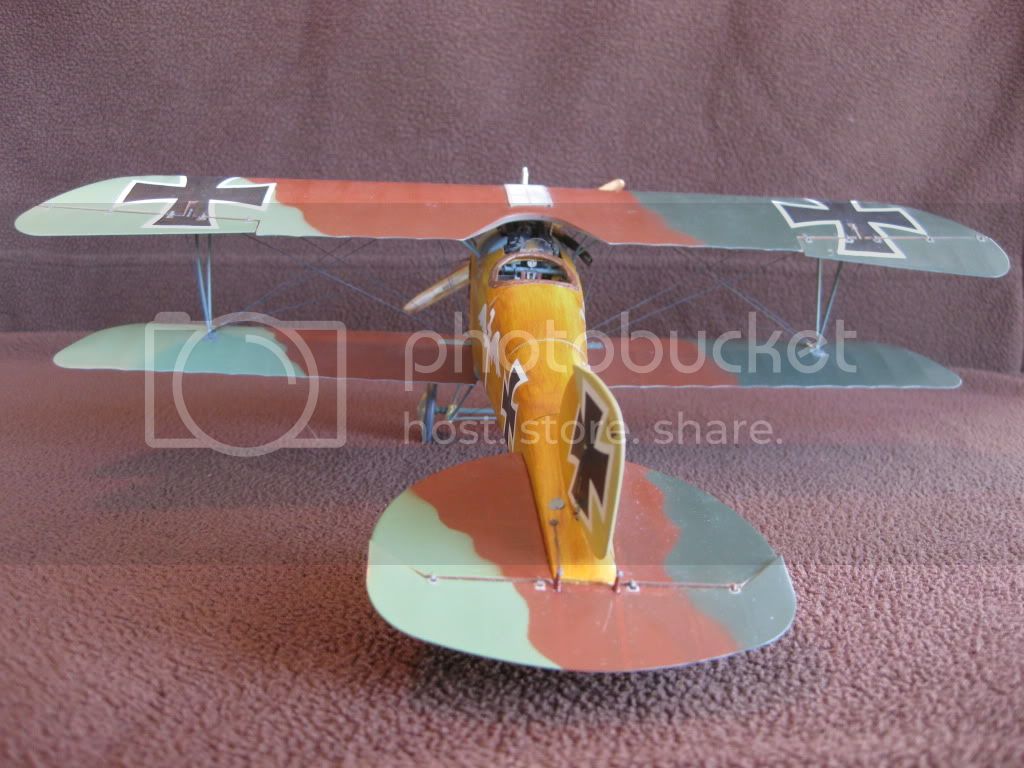
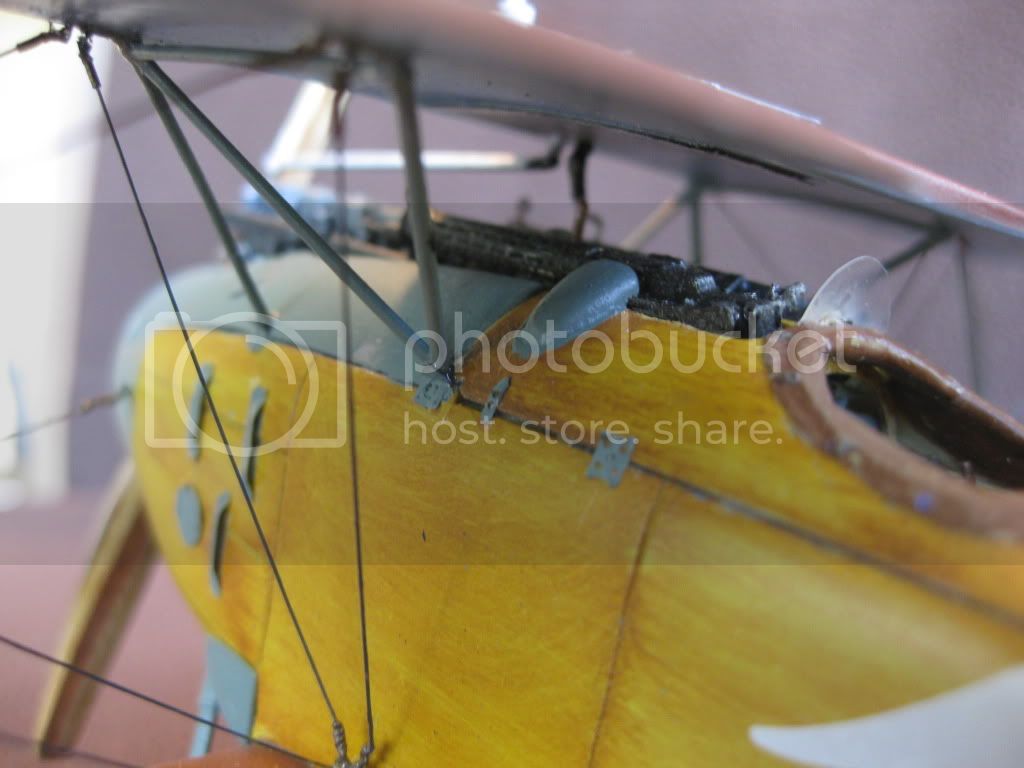
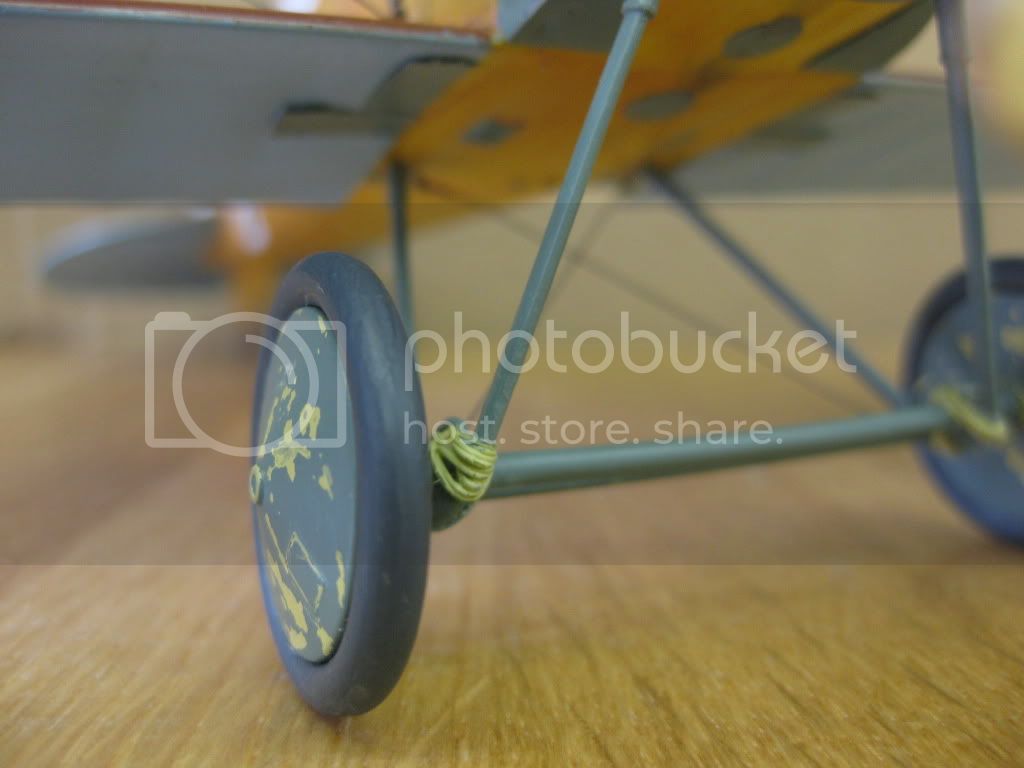
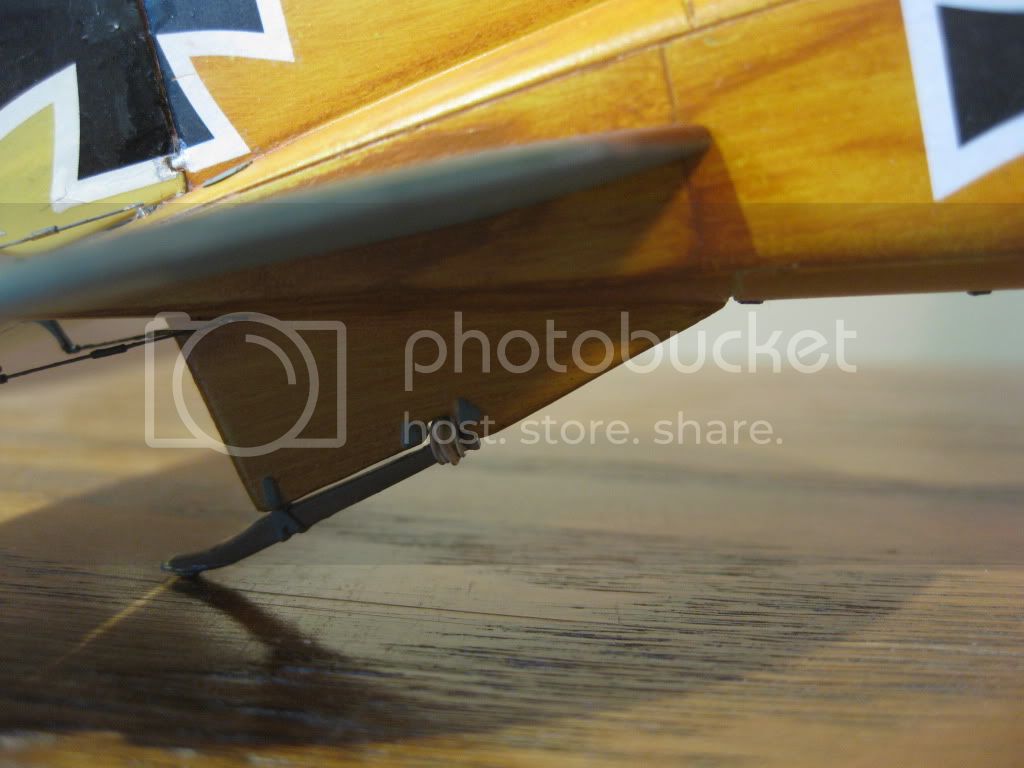
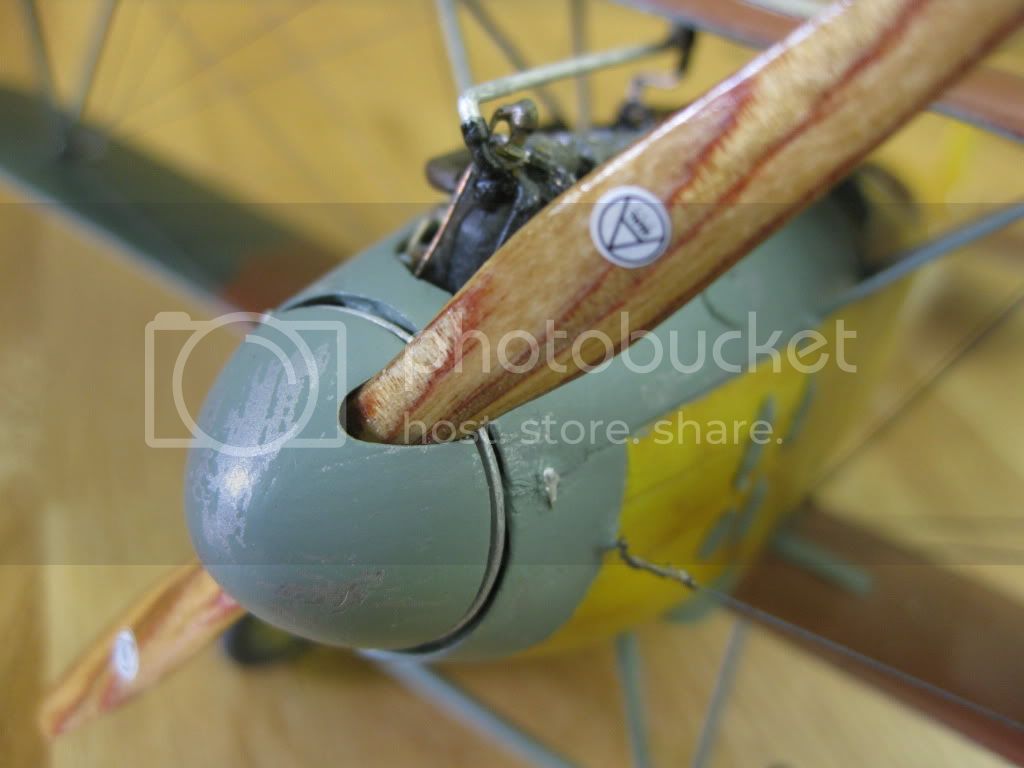
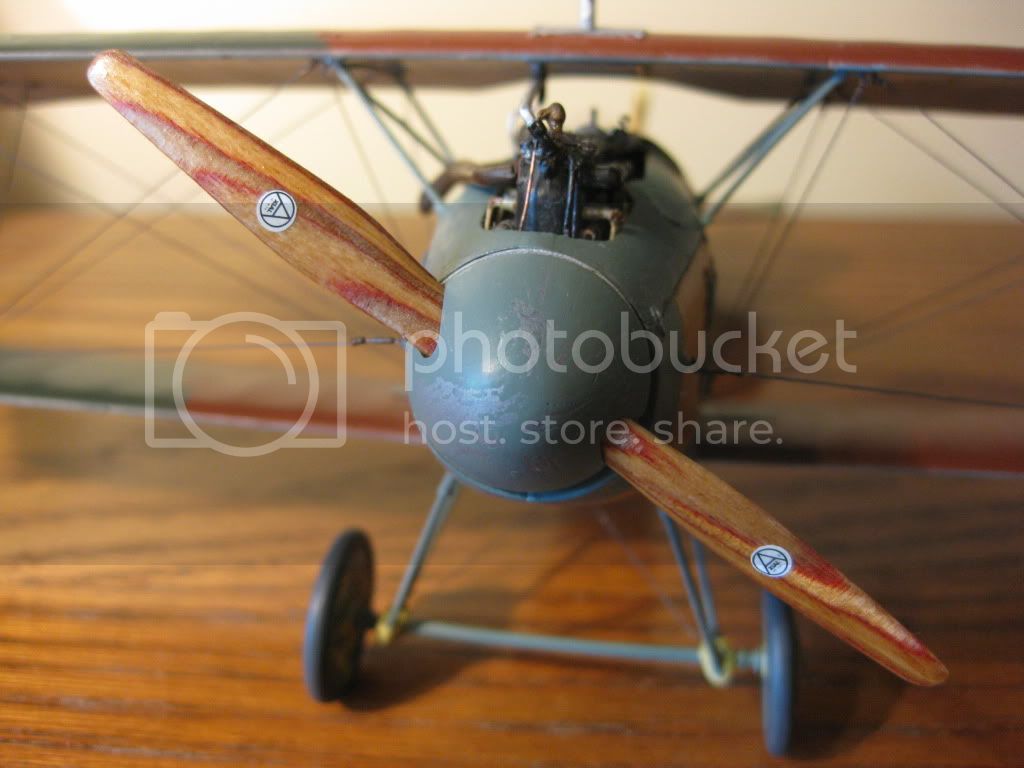
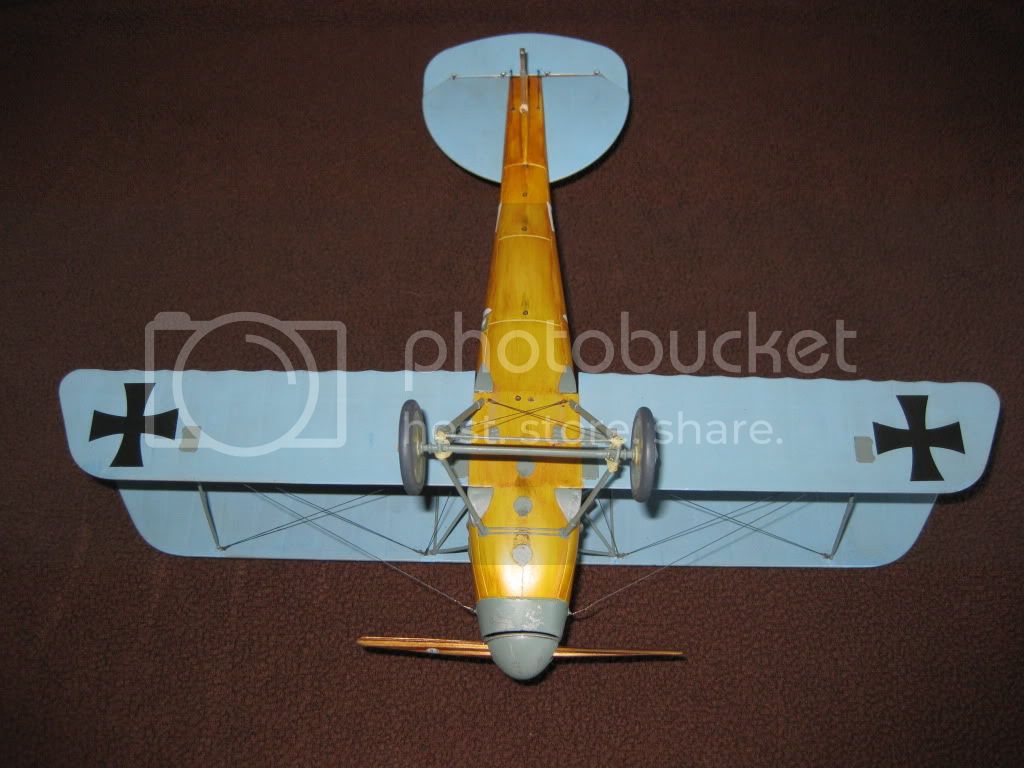
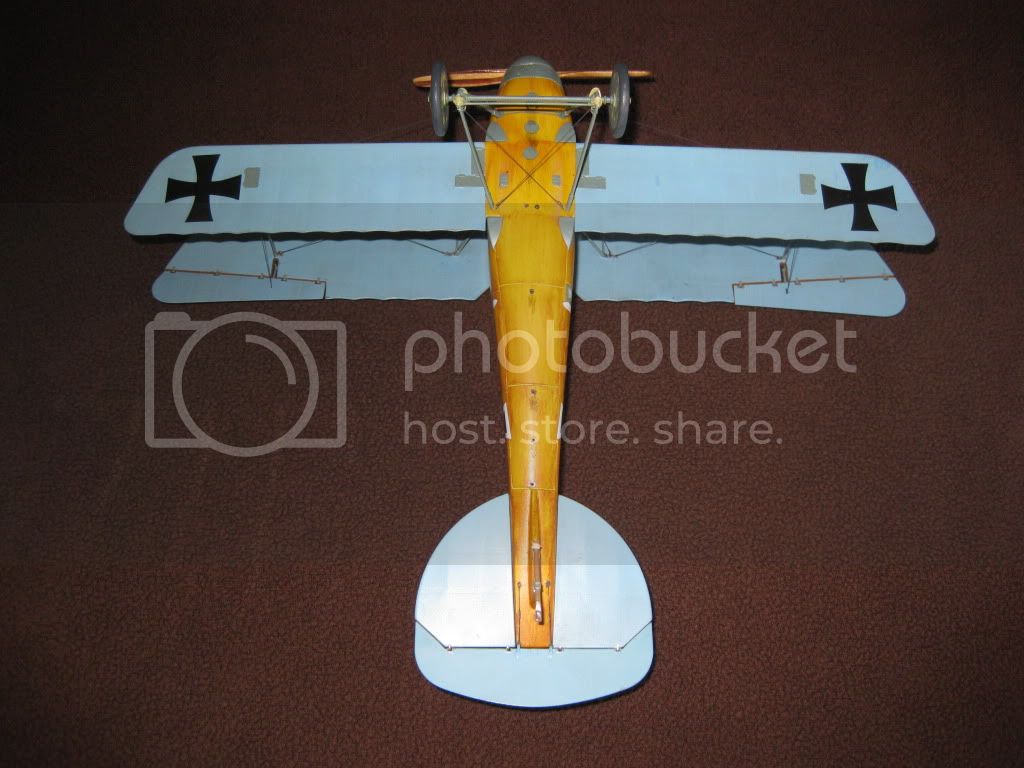
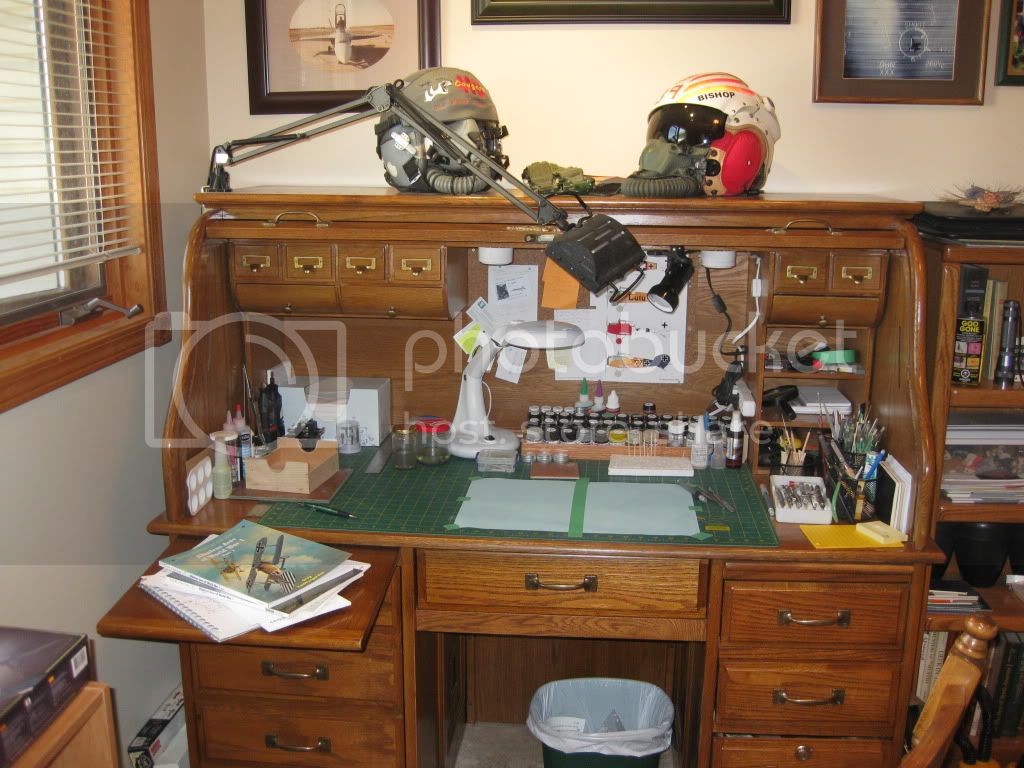
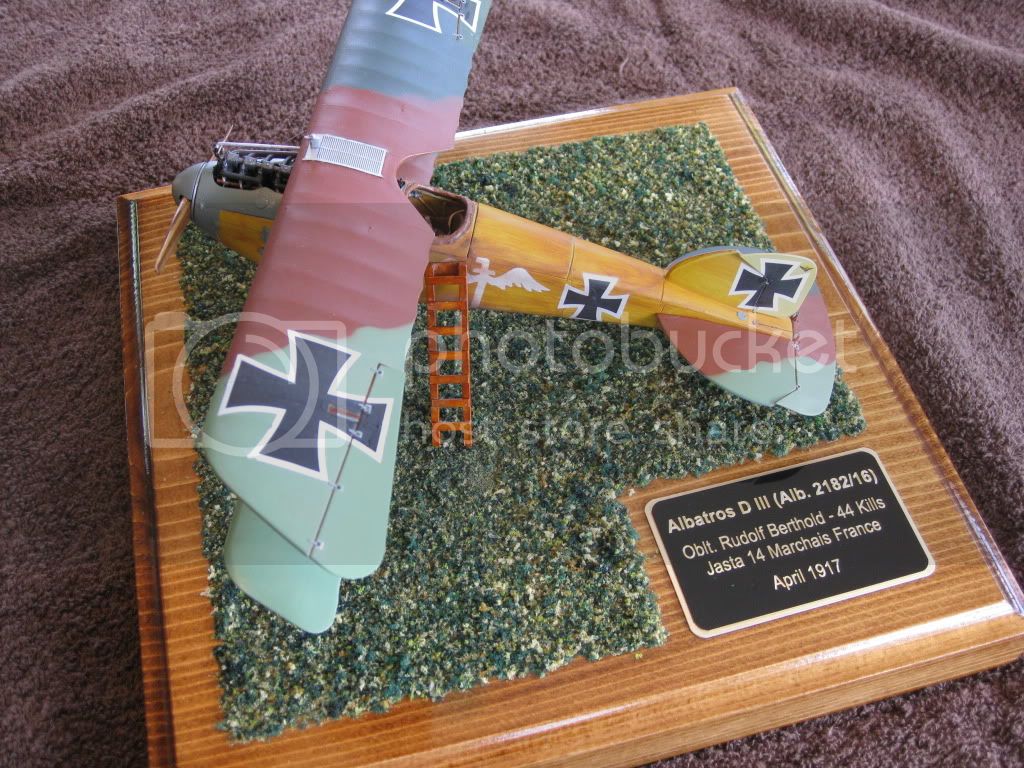
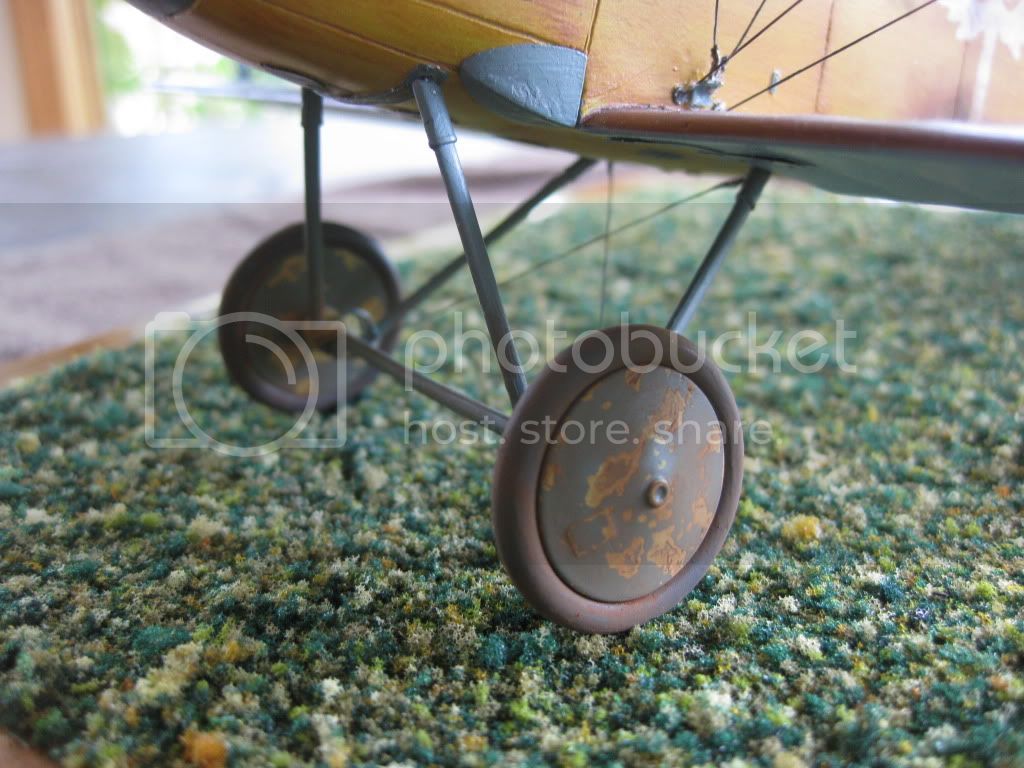
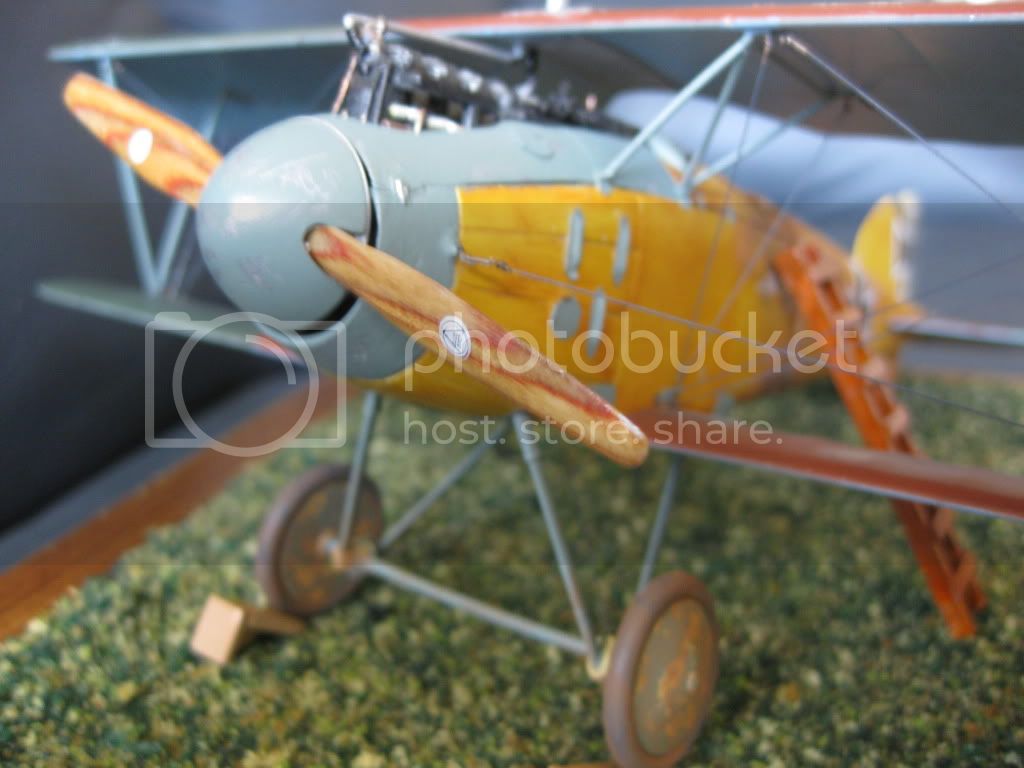
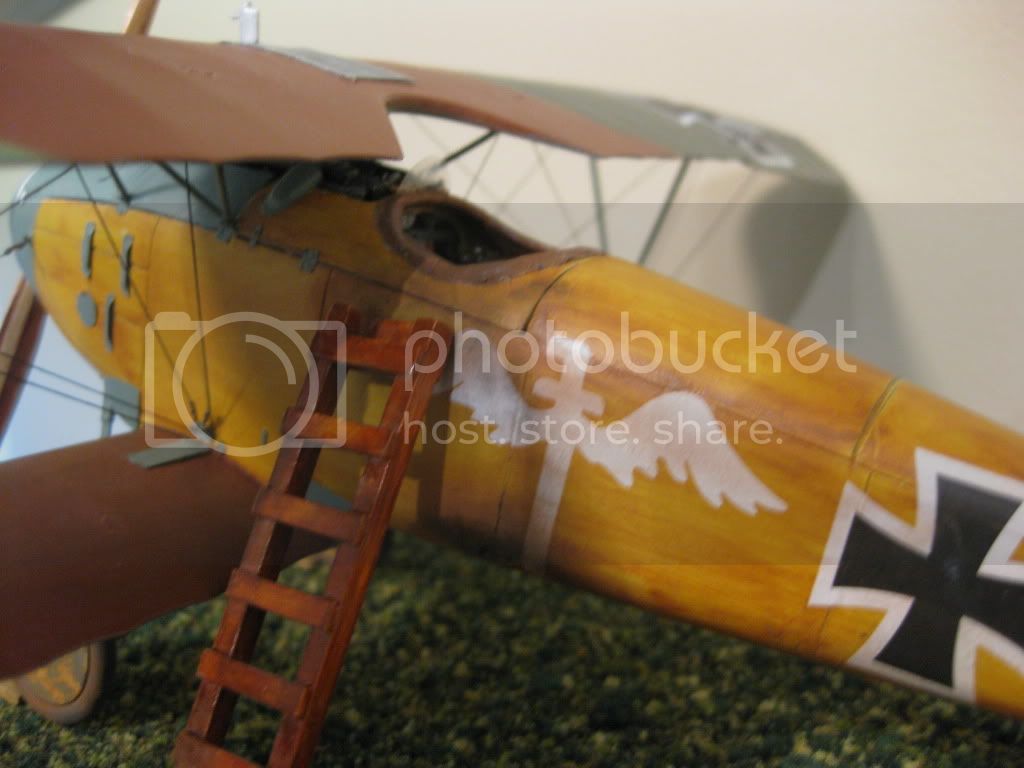
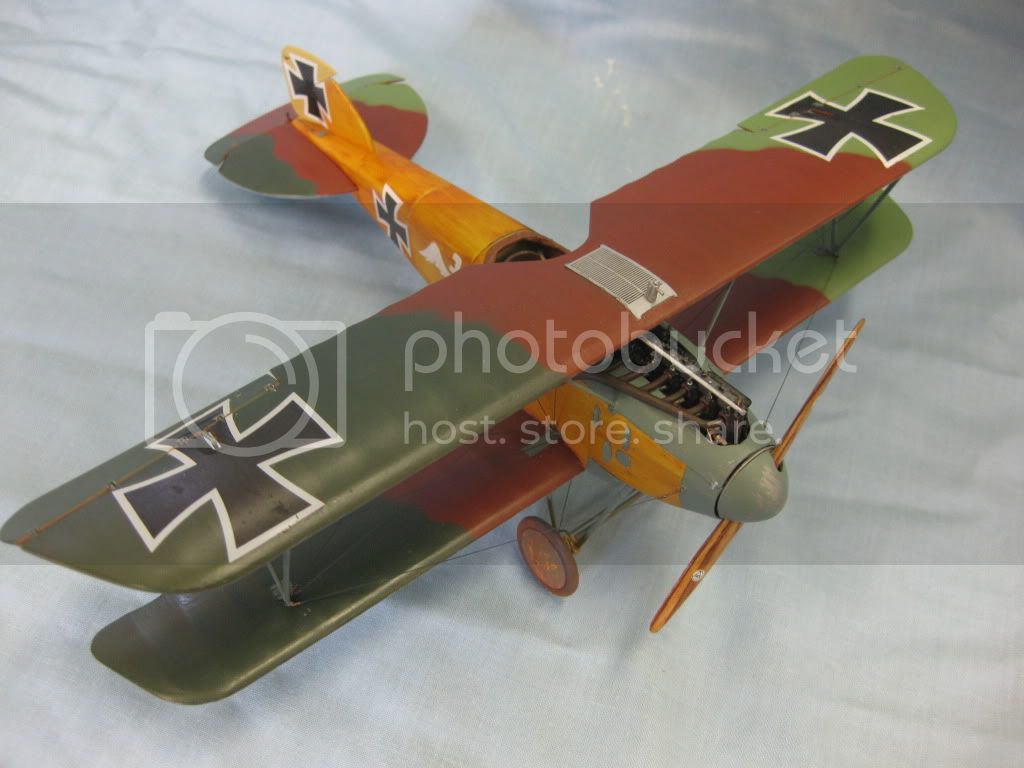
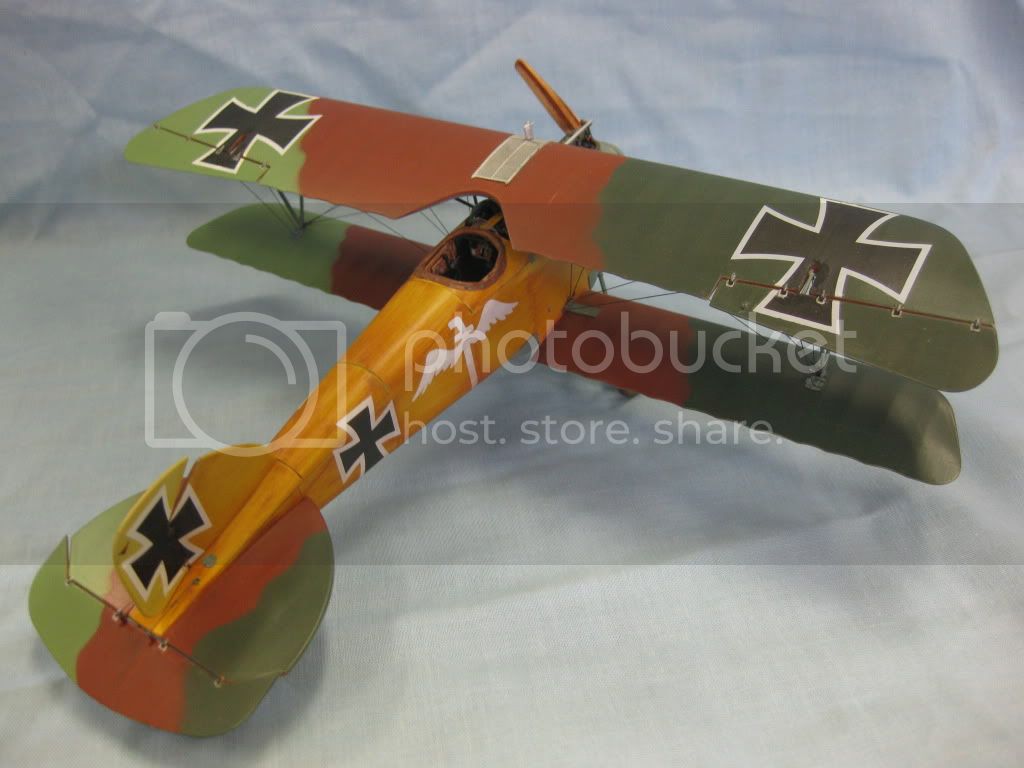
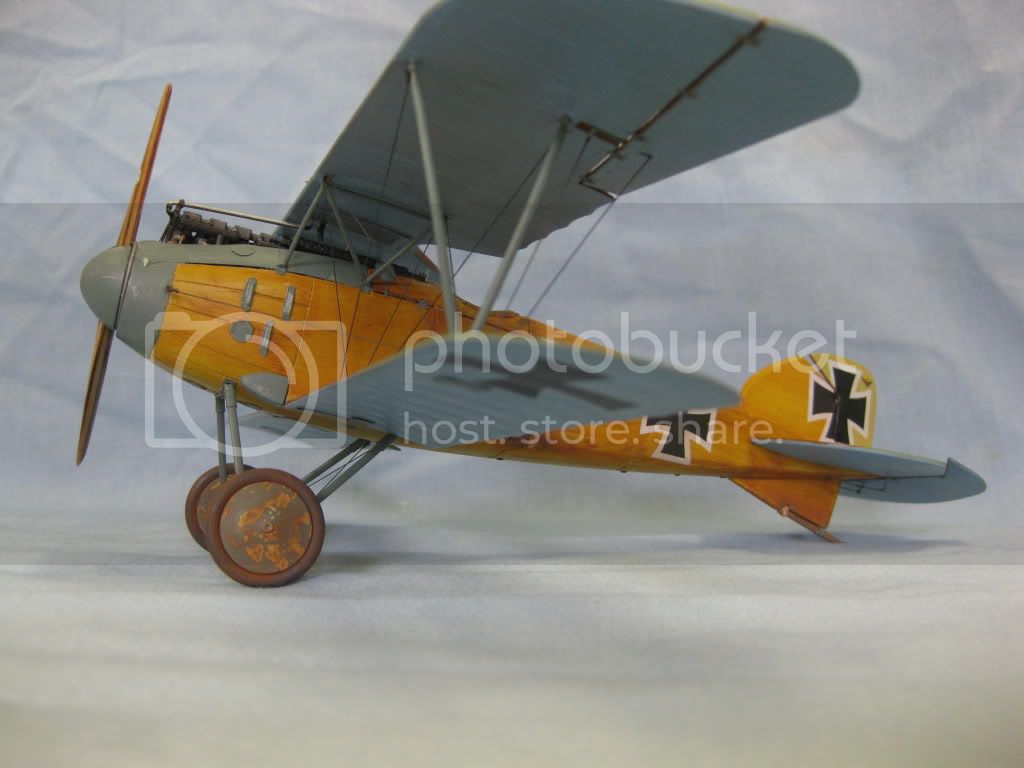
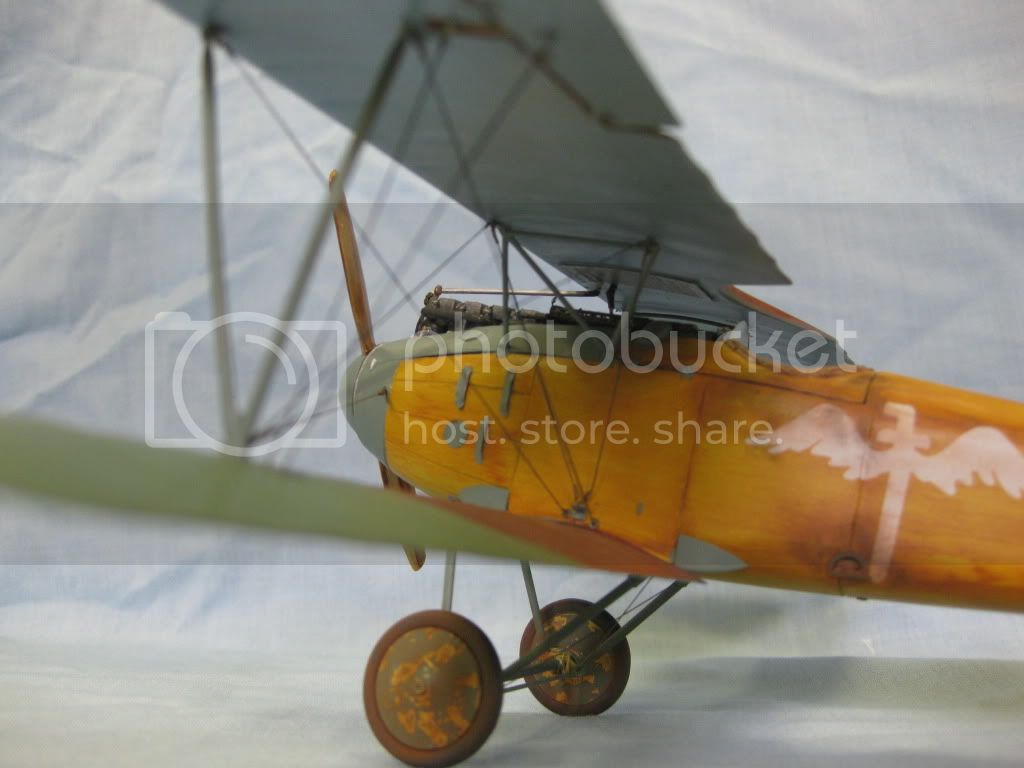
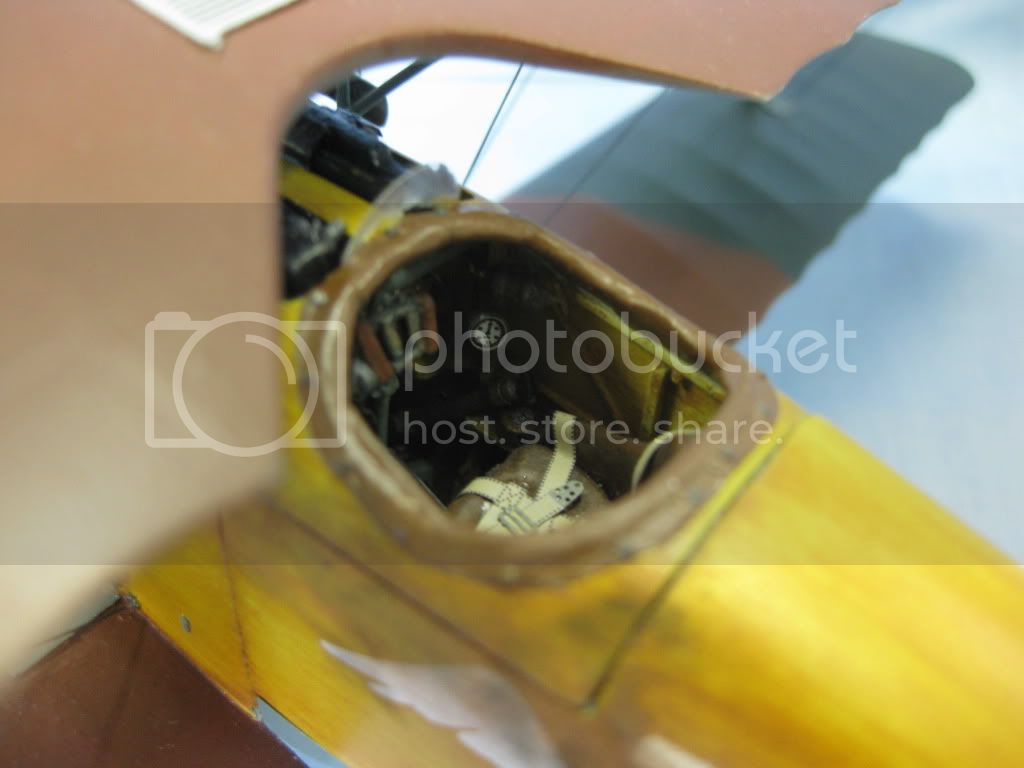
Got her (Berthold's DIII) finished today and loading photos onto Photobucket to do the closing post.........not the greatest but I'm happy with the final results (beauty being in the eye of the beholder of course)
Will post the final tomorrow.

Cheers,
Lance

lcarroll
_VISITCOMMUNITY
Alberta, Canada
Joined: July 26, 2010
KitMaker: 1,032 posts
AeroScale: 1,025 posts
Posted: Sunday, July 03, 2011 - 06:01 AM UTC
Well, not quite finished just yet..............the camera and a little thought have surfaced a need for touching up a few minor dings and scrapes and I am awaiting the arrival of some pigments in the mail. (Postal Strike finally over but the back log will no doubt delay all) Here she is at the almost done stage...........

I want to dust a few spots on the lower portion, gear and belly etc. with a small dose of pigment once it's in hand to finish with a slightly weathered effect and I have the display base in progress. Also think I'll cobble together a step ladder and a couple of wheel chocks to finish her off.
I'll be updating the PhotoBucket account this morning and hopefully enter a full update by end of day.

Cheers,
Lance
warreni
_VISITCOMMUNITY
South Australia, Australia
Joined: August 14, 2007
KitMaker: 5,926 posts
AeroScale: 2,201 posts
Posted: Sunday, July 03, 2011 - 07:34 AM UTC
Looks great Lance.
You are gonna love the WNW kits. Even an OOB one looks marvellous.
lcarroll
_VISITCOMMUNITY
Alberta, Canada
Joined: July 26, 2010
KitMaker: 1,032 posts
AeroScale: 1,025 posts
Posted: Sunday, July 03, 2011 - 08:39 AM UTC
Thanks for the compliment Warren. Means a lot coming from one who's results are so impressive. I havn't decided which one is next on the bench yet but I've spent a little time looking at references and more just poking through the boxes and I havn't been disappointed; the quality is just amazing!

Cheers,
Lance
lcarroll
_VISITCOMMUNITY
Alberta, Canada
Joined: July 26, 2010
KitMaker: 1,032 posts
AeroScale: 1,025 posts
Posted: Sunday, July 03, 2011 - 09:29 AM UTC
So here as promised is the, hopefully, "second from last" update on my venture back into the hobby.
Since the last update all of the rigging has been completed, landing gear installed and rigged, final (at the time!) paint touchups done, radiator hoses inslalled, and the few remaining bits knocked off inadvertantly re-attached. (the engine air pump wins the "most re-installations award" hands down as it's been dinged off more times then I can count.) All of the handling has resulted in a little (not serious) chipping of those wonderful decals thus reminder to self, more final over coats before wrap up! Touch ups to follow.


All the rigging is 0.20 monofil fishing line with the exception of the aileron and elevator control wires where I used fine .18mm stainless steel guitar wire.
As mentioned previously it was all painted with a thinned down Model Master Engine Grey Enamel.


The gear was pinned with 0.23 mm guitar wire and even so and with the addition of the rigging cross braces is still very shakey. Retro thought is to use wire on the gear braces in future. On studying the photos I've resolved to do better at the elastic cord thing on gear and tailskids next time around. A little overdone on the gear and messy on the skid if I may self critique.

I am "sold" on hand carving wooden props and looking forward to trying my own laminates.


Before I forget, the belly shots...........


Now I get to wait for Canada Post to get the final requirement here, hopefully soon. I've got a few days to complete the display base and as mentioned some minor add ons to the base. Also have the local Engraver doing up the description plate for the base. Until I decide on the next build (real soon!) and at least start a promised Book Review the desk, small as it is, is mighty clean and thus dysfunctional. I even cleaned out the waste basket so I'm more then ready for the next build.

Thought I'd include the desk shot for Mountain Flyer; I too could use a little more "spread"!

Cheers, and thanks for looking......
Lance
thegirl
_VISITCOMMUNITY
Alberta, Canada
Joined: January 19, 2008
KitMaker: 6,743 posts
AeroScale: 6,151 posts
Posted: Sunday, July 03, 2011 - 10:07 AM UTC
Very well done Lance ! I'm really impressed on how the whole project came together . It was enjoyable to read and follow the building stage . What really caught my eye is your prop , simply super !

Where did you get the antique writing desk ?

Looking forward to seeing the final weathering
lcarroll
_VISITCOMMUNITY
Alberta, Canada
Joined: July 26, 2010
KitMaker: 1,032 posts
AeroScale: 1,025 posts
Posted: Monday, July 04, 2011 - 11:04 AM UTC

Quoted Text

Very well done Lance ! I'm really impressed on how the whole project came together . It was enjoyable to read and follow the building stage . What really caught my eye is your prop , simply super !

Where did you get the antique writing desk ?

Looking forward to seeing the final weathering


Terri, Thanks for the kind words; coming from "the girl" they mean a great deal!
The prop is definitely one of the more rewarding parts of this project, hopefully I can get even better results laminating my own veneer strips on the next try.
The desk was a "find"on the local net shopping site (info mall) It's far from an antique; Sears sold them a few years back but very pricey. I got a good deal on it but it needed some repair and refinishing. I always thought it a good idea for a model bench as I can just close it and the chaos goes away, also keeps curious fingers away when necessary. On the other hand it gets a bit tight at times.
I'll post a "Done" update once the supplies arrive and I get the minor weathering completed.

Cheers,
Lance
wing_nut
_VISITCOMMUNITY
New Jersey, United States
Joined: June 02, 2006
KitMaker: 1,212 posts
AeroScale: 468 posts
Posted: Monday, July 04, 2011 - 04:55 PM UTC
Lance that is one to be proud of. Lots of little thing to love on the bird. The chipping on the wheels, the carved prop to name a couple. I've said this before and will say it again... I must be at McDonald's coz I'm lovin' it.
OEFFAG_153
_VISITCOMMUNITY
Västra Götaland, Sweden
Joined: February 19, 2010
KitMaker: 1,473 posts
AeroScale: 1,450 posts
Posted: Wednesday, July 06, 2011 - 01:48 AM UTC
A beautiful build Lance – Congratulations on finishing. I think your honey coloured wood finish is spot on! + many other very nice features.

Best Regards

Mikael
mtnflyer
_VISITCOMMUNITY
Alberta, Canada
Joined: March 08, 2009
KitMaker: 394 posts
AeroScale: 360 posts
Posted: Wednesday, July 06, 2011 - 03:00 AM UTC
I really like your D.III, Lance. Even though the minor frustrations you suffered, you pulled through with a shining light. That wonderful prop is a grand touch, and to me, your rigging looks expert. Congratulations; Very well done, indeed.
Buckeye198
_VISITCOMMUNITY
Ohio, United States
Joined: May 02, 2010
KitMaker: 596 posts
AeroScale: 197 posts
Posted: Wednesday, July 06, 2011 - 05:00 AM UTC
Wow...what a truly impressive build! It's amazing how much detail you put into it. I assume some of it was possible because you're working in 1/32 (ie, the wooden panels around the engine are absent in my 1/48 kit, as are many of the controls, engine details, etc.), but your superb use of PE, rigging, that Erector Set doohickey, and the techniques you've learned through all your experience add SO much to the kit! And I have to say, your wood paneling is incredible...the fuselage looks fantastic, and I think you deserve to brag more about your hand-carved prop! Phenomenal job!

Were the decals that shattered on you also Roden's? I knew the lozenge decals wouldn't work with all the cuts through the actual decals I'd have to make, but I figured things like the crosses and "LO!" decals would stay intact...maybe I should also look around for an Ernst Udet aftermarket decal set...

Finally, might I say that your desk is a prime example of efficiency! Everything you need is right at your fingertips, there's nothing you don't need that's clogging the works, shelves and drawers, and ample lighting! And don't worry about your desk being small...my entire workspace is probably just a hair wider than the middle drawer on your desk. A few questions though: it doesn't look like you have that many jars of paint. Are the other shades hidden away somewhere or do you just use a few shades as your bases to mix around? That's currently what I do, since the paint can get pricey and my LHS doesn't offer that many shades... Also what brand do you use? I'm looking for a cheap and easy-to-acquire acrylic paint. Any suggestions appreciated. Next question: are the flight helmets yours, or are they just awesome display pieces?

You're done a great job with this build, and I'll be following your WNW Albie!
lcarroll
_VISITCOMMUNITY
Alberta, Canada
Joined: July 26, 2010
KitMaker: 1,032 posts
AeroScale: 1,025 posts
Posted: Wednesday, July 06, 2011 - 07:14 AM UTC
Mikael, Marc, Guy and Robby,
Thanks so much for the nice words. She's not completely finished; when Canada Post cooperates and I get an hour or so to complete a little weathering I'll post a few photos of her on the display base and call it a wrap.

Robby,
I'll send an answer to your questions later today; have an appointment this afternoon and have to run.

Cheers,
Lance
lcarroll
_VISITCOMMUNITY
Alberta, Canada
Joined: July 26, 2010
KitMaker: 1,032 posts
AeroScale: 1,025 posts
Posted: Wednesday, July 06, 2011 - 03:20 PM UTC
Robby,
In answer to your questions;
The switch to 1/32 scale works well for me. As I've alluded to many times on this site, a previously (to me) unknown effect of age is thicker fingers.the older eyes have been well documented. Bottom line bigger gives more opportunity to continue to detail and satisfy the dreaded AMS. (I translate that as "Anal Modeling Syndrome", not sure how others represent it.)
The Decals..Yes, they all were horrible. Many of our contempories are suffering the same woes. On the bright side I note that Roden are doing absolutely stellar work in providing replacements if you ask. You should do so if only to add to your "stash"for future builds as you payed your money for them and they were defective. I'd send them an EMail.
Regarding Paint - the door on the left side of the desk covers 5 drawers I built into the desk.......other then one they are all full of paint jars. I am still a 1980's kind of model guy thus work mostly in enamels (Model Master) I am presently venturing into Acrylics, specifically Tamiya as I find the results "cleaner" and less "globby" then enamels. Also very impressed with their results when thinned and airbrushed. In answer to your question I'm no expert but if price and reasonable quality along with availability are the keys I'd recommend the Tamiya Products. For their quality vs. price I believe you couldn't do much better and they seem to be pretty available compared to others.
Last, the helmets are mine, to remind me of "back in the day" when life was simple, all was fun, and we were all going to live and be young forever.............
Ask me how that worked out!

Cheers, and Thanks for the compliments.keeps a guy pushing even harder.

Lance
vulkanizer
_VISITCOMMUNITY
Croatia Hrvatska
Joined: December 26, 2009
KitMaker: 144 posts
AeroScale: 109 posts
Posted: Thursday, July 07, 2011 - 10:59 AM UTC
I follow this building constantly, but I almost missed the propeller. Looks great, so I will use this idea on my Fokker.
Beautiful table ,you have to write topic how keep so orderly , no matter how much I try, my is always messy
lcarroll
_VISITCOMMUNITY
Alberta, Canada
Joined: July 26, 2010
KitMaker: 1,032 posts
AeroScale: 1,025 posts
Posted: Thursday, July 07, 2011 - 11:03 AM UTC

Quoted Text

I this building constantly, but I almost missed the propeller. Looks great, so I will use this idea in my Fokker.
Beautiful table ,you have to write topic how keep so orderly , no matter how much I try, my is always messy


Dani,
The table was cleaned up to start another project. Normally it's really a mess!! Beyond mess actually......

Cheers,
Lance
lcarroll
_VISITCOMMUNITY
Alberta, Canada
Joined: July 26, 2010
KitMaker: 1,032 posts
AeroScale: 1,025 posts
Posted: Friday, July 08, 2011 - 11:33 AM UTC
Well Boys and Girls, the DIII is finally DONE! I got my parcel in the mail at last (Pigments from MtnFlyer-Thank you so much Guy), finished the Display Base and the Trophy Store came thru right on time with the plate.
Added a ladder (Ref. photos in the Osprey Books provided the pattern) and chocks to the base as well. I'm afraid the photos aren't great today, must be the light or lack of it.


I did a minor weathering application with "European Dirt" pigment to the wheels, tires, and lower portion of the undercarriage. Also a little of the same to the left side of the fuselage below the cockpit along with some black grime, kick step well, and more dirt on the tailskid fairing. A lot of the photos show a fair amount of wear and dirt around the cockpit left side from the constant climbing in and out thus I went a little heavier there.


Now that it's completed I like the results however, as said before, am looking forward to a nice smooth build of a WNW product. A few more shots to wrap up what has been a frustrating but ultimately satisfying build.


In summary this KoTS Campaign was a great way to break into this forum. A lot of the techniques (pre-shading, turnbuckles and enhanced rigging, clear tints, and pigments) were first attempts for me; thanks to all who provided the info and answered the questions. I have learned a lot and hopefully improved my skills, made some wonderful acquaintances, and discovered that sharing is as great a part of this hobby as the activity itself.
I look forward to many more experiences such as this, and now on to the next build!

Cheers All,
Lance
mtnflyer
_VISITCOMMUNITY
Alberta, Canada
Joined: March 08, 2009
KitMaker: 394 posts
AeroScale: 360 posts
Posted: Friday, July 08, 2011 - 12:12 PM UTC
I like your D.III very much, Lance. An outstanding effort, and it definitely inspires me to get back to work on mine. Good Job!
lcarroll
_VISITCOMMUNITY
Alberta, Canada
Joined: July 26, 2010
KitMaker: 1,032 posts
AeroScale: 1,025 posts
Posted: Wednesday, July 13, 2011 - 04:52 AM UTC
Light was much better yesterday; took a few more photos to close this one off. Now, if I can just figure out how to get some of these off Photobucket and into the Gallery.............I'll be done.


After gazing at this one for a week I've decided the second Albatros will have to be a colorful scheme, back to the books I reckon!

Cheers,
Lance
vulkanizer
_VISITCOMMUNITY
Croatia Hrvatska
Joined: December 26, 2009
KitMaker: 144 posts
AeroScale: 109 posts
Posted: Wednesday, July 13, 2011 - 09:14 AM UTC
Congratulations on this wonderful albatros Lance, way to go
 _GOTOTOP