

Air Campaigns
Want to start or join a group build? This is where to start.
Want to start or join a group build? This is where to start.
Hosted by Frederick Boucher, Michael Satin
OFFICIAL: National Pride Campaign

c4willy

#305

Joined: February 01, 2006
KitMaker: 1,673 posts
AeroScale: 1,517 posts

Posted: Wednesday, December 31, 2014 - 07:10 AM UTC
Hi Joel many thanks, looking forward to seeing the F15 progress, you've done an outstanding job so far!
c4willy
#305
Joined: February 01, 2006
KitMaker: 1,673 posts
AeroScale: 1,517 posts
Posted: Wednesday, December 31, 2014 - 10:45 AM UTC
Yup mine too .... especially as my wife forbids the use of a airbrush inside! Or paint or glue or sanding for that matter ... I prefer to be there anyway ... a little piece and quiet after I'm finished work for the day. And since the garage is attached to the house it's somewhat insulated against the weather... somewhat LOL
Joel_W

Joined: December 04, 2010
KitMaker: 11,666 posts
AeroScale: 7,410 posts
Posted: Wednesday, December 31, 2014 - 08:57 PM UTC
Quoted Text
Yup mine too .... especially as my wife forbids the use of a airbrush inside! Or paint or glue or sanding for that matter ... I prefer to be there anyway ... a little piece and quiet after I'm finished work for the day. And since the garage is attached to the house it's somewhat insulated against the weather... somewhat LOL
Chris,
Wow!! Your wife is really tough. I paint and run a nosey compressor, glue, and sand in the man cave. I do have a paint booth setup for the window for lacquer based paints, so no smells ever leave the room. Besides the door is always closed. And I'm looking at buying a noiseless compressor or a CO2 tank this year, so I can paint when ever I want to.
Joel

Joel_W
Joined: December 04, 2010
KitMaker: 11,666 posts
AeroScale: 7,410 posts
Posted: Wednesday, December 31, 2014 - 09:10 PM UTC
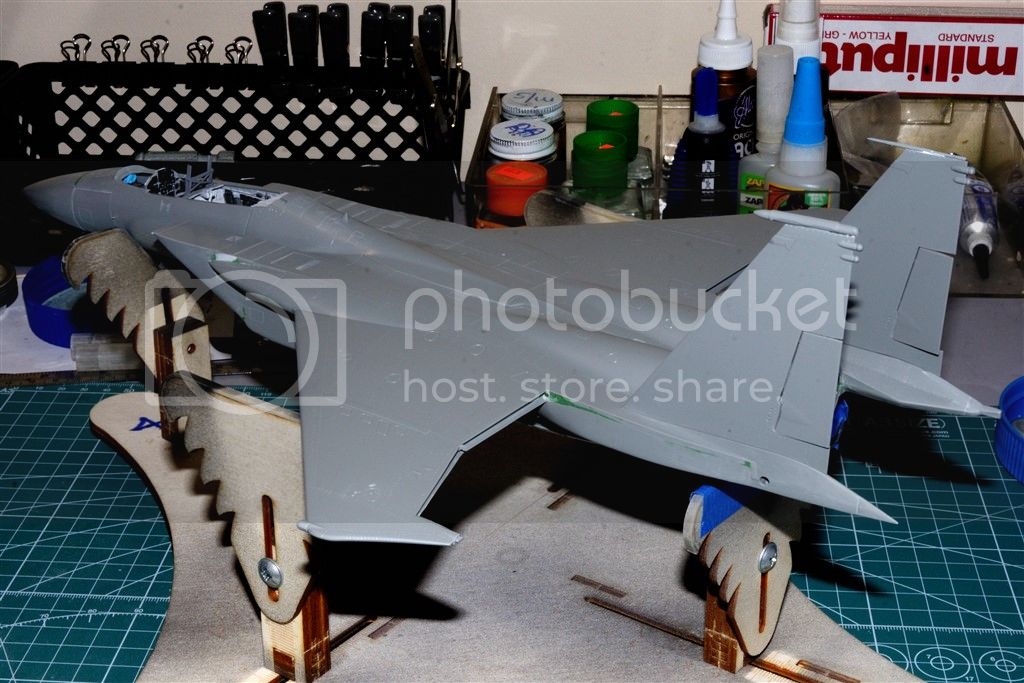
Got enough work done on the F-15C to post another update to my build blog in the Modern forum @ F-15C
The twin tails and rudders were added using steel pins so I can reposition them, as I wasn't thrilled with how the butt joints looked.
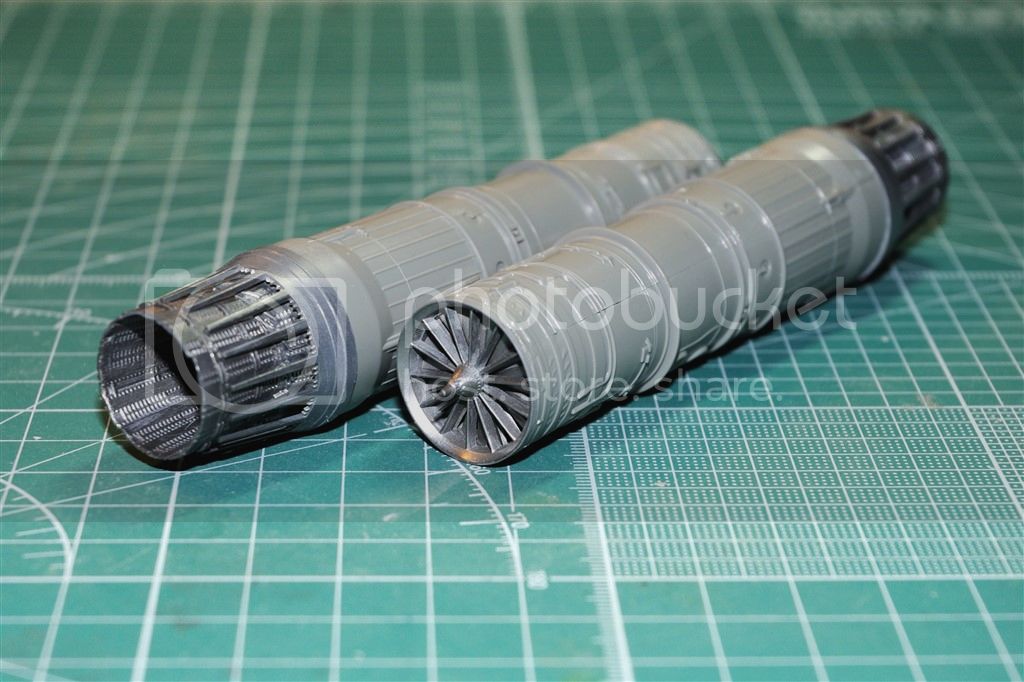
Both engines, which are literally mini kits were built up, and the exhaust cans were painted with Alcad 11 and model Master Metalizers.
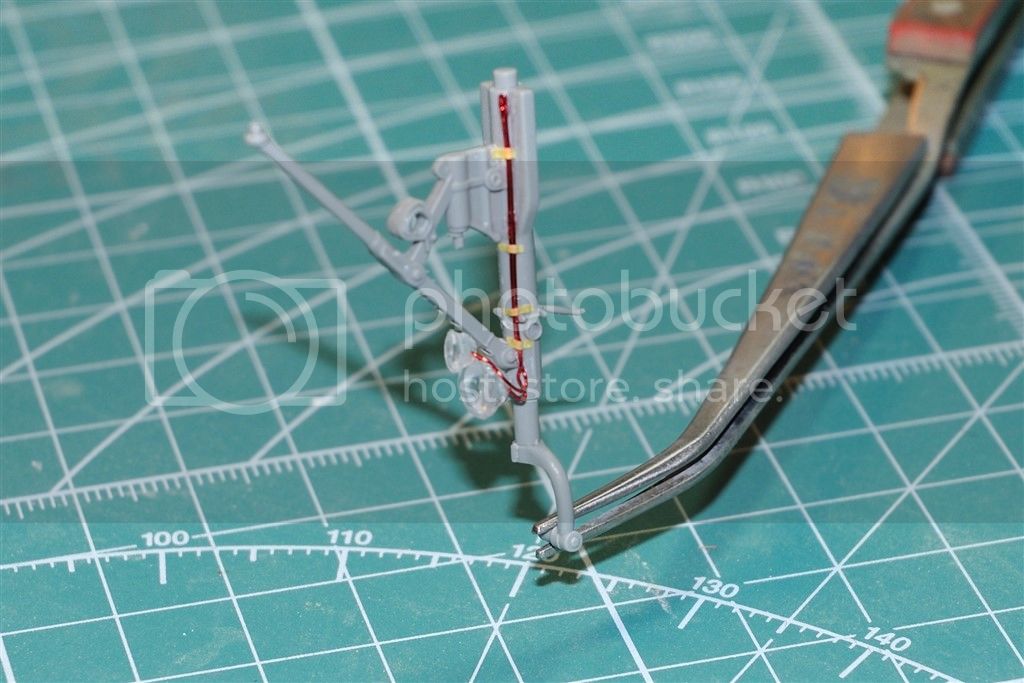
Finally, it's time to start detailing the landing gear. 1st up was the front gear strut. I drilled out the lightning holes, and added the electrical wires and brackets for the landing lights.
For the full blow by blow update, please stop by my build blog using the link above.
Joel
The twin tails and rudders were added using steel pins so I can reposition them, as I wasn't thrilled with how the butt joints looked.

Both engines, which are literally mini kits were built up, and the exhaust cans were painted with Alcad 11 and model Master Metalizers.

Finally, it's time to start detailing the landing gear. 1st up was the front gear strut. I drilled out the lightning holes, and added the electrical wires and brackets for the landing lights.

For the full blow by blow update, please stop by my build blog using the link above.
Joel

Mcleod

Joined: April 07, 2010
KitMaker: 1,028 posts
AeroScale: 939 posts
Posted: Wednesday, December 31, 2014 - 09:35 PM UTC
Hi Joel. I read your build blog in the evening of the last year; well done. Any progress you place in here is welcomed. I really like what you are doing with the gear!! 
Joel_W
Joined: December 04, 2010
KitMaker: 11,666 posts
AeroScale: 7,410 posts
Posted: Thursday, January 01, 2015 - 02:43 AM UTC
Ben,
Thanks.
I'm trying to post here a shorter version of the main update as I make them. I'm already having issues remembering that it's now 2015, & last year was 2014.
Joel
Thanks.
I'm trying to post here a shorter version of the main update as I make them. I'm already having issues remembering that it's now 2015, & last year was 2014.
Joel

ljames0874

Joined: August 15, 2012
KitMaker: 408 posts
AeroScale: 365 posts

Posted: Friday, January 02, 2015 - 10:59 PM UTC
More progress to report. The Nimrod moves on rather sedately, there is quite a lot of filling and sanding right now, plus assembly and painting of the smaller assemblies, such as the main landing gear, and flaps (these need to be done before the wings can be assembled).
The Harrier GR.3 is built, primed, and the camouflage pattern is on (using the blu-tack sausage method), with just the details to be painted in, before decals, sealing and weathering to go.

With the current inclement weather putting a halt to most of the painting (I do all my spraying and air brushing outside), it is a good job I have other builds on the go. The Esci Harrier GR.5 is coming together, though there are a few issues. Their RAF F-4 Phantom kits are fairly well regarded, but unfortunately this GR.5 kit is nothing like as good. There are no locating pins to speak of, and the fit of the major parts is pretty poor, especially the wing assembly fit to the upper fuselage. you can see the amount of filler I've had to use:


Oh well, these things are sent to test us - onwards and upwards!
Cheers Everybody!
The Harrier GR.3 is built, primed, and the camouflage pattern is on (using the blu-tack sausage method), with just the details to be painted in, before decals, sealing and weathering to go.
With the current inclement weather putting a halt to most of the painting (I do all my spraying and air brushing outside), it is a good job I have other builds on the go. The Esci Harrier GR.5 is coming together, though there are a few issues. Their RAF F-4 Phantom kits are fairly well regarded, but unfortunately this GR.5 kit is nothing like as good. There are no locating pins to speak of, and the fit of the major parts is pretty poor, especially the wing assembly fit to the upper fuselage. you can see the amount of filler I've had to use:
Oh well, these things are sent to test us - onwards and upwards!
Cheers Everybody!

b17-peter
#392

Joined: January 09, 2013
KitMaker: 696 posts
AeroScale: 608 posts

Posted: Saturday, January 03, 2015 - 02:04 AM UTC
Hi everybody,
cutting and glueing has started just on New Year's Eve!
I've seen already fine builds in this campaign, well done by all of you!
Hope I can get anywhere near these high standards
Here are some pictures of my present doings


cutting and glueing has started just on New Year's Eve!
I've seen already fine builds in this campaign, well done by all of you!
Hope I can get anywhere near these high standards
Here are some pictures of my present doings
b17-peter
#392
Joined: January 09, 2013
KitMaker: 696 posts
AeroScale: 608 posts
Posted: Saturday, January 03, 2015 - 02:44 AM UTC
@Simon Splendid job on your Mosquito!
@Joel Those F-15 engines look marvellous!
My Phantom will be built nearly straight OOB, except the bang seats, these are (probably) by Verlinden, if my memory is right. I had them in my accessories box for decades now (as the kit itself ), but now they are put to good use!


@Joel Those F-15 engines look marvellous!
My Phantom will be built nearly straight OOB, except the bang seats, these are (probably) by Verlinden, if my memory is right. I had them in my accessories box for decades now (as the kit itself
), but now they are put to good use! 
Bushioka
Joined: January 13, 2014
KitMaker: 107 posts
AeroScale: 105 posts
Posted: Monday, January 05, 2015 - 02:54 AM UTC
I should get going on one of two kits for this soon: either the 1/48 Curtiss Ascender or a 1/48 A-24 Banshee.
Joel_W
Joined: December 04, 2010
KitMaker: 11,666 posts
AeroScale: 7,410 posts
Posted: Monday, January 05, 2015 - 08:34 PM UTC
Peter,
Those seats really do look quite nice, especially in 1/72 scale.
Joel
Those seats really do look quite nice, especially in 1/72 scale.
Joel
Joel_W
Joined: December 04, 2010
KitMaker: 11,666 posts
AeroScale: 7,410 posts
Posted: Monday, January 05, 2015 - 08:43 PM UTC
Well, I finally finished the cockpit, glued on the front windscreen, and it was time for some primer.

The primer coat looked perfect, so after a day I applied the 1st color coat, which is just one shade darker then the primer.
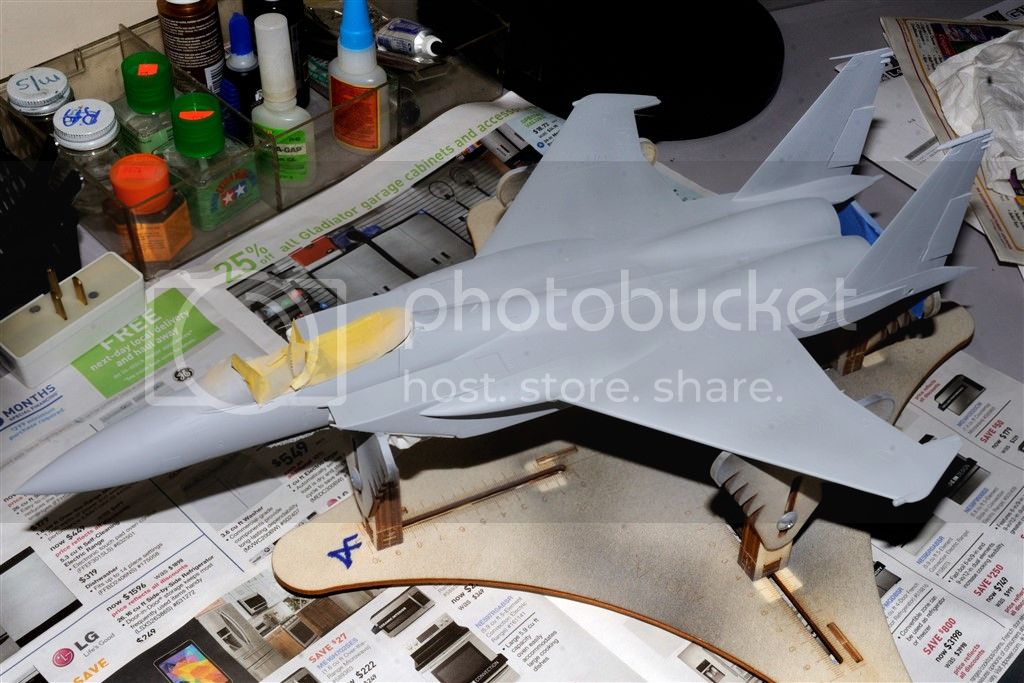
Next I started on the main landing gear by drilling out all the lightning holes.

To checkout the full update, here's the link to the build blog.
F-15-C
Thanks,
Joel

The primer coat looked perfect, so after a day I applied the 1st color coat, which is just one shade darker then the primer.

Next I started on the main landing gear by drilling out all the lightning holes.

To checkout the full update, here's the link to the build blog.
F-15-C
Thanks,
Joel
ljames0874
Joined: August 15, 2012
KitMaker: 408 posts
AeroScale: 365 posts
Posted: Sunday, January 11, 2015 - 11:00 PM UTC
Looking good there Joel & Peter, a pair of classic designs for sure!
More progress on the Nimrod to report. The wings have been the focus of my attention for the past week, particularly the thrust reverser cascades, which are in the wrong place on both the upper and lower wings. The upper set require moving forward, and the lower set need moving aft. Here, the correct positions have been marked out, then cut out:

Each of the cascades then recieved a PE mesh grille, and then were boxed in with plasticard:

Today the wings were attached, and now I am having to seriously consider where I am going to display this beast - I'm going to need a bigger house at this rate! Here is the obligatory "scale" shot, next to the GR.3:

Cheers Everyone!
More progress on the Nimrod to report. The wings have been the focus of my attention for the past week, particularly the thrust reverser cascades, which are in the wrong place on both the upper and lower wings. The upper set require moving forward, and the lower set need moving aft. Here, the correct positions have been marked out, then cut out:
Each of the cascades then recieved a PE mesh grille, and then were boxed in with plasticard:
Today the wings were attached, and now I am having to seriously consider where I am going to display this beast - I'm going to need a bigger house at this rate! Here is the obligatory "scale" shot, next to the GR.3:
Cheers Everyone!
Mcleod
Joined: April 07, 2010
KitMaker: 1,028 posts
AeroScale: 939 posts
Posted: Monday, January 12, 2015 - 12:03 AM UTC
Quite the impressive modifications going on here, Lee. I enjoy seeing this type of corrective work, although, I know so little about Nimrods.
Well done, indeed!!
Well done, indeed!!
Joel_W
Joined: December 04, 2010
KitMaker: 11,666 posts
AeroScale: 7,410 posts
Posted: Monday, January 12, 2015 - 01:05 AM UTC
Lee,
I personally appreciate corrections more then just bought added details. Nice job on that screening.
Believe me, I feel your pain about display space. I've wanted to make the move to 1/32 scale for some time, but since our next move in a few years is to a retirement condo from our house, I'm quite sure that my new Man Cave will be that much smaller then the one I have now. And being just 10x10 there isn't an unlimited amount of display space, especially since I have display shelves with individual model cases, and soon a real glass display case. Of course I haven't informed my wife about it as yet 
Joel
I personally appreciate corrections more then just bought added details. Nice job on that screening.
Believe me, I feel your pain about display space. I've wanted to make the move to 1/32 scale for some time, but since our next move in a few years is to a retirement condo from our house, I'm quite sure that my new Man Cave will be that much smaller then the one I have now. And being just 10x10 there isn't an unlimited amount of display space, especially since I have display shelves with individual model cases, and soon a real glass display case. Of course I haven't informed my wife about it as yet
Joel
Joel_W
Joined: December 04, 2010
KitMaker: 11,666 posts
AeroScale: 7,410 posts
Posted: Monday, January 12, 2015 - 01:17 AM UTC
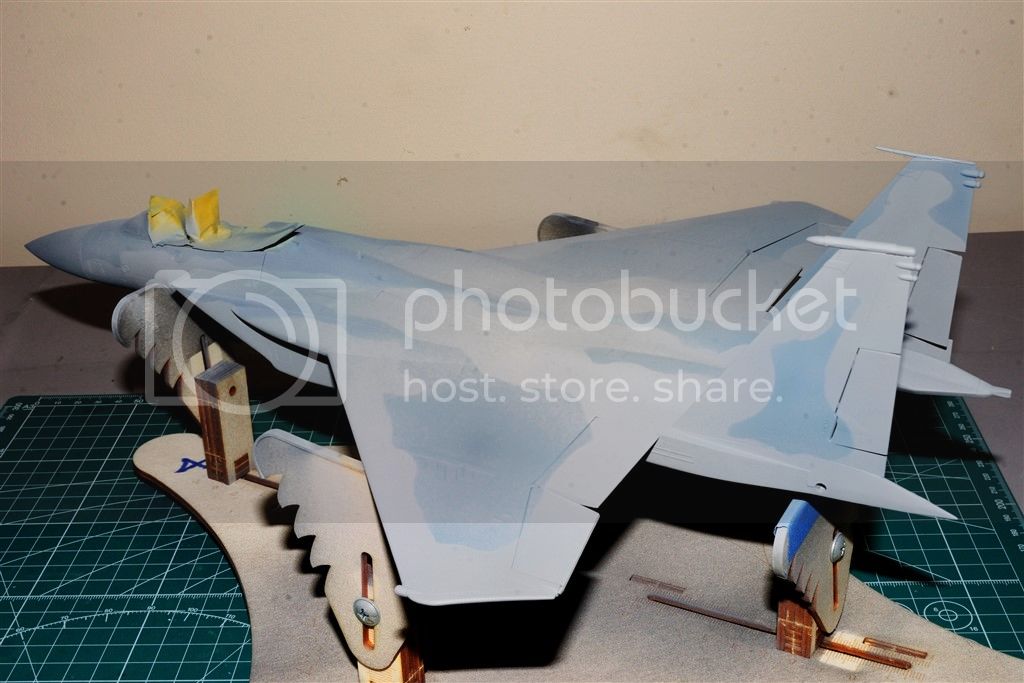
Well, I finally reached the painting stage for the fuselage. Having continued to do research on the various camo paint schemes, it seems that many of the ANG wings started to paint their aircraft in the MOD scheme, which is any variation of the basic two tone colors. The Dark Ghost Gray became various shades of Blue Gray to all Blue.
The kit decals has the markings for the 104th fighter wing of the Massachusetts ANG which opted for the MOD scheme. I've also found several Caracal sheets that can be used with the MOD scheme.
I painted the base color Model Master FS36375 Light Ghost Gray, then using Silly Putty to mask out the camo color after a rather poor free hand effort. Seems that I've started to shake a little more then I thought I did. This is a new technique that requires a consistent dia. roll, which I really need to practice. As it varies, so does the feathered edge. The darker color started life as Model Master Dark Ghost Gray FS36320. To that I added some dark Blue and a few drops of International Black. This combination was just too dark and stark after I removed the Silly Putty. So a few filters of Light Ghost Gray toned it down, and blended it in nicely.
I had a great deal of trouble with my Nikon D90 using two side lights to capture the colors correctly. the WB just shifts to the blue way too much. For the next photo session I'm going to try a gray #18 card and see if that helps, or even play with the WB settings myself. After some effort in Post Editing with the Nikon Capture NX2 program, I got the colors close enough.
Next up after 5 days of curing will be the NMF surfaces around the exhausts. In the meantime I'll be concentrating on the stations and loads out.
Joel


Mcleod
Joined: April 07, 2010
KitMaker: 1,028 posts
AeroScale: 939 posts
Posted: Monday, January 12, 2015 - 02:28 AM UTC
I'm certainly not F-15 adept, Joel. The paint pattern you've applied does look very good. Its hard to say by looking at the pictures if you overdid the filter, some spots look more than others; I'm sure the lighting has a lot to do with it.
All-in-all, you're doing a top shelf job; as usual.
All-in-all, you're doing a top shelf job; as usual.
Joel_W
Joined: December 04, 2010
KitMaker: 11,666 posts
AeroScale: 7,410 posts
Posted: Monday, January 12, 2015 - 02:54 AM UTC
Quoted Text
I'm certainly not F-15 adept, Joel. The paint pattern you've applied does look very good. Its hard to say by looking at the pictures if you overdid the filter, some spots look more than others; I'm sure the lighting has a lot to do with it.
All-in-all, you're doing a top shelf job; as usual.
Jonathan,
Thanks, and yes the 2nd color is uneven, as it's the start of the weathering process for fading paint. Figured I might as well do it now. Once the decals are on and I've done the pin washes, I'll do one more very light gray filter to blend the weathering in. the some chalks in the exhausts. I have Mig's exhaust black, but I can't find a med gray, so I think I'll try some cheap eye shadow from the cosmetic dept.
Joel
SGTJKJ

#041

Joined: July 20, 2006
KitMaker: 10,069 posts
AeroScale: 3,788 posts

Posted: Monday, January 12, 2015 - 01:56 PM UTC
Nice job, Joel. Looking forward to see more.
I have ordered some decals for Danish F-16s from TwoBoobs decals. Some nice colorful markings. I have not decided if I am going for a 1/48 or 1/72 kit yet. I have both in the stash.
I have ordered some decals for Danish F-16s from TwoBoobs decals. Some nice colorful markings. I have not decided if I am going for a 1/48 or 1/72 kit yet. I have both in the stash.

c4willy
#305
Joined: February 01, 2006
KitMaker: 1,673 posts
AeroScale: 1,517 posts
Posted: Thursday, January 15, 2015 - 05:05 AM UTC
Damn fine work on the F15 Joel, I have a F15 in 1/32 by Revell, Eagle campaign anybody? (LOL I can hear all those "what again" groans)
Joel_W
Joined: December 04, 2010
KitMaker: 11,666 posts
AeroScale: 7,410 posts
Posted: Thursday, January 15, 2015 - 06:17 AM UTC
Quoted Text
Damn fine work on the F15 Joel, I have a F15 in 1/32 by Revell, Eagle campaign anybody? (LOL I can hear all those "what again" groans)
Chris,
Thanks. I would be up for a Eagle campaign, as I would opt for the IAR Eagle. Of course another Birds of prey might be more appealing.
Joel
c4willy
#305
Joined: February 01, 2006
KitMaker: 1,673 posts
AeroScale: 1,517 posts
Posted: Thursday, January 15, 2015 - 07:19 AM UTC
Well now there's a thought! Birds of prey 2 anybody? (or is it three or more?)
Mcleod
Joined: April 07, 2010
KitMaker: 1,028 posts
AeroScale: 939 posts
Posted: Thursday, January 15, 2015 - 08:42 AM UTC
Quoted Text
Well now there's a thought! Birds of prey 2 anybody? (or is it three or more?)
You'd likely have more luck with this question if you begin a new topic in the campaign section.

c4willy
#305
Joined: February 01, 2006
KitMaker: 1,673 posts
AeroScale: 1,517 posts
Posted: Friday, January 16, 2015 - 09:36 AM UTC
LOL it's okay Ben I was merely teasing Joel with the idea, although your point is well taken.
ljames0874
Joined: August 15, 2012
KitMaker: 408 posts
AeroScale: 365 posts
Posted: Tuesday, January 20, 2015 - 09:20 PM UTC
Here we go again! Progress on the Nimrod is slow and steady. I have been doing a little work on the wing searchlights. This pair are on the outer edges of the engine nacelles. Airfix would have you glue the transparencies over gaping holes in the wing, so I have boxed the transparencies in with plasticard, painted with rub n buff. I used a burr tool to make concave indentations for the rear of the lights, painted them chrome, applied drops of kristal kleer to make lenses, before glueing on the transparencies - et voila!

Also, the GR.3 is finished, in Falklands Campaign markings - 4 Squadron RAF Cottesmore (flew off HMS Hermes):


Onwards and upwards - Cheers Everybody!
Also, the GR.3 is finished, in Falklands Campaign markings - 4 Squadron RAF Cottesmore (flew off HMS Hermes):
Onwards and upwards - Cheers Everybody!
 |

WEB HOSTING BY


Copyright ©2021 AeroScale and Kitmaker Network, a subsidiary of Silver Star Enterprises
All Rights Reserved. Please read our Conditions of Use and Privacy Policy.
All Rights Reserved. Please read our Conditions of Use and Privacy Policy.