


Air Campaigns
Want to start or join a group build? This is where to start.
Want to start or join a group build? This is where to start.
Hosted by Frederick Boucher, Michael Satin
OFFICIAL: National Pride Campaign

Mcleod

Joined: April 07, 2010
KitMaker: 1,028 posts
AeroScale: 939 posts
Posted: Tuesday, January 20, 2015 - 10:15 PM UTC
The Harrier is very well done, Lee, and looks great in the gallery with the other completed entries.
Joel_W

Joined: December 04, 2010
KitMaker: 11,666 posts
AeroScale: 7,410 posts
Posted: Tuesday, January 20, 2015 - 11:25 PM UTC
Lee,
I'll 2nd what that. Excellent build on the Harrier.
Joel
I'll 2nd what that. Excellent build on the Harrier.
Joel


scribbles101

Joined: May 25, 2013
KitMaker: 137 posts
AeroScale: 103 posts
Posted: Wednesday, January 21, 2015 - 07:30 PM UTC
Hi all, quick update on the Mosie night fighter - very nearly finished, the paint work needs a little patching up here and there, and the decals are almost done, so hopefully will be able to put up some finished pics soon, have not put anything here in a while because I have been rigging a sea Gladiator for another campaign, and that has taken much longer than expected, anyway, just thought I should check in!
Great work on the Harrier Lee, and those lights for the Nimrod look really nice - Great job!
Also learned a valuable lesson about night fighters. When you have a power cut, only put the thing down if you are certain you will find it again, took me ages to pick out the Mosquito against my mouse mat! That all black livery really works!
SGTJKJ

#041

Joined: July 20, 2006
KitMaker: 10,069 posts
AeroScale: 3,788 posts

Posted: Friday, January 23, 2015 - 12:31 AM UTC
Nice job on the Harrier, Lee.
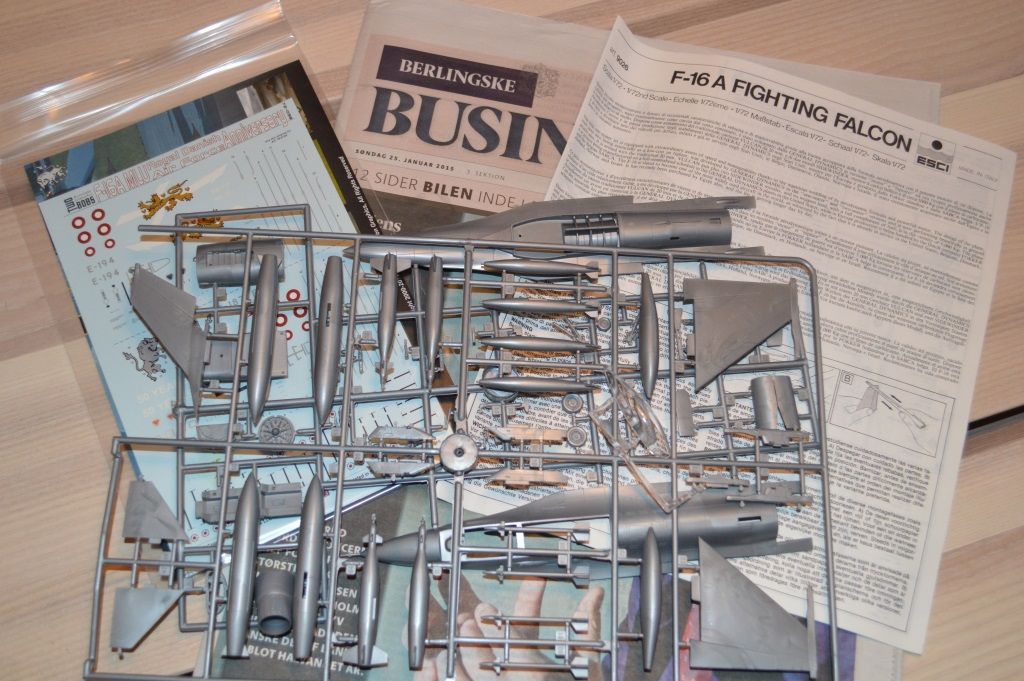
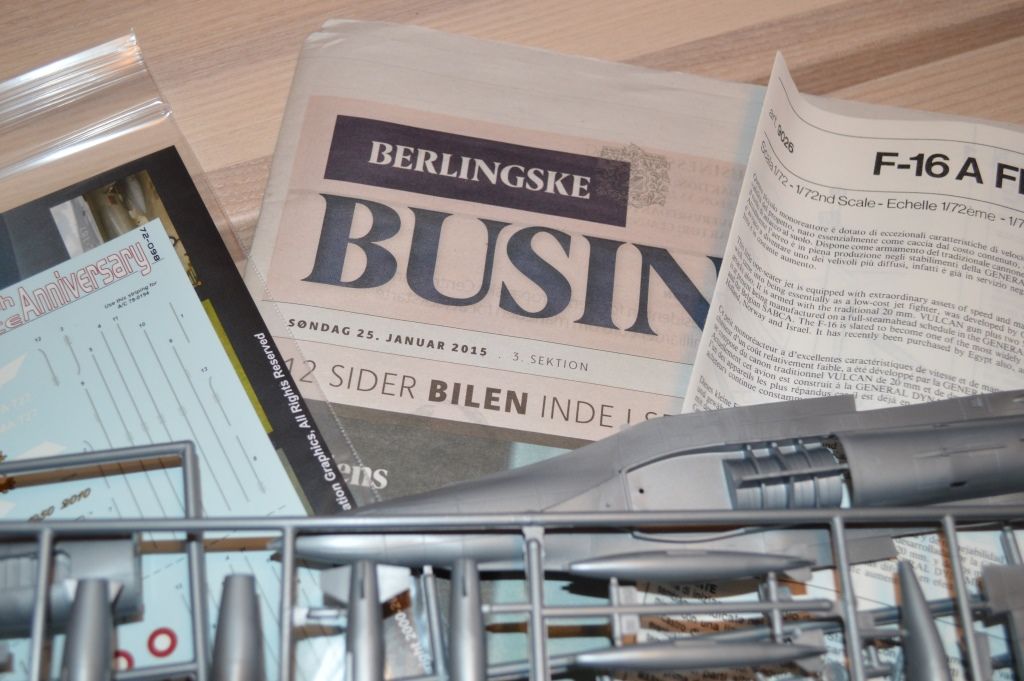
I have decided on one of these anniversary schemes for the Danish F-16. I just received these decals from Two Bobs
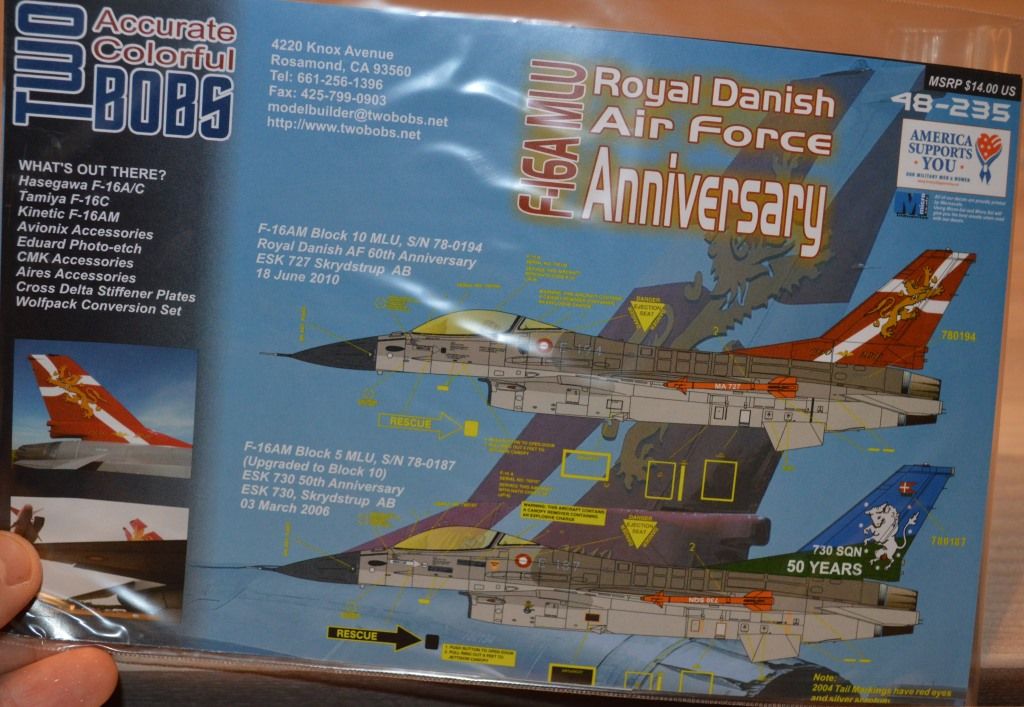
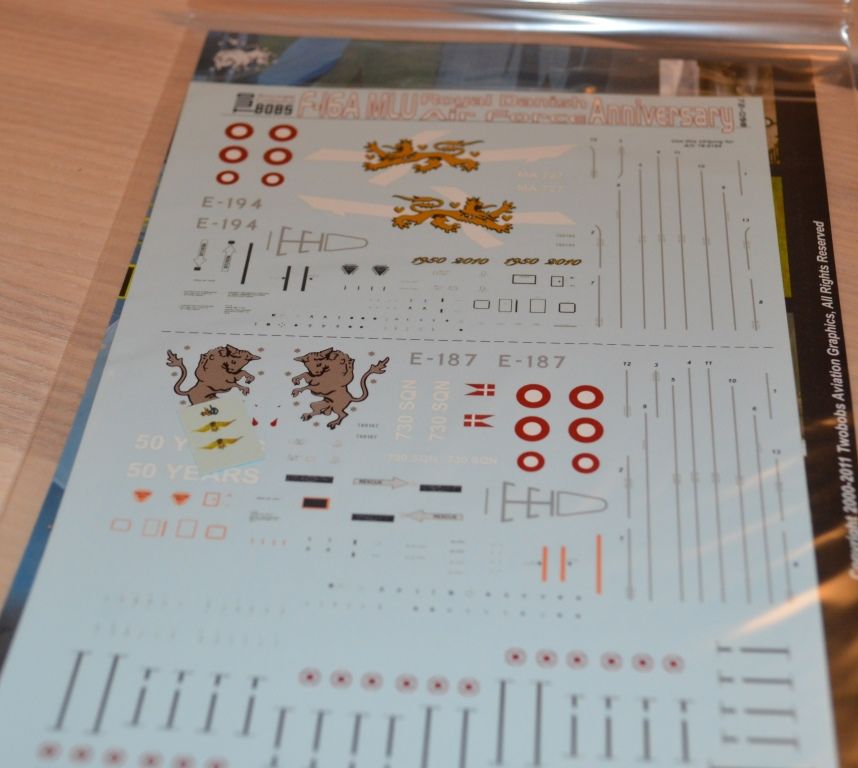
I have decided on one of these anniversary schemes for the Danish F-16. I just received these decals from Two Bobs


Mcleod
Joined: April 07, 2010
KitMaker: 1,028 posts
AeroScale: 939 posts
Posted: Friday, January 23, 2015 - 08:24 AM UTC
I'm kind of partial to the 60th scheme, Jesper. Either is a grand choice, though. Looking forward to seeing your F-16.

b17-peter

#392

Joined: January 09, 2013
KitMaker: 696 posts
AeroScale: 608 posts

Posted: Friday, January 23, 2015 - 05:52 PM UTC
@Lee Well done Harrier!
I'm now painting my Phantom, but I encountered some problems with Revell's Dark Grey acrylic paint and Humbrol's Metalcote as well. After some repairing it will go well, I hope
Good luck to you!
Cheers Pete
I'm now painting my Phantom, but I encountered some problems with Revell's Dark Grey acrylic paint and Humbrol's Metalcote as well. After some repairing it will go well, I hope
Good luck to you!
Cheers Pete
Joel_W
Joined: December 04, 2010
KitMaker: 11,666 posts
AeroScale: 7,410 posts
Posted: Friday, January 23, 2015 - 07:37 PM UTC
Jesper,
both schemes look really good to me. Given the choice I'd also opt for the 60th Ann. as well. I just like the overall red tail with the white cross better. But either one should really be spectacular.
Joel
both schemes look really good to me. Given the choice I'd also opt for the 60th Ann. as well. I just like the overall red tail with the white cross better. But either one should really be spectacular.
Joel
Mcleod
Joined: April 07, 2010
KitMaker: 1,028 posts
AeroScale: 939 posts
Posted: Friday, January 23, 2015 - 07:44 PM UTC
If you're having paint problems, Peter, they are not apparent in the neat splinter pattern. Nice progress.
Joel_W
Joined: December 04, 2010
KitMaker: 11,666 posts
AeroScale: 7,410 posts
Posted: Friday, January 23, 2015 - 07:46 PM UTC
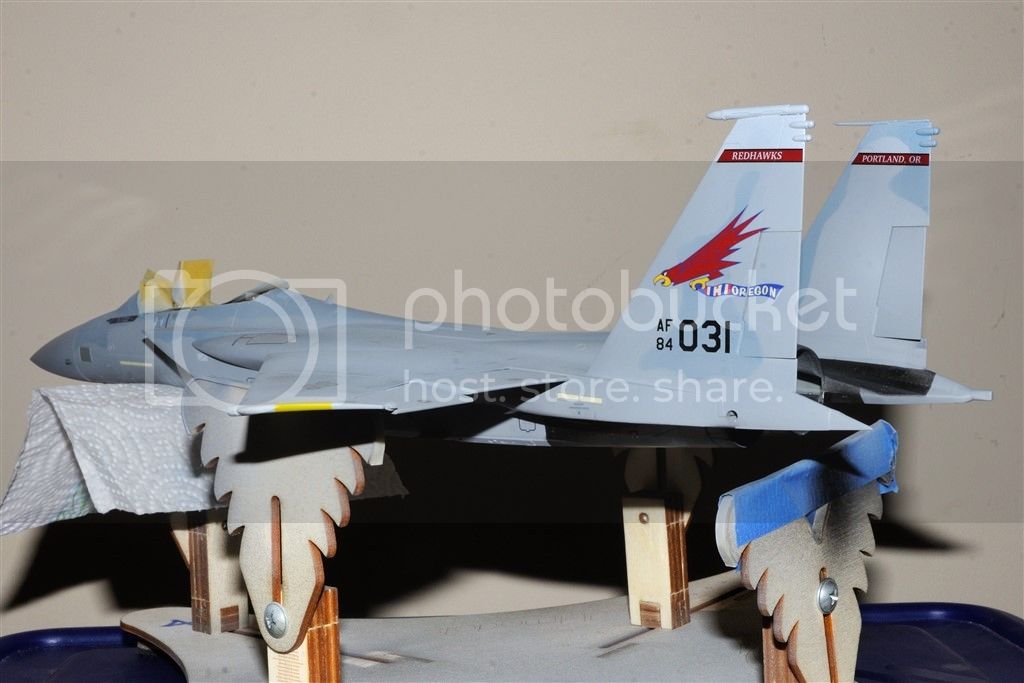
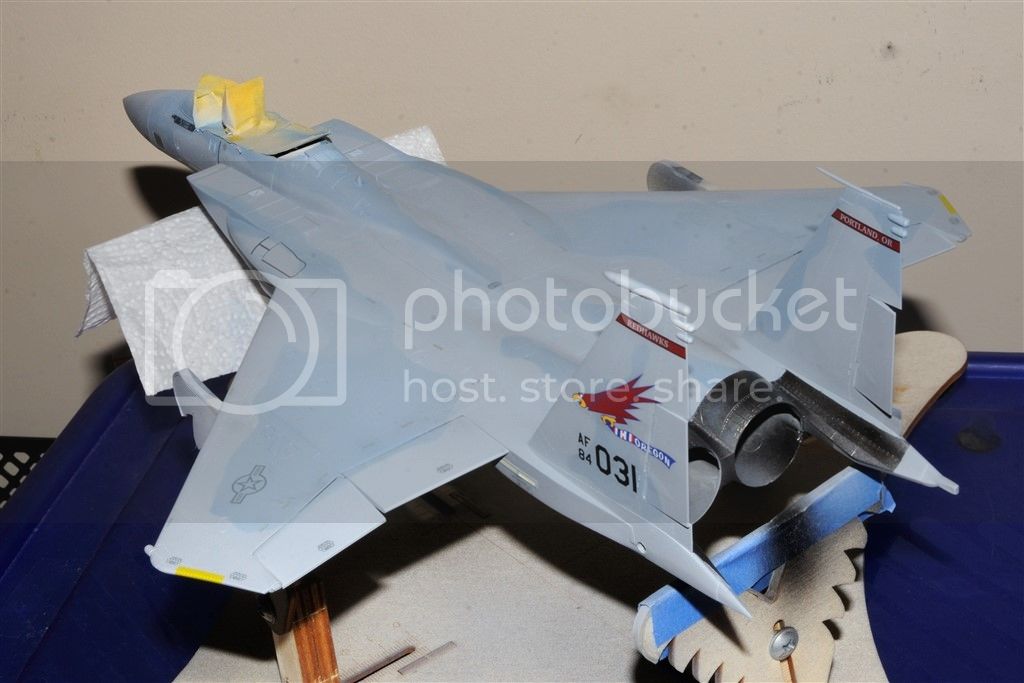
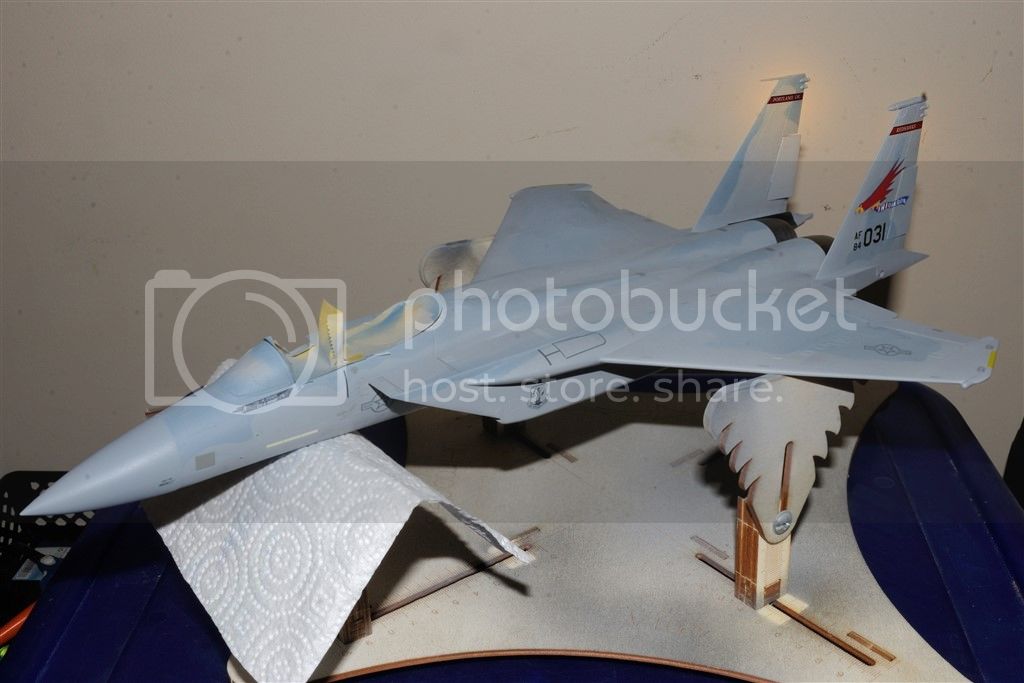
Haven't made much progress of late on the F-15C since I applied the NMF to the exhaust area. I've been spending my time working on the stations, gas tanks, and loads. The gas tanks have raised weld seams which got damaged though the sanding and polishing of the glue joints. I've been trying different methods to repair it including stretched sprue, but none really look that good.
Then one of my online friends pm'd me whose been a line chief for F-15Cs for 10 years that the instructions in the GWH kit for painting the exhaust NM areas on the topside is wrong. The NM extends to the curved base next to the twin tails. Naturally, I took the kit drawings as being correct for this, even though I posted a few pictures of this very area when the issue of colors for the MOD scheme was a hot topic of mine.
So I had to re-mask, then repaint the Alcad Stainless Steel. Masking in between the twin tales and under the one rudder that points in over the area was a real pain in the butt. Not to mention that I had to mask the other color shades, and then the rest of the fuselage as the overspray would some how find it's way to any exposed area.
I started with this:

and finished with this:
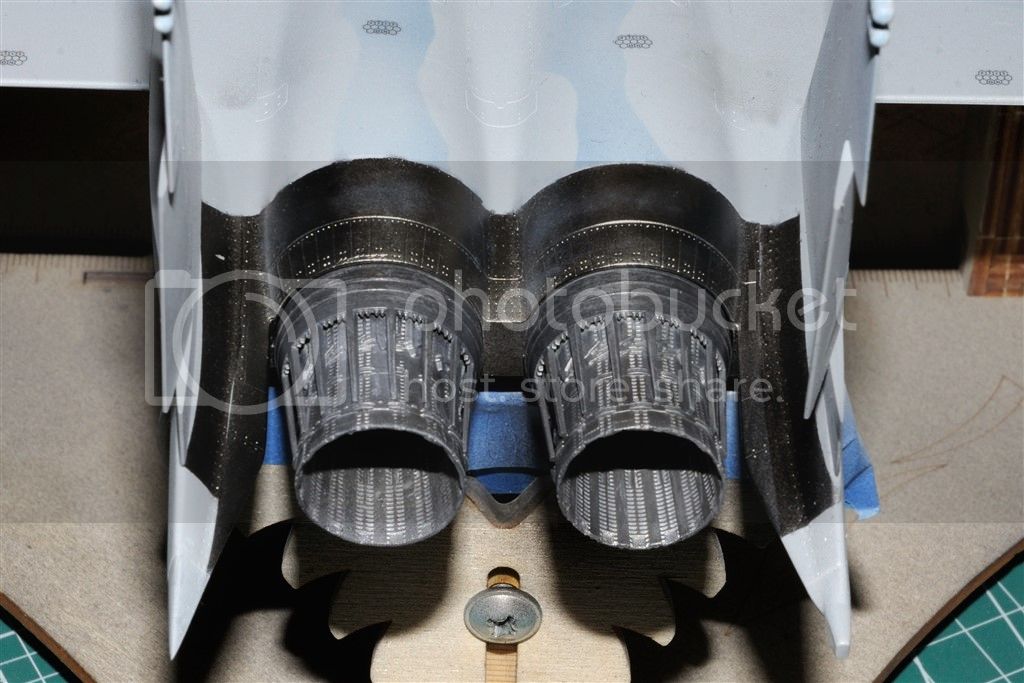
Looks even better looking right into the engine exhaust cones:

Joel
Mcleod
Joined: April 07, 2010
KitMaker: 1,028 posts
AeroScale: 939 posts
Posted: Friday, January 23, 2015 - 07:58 PM UTC
The second photo seems to have a linking problem, on my computer at least. Still, clicking on the link brings it to your bucket, Joel, so I can still see your outstanding repair.
You are a far better modeller than me; I would have left it. . Your efforts are inspiring.
Edit: I take the first sentence back, the photo suddenly appeared.
You are a far better modeller than me; I would have left it.
. Your efforts are inspiring. Edit: I take the first sentence back, the photo suddenly appeared.
Joel_W
Joined: December 04, 2010
KitMaker: 11,666 posts
AeroScale: 7,410 posts
Posted: Friday, January 23, 2015 - 08:56 PM UTC
Ben,
Thanks, but you're just as good a modeler as I am.
Thanks, but you're just as good a modeler as I am.

c4willy
#305

Joined: February 01, 2006
KitMaker: 1,673 posts
AeroScale: 1,517 posts

Posted: Saturday, January 24, 2015 - 12:59 AM UTC
Looking good Joel the repaint appears to be spot on. I really do like the look of the nmf however I find I'm to impatient to spend the required amount of time hiding all of the seams and blemishes required to make them look spot on. I have great admiration for those that do.
Any luck with your weld seams? I've seen armor aficionados use masking tape and putty worked with the edge of a blade to simulate weld seams. I personally have never tried it. But the results did look good. Of course the modeler had much experience with the medium so the results looked good.
I also seam to recall one of the after market company's doing raised resin seams as a water slide decal? Along with rivets and bolt heads. Just a thought, it would of course add an extra cost to the build however.

ljames0874

Joined: August 15, 2012
KitMaker: 408 posts
AeroScale: 365 posts

Posted: Saturday, January 24, 2015 - 02:14 PM UTC
Excellent work there Joel - I must get around to trying out Alclad myself. I hear it doesn't react too well to varnishes though, but I guess there must be a way around that.
Joel_W
Joined: December 04, 2010
KitMaker: 11,666 posts
AeroScale: 7,410 posts
Posted: Saturday, January 24, 2015 - 07:32 PM UTC
Quoted Text
Looking good Joel the repaint appears to be spot on. I really do like the look of the nmf however I find I'm to impatient to spend the required amount of time hiding all of the seams and blemishes required to make them look spot on. I have great admiration for those that do.
Any luck with your weld seams? I've seen armor aficionados use masking tape and putty worked with the edge of a blade to simulate weld seams. I personally have never tried it. But the results did look good. Of course the modeler had much experience with the medium so the results looked good.
I also seam to recall one of the after market company's doing raised resin seams as a water slide decal? Along with rivets and bolt heads. Just a thought, it would of course add an extra cost to the build however.
Chris,
That's basically my next step trying to mask then a light layer of thinned Green Stuff. The kit wield lines are smooth as silk, nothing like what you find on armor kits. As for the decals, they're by Archer. Haven't bought nor tried any as their basic sheets cost $20 each.
Honestly, it doesn't take any more time to prepare puttied seams, or repairs to imperfections for Alcads then it does for any other type of paint, so that they don't show. The only real difference is that any imperfection will show, while the really shallow or small ones may be covered and hidden by layers of paint.
Joel
Joel_W
Joined: December 04, 2010
KitMaker: 11,666 posts
AeroScale: 7,410 posts
Posted: Saturday, January 24, 2015 - 07:36 PM UTC
Quoted Text
Excellent work there Joel - I must get around to trying out Alclad myself. I hear it doesn't react too well to varnishes though, but I guess there must be a way around that.
Lee,
Unlike most modelers, I do seal my Alcad finishes with Testors Metalizer clear sealer. There is a slight shift in color, but honestly, it looks fine to me.
The biggest drawback to the Alcad system is the cost. They start at $8.95/bottle. I have 8 colors, their Gloss Black Base, and their clear Gloss sealer which I bought by mistake, as I just wanted the clear. That's how I started using the Testor Metalizer sealer. So the bottle has been designated to the back of the Alcad bin.
Joel

phantom_phanatic309
#372

Joined: March 10, 2010
KitMaker: 2,568 posts
AeroScale: 1,619 posts

Posted: Monday, January 26, 2015 - 04:49 AM UTC
Some great builds going on.
I'm going to change my build. I was given an Airfix Tiger Moth for Christmas and I think it's one I should get done rather than put it into the stash. I'll still get round to building the Provost.
I'll post some pics soon, photobucket are down for maintenance tonight so haven't been able to upload any pics.
Stephen

SGTJKJ
#041
Joined: July 20, 2006
KitMaker: 10,069 posts
AeroScale: 3,788 posts
Posted: Monday, January 26, 2015 - 03:29 PM UTC
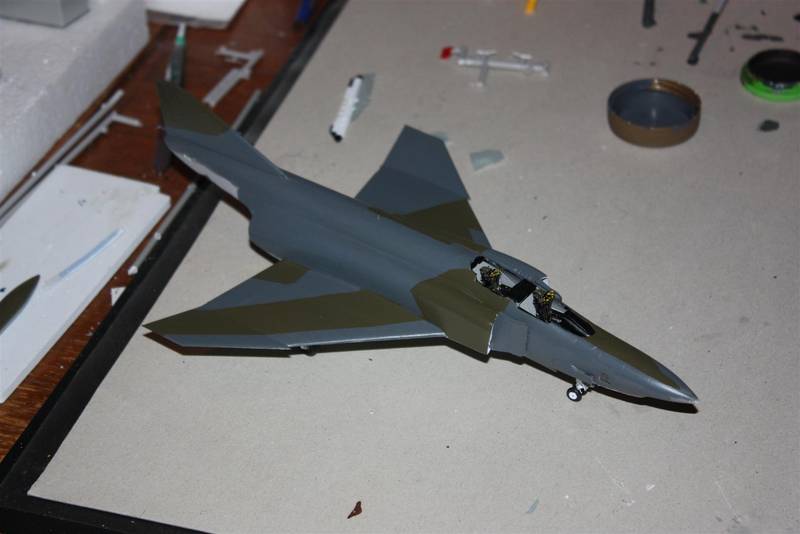
Thanks for the comments on the F-16 scheme. I will probably go for the 60 year anniversary scheme. Below the starting photos, although it will be some weeks until I actually start this kit.
Nice splinter scheme, Peter. Looks good to me.
Great looking engines, Joel!
Nice splinter scheme, Peter. Looks good to me.
Great looking engines, Joel!


Mcleod
Joined: April 07, 2010
KitMaker: 1,028 posts
AeroScale: 939 posts
Posted: Monday, January 26, 2015 - 06:30 PM UTC
Stephen, the Airfix Tiger Moth is a nice kit, and is welcome.
I've always liked the Esci/Ertl kits, Jesper. They used to be as common as snowflakes around here; I'm sure the F-16 will be a fun build.
I've always liked the Esci/Ertl kits, Jesper. They used to be as common as snowflakes around here; I'm sure the F-16 will be a fun build.
Joel_W
Joined: December 04, 2010
KitMaker: 11,666 posts
AeroScale: 7,410 posts
Posted: Tuesday, January 27, 2015 - 04:17 AM UTC
Well, I've reached the point of decaling the fuselage. I used a combination of GWH kit decals, and the really excellent Caracal F-15C ANG part 1 sheet. The decal sheet was printed by Cartograf, so they're absolutely perfect.
Joel
Joel


SGTJKJ
#041
Joined: July 20, 2006
KitMaker: 10,069 posts
AeroScale: 3,788 posts
Posted: Tuesday, January 27, 2015 - 01:20 PM UTC
Ben, ESCI are normally quite decent kits. I am looking forward to build this one.there is a little nostalgia to it 
Joel, the Eagle is really coming together now. Nice choice of decals, The color makes a nice contrast to the overall grey camouflage.
Joel, the Eagle is really coming together now. Nice choice of decals, The color makes a nice contrast to the overall grey camouflage.
Joel_W
Joined: December 04, 2010
KitMaker: 11,666 posts
AeroScale: 7,410 posts
Posted: Tuesday, January 27, 2015 - 06:50 PM UTC
Jasper,
That's the main reason I picked that particular scheme. The decal sheet also has the same tail markings for other FW aircraft but in the Gray scheme.
Joel
That's the main reason I picked that particular scheme. The decal sheet also has the same tail markings for other FW aircraft but in the Gray scheme.
Joel
phantom_phanatic309
#372
Joined: March 10, 2010
KitMaker: 2,568 posts
AeroScale: 1,619 posts
Posted: Wednesday, January 28, 2015 - 01:12 AM UTC
Here's my entry,
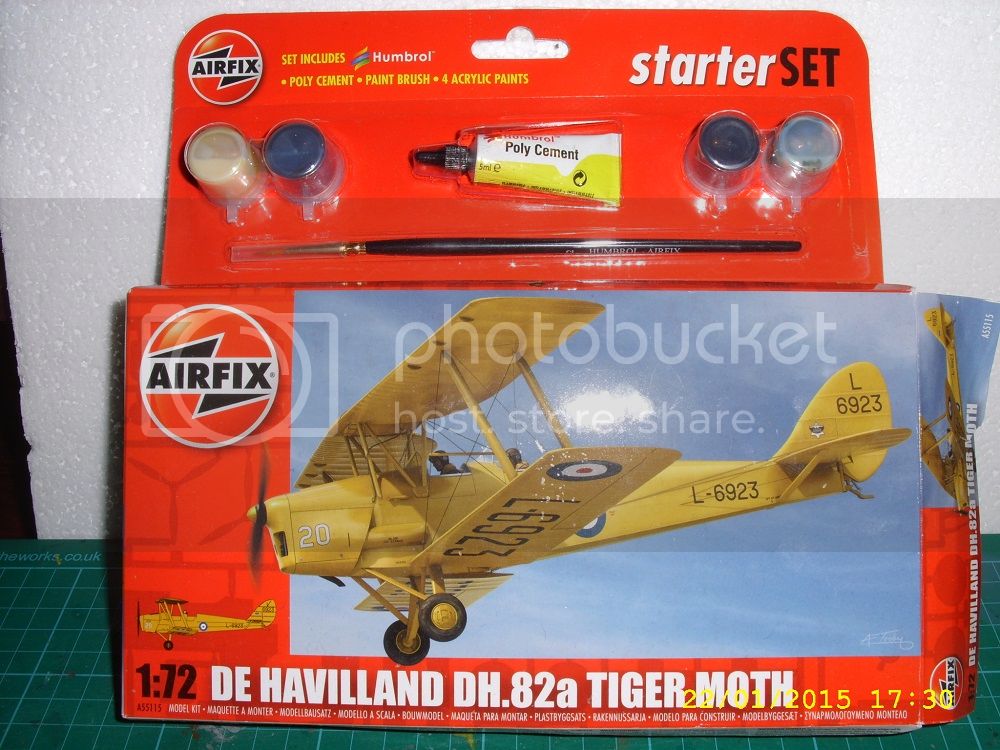
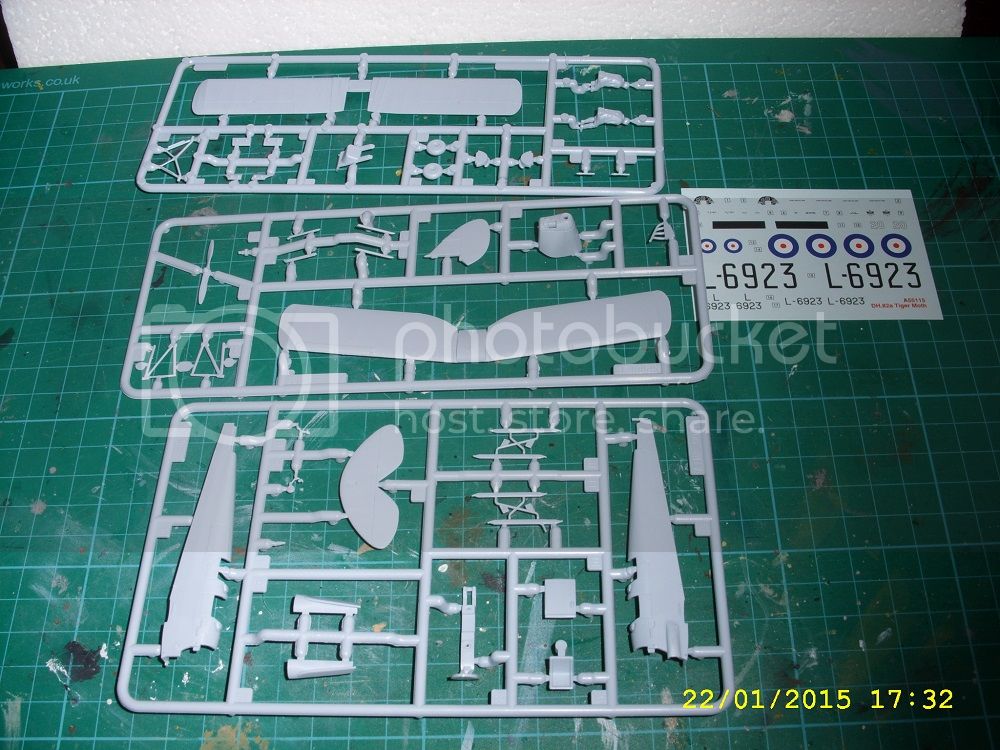
Started by cleaning up the fuselage and cockpit pieces before applying some paint. I'm thinking of putting in the crew figures for nostalgia's sake. And the RAF's white pre-war flying suits were very smart looking.
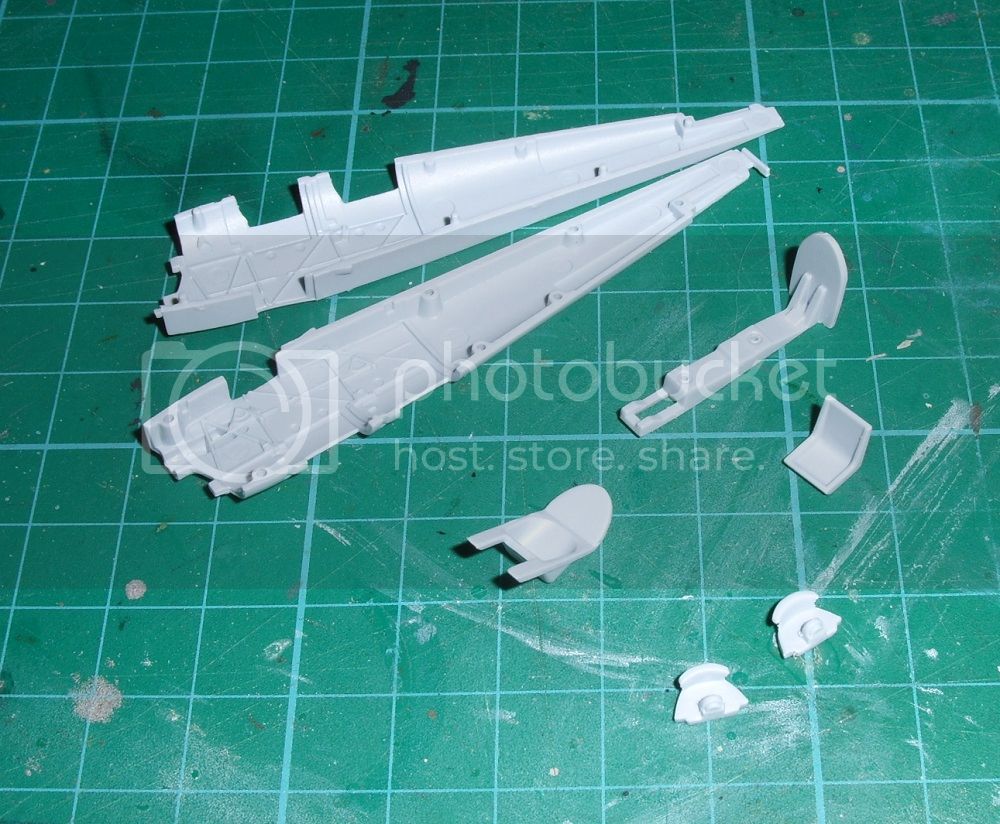
More to follow


Started by cleaning up the fuselage and cockpit pieces before applying some paint. I'm thinking of putting in the crew figures for nostalgia's sake. And the RAF's white pre-war flying suits were very smart looking.

More to follow
Mcleod
Joined: April 07, 2010
KitMaker: 1,028 posts
AeroScale: 939 posts
Posted: Wednesday, January 28, 2015 - 01:42 AM UTC
Looks like nice plastic, Stephen. Are you planning on using the attached paints? None of them look yellow on my screen.
phantom_phanatic309
#372
Joined: March 10, 2010
KitMaker: 2,568 posts
AeroScale: 1,619 posts
Posted: Wednesday, January 28, 2015 - 02:49 AM UTC
No I've got everything I need in more conventional paints. I'm going to use Xtracolours gloss RAF Trainer Yellow for the overall colour. Has a strange mustardy look to it and is not a true yellow but I trust they knew what they were making when the paints were mixed. I hear a lot of good things about that brand and I've got a few tins that I've yet to use, this being one of them.
The paint pot on the left of the box is the yellow. They have settled and need a good stirring before they can be made useable. I usually keep them as they can be handy to have when painting cockpits or anything else when faster drying acrylics are needed. I wouldn't use them to do an overall coat.
Thinking about colours I'm not sure what the interior should be. I'm thinking it should be brick-red dope with the frame and upper parts (not fabric) in green. If anyone can confirm this that would be great.

eMan
#298

Joined: August 08, 2002
KitMaker: 1,182 posts
AeroScale: 351 posts

Posted: Wednesday, January 28, 2015 - 09:09 AM UTC
Hello
I'm from Hong Kong, HK as a Special Administrative Region of the People's Republic of China there is no Air Forces, so I will build the Trumpeter 1/48 PLA J-8B for the campaign.

I'm from Hong Kong, HK as a Special Administrative Region of the People's Republic of China there is no Air Forces, so I will build the Trumpeter 1/48 PLA J-8B for the campaign.
 |

WEB HOSTING BY


Copyright ©2021 AeroScale and Kitmaker Network, a subsidiary of Silver Star Enterprises
All Rights Reserved. Please read our Conditions of Use and Privacy Policy.
All Rights Reserved. Please read our Conditions of Use and Privacy Policy.