

Air Campaigns
Want to start or join a group build? This is where to start.
Want to start or join a group build? This is where to start.
Hosted by Frederick Boucher, Michael Satin
OFFICIAL: National Pride Campaign

c4willy

#305

Joined: February 01, 2006
KitMaker: 1,673 posts
AeroScale: 1,517 posts

Posted: Thursday, February 12, 2015 - 11:51 AM UTC
Oh oh ..... boy is my face red! Well that makes it even more of an achievement Joel!
Joel_W

Joined: December 04, 2010
KitMaker: 11,666 posts
AeroScale: 7,410 posts
Posted: Thursday, February 12, 2015 - 09:10 PM UTC
Quoted Text
Oh oh ..... boy is my face red! Well that makes it even more of an achievement Joel!
Chris,
Believe me, you made my day.
Joel

Joel_W
Joined: December 04, 2010
KitMaker: 11,666 posts
AeroScale: 7,410 posts
Posted: Friday, February 13, 2015 - 06:26 AM UTC
Well, I just finished posting my last update in my Build Blog for the F-15C in the Modern forum at:
F-15C Build Blog
Without a doubt, this is my best build to date, and the best kit I've ever built. It's that good.
Here's a few pictures of the finished F-15C.
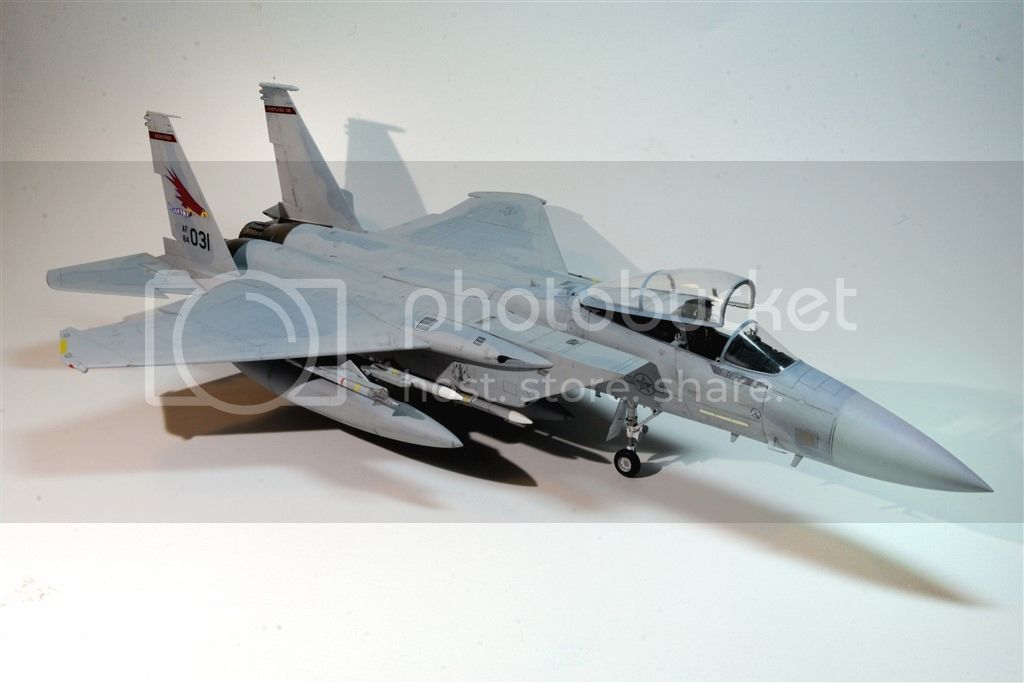
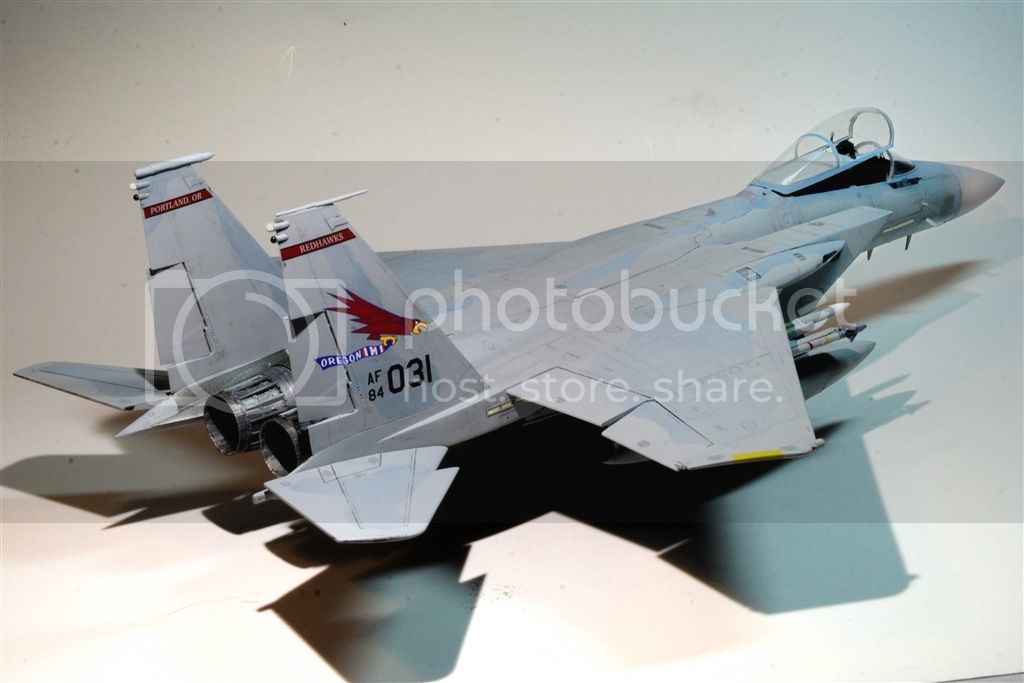
Now all that's left to do is post two pictures in the campaign gallery.
Joel
F-15C Build Blog
Without a doubt, this is my best build to date, and the best kit I've ever built. It's that good.
Here's a few pictures of the finished F-15C.


Now all that's left to do is post two pictures in the campaign gallery.
Joel

Mcleod

Joined: April 07, 2010
KitMaker: 1,028 posts
AeroScale: 939 posts
Posted: Friday, February 13, 2015 - 09:24 AM UTC
That F-15 is truly a top-shelf build, Joel.  Contest grade, for sure. It is indeed a pleasure to welcome such a fine model into our ever growing gallery.
Contest grade, for sure. It is indeed a pleasure to welcome such a fine model into our ever growing gallery. Joel_W
Joined: December 04, 2010
KitMaker: 11,666 posts
AeroScale: 7,410 posts
Posted: Friday, February 13, 2015 - 07:38 PM UTC
Quoted Text
That F-15 is truly a top-shelf build, Joel.
Ben,
Thank you so much for those most kind words.
Joel
SGTJKJ

#041

Joined: July 20, 2006
KitMaker: 10,069 posts
AeroScale: 3,788 posts

Posted: Saturday, February 14, 2015 - 11:42 AM UTC
Nice Mossie, Simon. Sinister looking in overall black. 
Congrats on finishing.
Congrats on finishing.


tinbanger
Joined: February 04, 2008
KitMaker: 2,507 posts
AeroScale: 1,814 posts

Posted: Saturday, February 14, 2015 - 11:42 PM UTC
All the main parts are now on:-

Mcleod
Joined: April 07, 2010
KitMaker: 1,028 posts
AeroScale: 939 posts
Posted: Saturday, February 14, 2015 - 11:48 PM UTC
Looks good, Richard. You have managed the slight annoyances of a MiniWings kit very well. I hope to see some paint coming up.
SGTJKJ
#041
Joined: July 20, 2006
KitMaker: 10,069 posts
AeroScale: 3,788 posts
Posted: Sunday, February 15, 2015 - 07:37 PM UTC
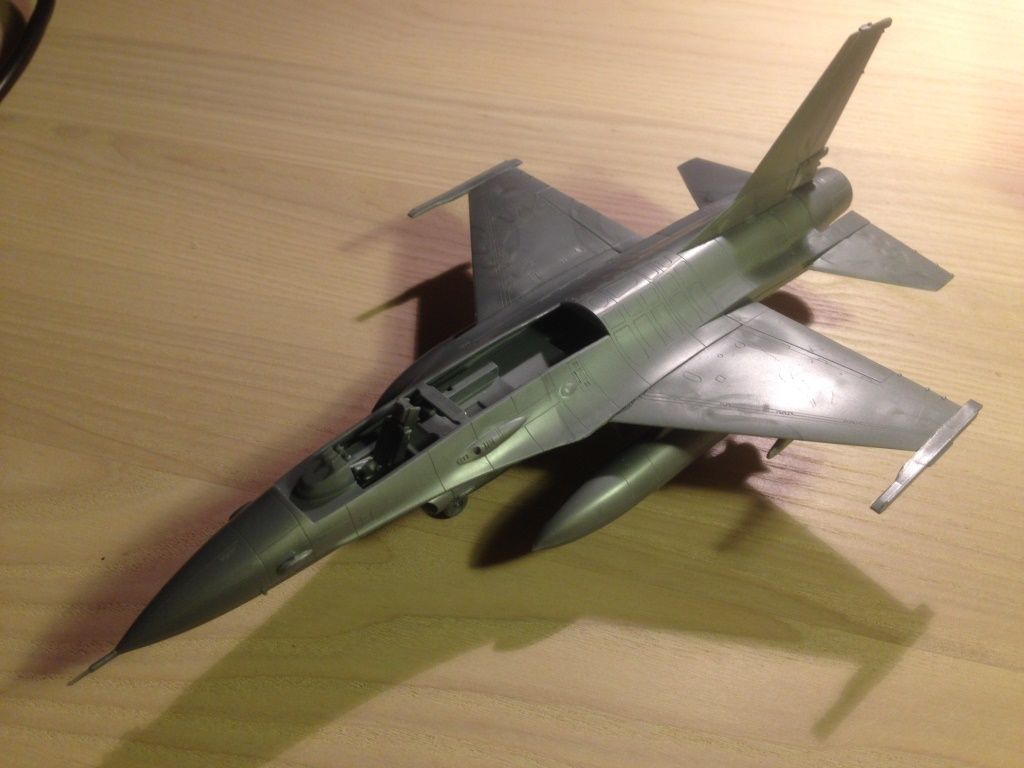
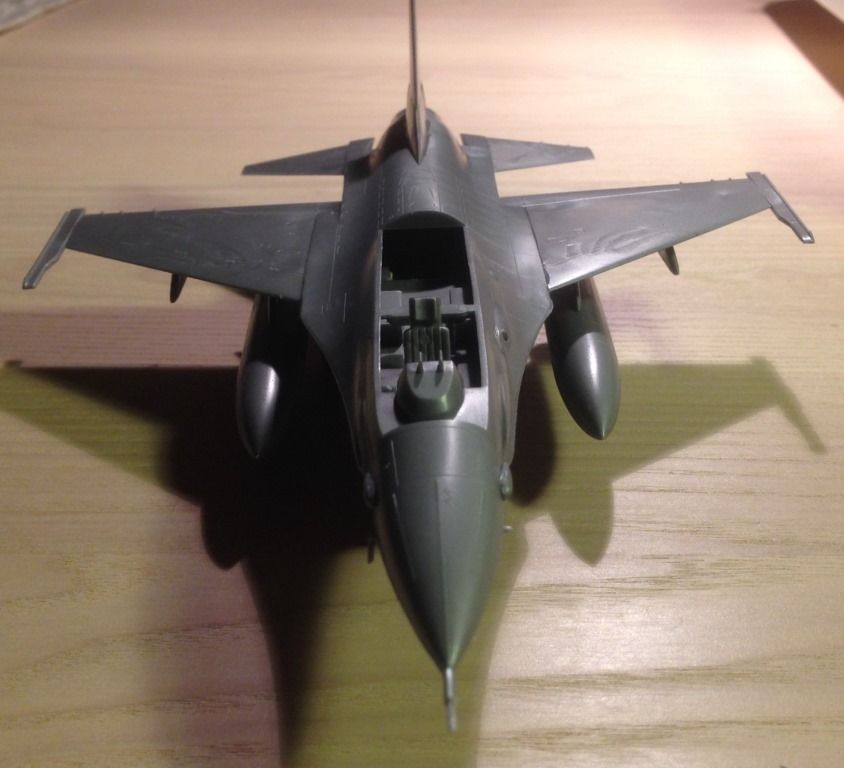
A little progress on my Danish F-16.
This is the old 1/72 ESCI kit. I most say that so far it is a pleasure to build although obviously missing the detail level of more modern offerings.
More to follow soon

This is the old 1/72 ESCI kit. I most say that so far it is a pleasure to build although obviously missing the detail level of more modern offerings.
More to follow soon


ljames0874

Joined: August 15, 2012
KitMaker: 408 posts
AeroScale: 365 posts

Posted: Sunday, February 15, 2015 - 08:18 PM UTC
Quoted Text
A little progress on my Danish F-16.
This is the old 1/72 ESCI kit. I most say that so far it is a pleasure to build although obviously missing the detail level of more modern offerings.
More to follow soon
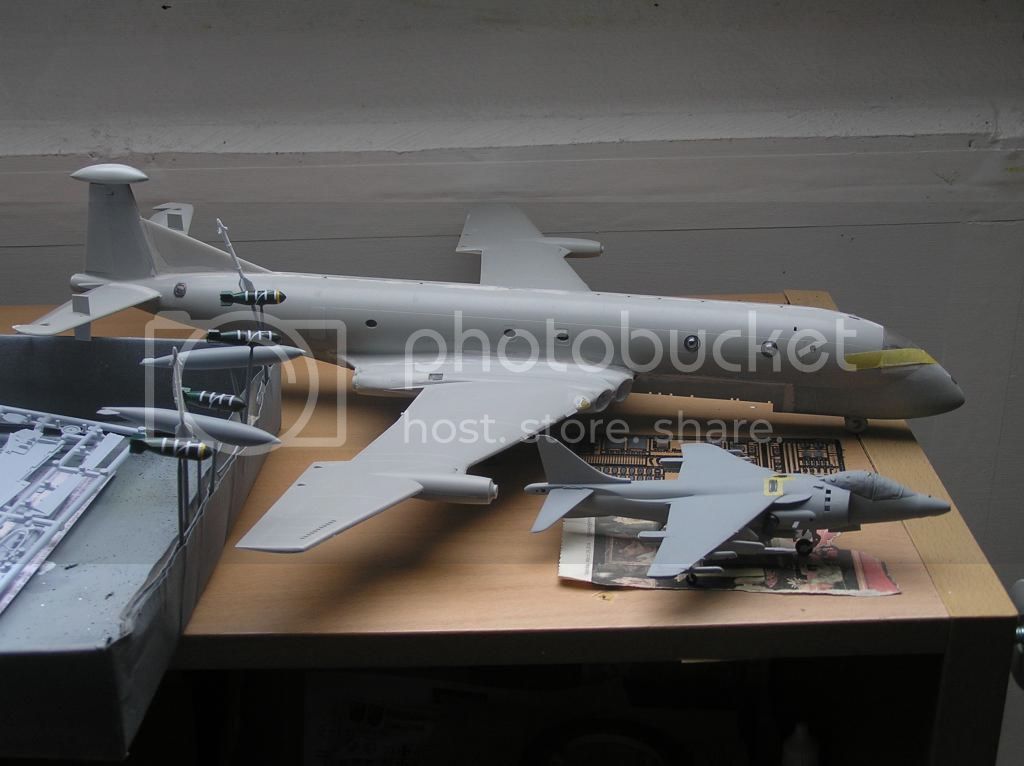
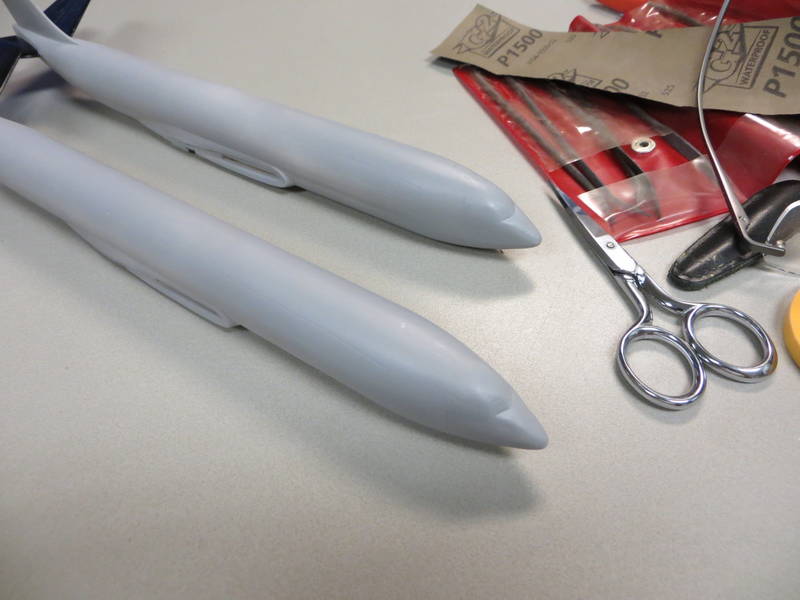
I hear you Jesper - this GR.5 Harrier is Esci too, but the kit was missing all the weapons and tanks when I got it. Your F-16 looks to have better surface detail than this kit though. The Nimrod is coming along, but rather slowly. I'm working on the PE surface detail set from Eduard, and yet more interminable filling and sanding. We're a ways off from spraying a coat of primer yet!
Cheers Everybody!
Dragon164
#226
Joined: February 20, 2012
KitMaker: 1,909 posts
AeroScale: 508 posts

Posted: Saturday, February 21, 2015 - 07:53 AM UTC
Well... I found my missing clear parts! they were in a box with the parts to a Testors F-19 go figure. 
Cheers Rob.
they were in a box with the parts to a Testors F-19 go figure. Cheers Rob.

Joel_W
Joined: December 04, 2010
KitMaker: 11,666 posts
AeroScale: 7,410 posts
Posted: Saturday, February 21, 2015 - 09:32 PM UTC
Quoted Text
Well... I found my missing clear parts!
Cheers Rob.
Rob,
At least you found them. I never find any missing parts till after I make new ones or buy another kit to replace them.
Joel

b17-peter
#392

Joined: January 09, 2013
KitMaker: 696 posts
AeroScale: 608 posts

Posted: Sunday, February 22, 2015 - 02:41 AM UTC
Hi mates, for the time being I mounted the plastic pitot tube from the kit, because the metal one I wanted to order, isn't yet in stock.
I'll put some pictures in the gallery soon.
Have fun!

Cheers Peter
I'll put some pictures in the gallery soon.
Have fun!
Cheers
Peter
JClapp
#259
Joined: October 23, 2011
KitMaker: 2,265 posts
AeroScale: 1,715 posts

Posted: Sunday, February 22, 2015 - 05:16 AM UTC
Quoted Text
Well... I found my missing clear parts!
Cheers Rob.
haha - right where you left them!


Mcleod
Joined: April 07, 2010
KitMaker: 1,028 posts
AeroScale: 939 posts
Posted: Sunday, February 22, 2015 - 07:35 AM UTC
Peter, your Phantom is truly a beauty, and welcome in the gallery.
Rob, I too am happy you've located your missing part.
Rob, I too am happy you've located your missing part.
Dragon164
#226
Joined: February 20, 2012
KitMaker: 1,909 posts
AeroScale: 508 posts
Posted: Sunday, February 22, 2015 - 11:26 AM UTC
Thanks everyone!
I have made a very small start I am opening the fuel dumps before mounting them in the fuse.
Cheers Rob.
I have made a very small start
I am opening the fuel dumps before mounting them in the fuse. Cheers Rob.
SGTJKJ
#041
Joined: July 20, 2006
KitMaker: 10,069 posts
AeroScale: 3,788 posts
Posted: Wednesday, February 25, 2015 - 01:03 PM UTC
A little more progress on my F-16.
I used the decals for the cockpit and actually looks decent considering the scale and what is actually visible.
I messed up the undercarriage so one wing is lower than the other. I have done that before on F-16s. I was very careful and ESCI has povided solid holes for the legs, so I am surprised I did this again.
Not sure how to try to fix it. Probably have to brake the wheels up again as it is really annoying to look at.
More to follow


Mcleod
Joined: April 07, 2010
KitMaker: 1,028 posts
AeroScale: 939 posts
Posted: Thursday, February 26, 2015 - 02:39 AM UTC
Jesper, the cockpit decals do look good.
Hope you can come up with a solution to your short gear leg issue. It is quite noticeable, even considering the camera lens distortion.
Your doing great all around, though.
Hope you can come up with a solution to your short gear leg issue. It is quite noticeable, even considering the camera lens distortion.
Your doing great all around, though.

phantom_phanatic309
#372

Joined: March 10, 2010
KitMaker: 2,568 posts
AeroScale: 1,619 posts
Posted: Thursday, February 26, 2015 - 03:09 AM UTC
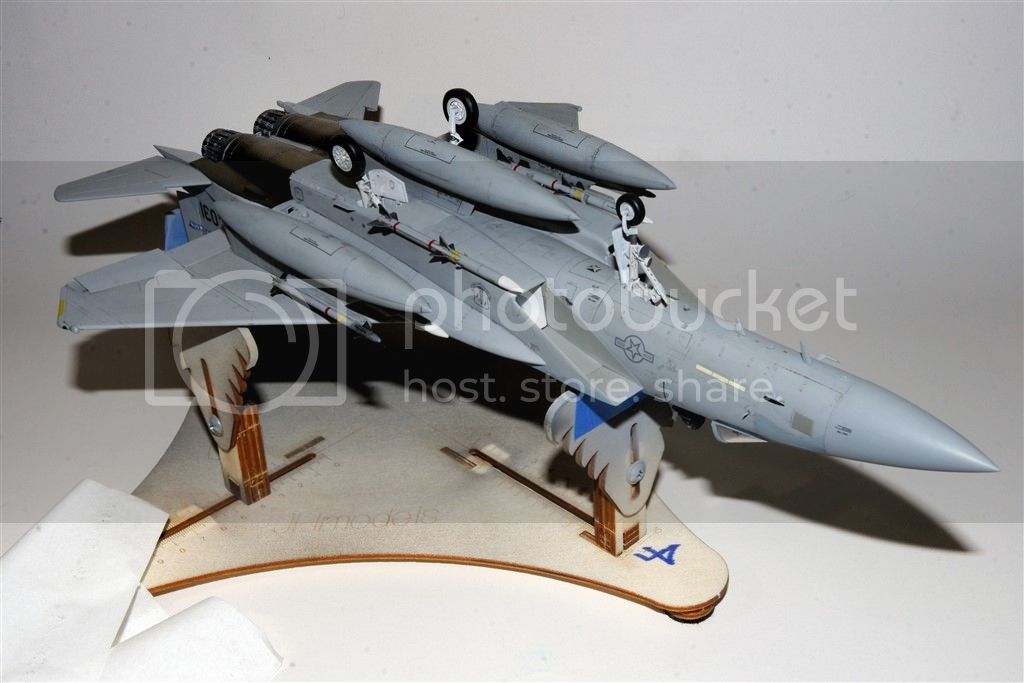
Joel, awesome work on the F-15! Looks like a fantastic kit.
Peter, I really like your Phantom. Always good to see one finished in a scheme not done very often.
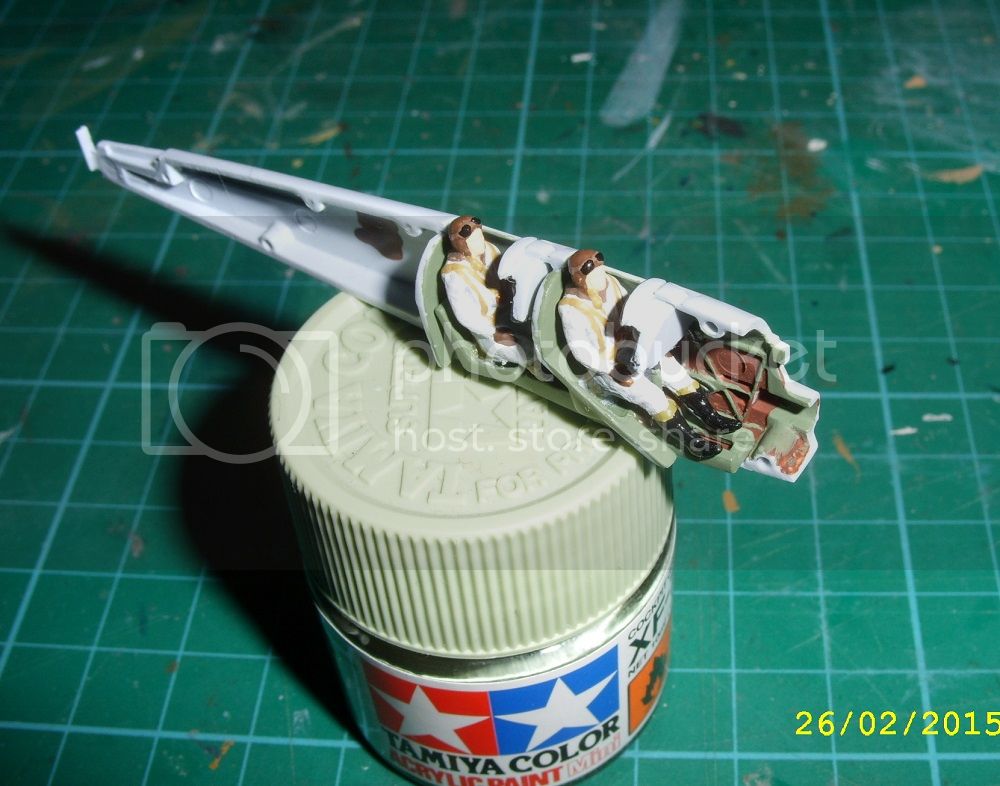
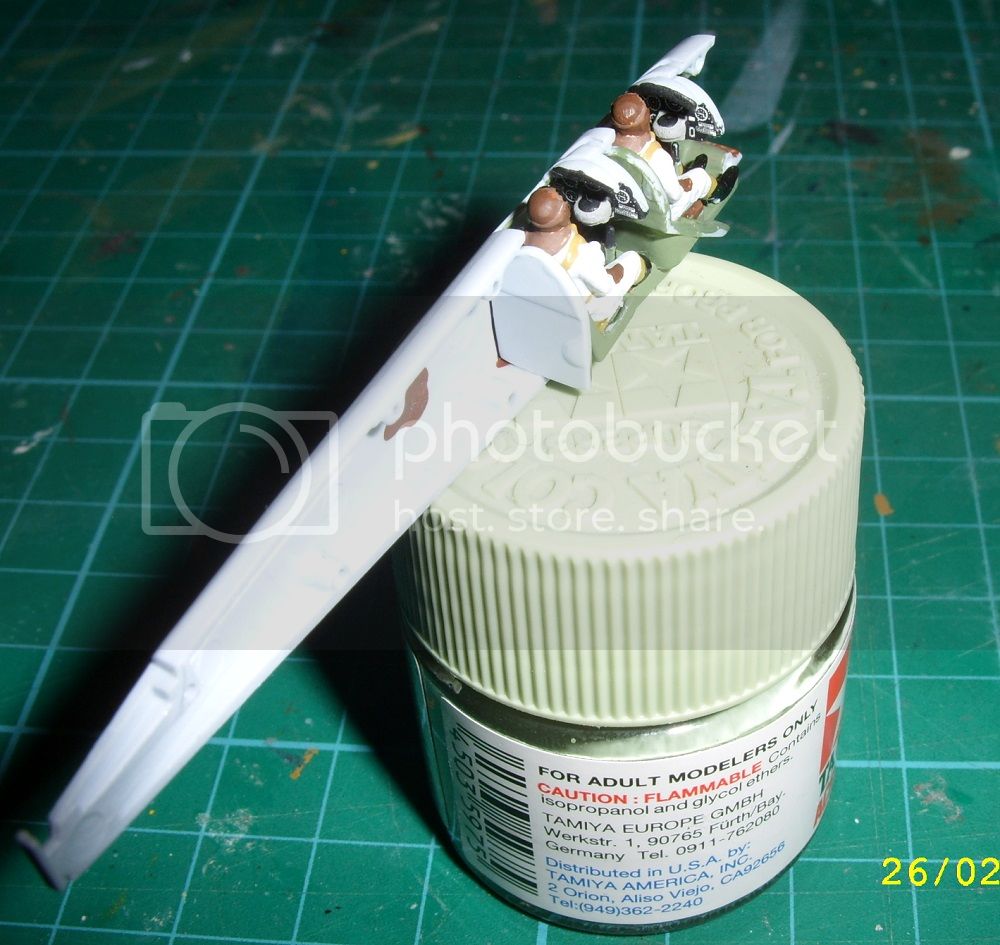
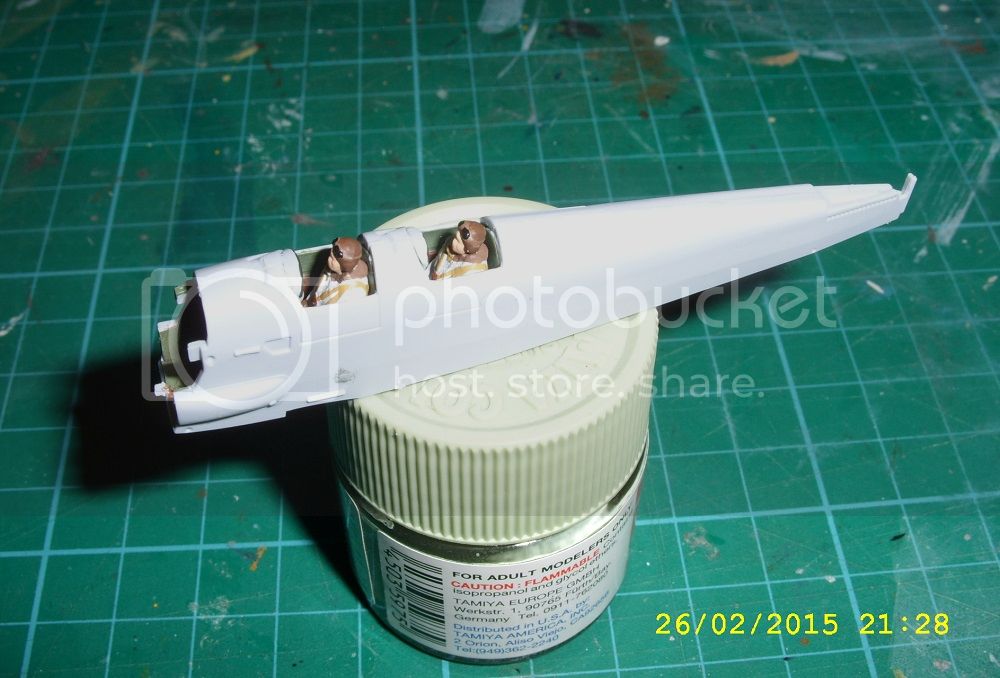
Managed some more work on m Moth. Apologies for the poor quality photo's, light was against me tonight!
I painted up the crew in typical inter-war white flying suits. Very smart, but I imagine difficult to keep clean! Makes you wonder how many student pilots were given a shouting at for dirty uniforms. The crew are the only weak point of this kit. The detail is very soft and often indistinct. I'm finding this common with all the new tools and I feel they are inferior to the old pilots. A minor problem, but Airfix can do better as the rest of the kit proves.
I used the kit supplied decals for the instrument panels, which are little to big and need some careful trimming to fit the plastic.
This was all then fitted in place and the fuselage glued together. The tolerances on the parts are very tight, and I had to file down some of the internal parts and cut away the fuselage location pins to get it all to fit.
Peter, I really like your Phantom. Always good to see one finished in a scheme not done very often.
Managed some more work on m Moth. Apologies for the poor quality photo's, light was against me tonight!
I painted up the crew in typical inter-war white flying suits. Very smart, but I imagine difficult to keep clean! Makes you wonder how many student pilots were given a shouting at for dirty uniforms. The crew are the only weak point of this kit. The detail is very soft and often indistinct. I'm finding this common with all the new tools and I feel they are inferior to the old pilots. A minor problem, but Airfix can do better as the rest of the kit proves.
I used the kit supplied decals for the instrument panels, which are little to big and need some careful trimming to fit the plastic.
This was all then fitted in place and the fuselage glued together. The tolerances on the parts are very tight, and I had to file down some of the internal parts and cut away the fuselage location pins to get it all to fit.


Mcleod
Joined: April 07, 2010
KitMaker: 1,028 posts
AeroScale: 939 posts
Posted: Thursday, February 26, 2015 - 04:32 AM UTC
The new pilots look good to me, Stephen; you did a nice job.
Seems to me that the old Airfix figures always had a huge hole in their chest.
Coming along nicely
Seems to me that the old Airfix figures always had a huge hole in their chest.
Coming along nicely
phantom_phanatic309
#372
Joined: March 10, 2010
KitMaker: 2,568 posts
AeroScale: 1,619 posts
Posted: Thursday, February 26, 2015 - 04:40 AM UTC
Thanks. I had to eyeball a lot of the detail painting as it was not very clear on both figures. Straps, helmets, boots, facial features were very indistinct on these figures. Weird thing is that their backs were much sharper even though that can't be seen when they're in place. I tried to get some pics of them before paint, but couldn't get the pics looking how I wanted.
And yeah I had some with sink holes, but looking at a couple in my spares the detail is much sharper than those in the Moth. Like I said, a minor problem as most people don't use them anyway.
And yeah I had some with sink holes, but looking at a couple in my spares the detail is much sharper than those in the Moth. Like I said, a minor problem as most people don't use them anyway.
JClapp
#259
Joined: October 23, 2011
KitMaker: 2,265 posts
AeroScale: 1,715 posts
Posted: Sunday, March 01, 2015 - 12:14 PM UTC
I realize I havent posted a build update here in several weeks.
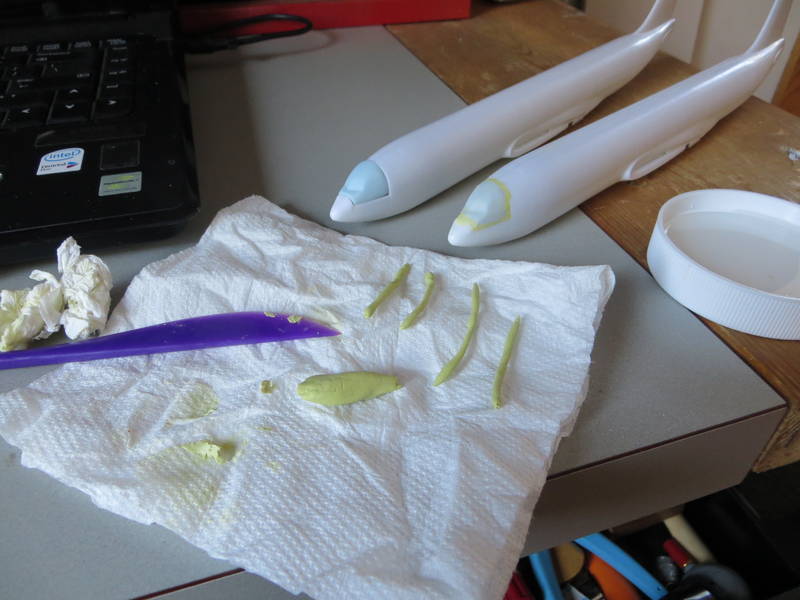
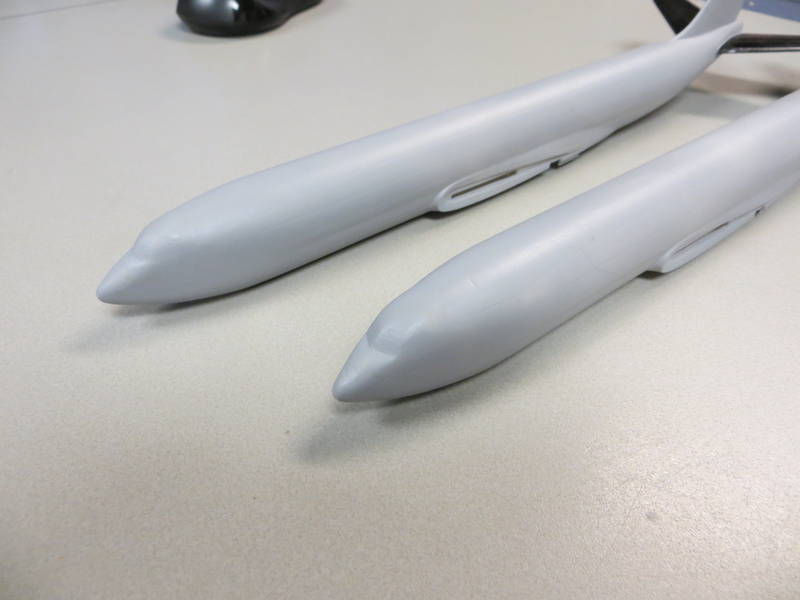
The Minicraft 707 requires an aftermarket cockpit insert. the one provided in the kit looks more like a DC4 than anything else.
The replacement part is by Contrails. Its a cast resin part, with less than perfect final dimensions, so some filling and fairing is required. Milliput answers the task.


weeks of fussing and many coats of primer later...
Enough.
Tonight Ive gotten the aluminum paint on them.

The wings are dry fitted. The joint fit up is pretty good. with a little work they should snug right up tight. On all larger models, from now on, I want to keep the wings removable for storage and transport purposes.
The Minicraft 707 requires an aftermarket cockpit insert. the one provided in the kit looks more like a DC4 than anything else.
The replacement part is by Contrails. Its a cast resin part, with less than perfect final dimensions, so some filling and fairing is required. Milliput answers the task.
weeks of fussing and many coats of primer later...
Enough.
Tonight Ive gotten the aluminum paint on them.
The wings are dry fitted. The joint fit up is pretty good. with a little work they should snug right up tight. On all larger models, from now on, I want to keep the wings removable for storage and transport purposes.
SGTJKJ
#041
Joined: July 20, 2006
KitMaker: 10,069 posts
AeroScale: 3,788 posts
Posted: Sunday, March 01, 2015 - 03:16 PM UTC
Looks nice, Jonanthan. Coming along really well.
Looking forward to see more.
Looking forward to see more.
Joel_W
Joined: December 04, 2010
KitMaker: 11,666 posts
AeroScale: 7,410 posts
Posted: Sunday, March 01, 2015 - 06:27 PM UTC
Jonathan,
Impressive to say the least. The cockpit sections look perfect.
Interesting idea of leaving the wings loose for storage and transportation. I would think that after a period of time of joining and removing, that the joint would wear some causing loose fitting wings. Then again, what do I know about such things. Only one way to find out, and test it.
Joel
ljames0874
Joined: August 15, 2012
KitMaker: 408 posts
AeroScale: 365 posts
Posted: Sunday, March 01, 2015 - 09:42 PM UTC
@ Stephen, Jonothan - good work, coming along nicely!
@ Joel - Well done on the F-15 - beautiful work!
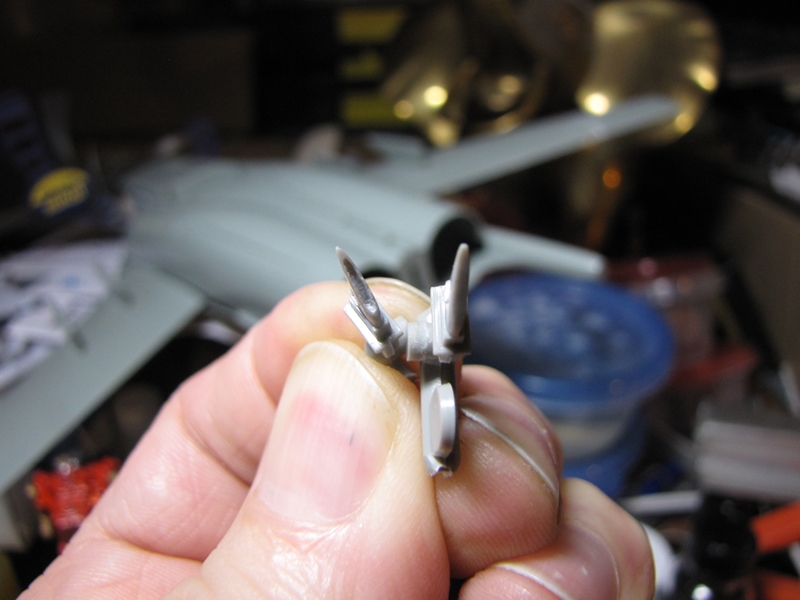
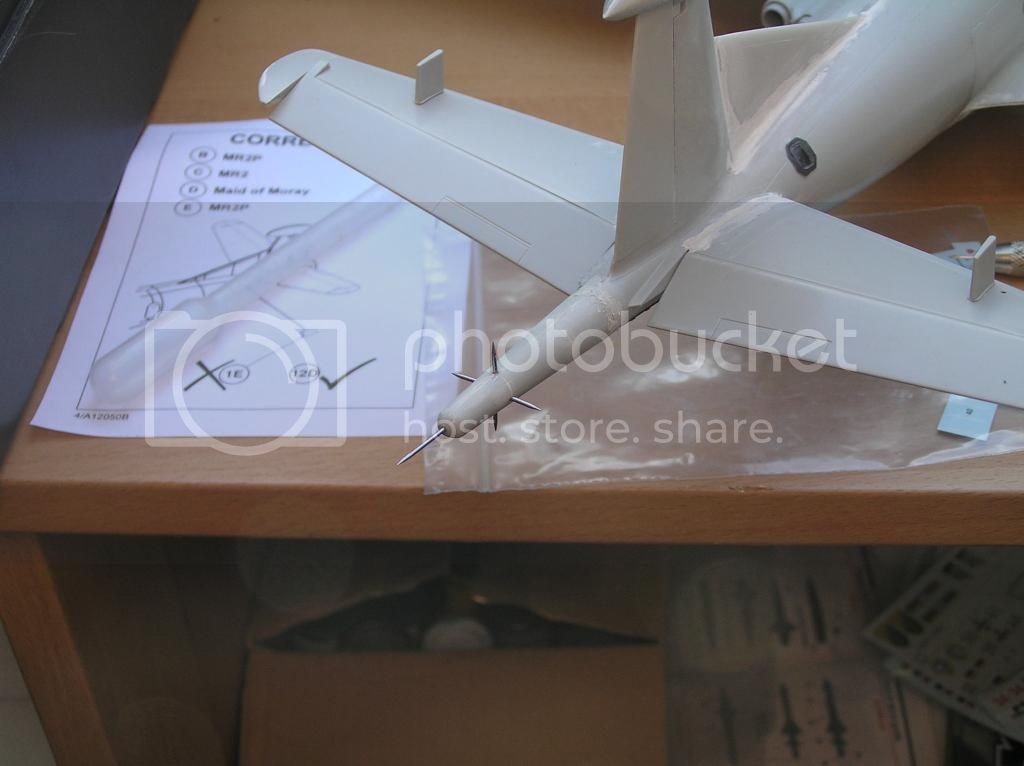
The Nimrod is getting there, slowly but surely. Still more PE and filler to go - here you can see that the MAD boom is in place, the unnecessary lines have been filled in, and the MAD "spikes" have been added, fashioned from steel pin tips.
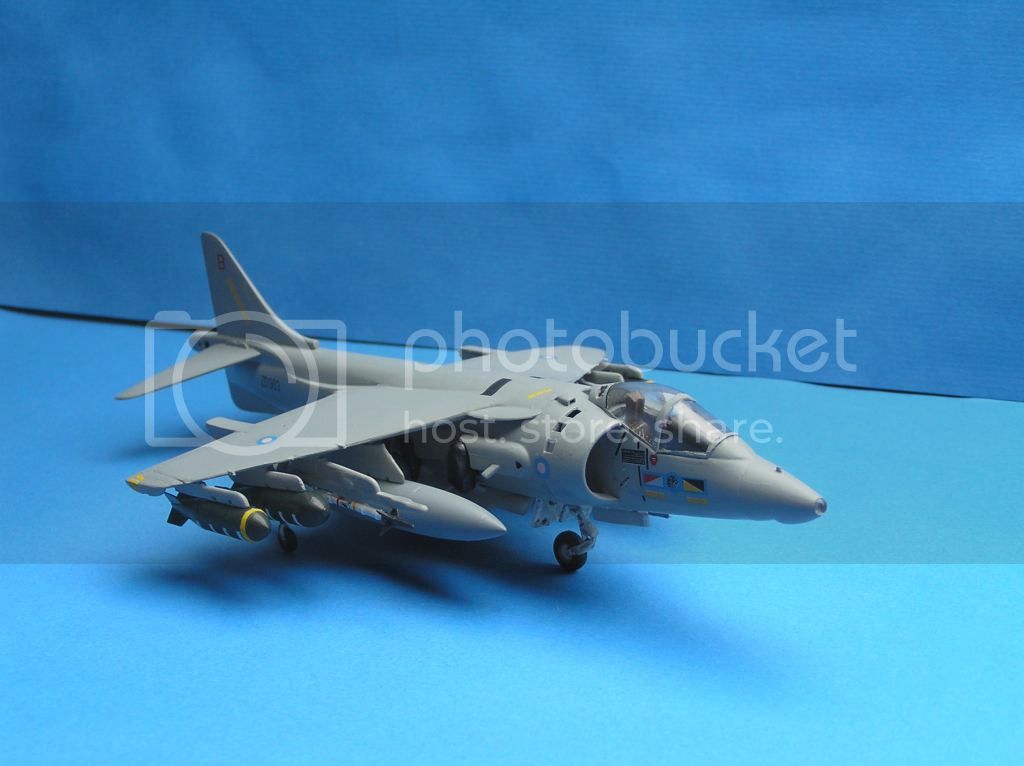
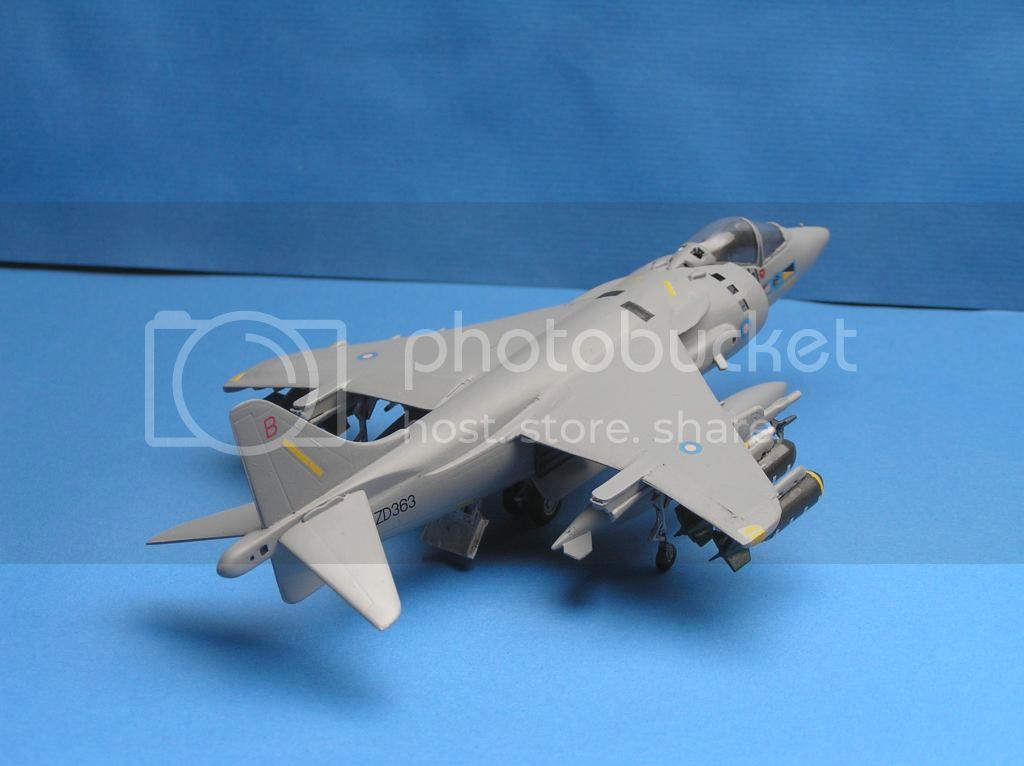
In other news, the GR5 is finished!
Cheers Everyone!
@ Joel - Well done on the F-15 - beautiful work!
The Nimrod is getting there, slowly but surely. Still more PE and filler to go - here you can see that the MAD boom is in place, the unnecessary lines have been filled in, and the MAD "spikes" have been added, fashioned from steel pin tips.
In other news, the GR5 is finished!
Cheers Everyone!
 |

WEB HOSTING BY


Copyright ©2021 AeroScale and Kitmaker Network, a subsidiary of Silver Star Enterprises
All Rights Reserved. Please read our Conditions of Use and Privacy Policy.
All Rights Reserved. Please read our Conditions of Use and Privacy Policy.