

Hi
Just love that idea with the pilot, So this will start up a new fashion, better get my old paintbrush and start working on painting some figures now. Perhaps I get one for my D.I build.
Now this starting to get interesting.
Cheers
Larsa Q
Early Aviation
Discuss World War I and the early years of aviation thru 1934.
Discuss World War I and the early years of aviation thru 1934.
Hosted by Jim Starkweather
1/32 Roden GB 2008 Albatros D.III

Repainted

Joined: April 04, 2006
KitMaker: 1,058 posts
AeroScale: 1,004 posts
Posted: Wednesday, July 16, 2008 - 07:01 AM UTC

RAGIII

Joined: June 19, 2007
KitMaker: 604 posts
AeroScale: 600 posts
Posted: Thursday, July 17, 2008 - 08:37 AM UTC
Quoted Text
Hi
Just love that idea with the pilot, So this will start up a new fashion, better get my old paintbrush and start working on painting some figures now. Perhaps I get one for my D.I build.
Now this starting to get interesting.
Cheers
Larsa Q
This was not intended as a challenge.. but if it gets more of us including figures then the result is good! Go Model Cellar!
RAGIII

CaptainA
Joined: May 14, 2007
KitMaker: 3,117 posts
AeroScale: 2,270 posts
Posted: Thursday, July 17, 2008 - 09:41 AM UTC
A figure standing next to an aircraft really makes the aircraft look better. It adds a sense of scale. Go Figure. 

RAGIII
Joined: June 19, 2007
KitMaker: 604 posts
AeroScale: 600 posts
Posted: Monday, July 28, 2008 - 04:07 PM UTC
A small update here: I received an order from MG Taylor today of SPADA decals for the Albatros DIII. The reason I ordered aftermarket was quite simply that the Roden crosses were so out of register I did not want to use them. This was not immediately noticed and therefore this is the first mention of any problems with decals. For those of you in the states who have not dealt with Michael for Misterkit paints or SPADA decals do yourself a favour and do so! Fuselage and rudder decals will be applied tomorrow, and then the entire fuselage overpainted RED!
RAGIII
PS: I could have contacted Roden customer service. In the past they have been extremely coooperative and helpful. I just chose to go aftermarket for the option of doing "Future" schemes.
RAGIII
PS: I could have contacted Roden customer service. In the past they have been extremely coooperative and helpful. I just chose to go aftermarket for the option of doing "Future" schemes.
RAGIII
Joined: June 19, 2007
KitMaker: 604 posts
AeroScale: 600 posts
Posted: Tuesday, August 05, 2008 - 12:21 PM UTC
Lets go back to steps 1-8 for a moment. I just had an epithany! Roden would have you build and detail the engine,then build the supporting structure and insert the engine after assembly. This results in a difficult wobbly assembly process for the formers and engine support and can lead to misalignment of the whole assembly. If I were to build another Roden Albatros, I would assemble and detail the engine,then attach parts 9K and 6K to the assembled engine. This would give the modeler a level, solid assembly to which the formers can then be added. I haven't tried this process but I believe it would work and simplify this process. By the way I have painted the Flesh on MvR and will take pictures this week of the nearly completed figure.
RAGIII
RAGIII

thegirl

Joined: January 19, 2008
KitMaker: 6,743 posts
AeroScale: 6,151 posts
Posted: Tuesday, August 05, 2008 - 03:17 PM UTC
Rick I can hardly wait to see this one when finished .
RAGIII
Joined: June 19, 2007
KitMaker: 604 posts
AeroScale: 600 posts
Posted: Wednesday, August 13, 2008 - 12:12 PM UTC
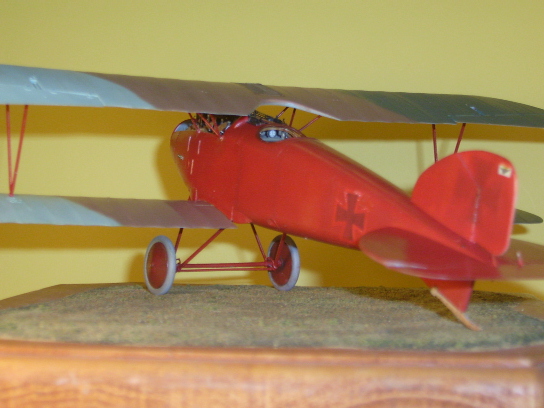
Here is a photo of the latest progress on the MvR DIII. I have overpainted the fuselage red using Monogram Pro Modeler acrylic Insignia Red. This paint was available in the mid to late 90s' and is excellent for both hand and airbrushing. As I thought the wood grain was really not needed,a coat of Model Masters wood could have given the same effect as an undercoat. By the way I took the photos last night so the model looks much more monotone than it actually is. I will wait for a good sunshiny day and hopefully get better (more revealing) photos.


thegirl
Joined: January 19, 2008
KitMaker: 6,743 posts
AeroScale: 6,151 posts
Posted: Wednesday, August 13, 2008 - 02:44 PM UTC
Looking really great , love how the red over spray looks on the national markings . How 's the figuar coming along ? 
RAGIII
Joined: June 19, 2007
KitMaker: 604 posts
AeroScale: 600 posts
Posted: Thursday, August 14, 2008 - 01:59 PM UTC
Quoted Text
Looking really great , love how the red over spray looks on the national markings . How 's the figuar coming along ?
Thanks Terri! The figure is coming along fine, I am just having a little difficulty with the photography! I am attaching a couple of pics of the Albie taken in sunlight today. Still not satisfied with the results but I think the focus is better. Someday perhaps I will be able to afford a camera that is a little more capable. Digital cameras have come a long way in the last 3 or 4 years since I purchased mine


RAGIII
Hatter50
Joined: June 17, 2006
KitMaker: 478 posts
AeroScale: 391 posts

Posted: Thursday, August 14, 2008 - 11:01 PM UTC
Hello Rick,
Excellent build! Have been following it closely. Abbie is next on my pile.
From the looks of your Engine photos you have a very capable camera. What gets me, is that the blown up photos don't highlight model and/or modeller flaws. I guess that speaks well of the model and modeller. I have been "shocked"
  when I look at mine 10 times larger than life.
Regards
Steve
Excellent build!
Have been following it closely. Abbie is next on my pile. From the looks of your Engine photos you have a very capable camera. What gets me, is that the blown up photos don't highlight model and/or modeller flaws.
I guess that speaks well of the model and modeller. I have been "shocked" when I look at mine 10 times larger than life.Regards
Steve
RAGIII
Joined: June 19, 2007
KitMaker: 604 posts
AeroScale: 600 posts
Posted: Saturday, August 16, 2008 - 11:14 AM UTC
Steve,
Thanks for the comments and I hope the build helps your future work. As for lack of flaws, there are plenty, I am just careful in how I shoot pictures
RAGIII
Thanks for the comments and I hope the build helps your future work. As for lack of flaws, there are plenty, I am just careful in how I shoot pictures
RAGIII
RAGIII
Joined: June 19, 2007
KitMaker: 604 posts
AeroScale: 600 posts
Posted: Tuesday, August 26, 2008 - 01:11 PM UTC
Update:
I have attached the upper wing. This is a tricky process for those of us who are still seat of the pants modelers and don't use fancy jigs. Next up is the small bullet hole patch on the rear fuselage just in front and above the cross and the grey panel below the cabanes. I plan to use decal film painted the apropriate colors. By the way I did a small amount of weathering/chipping around the crosses.


A few small details then on to the rigging.
RAGIII
I have attached the upper wing. This is a tricky process for those of us who are still seat of the pants modelers and don't use fancy jigs.
Next up is the small bullet hole patch on the rear fuselage just in front and above the cross and the grey panel below the cabanes. I plan to use decal film painted the apropriate colors. By the way I did a small amount of weathering/chipping around the crosses. A few small details then on to the rigging.
RAGIII
RAGIII
Joined: June 19, 2007
KitMaker: 604 posts
AeroScale: 600 posts
Posted: Friday, August 29, 2008 - 01:07 PM UTC
Not really an update as much as a further explaination. I have had great success with 1/48th Albatros fighters using the following method. I attach the interplane struts to the upper wing and let them hang in order to be aligned in a straight manner while drying. I then attach the cabanes to the fuselage , glue the interplanes to the lower wing and push the cabanes into their locating holes on the upper wing. with this kit that didn't work out too well. The struts are far more scale thckness than the 1/48th kits. The resulting wobble when attempting to turn the aircraft over to attach the cabanes to the upper wing loosened and broke the joint on the interplane struts. In the end I had to follow directions , and attach all of the struts to the lower wing and then mount to the upper.
I am now deciding if I am going to use the turnbuckles supplied on the Toms Model works PE fret. I have not attempted turnbuckles in the past and am a little aprehensive. Well done they can add a lot to the build. Not well done will be a distraction. I am definantly using a structural rigging method as the wing structure is still a little shaky. Any advice will be appreciated!
RAGIII
, and attach all of the struts to the lower wing and then mount to the upper. I am now deciding if I am going to use the turnbuckles supplied on the Toms Model works PE fret. I have not attempted turnbuckles in the past and am a little aprehensive. Well done they can add a lot to the build. Not well done will be a distraction. I am definantly using a structural rigging method as the wing structure is still a little shaky. Any advice will be appreciated!
RAGIII
thegirl
Joined: January 19, 2008
KitMaker: 6,743 posts
AeroScale: 6,151 posts
Posted: Friday, August 29, 2008 - 04:55 PM UTC
Rick , I'm not sure if this would help you out or not , but here it goes . I would replace the other struts with something else . Outer struts will still be flimsily . (Just my opinion ) . have you tried using chop sticks for making struts ! wooden ones work the best . cut the length you need a little longer then needed . Split the wood to the thickness you want sand to shape . use metal pins (brass) . What I like about using these method is that bamboo is very strong . easy to work with , takes paint very well . if the struts a metal ones I dip them in future a few times . I never tried Tom's Model Works turn buckles so no comment on them . I have tried Eduards . Their not bad , but they are flat and the should be round .
You can make your own . I do my buy bending the wire over a small drill bit and then twist a few times . In visible thread I use for my rigging . for the turnbuckle a plastic Q-tip is what I use cut the cotton off , same process as stretched spruce . end up with along fine tube . I cut them in 3mm in length . dip one of the copper thingies dip in super glue place in holes made for rigging . tie one end of thread around tiny loop . sold on two Q-tip doohickeys , glue the copper thing in the corresponding hole . pass the other end of the thread through the other copper thing pull tight , not to tight . fix with super glue slide one Q-tip doohickeys to one end the other one , other end . just trim off any excess when glue has set .
Terri
RAGIII
Joined: June 19, 2007
KitMaker: 604 posts
AeroScale: 600 posts
Posted: Sunday, August 31, 2008 - 02:32 AM UTC
Quoted Text
Rick , I'm not sure if this would help you out or not , but here it goes . I would replace the other struts with something else . Outer struts will still be flimsily . (Just my opinion ) . have you tried using chop sticks for making struts ! wooden ones work the best . cut the length you need a little longer then needed . Split the wood to the thickness you want sand to shape . use metal pins (brass) . What I like about using these method is that bamboo is very strong . easy to work with , takes paint very well . if the struts a metal ones I dip them in future a few times . I never tried Tom's Model Works turn buckles so no comment on them . I have tried Eduards . Their not bad , but they are flat and the should be round .
You can make your own . I do my buy bending the wire over a small drill bit and then twist a few times . In visible thread I use for my rigging . for the turnbuckle a plastic Q-tip is what I use cut the cotton off , same process as stretched spruce . end up with along fine tube . I cut them in 3mm in length . dip one of the copper thingies dip in super glue place in holes made for rigging . tie one end of thread around tiny loop . sold on two Q-tip doohickeys , glue the copper thing in the corresponding hole . pass the other end of the thread through the other copper thing pull tight , not to tight . fix with super glue slide one Q-tip doohickeys to one end the other one , other end . just trim off any excess when glue has set .
Terri
Terri,
Thanks for the suggestions I should note that the wing structure has stiffened up quite a bit as of now. The only thing I need to watch out for is resting the aircraft on its lower wings. These tend to flex, and can dislocate the cabanes. I think that by reinforcing all of the joints with superglue I have solved the major wobble problems As for the turnbuckles, I have the Toms as mentioned earlier, and also some from Bobs buckles(1/48th scale) that would probably work. I am hesitant because I don't want to ruin this build by experimentation.
RAGIII
thegirl
Joined: January 19, 2008
KitMaker: 6,743 posts
AeroScale: 6,151 posts
Posted: Sunday, August 31, 2008 - 03:02 AM UTC
Hello Rick , no worries at all . You don't have to be hesitant to do a little experimentation you are a fine builder . When I rigged my D.V it was all new to me on the method I used . What I did was make a mock up of the right side of a wing . ( out of sheet plastic .30 or .40 a strip for the bottom and one for the top . A shorter one to represent the fuselage side . Made some out struts glued them in place . When this was all dried I had something to experiment on . )
Bobs turn buckles are the better choice for this . How do plan on installing them ?
Bobs turn buckles are the better choice for this . How do plan on installing them ?
RAGIII
Joined: June 19, 2007
KitMaker: 604 posts
AeroScale: 600 posts
Posted: Thursday, September 04, 2008 - 11:40 AM UTC
Quoted Text
Hello Rick , no worries at all . You don't have to be hesitant to do a little experimentation you are a fine builder . When I rigged my D.V it was all new to me on the method I used . What I did was make a mock up of the right side of a wing . ( out of sheet plastic .30 or .40 a strip for the bottom and one for the top . A shorter one to represent the fuselage side . Made some out struts glued them in place . When this was all dried I had something to experiment on . )
Bobs turn buckles are the better choice for this . How do plan on installing them ?
Teri, thanks for the encouragement and suggestions! We will see which direction I go!
RAGIII

JackFlash
Joined: January 25, 2004
KitMaker: 11,669 posts
AeroScale: 11,011 posts
Posted: Thursday, September 04, 2008 - 04:41 PM UTC
No worries Rick! I am more than impressed with your choices and work.
RAGIII
Joined: June 19, 2007
KitMaker: 604 posts
AeroScale: 600 posts
Posted: Saturday, September 13, 2008 - 11:45 AM UTC
OK folks, nobody has mentioned this so maybe it is all in my mind?
The wing stagger seems to be correct, all struts are located in their proper locating holes etc,...... and yet.
The wing gap just doesn't look quite right. I have checked other builds on the Roden sight and they seem to look exactly like mine. When I look at Larsa and Brads builds on this site
it seems the gap is greater and the dehydral of the lower wings are also greater. Any comments?
RAGIII
Hatter50
Joined: June 17, 2006
KitMaker: 478 posts
AeroScale: 391 posts
Posted: Saturday, September 13, 2008 - 11:58 AM UTC
Rick,
You might be asking just the folks that have actually built that particular aircraft, but without some specific photos of the problem, others of us may not see the problem that you are having.
That machine is the next on my stash, so I am "interested". I'm "interested" in Dihedral in general with my SE5.
In my case I'm contemplating adding a metal tube to reinforce the dihedral.
Regards
Steve
RAGIII
Joined: June 19, 2007
KitMaker: 604 posts
AeroScale: 600 posts
Posted: Saturday, September 13, 2008 - 12:16 PM UTC
Steve, quite honestly I think that the dehydral of the lower wing seems right on my build. I just look at the pictures and the gap seems too close to the fuselage. Look at pictures of the real aircraft. Brad and Larsa both sanded off the locating holes on the fuselage for the cabanes. I believe Larsas' relocation is just a tad higher for the cabanes. This would affect the stagger and the lower wing dehydral(in order to bring the interplane struts up to a point where they connect to both wings.) Again I am not sure this is a problem. I have some eyesight problems that ocasionally interfere with my view of angles
RAGIII
PS: Just had a rare moment of Lucidity! I measured from wing centerline top to bottom on the kit and on a 1/32nd drawing. If I did it right there is less than 1mm difference at the cabanes!
RAGIII
RAGIII
PS: Just had a rare moment of Lucidity! I measured from wing centerline top to bottom on the kit and on a 1/32nd drawing. If I did it right there is less than 1mm difference at the cabanes!
RAGIII
Repainted
Joined: April 04, 2006
KitMaker: 1,058 posts
AeroScale: 1,004 posts
Posted: Sunday, September 14, 2008 - 06:06 PM UTC
Hi RAGIII
You´re correct avout the sanding off the location holes. First thing I´ll had problem to get the lower wing to get in place. Then we have the follow Eduard instruction´s. I usually make a mark with a needle arond the locationmark before I´ll sanded it off. But this time I´ll just sanded to much so the needlemark was lost too.I use a homemade jig to set up the upperwing leaving the cabane struts for last to assamble.If I had to build this kit again I´ll would let the PE bits away this time.
Hope this helps, Still like you DIII better then mine Guess this is the red colours
Larsa
You´re correct avout the sanding off the location holes. First thing I´ll had problem to get the lower wing to get in place. Then we have the follow Eduard instruction´s. I usually make a mark with a needle arond the locationmark before I´ll sanded it off. But this time I´ll just sanded to much so the needlemark was lost too.I use a homemade jig to set up the upperwing leaving the cabane struts for last to assamble.If I had to build this kit again I´ll would let the PE bits away this time.
Hope this helps, Still like you DIII better then mine
Guess this is the red coloursLarsa
RAGIII
Joined: June 19, 2007
KitMaker: 604 posts
AeroScale: 600 posts
Posted: Monday, September 15, 2008 - 01:26 AM UTC
Quoted Text
Hi RAGIII
You´re correct avout the sanding off the location holes. First thing I´ll had problem to get the lower wing to get in place. Then we have the follow Eduard instruction´s. I usually make a mark with a needle arond the locationmark before I´ll sanded it off. But this time I´ll just sanded to much so the needlemark was lost too.I use a homemade jig to set up the upperwing leaving the cabane struts for last to assamble.If I had to build this kit again I´ll would let the PE bits away this time.
Hope this helps, Still like you DIII better then mine
Larsa
LARSA,
I actually still think your build has a more correct "LOOK" than a straight out of the box build reference the wing gap! JMHO,
RAGIII
Repainted
Joined: April 04, 2006
KitMaker: 1,058 posts
AeroScale: 1,004 posts
Posted: Monday, September 15, 2008 - 02:03 AM UTC
Noop i´ll like your´s. I have alots off bloopers in my build.
Larsa
Larsa
thegirl
Joined: January 19, 2008
KitMaker: 6,743 posts
AeroScale: 6,151 posts
Posted: Monday, September 15, 2008 - 03:10 AM UTC
.You have done a fantastic build on this one . I'm very impressed with the craftsmanship you have done on this bird .
 |

WEB HOSTING BY


Copyright ©2021 AeroScale and Kitmaker Network, a subsidiary of Silver Star Enterprises
All Rights Reserved. Please read our Conditions of Use and Privacy Policy.
All Rights Reserved. Please read our Conditions of Use and Privacy Policy.