1/32 Roden GB 2008 Albatros D.III
Queensland, Australia
Joined: August 30, 2006
KitMaker: 285 posts
AeroScale: 281 posts
Posted: Tuesday, September 16, 2008 - 02:29 AM UTC
Honestly, I can't say as I paid too much attention to the wing spacing when I built this kit - I think my build worked out at having a slightly larger dihedral as I had quite a few troubles getting the lower wing to fit. By the time i got to adding the top wing, I was just happy that I got it all together without any dramas!

In all honesty Rick, I think your lesser wing spacing better captures the sleek look of the Albatros.
BC
North Carolina, United States
Joined: June 19, 2007
KitMaker: 604 posts
AeroScale: 600 posts
Posted: Friday, September 19, 2008 - 11:58 AM UTC
Quoted Text
Honestly, I can't say as I paid too much attention to the wing spacing when I built this kit - I think my build worked out at having a slightly larger dihedral as I had quite a few troubles getting the lower wing to fit. By the time i got to adding the top wing, I was just happy that I got it all together without any dramas! In all honesty Rick, I think your lesser wing spacing better captures the sleek look of the Albatros.
BC
Brad, thanks for the comments! Just for the record, my intention in bringing this up is not to decide if my build LOOKS NICE, but rather to determine if there is a problem with the kits out of the box wing gap? After looking closely at photos, I think that the cabanes should mount at the top of the metal fitting and not the center as most kits, this one included,represent. My guess is that the tiny difference of 1mm would be more noticible than one would think??
North Carolina, United States
Joined: June 19, 2007
KitMaker: 604 posts
AeroScale: 600 posts
Posted: Monday, October 06, 2008 - 12:09 PM UTC
Just an update. Rigging has begun and is proceeding well! I have opted to do structural rigging as I said earlier and will attempt to simulate the turnbuckles in an older method. We shall see how this tuns out? Pictures when done and a sunny day arrives.
RAGIII
P.S. The MvR figure is virtually finished. Just a little work to do on the PlM medal. How I wish a PE version was available in 1/32nd!
RAGIII
North Carolina, United States
Joined: June 17, 2006
KitMaker: 478 posts
AeroScale: 391 posts
Posted: Monday, October 06, 2008 - 12:21 PM UTC
Rick,
What is structural rigging? I assume that means that it actually supports the structure to some degree?

gonna learn something new here.................
Regards
Steve
1/350 USS San Francisco on Slipways
1/350 HMS Warspite in Research Mode
1/32 P-39D stalled
North Carolina, United States
Joined: June 19, 2007
KitMaker: 604 posts
AeroScale: 600 posts
Posted: Monday, October 06, 2008 - 12:30 PM UTC
Quoted Text
Rick,
What is structural rigging? I assume that means that it actually supports the structure to some degree? gonna learn something new here.................
Regards
Steve
Steve, just like it sounds. It is basically drilling holes completely through the wing, using monofilament for the line, and assembling/rigging in a method that supports the structure. I usually rig in sequences.For example, port landing wires then Starboard Landing wires, etc, etc. One can actually fix minor dyhedral problems etc. by pulling tighter on one side. Nothing fancy here, just another term for using monofilament rigging

RAGIII
P.S. For a look at how well the rigging supports the overall structure search for my thread on SE5 disaster. After being knocked to the floor and losing many struts, the basic wing cellule on my 1/32nd scale se HELD TOGETHER, EVEN STAYED TIGHT ON ONE SIDE

Östergötland, Sweden
Joined: April 04, 2006
KitMaker: 1,058 posts
AeroScale: 1,004 posts
Posted: Friday, October 10, 2008 - 04:05 AM UTC
Hey RAGIII
I like this. Hoping for some new pics doo, on the rigging works
Larsa
North Carolina, United States
Joined: June 19, 2007
KitMaker: 604 posts
AeroScale: 600 posts
Posted: Friday, October 10, 2008 - 02:04 PM UTC
Thanks Larsa. I only have four major lines to add then some pictures will be shot. The overall wing structure is already vastly more secure than before rigging started. I began with the supporting wires from the cabane struts to the fuselage /lower wing joint. Then I proceeded to the lines from the wing/ fuselage joint to the upper wing/ interplane struts. Next up was the wires from the interplane / bottom of the V to the upper wing cabane location. The other supporting wires from the forward fuselage to the upper rear strut, and the lower front of the V were added last. ( MvRs' aircraft seems to have had both). The next phase will be the Aileron control wires and elevator control wires. I hope this is not confusing but I always get confused myself when trying to identify "Flying" and "Landing" wires etc.

RAGIII
North Carolina, United States
Joined: June 19, 2007
KitMaker: 604 posts
AeroScale: 600 posts
Posted: Sunday, October 12, 2008 - 03:16 PM UTC
The rigging has really gone well on this one. Should be able to shoot and post pictures tomorrow!
RAGIII
Alberta, Canada
Joined: January 19, 2008
KitMaker: 6,743 posts
AeroScale: 6,151 posts
Posted: Sunday, October 12, 2008 - 04:19 PM UTC
This, I'm more then looking forward to Rick ! Been following for some time now and your work is very encouraging .
North Carolina, United States
Joined: June 19, 2007
KitMaker: 604 posts
AeroScale: 600 posts
Posted: Monday, October 27, 2008 - 02:09 AM UTC
Just a small update. I know I have promissed pictures but..... I am so close to being finished that I decided to post when the model is done! Just a little touch up and the final clear finishes are left. Besides with all of the Albatri showing up in the build I figured I needed to finish before I was too embarassed to post

RAGIII
Östergötland, Sweden
Joined: April 04, 2006
KitMaker: 1,058 posts
AeroScale: 1,004 posts
Posted: Monday, October 27, 2008 - 03:50 AM UTC
RagIII
We are waiting for those pictures over here

Can you feel the Pressure?
Larsa
North Carolina, United States
Joined: June 17, 2006
KitMaker: 478 posts
AeroScale: 391 posts
Posted: Monday, October 27, 2008 - 05:49 AM UTC
Waiting for the pictures Wayyyyyyyyyyyyyy back over here also........the pressue is being pulled over thousands of miles. Rick's and other builds here is what "Made me" get mine. I think you guys secretly work for Roden. I'm a novice with good teachers.

Regards
Steve
1/350 USS San Francisco on Slipways
1/350 HMS Warspite in Research Mode
1/32 P-39D stalled
North Carolina, United States
Joined: June 19, 2007
KitMaker: 604 posts
AeroScale: 600 posts
Posted: Wednesday, November 05, 2008 - 12:02 PM UTC
Here are the requested photos. Poly Scale satin finish has been applied but I think I will shoot a flat cote on at least the fuselage. I also intend to add some oil staining in strategic areas. Finally the wind screen must be added.
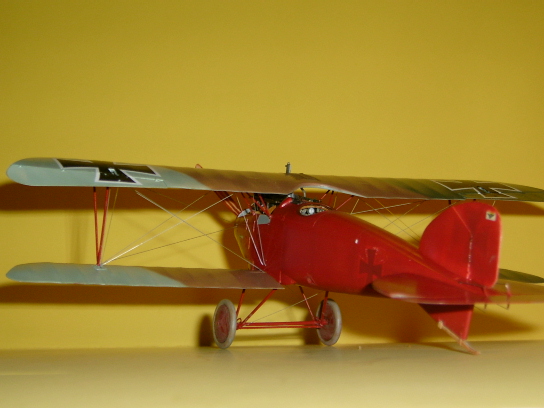
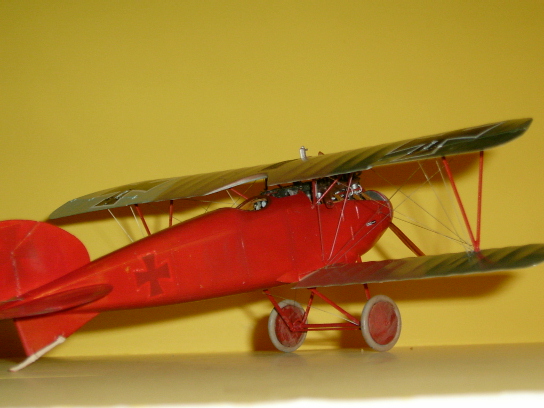
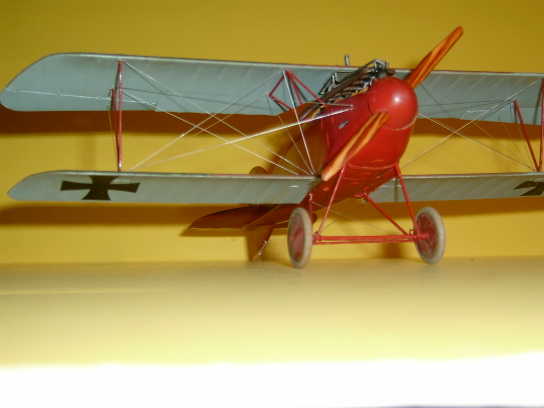
Looking at the photos I also just remembered I have to stain the wood on the tailskid!
Colorado, United States
Joined: January 25, 2004
KitMaker: 11,669 posts
AeroScale: 11,011 posts
Posted: Wednesday, November 05, 2008 - 03:23 PM UTC
". . .The most important thing is to know why you build and then get the most that you can out of building." via D.D.
New York, United States
Joined: December 15, 2006
KitMaker: 365 posts
AeroScale: 344 posts
Posted: Wednesday, November 05, 2008 - 09:32 PM UTC
Rick,
Outstanding indeed, most excellent!
Regards, Dwayne
Alberta, Canada
Joined: January 19, 2008
KitMaker: 6,743 posts
AeroScale: 6,151 posts
Posted: Thursday, November 06, 2008 - 02:19 AM UTC
Rick , awesome all the way around , Fantastic build !!
North Carolina, United States
Joined: June 19, 2007
KitMaker: 604 posts
AeroScale: 600 posts
Posted: Thursday, November 06, 2008 - 11:26 AM UTC
Stephen, Dwayne and Teri,
Thanks, the next photos will be the last!
RAGIII
Victoria, Australia
Joined: November 26, 2006
KitMaker: 608 posts
AeroScale: 602 posts
Posted: Thursday, November 06, 2008 - 01:29 PM UTC
Beautiful Rick!
Great finish.
Cheers,
Hugh
Östergötland, Sweden
Joined: April 04, 2006
KitMaker: 1,058 posts
AeroScale: 1,004 posts
Posted: Thursday, November 06, 2008 - 07:00 PM UTC
This is real good.You have a colourful bird on the shelf,and I like it.
Larsa Q
North Carolina, United States
Joined: June 19, 2007
KitMaker: 604 posts
AeroScale: 600 posts
Posted: Friday, November 07, 2008 - 12:04 PM UTC
Larsa and Hugh, Thanks for the compliments. As a matter of fact I appreciate all of the comments and suggestions from all during this build. If I didn't always listen it was because I wanted to do the best I could within my comfort zone. Maybe on the next one I will take some risks
RAGIII
Mendoza, Argentina
Joined: June 14, 2006
KitMaker: 222 posts
AeroScale: 219 posts
Posted: Friday, November 07, 2008 - 07:29 PM UTC
Wonderful model Rick, congratulations!!!

I have always imagined that Paradise will be a kind of library.
Siempre imagine que el paraíso sería algún tipo de biblioteca.
Jorge Luis Borges
Indiana, United States
Joined: May 14, 2007
KitMaker: 3,117 posts
AeroScale: 2,270 posts
Posted: Saturday, November 08, 2008 - 09:19 AM UTC
It really came out nice, Rick.
"Treat 'em Rough", Current Builds--Wingnut Rumpler
I am frequently seen with blood shot eyes from staying up past my nap time to get the right colour scheme on my latest WWI model?
North Carolina, United States
Joined: June 19, 2007
KitMaker: 604 posts
AeroScale: 600 posts
Posted: Sunday, November 09, 2008 - 03:01 PM UTC
Claudio and Carl,
I appreciate the comments. Last pictures soon. I am now looking forward to the SPAD VII
RAGIII
North Carolina, United States
Joined: June 17, 2006
KitMaker: 478 posts
AeroScale: 391 posts
Posted: Sunday, November 09, 2008 - 11:34 PM UTC
Rick................the SPAD ain't 1/48

your gonna be "Lost" in the "Bigness".
Regards
Steve
1/350 USS San Francisco on Slipways
1/350 HMS Warspite in Research Mode
1/32 P-39D stalled
Östergötland, Sweden
Joined: April 04, 2006
KitMaker: 1,058 posts
AeroScale: 1,004 posts
Posted: Monday, November 10, 2008 - 03:13 AM UTC
Quoted Text
Claudio and Carl,
I appreciate the comments. Last pictures soon. I am now looking forward to the SPAD VII
RAGIII
Me too, looking forward to see wwhat you can do with this one.
Larsa Q


