_GOTOBOTTOM
Early Aviation
Discuss World War I and the early years of aviation thru 1934.
1/32 Roden GB 2008 Albatros D.III
RAGIII
_VISITCOMMUNITY
North Carolina, United States
Joined: June 19, 2007
KitMaker: 604 posts
AeroScale: 600 posts
Posted: Friday, March 07, 2008 - 12:38 PM UTC
The Albatros DIII was "THE" aircraft of the aces in 1917. A developement of the successful Albatros DII with sesquiplane wings for improved visibility the DIII was to remain in production well into 1918, (OAW built versions). In the hands of Manfred von Richthofen and Jasta 11 this aircraft proved to be more than a match for the hard pressed British Corp squadrons facing the Jastas'.

The Roden kit has been available for about 1 year and is an excellent example of this historic aircraft. I have chosen to do Manfred von Richthofens' early Albatros DIII as most reviewers seem to ignore this aircraft as "overdone" by modelers.

Photos to follow:
RAGIII
_VISITCOMMUNITY
North Carolina, United States
Joined: June 19, 2007
KitMaker: 604 posts
AeroScale: 600 posts
Posted: Friday, March 07, 2008 - 12:48 PM UTC
I have chosen to do as stated in my original post, the Early DIII with the overpainted red fuselage flown by MvR. Attached is a well known photo of MvR and other members of Jasta 11 posing with his Albatros DIII.

RAGIII
_VISITCOMMUNITY
North Carolina, United States
Joined: June 19, 2007
KitMaker: 604 posts
AeroScale: 600 posts
Posted: Friday, March 07, 2008 - 01:02 PM UTC
I don't know why in the last couple of weeks I have lost all knowledge of posting pictures. This was the easiest forum I ever used and now I can't seem to get it right I will continue to try and remember what I used to do easily and continue my build article !
Removed by original poster on 03/08/08 - 01:14:13 (GMT).
SuccorPhysh
_VISITCOMMUNITY
Texas, United States
Joined: June 24, 2007
KitMaker: 82 posts
AeroScale: 81 posts
Posted: Friday, March 07, 2008 - 06:37 PM UTC
if it makes you feel any better, I am having the same problem.
JackFlash
_VISITCOMMUNITY
Colorado, United States
Joined: January 25, 2004
KitMaker: 11,669 posts
AeroScale: 11,011 posts
Posted: Friday, March 07, 2008 - 07:59 PM UTC

Quoted Text

I have chosen to do as stated in my original post, the Early DIII with the overpainted red fuselage flown by MvR. Attached is a well known photo of MvR and other members of Jasta 11 posing with his Albatros DIII.


Here is a quiz for you what famous album cover (yes I am dating myself) was this seen on?
RAGIII
_VISITCOMMUNITY
North Carolina, United States
Joined: June 19, 2007
KitMaker: 604 posts
AeroScale: 600 posts
Posted: Saturday, March 08, 2008 - 01:59 PM UTC
Construction begins with the engine assembly in steps 1-6. Roden would have you add parts to the right side in step 1, then progress to the left side, and finally assemble the engine. I chose to do a more standard assembly sequence and glue the right and left halves together and then add the details. Borrowing heavily from Brad Cancian's build notes I added plug wires and replaced part number 6Z with plastic rod. One thing to mention here is that Roden shows you attaching the radiator return pipe,part 7B to the bottom right hand engine half. I did not follow this as the pipe is FAR TOO short to attach at this point and meet the wing in later steps. Looking at Brad's build I noticed he also skipped this so I believe that Roden got this wrong in their directions.

I skipped steps 7&8 temporarily, to assemble the formers and engine supports per step 9. The supports were given a coat of Testors wood, and then a wash of artists tube oils Burnt Sienna for the wood effect.One thing to note is that some modelers use Japan drier to speed up the process. I have found that Testors Model Masters Airbrush thinner used instead of Turps decreases drying time but leaves plenty of time to work and rework the oils untill you are satisfied. One thing to note is that the directions show the tabs on part 45A pointing to the front. If you assemble this former as directed it is backwards with the short cut off side to the left instead of the right to make room for the exhaust pipes.

The motor was painted with Testors Model Masters Non-Buffing Gun Metal for the cylinders, and Gunze Metalics for the crakcase and details. I have not quite finished this as I do intend to add the fuel regulator? to the BACK of the engine, correct I think for the Mercedes DIII 160hp ? Stephen your comments here are welcome! I will add a wash of artists oils to simulate Oil stains and generally dirty this area up, as well as add the manufacturers detail plates supplied in the Eduard PE set. Speaking of the PE I have the excellent Tom's model works set, kindly donated by Tom's, and ordered the Eduard set. The Tom's set includes seat belt buckles more on these later, machine gun cooling jackets and details, a couple of interior details, and a lot of great exterior details. Eduard offered some excellent details not on the Toms set for both the interior and exterior and I felt a combination of the two would be good. I Love the Albatros
Attached see the details of the Engine:


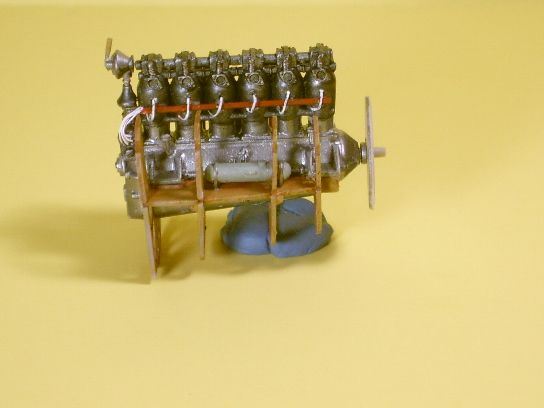
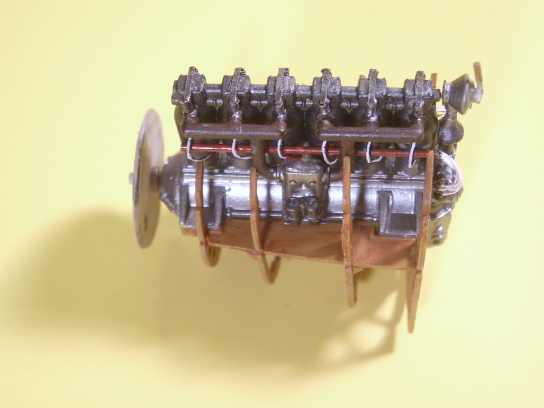
Plug wires and Valve Springs were made with small gauge wire.
RAGIII
JackFlash
_VISITCOMMUNITY
Colorado, United States
Joined: January 25, 2004
KitMaker: 11,669 posts
AeroScale: 11,011 posts
Posted: Saturday, March 08, 2008 - 06:02 PM UTC
Greetings all; Yes Hugh ( wait a minute - Rick not Hugh watch out old guy pounding the keys) the nomenclature for the Mercedes wa the 1466 Merc. D.III (D for Diamler which mercedes owned) 160hp. BUT the Caveat being the newer Merc. D.IIIa 170hp was just coming out at this time and it is believed most of the first production had the this. They were very similar but the kit is closer to the 170hp version stock. So you are in the ball park with a home run.
Rittersbach
_VISITCOMMUNITY
Texas, United States
Joined: August 16, 2007
KitMaker: 83 posts
AeroScale: 80 posts
Posted: Sunday, March 09, 2008 - 03:48 AM UTC

Quoted Text

Here is a quiz for you what famous album cover (yes I am dating myself) was this seen on?


That would be Led Zeppelin II....Hoping for a reunion tour sometime in 2008.

Jeff

RAGIII
_VISITCOMMUNITY
North Carolina, United States
Joined: June 19, 2007
KitMaker: 604 posts
AeroScale: 600 posts
Posted: Sunday, March 09, 2008 - 10:36 AM UTC

Quoted Text

Greetings all; Yes Hugh the nomenclature for the Mercedes wa the 1466 Merc. D.III (D for Diamler which mercedes owned) 160hp. BUT the Caveat being the newer Merc. D.IIIa 170hp was just coming out at this time and it is believed most of the first production had the this. They were very similar but the kit is closer to the 170hp version stock. So you are in the ball park with a home run.


Stephen, I think you have your builders mixed! I am RAGIII/AKA Rick Geisler, I think Hugh is doing the F1 Tripe.

Thanks for the imput! By the way while doing this update last night I was preparing to go to Stephens post about having difficulty Posting pictures so I could get back on track. No koy, the site was being updated in the middle of my work and I couldn't access the thread. So On to the next steps, already in progress.
RAGIII
RAGIII
_VISITCOMMUNITY
North Carolina, United States
Joined: June 19, 2007
KitMaker: 604 posts
AeroScale: 600 posts
Posted: Sunday, March 09, 2008 - 12:12 PM UTC
Before going back to steps 7&8 which involve the control column and its adjacent former I decided to prepare the major interior components and the fuselage interior for painting. This is to aid in a smooth assembly and painting process. I filled the fuselage mold release dimples with plastic disks punched out of styrene sheet using my Waldron Punch and die set. Sink marks in the fuel tank were filled with a mixture of Squadron white putty and Testors liquid cement.


RAGIII
JackFlash
_VISITCOMMUNITY
Colorado, United States
Joined: January 25, 2004
KitMaker: 11,669 posts
AeroScale: 11,011 posts
Posted: Sunday, March 09, 2008 - 12:54 PM UTC
Greeting Rick;

My fault I had just finished writing an e-mail to Kalt and Hugh. Model On!
RAGIII
_VISITCOMMUNITY
North Carolina, United States
Joined: June 19, 2007
KitMaker: 604 posts
AeroScale: 600 posts
Posted: Tuesday, March 18, 2008 - 01:22 PM UTC
OK, here is an update:
Went back to steps 2,6 and 7. Step 2 involves assembling the panel on the left side of the fuselage containing the magneto switch, spark control handle,snd starting magneto. Eduard provides PE to be used with these parts. The control column and adjoining former are finished ,including the Eduard PE supplied for this assembly,less some wiring to be added. Photos will be posted in a day or two.

By the way the fuselage interior and all remaining formers have had the wood grain effect painted.
RAGIII
RAGIII
_VISITCOMMUNITY
North Carolina, United States
Joined: June 19, 2007
KitMaker: 604 posts
AeroScale: 600 posts
Posted: Saturday, March 29, 2008 - 10:16 AM UTC
At this point in the construction I have begun to use the PE pices supplied by Toms Model Works and purchased by Eduard, Attached are photos of the directions and parts for the Eduard PE . I wiill photograph the Toms set and directions at the same time I photograph the progress on construction.


RAGIII
RAGIII
_VISITCOMMUNITY
North Carolina, United States
Joined: June 19, 2007
KitMaker: 604 posts
AeroScale: 600 posts
Posted: Friday, April 11, 2008 - 02:05 PM UTC
Steps 8-12 deal with assembling the interior framework and subassemblies from the previous steps. As stated earlier I have painted the interior framework, fuselage sides etc prior to final assembly. Attached are photos of the Toms PE and instructions as well as the construction to date, aproximately step 12.


RAGIII
_VISITCOMMUNITY
North Carolina, United States
Joined: June 19, 2007
KitMaker: 604 posts
AeroScale: 600 posts
Posted: Friday, April 11, 2008 - 02:34 PM UTC
A few notes on the construction:
First it is difficult to get good alignment on the formers constructing them as per directions.
Second, Eduards PE parts for the fuel contro; panel pictured do not have openings for the PE switches/cocks. I substituted Plastic disks punched out of 10 thou plastic, and then drilled a hole to attach the PE switches. I then reduced a picture from the Smithsonian Albatros DV book of the circular mounts,copied them onto paper and punched them out. A little white glue secured them to the plastic disks. Then the cocks were attached.
RAGIII
JackFlash
_VISITCOMMUNITY
Colorado, United States
Joined: January 25, 2004
KitMaker: 11,669 posts
AeroScale: 11,011 posts
Posted: Saturday, April 12, 2008 - 03:36 PM UTC
Excellent progress Rick. Would you agree that there is an extrodinary amount of detail in the plastic kit?
RAGIII
_VISITCOMMUNITY
North Carolina, United States
Joined: June 19, 2007
KitMaker: 604 posts
AeroScale: 600 posts
Posted: Sunday, April 13, 2008 - 02:58 AM UTC

Quoted Text

Excellent progress Rick. Would you agree that there is an extrodinary amount of detail in the plastic kit?


Absolutely!! This kit could be built straight out of the box and would still look great. Just add seat belts and PE cooling jackets for the guns.
RAGIII
RAGIII
_VISITCOMMUNITY
North Carolina, United States
Joined: June 19, 2007
KitMaker: 604 posts
AeroScale: 600 posts
Posted: Sunday, April 20, 2008 - 10:08 AM UTC
Just a note here on progress.I did not realize that I was actually past Step 12,and that steps 13,14, and 16 are also completed. (These are the assembly of the seat and framework, the fuel tank,ammo bins etc and can be seen on the previously posted photos). I have moved on to step 18, (Step 17 is attaching the Ailerons to the upper wing). Step 18 is the installation of the interior and the joining of the fuselage halves. I found no major problem with this step although I did use filler on some of the seams.Pictures in a few days.
RAGIII
RAGIII
_VISITCOMMUNITY
North Carolina, United States
Joined: June 19, 2007
KitMaker: 604 posts
AeroScale: 600 posts
Posted: Tuesday, April 29, 2008 - 01:25 PM UTC
A question before I continue. On the picture of the real bird posted previously notice the light,Grey? panel. This does not equate to any known panel on the DIII, yet is present in at least 2 of the pics of this DIII. Is this some sort of repair?, Applique armor? Any thoughts welcome!
RAGIII
JackFlash
_VISITCOMMUNITY
Colorado, United States
Joined: January 25, 2004
KitMaker: 11,669 posts
AeroScale: 11,011 posts
Posted: Tuesday, April 29, 2008 - 07:23 PM UTC
Its a mechanics oil rag.

RAGIII
_VISITCOMMUNITY
North Carolina, United States
Joined: June 19, 2007
KitMaker: 604 posts
AeroScale: 600 posts
Posted: Wednesday, April 30, 2008 - 11:27 AM UTC
Stephen,
A mechanics rag was one of my original thoughts on this matter. The only reason I have put it up for discussion is that in the Ferko Richthofen book the picture seems to be much more clear and the "rag" doesn't seem to hang right. Also check out the famous photo of this aircraft taking off. You know the one with Luberts(SP) Blue and Yellow albie in the right hand of the picture. Is it my iagination or is there a lighter grey looking area in the same position on MvRs bird as in the group photo? All of that being said I could go with the rag theory. By the way the profile in Ferkos book shows this as a grey painted panel
RAGIII
JackFlash
_VISITCOMMUNITY
Colorado, United States
Joined: January 25, 2004
KitMaker: 11,669 posts
AeroScale: 11,011 posts
Posted: Wednesday, April 30, 2008 - 12:31 PM UTC
Here are the images Hugh is discussing.
thegirl
_VISITCOMMUNITY
Alberta, Canada
Joined: January 19, 2008
KitMaker: 6,743 posts
AeroScale: 6,151 posts
Posted: Wednesday, April 30, 2008 - 02:01 PM UTC
Well that does look like it might be a rag , but I would say it is a repair job painted grey . A rag doesn't hang that way naturally . At least that's how I see it . Model looks great so far can't wait to see when the rest of it is done .
RAGIII
_VISITCOMMUNITY
North Carolina, United States
Joined: June 19, 2007
KitMaker: 604 posts
AeroScale: 600 posts
Posted: Thursday, May 08, 2008 - 12:59 AM UTC
Here is my theory. There was damage to the aircraft in the area we are discussing. With the photo shoot scheduled they took the most expediant route and covered it up, perhaps with a rag. Later the damage was repaired and primed as seen in the second photo. The shape is close but not exact . Any thoughts?

RAGIII

PS. Thanks for the comments Terri!
 _GOTOTOP