

Oh wow i missed that too, i might decide to paint them.
sorry to hear about your spout of bad luck kirby, im sure you will have plenty of time to finish, but if you want some more time at the end it should be okay with me. i havent even started yet!!!!! i really need to get building tomorow!
Air Campaigns
Want to start or join a group build? This is where to start.
Want to start or join a group build? This is where to start.
Hosted by Frederick Boucher, Michael Satin
Official: Phabulous Phantom Thread
jam2727

Joined: June 28, 2007
KitMaker: 171 posts
AeroScale: 113 posts

Posted: Tuesday, July 01, 2008 - 01:04 AM UTC
SGTJKJ

#041

Joined: July 20, 2006
KitMaker: 10,069 posts
AeroScale: 3,788 posts

Posted: Wednesday, July 02, 2008 - 12:36 AM UTC
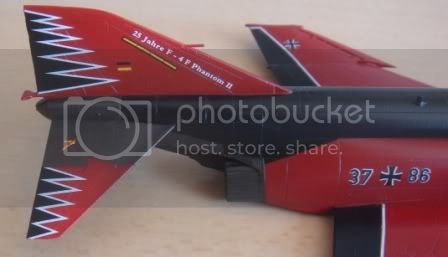
I have now finished applying all the decals to my JG 71 Phantom II. It went well although there are some issues to look out for.
James, one solution could be to paint the white lines on the wings, but I am pretty satisfied how mine turned out by using the decals.
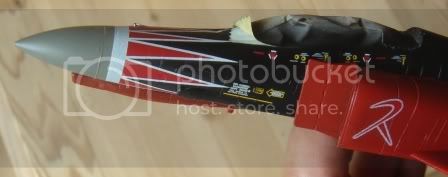
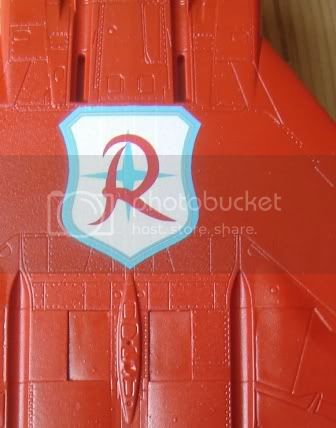
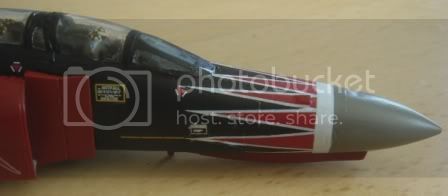
BEWARE - The "tulip" decal for the nose is very tricky. Not only because it is on the round pointed nose of the aircraft, but also because it covers several small antennas and air intakes. I think it would help if you cut all the excess clear decal film away before applying the decal. I had to do it when the decal was already on the aircraft and it got a little technical although it ended well.
 James, I noticed you have the "white wash" campaign banner. That campaign has ended. Maybe I could tempt you with a banner for the upcoming half track campaign?

http://i14.photobucket.com/albums/a347/ravenwing1/halftrackcampaignbanner3.jpg

http://i14.photobucket.com/albums/a347/ravenwing1/halftrackcampaignbanner2.jpg

James, one solution could be to paint the white lines on the wings, but I am pretty satisfied how mine turned out by using the decals.
BEWARE - The "tulip" decal for the nose is very tricky. Not only because it is on the round pointed nose of the aircraft, but also because it covers several small antennas and air intakes. I think it would help if you cut all the excess clear decal film away before applying the decal. I had to do it when the decal was already on the aircraft and it got a little technical although it ended well.
James, I noticed you have the "white wash" campaign banner. That campaign has ended. Maybe I could tempt you with a banner for the upcoming half track campaign? http://i14.photobucket.com/albums/a347/ravenwing1/halftrackcampaignbanner3.jpg
http://i14.photobucket.com/albums/a347/ravenwing1/halftrackcampaignbanner2.jpg


JollyRoger

Joined: December 22, 2004
KitMaker: 1,241 posts
AeroScale: 616 posts

Posted: Wednesday, July 02, 2008 - 02:26 AM UTC
WOOOOOOOOOOW!!!! That is one realy good looking Phantom (or we can say Vantom eheheheh) Jesper!!! Arii released a 1/144 version of the very same aircraft, I was thinking about geting one. Let's see what will I do with mine. I started to the cockpit but that is all for now. On the otherhand the Brits are going slowly but steady. Hmm now that I opened the subject, I found in a conversion table that Humbrol 164,165 and 166 are the RAF Phantom colors, does anybody have any idea about it? Are they correct? If so I will try to possess them.
jam2727
Joined: June 28, 2007
KitMaker: 171 posts
AeroScale: 113 posts
Posted: Wednesday, July 02, 2008 - 02:16 PM UTC
Wow Jesper that looks so good! do you have anymore pics of the nose? also with the white lines did you forget the front 2 white lines, or havent you done them yet?
I know about my banner, just havent done anything about it im busted now so is halftracks a particular campaign to you?
it would be cool if someone could make a phantom banner
once again jesper great looking phantom i cant wait to see the final result. i dont think i will be able to beat that effort 
I know about my banner, just havent done anything about it
im busted now so is halftracks a particular campaign to you? it would be cool if someone could make a phantom banner
once again jesper great looking phantom i cant wait to see the final result. i dont think i will be able to beat that effort
SGTJKJ
#041
Joined: July 20, 2006
KitMaker: 10,069 posts
AeroScale: 3,788 posts
Posted: Thursday, July 03, 2008 - 01:24 AM UTC
Thanks for the comments, Yalym and James. I appreciate it.
I have now added the cockpit. The fit is quite bad - especially since the rest of the lit fits like a glove. So if possible I would make the aircraft with open cockpit. Since I have made my Phantom II wheels up it would look strange with an open cockpit 
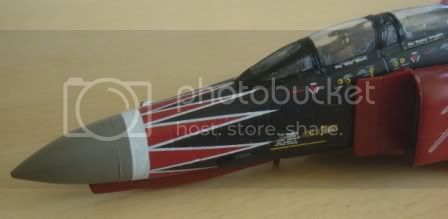
When I finish the aircraft I will make sure to add a picture of the nose.
James, I do not have any particular interest in the Half track campaign - other than participating. However, I made the banners for the campaign leader and thought they might fancy you. I will look into making a couple of Phantom Banners.
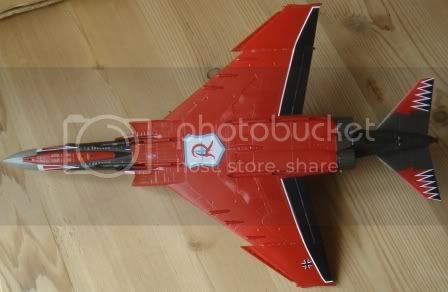
The two white lines on the front of the wing is because the leading edge wing flaps are deployed as I see it. It can be a little difficult to jugde, but if the wing flaps are not deployed (as in our kit) I think the front part of the wing will be overall red. Therefore I will not add those white lines.
I have now added the cockpit. The fit is quite bad - especially since the rest of the lit fits like a glove. So if possible I would make the aircraft with open cockpit. Since I have made my Phantom II wheels up it would look strange with an open cockpit
When I finish the aircraft I will make sure to add a picture of the nose.
James, I do not have any particular interest in the Half track campaign - other than participating.
However, I made the banners for the campaign leader and thought they might fancy you. I will look into making a couple of Phantom Banners.The two white lines on the front of the wing is because the leading edge wing flaps are deployed as I see it. It can be a little difficult to jugde, but if the wing flaps are not deployed (as in our kit) I think the front part of the wing will be overall red. Therefore I will not add those white lines.
Hoss

Joined: January 05, 2006
KitMaker: 96 posts
AeroScale: 61 posts
Posted: Thursday, July 03, 2008 - 01:58 AM UTC
I would tend to agree with your assessment, Jesper. The photo you found seems to back that up very well.
Nice looking model. I've got the very same kit in my stash and you've really got me fired up to build it. When you say the cockpit doesn't fit well...what exactly causing the problem? Is it kit parts or aftermarket? Once again, model looks outstanding...congrats.
Nice looking model. I've got the very same kit in my stash and you've really got me fired up to build it. When you say the cockpit doesn't fit well...what exactly causing the problem? Is it kit parts or aftermarket? Once again, model looks outstanding...congrats.
SGTJKJ
#041
Joined: July 20, 2006
KitMaker: 10,069 posts
AeroScale: 3,788 posts
Posted: Thursday, July 03, 2008 - 02:16 AM UTC
Quoted Text
When you say the cockpit doesn't fit well...what exactly causing the problem? Is it kit parts or aftermarket? Once again, model looks outstanding...congrats.
Thanks Kirby
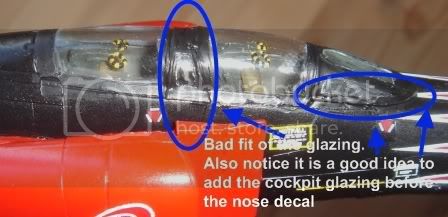
It is the kit cockpit glazing that is causing the problem. It is the kit supplied glazing as I am building this Phantom entirely OOB.Notice that the front cockpit glazing actually covers part of the nose "tulip". So add the nose decal AFTER the front glazing. Obviously I have make a mistake by doing it the other way around.
SGTJKJ
#041
Joined: July 20, 2006
KitMaker: 10,069 posts
AeroScale: 3,788 posts
Posted: Thursday, July 03, 2008 - 02:20 AM UTC
Quoted Text
it would be cool if someone could make a phantom banner
Your wish is my command


http://i14.photobucket.com/albums/a347/ravenwing1/phantombanner1.jpg

http://i14.photobucket.com/albums/a347/ravenwing1/phantombanner3.jpg

http://i14.photobucket.com/albums/a347/ravenwing1/phantombanner2.jpg

http://i14.photobucket.com/albums/a347/ravenwing1/phantombanner4.jpg
SGTJKJ
#041
Joined: July 20, 2006
KitMaker: 10,069 posts
AeroScale: 3,788 posts
Posted: Thursday, July 03, 2008 - 03:07 AM UTC
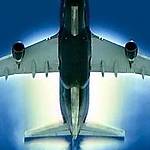
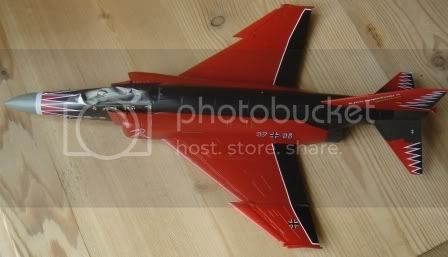
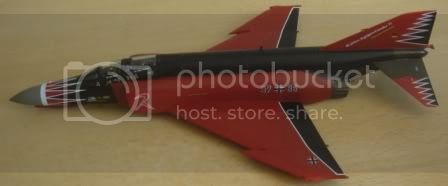
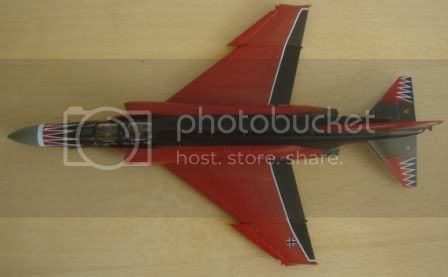
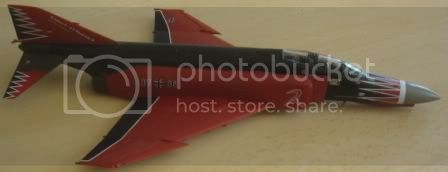
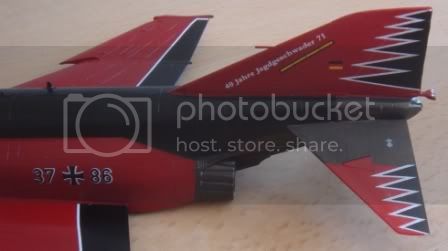
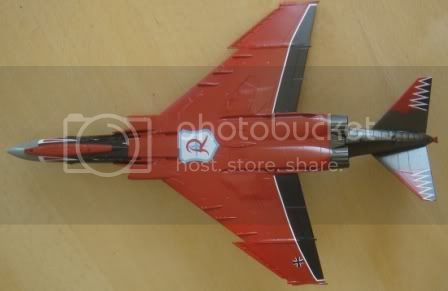
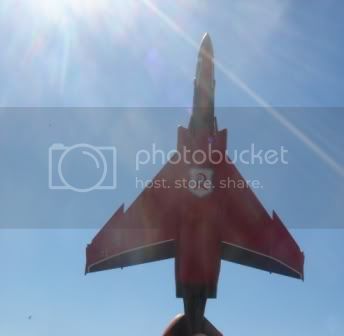
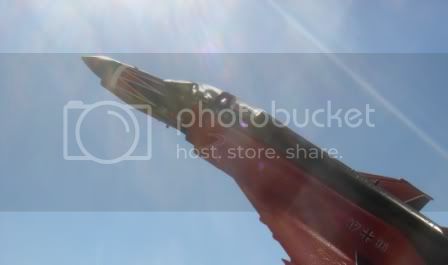
Here is my finished Revell 1/72 Phantom II in the special Richthofen celebration scheme. A really great kit although there are a few issues around the cockpit glazing and care needs to be take with the large decals - especially on the nose.
I used on weathering whatsoever, as I assume the celebratory aircraft was kept very clear with preussian efficiency.
Sorry for the many pictures, but as there are at least a couple of other modellers here building or planning to build this kit I have added more than usual.
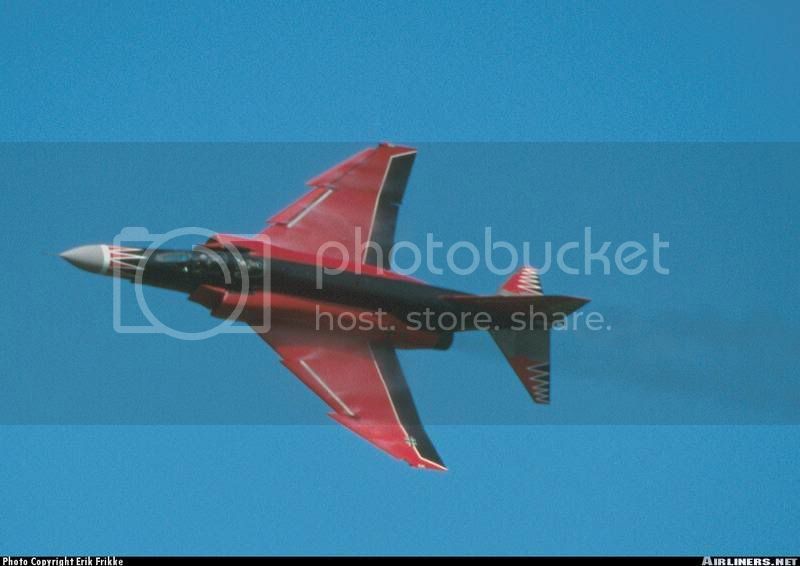
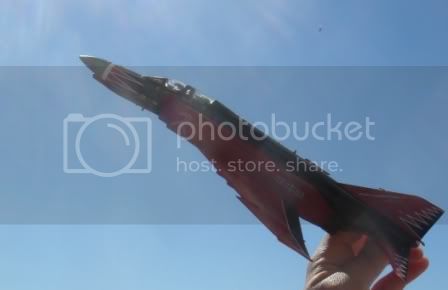
I also took a few extra pictures of my Phantom in flight. Notice that the Phantom uses the special huge fingers afterburner in one of the photos Now my neighbor know that men are never too old to play with aircraft.
I am looking forward to see more Phantoms in the sky soon.
I used on weathering whatsoever, as I assume the celebratory aircraft was kept very clear with preussian efficiency.
Sorry for the many pictures, but as there are at least a couple of other modellers here building or planning to build this kit I have added more than usual.
I also took a few extra pictures of my Phantom in flight. Notice that the Phantom uses the special huge fingers afterburner in one of the photos
Now my neighbor know that men are never too old to play with aircraft. I am looking forward to see more Phantoms in the sky soon.
Hoss
Joined: January 05, 2006
KitMaker: 96 posts
AeroScale: 61 posts
Posted: Thursday, July 03, 2008 - 10:49 AM UTC
Thanks for the advice on the canopy, windscreen, and the tulip decal...I will try to keep this in mind when I finally build the same kit. I just hope it comes out as sharp as yours. Man, that is one beautiful model. I think everyone can agree that you did the bird proud!!
I have a kit from Hasegawa in 1/72 of Luftwaffe F-4F in the "JG -72 Westfalen Special 2001" scheme that I am thinking of building but I just don't think my skills are where I would like them to be and do the model justice....I must say that you are certainly trying to inspire me to go for it. Anyway, first I will build what I started - an F-4S from USN service. Hopefully I will upload some photos before long.
Cheers.
jam2727
Joined: June 28, 2007
KitMaker: 171 posts
AeroScale: 113 posts
Posted: Thursday, July 03, 2008 - 05:52 PM UTC
Wow well done Jesper very well done again. Thank you so much for the banners.
Hoss go for JG + 72 that is one of the most beutifull phantoms ever, and i have heard rumours that they have actually scrapped it!!!!!! i have never seen a model of JG + 72 so that would be great. i have a few photos of that one too if you want some pics.
Hoss go for JG + 72 that is one of the most beutifull phantoms ever, and i have heard rumours that they have actually scrapped it!!!!!! i have never seen a model of JG + 72 so that would be great. i have a few photos of that one too if you want some pics.
SGTJKJ
#041
Joined: July 20, 2006
KitMaker: 10,069 posts
AeroScale: 3,788 posts
Posted: Thursday, July 03, 2008 - 09:26 PM UTC
Thanks for the feed back, James and Kirby. I really appreciate it. I am also quite satisfied with this build, although I might go ahead and do some light weathering anyway.
Too bad if they scrapped the real bird. It would be a beauty at any aircraft/military museum.
Kirby, I w=know what you mean about the Hasegawa model. I have it the same way some times for Dragons Premium armour kits. I always tell my self that there are many more excellent kits out there, so one might as well go for it. Short version: I would go for it.

wrenchy

Joined: April 23, 2006
KitMaker: 140 posts
AeroScale: 89 posts
Posted: Saturday, July 05, 2008 - 05:14 PM UTC
I'll be doing up Monograms F-4C in Vietnam markings for this campaign. Hopefully I can get it done, I've buried myself in a few different group builds this year.

Hoss
Joined: January 05, 2006
KitMaker: 96 posts
AeroScale: 61 posts
Posted: Saturday, July 05, 2008 - 10:48 PM UTC
Hey guys. You all are trying real hard to push me over the edge toward that JG 72 Phantom build...I agree that it represents a very beautiful F-4F. Oh so close to going for it....
Anyways, here - hopefully I can upload the pics - are some shots of what I've gotten done so far with my original build. The USN F-4S. I finished the cockpit and just had to do me some dry fitting.
I am looking ahead and really dred the windscreen - canopy masking. For somereason when I was a teen doing this it wasn't such a big deal...I guess I'm a little more meticulous now that I'm officially an old fart! Any advice? I've got some bare metal foil and heard that works pretty good. Then I read were parafilm is the way to go...unfortunately,that I don't have.
Wow, way late so I'll catch y'all next time. [ img]
img]
http://put.url.here/image.file[/img]
Anyways, here - hopefully I can upload the pics - are some shots of what I've gotten done so far with my original build. The USN F-4S. I finished the cockpit and just had to do me some dry fitting.
I am looking ahead and really dred the windscreen - canopy masking. For somereason when I was a teen doing this it wasn't such a big deal...I guess I'm a little more meticulous now that I'm officially an old fart! Any advice? I've got some bare metal foil and heard that works pretty good. Then I read were parafilm is the way to go...unfortunately,that I don't have.
Wow, way late so I'll catch y'all next time. [
img]http://put.url.here/image.file[/img]
Hoss
Joined: January 05, 2006
KitMaker: 96 posts
AeroScale: 61 posts
Posted: Saturday, July 05, 2008 - 10:53 PM UTC
Well that didn't go as planned. I am very tired and will try to fgure out how to get the pics up later. I have them in my gallery on kitmaker so just need to figure out how to get them into message...D'uh. Night gents....or should I say morning! 

atoplu
Joined: August 17, 2003
KitMaker: 753 posts
AeroScale: 174 posts
Posted: Sunday, July 06, 2008 - 04:51 AM UTC
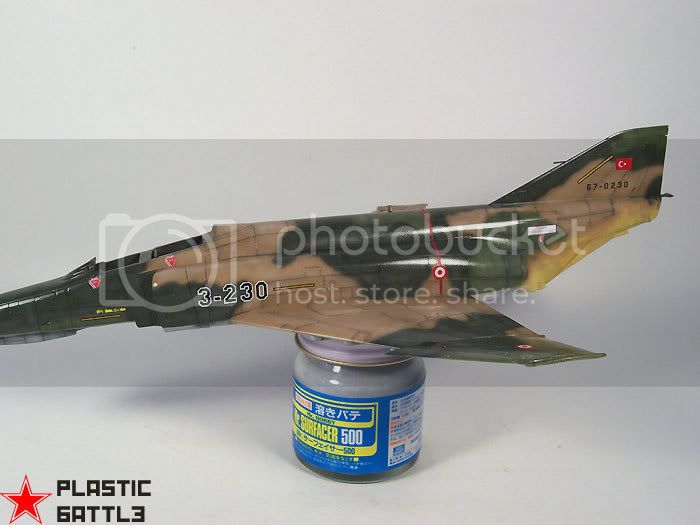
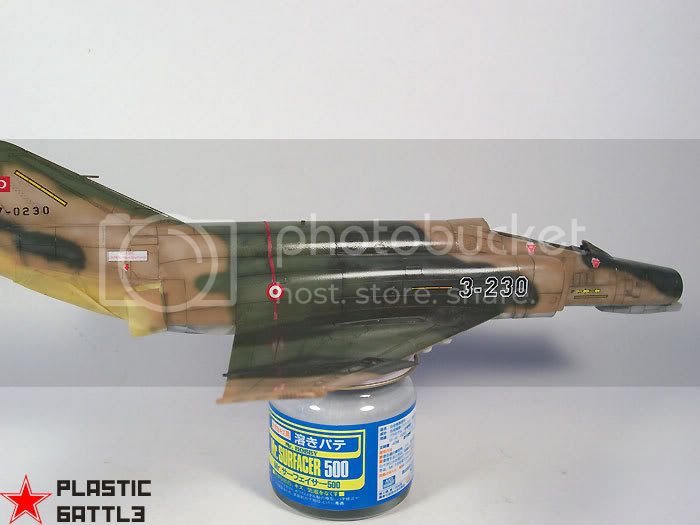
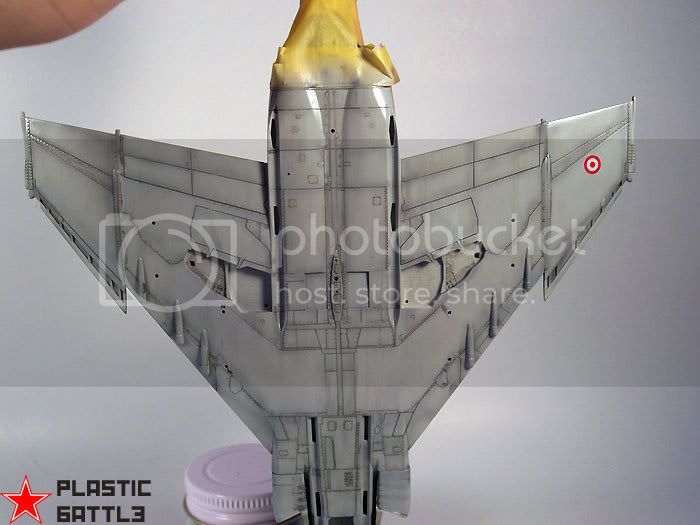
Decal phase is done.

Hoss
Joined: January 05, 2006
KitMaker: 96 posts
AeroScale: 61 posts
Posted: Sunday, July 06, 2008 - 10:56 AM UTC
Another nice looking jet! Good job, atoplu. I especially like the underside with the wash and all the panel lines really popping! Look forward to seeing your model completed.
Hoss
Joined: January 05, 2006
KitMaker: 96 posts
AeroScale: 61 posts
Posted: Sunday, July 06, 2008 - 11:10 AM UTC
Hoss
Joined: January 05, 2006
KitMaker: 96 posts
AeroScale: 61 posts
Posted: Sunday, July 06, 2008 - 11:13 AM UTC
D'uh...I am not a failure, I am not a failure, I am not a failure....
Here goes again...
http://gallery.kitmaker.net/showphoto.php/photo/266995][img]
Here goes again...
http://gallery.kitmaker.net/showphoto.php/photo/266995][img]
jam2727
Joined: June 28, 2007
KitMaker: 171 posts
AeroScale: 113 posts
Posted: Sunday, July 06, 2008 - 01:54 PM UTC
Kirby you finally got it. that will be a pretty nice aircraft to build. Do you plane to make it look that dirty?And to you Ayhan you are an absolute modelling freak!
i dont belive how realistic that looks. please please tell me how you did the underside of the plane, wait tell me how you did the whole plane i want to know how to make them look that good because that is stunning mate!SGTJKJ
#041
Joined: July 20, 2006
KitMaker: 10,069 posts
AeroScale: 3,788 posts
Posted: Sunday, July 06, 2008 - 10:11 PM UTC
Great looking Phantom, Ayhan. Really nice subtle weathering that brings out all the details.
Kirby, your Phantom is coming along nicely. Looking forward to see more.
Kirby, your Phantom is coming along nicely. Looking forward to see more.
atoplu
Joined: August 17, 2003
KitMaker: 753 posts
AeroScale: 174 posts
Posted: Wednesday, July 09, 2008 - 07:04 AM UTC
Quoted Text
And to you Ayhan you are an absolute modelling freak!
Thank u dude..well,first of all,I pre-shaded the panel lines.Than painted the whole plane than lightened the colors that I used and sprayed into panels..I tried not to spray to panels lines which are already a bir darker dur to pre,shading.
After glossy coating,I washed the plane with artist oil..
Cheers + Regards..
jam2727
Joined: June 28, 2007
KitMaker: 171 posts
AeroScale: 113 posts
Posted: Wednesday, July 09, 2008 - 12:49 PM UTC
Hey all
Thanks for the tips Ayhan
jesper here is one for you, i have come to my first problem thanks to the half decent instructions. i am going to have my aircraft as if it is on the ground so this is confusing and even though you have your landing gear closed up you might be able to help.

if that image works you should probably be able to spot whats wrong. dose it need to be pushed a little further in? if anyone could help with this too that would be great
Thanks for the tips Ayhan
jesper here is one for you, i have come to my first problem thanks to the half decent instructions. i am going to have my aircraft as if it is on the ground so this is confusing and even though you have your landing gear closed up you might be able to help.
if that image works you should probably be able to spot whats wrong. dose it need to be pushed a little further in? if anyone could help with this too that would be great
Hoss
Joined: January 05, 2006
KitMaker: 96 posts
AeroScale: 61 posts
Posted: Wednesday, July 09, 2008 - 02:44 PM UTC
Hey guys.
Jam2727, reference the dirty phantom...dude I'm going to be real proud if I can just finish my bird with a half way decent paint job. I am getting used to my Aztec airbrush and have my fingers crossed. I am going to skip the weathering for now unless I start feeling a little cocky. I know, life is short and I need to live a little, right?
I think what you are trying to show in the pic was the misalignment at the front of the wheel well...is that correct? Not sure how you would go about fixing that since I assume you've already done some welding the parts together?
Atoplu, thanks for the secret to your success. Man I love how that worked out for you. Once again thanks for sharing. That's what makes this site so terrific.
I am looking forward to getting some things moving on my jet this Friday and Saturday - my days off.
Cheers.
Hoss
Joined: January 05, 2006
KitMaker: 96 posts
AeroScale: 61 posts
Posted: Wednesday, July 09, 2008 - 02:51 PM UTC
I wonder if some phantom expert out there can help...
Am building the F-4S and the front gear door has three small lights? to the left side of the landing light. What are the colors from top to bottom. Haven't found the answer on my own yet although I am still looking. Thanks in advance for the help.
Oh yeah, way off subject but while working the local control (tower) position at the Savannah Airport had a flight of two and then followed smartly by a single ship of F-18 Hornets come in and do a carrier break right over the control tower. Man was it cool!!! 300 kts at 500 feet! Guess what my next build will be?!
 |

WEB HOSTING BY


Copyright ©2021 AeroScale and Kitmaker Network, a subsidiary of Silver Star Enterprises
All Rights Reserved. Please read our Conditions of Use and Privacy Policy.
All Rights Reserved. Please read our Conditions of Use and Privacy Policy.