_GOTOBOTTOM
Early Aviation
Discuss World War I and the early years of aviation thru 1934.
1:32 Roden GB 2008 Albatros D.I
Repainted
_VISITCOMMUNITY
Östergötland, Sweden
Joined: April 04, 2006
KitMaker: 1,058 posts
AeroScale: 1,004 posts
Posted: Wednesday, June 04, 2008 - 08:09 AM UTC
Hi
I have opened the box on Rodens new 1/32 and taken some pics of the sprues. At first I got some real taste of the first DIII kit. Very much is just the same, only relaying to my memory so I can have some flaws on this. The big changes are the radiators and the main wings. I haven’t checked the details against any planes yet but I look good in my eyes. There’s very little flash to deal with and the same ejection marks on the inside of the fuselage is there.

So when the Nieuport is finished, I will dig deep in this box, this one will also be an fairly OOB build. So if Stephen extends the GB I can give you this build to.
Please feel free to comment.


Larsa
Repainted
_VISITCOMMUNITY
Östergötland, Sweden
Joined: April 04, 2006
KitMaker: 1,058 posts
AeroScale: 1,004 posts
Posted: Friday, June 06, 2008 - 11:52 PM UTC
Hi
I just started up this build yesterday by fixing some woodgrain on all bit for the interior. This was a fun way to start the build, Just airbrushing some Humbrols basecolour and when the Humbrol was dry I did the grains in oilcolours. So now this have to dry out completely before starting the build.


Larsa Q
MerlinV
_VISITCOMMUNITY
Victoria, Australia
Joined: November 26, 2006
KitMaker: 608 posts
AeroScale: 602 posts
Posted: Saturday, June 07, 2008 - 01:12 PM UTC
Hi Larsa,

The fuselage looks to be pleaseantly free of sink marks and ejector pin marks in this case.
your wood grain looks good from this distance.

Cheers,

Hugh
Repainted
_VISITCOMMUNITY
Östergötland, Sweden
Joined: April 04, 2006
KitMaker: 1,058 posts
AeroScale: 1,004 posts
Posted: Saturday, June 07, 2008 - 11:55 PM UTC

Quoted Text

Hi Larsa,

The fuselage looks to be pleaseantly free of sink marks and ejector pin marks in this case.
your wood grain looks good from this distance.

Cheers,

Hugh


Hi Hugh
There was two sinkmarks in the middle off the inside off the fuselage, I´ll sanded them and filled them with Mr surfacer, some nailpolish remover to clean it up and that was a fix. the sinkmarks you can see in the front is an "no see"
The woodgrains on the inside have the correct distance . When it´s complete dry I will give it a coat of semigloss varnish mixed with tiny black/brown colour.


Larsa Q
RAGIII
_VISITCOMMUNITY
North Carolina, United States
Joined: June 19, 2007
KitMaker: 604 posts
AeroScale: 600 posts
Posted: Sunday, June 08, 2008 - 02:41 AM UTC
Looks great so far. I like the wood grain. Are you doing anything differently on the fuselage construction as compared o your DIII build?
RAGIII
Repainted
_VISITCOMMUNITY
Östergötland, Sweden
Joined: April 04, 2006
KitMaker: 1,058 posts
AeroScale: 1,004 posts
Posted: Sunday, June 08, 2008 - 03:18 AM UTC
Oh You remebered that one, Thank´s
I don´t going in for no Brad C build on the D.I, have not decided how much to do on it, but a new seat will allways look nice in the office . I have too make all things by myself do Parts not yet have any etch for this one. But I´ll keep mailing them
If you having any good ideas, let me know

Larsa Q
thegirl
_VISITCOMMUNITY
Alberta, Canada
Joined: January 19, 2008
KitMaker: 6,743 posts
AeroScale: 6,151 posts
Posted: Sunday, June 08, 2008 - 03:41 AM UTC
Couldn't you use the PE sets that are out there for the D.III ? The details seem to be the same in the cockpit between these aircraft ? I'm only asking because I have the Gavia kit of the D.I and Many of the eduards D.III Which the Gavia kit is the Eduard kit of the D.II . At the time I didn't know this . Until I got home and opened the box ! could have just pick up another D.II and scatch my own struts for the difference .
Repainted
_VISITCOMMUNITY
Östergötland, Sweden
Joined: April 04, 2006
KitMaker: 1,058 posts
AeroScale: 1,004 posts
Posted: Sunday, June 08, 2008 - 04:37 AM UTC
Hi Terri
Tempting but that´s not the rule Stephen have set up.

B. Kit must be built with Roden kit parts.
1. Aftermarket parts can be used if they are specifically designed for the Roden kit you are building.

But that´s okey, doe often photo etch will give you problems,


Larsa
Repainted
_VISITCOMMUNITY
Östergötland, Sweden
Joined: April 04, 2006
KitMaker: 1,058 posts
AeroScale: 1,004 posts
Posted: Friday, June 27, 2008 - 04:51 AM UTC
Hi Folks
Here´s where you will find me now. Just give me a week or two allong with my family and I´ll start sending up pics again.


Larsa Q
RAGIII
_VISITCOMMUNITY
North Carolina, United States
Joined: June 19, 2007
KitMaker: 604 posts
AeroScale: 600 posts
Posted: Saturday, July 05, 2008 - 05:37 AM UTC
Lars, just curious. In looking at the data file, and then again at the kit ,it seems one MUST build this one with the hood closed up or do major modification to the center pylon struts. Am I correct?
RAGIII
Repainted
_VISITCOMMUNITY
Östergötland, Sweden
Joined: April 04, 2006
KitMaker: 1,058 posts
AeroScale: 1,004 posts
Posted: Saturday, July 05, 2008 - 05:50 AM UTC

Quoted Text

Lars, just curious. In looking at the data file, and then again at the kit ,it seems one MUST build this one with the hood closed up or do major modification to the center pylon struts. Am I correct?
RAGIII


Curiosity killed the cat

Hi RAGIII
I think about how I am going to build this one. It would be fun, an Albie with open hood to show off that Mercedes engine. But to open this up it will take some work and I don´t have the time for that on this project either, so this D.I will have the lid on

Having some bad weather now I jumpstarted the engine build ( yes I still have vacation but its a rainy day here) pics coming this way any day


Larsa Q
Repainted
_VISITCOMMUNITY
Östergötland, Sweden
Joined: April 04, 2006
KitMaker: 1,058 posts
AeroScale: 1,004 posts
Posted: Sunday, July 27, 2008 - 04:18 AM UTC
Hi
I just started up this build so for a starter the engine is glued together and some detailing is fixed. I used copperwire and plasticard for the job. yep, there is two engines. I for the this D1 build and the other one´s for Rodens Pfalz DIII. It´s a little bit boring with these engines now, so I´ll figured that was a good idea to fix the Pfalz engine in the same time.The insulation on the manifold on the right engine is made from fine surgicaltape cut in thin strips and superglued in place.

Engine to the right is for the Pfalz kit and the left is for the Albatros.

I fixed new covers on the wings off thin plasticard.


The controls of the little panel on top off the picture will have some new ones made from plasticard and wires next time you see it.
What´s next job then. I dont like the seat in this kit. I guess it´s all me, so next job will be a new seat from plasticard and and milliput made in the same way I did for the Albatros DIII. So next time you will have some text about how that goes


Larsa Q
CaptainA
_VISITCOMMUNITY
Indiana, United States
Joined: May 14, 2007
KitMaker: 3,117 posts
AeroScale: 2,270 posts
Posted: Sunday, July 27, 2008 - 10:22 AM UTC
Good to see some progress. Engins look pretty good.
Repainted
_VISITCOMMUNITY
Östergötland, Sweden
Joined: April 04, 2006
KitMaker: 1,058 posts
AeroScale: 1,004 posts
Posted: Monday, July 28, 2008 - 05:54 AM UTC
Thanks Carl
Don´t rush me

Larsa Q
CaptainA
_VISITCOMMUNITY
Indiana, United States
Joined: May 14, 2007
KitMaker: 3,117 posts
AeroScale: 2,270 posts
Posted: Monday, July 28, 2008 - 10:36 AM UTC
Rush has beenout of my vocabulary for the last 6 years. Strangely coincides with my retirement.
thegirl
_VISITCOMMUNITY
Alberta, Canada
Joined: January 19, 2008
KitMaker: 6,743 posts
AeroScale: 6,151 posts
Posted: Monday, July 28, 2008 - 11:31 AM UTC
Love the taping Lars , That really makes the engine stand out .
Repainted
_VISITCOMMUNITY
Östergötland, Sweden
Joined: April 04, 2006
KitMaker: 1,058 posts
AeroScale: 1,004 posts
Posted: Tuesday, August 12, 2008 - 09:35 PM UTC
Hi folks
Back from a three week period off bad headache. Can’t focus on the small stuff, but now I'm on the sunny side again. The engine for the Albatros is painted, planning to take some pics tonight for you
The work stalled just when I was in for a new seat for the interior, so this what’s comes next.

A lot off caching up now boys and girls

Larsa Q
JackFlash
_VISITCOMMUNITY
Colorado, United States
Joined: January 25, 2004
KitMaker: 11,669 posts
AeroScale: 11,011 posts
Posted: Tuesday, August 12, 2008 - 09:51 PM UTC
Glad to have you back again Larsa. You were missed.
Repainted
_VISITCOMMUNITY
Östergötland, Sweden
Joined: April 04, 2006
KitMaker: 1,058 posts
AeroScale: 1,004 posts
Posted: Tuesday, August 12, 2008 - 10:19 PM UTC
Thanks Jack.
" I tryed to burn candles everday to get some contact with the still living family, just to found out there was no medium running in this family "

Larsa
Repainted
_VISITCOMMUNITY
Östergötland, Sweden
Joined: April 04, 2006
KitMaker: 1,058 posts
AeroScale: 1,004 posts
Posted: Monday, August 18, 2008 - 09:35 PM UTC
Hi
Sorry for the lazyness from me. Here´s the update.
Starting with the engines, the paints on and it´s ready for getting married with the enginemount.

The second engine is for a slow build Pfalz kit, so don´t get the idea of an twinengined Albie.


I started with the controlpanel for the interior.The cast controls was cutted away and tiny 2mm disc was punched out. I will use thin copperwire for handles. The two plastic pieces in the pics is the parts for a new seat that I promised.I used a wide tape to get the shape form the kit seat, the tape was sticked to a thin plasticard and after some cutting and sandin the bits was glued together.


Next step for the seat is to use some Milliput to get the padding.

Chhers
Larsa Q
Hatter50
_VISITCOMMUNITY
North Carolina, United States
Joined: June 17, 2006
KitMaker: 478 posts
AeroScale: 391 posts
Posted: Tuesday, August 19, 2008 - 08:35 AM UTC
Larsa,

Got to tell you that I LOVE the engines..........been watch'n 'em closely.

Regards
Steve
thegirl
_VISITCOMMUNITY
Alberta, Canada
Joined: January 19, 2008
KitMaker: 6,743 posts
AeroScale: 6,151 posts
Posted: Wednesday, August 20, 2008 - 02:34 AM UTC
Excellent work done the engines Lars , looking forward on seeing the rest of this build !
Repainted
_VISITCOMMUNITY
Östergötland, Sweden
Joined: April 04, 2006
KitMaker: 1,058 posts
AeroScale: 1,004 posts
Posted: Wednesday, August 20, 2008 - 05:45 AM UTC
Hi Thanks
There´s standard for these engines,. This detailing everyone makes,still the OOB engine is really fine.


Larsa Q
JackFlash
_VISITCOMMUNITY
Colorado, United States
Joined: January 25, 2004
KitMaker: 11,669 posts
AeroScale: 11,011 posts
Posted: Wednesday, August 20, 2008 - 06:20 AM UTC
Excellent Larsa! Consistant workmanship. Also I agree Roden does give us some highly detailed pieces right from the box.
Repainted
_VISITCOMMUNITY
Östergötland, Sweden
Joined: April 04, 2006
KitMaker: 1,058 posts
AeroScale: 1,004 posts
Posted: Thursday, September 04, 2008 - 02:30 AM UTC
Hi
I’m sorry to let you guys wait on this but time flies as they say. Here’s the new seat. Using Milliput (MP) for the soft leatherpaddings is a straight affair like this.
I Mixed equal amount filler and harder. To keep the MP to not stick to your fingers use Talkumpowder/Babypowder when mixing, the stickiness goes away at once.


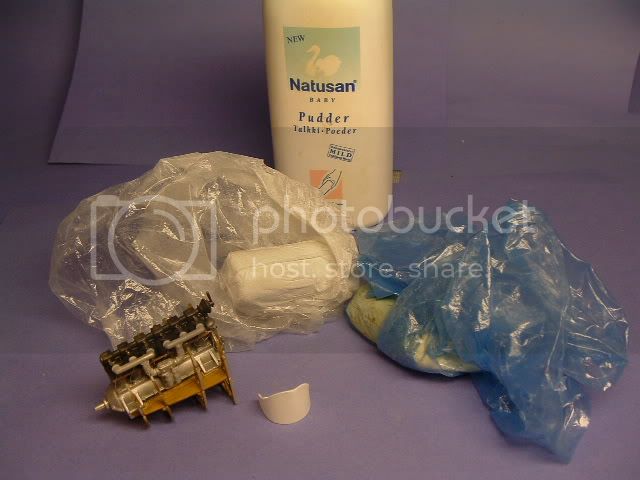
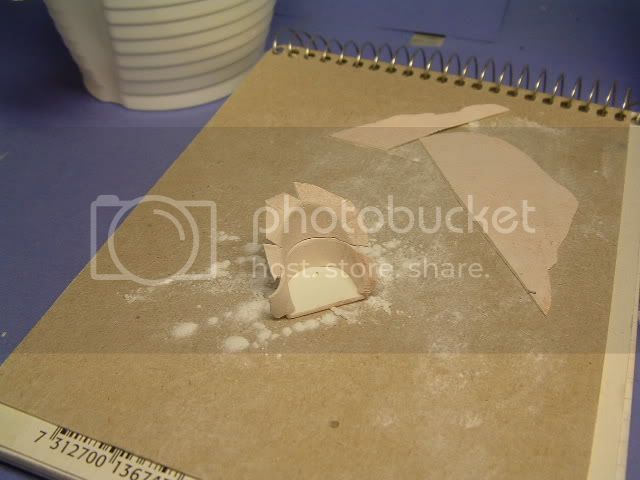
I also mixed in some sanded down dry pastel crayons just to make it easier for the camera and my eyes to see what I'm dealing with. When mixed the pee off Milliput is rolled out on a cardboard using some more talcum to prevent it from stick to the cardboard.


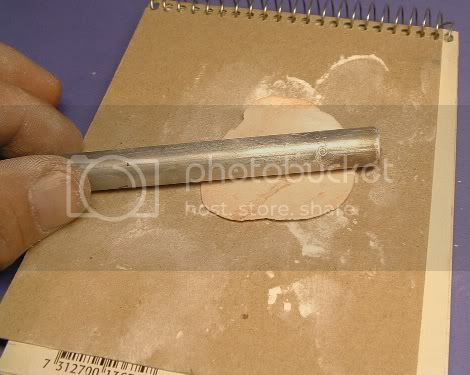
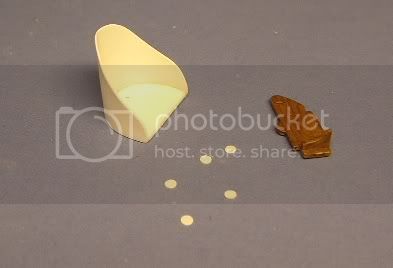
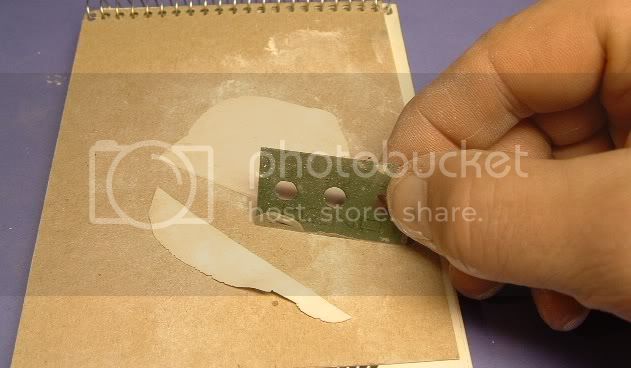
When the thickness off the MP was in my liking ( around 1mm) I used an razorblade to cut it up into useful bits.


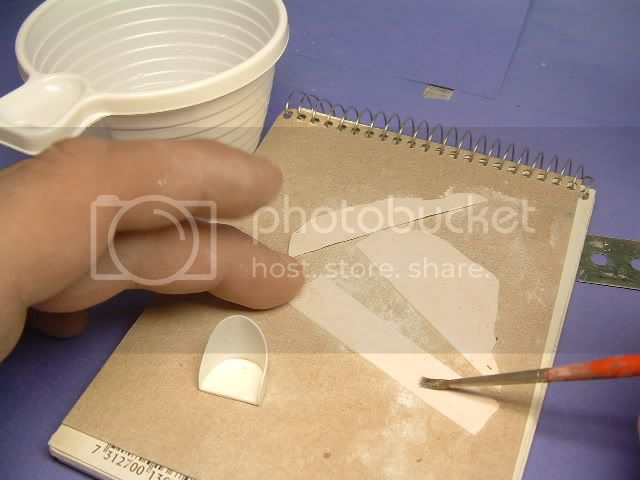
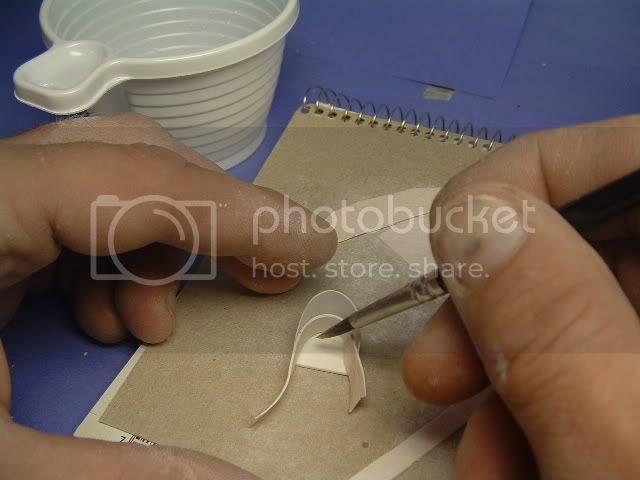
Now I wanted the stickiness to come back so I gentle brushed some water on one side, this wet side acct as the gluingside against the plastic seat. Access Milliput is cut away and the with a dry brush the MP is folded over the edge off the seat.


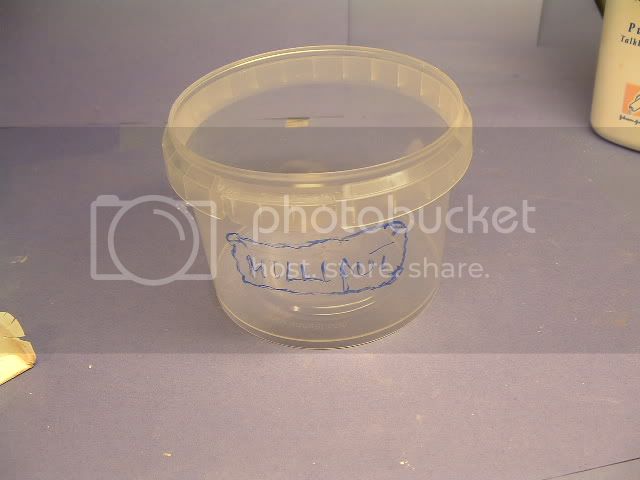
There´s always some leftovers when dealing with MP. Just kneed it back to a pee and put in a jar. This jar will be put into the freezer in the kitchen labelled Milliput, so nobody else will take it for something else. Next time you will need some MP, you just take one off this leftover MP, s and kneed them warm and soft and you can use them again.


The seat will be set to dry under the worklamp for an hour or two, then the last access will be sanded off and prep for paints.


I don´t know if you guys using Milliput or not but this “how too” is a free one sodas and popcorn is extra

Larsa
 _GOTOTOP