

morgen morgen as the "Fischköppe" say
You are totally right Steffen I am very blessed. Just a little indulgence with styrene and solvents is needed from time to time.
Hope things work out for yourself soon. All the best.
Looking forward to seeing the results with this corsair.
Cold War (1950-1974)
Discuss the aircraft modeling subjects during the Cold War period.
Discuss the aircraft modeling subjects during the Cold War period.
Hosted by Tim Hatton
Chance-Vought F4U-5N Corsair Hasegawa 1/48

jaypee

Joined: February 07, 2008
KitMaker: 1,699 posts
AeroScale: 1,384 posts

Posted: Friday, August 07, 2009 - 10:01 PM UTC


TedMamere

Joined: May 15, 2005
KitMaker: 5,653 posts
AeroScale: 4,347 posts

Posted: Friday, August 07, 2009 - 11:34 PM UTC
Hi Steffen,
I prefer tomorrow...
Jean-Luc
Quoted Text
maybe tomorrow .. maybe in 5 years .. who knows.
I prefer tomorrow...
Jean-Luc


alpha_tango

Joined: September 07, 2005
KitMaker: 5,609 posts
AeroScale: 5,231 posts
Posted: Saturday, August 08, 2009 - 12:57 AM UTC
Hi Jean-Luc
There are many very small markings and I think it will take a bit longer as i have to make some breaks to let the stencils dry befor I attach the next batch .. it is hot and humid so concentration is also a bit challenged .. I would say maybe Tuesday as I want to add some weathering.
cheers
Steffen
P.S: @J-P ... being a Fischkopp myself (well almost, my brother is living in Husum now and I come from the North of Germany too) I like to correct you: it is "Moin, Moin" for the talkative people and just "Moin" for guys like me


ShawnM

Joined: November 24, 2008
KitMaker: 564 posts
AeroScale: 510 posts

Posted: Saturday, August 08, 2009 - 02:52 AM UTC
looking good!

Narn08

Joined: April 13, 2007
KitMaker: 44 posts
AeroScale: 30 posts
Posted: Saturday, August 08, 2009 - 05:39 AM UTC
nice build, looks good

thegirl

Joined: January 19, 2008
KitMaker: 6,743 posts
AeroScale: 6,151 posts
Posted: Saturday, August 08, 2009 - 06:03 AM UTC
I've been following your build Steffen and what can say ..............looks awesome . The colour does seem to be off but that could be me do to not having enough of morning coffee !!!
You kind of have inspired me to pull out the Tamiya F4u-1a in the stash and build it .
looking forwrad to the final pic's !
You kind of have inspired me to pull out the Tamiya F4u-1a in the stash and build it .
looking forwrad to the final pic's !
alpha_tango
Joined: September 07, 2005
KitMaker: 5,609 posts
AeroScale: 5,231 posts
Posted: Saturday, August 08, 2009 - 06:31 AM UTC
Thanks guys and of course Terri too 
Terri could you explain in what the colour looks wrong? .. it is no own mix but a bought colour and Jens Popp is pretty known for taking colours very seriously!( I am trying to avoid the a-word here) ... Also I visited Marc last week and he has an own mix for his Navy bird (a Hellcat) which looks very, very close (if not the same colour) to what I used .. so I am curious what might be wrong? .. though I can't change anything now the decals are on.
all the best
Steffen
ShawnM
Joined: November 24, 2008
KitMaker: 564 posts
AeroScale: 510 posts
Posted: Saturday, August 08, 2009 - 09:55 AM UTC
the color may look off due to the light refraction off of the blue background, same reason the white markings look blue
alpha_tango
Joined: September 07, 2005
KitMaker: 5,609 posts
AeroScale: 5,231 posts
Posted: Saturday, August 08, 2009 - 10:02 AM UTC
Quoted Text
the color may look off due to the light refraction off of the blue background, same reason the white markings look blue
No... The "white" markings are lt. blue!
you can see the BuNo. which is white and the bomb drop markings are also white.So again .. in which aspect the colour is wrong?
all the best
Steffen
alpha_tango
Joined: September 07, 2005
KitMaker: 5,609 posts
AeroScale: 5,231 posts
Posted: Sunday, August 09, 2009 - 03:25 AM UTC
Hi all
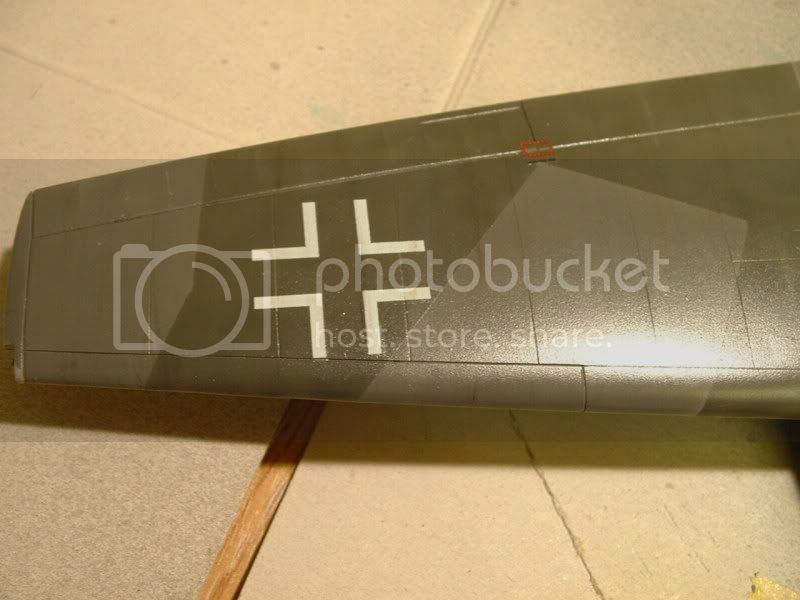
today I want to post another photo even though there is not much to see .. though I have a ton of small stencils added. I also painted the radome and the prop hub in a self mixed light blue to match the decals. When everything is dry I will add another coat of future this evening and depending on how it turns out I will start weathering tomorrow .. washing mapping and all the stuff you like ...
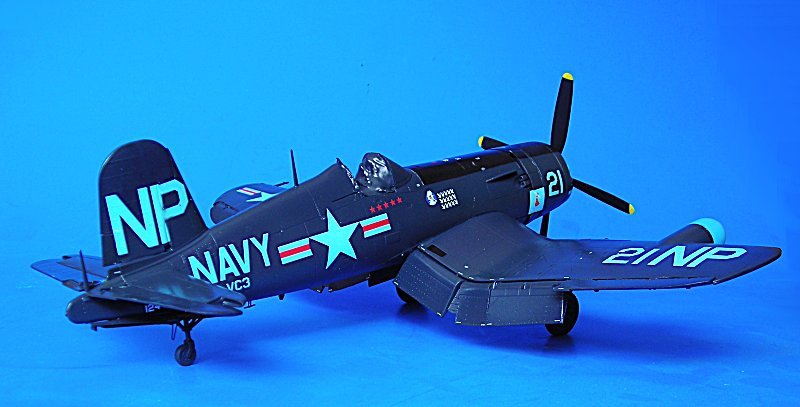
BTW I found a horrible mistake .. almost a fatal flaw. I sealed all the decals with brush painted future. Sadly the board number "21" on the rhs got loose and dried at a slight angle .. not much but very visible. Unfortunately there is nothing I can do as I only have one set of decals .. so it is like it is..
all the best
Steffen
today I want to post another photo even though there is not much to see .. though I have a ton of small stencils added. I also painted the radome and the prop hub in a self mixed light blue to match the decals. When everything is dry I will add another coat of future this evening and depending on how it turns out I will start weathering tomorrow .. washing mapping and all the stuff you like ...
BTW I found a horrible mistake .. almost a fatal flaw. I sealed all the decals with brush painted future. Sadly the board number "21" on the rhs got loose and dried at a slight angle .. not much but very visible. Unfortunately there is nothing I can do as I only have one set of decals .. so it is like it is..
all the best
Steffen
thegirl
Joined: January 19, 2008
KitMaker: 6,743 posts
AeroScale: 6,151 posts
Posted: Sunday, August 09, 2009 - 05:04 AM UTC
No Steffen you didn't do anything wrong at all with the colour . Like I said more then likely it's me and it was me ( had power save on the desk top screen which changes every thing like colours and hues ...................)
Didn't mean to set off any bells of inaccuracies you did a fine job on the build and look forward to the rest of the finished model !
Didn't mean to set off any bells of inaccuracies you did a fine job on the build and look forward to the rest of the finished model !
alpha_tango
Joined: September 07, 2005
KitMaker: 5,609 posts
AeroScale: 5,231 posts
Posted: Sunday, August 09, 2009 - 08:25 PM UTC
good morning
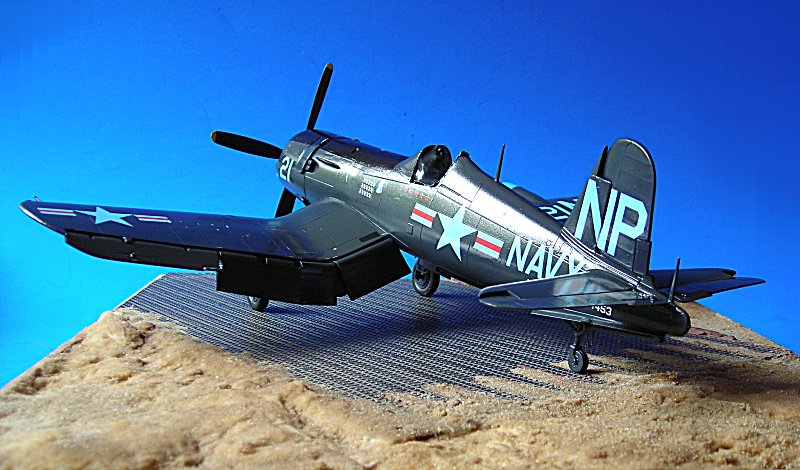
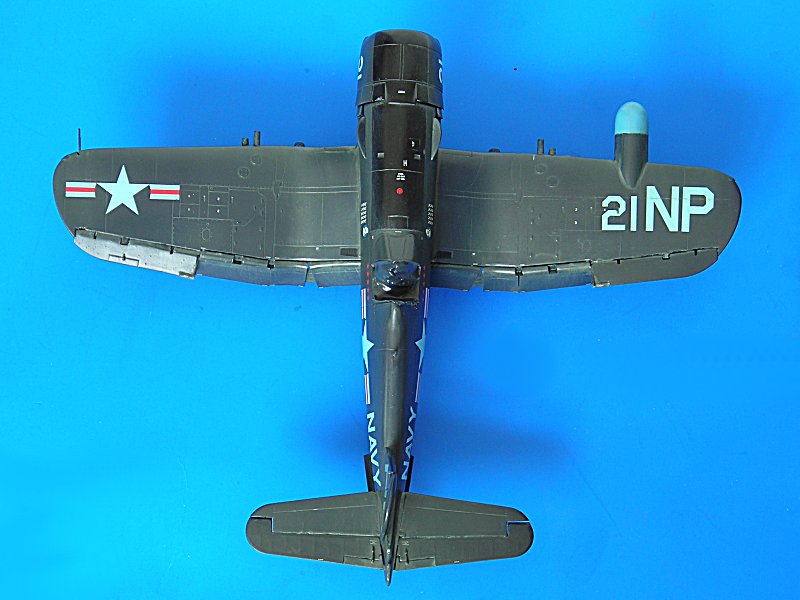
yesterday the model got a good layer of klear and now it is nice and shiny. i took two further pix before I start ruining it . The base is an old project for another unfinished model (F-84) and as I was at building bases I decided to proceed a bit with this one too. PSP is from eduard and the environment is just sprinkled on .. there's no colour on yet.

Thanks Terri! I try my best, but I am also quite often wrong so if anyone thinks he has better or more information than me than I am interested to hear it .. sometimes I can change it and sometime I will just live with my mistake....
all the best
Steffen
yesterday the model got a good layer of klear and now it is nice and shiny. i took two further pix before I start ruining it . The base is an old project for another unfinished model (F-84) and as I was at building bases I decided to proceed a bit with this one too. PSP is from eduard and the environment is just sprinkled on .. there's no colour on yet.
Thanks Terri! I try my best, but I am also quite often wrong so if anyone thinks he has better or more information than me than I am interested to hear it .. sometimes I can change it and sometime I will just live with my mistake....
all the best
Steffen
Mecenas
Joined: December 23, 2007
KitMaker: 1,596 posts
AeroScale: 1,275 posts
KitMaker: 1,596 posts
AeroScale: 1,275 posts

Posted: Sunday, August 09, 2009 - 09:27 PM UTC
Just great, nothing more to say. I wish my Spitfire would look half good as your models.
alpha_tango
Joined: September 07, 2005
KitMaker: 5,609 posts
AeroScale: 5,231 posts
Posted: Sunday, August 09, 2009 - 10:25 PM UTC
Many thanks Michal!
... but I am sure your Spit will look at least as good as this bird, probably better!
After my usual wash I wanted to try a new technique that the armour modellers use to break the monotony of larger aras. It is called mapping and I think Mig Jimenez explained it elsewhere here. It all starts by a lot of dot of different oil colours, which are then taken away with a brush.
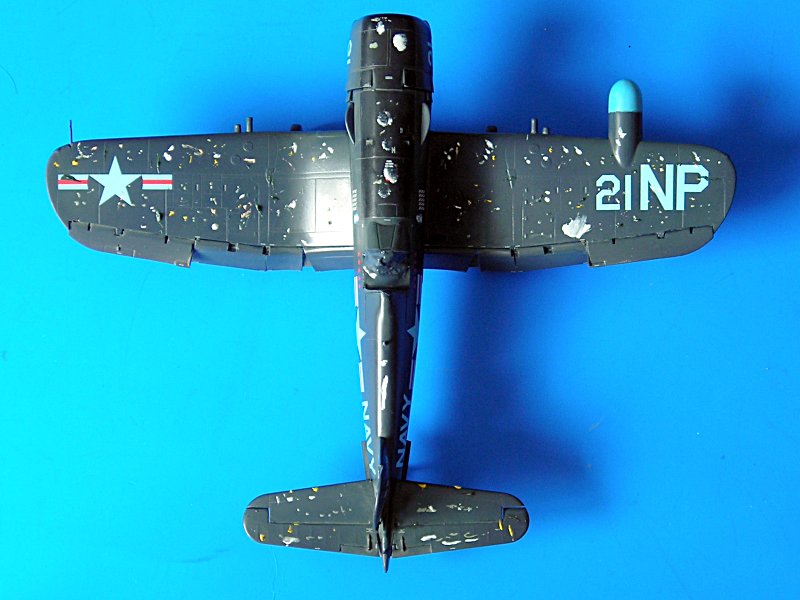
The result is pretty subtle on my model and I do not think it will be visible at all when I photograph it. It might work better on a flat surface but well, it is a step to make the thing look worn .. a lot more to do after the oils have dried (I'll wait at least until tomorrow)
all the best
Steffen
... but I am sure your Spit will look at least as good as this bird, probably better!
After my usual wash I wanted to try a new technique that the armour modellers use to break the monotony of larger aras. It is called mapping and I think Mig Jimenez explained it elsewhere here. It all starts by a lot of dot of different oil colours, which are then taken away with a brush.
The result is pretty subtle on my model and I do not think it will be visible at all when I photograph it. It might work better on a flat surface but well, it is a step to make the thing look worn .. a lot more to do after the oils have dried (I'll wait at least until tomorrow)
all the best
Steffen

_H_Dori

Joined: November 09, 2006
KitMaker: 295 posts
AeroScale: 276 posts

Posted: Sunday, August 09, 2009 - 11:53 PM UTC
That looks soo cool Steffen.
I really like the "mapping" technique as it really adds to the finished model. Plus, if you think it's not heavy enough you can always add more!
Getting close now mate, keep it up!
Howard
I really like the "mapping" technique as it really adds to the finished model. Plus, if you think it's not heavy enough you can always add more!
Getting close now mate, keep it up!
Howard
alpha_tango
Joined: September 07, 2005
KitMaker: 5,609 posts
AeroScale: 5,231 posts
Posted: Monday, August 10, 2009 - 12:48 AM UTC
Many thanks Howard!
Still I do not think mapping is a good technique for my toolbox. The oils take much (muuuuuuuuuuuuuuuuuch) too long to dry and keep me off from the project and the effect is barely visible (although that might be a problem of me doing things wrong).
Maybe it works perfectly for the "weekend warrior" but it is nothing for me as I have to keep the pace once I have motivated myself. I know it can look great (on photos) but when the stuff is finally dry I will do other things to add more wear and tear ..
cheers
Steffen
thegirl
Joined: January 19, 2008
KitMaker: 6,743 posts
AeroScale: 6,151 posts
Posted: Monday, August 10, 2009 - 01:44 AM UTC
Now I'm curious to see how the mapping will turn out on an aircraft . Seen the armour guy's do this as well and it looks cool once done .
Have you ever tried using pastel challks for this ?
Have you ever tried using pastel challks for this ?
alpha_tango
Joined: September 07, 2005
KitMaker: 5,609 posts
AeroScale: 5,231 posts
Posted: Monday, August 10, 2009 - 02:41 AM UTC
Well, you asked for it , but you really can't see nothing on a photo
all the best
Steffen
all the best
Steffen
_H_Dori
Joined: November 09, 2006
KitMaker: 295 posts
AeroScale: 276 posts
Posted: Monday, August 10, 2009 - 04:40 AM UTC
I've so far found them dry enough to touch in a day Steffen but I am no expert. One thing I did find was that a coat of gloss really brought them out!
Sorry to thread steal but this was my BF 110:
I shall remove this in a day to stop clutter on your build log mate
Howard
Sorry to thread steal but this was my BF 110:
I shall remove this in a day to stop clutter on your build log mate
Howard
alpha_tango
Joined: September 07, 2005
KitMaker: 5,609 posts
AeroScale: 5,231 posts
Posted: Monday, August 10, 2009 - 05:23 AM UTC
Hello Howard
where to begin .. to achieve the streaks i see in your build I do not need a further method, because I get that with my washing already. Remember I do not "pin wash" but "sludge wash" read: the whole model will get it. Due to the thinner it is touch dry in 20-30 minutes and when wiped ready for further work in another 2 hours or so.
The mapping shall result in tonal differences all over the unicolour model. I hardly see that on my model. It won't get another gloss coat but just flat (the areas that got the mapping) which will result in further smothing out things .. so IMO there will be nothing left of it.
The next steps involve airbrushing (postshaing, dusting, flat coats ...) so the oil paint has to be thouroughly dried through. It is still oily when I touch the model now (after 6 hours +) so probably I will have to wait 2 days or more until I can work further on it .. so in my book it is just not worth it ... suum cuique. If you like it: do it.
BTW no need to remove the pic! We are all here to learn and other people may like it and if they see your example might be encouraged to try for themselves...
Thanks for your input!!!
... as I wrote, it may not fit my current working style but maybe others and in case I fall back to my other approach, i.e. working on several models at the same time, it might be o.k. too.
all the best
Steffen
thegirl
Joined: January 19, 2008
KitMaker: 6,743 posts
AeroScale: 6,151 posts
Posted: Monday, August 10, 2009 - 01:19 PM UTC
There is a noticable difference Steffen . Has a faded look to it .
Not bad either Howard , but will dullcoating the model afterwards cover that up some what ?
Not bad either Howard , but will dullcoating the model afterwards cover that up some what ?
_H_Dori
Joined: November 09, 2006
KitMaker: 295 posts
AeroScale: 276 posts
Posted: Tuesday, August 11, 2009 - 12:23 AM UTC
Thanks Steffen, yes I remember now that you sludge wash your models and thats something I've never had the balls to do yet it always looks great on your ones. I shall give it a go one day
Terri, thank you for your kind comment. What I found was that the dull coat just toned it down but it is still obvious if you look for it. Just adds some nice tones and colour changes to the model.
Howard
Terri, thank you for your kind comment. What I found was that the dull coat just toned it down but it is still obvious if you look for it. Just adds some nice tones and colour changes to the model.
Howard
alpha_tango
Joined: September 07, 2005
KitMaker: 5,609 posts
AeroScale: 5,231 posts
Posted: Tuesday, August 11, 2009 - 12:29 AM UTC
Hi Terri
sure, but I miss the "map-effect" it is just as if I had wiped off my wash (which I do with differnt shades already) less carefully.
The main anger I have is not the effect as such but what I recieve compared to the time I have to invest/wait. I could have done similar with a few dusting rounds with my airbrush in 5 minutes plus wash I would come out with max. 2 hours instead of 2 days (or more .. it is still tacky) ...
all the best
Steffen
P.S: Sorry Howard just missed your post. I have written it a few times already. Everyone will find the methods that fit their style and if you found it you better stick to them .. of course trying something new is not excluded, but if it does not fit it is just not worth it.
jaypee
Joined: February 07, 2008
KitMaker: 1,699 posts
AeroScale: 1,384 posts
Posted: Tuesday, August 11, 2009 - 03:40 AM UTC
I tried the mapping effect a few times now. And two things made the drying longer.
1. Too much oil in the paint. I had cheap oils that had a lot of linseed oil in them
2. Using turpentine takes forever to dry
So I got some better oils, very small tubes so not too dear. Student oils they were called
at the art shop. and I used white spirit to make them thinner. the previous ones where
very cheap and came in plastic tubes.
Using white spirit (rather than turps or turps subtitute)
acts as a de greaser and removes a lot of the oil. Still took a few days
to dry but they didn't blend into a uniform colour as much as when working with turps.
alpha_tango
Joined: September 07, 2005
KitMaker: 5,609 posts
AeroScale: 5,231 posts
Posted: Tuesday, August 11, 2009 - 04:03 AM UTC
Many thanks J-P!
Actually I use Mussini and MiG oils which are pretty expensive. I also use normal Schmincke oils, which are a little bit less than the Mussini line but still artist oils and faar from being cheap.
For the mapping effect I did not dilute the stuff at all (that is what I had seen in the demos) .. and now I have the mess. For the washes i use Humbrol or Testors thinner or sometimes Mig "thinner for washes" .. so all in all no cheapos here.
all the best
Steffen
 |

WEB HOSTING BY


Copyright ©2021 AeroScale and Kitmaker Network, a subsidiary of Silver Star Enterprises
All Rights Reserved. Please read our Conditions of Use and Privacy Policy.
All Rights Reserved. Please read our Conditions of Use and Privacy Policy.