P51 campaign proposal for 2010
Attica, Greece / Ελλάδα
Joined: May 01, 2008
KitMaker: 1,437 posts
AeroScale: 1,241 posts
Posted: Friday, December 17, 2010 - 08:05 PM UTC
Quoted Text
Nige and Nick those are most impressive birds guys good job. 
Thank you very much Mr. Justin
Cheers Nick

Alberta, Canada
Joined: January 19, 2008
KitMaker: 6,743 posts
AeroScale: 6,151 posts
Posted: Friday, December 17, 2010 - 11:56 PM UTC
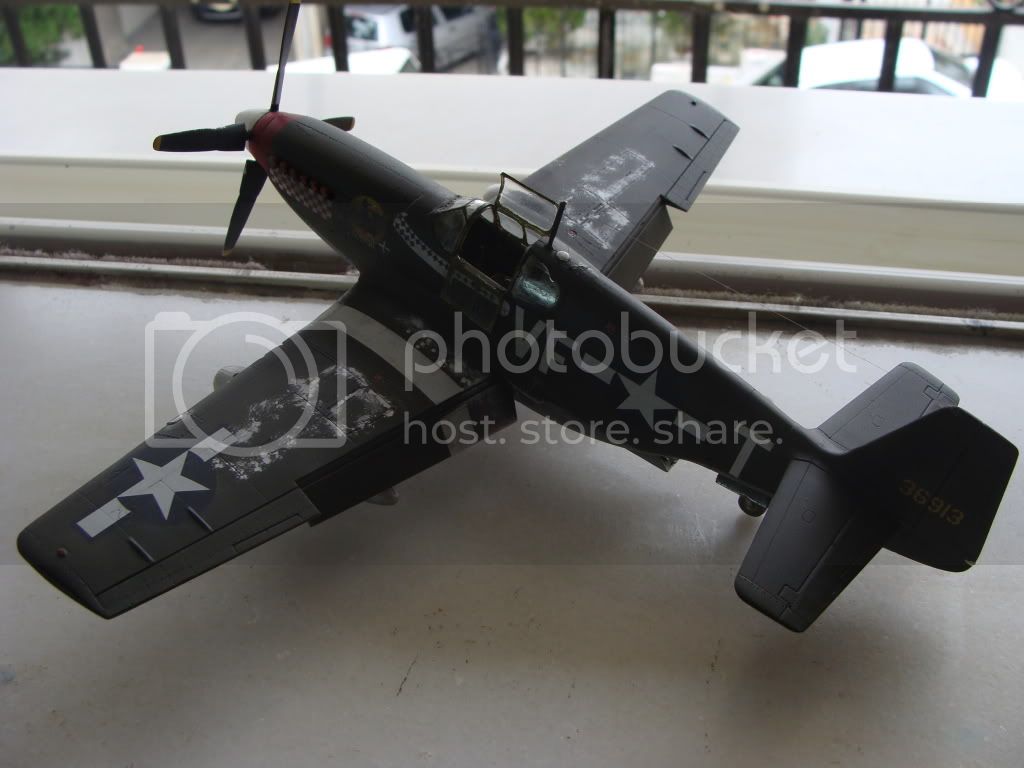
Very nice build Nick ! You have come along way in your modelling skills since joining the site , looking forward to seeing the rest of the canopy in place
Well done Nigel , the NMF looks really sweet and sure stands out with the red stripe and OD tail section

#041
Kobenhavn, Denmark
Joined: July 20, 2006
KitMaker: 10,069 posts
AeroScale: 3,788 posts
Posted: Saturday, December 18, 2010 - 12:03 AM UTC
Thanks for the comment, Damian. I really wanted to show of the role of the Mustang as close air support by giving it the full load out.
Beautiful job on the masking, Nige. Coming along very nicely.
Nick, nice weathering. It looks very nice and the details pop up fine. Looking forward to see the final result.
Campaign'oholic - 252+ campaigns completed
Slovakia
Joined: October 15, 2010
KitMaker: 825 posts
AeroScale: 476 posts
Posted: Saturday, December 18, 2010 - 07:14 AM UTC
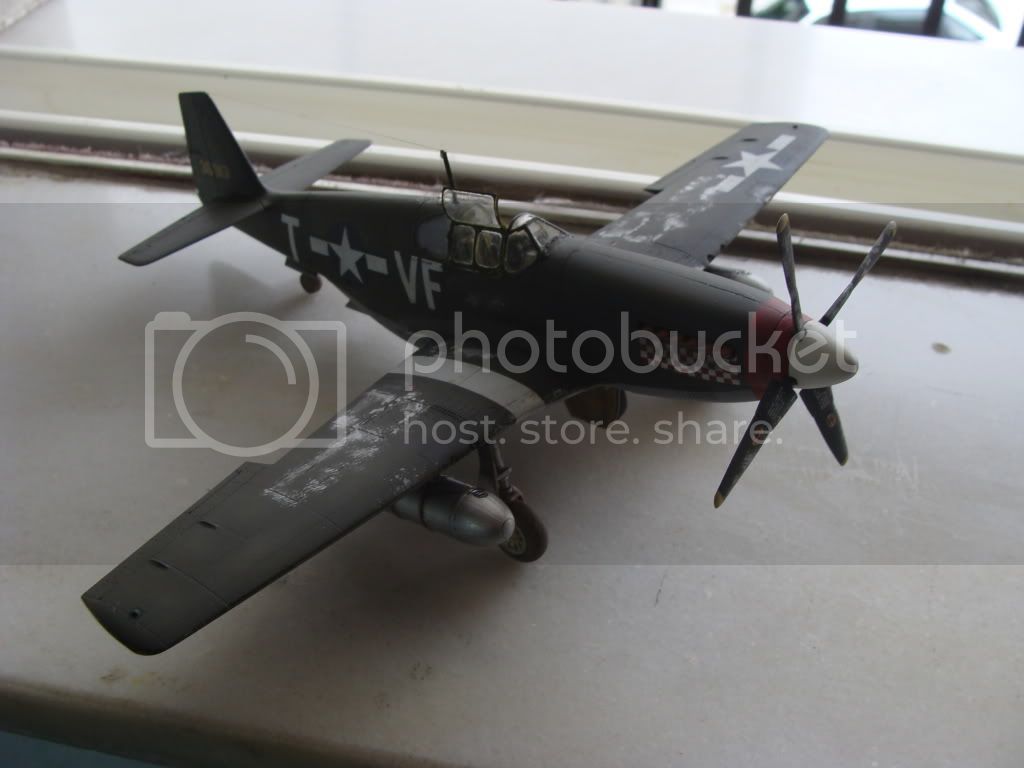
So this one is finished. I uploaded a photo to my gallery, but I have no Idea how to uplod it into the campign gallery. Can anyone help ?
I will also make better pictures in the future.

Attica, Greece / Ελλάδα
Joined: May 01, 2008
KitMaker: 1,437 posts
AeroScale: 1,241 posts
Posted: Saturday, December 18, 2010 - 11:02 AM UTC
AussieReg
 Associate Editor
#007
Victoria, Australia
Joined: June 09, 2009
KitMaker: 8,156 posts
AeroScale: 3,756 posts
Posted: Saturday, December 18, 2010 - 11:40 AM UTC
Nick, your skills are WAY beyond where I was at your age, excellent work and a great little step-by-step with your washes.
Naseby, beatifully finished 'Stang. I really love the subtle weathering, a bit of grime on the wheel well doors and tanks, a few chips on the leading edges, a bit of soot from the exhaust. Really nicely done.
I'm going to put a couple of hours into the F-82 today, so by the end of the day I will have the wings on, or the whole thing will be a melted puddle on the bricks outside !!

Cheers, D
ON the bench
Revell 1/24 '53 Corvette (building as '54)
Revell 1/24 BMW 507 Coupe and Cabrio
Italeri 1/48 Me262 B-1a/U1 Nightfighter
Monogram 1/24 '57 Chevy Nomad
Dragon 1/350 USS Frank Knox DD-742
Florida, United States
Joined: January 14, 2009
KitMaker: 2,798 posts
AeroScale: 2,443 posts
Posted: Saturday, December 18, 2010 - 11:59 AM UTC
Congratulations Nick on a fine build.
"From time to time, the tree of liberty must be watered with the blood of
tyrants and patriots."
- Thomas Jefferson
IPMS#47611
AussieReg
Associate Editor #007
Victoria, Australia
Joined: June 09, 2009
KitMaker: 8,156 posts
AeroScale: 3,756 posts
Posted: Saturday, December 18, 2010 - 07:33 PM UTC
Man this thing is really testing my patience !!
Test fit of midwing lower section


After much sanding and carving, many packers and fillers and shims, we get this . . . . .

and this on the upper midwing

And OF COURSE the main wings have NO DIHEDRAL when I test fit them, so we need more shims . . .

I don't think there's enough filler in Australia to smooth this beast out, best I import a new 10 litre bucket.

ON the bench
Revell 1/24 '53 Corvette (building as '54)
Revell 1/24 BMW 507 Coupe and Cabrio
Italeri 1/48 Me262 B-1a/U1 Nightfighter
Monogram 1/24 '57 Chevy Nomad
Dragon 1/350 USS Frank Knox DD-742
Texas, United States
Joined: February 22, 2008
KitMaker: 5,026 posts
AeroScale: 2,811 posts
Posted: Saturday, December 18, 2010 - 08:08 PM UTC
@ Damian, you are a better man than I and your posts are letting me see some light on how to accomplish what is needed for another build of mine. So your efforts are not wasted by helping someone else. THANKS BUDDY for the insight.
@ Nick: nice tutorial on weathering there.
If it aint broke dont fix it.
Attica, Greece / Ελλάδα
Joined: May 01, 2008
KitMaker: 1,437 posts
AeroScale: 1,241 posts
Posted: Saturday, December 18, 2010 - 09:01 PM UTC
South Australia, Australia
Joined: August 14, 2007
KitMaker: 5,926 posts
AeroScale: 2,201 posts
Posted: Saturday, December 18, 2010 - 09:25 PM UTC
I am sorry Damien but I would have put that one aside long ago. The fit etc of that kit is non-existent! Reminds me of the Maquette T-34 I have almost finished... The gaps were even bigger in that one!!
You may be right, I may be crazy.
AussieReg
Associate Editor #007
Victoria, Australia
Joined: June 09, 2009
KitMaker: 8,156 posts
AeroScale: 3,756 posts
Posted: Saturday, December 18, 2010 - 10:00 PM UTC
Hi Warren. This one certainly won't be a MOM winner for me once I'm finished that's for sure. It is just providing a big pallette for me to try out a heap of new techniques and products all at once.
My 2 boys are looking forward to adding this to their "Rigby Air Force", and promptly trashing it as they have with a few of my other builds.
Cheers, D
ON the bench
Revell 1/24 '53 Corvette (building as '54)
Revell 1/24 BMW 507 Coupe and Cabrio
Italeri 1/48 Me262 B-1a/U1 Nightfighter
Monogram 1/24 '57 Chevy Nomad
Dragon 1/350 USS Frank Knox DD-742
Attica, Greece / Ελλάδα
Joined: May 01, 2008
KitMaker: 1,437 posts
AeroScale: 1,241 posts
Posted: Sunday, December 19, 2010 - 01:18 AM UTC
Slovakia
Joined: October 15, 2010
KitMaker: 825 posts
AeroScale: 476 posts
Posted: Sunday, December 19, 2010 - 11:15 PM UTC
Thanks for Your comment, Im happy that You like my built.
@Nick: You have a nice model there. Dont worry, the chipping isnt bad, and You also added the antenna, something I wouldnt dare.
@Damian: Come on, You can do it. There should be a special badge or something for You guys, who actualy finished that kit. It needs more putty, there is still some plastic visible
Attica, Greece / Ελλάδα
Joined: May 01, 2008
KitMaker: 1,437 posts
AeroScale: 1,241 posts
Posted: Monday, December 20, 2010 - 01:21 AM UTC
Quoted Text
@Nick: You have a nice model there. Dont worry, the chipping isnt bad, and You also added the antenna, something I wouldnt dare.
Thank you very much
BUT, you MUST put the antenna


Cheers Nick
Alberta, Canada
Joined: January 19, 2008
KitMaker: 6,743 posts
AeroScale: 6,151 posts
Posted: Tuesday, December 21, 2010 - 02:02 AM UTC
Congrats on a nice build Nick , you did very well !
No worries on the chipping , it's your model and you can do the weathering how you see fit

Attica, Greece / Ελλάδα
Joined: May 01, 2008
KitMaker: 1,437 posts
AeroScale: 1,241 posts
Posted: Tuesday, December 21, 2010 - 09:08 AM UTC
Quoted Text
Congrats on a nice build Nick , you did very well !
No worries on the chipping , it's your model and you can do the weathering how you see fit
Thank you very much Ms. Terri
But, no, you can't tell: "it's my model and I just do whatever I want." If we want to improve ourselves we have to do the CORRECT thing
For example: I HATE seeing models without wash, especially from experienced builders
, it just makes the model a "click" worser or more

Anyway, have a nice mustang building to everyone hasn't finished yet
Cheers Nick
South Australia, Australia
Joined: August 14, 2007
KitMaker: 5,926 posts
AeroScale: 2,201 posts
Posted: Tuesday, December 21, 2010 - 09:27 AM UTC
Now you see Nick I don't agree about washes. Not every aircraft looks dirty. Much time and effort is normally devoted to cleaning civilian aircraft just for the image. And military aircraft are kept clean as it is a good way to keep idle maintainers busy...
Also, in my opinion, these washes that accentuate the panel lines are unrealistic. If you look at a real aircraft it is very difficult to see panel lines, even from up close. So to me it is unrealistic to be able to see panels, rivets etc when looking at model aircraft.
That is why I do not normally do panel washes. As Terri said, it is up to the person building the model as to how they want to represent it. If we all built models the same way it would be a very boring hobby..
You may be right, I may be crazy.
Florida, United States
Joined: January 14, 2009
KitMaker: 2,798 posts
AeroScale: 2,443 posts
Posted: Tuesday, December 21, 2010 - 01:35 PM UTC
"From time to time, the tree of liberty must be watered with the blood of
tyrants and patriots."
- Thomas Jefferson
IPMS#47611
Alberta, Canada
Joined: January 19, 2008
KitMaker: 6,743 posts
AeroScale: 6,151 posts
Posted: Tuesday, December 21, 2010 - 03:09 PM UTC
Sorry Nick , but I have to agree with Warren on this . Most modellers over weather their aircraft . They follow suit to what others are doing and how they build their kits .
Now to tell someone that they are wrong because they didn't do wash on their kit is not right . So my build would be wrong because I didn't do wash ?????
There is nothing wrong with trying to do the details right it is a great way to learn and build on or skills , but don't lose face on what the hobby is about Nick and that is building , having fun while we share with others . When we start building to please others and worry about whether someone got something right or not ....while then you lose out .
Your a good modeller Nick and I mean what I said about your skills . You have improved with ever kit here on the site and you are a terrific joy to have around . I encourage you to expand on your skills , but do it for yourself and not the glory of others .
Like I said before , it's your kit . Build it to how you like it . Your the only one who you have please

#439
Washington, United States
Joined: November 05, 2005
KitMaker: 4,950 posts
AeroScale: 3,192 posts
Posted: Tuesday, December 21, 2010 - 04:44 PM UTC
Not weighing in on the weather vs. not weather, but...
Back when I worked on the F-16, they used an epoxy to level the skin and fill any gaps between panels. I've got to think that that epoxy takes paint and exposure differently than the aluminum. Could cause a demarkation line no matter how many times the crew scrubbed the plane.
Hanger Queens in Waiting:
Monogram 1/72 F8F-1
Corsair the Sky Pirate - 1/72 Ace A-7D
Century Series - Airfix 1/72 F-105G
Anti Shipping - Academy 1/72 PBJ-1D
Academy 1/72 F-84E
Attica, Greece / Ελλάδα
Joined: May 01, 2008
KitMaker: 1,437 posts
AeroScale: 1,241 posts
Posted: Wednesday, December 22, 2010 - 12:32 AM UTC
I do the wash because I want to highlight the details, to blend the colors & rarely use it as a way to dirt the model
Btw, it's just my opinion, happy modelling
Cheers Nick
Ontario, Canada
Joined: November 14, 2009
KitMaker: 270 posts
AeroScale: 264 posts
Posted: Wednesday, December 22, 2010 - 06:51 AM UTC
Finally got started on this build yesterday. I'm actually building two P-51D kits side-by-side, an ancient Nichimo of slightly better than toy quality (it's got semi-posable control surfaces, retracting gear and a surprisingly nice cockpit) and the Hasegawa kit everybody knows. Both are 1/48th
I'd actually planned on building a 1/32 Mustang Ia, but the HobbyCraft kit has some serious issues with warpage and until I work those out it's only going to be donating its Malcolm hood to a Revell kit I've had on the go for quite a while.
I should have some progress pics shortly, the Nichimo's building pretty quickly
Ontario, Canada
Joined: November 14, 2009
KitMaker: 270 posts
AeroScale: 264 posts
Posted: Wednesday, December 22, 2010 - 02:19 PM UTC
And the promised images:
 DSC02376
 by
Mawz, on Flick
The wing goes together right quick and can be assembled first, there's zero painting required but you do have to choose which stores setup you want. I'm sticking to a pair of drop tanks.
 DSC02375
 by
Mawz, on Flickr
And here's the fuselage partially assembled. I'm have even more problems with the Testors Acryl Interior Green, it really doesn't like the older Hasegawa plastic. Hate that paint, but Tamiya doesn't make a good match.
AussieReg
Associate Editor #007
Victoria, Australia
Joined: June 09, 2009
KitMaker: 8,156 posts
AeroScale: 3,756 posts
Posted: Wednesday, December 22, 2010 - 08:14 PM UTC
Hey Adam, I use Gunze H58 Interior Green acrylic, maybe you can source that somewhere close by and give it a try, otherwise Tamiya XF5 Flat Green mixed with a bit of yellow to get the desired tone does the job for me.
Cheers, D
ON the bench
Revell 1/24 '53 Corvette (building as '54)
Revell 1/24 BMW 507 Coupe and Cabrio
Italeri 1/48 Me262 B-1a/U1 Nightfighter
Monogram 1/24 '57 Chevy Nomad
Dragon 1/350 USS Frank Knox DD-742


 )
)