
World War II
Discuss WWII and the era directly before and after the war from 1935-1949.
Discuss WWII and the era directly before and after the war from 1935-1949.
Hosted by Rowan Baylis
Tale of Two Tiffies
Dirkpitt289

Joined: May 24, 2008
KitMaker: 346 posts
AeroScale: 307 posts

Posted: Thursday, May 06, 2010 - 06:52 AM UTC
Sweet! 


robot_

Joined: March 08, 2009
KitMaker: 719 posts
AeroScale: 691 posts

Posted: Friday, May 07, 2010 - 11:08 AM UTC
Thanks for the nice feedback guys! Pre-shading is a matter of taste, the effect exaggerates something that is very subtle, if present at all, on real aircraft.
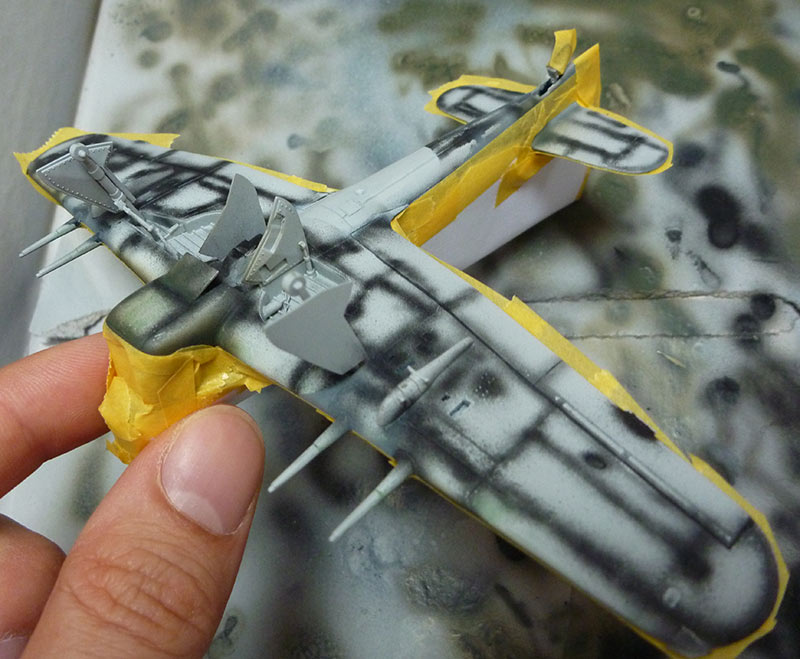
Masked up again, ready for the Medium Sea Grey. I touched-up the pre-shading with white and then re-did parts with black, before going to the grey.
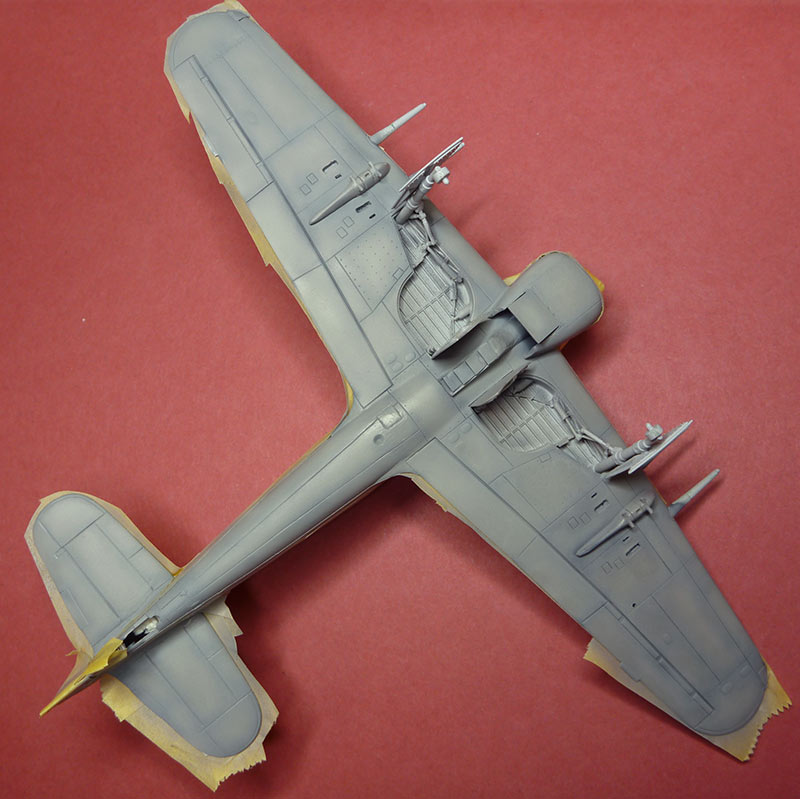

A few little things to touch up still. I think only dark green is needed- on the top cowl; on the side of the fuselage where the Mr. Surfacer overspray reached without me noticing when I touched up the green the first time; and on the radiator- a combination of bad masking, and a little bit of paint that pulled away with the tape where I had been too enthusiastic burnishing it down.
I'll do a bit more airbrushing- the cannon and spinner in red, the prop in back with yellow tips, the yellow id stripes on the leading edges, the sliding part of the canopy, and the wheels.
Once that is done, I'll brush paint the wheel wells (I figure using thinned paint, and using washes and pigments afterwards, there is no advantage to airbrushing, and the masking would be a nightmare). Then I'll brush paint the exhausts and a few little bits in the cockpit, then it'll be ready for the transfers.
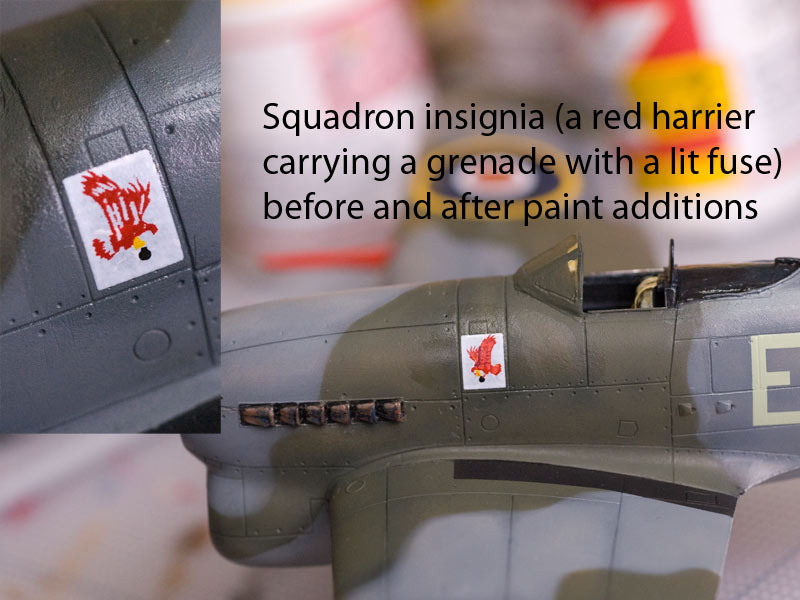
I will be using Xtradecals C1 roundels in all three positions, Modeldecal Sky code letters, and black serials that I printed myself on clear transfer paper. I'll probably adapt the kit's 193 squadron crest (a red harrier carrying a grenade, on a rectangular white field) by painting over it a bit, and I'll also use the kit's few stencil transfers.

Masked up again, ready for the Medium Sea Grey. I touched-up the pre-shading with white and then re-did parts with black, before going to the grey.


A few little things to touch up still. I think only dark green is needed- on the top cowl; on the side of the fuselage where the Mr. Surfacer overspray reached without me noticing when I touched up the green the first time; and on the radiator- a combination of bad masking, and a little bit of paint that pulled away with the tape where I had been too enthusiastic burnishing it down.
I'll do a bit more airbrushing- the cannon and spinner in red, the prop in back with yellow tips, the yellow id stripes on the leading edges, the sliding part of the canopy, and the wheels.
Once that is done, I'll brush paint the wheel wells (I figure using thinned paint, and using washes and pigments afterwards, there is no advantage to airbrushing, and the masking would be a nightmare). Then I'll brush paint the exhausts and a few little bits in the cockpit, then it'll be ready for the transfers.
I will be using Xtradecals C1 roundels in all three positions, Modeldecal Sky code letters, and black serials that I printed myself on clear transfer paper. I'll probably adapt the kit's 193 squadron crest (a red harrier carrying a grenade, on a rectangular white field) by painting over it a bit, and I'll also use the kit's few stencil transfers.
Posted: Friday, May 07, 2010 - 01:10 PM UTC
Looking great Ben, I love it !!

robot_

Joined: March 08, 2009
KitMaker: 719 posts
AeroScale: 691 posts

Posted: Wednesday, May 12, 2010 - 09:29 PM UTC
Thanks! I like it too (on the whole)!

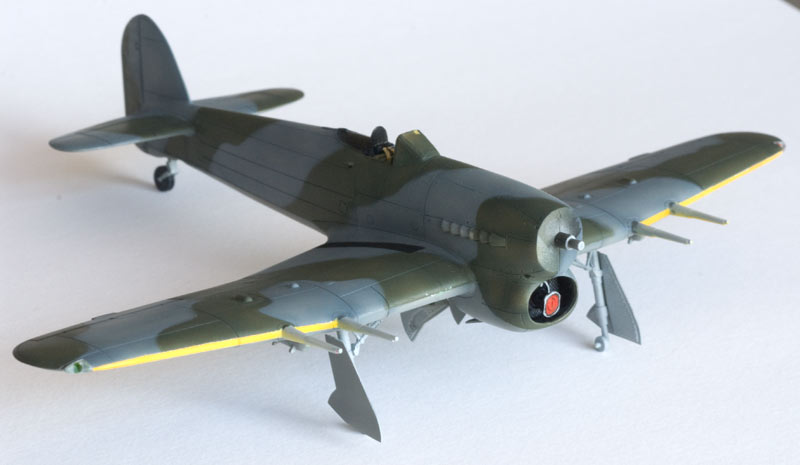
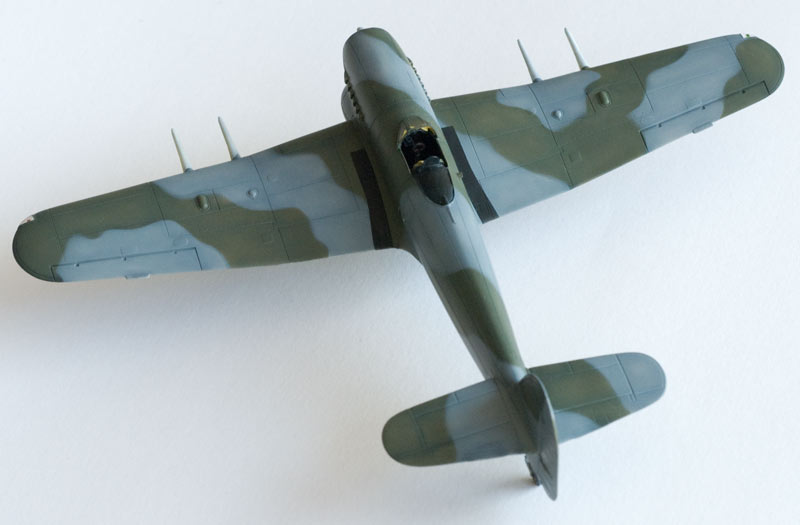
I masked and painted the yellow leading edges, and the walkways. I also did a third round of filling on the napalm tanks, and a second primer coat on them and the prop, then painted the yellow tips of the prop.
Also painted the red spinner, but it is too bright, so I'll have to mix in a bit of brown and black.

robot_

Joined: March 08, 2009
KitMaker: 719 posts
AeroScale: 691 posts

Posted: Thursday, May 13, 2010 - 11:19 AM UTC
It took a long time to mask the cannon, and it isn't perfect. I remembered the tip of using varnish before the final colour when masking, as it seals the edges of the tape, just as I removed the yellow stripe masks, and there was obvious white bleed under the tape (I used a white undercoat for the yellow). So I used the varnish technique tonight for the tips of the prop and around the cannon.
The shade of red is not exactly what I wanted, but it is OK.
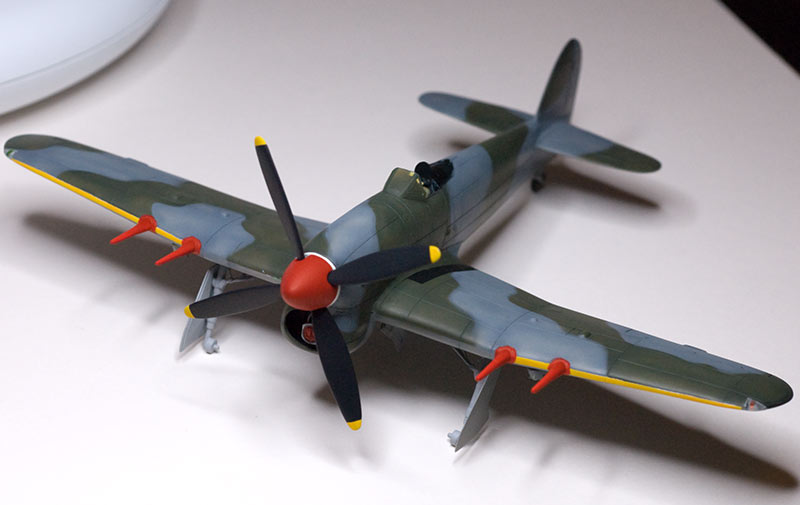
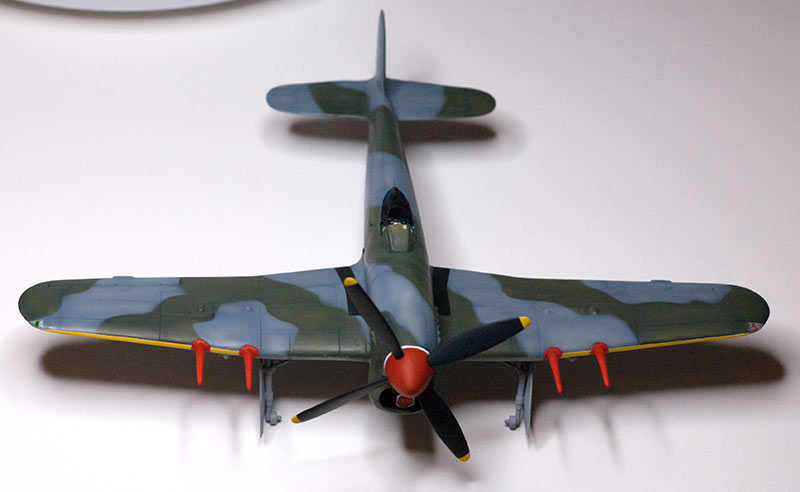
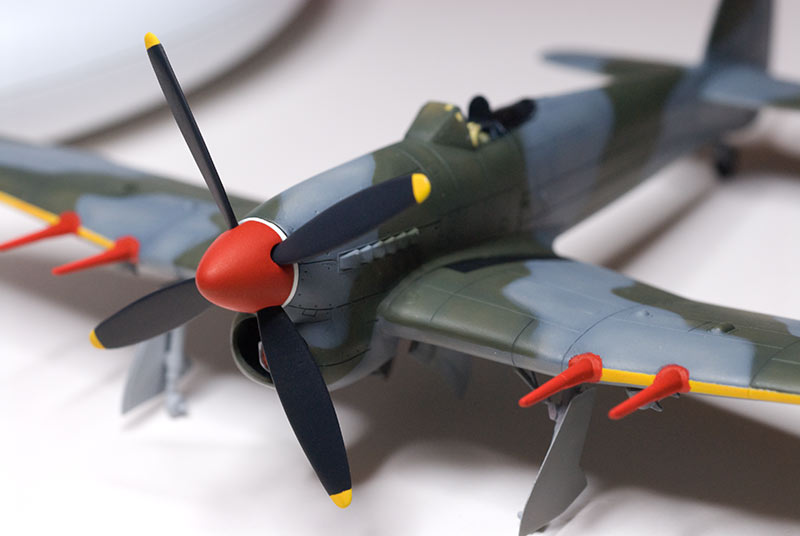
The shade of red is not exactly what I wanted, but it is OK.


Griffon65

Joined: November 06, 2008
KitMaker: 363 posts
AeroScale: 51 posts

Posted: Thursday, May 13, 2010 - 12:52 PM UTC
It looks great Ben! I really like the camo effect that you got, and the finish of the paint on the prop and spinner looks fantastic, even if it isn't exactly the colour you wanted.
I'll deffinately be using this thread as a reference when I finally get around to doing my first build .
.
I'll deffinately be using this thread as a reference when I finally get around to doing my first build
 .
.
magnusf

Joined: May 02, 2006
KitMaker: 1,953 posts
AeroScale: 1,902 posts

Posted: Thursday, May 13, 2010 - 10:35 PM UTC
Great paint scheme! Typhoons tend to get a bit anonymous, the red cannon really stand out!

Magnus

Magnus

Dirkpitt289

Joined: May 24, 2008
KitMaker: 346 posts
AeroScale: 307 posts

Posted: Friday, May 14, 2010 - 01:01 AM UTC
WOW, it really looks great

robot_

Joined: March 08, 2009
KitMaker: 719 posts
AeroScale: 691 posts

Posted: Saturday, May 15, 2010 - 10:47 AM UTC
Thanks guys, your encouragement really helps, I appreciate it!
Yesterday I brush painted the main wheel wells in very watery silver (like my black, I have poured thinned paint back into the pot, and it is now all watery- a real pain with the silver in particular, as it is now unusable for dry brushing). I then did an ink wash of Citadel Devlan Mud, and left it overnight. Then did a wash only in the corners with the citadel ink mixed with my watery black paint. After this dried, I painted the high points in watery silver (I'd have liked to dry-brush it!).
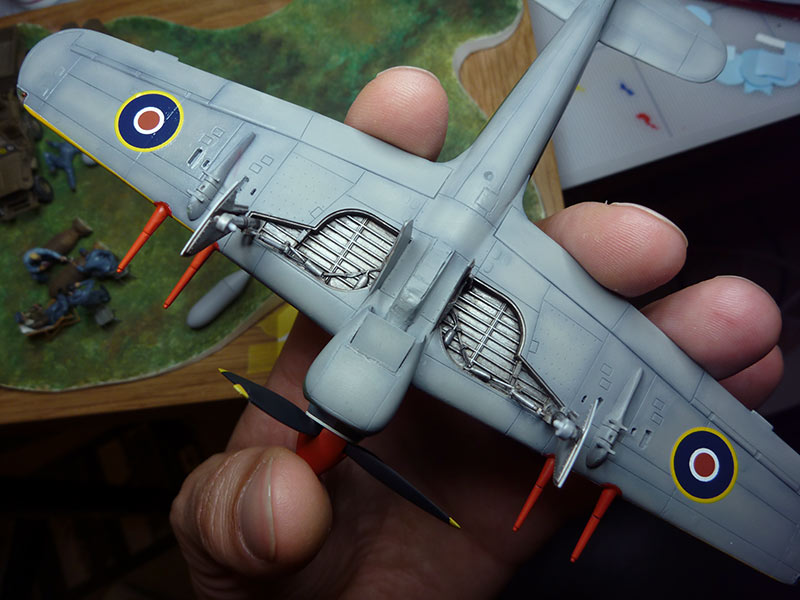
In that photo you can see some overspray of the red from the cannon on the port wing, even after the hour I spend masking the entire plane! You can also see that the scratch-build tropical filter is a bit rough still! And the joint of the radiator flap, and near the new navigation light, and....
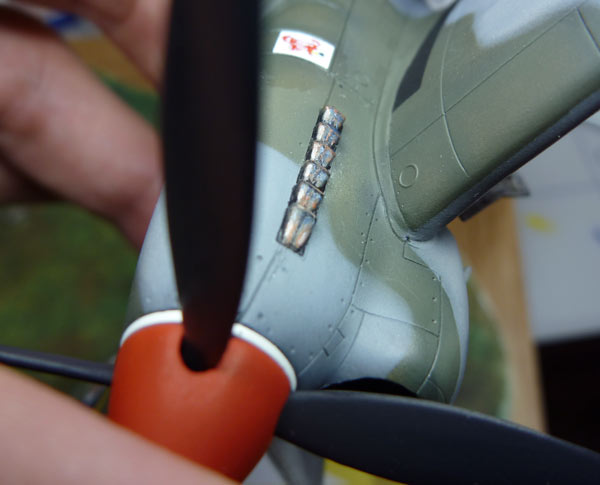
I've painted one side's exhaust stack. The effect I was aiming for was burnt metal, looking almost coppery in places (like the exhaust collectors on Bristol radial engined planes that are contentiously painted in a copper colour!), and with a blued effect where it has been heated. I'll be airbrushing some exhaust stains in browny black over this, so it won't look so shiny. I painted on the details of the ridge at the end of each exhaust, and also the welded seam along the length of the exhaust. I almost bought a Sabre exhaust on eBay a few weeks back, so I know what they look like in detail now!
I then thought I'd start on the transfers... luckily the 193 squadron crest was included with the Academy kit, and although it was intended to go on the tail, the size was *perfect* for the location over the oil tank on the nose. The roundels are all type C1, as per instructions to 2nd TAF squadrons in December 1944 (IIRC). The roundels are Xtradecals, and have perfect colours and registration. They are quite resistant to MicroSet/Sol, particularly the red part- guess because it has two layers of ink (white and red), and is furtherest from the edges. The code letters are from Model Decal. I really like this set, as the hard-to-match sky colour matches what I think is correct (and the Xtracrylic paint), and also because they offer several styles for each letter. For example: the 'P' has three versions- a rounded one, a wide squared-off one, and a narrow squared-off one, so you can match it to reference photos.
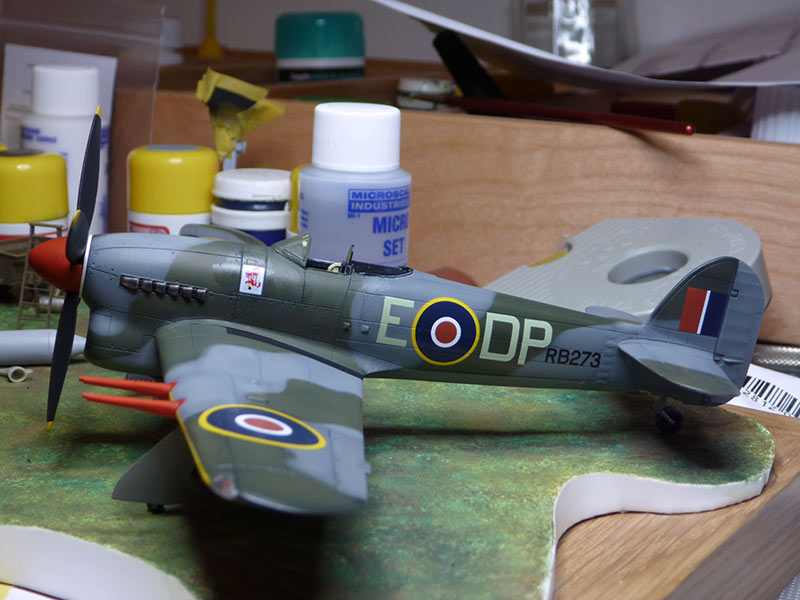
Only when adding the fin flash did I notice I hadn't painted the rudder green at the top- I will have to do that when I touch up the underside overspray.
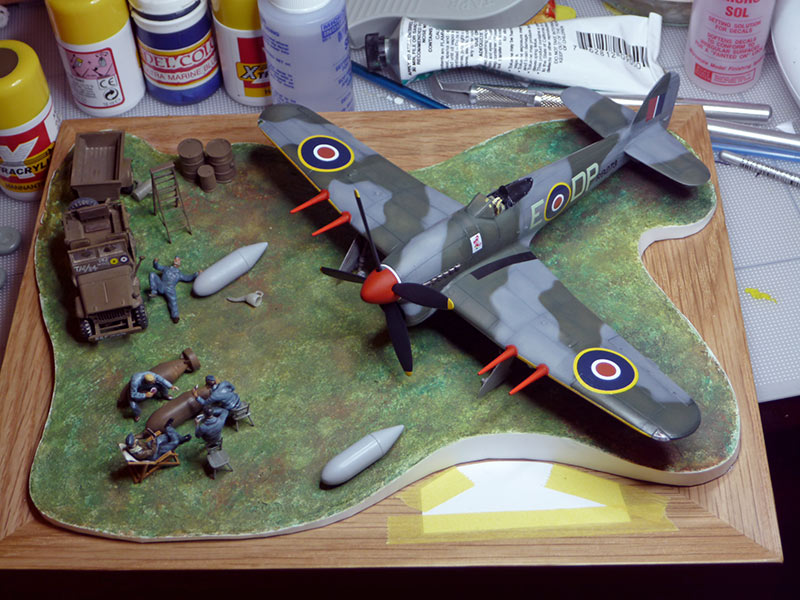
I still have to finish re-modelling the wheels- I have destroyed the old hubs, and am trying to find a way of scratch building the spokes, which is hard when I have no way of even making circles from sheet styrene, let alone cutting evenly sized and spaced notches all around the circle...
Anyway, off to bed now....
Yesterday I brush painted the main wheel wells in very watery silver (like my black, I have poured thinned paint back into the pot, and it is now all watery- a real pain with the silver in particular, as it is now unusable for dry brushing). I then did an ink wash of Citadel Devlan Mud, and left it overnight. Then did a wash only in the corners with the citadel ink mixed with my watery black paint. After this dried, I painted the high points in watery silver (I'd have liked to dry-brush it!).

In that photo you can see some overspray of the red from the cannon on the port wing, even after the hour I spend masking the entire plane! You can also see that the scratch-build tropical filter is a bit rough still! And the joint of the radiator flap, and near the new navigation light, and....
I've painted one side's exhaust stack. The effect I was aiming for was burnt metal, looking almost coppery in places (like the exhaust collectors on Bristol radial engined planes that are contentiously painted in a copper colour!), and with a blued effect where it has been heated. I'll be airbrushing some exhaust stains in browny black over this, so it won't look so shiny. I painted on the details of the ridge at the end of each exhaust, and also the welded seam along the length of the exhaust. I almost bought a Sabre exhaust on eBay a few weeks back, so I know what they look like in detail now!

I then thought I'd start on the transfers... luckily the 193 squadron crest was included with the Academy kit, and although it was intended to go on the tail, the size was *perfect* for the location over the oil tank on the nose. The roundels are all type C1, as per instructions to 2nd TAF squadrons in December 1944 (IIRC). The roundels are Xtradecals, and have perfect colours and registration. They are quite resistant to MicroSet/Sol, particularly the red part- guess because it has two layers of ink (white and red), and is furtherest from the edges. The code letters are from Model Decal. I really like this set, as the hard-to-match sky colour matches what I think is correct (and the Xtracrylic paint), and also because they offer several styles for each letter. For example: the 'P' has three versions- a rounded one, a wide squared-off one, and a narrow squared-off one, so you can match it to reference photos.

Only when adding the fin flash did I notice I hadn't painted the rudder green at the top- I will have to do that when I touch up the underside overspray.

I still have to finish re-modelling the wheels- I have destroyed the old hubs, and am trying to find a way of scratch building the spokes, which is hard when I have no way of even making circles from sheet styrene, let alone cutting evenly sized and spaced notches all around the circle...
Anyway, off to bed now....

robot_

Joined: March 08, 2009
KitMaker: 719 posts
AeroScale: 691 posts

Posted: Sunday, May 16, 2010 - 09:32 AM UTC
Spent more time on DP-E: lots of time finding suitable transfers for stencils (taken from Revell Hurricane IIc and Tamiya Mosquito kits), and finding a placement diagram (someone on Britmodeller helped me out).
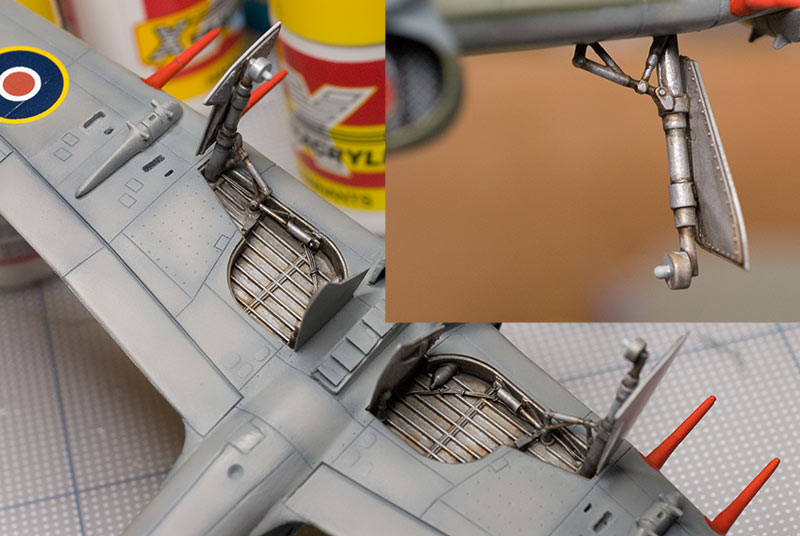
Also re-touched the squadron crests on the oil tank covers, and added some sepia-coloured wash (Citadel) staining to the wheel wells and undercarriage.
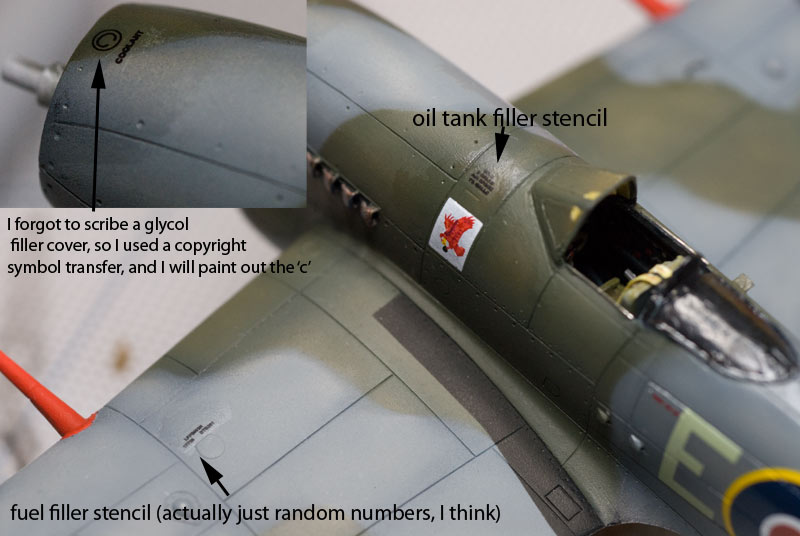
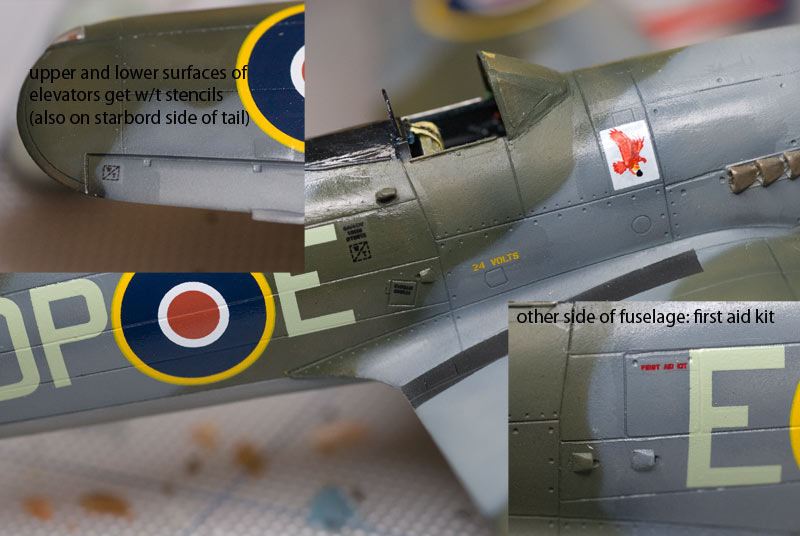
After I am sure all the transfers are down tightly with no silvering, I'll wash off the Micro Set and Sol residues, and spray a coat of Klear (never sprayed it on before, but I have been trapping too much dust when I brush it on). Then do a few touch-ups (the rudder's missing green that I mentioned yesterday), and it will be ready for oil washes and other weathering. I haven't made any progress on the wheels- as a last resort I could take the resin Pavla ones....
Also re-touched the squadron crests on the oil tank covers, and added some sepia-coloured wash (Citadel) staining to the wheel wells and undercarriage.


After I am sure all the transfers are down tightly with no silvering, I'll wash off the Micro Set and Sol residues, and spray a coat of Klear (never sprayed it on before, but I have been trapping too much dust when I brush it on). Then do a few touch-ups (the rudder's missing green that I mentioned yesterday), and it will be ready for oil washes and other weathering. I haven't made any progress on the wheels- as a last resort I could take the resin Pavla ones....

robot_

Joined: March 08, 2009
KitMaker: 719 posts
AeroScale: 691 posts

Posted: Monday, May 17, 2010 - 09:48 PM UTC
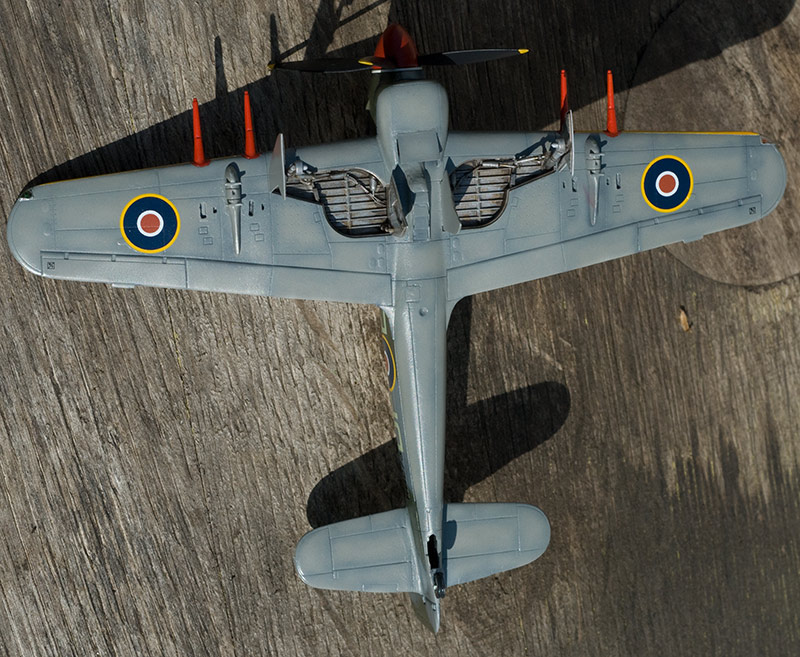
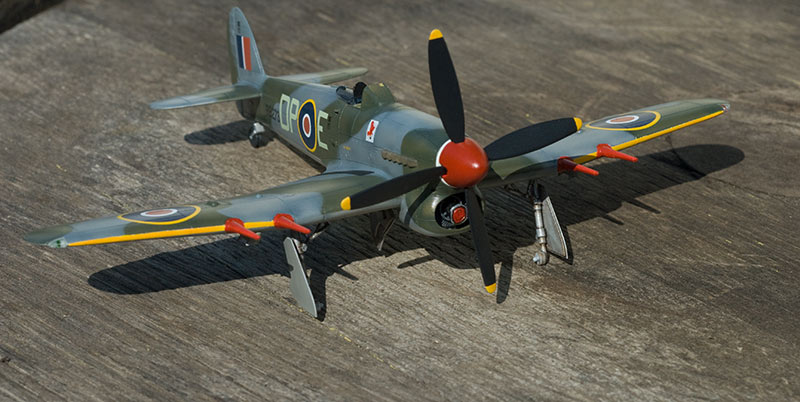
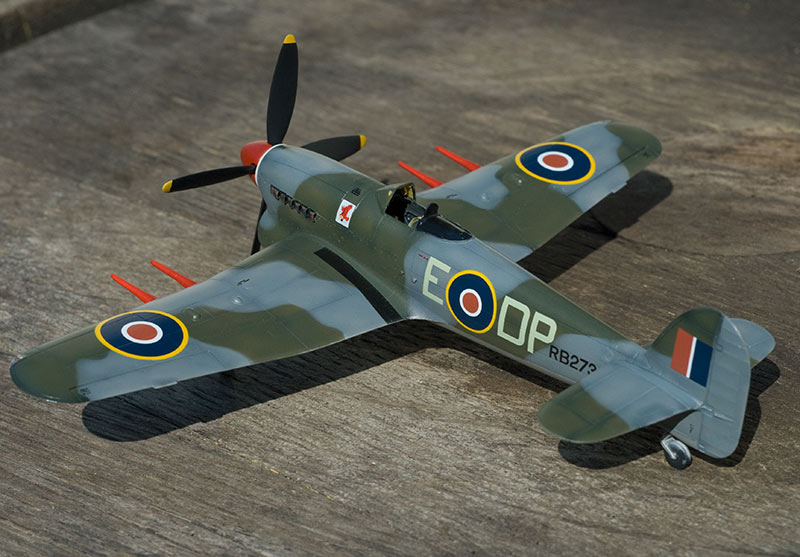
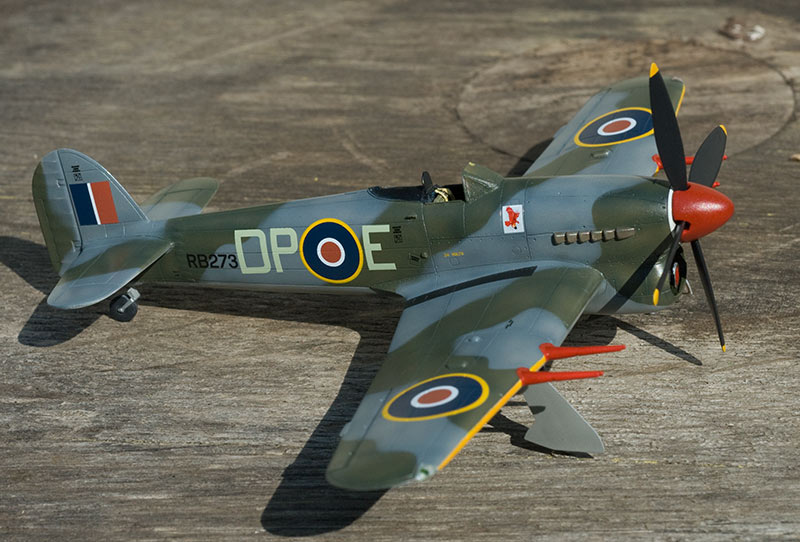
Sprayed the Klear this morning. I am so happy, as the red has now lost its orange tint. Transfers blended in well too. 


Dirkpitt289

Joined: May 24, 2008
KitMaker: 346 posts
AeroScale: 307 posts

Posted: Tuesday, May 18, 2010 - 12:52 AM UTC
Looks simply stunning. The preshading makes the look (IMHO). I have never got that to work. BRAVO! 

Philippus

Joined: March 13, 2007
KitMaker: 182 posts
AeroScale: 65 posts

Posted: Tuesday, May 18, 2010 - 11:53 AM UTC
Looks fantastic Ben!
Philip
Philip


robot_

Joined: March 08, 2009
KitMaker: 719 posts
AeroScale: 691 posts

Posted: Sunday, July 11, 2010 - 09:08 AM UTC
Another two months have passed, and progress has been slow (but I was on holiday for almost three weeks).
I have just finished the filter supports that cross the radiator:
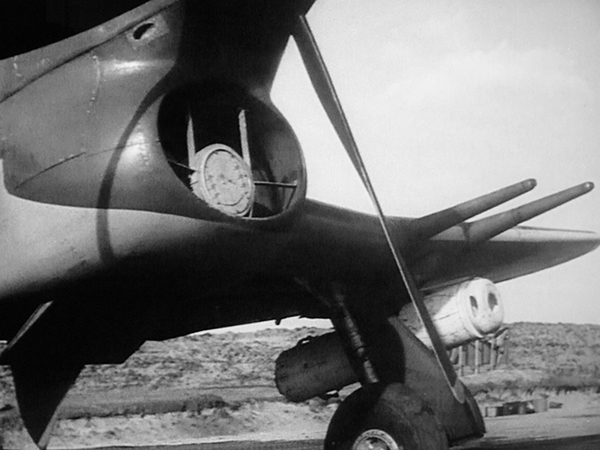
It took a long time, and a few test materials, until I found some unused of brass photo etch (from the Part set for the Sopwith Camel).
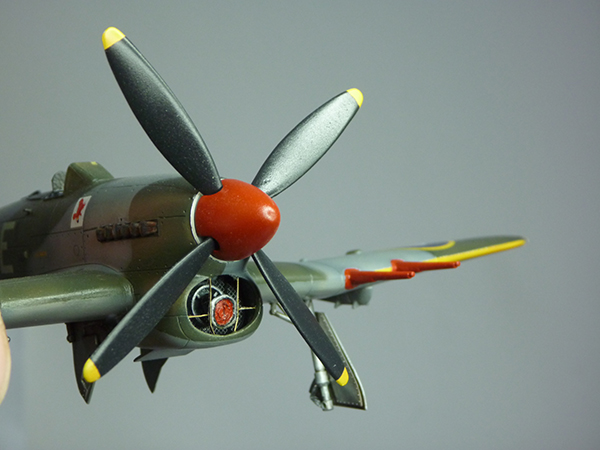
I hope the 'cuckoo doors' look less botched after the gloss is knocked back a bit by the final varnish.
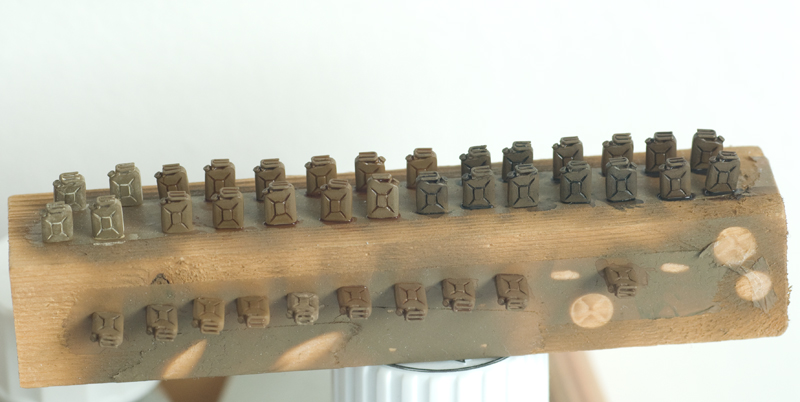
Ink washes (yellow and brown, some with pigments added to them) to give variation to the olive drab jerry cans.
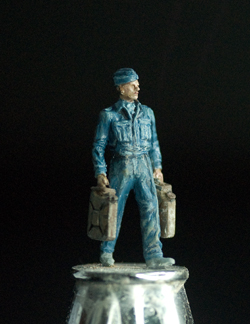
The first of the new Revell figures that I have finished- I had to convert him from a standing pose to a walking one.
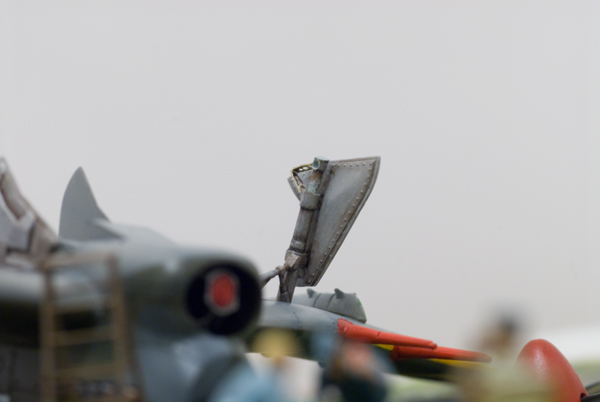
I have taken the plunge and shortened and re-worked the oleo struts, adding the Part scissor links. The only thing that is making the model not sit 100% right now is the tailwheel, which is too far out from the fuselage.
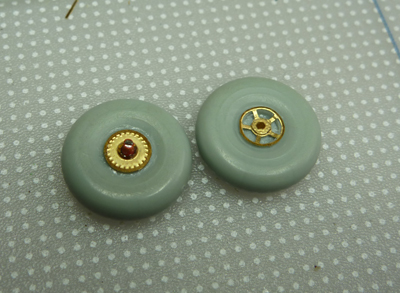
I bought the Part PE to solve the wheel problem I had created- I had destroyed the hubs, but was unable to scratch build good enough replacements. Not 100% accurate (the spokes are a little thin), but better than any other Typhoon wheels I have seen in 1/72.
I still have to spray the green on the rudder that I missed first time around (not got the airbrush out in ages), and the camouflage colours on the canopy framing. Then paint the wheels- I will be spraying them, something I have not done before, but I think the smooth finish is worth the extra hassle (I need to get a pair of compasses and mount a blade in them to cut the masks for the hubs). Or I may spray the grey for the rubber, and hand paint the hubs.
Then I have to paint the 90 gal tanks (aluminium, then olive drab, then red, with salt for chipping effects added between each coat).
I can't believe I've slowed down this much... every task seems a great labour
I have just finished the filter supports that cross the radiator:

It took a long time, and a few test materials, until I found some unused of brass photo etch (from the Part set for the Sopwith Camel).

I hope the 'cuckoo doors' look less botched after the gloss is knocked back a bit by the final varnish.

Ink washes (yellow and brown, some with pigments added to them) to give variation to the olive drab jerry cans.

The first of the new Revell figures that I have finished- I had to convert him from a standing pose to a walking one.

I have taken the plunge and shortened and re-worked the oleo struts, adding the Part scissor links. The only thing that is making the model not sit 100% right now is the tailwheel, which is too far out from the fuselage.

I bought the Part PE to solve the wheel problem I had created- I had destroyed the hubs, but was unable to scratch build good enough replacements. Not 100% accurate (the spokes are a little thin), but better than any other Typhoon wheels I have seen in 1/72.
I still have to spray the green on the rudder that I missed first time around (not got the airbrush out in ages), and the camouflage colours on the canopy framing. Then paint the wheels- I will be spraying them, something I have not done before, but I think the smooth finish is worth the extra hassle (I need to get a pair of compasses and mount a blade in them to cut the masks for the hubs). Or I may spray the grey for the rubber, and hand paint the hubs.
Then I have to paint the 90 gal tanks (aluminium, then olive drab, then red, with salt for chipping effects added between each coat).
I can't believe I've slowed down this much... every task seems a great labour


jaypee

Joined: February 07, 2008
KitMaker: 1,699 posts
AeroScale: 1,384 posts

Posted: Sunday, July 11, 2010 - 10:32 PM UTC
I know the feeling. Very little done recently with holidays and visits and work and running and life in general.
I've got two other builds nearer to completion but just seem like a drag. But got back with some sanding and filling of the Civvy Sunderland yesterday. Feels much better. Onwards and upwards.
The inside of the gear door has a good grubby look to it. I like it a lot.
I've got two other builds nearer to completion but just seem like a drag. But got back with some sanding and filling of the Civvy Sunderland yesterday. Feels much better. Onwards and upwards.
The inside of the gear door has a good grubby look to it. I like it a lot.
Posted: Sunday, July 11, 2010 - 10:48 PM UTC
Quoted Text
I can't believe I've slowed down this much... every task seems a great labour
Hi Ben.
I hope for you that great labour will translate into greater satisfaction at the end. You are doing a superb job, the attention to detail is wonderful.
Cheers, D

robot_

Joined: March 08, 2009
KitMaker: 719 posts
AeroScale: 691 posts

Posted: Saturday, July 17, 2010 - 10:34 AM UTC
Thanks for the support guys!
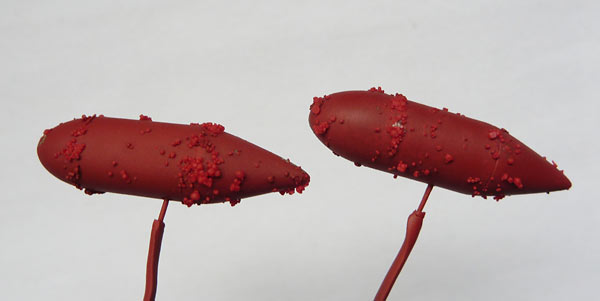
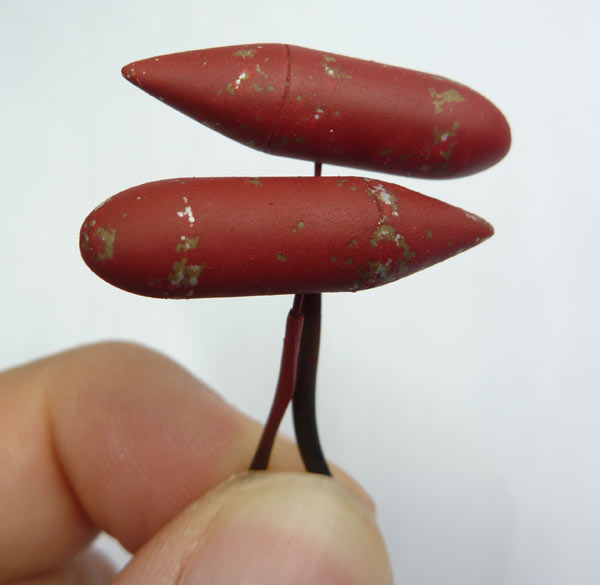
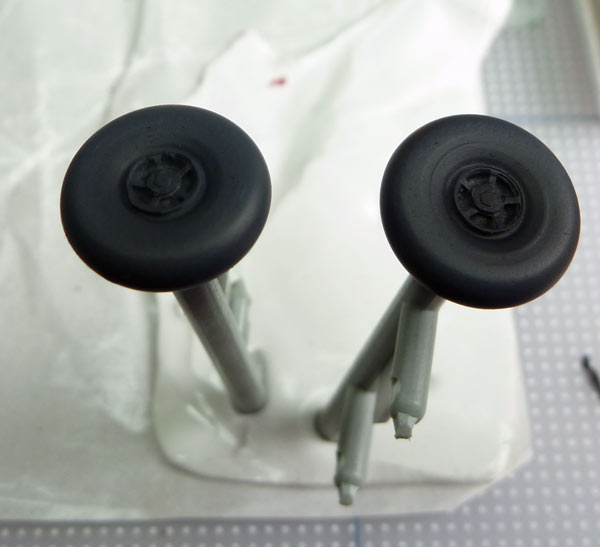
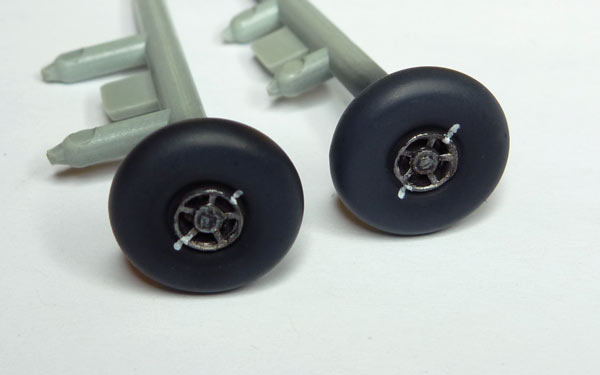
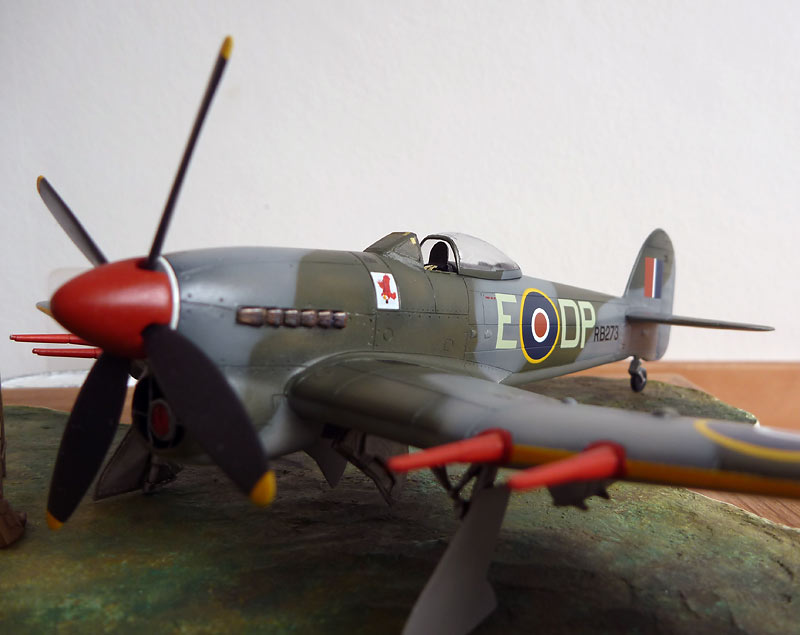
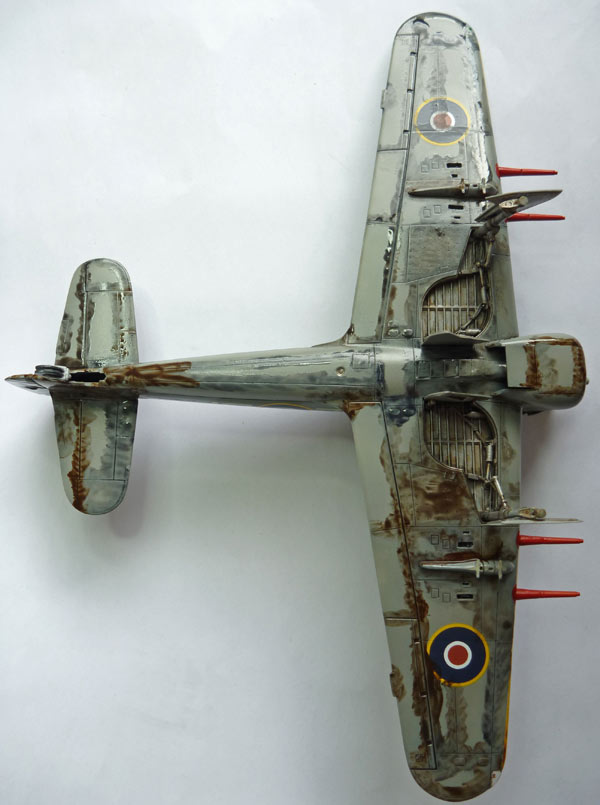
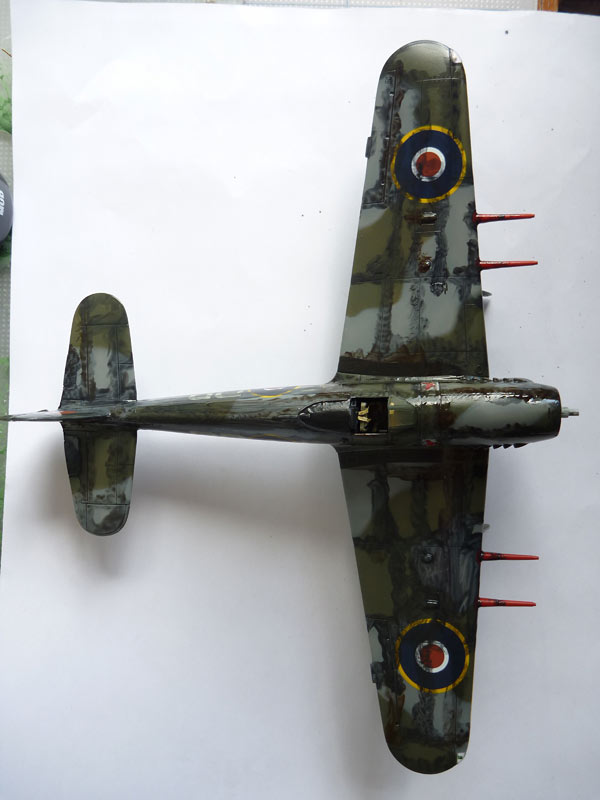
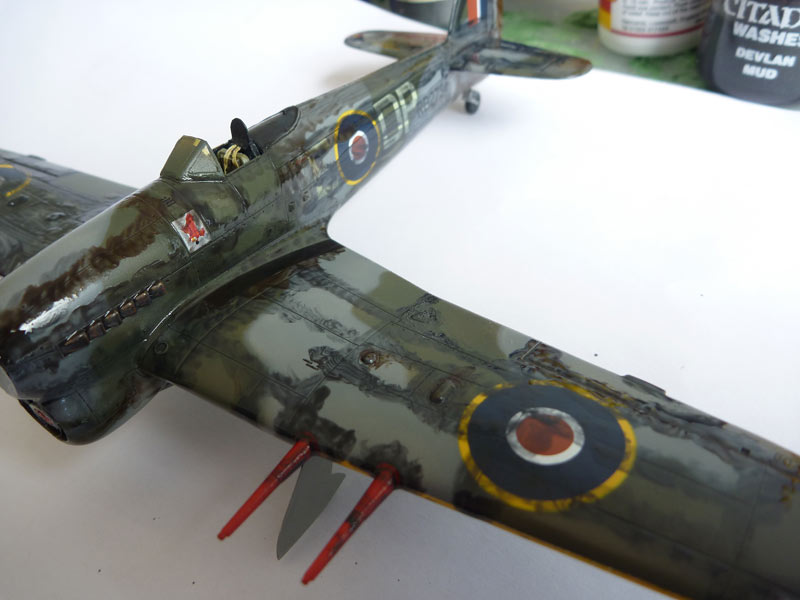
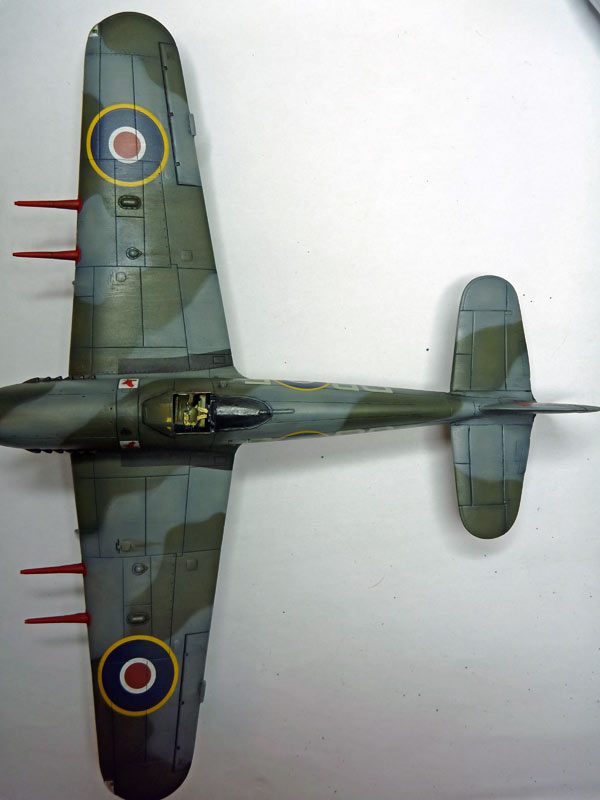
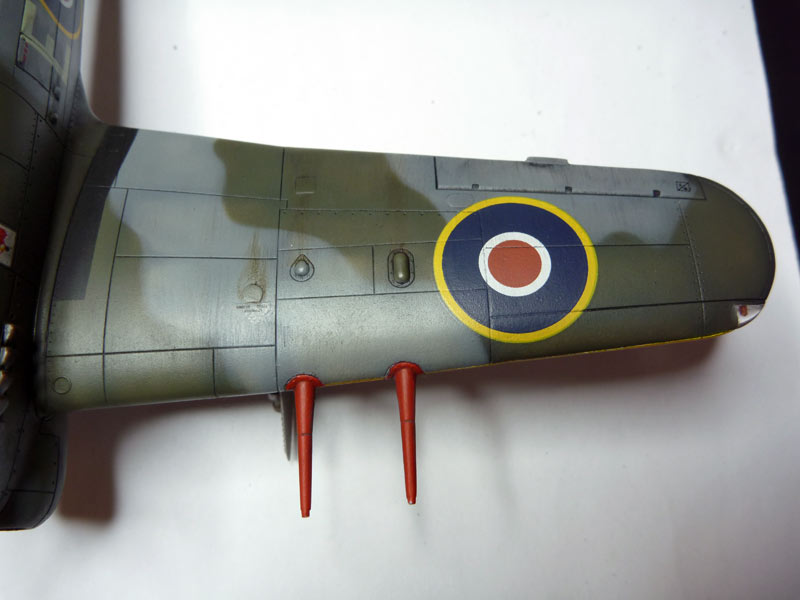
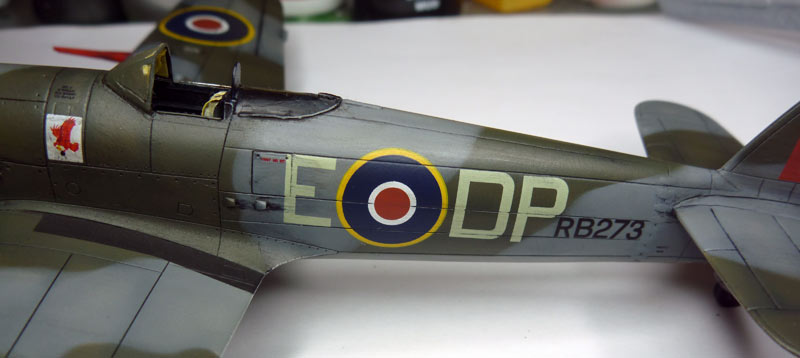
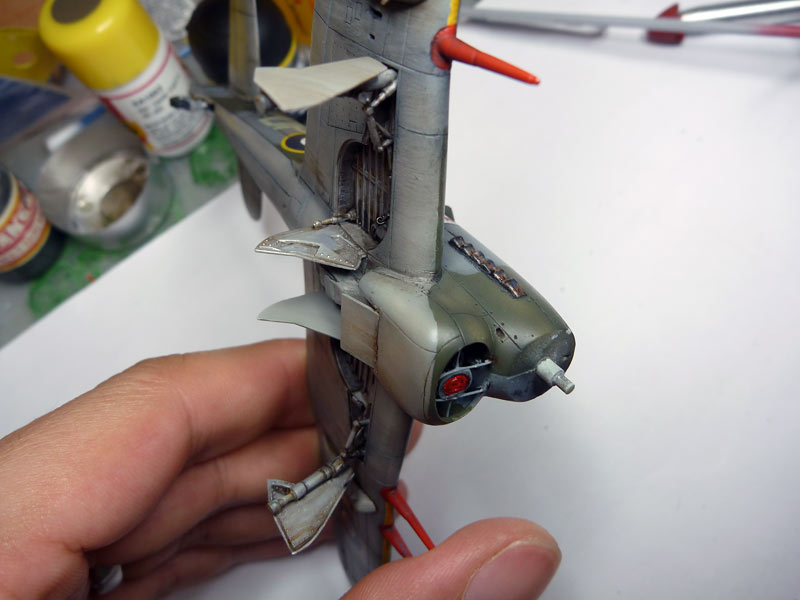
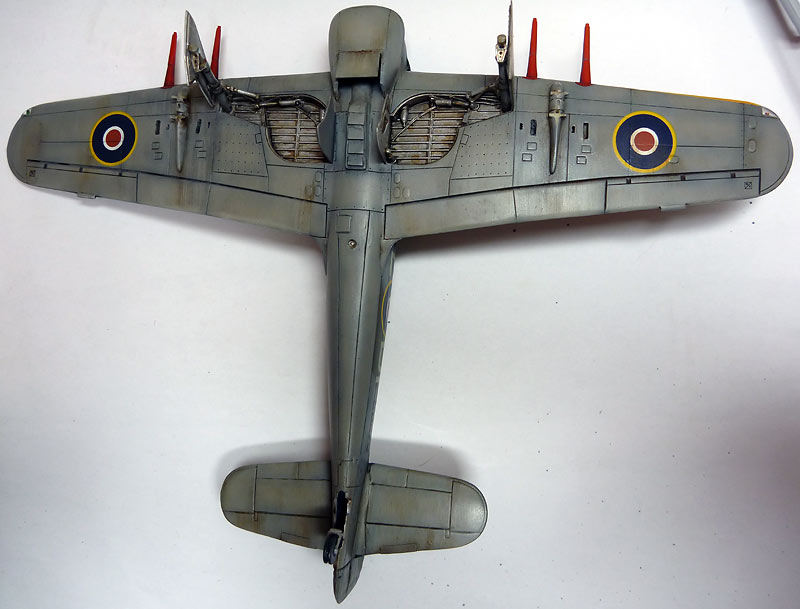
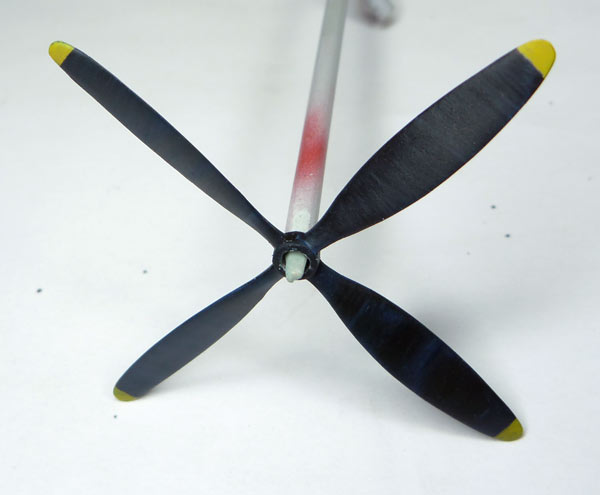
I managed to get a lot done today- all the items on the list from the end of the last post, plus the oil paint washes. I tried to do some wear marks on the prop using grey, white and blue oils. I'm not sure about the look- I will have to see it assembled before I decide whether it is was a success.
I have to be patient while waiting for the oils to harden, then give the model another coat of varnish, attach the wheels, attach the canopy, make and fit IFF and wireless antennae, fit the retractable foot stirrup, and then try out some pastels and pigments.

robot_

Joined: March 08, 2009
KitMaker: 719 posts
AeroScale: 691 posts

Posted: Sunday, July 18, 2010 - 10:28 AM UTC
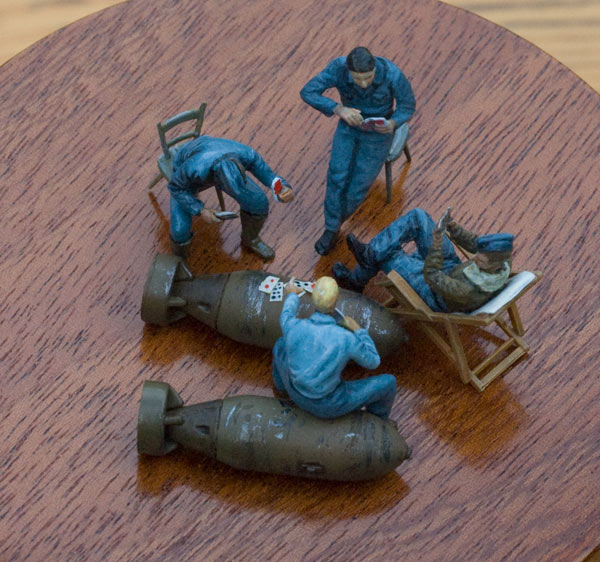
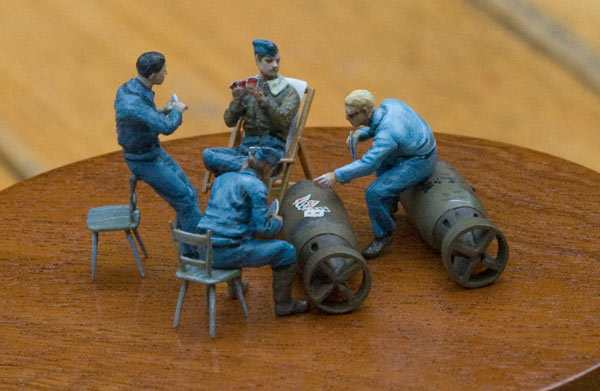
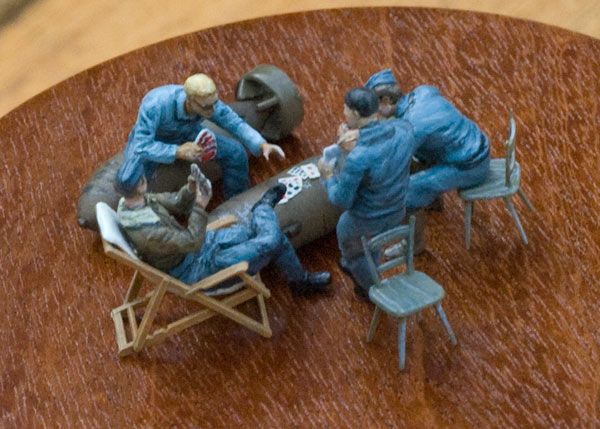
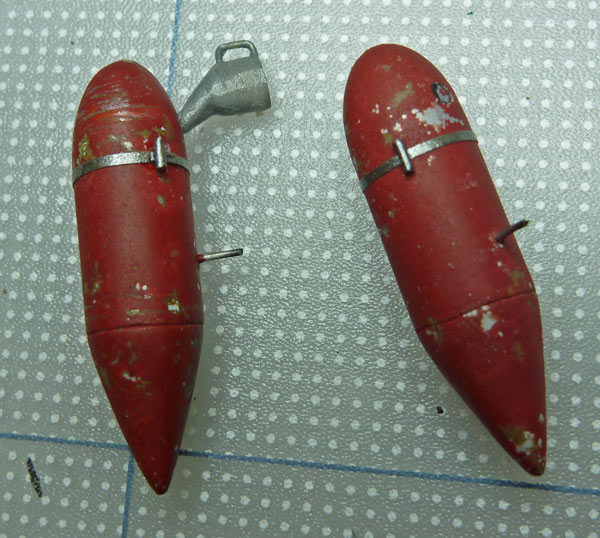
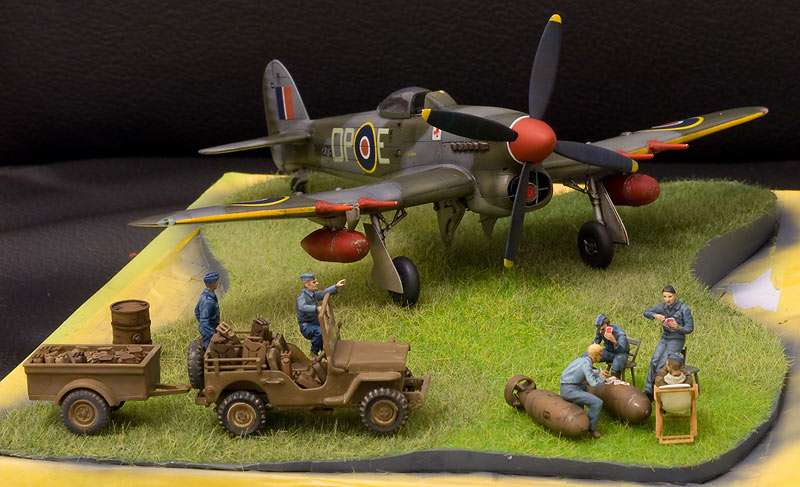
Finished the card playing group (basically just finished painting the bombs and made some cards out of Tamiya tape). Used more tape to make the straps holding the igniting charge to the napalm tanks. Added a few scratches and filling cap to the tanks too. The painting of the bombs was just olive drab all over, followed by painting on scratches in dark metallic paint using a bit of scouring pad. I rotated the bomb against the pad to make scratches from the bombs being rolled about. The tail units of the bombs are added just before use, so are a different shade (I just did an ink wash to them).
Posted: Sunday, July 18, 2010 - 12:06 PM UTC
Awesome detail work Ben, I love it !!

robot_

Joined: March 08, 2009
KitMaker: 719 posts
AeroScale: 691 posts

Posted: Monday, July 19, 2010 - 10:05 PM UTC
Thanks Damian!
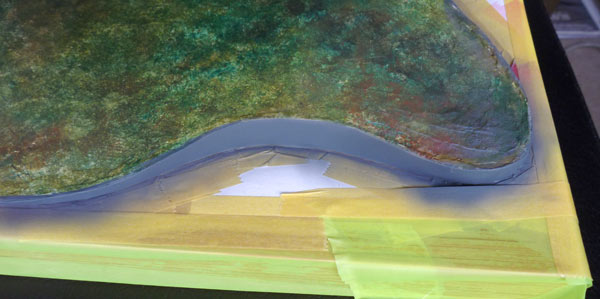
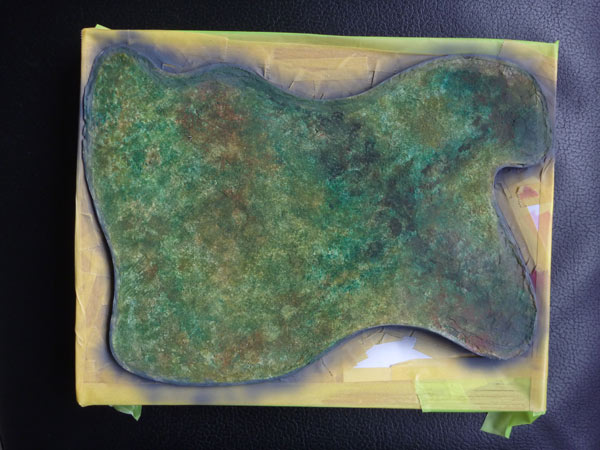
Last night I sprayed the white edges of the base a dark grey- I think it looks much better than the original white of the sheet styrene.
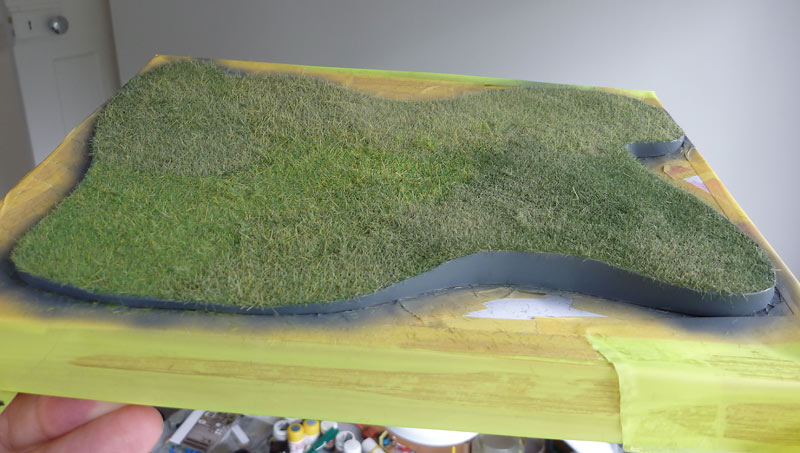
This morning I applied the static grass. I used my electric tea strainer (a metal tea strainer attached to the handle of an electric fly swat, with another wire running into the glue). I used 5 different colours of grass, of different lengths.
I need to apply some light airbrushing to blend the different grasses together, and re-create the shadow effect that I previously painted on the base.


Last night I sprayed the white edges of the base a dark grey- I think it looks much better than the original white of the sheet styrene.

This morning I applied the static grass. I used my electric tea strainer (a metal tea strainer attached to the handle of an electric fly swat, with another wire running into the glue). I used 5 different colours of grass, of different lengths.
I need to apply some light airbrushing to blend the different grasses together, and re-create the shadow effect that I previously painted on the base.

robot_

Joined: March 08, 2009
KitMaker: 719 posts
AeroScale: 691 posts

Posted: Tuesday, July 20, 2010 - 11:13 AM UTC
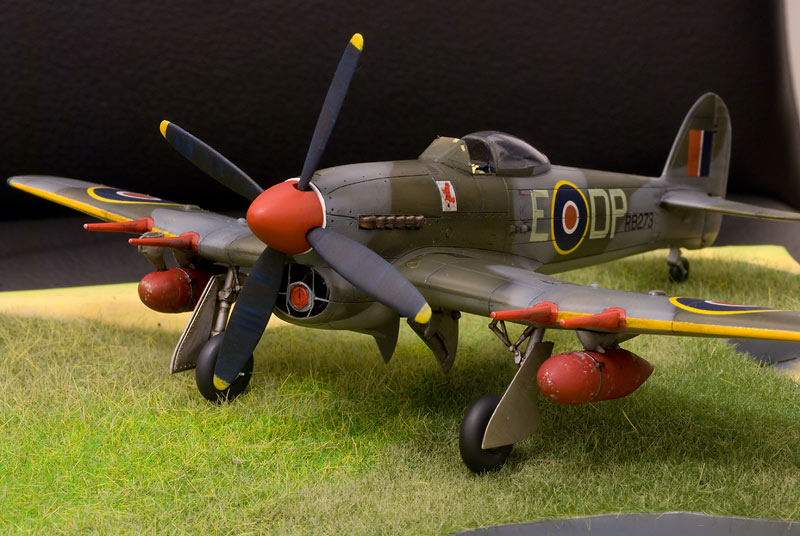
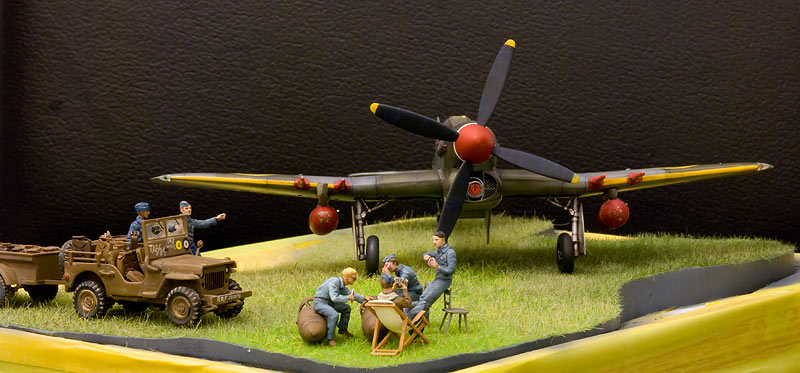
Wheels are on, tanks are on, another coat of Klear to cover the oil paint washes, prop and spinner are attached.


mtnflyer

Joined: March 08, 2009
KitMaker: 394 posts
AeroScale: 360 posts

Posted: Tuesday, July 20, 2010 - 11:35 AM UTC
An eye-catching, fantastic job! Very cool. 
Is drilling and painting the cannon barrels on your list?

Is drilling and painting the cannon barrels on your list?
NickZour

Joined: May 01, 2008
KitMaker: 1,437 posts
AeroScale: 1,241 posts

Posted: Tuesday, July 20, 2010 - 12:42 PM UTC
Congatulations, it's a great little dio' 

Cheers Nick


Cheers Nick


robot_

Joined: March 08, 2009
KitMaker: 719 posts
AeroScale: 691 posts

Posted: Wednesday, July 21, 2010 - 09:30 PM UTC
Thanks for the nice comments! It's a shame a few posts were lost.
I've been working on the last two figures- the one sitting on the wing, and the one on the ladder. Hopefully post photos of them nearing completion tonight.
I've been working on the last two figures- the one sitting on the wing, and the one on the ladder. Hopefully post photos of them nearing completion tonight.
eagledoc2000

Joined: August 03, 2003
KitMaker: 34 posts
AeroScale: 22 posts

Posted: Wednesday, July 28, 2010 - 02:12 AM UTC
Excellent work!! Well Done
 |


