_GOTOBOTTOM
Early Aviation
Discuss World War I and the early years of aviation thru 1934.
KotS GB 2012 Halb. CL.II -Stephen
JackFlash
_VISITCOMMUNITY
Colorado, United States
Joined: January 25, 2004
KitMaker: 11,669 posts
AeroScale: 11,011 posts
Posted: Thursday, January 07, 2010 - 10:13 AM UTC
So it begins.


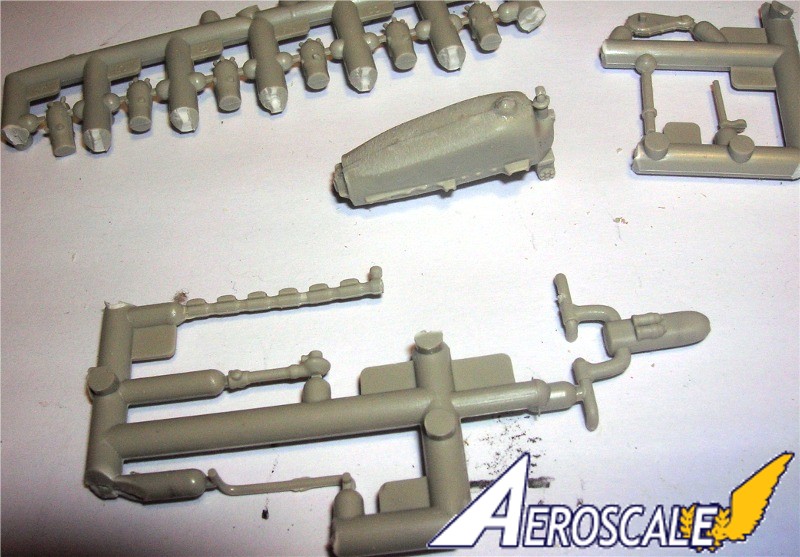
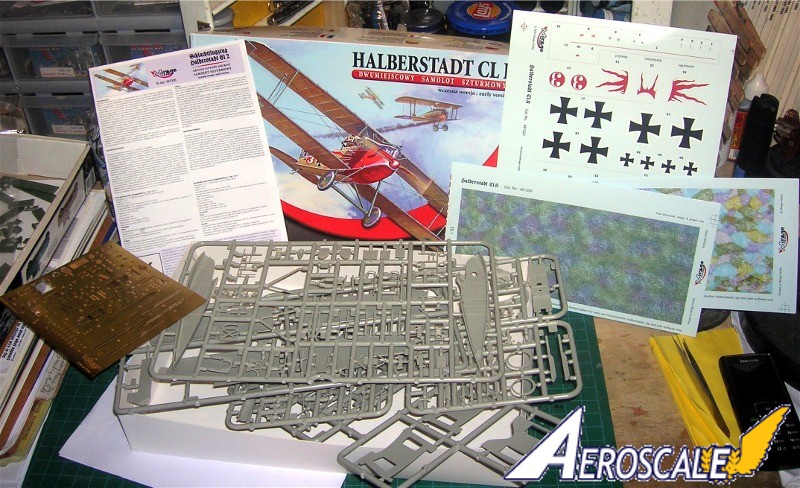
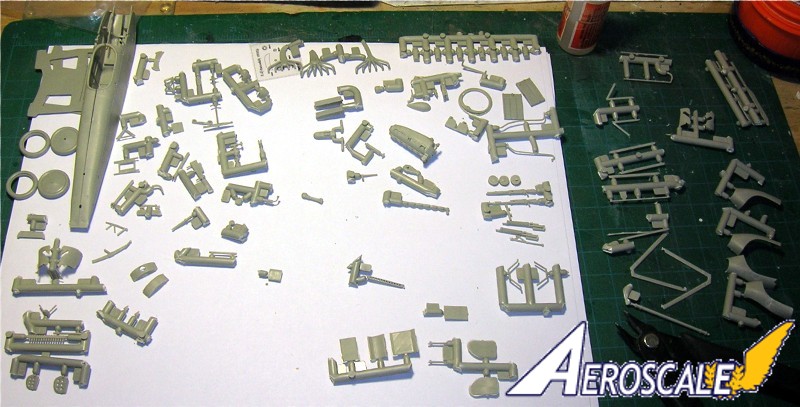
As mentioned earlier the preparation has taken about 4 hours. I can usually gauge how long a build will go after the preparation time. There are a lot of parts (141 @ grey styrene parts w/16 not needed) and I had my hands on all of them at one time or another this evening.

For me prepping is one of the most critical events of a build. The plastic sprue attachment points that have been previously noted are not bad to deal with at all. I will begin my build blog in a separate thread later this next week. The underside of wings stabilizers and elevator did get a quick base coat and will be left to dry for a couple of days.

The following is provided to help anyone looking for a good method to prep.
1. Read and re-read the instructions.
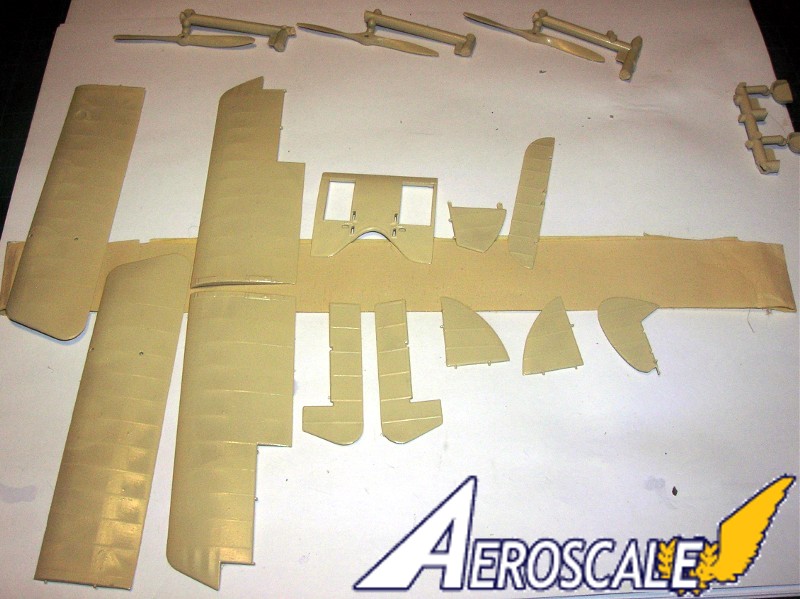
2. Sand smooth all edges of the wing panels, ailerons, stabilizers, elevator & rudder.
3. Sand smooth most sprue attachment points for other parts.
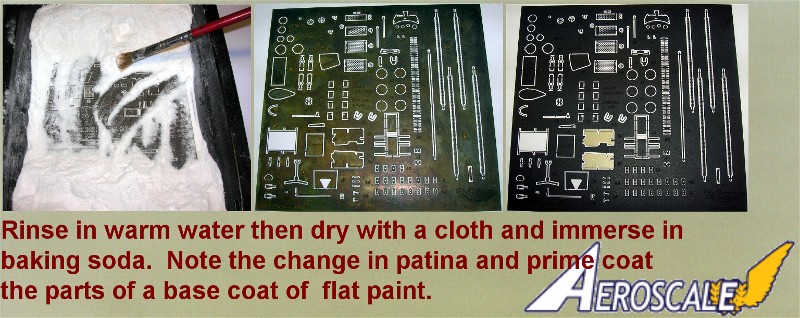
4. Separate parts into fabric covered, metal and wood areas.
5. Inventory required paints for the build.
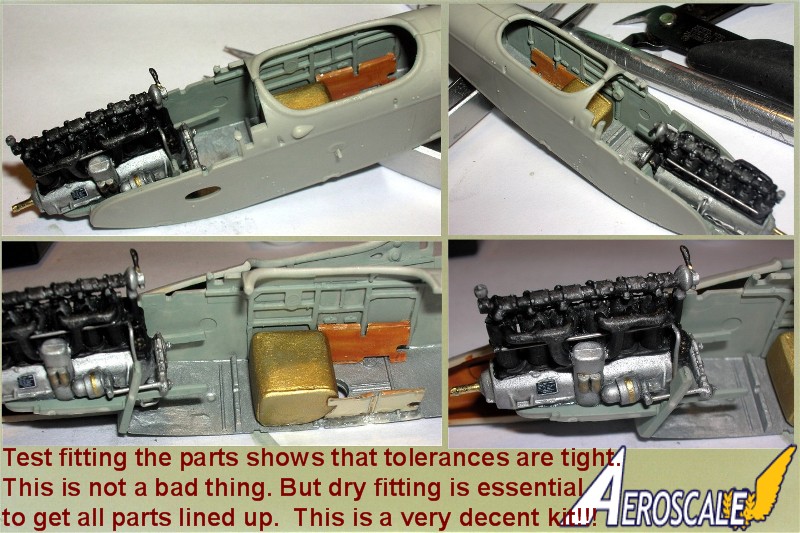
6. Test fit basic components.
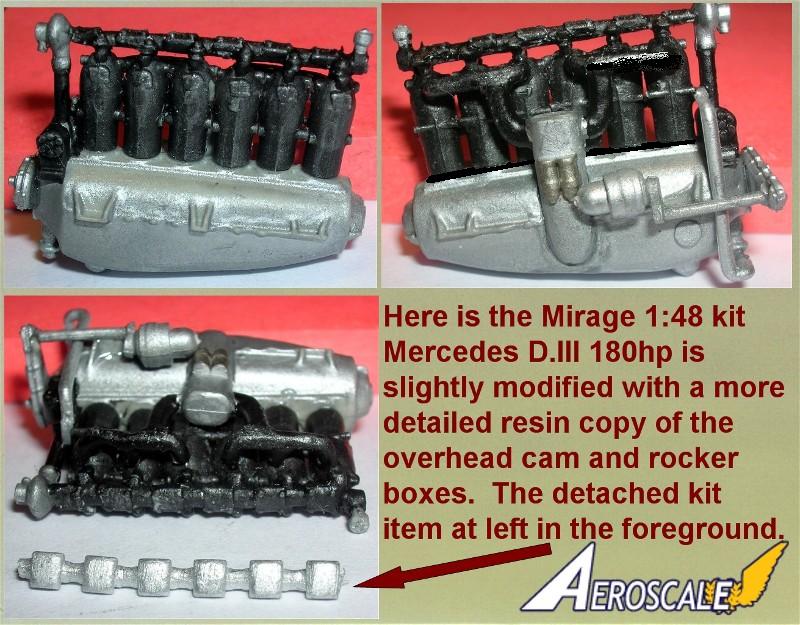
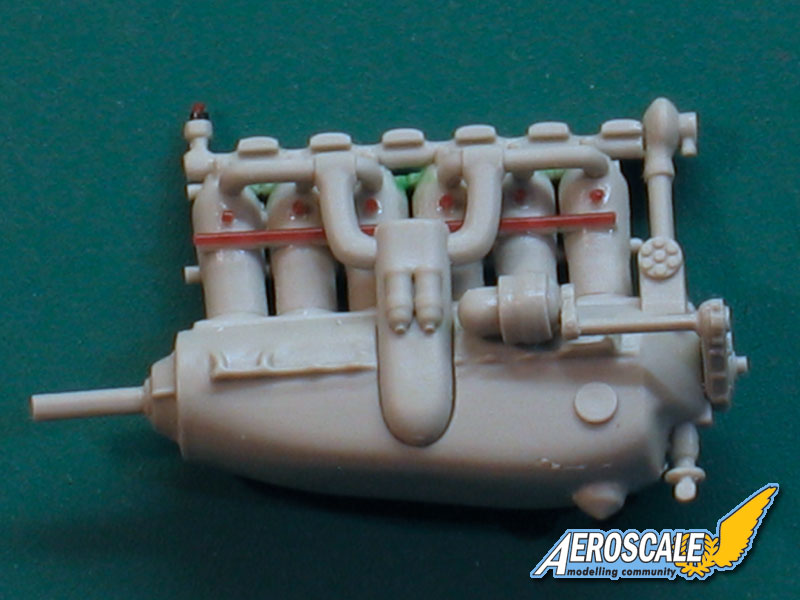
7. Identify areas that will need "extra" work or detailing from your spares or aftermarket sets
Mecenas
Joined: December 23, 2007
KitMaker: 1,596 posts
AeroScale: 1,275 posts
Posted: Thursday, January 07, 2010 - 10:27 AM UTC
Does this picture


mean there are two models in the box?

It's very interesting what you'r doing because I'm always affraid I will loose some parts so and I do not cut them off sprue untill I need them. But if you are carefull and keep your workbench tidy it may quicken your work, because you don't have to switch from one stage to another: first cleaning the parts, then painting wood, later metal and so on and on...very good idea.
JackFlash
_VISITCOMMUNITY
Colorado, United States
Joined: January 25, 2004
KitMaker: 11,669 posts
AeroScale: 11,011 posts
Posted: Thursday, January 07, 2010 - 12:33 PM UTC

Quoted Text

Does this picture . . .mean there are two models in the box? It's very interesting what you'r doing because I'm always afraid I will loose some parts so and I do not cut them off sprue until I need them. But if you are carefull and keep your workbench tidy it may quicken your work, because you don't have to switch from one stage to another: first cleaning the parts, then painting wood, later metal and so on and on...very good idea.


Greetings Michal, Only one kit per kit box. What you are seeing on the left is the discarded sprues. The kit parts still have their part number tags with a portion of the sprue attached. This aids in identifying the part and having something to hold it with when painting.

Every seam has to be removed from a part before painting. Each part is then placed in to a ziploc bag according to subject colour for painting. As mentioned before fabric, wood or metal. Items that receive an overcoating (like interior parts) are placed in a 4th bag. This allows me to conserve paint by shooting parts with the same base colour all at one time. Then give everything a flat over coat on all surfaces that protects the parts.
JackFlash
_VISITCOMMUNITY
Colorado, United States
Joined: January 25, 2004
KitMaker: 11,669 posts
AeroScale: 11,011 posts
Posted: Thursday, January 07, 2010 - 12:35 PM UTC
For instance.

JackFlash
_VISITCOMMUNITY
Colorado, United States
Joined: January 25, 2004
KitMaker: 11,669 posts
AeroScale: 11,011 posts
Posted: Thursday, January 07, 2010 - 01:58 PM UTC
The first steps include the parts for the Mercedes D.IIIaü 180hp motor assembly. The rocker box assembly is lacking in some details so did replace it with a resin copy I had in the spares box.


Opps misprint in the collage image. It should read "Mercedes D.IIIaü". Also note the kit plumbing is a bit thick for scale and I will replace it with smaller diamter bent brass rod.
Mecenas
Joined: December 23, 2007
KitMaker: 1,596 posts
AeroScale: 1,275 posts
Posted: Thursday, January 07, 2010 - 06:39 PM UTC

Quoted Text

Greetings Michal, Only one kit per kit box. What you are seeing on the left is the discarded sprues.


Yeah, I was just kidding I had the same when I cut off only the main parts in the Airfix Spitfire...half of the box content went to junk...
Merlin
Staff MemberSenior Editor
AEROSCALE
#017
_VISITCOMMUNITY
United Kingdom
Joined: June 11, 2003
KitMaker: 17,582 posts
AeroScale: 12,795 posts
Posted: Thursday, January 07, 2010 - 09:08 PM UTC
Hi Stephen

I sometimes slice up sprues that way - but never as thoroughly as you. How to tackle cleaning up and painting is always a quandary:

a. Separate all the parts to clean them up thoroughly prior to painting, or
b. Leave them on the sprues, part-clean them up and paint them, then separate them and finish cleaning them up and re-painting as necessary.

I usually go for the former, mounting the parts on double-sided tape and Blu-Tack for painting.

Here's where I got to with the engine before I had to shelve the build temporarily. I still need to hide that seam around Part #F14 and add wiring and more plumbing:


One point I noticed was that the shaft for the electric generator was a bit too long and pushed everything out of true (it looks like you hit the same problem) so I shortened it a bit. It's worth checking that it will all line up with the fuselage opening too...

Are you going to use the kit's decal mottling? The more I think about it (I know - I've had plenty of time! LOL!), the I'm coming to the conclusion that I'll paint the camouflage.

All the best

Rowan
JackFlash
_VISITCOMMUNITY
Colorado, United States
Joined: January 25, 2004
KitMaker: 11,669 posts
AeroScale: 11,011 posts
Posted: Friday, January 08, 2010 - 05:24 AM UTC
Greetings Rowan ,

There is a two part problem here.
1. the Generator shaft is too long so I drilled straight through the gearing housing.
2. What continued the problem was the vertical water pipe is too thick. Hence my reason to replace the plumbing and reset the affected parts as mentioned.
JackFlash
_VISITCOMMUNITY
Colorado, United States
Joined: January 25, 2004
KitMaker: 11,669 posts
AeroScale: 11,011 posts
Posted: Friday, January 08, 2010 - 05:32 AM UTC
Here is the main fuel tank assembly.


Here is a relative comparison of the kit motor with other manufacturer's versions.

JackFlash
_VISITCOMMUNITY
Colorado, United States
Joined: January 25, 2004
KitMaker: 11,669 posts
AeroScale: 11,011 posts
Posted: Saturday, January 09, 2010 - 04:23 PM UTC
I have reworked the kit motor to include some brass rod replacement plumbing. I will shoot some images later tonight. The fuel tank will get some additional details as well. Before you go too far with the generator, note that the gen. shaft must fit a slot in the bulkhead / fuselage former support. So the gear housing and the shaft must both sit at a right angle to the motor thrust line itself. What Mirage does not provide is the shelf for the generator to sit on. You will note that for a visual aid the Vector engine has this.

JackFlash
_VISITCOMMUNITY
Colorado, United States
Joined: January 25, 2004
KitMaker: 11,669 posts
AeroScale: 11,011 posts
Posted: Sunday, January 10, 2010 - 04:33 PM UTC
As promised here is the reworked engine with a couple of Dave Watts images of his 180hp Merc. Used with his permission of course. As you can see there are a few more general details I could add. The text for this review is about half done at this time.

thegirl
_VISITCOMMUNITY
Alberta, Canada
Joined: January 19, 2008
KitMaker: 6,743 posts
AeroScale: 6,151 posts
Posted: Monday, January 11, 2010 - 04:06 AM UTC
Engine looks super Stephen . Also nice to see the differences in the four manfactures . Vector being the better out of them . Of course though with other parts rob from the other ones , you will end up with nice looking engine . Not that there is any thing with the supplied kit engine . It just looks a little odd in shape .

Looking forward to the next up-date
Merlin
Staff MemberSenior Editor
AEROSCALE
#017
_VISITCOMMUNITY
United Kingdom
Joined: June 11, 2003
KitMaker: 17,582 posts
AeroScale: 12,795 posts
Posted: Monday, January 11, 2010 - 08:12 AM UTC
Hi Stephen

Thanks for the excellent reference shots! It's interesting that the cylinders aren't black all the way to the bottom on the preserved engine - I'll try to remember to do that on my one.

All the best

Rowan
JackFlash
_VISITCOMMUNITY
Colorado, United States
Joined: January 25, 2004
KitMaker: 11,669 posts
AeroScale: 11,011 posts
Posted: Monday, January 11, 2010 - 09:25 AM UTC
Thanks Terri & Rowan. Evidently the coloured rings noted horse power variations in late production motors. At a glance you could tell if the motor was an air depot rebuild or a factory built version. Dave Watts has been trying to sort that out for a few years now.
RAGIII
_VISITCOMMUNITY
North Carolina, United States
Joined: June 19, 2007
KitMaker: 604 posts
AeroScale: 600 posts
Posted: Monday, January 11, 2010 - 03:25 PM UTC
Stephen,
Looking forward to your build the kit looks fantastic.
RAGIII
Mgunns
_VISITCOMMUNITY
Arizona, United States
Joined: December 12, 2008
KitMaker: 1,423 posts
AeroScale: 1,319 posts
Posted: Tuesday, January 12, 2010 - 09:43 AM UTC
It all sort of comes together when you see the actual engine and the 'gizmoness' (as Indian Larry used to say) of it all.
JackFlash
_VISITCOMMUNITY
Colorado, United States
Joined: January 25, 2004
KitMaker: 11,669 posts
AeroScale: 11,011 posts
Posted: Wednesday, January 13, 2010 - 08:26 PM UTC
Now we begin the photoetch.


edoardo
_VISITCOMMUNITY
Milano, Italy
Joined: November 30, 2007
KitMaker: 642 posts
AeroScale: 382 posts
Posted: Wednesday, January 13, 2010 - 08:52 PM UTC
Very instructive and interesting, Stephen!
I'll follow you closely!

ciao
Edo
thegirl
_VISITCOMMUNITY
Alberta, Canada
Joined: January 19, 2008
KitMaker: 6,743 posts
AeroScale: 6,151 posts
Posted: Thursday, January 14, 2010 - 01:35 AM UTC
How do you find the thickness of the brass ? It seems thicker then with most kit's which come with PE ? Reminds me of Dragons with their stort run in WW 1 kits .
JackFlash
_VISITCOMMUNITY
Colorado, United States
Joined: January 25, 2004
KitMaker: 11,669 posts
AeroScale: 11,011 posts
Posted: Thursday, January 14, 2010 - 05:04 AM UTC

Quoted Text

How do you find the thickness of the brass ? It seems thicker then with most kit's which come with PE ? Reminds me of Dragon's with their short run in WWI kits .


DML / Dragon were often just a thicker metal covered in nickel. The type of metal varied slightly. Mirage's brass is slightly thicker than say Part of Poland but seems to take basic forming very well. More on that when I start posting images of the specific items.
JackFlash
_VISITCOMMUNITY
Colorado, United States
Joined: January 25, 2004
KitMaker: 11,669 posts
AeroScale: 11,011 posts
Posted: Tuesday, January 19, 2010 - 06:24 PM UTC


As the build progresses I can honestly say that it is easy to see that a great deal of thought and planning went into its molding.
thegirl
_VISITCOMMUNITY
Alberta, Canada
Joined: January 19, 2008
KitMaker: 6,743 posts
AeroScale: 6,151 posts
Posted: Wednesday, January 20, 2010 - 01:21 AM UTC
I really like how the engine sit's on it's craddle and the fit . Nice subject to detail with the cowling of if one decideds to go that way .
Mgunns
_VISITCOMMUNITY
Arizona, United States
Joined: December 12, 2008
KitMaker: 1,423 posts
AeroScale: 1,319 posts
Posted: Wednesday, January 20, 2010 - 05:13 AM UTC
Your work is really encouraging me to pull this off the shelf and tackle it. I am looking forward to seeing your work as you progress.

Emilio_Lizardo
_VISITCOMMUNITY
Missouri, United States
Joined: November 10, 2009
KitMaker: 27 posts
AeroScale: 26 posts
Posted: Thursday, January 21, 2010 - 11:02 AM UTC
On the brass prep. let me get this through the thick cranium....

Dip the plate in 'Blacken-it', rinse/dry and then brush on the baking soda?
JackFlash
_VISITCOMMUNITY
Colorado, United States
Joined: January 25, 2004
KitMaker: 11,669 posts
AeroScale: 11,011 posts
Posted: Thursday, January 21, 2010 - 04:28 PM UTC

Quoted Text

On the brass prep. let me get this through the thick cranium....

Dip the plate in 'Blacken-it', rinse/dry and then brush on the baking soda?


Essentially that is it. I go the extra step with the baking soda as it neutralizes the acid that might not have been washed away from the brass recesses. You don't want any part to have the acid still active. Weeks later after you paint and install the item the acid may still be eating away even if its overpainted. Done right this process gives the brass an etched surface that you can paint without primer.

I just applied the fretted brass gun jackets to the plastic breeches / receivers. When I rolled the painted jackets to form them not one cracked or peeled the paint covering. (You have to paint the interior side of the fretted jackets before you roll them.
 _GOTOTOP