KotS GB 2012 Halb. CL.II -Stephen
Västra Götaland, Sweden
Joined: February 19, 2010
KitMaker: 1,473 posts
AeroScale: 1,450 posts
Posted: Sunday, March 25, 2012 - 07:43 PM UTC
Hello Stephen always nice to follow your skills with the Lozenge

Mikael
_________________________________________________________
Just finished the Wingnut Wings Taube. On to the Junkers D.1
Colorado, United States
Joined: January 25, 2004
KitMaker: 11,669 posts
AeroScale: 11,011 posts
Posted: Monday, March 26, 2012 - 06:25 AM UTC
Thanks Mikael! The other lower wing is coming along. I note the rib tapes on the ailerons so they will be added too.
". . .The most important thing is to know why you build and then get the most that you can out of building." via D.D.
Colorado, United States
Joined: January 25, 2004
KitMaker: 11,669 posts
AeroScale: 11,011 posts
Posted: Monday, March 26, 2012 - 06:26 AM UTC
Also I am considering texture.
". . .The most important thing is to know why you build and then get the most that you can out of building." via D.D.
Alberta, Canada
Joined: July 26, 2010
KitMaker: 1,032 posts
AeroScale: 1,025 posts
Posted: Monday, March 26, 2012 - 06:38 AM UTC
Quoted Text
Also I am considering texture.
If you do I'll be watching closely. I've got a couple of the Microsculpt Sheets standing by and I'm itching to try it out, probably over the WNW Lozenge.
Break a leg!
Cheers,
Lance

Officially Retired as of 20 August 2013 and looking forward to some un-interrupted bench time. Currently starting Roden's Nieuport 28 and hoping to follow that with another WNW Fokker DVII.
Colorado, United States
Joined: January 25, 2004
KitMaker: 11,669 posts
AeroScale: 11,011 posts
Posted: Thursday, March 29, 2012 - 11:50 PM UTC
Here we go on the lower wing attachments. The "pins" are about .080 gauge stainless steel wire inserted into corresponding holes I drilled. This gives the wing a great attachment point.


". . .The most important thing is to know why you build and then get the most that you can out of building." via D.D.
Colorado, United States
Joined: January 25, 2004
KitMaker: 11,669 posts
AeroScale: 11,011 posts
Posted: Thursday, March 29, 2012 - 11:52 PM UTC
Next image shows the progress so far.

Ribtapes, ribtapes . . .still so much to do.

This is the "modified" texture from Microsculpt. It goes on like a dream. Now to let the lower wings upper surfaces dry and then trim. 66 sections of decal have been applied and I am not finished yet.
". . .The most important thing is to know why you build and then get the most that you can out of building." via D.D.
Croatia Hrvatska
Joined: November 06, 2009
KitMaker: 624 posts
AeroScale: 609 posts
Posted: Friday, March 30, 2012 - 12:31 AM UTC
Hi Stephen,
Some nice progress there with the "Halbie"... I would have commented more extensivelly, but who wants to mess up with the Editor-at-Large

All the best,
Entoni
"When everything else fails, read the instructions"
Colorado, United States
Joined: January 25, 2004
KitMaker: 11,669 posts
AeroScale: 11,011 posts
Posted: Friday, March 30, 2012 - 12:57 AM UTC
Yeah, I had to get Merlin to explain it to me.
". . .The most important thing is to know why you build and then get the most that you can out of building." via D.D.
Alberta, Canada
Joined: July 26, 2010
KitMaker: 1,032 posts
AeroScale: 1,025 posts
Posted: Friday, March 30, 2012 - 01:55 AM UTC
Quoted Text
Next image shows the progress so far.
Quoted Text
Ribtapes, ribtapes . . .still so much to do.
This is the "modified" texture from Microsculpt. It goes on like a dream. Now to let the lower wings upper surfaces dry and then trim. 66 sections of decal have been applied and I am not finished yet.
When you say "modified" texture what does that mean. I'm wondering if the stuff I have is older/inferior? Your photo only shows the top of the Sheet which is identical to mine; bottom on mine is"Copyright 2007 Microsculpt Studio" and "MD-48007".
Are they the same?
Thanks,
Lance

Officially Retired as of 20 August 2013 and looking forward to some un-interrupted bench time. Currently starting Roden's Nieuport 28 and hoping to follow that with another WNW Fokker DVII.
Colorado, United States
Joined: January 25, 2004
KitMaker: 11,669 posts
AeroScale: 11,011 posts
Posted: Friday, March 30, 2012 - 02:35 PM UTC
Quoted Text
When you say "modified" texture what does that mean. I'm wondering if the stuff I have is older/inferior? Your photo only shows the top of the Sheet which is identical to mine; bottom on mine is"Copyright 2007 Microsculpt Studio" and "MD-48007".
Are they the same?
Thanks,
Lance
Not inferior. But I would give it a couple of clear coats before using. When Tom Sollers first gave me his Textured decals I wrote about them and gave him my opinion. They were simply too flimsy and might frustrates modelers. He went back and fixed the issue but I think it was in late 2008 when that took place.
Try a small section on a minor piece. If it tends to be too flimsy simply over coat the rest of the sheet that you will project to use in the 20 hours following the over coat. Rattle can hobby clear like Testor's gloss coat work just fine.
When I get home tonight I'll check for sure about the model number on the sheets.
". . .The most important thing is to know why you build and then get the most that you can out of building." via D.D.
Alberta, Canada
Joined: July 26, 2010
KitMaker: 1,032 posts
AeroScale: 1,025 posts
Posted: Friday, March 30, 2012 - 03:41 PM UTC
Thanks Stephen. I bought mine on the net from Microsculpt about 16-18 months ago so hopefully it's the "new and improved" version. I'll test it first regardless as we all have learned that the worst testing platform is the almost complete model.
Cheers,
Lance
Officially Retired as of 20 August 2013 and looking forward to some un-interrupted bench time. Currently starting Roden's Nieuport 28 and hoping to follow that with another WNW Fokker DVII.
Alberta, Canada
Joined: January 19, 2008
KitMaker: 6,743 posts
AeroScale: 6,151 posts
Posted: Saturday, March 31, 2012 - 01:42 AM UTC
Moving along very nicely Stephen .
Colorado, United States
Joined: January 25, 2004
KitMaker: 11,669 posts
AeroScale: 11,011 posts
Posted: Saturday, March 31, 2012 - 02:36 AM UTC
Ok, Lance yes same model number as the one you mentioned and here is the result after a Testors dullcote.

 Hello Terri!
 ". . .The most important thing is to know why you build and then get the most that you can out of building." via D.D.
Västra Götaland, Sweden
Joined: February 19, 2010
KitMaker: 1,473 posts
AeroScale: 1,450 posts
Posted: Saturday, March 31, 2012 - 06:56 AM UTC
Stephen, that textured wing is looking really great, will you do any oil washes as well?
Mikael
_________________________________________________________
Just finished the Wingnut Wings Taube. On to the Junkers D.1
Colorado, United States
Joined: January 25, 2004
KitMaker: 11,669 posts
AeroScale: 11,011 posts
Posted: Saturday, March 31, 2012 - 11:42 AM UTC
Greetings Mikael. It is just decals. Though I have thought about using oils, I just never got around to it. Most washes I use are acrylic or enamel. In this case as I mentiond, no washes.
Also as I proceed here I thought I would discuss some of the method to my madness. While I am sure that the under surfaces on some early Halb.CL.II airframes were CDL (Clear doped linen), I am also sure that in some cases they were painted a cream colour like the French machines (Spad & etc). Some of this comes from production plans of aircraft manufacturers during war time.
If they were to run short of one substance and could not wait for new supplies to arrive without holding up productions, they had options. So in some cases the undersurfaces appear light but uniform without shadows between the underlying skeletal framing. Edging & rib tapes were applied after the wing covering was attached and doped.
The fabric covering was sewn in place (whip stitched) on the ribs (that had cotten batting attached)and then doped. Next the tapes were tacked in place over the stitching and doped. I have seen an image of Halb. CL. II being repaired at the lower wing trailing edge. The edge & rib tapes have been pulled back -intact the fabric covering seam ripped open (uppersurface) then a rigger is seen working on the repair.
I am going to duplicate the painted tapes on the surfaces of the wings of my build. All the edging tapes seem to have been left in clear dope. A good indication thy were applied after the wing cover and rib tapes were applied. Also components were built in different shops and brought together on the main factory floor. (Something they did in WWII as well). Evidently each shop was alotted a certain amount of materials to accomplish their assigned work load.
The reasoning for the tan, cream overcoating is easy to understand. But the Germans even applied tan paint to the undersurfaces of the metal skin on the Junkers J.I types. WNW says that it was done to make the ground troops think that it was just fabric surfaces. Studying ground support aircraft for the past couple of years has fed me all kinds of information like this.
". . .The most important thing is to know why you build and then get the most that you can out of building." via D.D.
Alberta, Canada
Joined: March 08, 2009
KitMaker: 394 posts
AeroScale: 360 posts
Posted: Saturday, March 31, 2012 - 01:09 PM UTC
This is the first I've ever seen decal used for this effect; never realized they existed, nor did I give the idea of texture much thought.
I really admire what you have done. It looks great.
I'm learning. Thankyou
Current Projects: 1/144 R5D-3 (MiniCraft)
1/48 Ford Flivver (Williams Bro.)
1/72 UC-64A Norseman (MatchBox)
MAAC No.51187
IPMS CANADA No. 3369
British Columbia, Canada
Joined: September 03, 2009
KitMaker: 6,965 posts
AeroScale: 6,247 posts
Posted: Saturday, March 31, 2012 - 01:41 PM UTC
I'm curious about those texture decals. Is the texture just printed shades, or do they have a 3D effect? I'm wondering what they'd be like with a very thin coloured decal applied overtop.
When once you have tasted flight you will walk the Earth with your eyes turned skyward.
For there you have been, and there you will always long to return.
-Leonardo Da Vinci
Alberta, Canada
Joined: July 26, 2010
KitMaker: 1,032 posts
AeroScale: 1,025 posts
Posted: Saturday, March 31, 2012 - 02:10 PM UTC
Stephen,
Thanks for the info; I really like the look of your results. The textured application certainly tones down the lozenge and, IMHO, makes it look much more life-like. I've seen lozenge first-hand only twice (and both reproductions); the Smithsonian and the Canadian Aviation Museum in Ottawa. The latter was very much a night scheme application and the lozenge was "subdued" like your example here. My only viewing of actual lozenge is on-line and it's been almost 100 years since it was being used as well.
I'm on it with my next build which I'll be registering for KoTS II tomorrow, Monday latest.
Cheers,
Lance

Officially Retired as of 20 August 2013 and looking forward to some un-interrupted bench time. Currently starting Roden's Nieuport 28 and hoping to follow that with another WNW Fokker DVII.
Colorado, United States
Joined: January 25, 2004
KitMaker: 11,669 posts
AeroScale: 11,011 posts
Posted: Saturday, March 31, 2012 - 02:28 PM UTC
Thanks Guy & Lanc
Quoted Text
I'm curious about those texture decals. Is the texture just printed shades, or do they have a 3D effect? I'm wondering what they'd be like with a very thin coloured decal applied overtop.
Greetings Ms. Jessica,
This is only in two light shades (a grey and a grey brown)and an opaque decal over it would kill the effect. It was meant to lay down over an opaque decal to add textured fabric effect. The decal it was made for is the "factory colour printed" version. I am afraid it would render a painted fabric unreal. Just my opinion.
". . .The most important thing is to know why you build and then get the most that you can out of building." via D.D.
British Columbia, Canada
Joined: September 03, 2009
KitMaker: 6,965 posts
AeroScale: 6,247 posts
Posted: Saturday, March 31, 2012 - 04:05 PM UTC
So it's just a visual texture then. It really adds to the look of the final surface.
When once you have tasted flight you will walk the Earth with your eyes turned skyward.
For there you have been, and there you will always long to return.
-Leonardo Da Vinci
Colorado, United States
Joined: January 25, 2004
KitMaker: 11,669 posts
AeroScale: 11,011 posts
Posted: Monday, April 02, 2012 - 03:30 PM UTC
Here is where I started expounding on the virtues of "texturing" lozenge decals.
Here are some recent studies where Dan San Abbott and Mark Miller's influence is strong. The pink rib tapes denote Albatros - Johannistahl built wings.
First 4 colour lower.

Next 4 colour upper.

". . .The most important thing is to know why you build and then get the most that you can out of building." via D.D.
England - South East, United Kingdom
Joined: November 06, 2005
KitMaker: 1,667 posts
AeroScale: 1,551 posts
Posted: Monday, April 02, 2012 - 07:13 PM UTC
Yes texturing, like woodgraining is a matter of taste, but like most every method of wearing and washing it's finding the balance you are happy with.
It may be out of scale in some respect but it damn well looks right, it gives the viewer the sense of what he or she are looking at actually is. I do like it myself it certainly adds to the overall effect
Oh and loving the work so far too Stephen, nice attention to detail.
Keith
Still can't cure the AMS even with sausage finger implants & olde eyes.
Alberta, Canada
Joined: July 26, 2010
KitMaker: 1,032 posts
AeroScale: 1,025 posts
Posted: Tuesday, April 03, 2012 - 01:43 AM UTC
Quoted Text
Thanks Guy & Lanc
Quoted Text
I'm curious about those texture decals. Is the texture just printed shades, or do they have a 3D effect? I'm wondering what they'd be like with a very thin coloured decal applied overtop.
Greetings Ms. Jessica,
This is only in two light shades (a grey and a grey brown)and an opaque decal over it would kill the effect. It was meant to lay down over an opaque decal to add textured fabric effect. The decal it was made for is the "factory colour printed" version. I am afraid it would render a painted fabric unreal. Just my opinion.
Stephen,
The two shades you mention, do they have different Sheet or Product numbers? When I ordered mine (approx. 1 year ago) I don't recall there being any choice however looking at my Sheets I believe they are the "grey-brown".
Also, on your preceeding photos did the crosses go on over top of the textured decal or before?
Cheers,
Lance
Officially Retired as of 20 August 2013 and looking forward to some un-interrupted bench time. Currently starting Roden's Nieuport 28 and hoping to follow that with another WNW Fokker DVII.
Colorado, United States
Joined: January 25, 2004
KitMaker: 11,669 posts
AeroScale: 11,011 posts
Posted: Tuesday, April 03, 2012 - 04:13 AM UTC
The first was grey but that was the one that was too flimsy. Crosses are painted on so I would put them on over the texture unless you wanted a dirty look. I want to repeat texture is appropriate for fabrics with printed patterns but not for painted fabric surfaces.
". . .The most important thing is to know why you build and then get the most that you can out of building." via D.D.
Colorado, United States
Joined: January 25, 2004
KitMaker: 11,669 posts
AeroScale: 11,011 posts
Posted: Thursday, April 05, 2012 - 03:18 PM UTC
While the wings on this build kit have been drying, between applications I pulled out my other two Mirage 1:48 Halb. CL.II kits and have been prepping them. One set I used to apply the Mirage 5 colour lozenge decals
here. 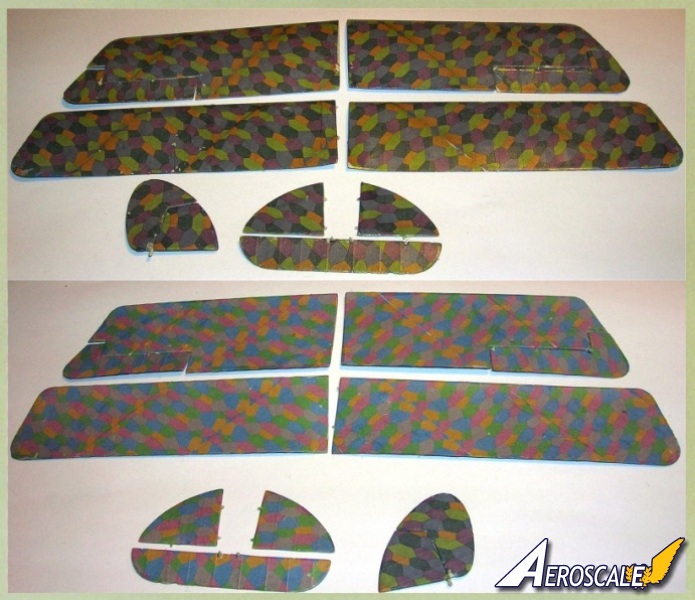
The other will get the clear doped linen treatment. When Mirage comes out with the CL.IV I will do those wings with their 4 colour lozenge. I understand they are doing some research on this now. They want to get future issues of the 4 & 5 colour closer to some tracings that have come into their possesion. I like a company that does their best to get it right.
". . .The most important thing is to know why you build and then get the most that you can out of building." via D.D.


