Early Aviation
Discuss World War I and the early years of aviation thru 1934.
KotS GB 2012 Halb. CL.II -Stephen
JackFlash
_VISITCOMMUNITY
Colorado, United States
Joined: January 25, 2004
KitMaker: 11,669 posts
AeroScale: 11,011 posts
Posted: Thursday, January 05, 2012 - 03:05 PM UTC

Quoted Text

How does rest of the engine cowling fit ?


Actually it is a good fit. When you begin to attach the rear portions of the upper cowling I was afraid that it was goint to throw off the alignment of the front engine cowlings (#53 & #54) in this case. But the fit turns out very close with only some minor clean up. With that said the opening in the pilot's right side front cowl for the cylinders needs to be carved back about 1mm. If your putting sparkplug wiring in your build that 1mm will allow the wires to pass from the sparkplug locations to the conduit without the cowl hindering the runs. I will be leaving my left side cowling off to display the motor. But I was sure someone might ask.

Note also when installing the engine take extra care to align the motor & the motor mounts up with the centerline of the fuselage. I had to go back and reset mine when I found it was 2mm off. My own fault really. It will be very noticeable when seen from the nose or above.


JackFlash
_VISITCOMMUNITY
Colorado, United States
Joined: January 25, 2004
KitMaker: 11,669 posts
AeroScale: 11,011 posts
Posted: Thursday, January 05, 2012 - 03:10 PM UTC
Also just to note that mine is the earlier single Spandau Maxim gun mount.


JackFlash
_VISITCOMMUNITY
Colorado, United States
Joined: January 25, 2004
KitMaker: 11,669 posts
AeroScale: 11,011 posts
Posted: Thursday, January 05, 2012 - 03:13 PM UTC
Now if your doing a build that requires the other cowlings (#51 & #52) you will have shorter rear pieces and the front are a bit longer and so the seam for the cowlings will set further back. I think that these are to be used on the later twin Spandau set up.
JackFlash
_VISITCOMMUNITY
Colorado, United States
Joined: January 25, 2004
KitMaker: 11,669 posts
AeroScale: 11,011 posts
Posted: Wednesday, January 11, 2012 - 08:30 AM UTC


Here the fuselage is all closed up and ready for the Mirage camo decal like I used on the center section. But I went a little darker on the fuselage base coat.
JackFlash
_VISITCOMMUNITY
Colorado, United States
Joined: January 25, 2004
KitMaker: 11,669 posts
AeroScale: 11,011 posts
Posted: Wednesday, January 11, 2012 - 08:38 AM UTC


Quoted Text

". . .The center scetion has the Mirage mottled camouflage decal applied. It lays down well and I think it will be just as easy to lay down on the fuselage. BUT - The fuselage will have to have a base coat just like the center section."

JackFlash
_VISITCOMMUNITY
Colorado, United States
Joined: January 25, 2004
KitMaker: 11,669 posts
AeroScale: 11,011 posts
Posted: Sunday, January 15, 2012 - 09:06 AM UTC
As I continue to work on this kit let me remind you earnestly - clear coat just the Mirage kit decals you will use. And then cut them from the sheet as close to the decal edge as possible. Mottled or the full decal sheet of national, unit & personal markings. Without it these items will fracture. With the clear coat and some Sol & Set they go on nicely. The red flame decals will plague you if you do not clear coat them and let dry first.
JackFlash
_VISITCOMMUNITY
Colorado, United States
Joined: January 25, 2004
KitMaker: 11,669 posts
AeroScale: 11,011 posts
Posted: Sunday, January 15, 2012 - 01:42 PM UTC
Also just to have it here and note that another fine build was done by our own Mark (Guitarlute) Hamrick see here.
JackFlash
_VISITCOMMUNITY
Colorado, United States
Joined: January 25, 2004
KitMaker: 11,669 posts
AeroScale: 11,011 posts
Posted: Friday, January 20, 2012 - 04:40 PM UTC
I will put this into the review but just to touch on it here the radio-telefunkin set ups are usually either or and Mirage gives you an option to choose one set or another. Now the bird I chose to do does not seem to have external grenade racks or bombs so I am going with a set up for both units. Halberstadt CL.II 14277/17 "3", Schlachtstaffel 26b, Bissinghem airfield, spring 1918.

There were usually six machines set up in Schlachtstaffel flights or "kette". Each tended to have certain equipment or armament options.
JackFlash
_VISITCOMMUNITY
Colorado, United States
Joined: January 25, 2004
KitMaker: 11,669 posts
AeroScale: 11,011 posts
Posted: Friday, January 20, 2012 - 05:49 PM UTC
As is usual in my builds I like to provide some historical background and I am a little behind in doing so with this thread so lets get on with it.

"Their success in the CAS (close air support) and "contact-patrol" roles led to the Schustas being re-designated as "Schlachtstaffeln" (literally Battle Squadrons) who now specialised in CAS operations while the more reconnaissance intensive "contact-patrols" were taken over by the Flieger Abteilung (Infantrie) squadrons who specialised in very low altitude infantry co-operation, communication and reconnaissance.

Schlastas operated a mix of un-armoured but highly manoeuvrable two-seat fighters such as the Halberstadt CL.II and the Hannover CL.III & IIIa aircraft as well as later armored types such as the Albatros J.I and the AEG J.I.

The Fl. Abt. (Inf.) units would, however, usually operate only the armoured aircraft types including the very successful Junkers J.I.

A Schlastas operated according to a strict set of orders that required it to stick to a pre-determined "sphere of action". The intention of this rule was to prevent the effectiveness of the Schlastas from being diluted by secondary tasks. Schlastas were attached to field armies, corps and even individual divisions to ensure the closest possible co-operation with ground forces. When attacking, Schlastas would try to stay in close contact with ground forces, although this was difficult since aircraft were not universally equipped with radio at the time. Communication was often accomplished by message drops by the aircraft and signals laid out in predescribed symbol form by the ground forces in response. Radio communications were used when such equipment was available. A Schlasta usually consisted of 4-6 aircraft which was the maximum number a formation leader could effectively command without voice radio. The ability of a Schlasta leader to exercise control over his flight was important since a concentrated low altitude mass attack, preferably in formation, by multiple squadrons were at the heart of Schlasta tactics. The "spheres of action" assigned to different Schlasta included enemy infantry formations, airfields, artillery positions, unit headquarters, supply columns and even tanks, attacking with machine-gun fire, small fragmenting mortar bombs and hand grenades."

The previous is from:
Sclachtflieger! by Duiven, Rick; Dan-San Abbott (2006). Atglen PA: Schiffer Military History. ISBN 0-7643-2441-1.

JackFlash
_VISITCOMMUNITY
Colorado, United States
Joined: January 25, 2004
KitMaker: 11,669 posts
AeroScale: 11,011 posts
Posted: Tuesday, January 24, 2012 - 09:15 PM UTC


I combine several spare kit parts to try to get the closest look of a Parabellum and as can be seen in the image below the look is ok but still needs some refining to be more in -scale.


The Mirage Parabellum ammo reels are "put together" with a scrap section of sprue. The plasitc reels could be used but require work that can be left alone if the scrap is used instead.


Here is the sequence of fuselage decal applications.

JackFlash
_VISITCOMMUNITY
Colorado, United States
Joined: January 25, 2004
KitMaker: 11,669 posts
AeroScale: 11,011 posts
Posted: Tuesday, January 31, 2012 - 08:02 PM UTC
So this kit is my 1st entry in the KotS II GB.
Mgunns
_VISITCOMMUNITY
Arizona, United States
Joined: December 12, 2008
KitMaker: 1,423 posts
AeroScale: 1,319 posts
Posted: Friday, February 03, 2012 - 06:38 AM UTC
Hello Stephen:

It looks as if you are making good progress on this build. I have been following you on this build and look forward to more progress.

Best
Mark
thegirl
_VISITCOMMUNITY
Alberta, Canada
Joined: January 19, 2008
KitMaker: 6,743 posts
AeroScale: 6,151 posts
Posted: Saturday, February 25, 2012 - 11:32 AM UTC
How did you do the decal on the turtle deck ?

Nice to see you make head way with this build , looking forward to your next up-date .


Terri
JackFlash
_VISITCOMMUNITY
Colorado, United States
Joined: January 25, 2004
KitMaker: 11,669 posts
AeroScale: 11,011 posts
Posted: Saturday, February 25, 2012 - 03:14 PM UTC
Thanks Terri,

As to the turtle deck or spine area its relatively easy. I usually take a piece of tracing or onion paper (Very thin) and cut a section out and hold it in place (on the fuselage sides)with a couple of wooden spring action clothes pins. I then burnish the paper over the longerons with the face of my thumbnail.

The ridges left by this leave me a pretty good guide to the needed area to be covered by the mottle decal. Using my thumbnail allows that I won't damage any plastic details. When almost dry I cut any excess off with a new Xacto blade. I am busy at this moment with the dry fitting of the lower wings and finishing the fuselage datum decals and its undersurface.

The pinched nerve in my back has me working when I can right now. But still plenty of time to finish this build.
thegirl
_VISITCOMMUNITY
Alberta, Canada
Joined: January 19, 2008
KitMaker: 6,743 posts
AeroScale: 6,151 posts
Posted: Sunday, February 26, 2012 - 01:33 PM UTC
Smacks forehead .....doa !

Should have know this already Stephen . I've used paper before for doing similar methods . The onion paper is new to me and will have to keep this in mind . Thanks for the reply .......

Pinched nerve in the back is never a good thing , hope you feel up to par soon .


Terri
OEFFAG_153
_VISITCOMMUNITY
Västra Götaland, Sweden
Joined: February 19, 2010
KitMaker: 1,473 posts
AeroScale: 1,450 posts
Posted: Monday, February 27, 2012 - 08:21 PM UTC
Stephen,

This is one very interesting build – and a very cool profile – love those flames

Hope your back gest better soon!

Mikael
KrzysiekK
_VISITCOMMUNITY
Warszawa, Poland
Joined: January 24, 2012
KitMaker: 30 posts
AeroScale: 29 posts
Posted: Tuesday, February 28, 2012 - 05:25 AM UTC
yeah, looking forward as well.
Have to confront with my CL IV project
J99Hasso
_VISITCOMMUNITY
Berlin, Germany
Joined: March 06, 2012
KitMaker: 5 posts
AeroScale: 4 posts
Posted: Tuesday, March 06, 2012 - 09:58 AM UTC
What motors are installed in Halberstadt? The Mercedes D III or D IIIa ?
JackFlash
_VISITCOMMUNITY
Colorado, United States
Joined: January 25, 2004
KitMaker: 11,669 posts
AeroScale: 11,011 posts
Posted: Tuesday, March 06, 2012 - 10:18 AM UTC
The Mercedes D.IIIa 170hp was in production at the time with the narrow upright air pump on the #1 cylinder. The D.III was outclassed and examples in repair were being built up to D.IIIa standards. This basically meant moving the air pump and installing flat head pistons over the old concave or cupped heads versions. There were other mods as well.
J99Hasso
_VISITCOMMUNITY
Berlin, Germany
Joined: March 06, 2012
KitMaker: 5 posts
AeroScale: 4 posts
Posted: Tuesday, March 06, 2012 - 10:25 AM UTC
Is there a source?
JackFlash
_VISITCOMMUNITY
Colorado, United States
Joined: January 25, 2004
KitMaker: 11,669 posts
AeroScale: 11,011 posts
Posted: Tuesday, March 06, 2012 - 10:39 AM UTC
Several in the Daimler factory archives.
JackFlash
_VISITCOMMUNITY
Colorado, United States
Joined: January 25, 2004
KitMaker: 11,669 posts
AeroScale: 11,011 posts
Posted: Wednesday, March 21, 2012 - 08:07 PM UTC
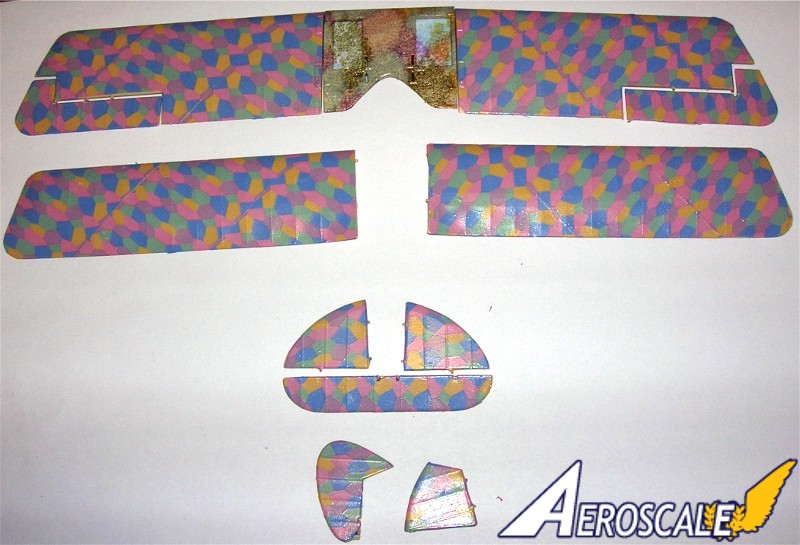
Ok, I have been busy slapping lozenge decals on some kit review wings for Mirage and HGW. Also I have been working on several full kit reviews. As soon as that's done back on this full steam.
JackFlash
_VISITCOMMUNITY
Colorado, United States
Joined: January 25, 2004
KitMaker: 11,669 posts
AeroScale: 11,011 posts
Posted: Sunday, March 25, 2012 - 12:27 AM UTC

Simulating the natural linen batting for the rib tape of the early production type.

Here I cut Microsculpt undersurface lozenge for the edge tapes.


lcarroll
_VISITCOMMUNITY
Alberta, Canada
Joined: July 26, 2010
KitMaker: 1,032 posts
AeroScale: 1,025 posts
Posted: Sunday, March 25, 2012 - 01:09 AM UTC
Stephen,
What are you using for the "natural linen batting for rib tapes" for the earlier types?
Nice little assembly jigs/stands. Another great idea I'll quietly take from the Master's tickle trunk!
Lozenge looks really good.
Cheers,
Lance
JackFlash
_VISITCOMMUNITY
Colorado, United States
Joined: January 25, 2004
KitMaker: 11,669 posts
AeroScale: 11,011 posts
Posted: Sunday, March 25, 2012 - 08:54 AM UTC
Greetings Lance. Rib tapes are simply decal film with 3-4 layers of clear gloss and cut into strips.