

Early Aviation
Discuss World War I and the early years of aviation thru 1934.
Discuss World War I and the early years of aviation thru 1934.
Hosted by Jim Starkweather
KotS GB 2012 Halb. CL.II -Stephen

JackFlash

Joined: January 25, 2004
KitMaker: 11,669 posts
AeroScale: 11,011 posts
Posted: Friday, January 22, 2010 - 11:48 PM UTC
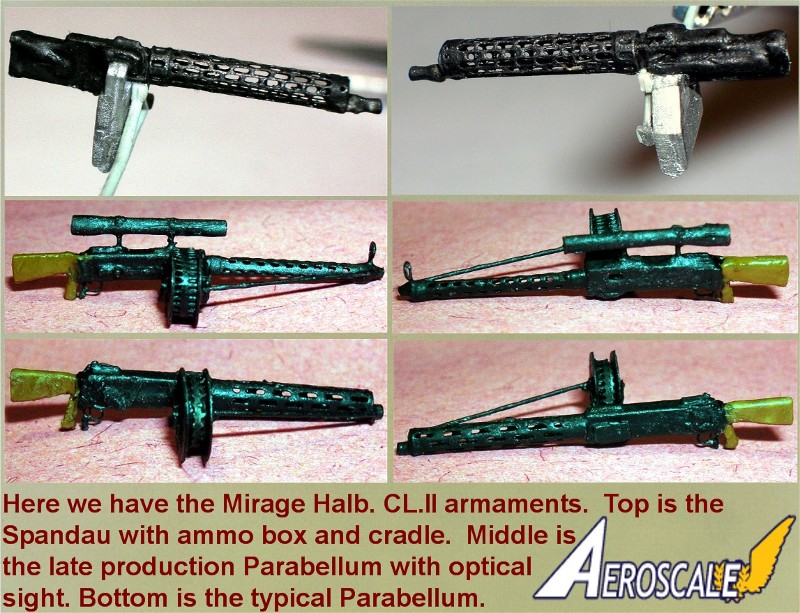
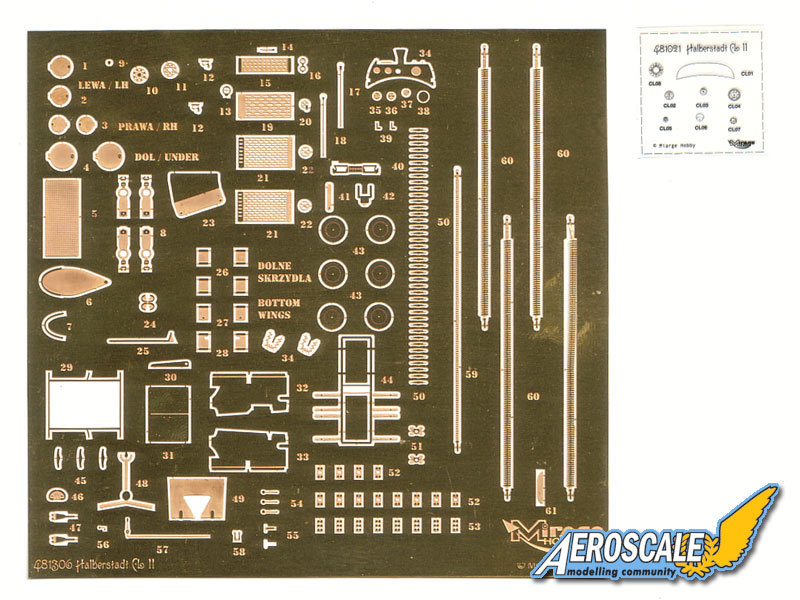
Here are the armaments.
JackFlash
Joined: January 25, 2004
KitMaker: 11,669 posts
AeroScale: 11,011 posts
Posted: Saturday, January 23, 2010 - 03:52 PM UTC
JackFlash
Joined: January 25, 2004
KitMaker: 11,669 posts
AeroScale: 11,011 posts
Posted: Sunday, January 24, 2010 - 12:07 AM UTC
While other portions of the build are drying I began to work with the wing coverings / camouflage by applying the Microsculpt 5 colour lozenge and the Mirage Mottled camouflage.
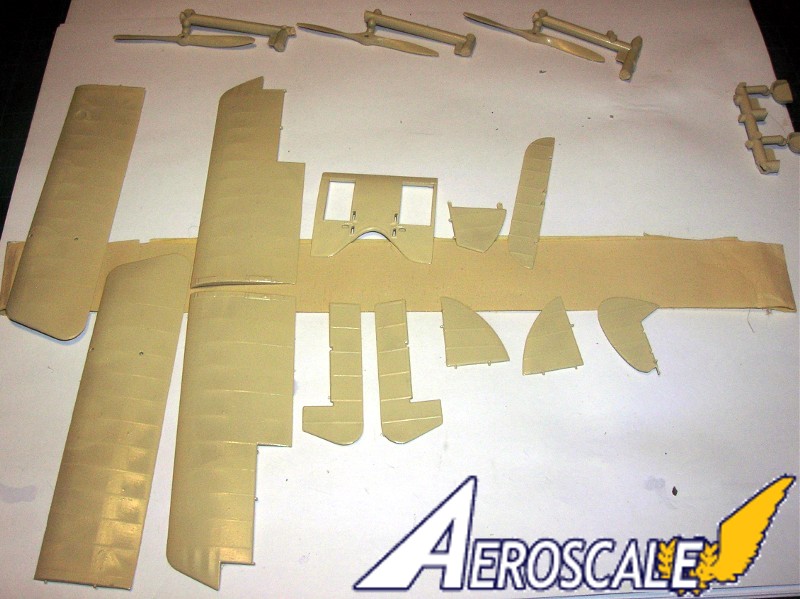
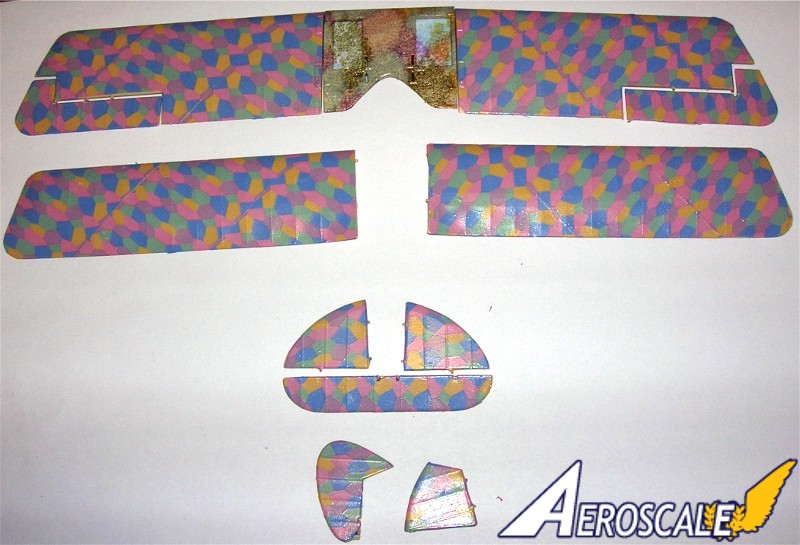
The center scetion has the Mirage mottled camouflage decal applied. It lays down well and I think it will be just as easy to lay down on the fuselage. BUT - The fuselage will have to have a base coat just like the center section.
The center scetion has the Mirage mottled camouflage decal applied. It lays down well and I think it will be just as easy to lay down on the fuselage. BUT - The fuselage will have to have a base coat just like the center section.

thegirl

Joined: January 19, 2008
KitMaker: 6,743 posts
AeroScale: 6,151 posts
Posted: Sunday, January 24, 2010 - 12:31 AM UTC
Nice work done to the guns Stephen ! Mirage has done an excellent job with the mouldings and PE parts for these .
Was one of the kit's cowling covers broken in your kit ?
Lozenge looks great as well , what did you use for your base coat ?
Was one of the kit's cowling covers broken in your kit ?
Lozenge looks great as well , what did you use for your base coat ?
JackFlash
Joined: January 25, 2004
KitMaker: 11,669 posts
AeroScale: 11,011 posts
Posted: Sunday, January 24, 2010 - 04:48 PM UTC
Quoted Text
Nice work done to the guns Stephen ! Mirage has done an excellent job with the mouldings and PE parts for these .
Was one of the kit's cowling covers broken in your kit ?
Lozenge looks great as well , what did you use for your base coat ?
Agreed on the guns though I am of the opinion the "wooden" rear gun stocks and hand grips may be a slight bit short. Yes, as a matter of fact one was broken but easily repaired. For the base coat its is a yellow almond spray coat. Its actually an outdoor / appliance paint. I like it because its hot enough when it goes down to be almost unscratchable when dry and very thin.
For others reading this, generic use outdoor paints have to be durable when they come from name brands like Dupont or etc. They assume you use them for outdor lawn furniture or etc. These types of paints going down on a mildly sanded surface really lock down. When a paint is described as "hot" that means the carrier fluid / thinner in the paint etches into the painted surface. Two mist coats and one final cover coat. Light even coats. Let it cure for about 3-5 days (depending on your climate)
guitarlute101
Joined: December 18, 2006
KitMaker: 1,121 posts
AeroScale: 1,063 posts
Posted: Wednesday, January 27, 2010 - 12:31 PM UTC
Stephen,
I just received my Halberstadt kit. The instructions call for you to paint the back of the clear instrument dials but my kit has no clear film or acetate included, does yours?
Mark
I just received my Halberstadt kit. The instructions call for you to paint the back of the clear instrument dials but my kit has no clear film or acetate included, does yours?
Mark
thegirl
Joined: January 19, 2008
KitMaker: 6,743 posts
AeroScale: 6,151 posts
Posted: Wednesday, January 27, 2010 - 02:40 PM UTC
Excellent Mark , pick my up last year . You got me thinking though . I didn't recall seeing one in my , so I went and checked and there is one in the copy I have .

Merlin

#017


Joined: June 11, 2003
KitMaker: 17,582 posts
AeroScale: 12,795 posts

Posted: Wednesday, January 27, 2010 - 09:01 PM UTC
Hi Mark
There was one in kit I reviewed last year:
All the best
Rowan
There was one in kit I reviewed last year:
All the best
Rowan

JackFlash
Joined: January 25, 2004
KitMaker: 11,669 posts
AeroScale: 11,011 posts
Posted: Thursday, January 28, 2010 - 01:46 AM UTC
Quoted Text
Stephen, I just received my Halberstadt kit. The instructions call for you to paint the back of the clear instrument dials but my kit has no clear film or acetate included, does yours?
Mark
Yes, Mine was in the zip lock bag with the decals. Piotr would probably replace it if you contact him with a scan of the receipt.
guitarlute101
Joined: December 18, 2006
KitMaker: 1,121 posts
AeroScale: 1,063 posts
Posted: Thursday, January 28, 2010 - 02:13 AM UTC
Thanks,
I got mine from Squadron on sale. The decals were not in a zip bag in the box so it was probably just an oversight. I'll see if I can reach him.
Mark
I got mine from Squadron on sale. The decals were not in a zip bag in the box so it was probably just an oversight. I'll see if I can reach him.
Mark
JackFlash
Joined: January 25, 2004
KitMaker: 11,669 posts
AeroScale: 11,011 posts
Posted: Saturday, January 30, 2010 - 01:22 AM UTC
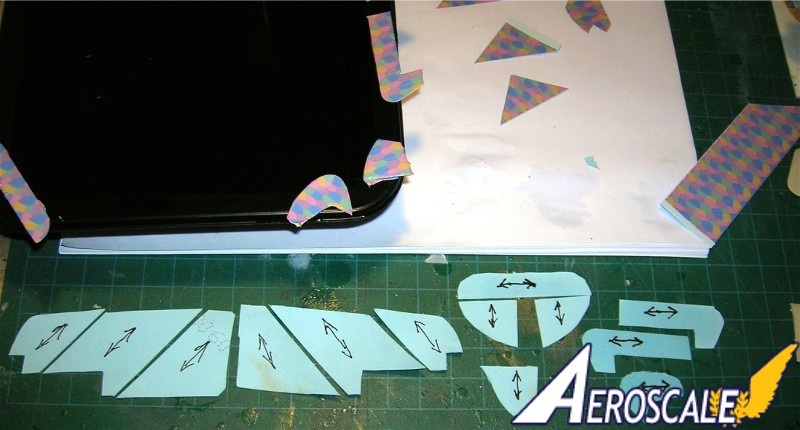
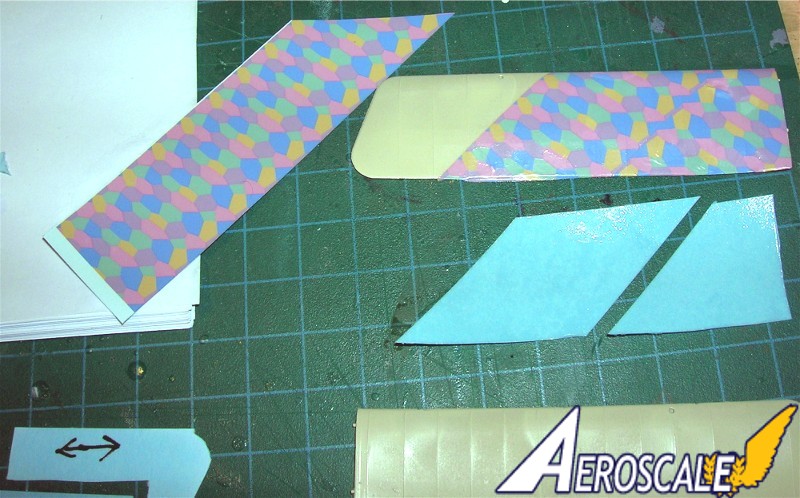
Next after the initial decal application to the wings is dry I start with the lozenge strips. It looks like Halberstadt actually matched the strips to the surfaces on the early machines. The farben Flugzeugstoff (coloured aircraft fabric) rib tapes were strips of fabric from the same 5 colour camouflage.
Why they did this and only using the colour pattern meant for the under surface, on the top surface is unknown. The reasons can only be guessed. Now the under surfaces of the early production Halberstadt CL.II types was a tyical cream . Not CDL (Clear Doped Linen) but overpainted like the allies did their aircraft for wearher protection. It seems that the rib tapes (already on the finished wing) were over painted this same colour. I was trying to figure out through photo images if there was an unpainted lozenge edging strip around the overhead profile of the wing or if this was simply overpainted as well? It looks like there was a lozenge strip edging.

From Rosebud's site
Why they did this and only using the colour pattern meant for the under surface, on the top surface is unknown. The reasons can only be guessed. Now the under surfaces of the early production Halberstadt CL.II types was a tyical cream . Not CDL (Clear Doped Linen) but overpainted like the allies did their aircraft for wearher protection. It seems that the rib tapes (already on the finished wing) were over painted this same colour. I was trying to figure out through photo images if there was an unpainted lozenge edging strip around the overhead profile of the wing or if this was simply overpainted as well? It looks like there was a lozenge strip edging.
From Rosebud's site
This post was removed.
thegirl
Joined: January 19, 2008
KitMaker: 6,743 posts
AeroScale: 6,151 posts
Posted: Sunday, January 31, 2010 - 11:14 AM UTC
Hard to tell in the photo Stephen , but it would make some logical sense that since the top wing was covered in lozenge that the outer taping would be the same . It clearly shows the over lap on the under surfaces of the wings in a " dark colour " so this being done in a yellow cream colour wouldn't really show up that well in the photo .
JackFlash
Joined: January 25, 2004
KitMaker: 11,669 posts
AeroScale: 11,011 posts
Posted: Wednesday, February 03, 2010 - 01:48 AM UTC
Greeetings Terri. If you look at the trailing edges of the undersurfaces of the wings we see the lozenge strip overlap.
Now on to more interior parts. First the rear of the instrument panel before the last coat of paint.
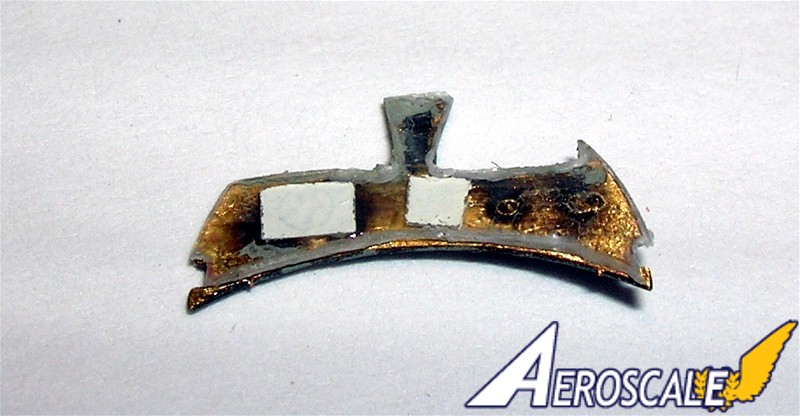
Here is the front of course.
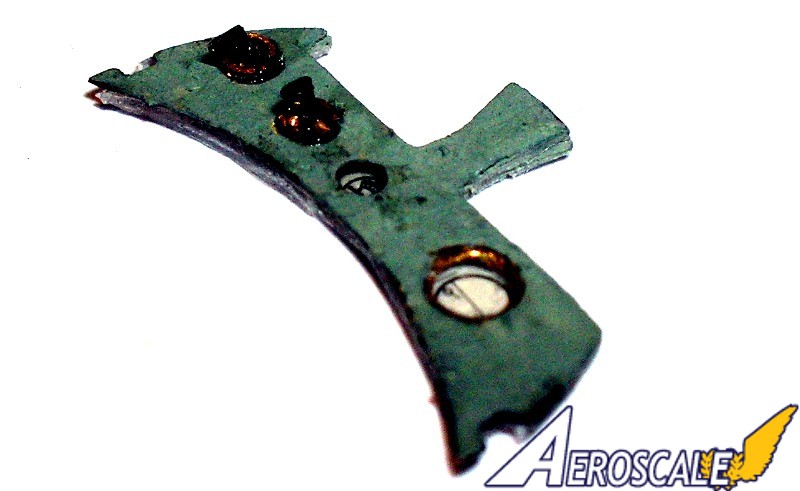
Now its installed along with the control column and rudder control assembly.

Now on to more interior parts. First the rear of the instrument panel before the last coat of paint.
Here is the front of course.
Now its installed along with the control column and rudder control assembly.
guitarlute101
Joined: December 18, 2006
KitMaker: 1,121 posts
AeroScale: 1,063 posts
Posted: Wednesday, February 03, 2010 - 02:52 AM UTC
Hi Stephen,
Great work as usual. How were the control cables arranged in the cockpit?
Mark
Great work as usual. How were the control cables arranged in the cockpit?
Mark
JackFlash
Joined: January 25, 2004
KitMaker: 11,669 posts
AeroScale: 11,011 posts
Posted: Monday, May 31, 2010 - 02:04 PM UTC
Bit of an upadate. . .the reason I haven't been progressing like I want to on this kit is I have been working with the Foundation on purchasing this. Pictured is a beautiful Halberstadt CL.II replica that our museum is hoping to acquire through a generous donation. The Halberstadt was a German two-seat escort fighter that often accompanied reconnaissance aircraft. First introduced in 1917, there were approximately 900 of these produced. This particular plane is currently located in Nevada.
Keep checking back for more information on this wonderful (potential) addition to our collection of flying WWI planes.See More
Keep checking back for more information on this wonderful (potential) addition to our collection of flying WWI planes.See More
JackFlash
Joined: January 25, 2004
KitMaker: 11,669 posts
AeroScale: 11,011 posts
Posted: Friday, December 17, 2010 - 03:57 AM UTC
Here the lozenge wrap has been applied.

I may use some of the Copper State Models PE to augment the Mirage kit.

I may use some of the Copper State Models PE to augment the Mirage kit.
thegirl
Joined: January 19, 2008
KitMaker: 6,743 posts
AeroScale: 6,151 posts
Posted: Friday, December 17, 2010 - 11:50 PM UTC
She is turning out mighty fine indeed so far . The Copper State PE will added that little something extra , nice touch !

OEFFAG_153

Joined: February 19, 2010
KitMaker: 1,473 posts
AeroScale: 1,450 posts

Posted: Saturday, December 18, 2010 - 05:58 AM UTC
Beautiful interior those lozenge wrappings on the structure are real eyecatchers!
Mikael
Mikael
JackFlash
Joined: January 25, 2004
KitMaker: 11,669 posts
AeroScale: 11,011 posts
Posted: Saturday, November 26, 2011 - 01:56 PM UTC
Now that I have finished the Eduard 1:48 Alb. D.III Oeffag kit and am in the final steps on the WNW 1:32 Junkers J.I for the KotS GB. I want to get back to this build.
JackFlash
Joined: January 25, 2004
KitMaker: 11,669 posts
AeroScale: 11,011 posts
Posted: Sunday, November 27, 2011 - 02:09 PM UTC
To continue, Here we see lozenge application to a set of Mirage Halb. CL.II wheels.
Here the lozenge is laid over the part with the decal being rolled out over the surface. Note "Set" has been liberally applied..

The center of the decal has a "X" cut in the center. When almost dry apply the "Sol"

To allow them to dry evenly without sliding I put them in the depressions of this Testors paint tray. The depressions were originally designed to mix paint in.

Here the lozenge is laid over the part with the decal being rolled out over the surface. Note "Set" has been liberally applied..
The center of the decal has a "X" cut in the center. When almost dry apply the "Sol"
To allow them to dry evenly without sliding I put them in the depressions of this Testors paint tray. The depressions were originally designed to mix paint in.
thegirl
Joined: January 19, 2008
KitMaker: 6,743 posts
AeroScale: 6,151 posts
Posted: Wednesday, November 30, 2011 - 11:37 AM UTC
Nice to see you pick this back up once more , looking forward to future up-dates .
Terri
Terri
JackFlash
Joined: January 25, 2004
KitMaker: 11,669 posts
AeroScale: 11,011 posts
Posted: Sunday, January 01, 2012 - 05:43 PM UTC
Alrighty then, now that the holidays are slowing down and I have cleared my bench of commitments. I have 2 inprogress kits needing my attention. This is one.
JackFlash
Joined: January 25, 2004
KitMaker: 11,669 posts
AeroScale: 11,011 posts
Posted: Wednesday, January 04, 2012 - 08:02 PM UTC

Almost ready to close up.


Now for some colour.
thegirl
Joined: January 19, 2008
KitMaker: 6,743 posts
AeroScale: 6,151 posts
Posted: Thursday, January 05, 2012 - 02:45 PM UTC
How does rest of the engine cowling fit ?
 |

WEB HOSTING BY


Copyright ©2021 AeroScale and Kitmaker Network, a subsidiary of Silver Star Enterprises
All Rights Reserved. Please read our Conditions of Use and Privacy Policy.
All Rights Reserved. Please read our Conditions of Use and Privacy Policy.