1:48 Mirage Halberstadt CL.II - Mark
West Virginia, United States
Joined: December 18, 2006
KitMaker: 1,121 posts
AeroScale: 1,063 posts
Posted: Friday, March 05, 2010 - 05:10 AM UTC
Texas, United States
Joined: February 01, 2007
KitMaker: 365 posts
AeroScale: 356 posts
Posted: Friday, March 05, 2010 - 05:53 AM UTC
Mark,
Great build to date my friend. I do have one question for you though,was the interior painted a very light green on the actual aircraft? Having asked that I may be guilty of making an assumption that it would be finish in the usual clear vanish.Either way excellent work.
Regards,
Gregory Jouette
West Virginia, United States
Joined: December 18, 2006
KitMaker: 1,121 posts
AeroScale: 1,063 posts
Posted: Friday, March 05, 2010 - 06:31 AM UTC
Hi Gregory,
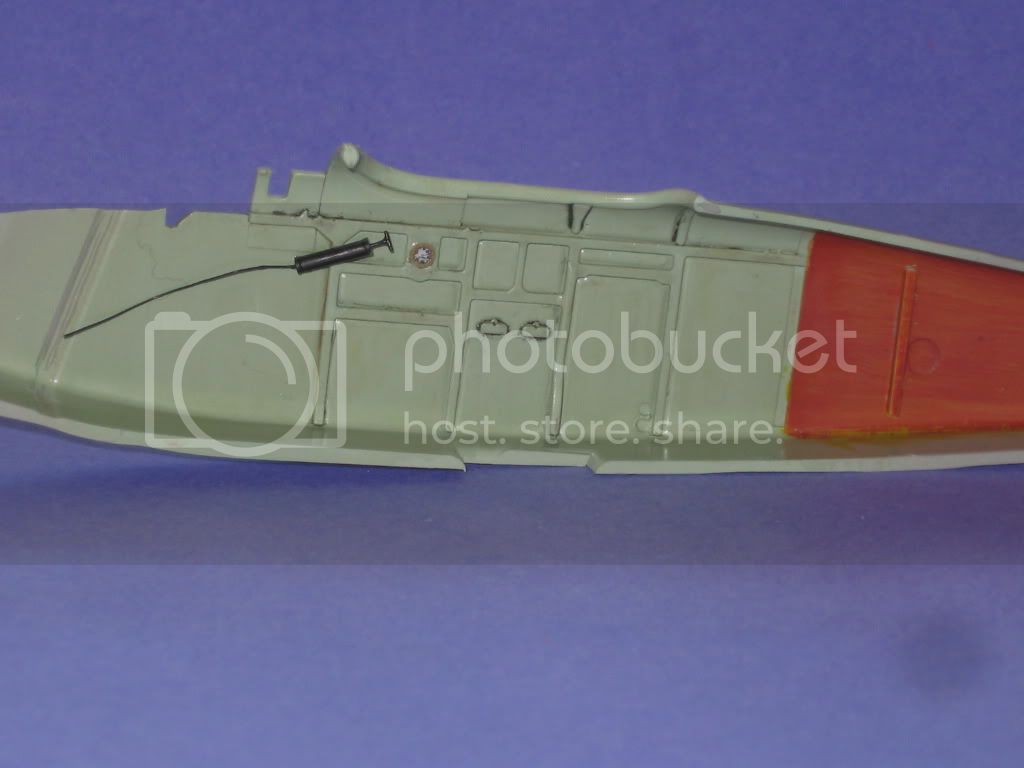
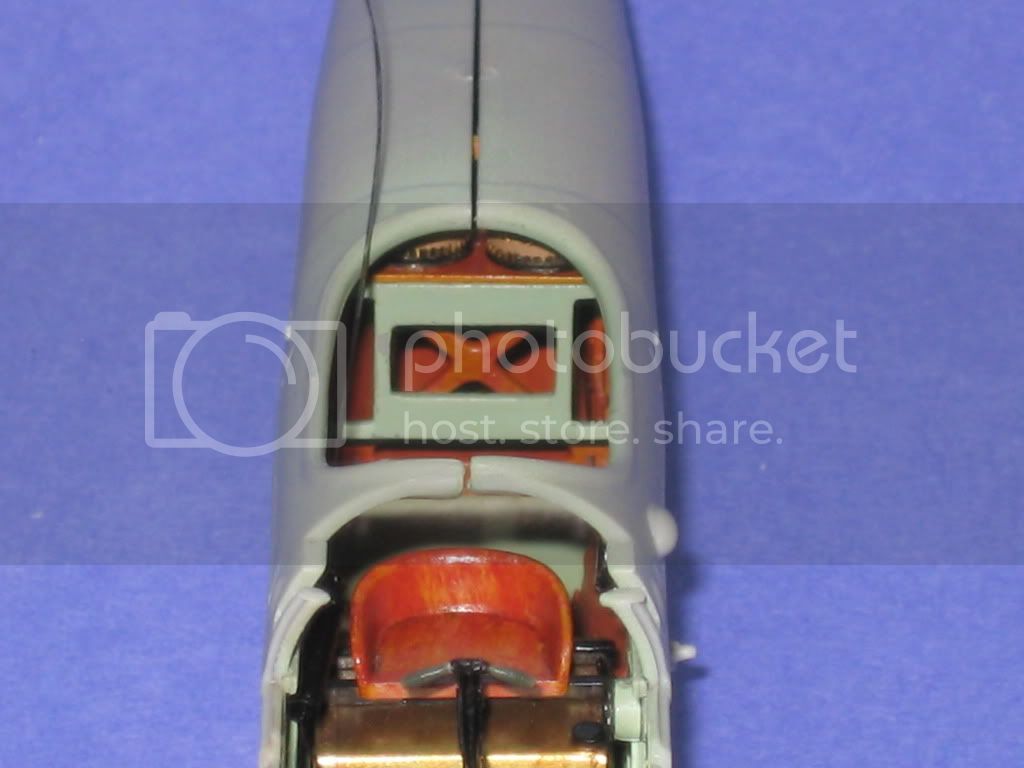
I'm following the kit instructions for the painting. There is a surviving example that the kit is based off of that is partially painted green. The cockpit and observer's floor was metal so I would assume that it would be painted and possibly carried over to the sides of the cockpit areas. A photo on page 31 of the Datafile (27) seems to me to have a painted interior as I see no woodgrain.
Mark
England - South East, United Kingdom
Joined: November 06, 2005
KitMaker: 1,667 posts
AeroScale: 1,551 posts
Posted: Friday, March 05, 2010 - 09:28 PM UTC
A lovely start, nice work as always Mark
K
Still can't cure the AMS even with sausage finger implants & olde eyes.
Alberta, Canada
Joined: January 19, 2008
KitMaker: 6,743 posts
AeroScale: 6,151 posts
Posted: Saturday, March 06, 2010 - 07:05 AM UTC
Great start on this kit Mark . Nice to see it being built on line . This will not be dissppointing at all . ( Hope you are doing the flame one )
Will you be adding the lozenge to the top part of the framing ? Some photos seem to show this while others don't . Can be hard to tell some times . I'm a little iffy on the framing , it seems to be over scaled . What is your take on this ?
Looking forward to more progress Mark

West Virginia, United States
Joined: December 18, 2006
KitMaker: 1,121 posts
AeroScale: 1,063 posts
Posted: Sunday, March 07, 2010 - 12:50 PM UTC
Arizona, United States
Joined: December 12, 2008
KitMaker: 1,423 posts
AeroScale: 1,319 posts
Posted: Sunday, March 07, 2010 - 03:25 PM UTC

Really first rate work Mark. I am looking forward to seeing more of your progress.
Nice clean detail, really looks great.
We few, we happy few........
Alberta, Canada
Joined: January 19, 2008
KitMaker: 6,743 posts
AeroScale: 6,151 posts
Posted: Monday, March 08, 2010 - 12:58 AM UTC
I'm all smiles Mark !
The skull and cross bones are nice markings . I will be using those ones on the Bluemax kit .
Texas, United States
Joined: February 01, 2007
KitMaker: 365 posts
AeroScale: 356 posts
Posted: Monday, March 08, 2010 - 02:08 AM UTC
Better and better with each new update.Keep'em coming my friend.
Regards,
Gregory Jouette

West Virginia, United States
Joined: December 18, 2006
KitMaker: 1,121 posts
AeroScale: 1,063 posts
Posted: Tuesday, March 09, 2010 - 02:26 AM UTC
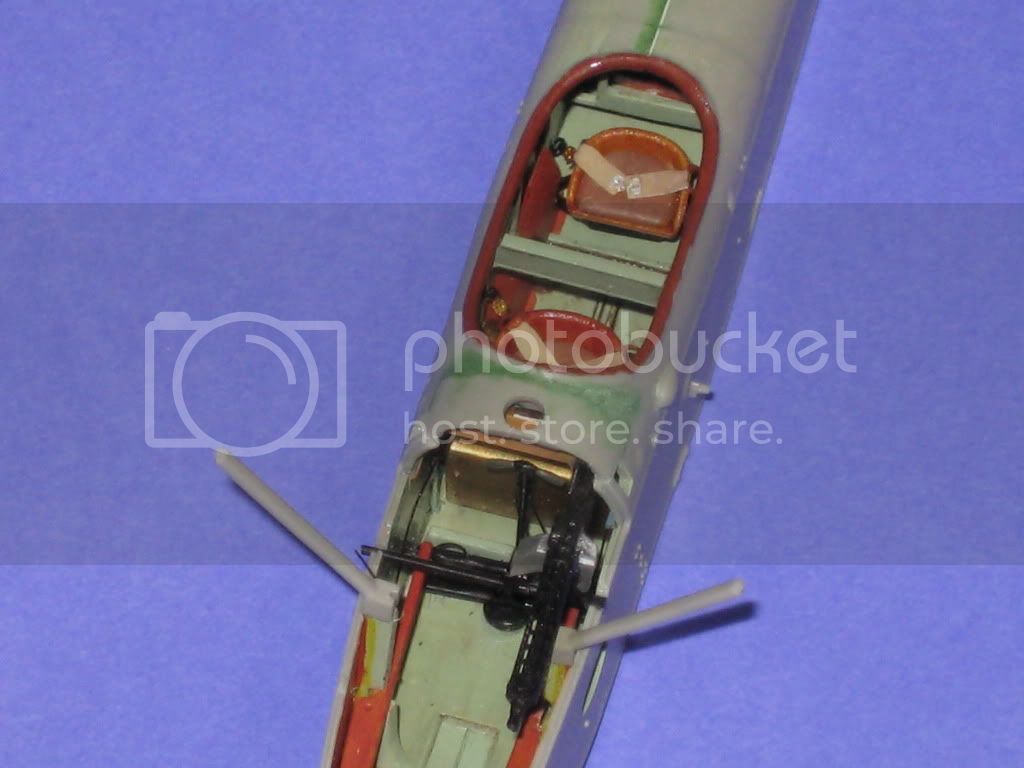
Thanks everyone. I'm going to close the fuselage tonight and I'll have more pictures. A lot of pieces but a very fun build.
Mark
West Virginia, United States
Joined: December 18, 2006
KitMaker: 1,121 posts
AeroScale: 1,063 posts
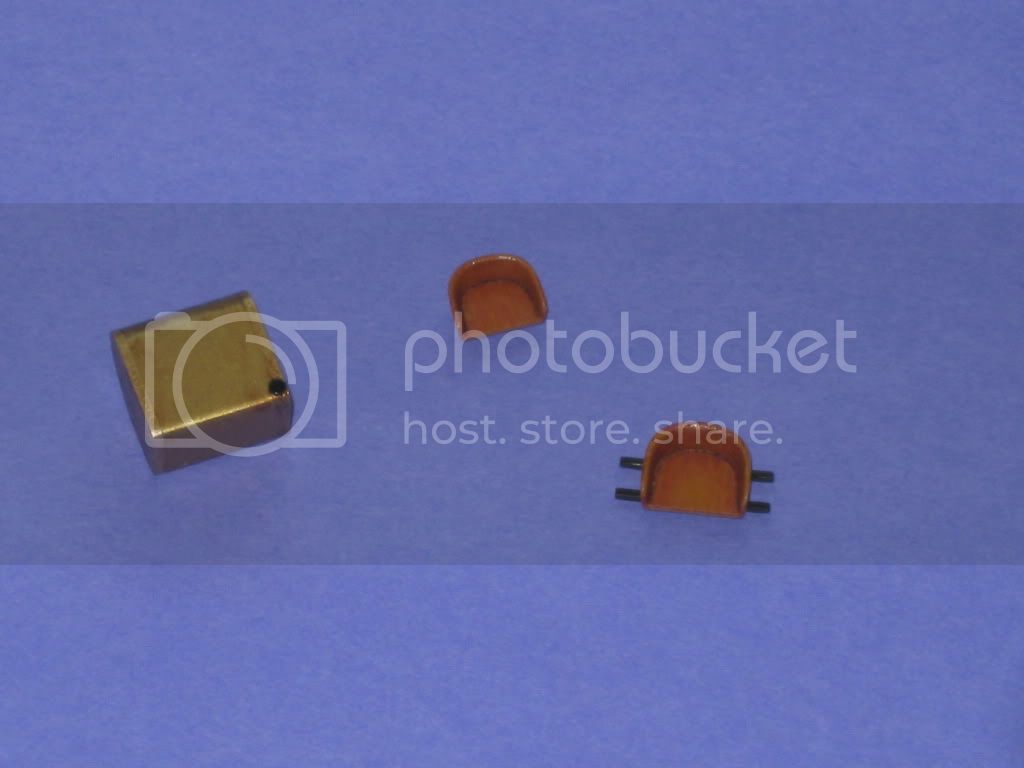
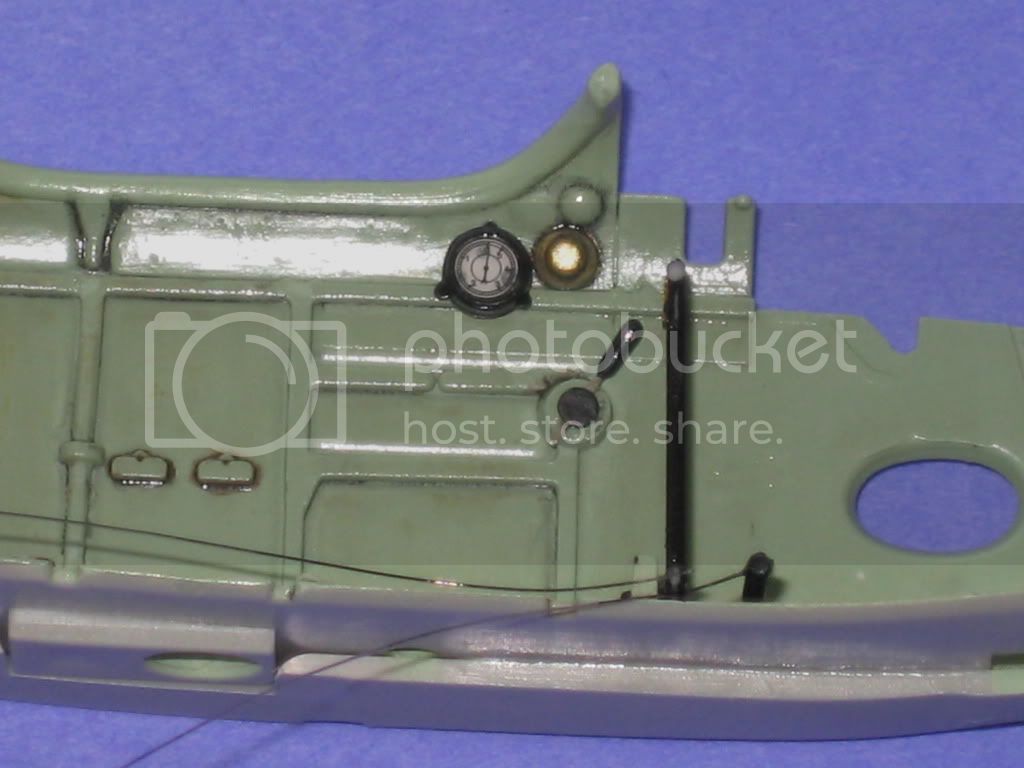
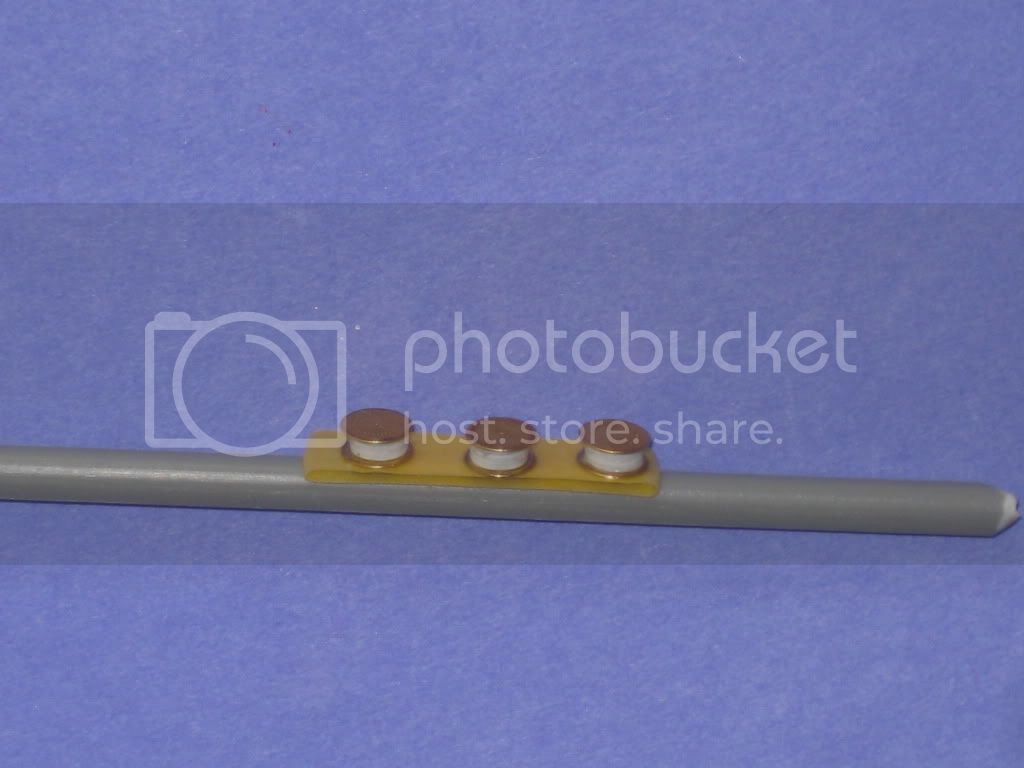
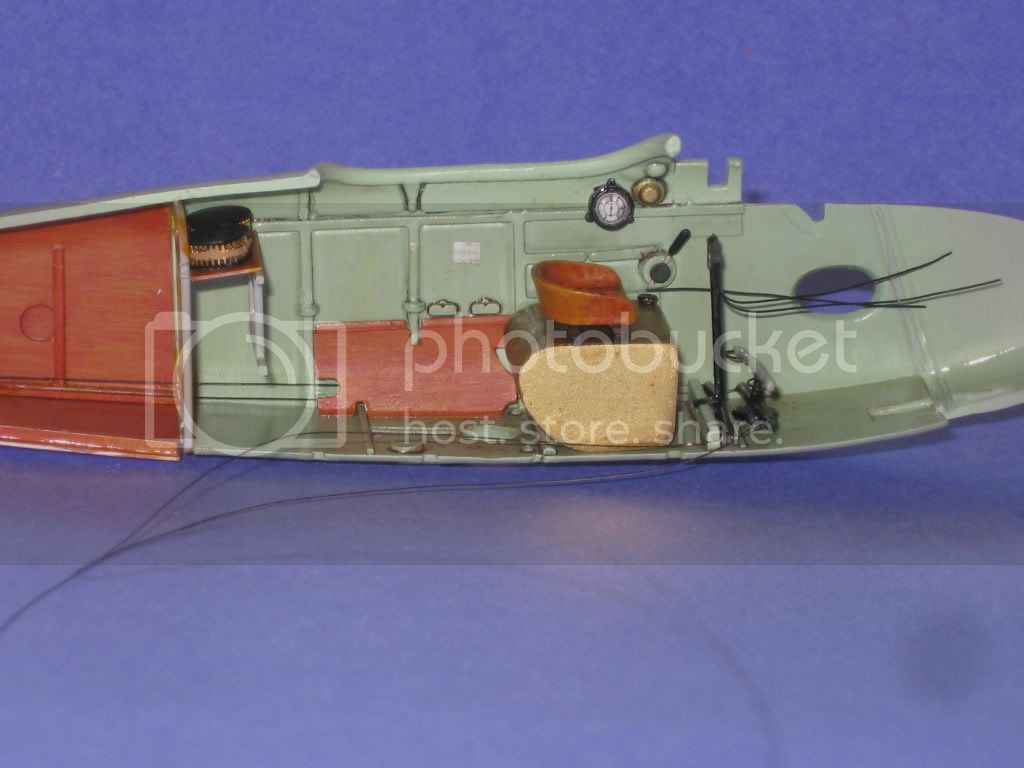
Posted: Tuesday, March 16, 2010 - 03:09 PM UTC
Alberta, Canada
Joined: January 19, 2008
KitMaker: 6,743 posts
AeroScale: 6,151 posts
Posted: Wednesday, March 17, 2010 - 12:32 AM UTC
Very nice Mark !
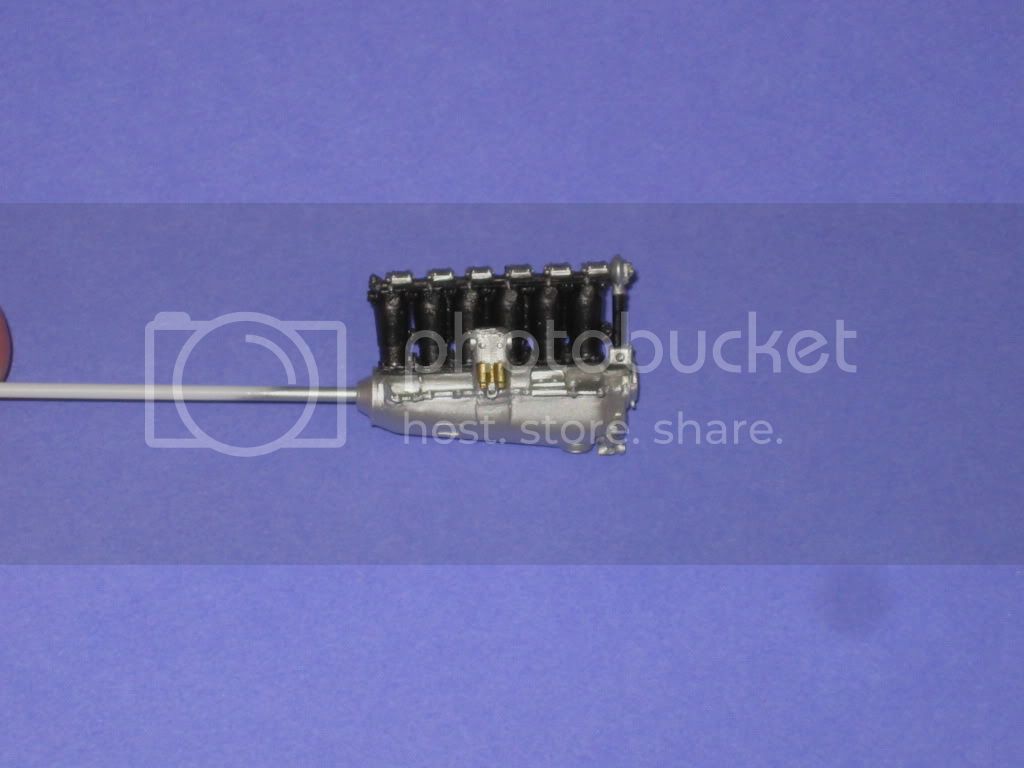
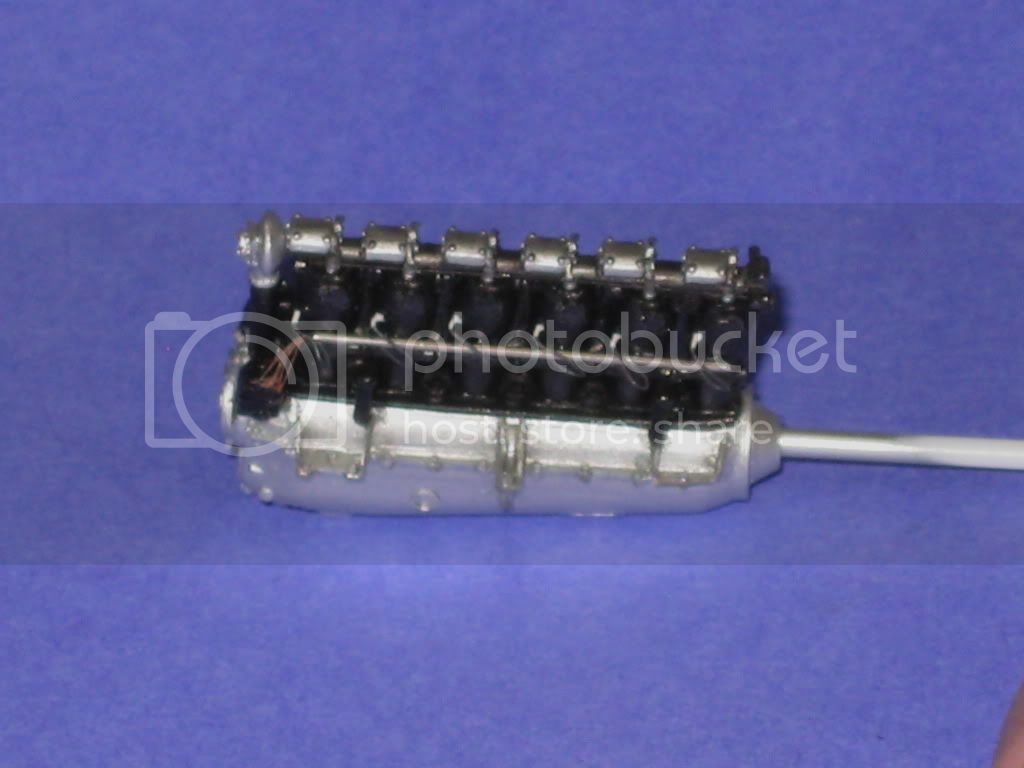
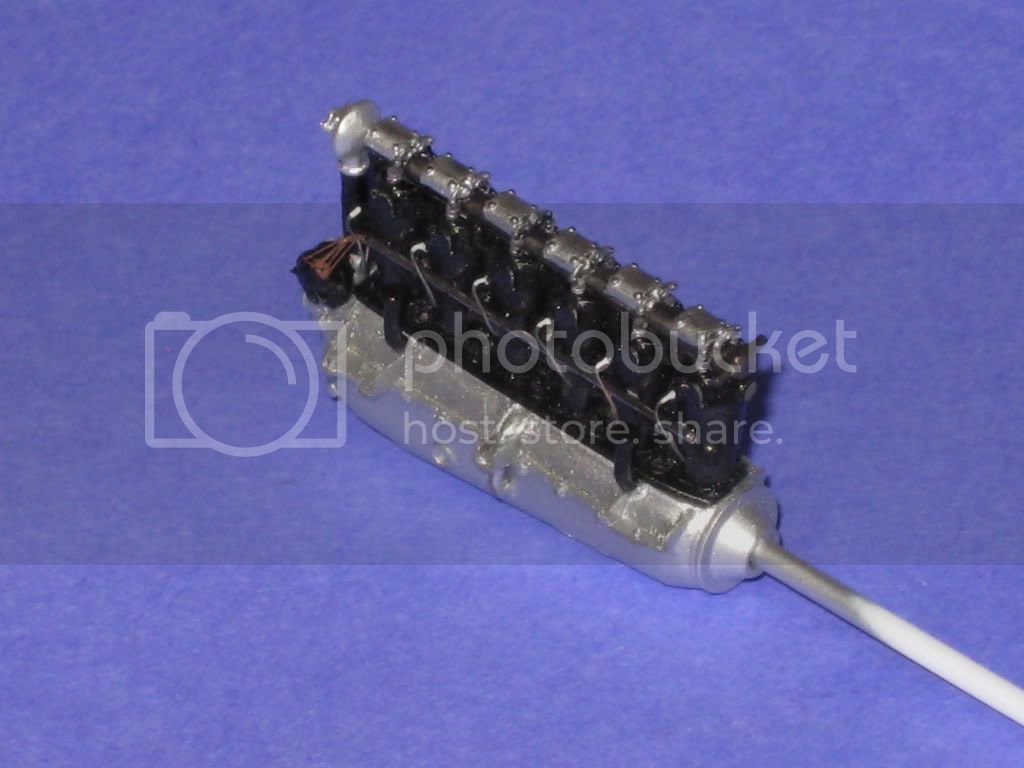
It is a great kit , but the engine is the weakest part on the detail in the kit . The vector replacement looks really good and more to scale . How are you finding the fit so far ?
Colorado, United States
Joined: January 25, 2004
KitMaker: 11,669 posts
AeroScale: 11,011 posts
Posted: Wednesday, March 17, 2010 - 03:11 AM UTC
". . .The most important thing is to know why you build and then get the most that you can out of building." via D.D.
Texas, United States
Joined: February 01, 2007
KitMaker: 365 posts
AeroScale: 356 posts
Posted: Wednesday, March 17, 2010 - 03:37 AM UTC
Mark,
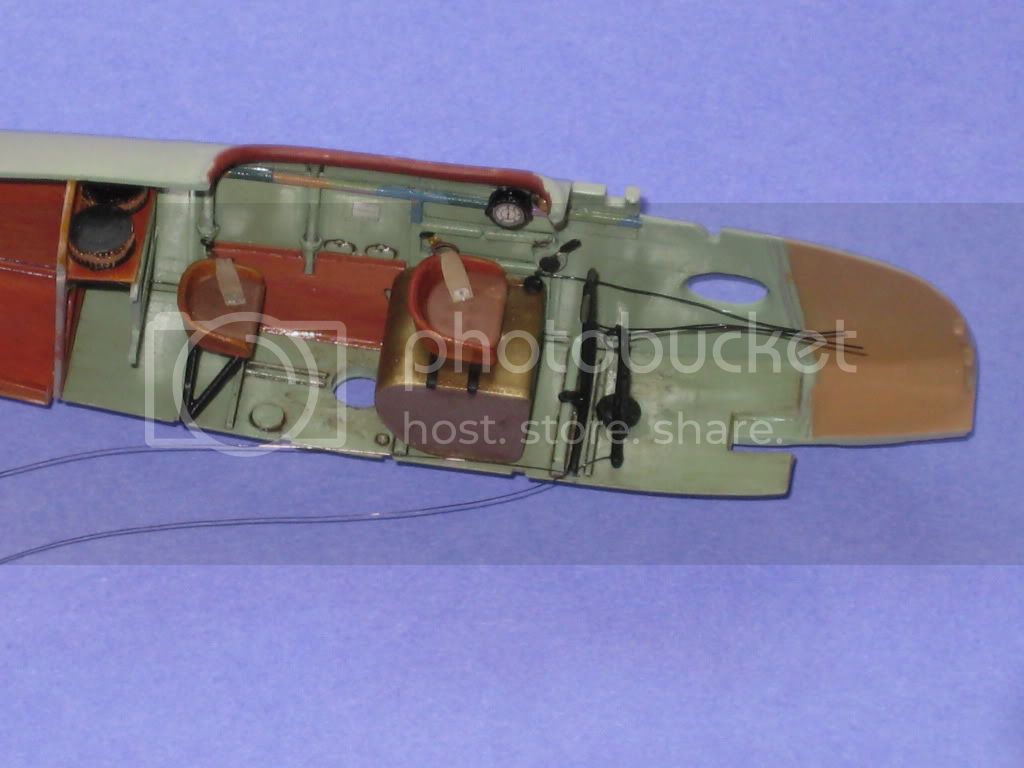
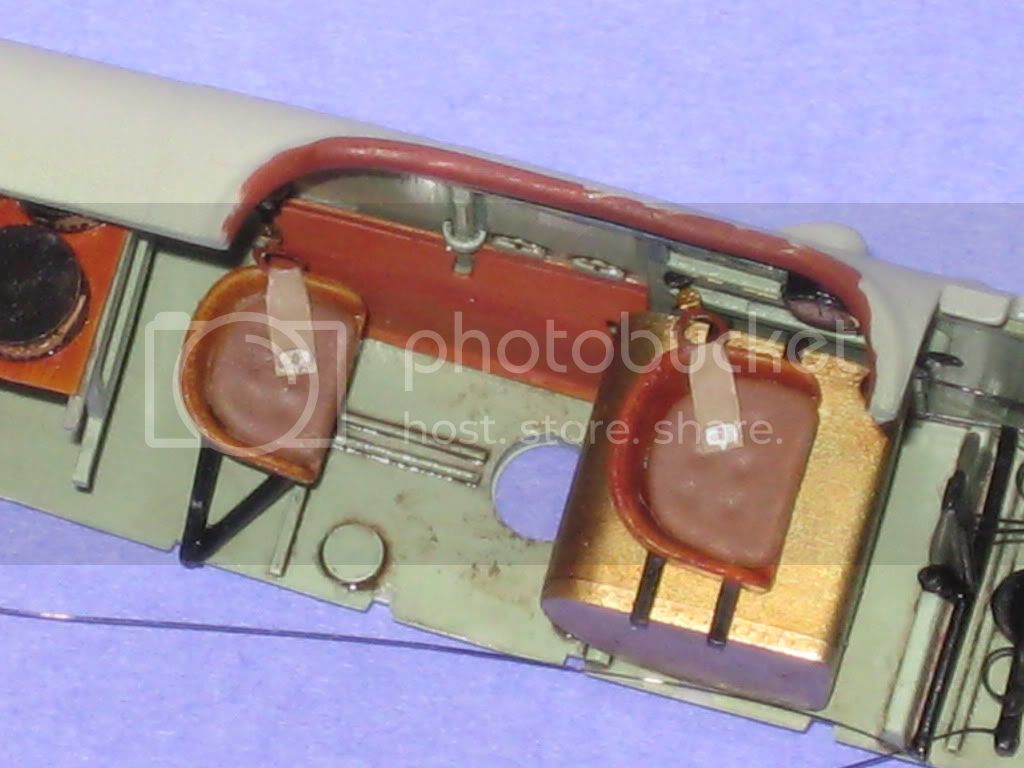
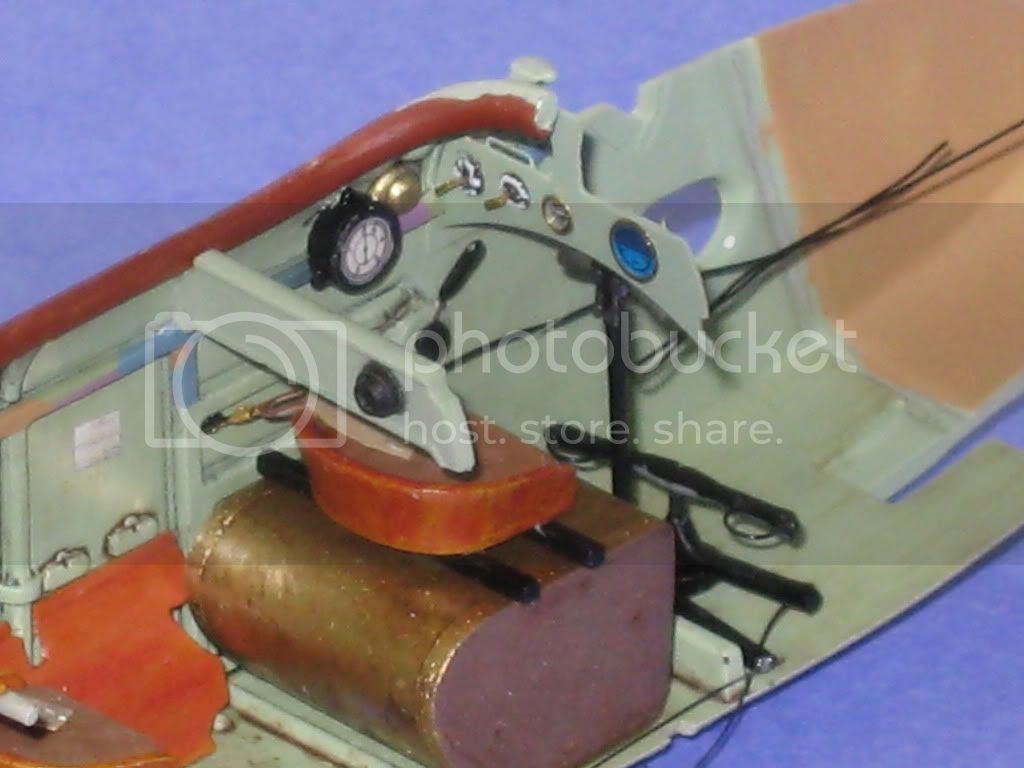
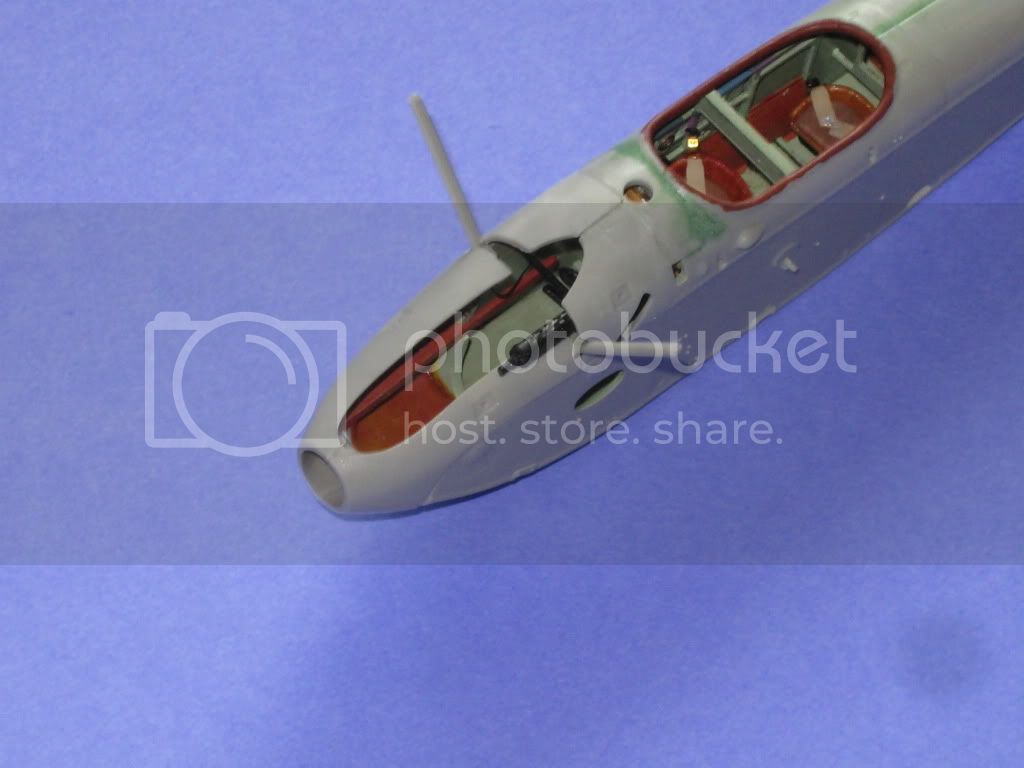
Excellent progress my friend.Great details in the fuselage interior,your brass fuel tank really draws the eyes to itself. Beautiful paint and weathering of the tank are very realistic.
I wonder how the kit compares to the Blue Max example Terri wrote of? I wouldn't mind building the same aircraft myself at some point,just not certain which kit is the better. At any rate Excellent project to date and I look forward to the next update.
Regards,
Gregory Jouette
PS: The Vector Mercedes is outstanding. It's amazing how far the details of these new kits and aftermarket details have come since the days when Aurora was king.
West Virginia, United States
Joined: December 18, 2006
KitMaker: 1,121 posts
AeroScale: 1,063 posts
Posted: Wednesday, March 17, 2010 - 07:42 AM UTC
Thanks for the input everone. I appreciate it.
Terri, the fit is pretty good on most parts but the cowling takes some real work. You've got me rethinking the flames profile....................
Gregory, thanks for the kind comments. Perhaps we can talk Terri into posting pictures of her Blue Max Halbie sprues here. I don't mind at all.
Mark
Arizona, United States
Joined: December 12, 2008
KitMaker: 1,423 posts
AeroScale: 1,319 posts
Posted: Wednesday, March 17, 2010 - 08:01 AM UTC
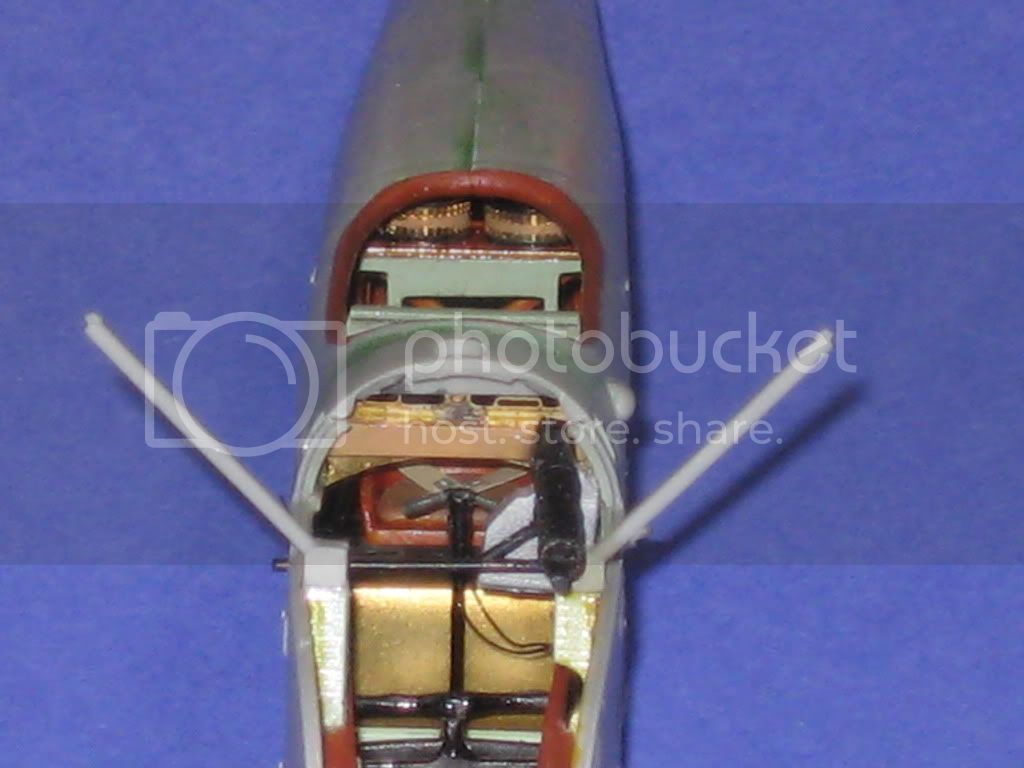
HI Mark: Looking good. I really like your ammo drums. It looks like you have mastered the art of making them real. Plainly one can see the individual rounds. Very nice.
Best
Mark
We few, we happy few........

#439
Washington, United States
Joined: November 05, 2005
KitMaker: 4,950 posts
AeroScale: 3,192 posts
Posted: Wednesday, March 17, 2010 - 08:35 AM UTC
Very nice work.
Hanger Queens in Waiting:
Monogram 1/72 F8F-1
Corsair the Sky Pirate - 1/72 Ace A-7D
Century Series - Airfix 1/72 F-105G
Anti Shipping - Academy 1/72 PBJ-1D
Academy 1/72 F-84E
Alberta, Canada
Joined: January 19, 2008
KitMaker: 6,743 posts
AeroScale: 6,151 posts
Posted: Wednesday, March 17, 2010 - 11:53 AM UTC
Quoted Text
Thanks for the input everone. I appreciate it.
Terri, the fit is pretty good on most parts but the cowling takes some real work. You've got me rethinking the flames profile....................
Gregory, thanks for the kind comments. Perhaps we can talk Terri into posting pictures of her Blue Max Halbie sprues here. I don't mind at all.
Mark
I can do that for you Mark
Alberta, Canada
Joined: January 19, 2008
KitMaker: 6,743 posts
AeroScale: 6,151 posts
Posted: Wednesday, March 17, 2010 - 12:36 PM UTC
Colorado, United States
Joined: January 25, 2004
KitMaker: 11,669 posts
AeroScale: 11,011 posts
Posted: Wednesday, March 17, 2010 - 02:44 PM UTC
Here is a bit of fun on the subject.
Click here. ". . .The most important thing is to know why you build and then get the most that you can out of building." via D.D.
West Virginia, United States
Joined: December 18, 2006
KitMaker: 1,121 posts
AeroScale: 1,063 posts
Posted: Thursday, March 18, 2010 - 05:23 AM UTC
Thanks Terri and Stephen. That is some nice info on the Blue Max kit. that should give everyone a good idea of the differences in the two kits.
Mark
West Virginia, United States
Joined: December 18, 2006
KitMaker: 1,121 posts
AeroScale: 1,063 posts
Posted: Saturday, March 20, 2010 - 04:40 AM UTC
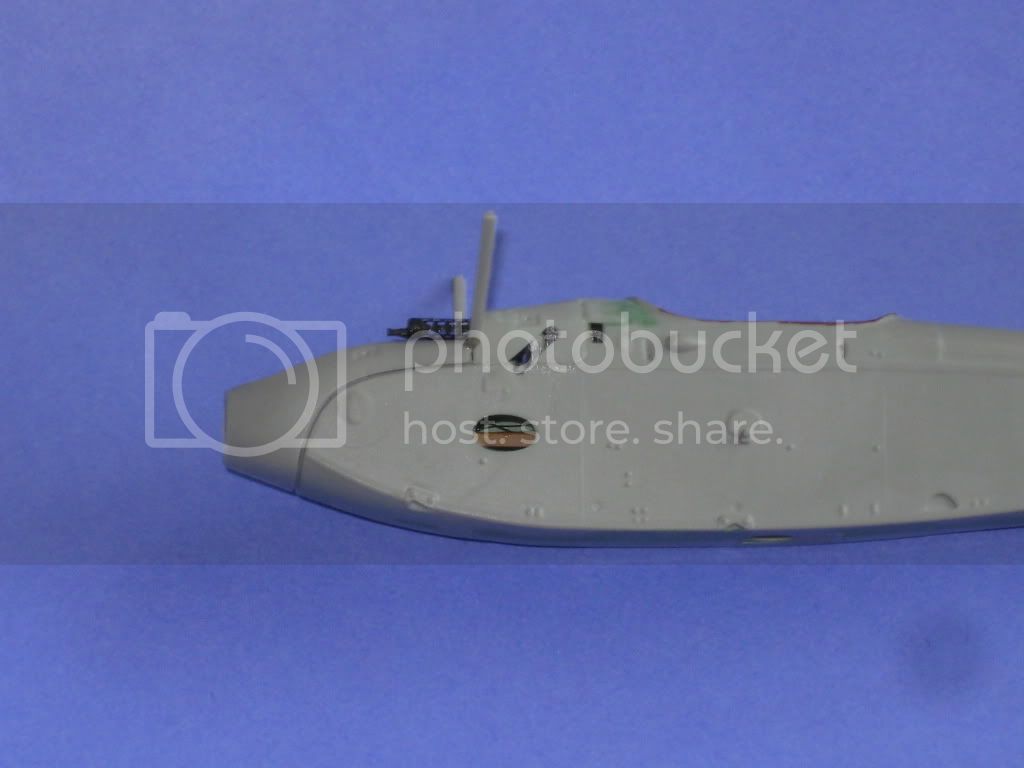
Here is an update on the cowling. The fit is a little "gappy". It's a little hard to tell how much of the flash to take off of the parts so I just sanded a little at a time until they were close. The port cowling also has a sink mark on top that will need to be filled in with putty. You can fill the small gaps in with Elmers glue thinned with water.
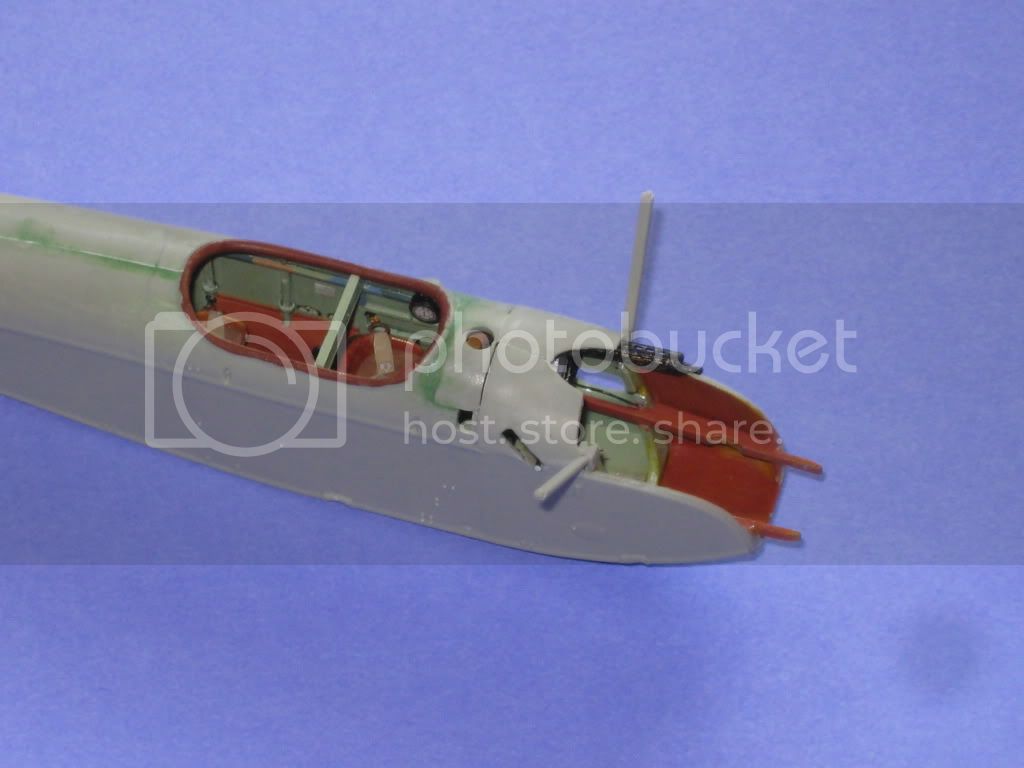

The Vector engine fits nicely................
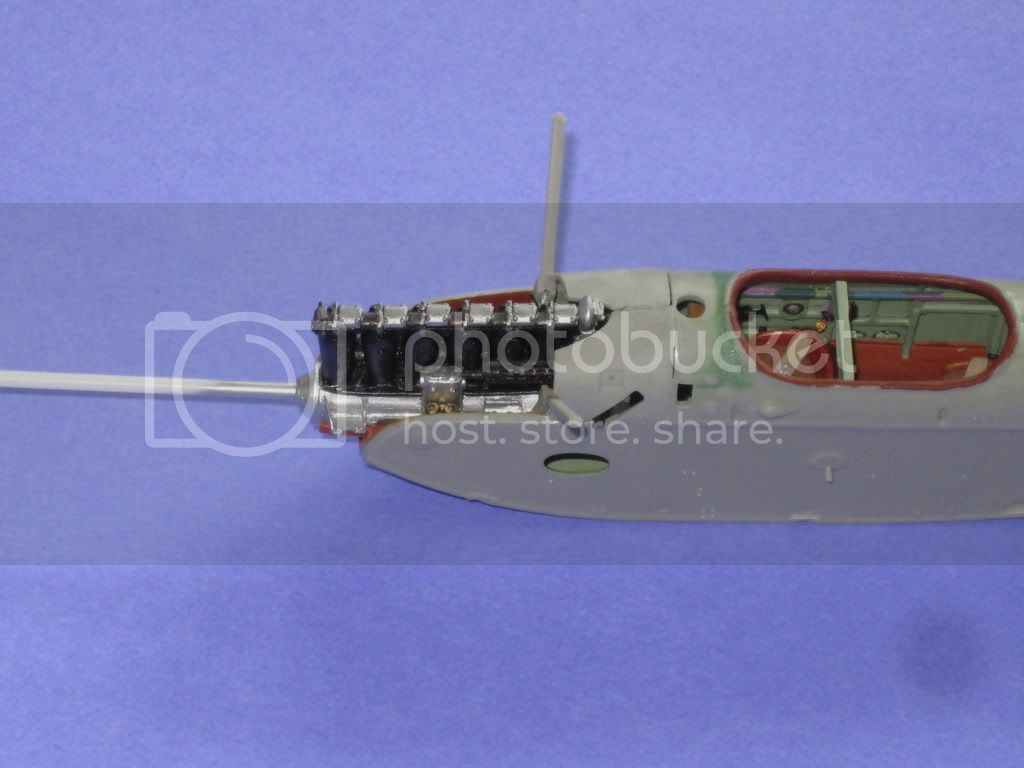

Here is the front cowling test fit. The starboard (pilot's right) side doesn't meet the rear cowling. In the datafile it looks like it should. The instructions are no help here because the engine blocks the view. The exhaust stack covers this area later. What to do, what to do.............................
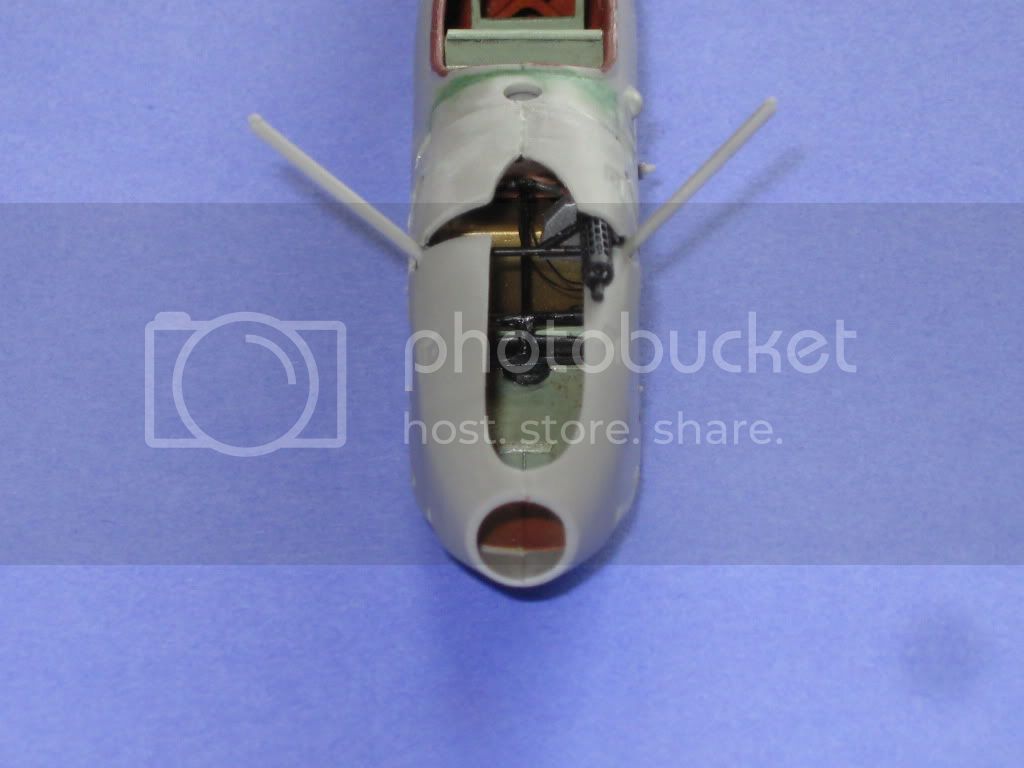
Cowling suggestions welcomed..............
More soon,
Mark
Colorado, United States
Joined: January 25, 2004
KitMaker: 11,669 posts
AeroScale: 11,011 posts
Posted: Saturday, March 20, 2010 - 04:00 PM UTC
Add a trianuglar piece verticallly to the pilot's right side upper cowling edge. Have the engine cowling butt against it.
". . .The most important thing is to know why you build and then get the most that you can out of building." via D.D.
West Virginia, United States
Joined: December 18, 2006
KitMaker: 1,121 posts
AeroScale: 1,063 posts
Posted: Sunday, March 21, 2010 - 12:24 PM UTC
Thanks Stephen. That's what I was thinking. It seems the only way around the gap although there seems to be some piping that needs to go through there from the engine to the wing radiator. I'll finish the engine and test fit a little more to find out so I don't paint my self into a corner.
I had some time to detail the right side of the engine today.
Mark
Alberta, Canada
Joined: January 19, 2008
KitMaker: 6,743 posts
AeroScale: 6,151 posts
Posted: Monday, March 22, 2010 - 01:08 AM UTC
Nice detailing on the engine Mark .
I would agree on test fitting the rest of the parts to make sure you will have enough clearance and room for the rest of the parts before backing the cowl like Stephen has suggested . I look forward to more progress , this is shaping up very nicely