

Early Aviation
Discuss World War I and the early years of aviation thru 1934.
Discuss World War I and the early years of aviation thru 1934.
Hosted by Jim Starkweather
Fly 1:48 Macchi M5

JackFlash

Joined: January 25, 2004
KitMaker: 11,669 posts
AeroScale: 11,011 posts
Posted: Saturday, May 28, 2011 - 03:36 PM UTC
Great work Louis! I really like the way you have handled this (and other builds).

Louis

Joined: May 21, 2006
KitMaker: 472 posts
AeroScale: 471 posts
Posted: Friday, June 17, 2011 - 11:16 AM UTC
Thank you Stephen.
I start the installation of decals....
I'm using "microsol".
The aircraft is painted with gloss varnish.
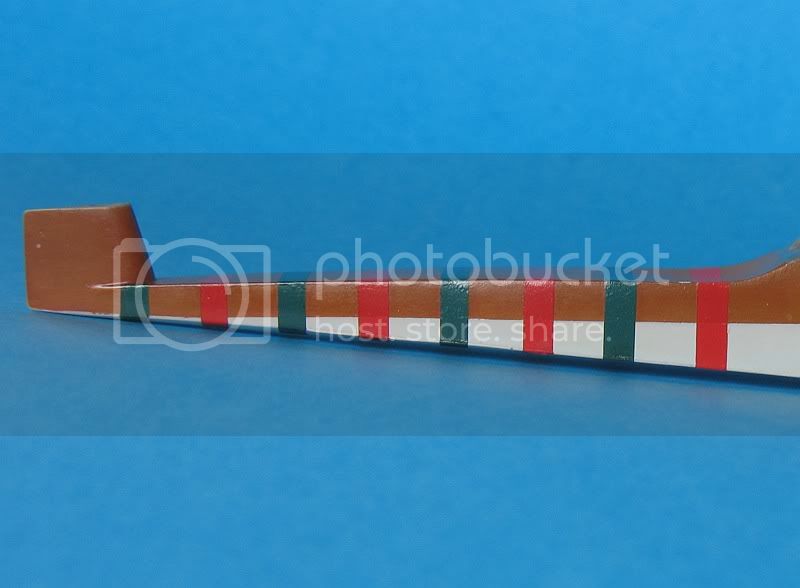
The red and green lignes s are four pieces. They are placed without problems and have almost the correct length. You have to touch up red and green.
Red and green are opaque. I just cut the outline of the decal to remove the very thin suport .
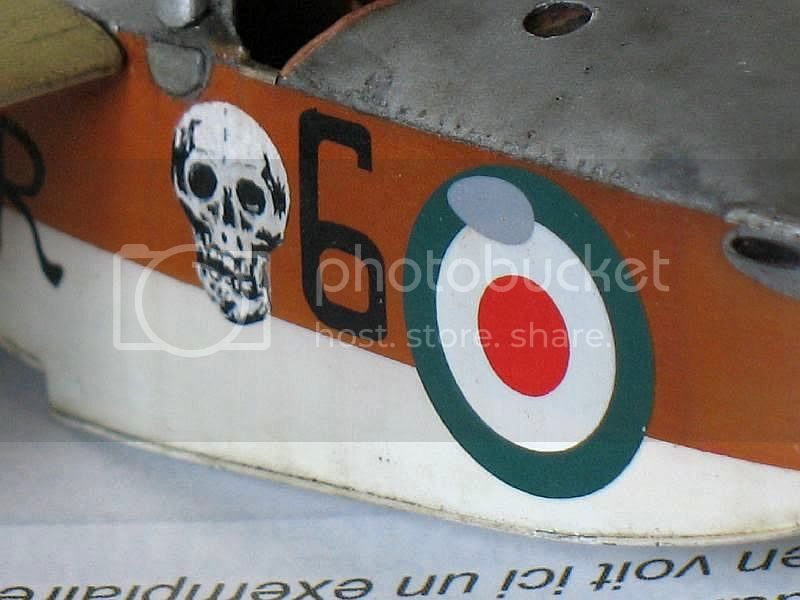
The roundel on the nose is very difficult to place. I cut it in half and I remove a segment.
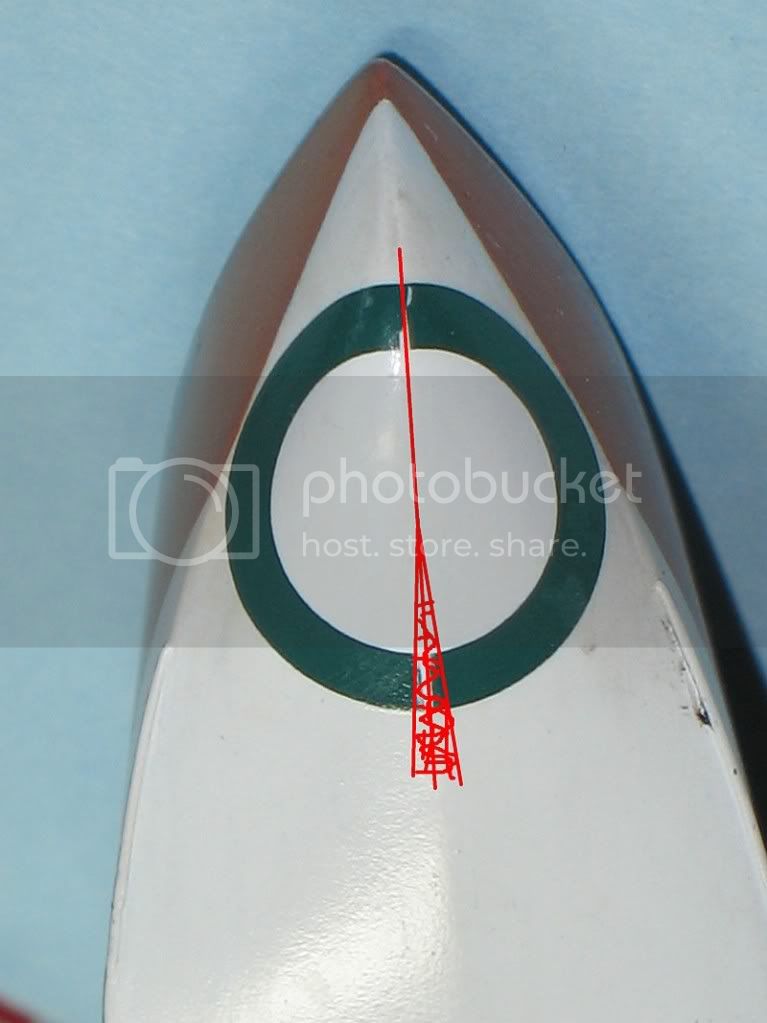
The split is plugged with white paint and then sanded (micromech 12000). The green is humbrol 3, red hu 60.
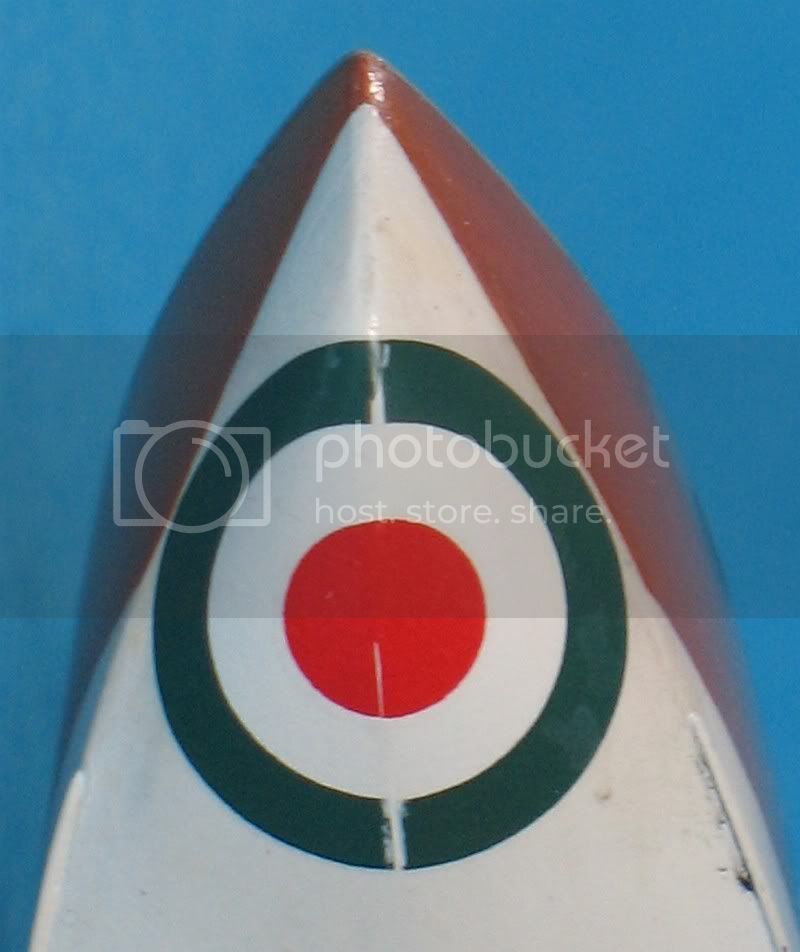
The white of the roundels must be painted because it is too "transparent".

The rivets are pierced with a needle.
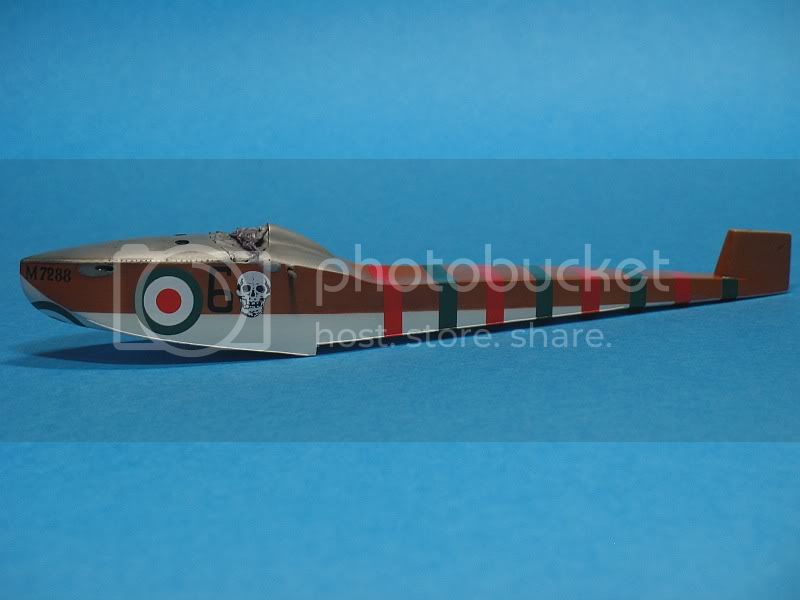

Next, weathering and varnish
Regards.
I start the installation of decals....
I'm using "microsol".
The aircraft is painted with gloss varnish.
The red and green lignes s are four pieces. They are placed without problems and have almost the correct length. You have to touch up red and green.
Red and green are opaque. I just cut the outline of the decal to remove the very thin suport .
The roundel on the nose is very difficult to place. I cut it in half and I remove a segment.
The split is plugged with white paint and then sanded (micromech 12000). The green is humbrol 3, red hu 60.
The white of the roundels must be painted because it is too "transparent".
The rivets are pierced with a needle.
Next, weathering and varnish
Regards.
JackFlash
Joined: January 25, 2004
KitMaker: 11,669 posts
AeroScale: 11,011 posts
Posted: Friday, June 17, 2011 - 02:27 PM UTC
Greetings Louis! may I say she is coming along nicely and thank you for continuing to show us how its done. Beautiful build. Your reworking of the radiator and chin shell was most impressive.
Louis
Joined: May 21, 2006
KitMaker: 472 posts
AeroScale: 471 posts
Posted: Friday, June 17, 2011 - 07:38 PM UTC
Thank you very much Stephen.

thegirl

Joined: January 19, 2008
KitMaker: 6,743 posts
AeroScale: 6,151 posts
Posted: Saturday, June 18, 2011 - 03:18 AM UTC
Really have to agree with Stephen Louis . Absolutely beautiful work !

lcarroll
Joined: July 26, 2010
KitMaker: 1,032 posts
AeroScale: 1,025 posts

Posted: Saturday, June 18, 2011 - 04:05 AM UTC
Louis,
I have really enjoyed following you through this build and can only add my compliments to the others; very nice work indeed and looking forward to more as you finish her up.
Cheers,
Lance
I have really enjoyed following you through this build and can only add my compliments to the others; very nice work indeed and looking forward to more as you finish her up.
Cheers,
Lance
Removed by original poster on 06/19/11 - 19:52:17 (GMT).
Louis
Joined: May 21, 2006
KitMaker: 472 posts
AeroScale: 471 posts
Posted: Thursday, July 14, 2011 - 11:11 AM UTC
Thank you very much!!!
ici, le même article en français
Hello,
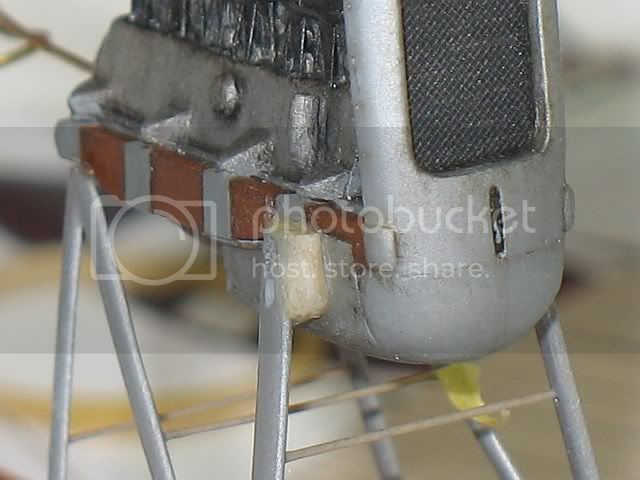
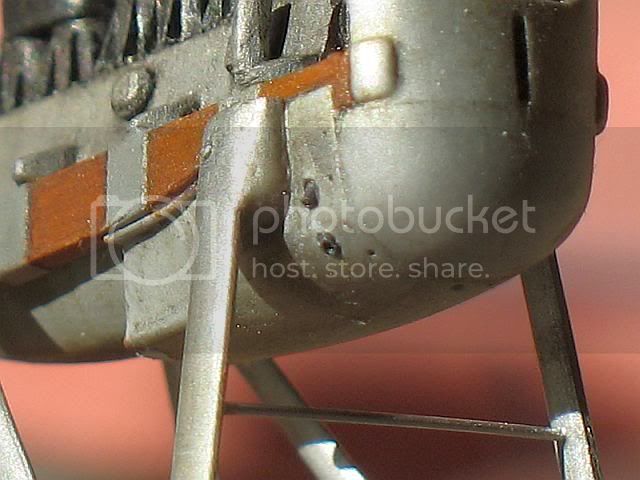
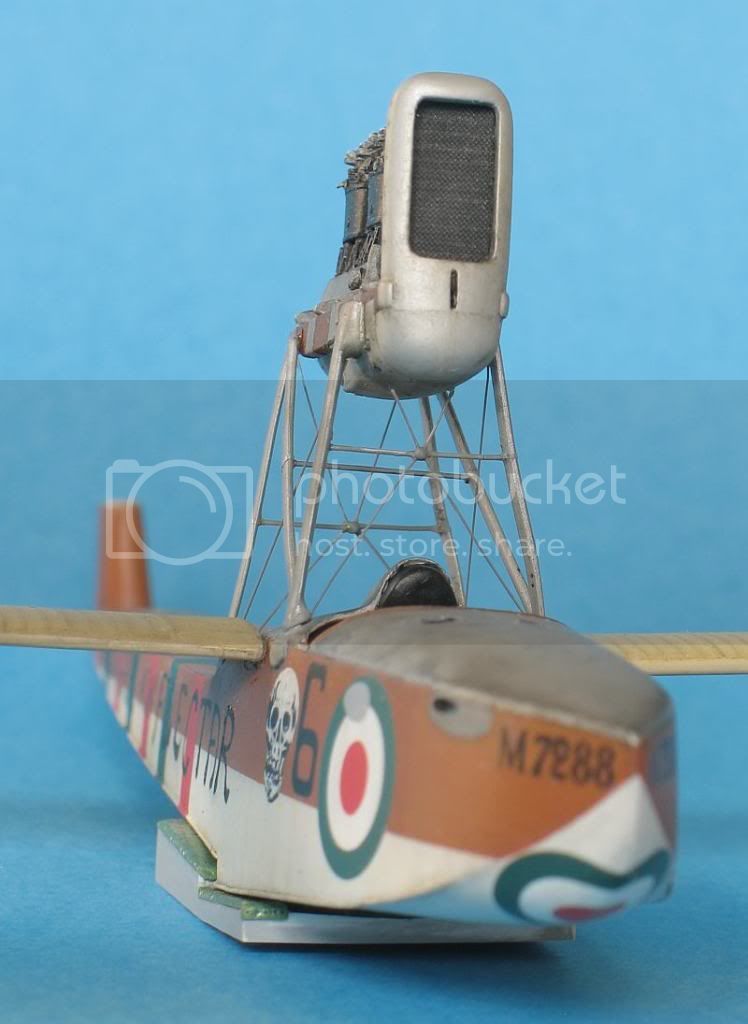
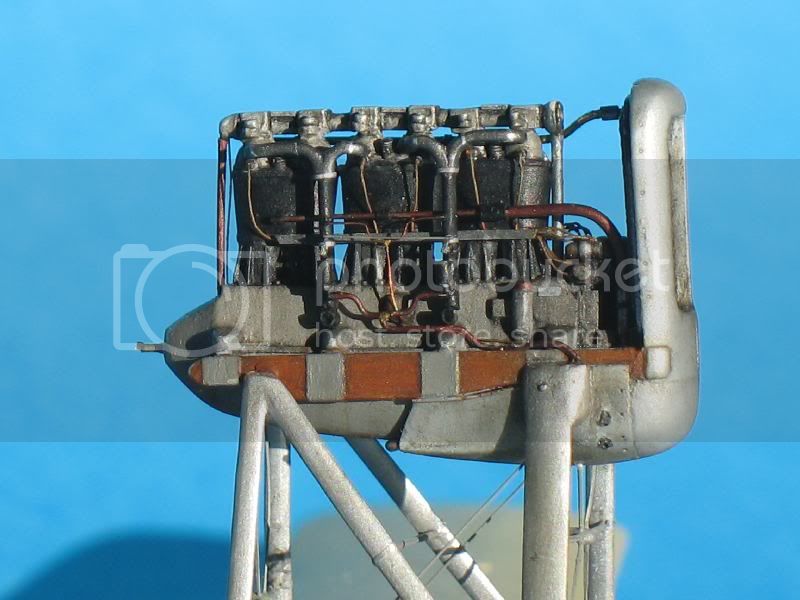
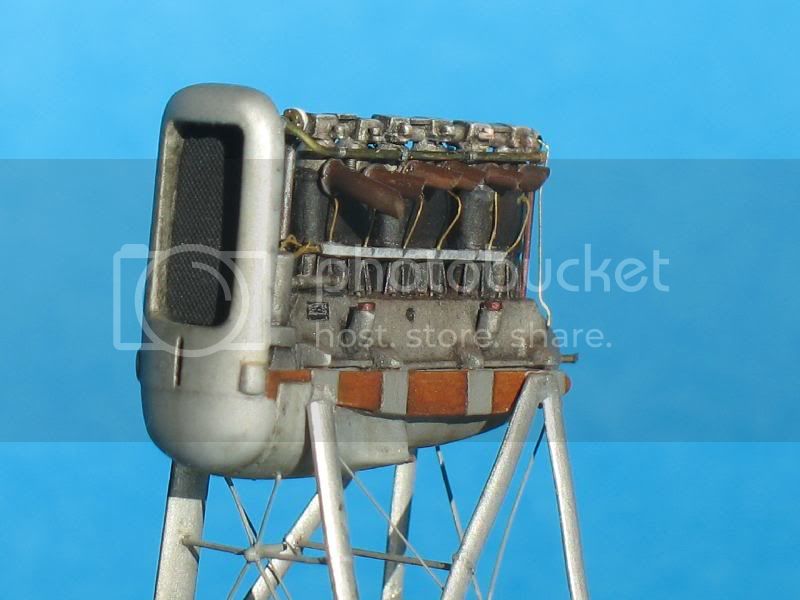
The engine is almost done. The cover is extended over the wooden arm that support it.
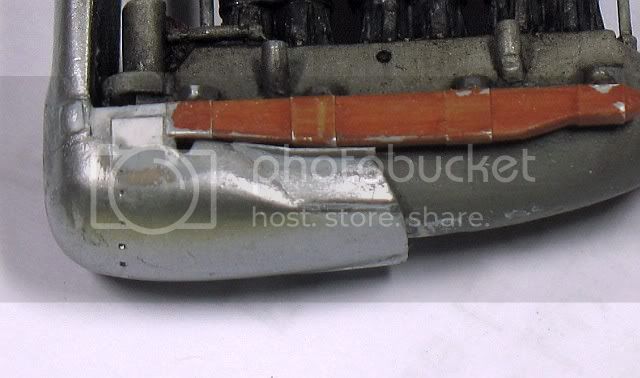
The rivets on the hood of the radiator are made after painting with a 0.5mm pencil sharpened.
The ribs of the wing Blue Max are very (too?) Thick (in relief) on the underside. The metal plate that protects the wing of the exhausts is .... the wrong side. So I scraped and moved the right side. It is replaced by tape and riveted aluminum sanded.
The ribs (replacing the plate) have been reworked with the same material but are slightly thicker. I have done better to sand the entire underside of the wing as it seems very smooth in the pictures.
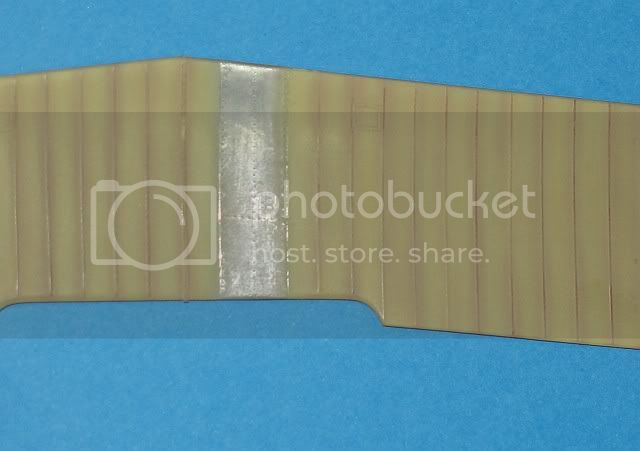
The ribs are spent in dark brown.
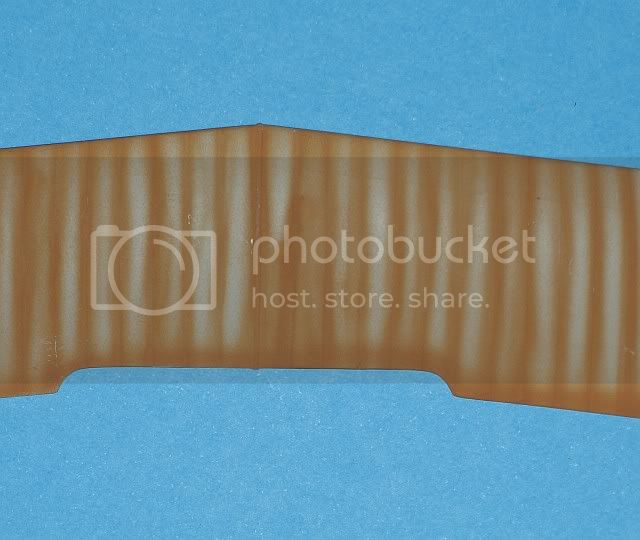
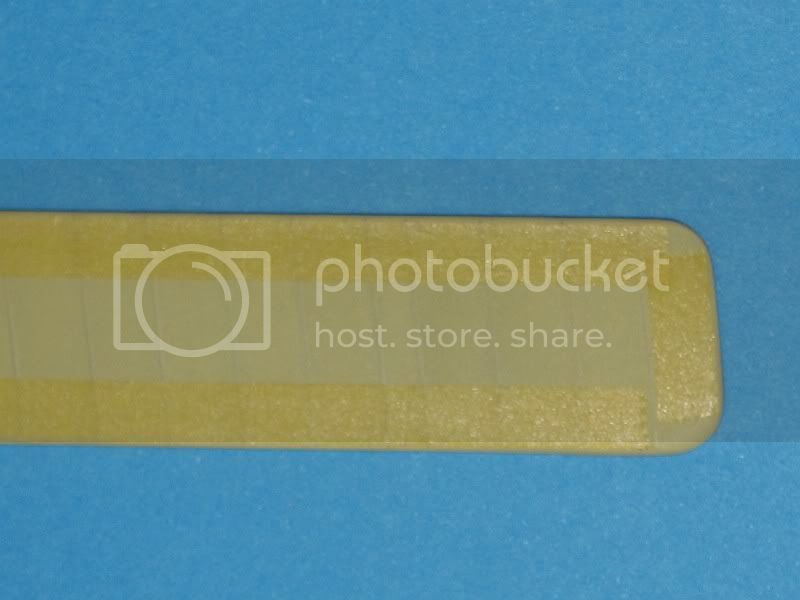
 I could not put correctly strips of tape (3/4mm) on the ribs painted brown, so I painted beige with no tape (of the entire wing so).
After drying I polish the wing to bring up the dark color of the ribs.
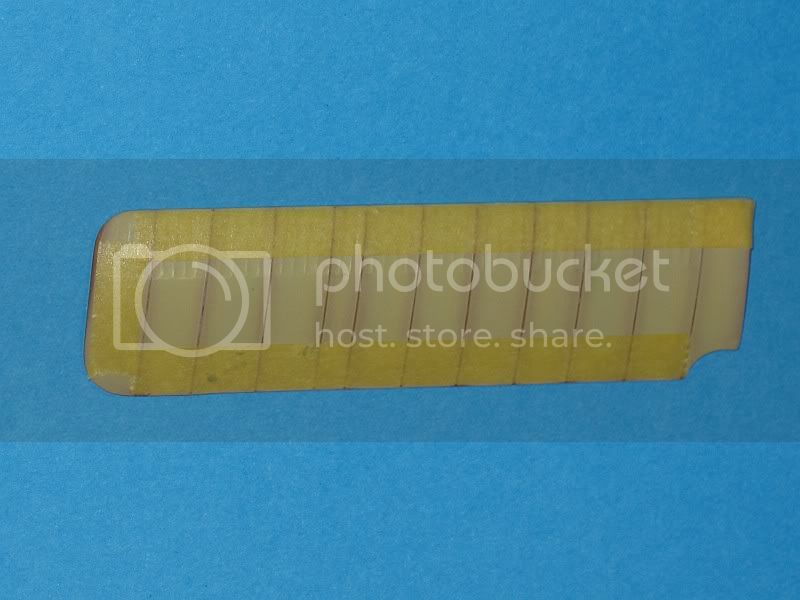
Then we made as usual by reducing the dark color with an airbrush. The limits are somewhat less accurate but it will be fine.

Regards.
Louis
ici, le même article en français
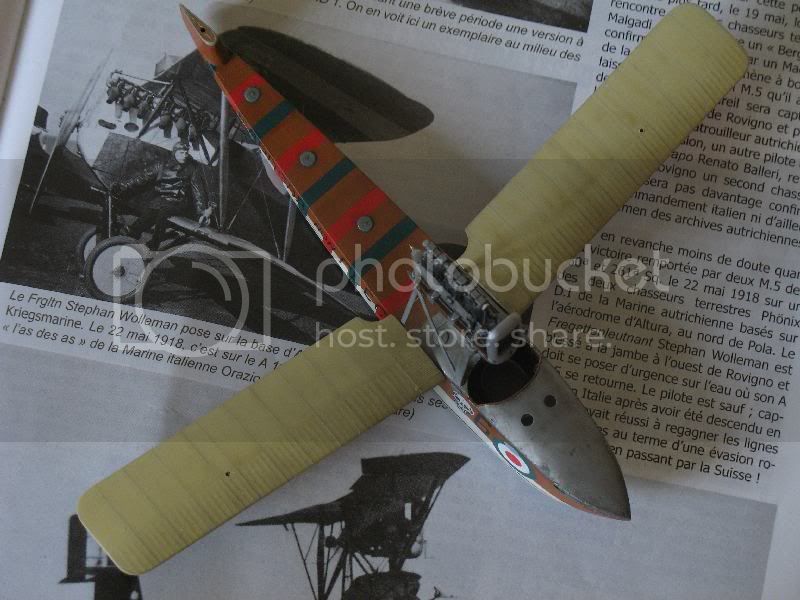
Hello,
The engine is almost done. The cover is extended over the wooden arm that support it.
The rivets on the hood of the radiator are made after painting with a 0.5mm pencil sharpened.
The ribs of the wing Blue Max are very (too?) Thick (in relief) on the underside. The metal plate that protects the wing of the exhausts is .... the wrong side. So I scraped and moved the right side. It is replaced by tape and riveted aluminum sanded.
The ribs (replacing the plate) have been reworked with the same material but are slightly thicker. I have done better to sand the entire underside of the wing as it seems very smooth in the pictures.
The ribs are spent in dark brown.
I could not put correctly strips of tape (3/4mm) on the ribs painted brown, so I painted beige with no tape (of the entire wing so).After drying I polish the wing to bring up the dark color of the ribs.
Then we made as usual by reducing the dark color with an airbrush. The limits are somewhat less accurate but it will be fine.
Regards.
Louis
Louis
Joined: May 21, 2006
KitMaker: 472 posts
AeroScale: 471 posts
Posted: Monday, August 29, 2011 - 10:59 AM UTC
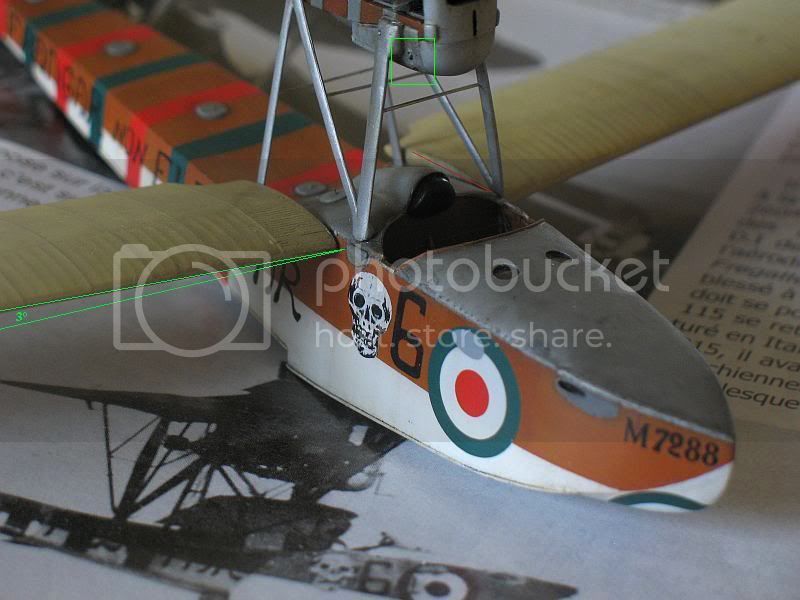
Hello,
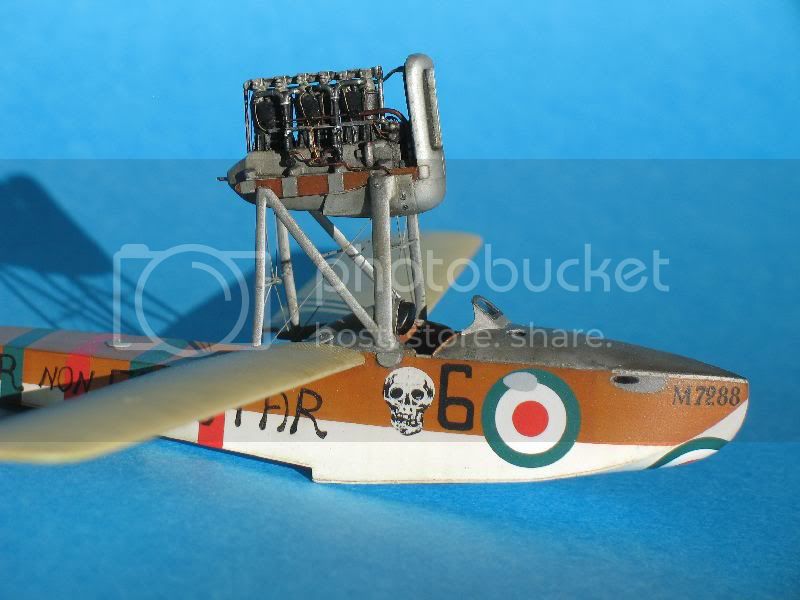
The motor is glued to the mats. It is very very difficult. It should have an angle of 3 ° to the horizontal. Not mine....
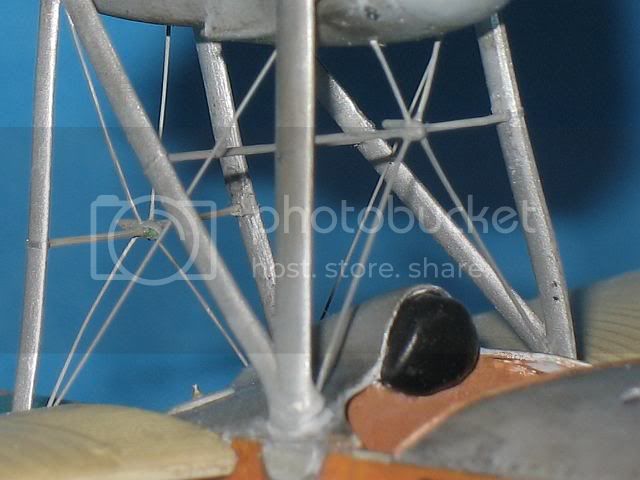
Joints in the lower wings are fragile. The upper wing is placed on the masts of the motor bearing full weight.
The masts on top of the engine are metal remake. I hope they can suporte the weight of the wing.


So I made a plaster mold to make them with lead. I'm using Fokker DVII mast.
The mould deteriorates quickly and there is some sanding to predict.

The four caps on the fuselage are made of plastic (3.5mm) sanded and covered with a drop of viscous paint to "rounding".
Regards.
JackFlash
Joined: January 25, 2004
KitMaker: 11,669 posts
AeroScale: 11,011 posts
Posted: Monday, August 29, 2011 - 11:34 AM UTC
Excellent work Louis! I really look forward to your updates.

OEFFAG_153

Joined: February 19, 2010
KitMaker: 1,473 posts
AeroScale: 1,450 posts
Posted: Monday, August 29, 2011 - 07:10 PM UTC
Hi Louis,
This is one excellent build of a beautiful subject. Lots of great hints on how to do things too!
Looking forward to more!
Best Regards
Mikael
This is one excellent build of a beautiful subject. Lots of great hints on how to do things too!
Looking forward to more!
Best Regards
Mikael

eseperic

Joined: November 06, 2009
KitMaker: 624 posts
AeroScale: 609 posts

Posted: Monday, August 29, 2011 - 10:32 PM UTC
Hi Louis,
What a beautiful display of skills and determination... I appreciate your dedication to detail. It seems that you make things a bit more difficult just to enjoy modelling! Congrats!
What a beautiful display of skills and determination... I appreciate your dedication to detail. It seems that you make things a bit more difficult just to enjoy modelling! Congrats!
Louis
Joined: May 21, 2006
KitMaker: 472 posts
AeroScale: 471 posts
Posted: Tuesday, August 30, 2011 - 08:50 AM UTC
Quoted Text
Hi Louis,
It seems that you make things a bit more difficult just to enjoy modelling! Congrats!
Well.... I think that's it!
Thank you for your nice words.
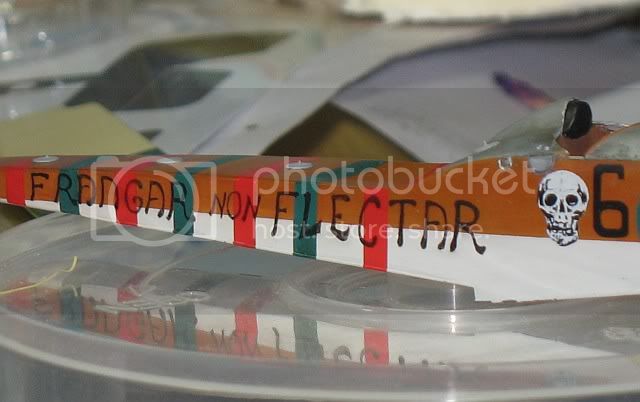
PS: Does anyone know an photo showing the left side of this M5 "Frangare non Flectar" ( "I would rather break than submit" something like that ) ?
Louis.
Louis
Joined: May 21, 2006
KitMaker: 472 posts
AeroScale: 471 posts
Posted: Wednesday, August 31, 2011 - 10:16 AM UTC
One side, with oil paint:
Regards
Regards
Louis
Joined: May 21, 2006
KitMaker: 472 posts
AeroScale: 471 posts
Posted: Saturday, October 08, 2011 - 09:40 AM UTC
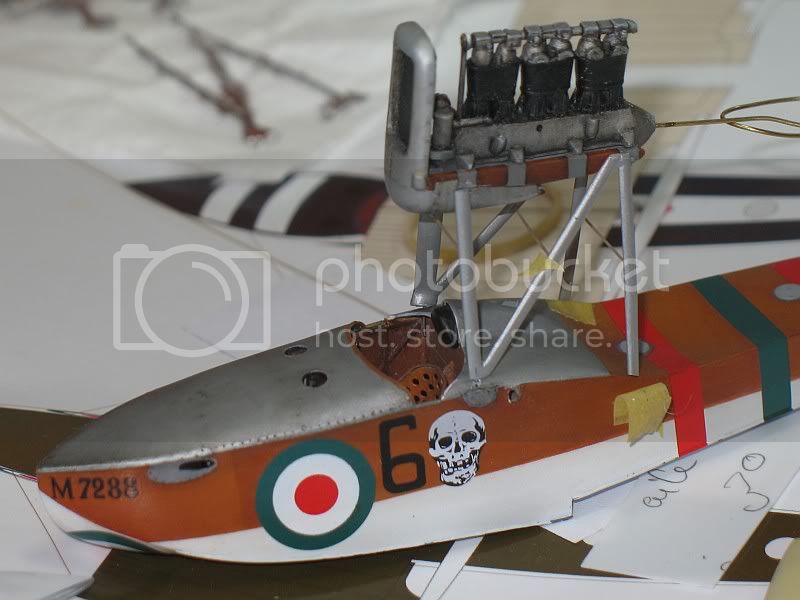
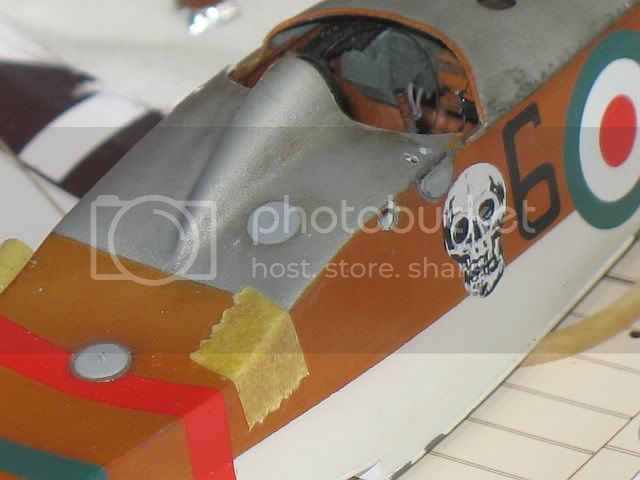
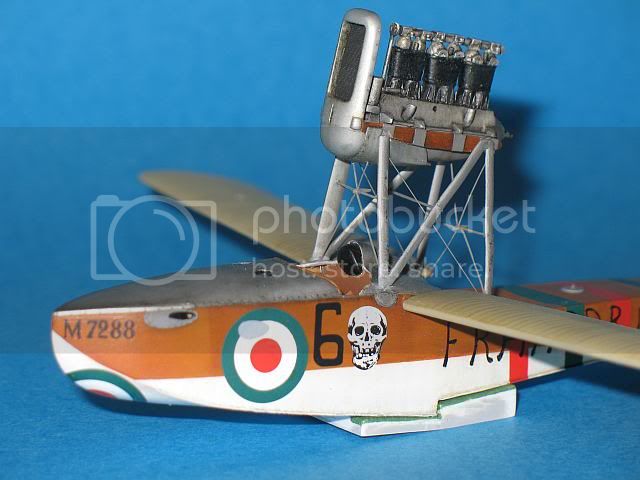
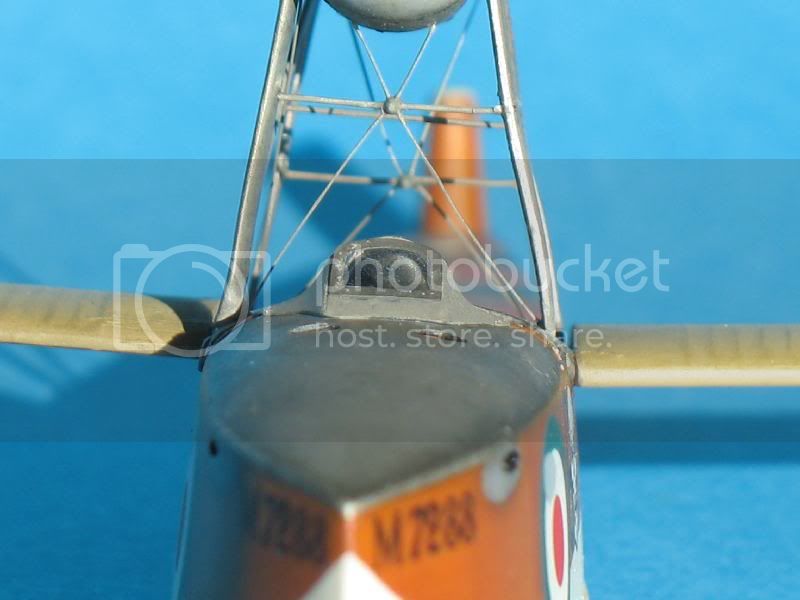
Hello,
The upper wing is painted. The Pheon decals are very good. I'm using new varnish from
Prince August. Very easy, very good, very strong.
Strangely I have not managed to put the cockades in the same place on each side .... would not they round? Or it's the wing ? I do not care.
A tube through the wing. It dirties the wing.


Wings are glued. Three degrees from the horizontal. They are a little high. Or the fuselage " too fast down" (?) toward the rear.
Two small hoses are stuck in two holes (green).
The engine is very, very difficult to put on the fuselage. It is difficult to find the right angle and put in the axis of the aircraft...that is why the masts of the motor are not stuck where they should..

The decals represent the vents in their place... They are not the same place on both sides.
On the right side, a rectangular vent (or something like that) must be added. You can see it on picture.

Weathering is done in oil paint.
It is very light on the hull. These planes seemed very clean.
Best regards.
The upper wing is painted. The Pheon decals are very good. I'm using new varnish from
Prince August. Very easy, very good, very strong.
Strangely I have not managed to put the cockades in the same place on each side .... would not they round? Or it's the wing ? I do not care.
A tube through the wing. It dirties the wing.
Wings are glued. Three degrees from the horizontal. They are a little high. Or the fuselage " too fast down" (?) toward the rear.
Two small hoses are stuck in two holes (green).
The engine is very, very difficult to put on the fuselage. It is difficult to find the right angle and put in the axis of the aircraft...that is why the masts of the motor are not stuck where they should..
The decals represent the vents in their place... They are not the same place on both sides.
On the right side, a rectangular vent (or something like that) must be added. You can see it on picture.
Weathering is done in oil paint.
It is very light on the hull. These planes seemed very clean.
Best regards.
JackFlash
Joined: January 25, 2004
KitMaker: 11,669 posts
AeroScale: 11,011 posts
Posted: Saturday, October 08, 2011 - 03:39 PM UTC
When it comes to the details, Louis you are the master.
Louis
Joined: May 21, 2006
KitMaker: 472 posts
AeroScale: 471 posts
Posted: Saturday, October 08, 2011 - 09:34 PM UTC
Quoted Text
Two small hoses are stuck in two holes (green).
Thank you Stephen.
Louis
Joined: May 21, 2006
KitMaker: 472 posts
AeroScale: 471 posts
Posted: Tuesday, October 25, 2011 - 10:00 AM UTC
A cart to transport it.

Too small...I do it again.


Note the protections (leather???) to avoid damaging the hull.


Regards
Too small...I do it again.
Note the protections (leather???) to avoid damaging the hull.
Regards
JackFlash
Joined: January 25, 2004
KitMaker: 11,669 posts
AeroScale: 11,011 posts
Posted: Tuesday, October 25, 2011 - 06:27 PM UTC
Yes nicely done. and it would make a great "master" to have some resin copies made.

Airbag
Joined: January 24, 2009
KitMaker: 18 posts
AeroScale: 17 posts

Posted: Tuesday, October 25, 2011 - 09:42 PM UTC
Hello Louis, this is just a fascinating and exciting build and I know I'm biased, but the Macchi is about the most elegant aeroplane of WWI and this marathon piece of superb work is certainly doing it justice. You must be nearly at the end now? Love the handling trolley - great touch!
All the best
Rowan
All the best
Rowan
Louis
Joined: May 21, 2006
KitMaker: 472 posts
AeroScale: 471 posts
Posted: Thursday, October 27, 2011 - 09:16 AM UTC
Quoted Text
Yes nicely done. and it would make a great "master" to have some resin copies made.
Hello Stephen,
Thank you.
Perhaps I will done copie, but no resine. I've never used resin and it looks very toxic (my children roam everywhere...) and binding. I will try with metal.
I'm not sure that the width of my handling trolley will be OK with the fly or bluemax models. Mine is 24 mm wide (without wheels) and its shape corresponds to my kit.
Hello Rowan.
Thank you very much. Very glad that you like it.
I approach the end:
-fix the upper wing.
-glued all the engine parts.
-build floteurs
-rigging
It's time to finish it.
Regards.
Louis
Joined: May 21, 2006
KitMaker: 472 posts
AeroScale: 471 posts
Posted: Monday, October 31, 2011 - 09:27 AM UTC
Flat rigging:
All was well until I took my hair dryer to tighten the cables ... Bad idea!
The left side mat were twisted. I have not managed to set upright them. I'm too dumb!
No picture front view!
Regards.
All was well until I took my hair dryer to tighten the cables ... Bad idea!
The left side mat were twisted. I have not managed to set upright them. I'm too dumb!
No picture front view!
Regards.
Louis
Joined: May 21, 2006
KitMaker: 472 posts
AeroScale: 471 posts
Posted: Sunday, December 11, 2011 - 10:54 AM UTC
Hello,
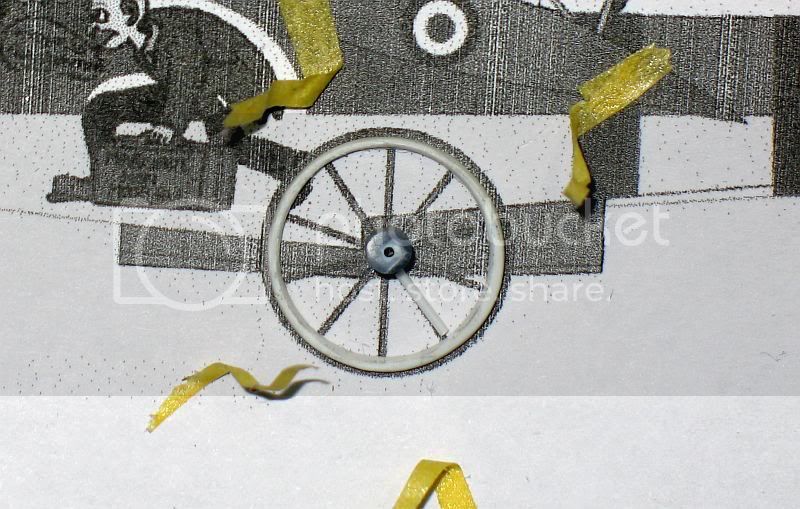
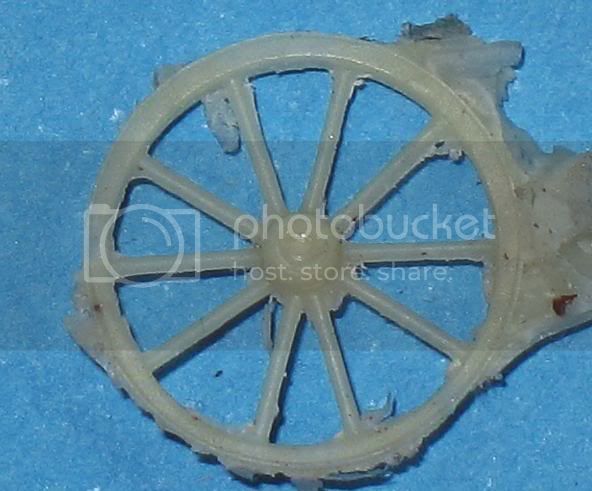
I finished one wheel completely...

I made a silicone mold to make wheel lead. The spokes are too thin and the metal does not flow into it. The mold have evacuations for air and a tank.
If anyone has an idea ....
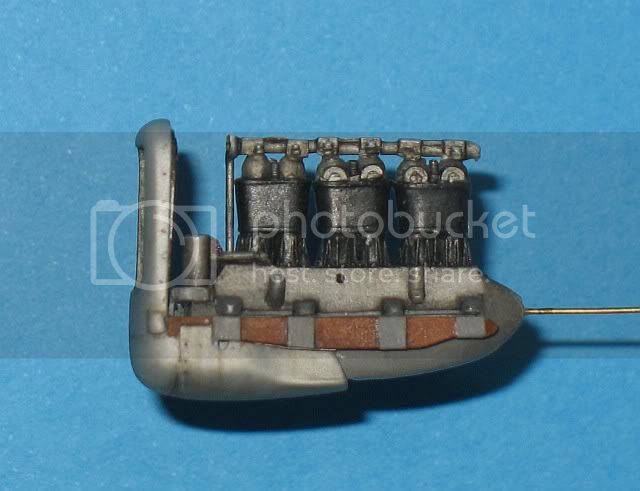
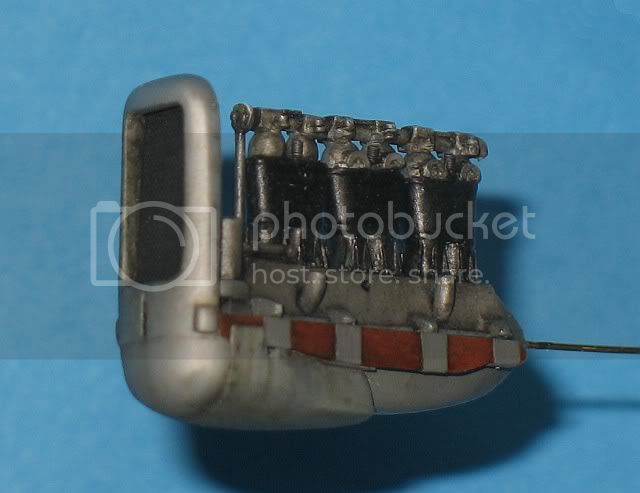
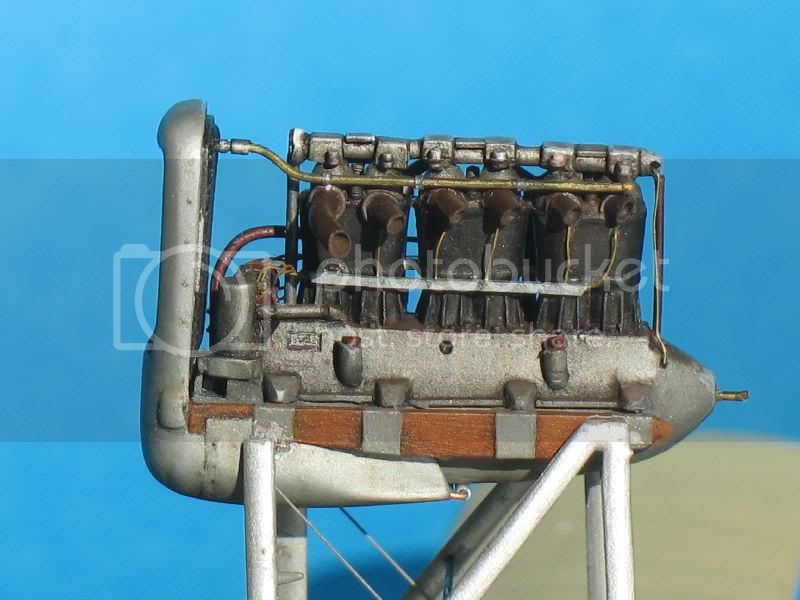
The engine is finished. The pipes are copper brass and lead. Exhaust pipes has been redesigned plastic (I lost those in the box).
The windshield is going in transparent plastic sheet. It's very difficult to give a form that is correct. Mine is a little high and I think probably not enough inclined. A frame is cut and glued on top.


Regards.
I finished one wheel completely...
I made a silicone mold to make wheel lead. The spokes are too thin and the metal does not flow into it. The mold have evacuations for air and a tank.
If anyone has an idea ....
The engine is finished. The pipes are copper brass and lead. Exhaust pipes has been redesigned plastic (I lost those in the box).
The windshield is going in transparent plastic sheet. It's very difficult to give a form that is correct. Mine is a little high and I think probably not enough inclined. A frame is cut and glued on top.
Regards.
Louis
Joined: May 21, 2006
KitMaker: 472 posts
AeroScale: 471 posts
Posted: Friday, January 06, 2012 - 10:48 AM UTC
Hello,
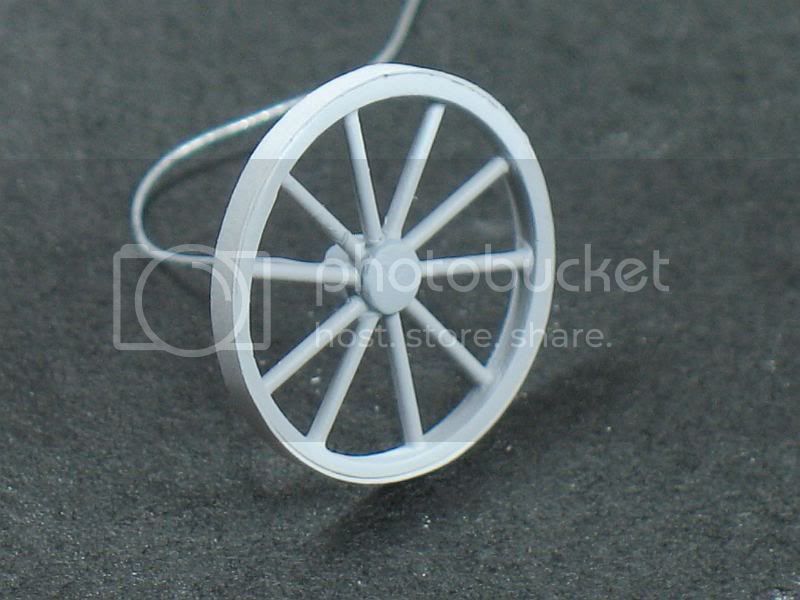
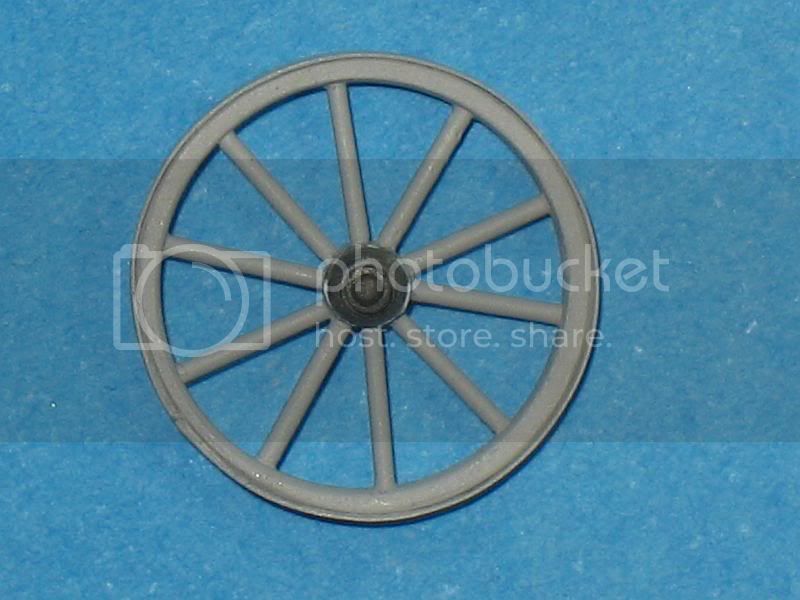
I tried to mold a wheel with resin. On the third try I get an complete wheel. but the hub is poorly reproduced. The wheel is too fragile to be used, it is easily deformed. The resin is placed in the mold with a brush.

I use a hub from first try to glued it on my second wheel (built).
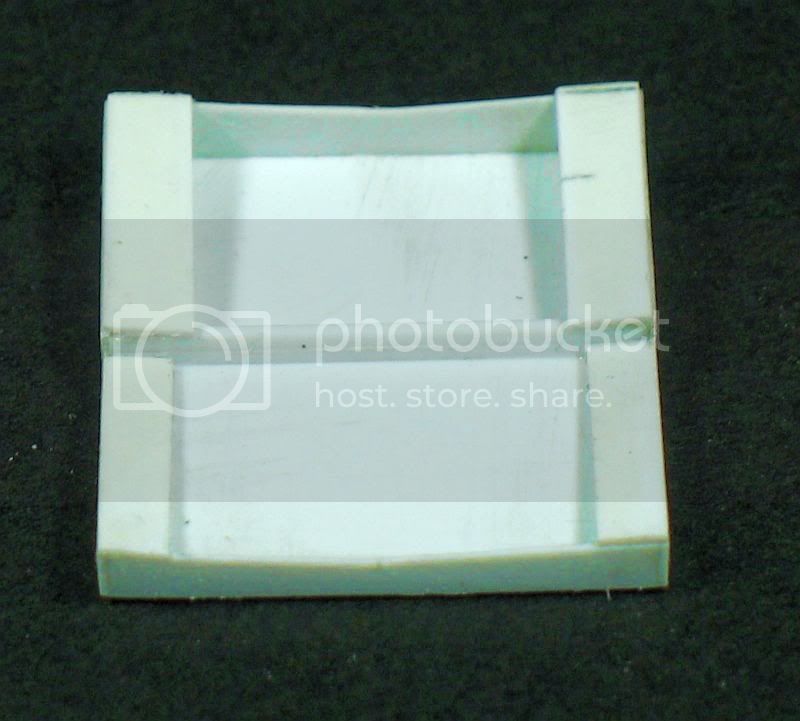
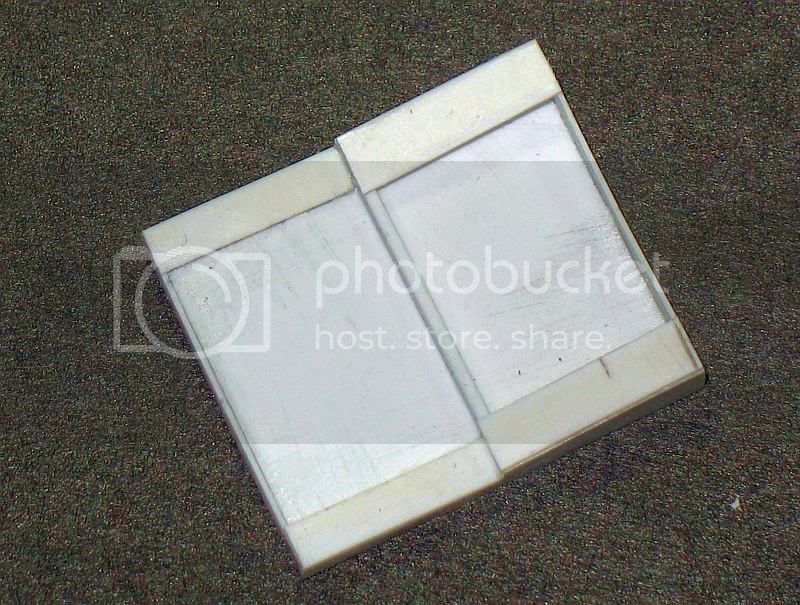
The floats (Fly) are very wrong. It lacks 4mm long, 1 mm wide and the shape is wrong.

I cut the float at the end of the white paper:

added 4 mm:
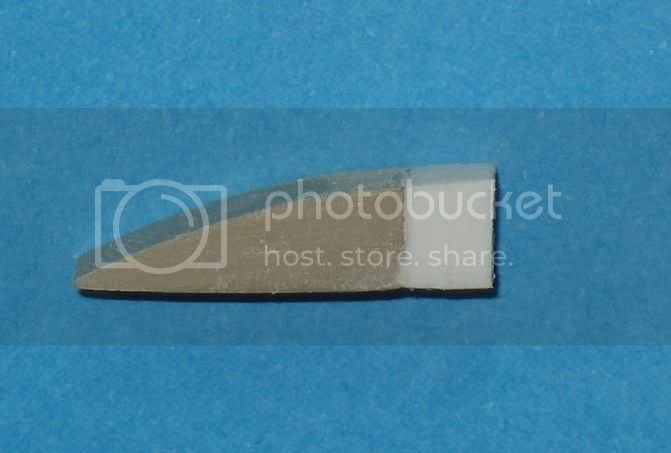
and 1mmm again:

I glued a copy of the float plan:

The border is remove.
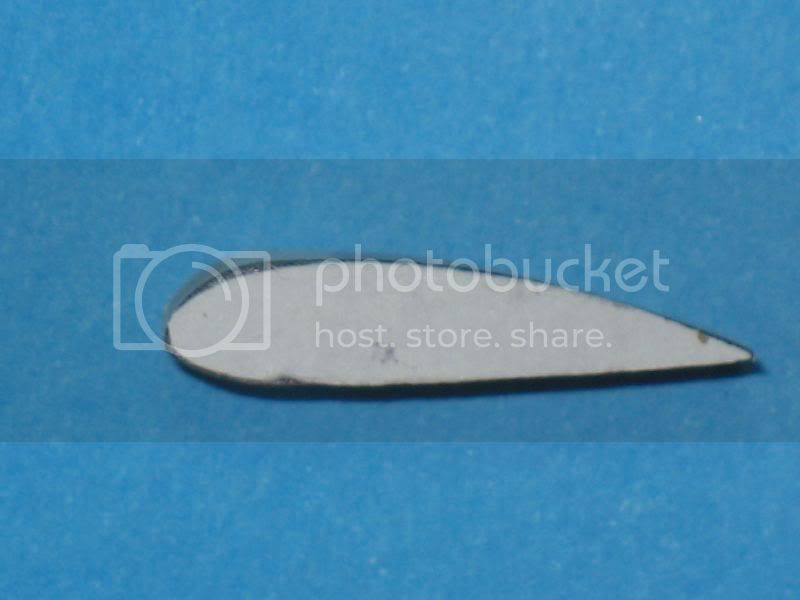
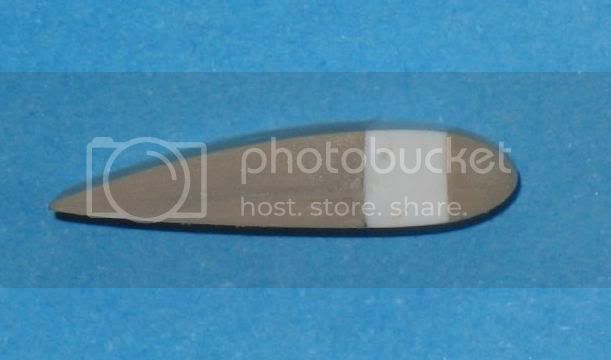

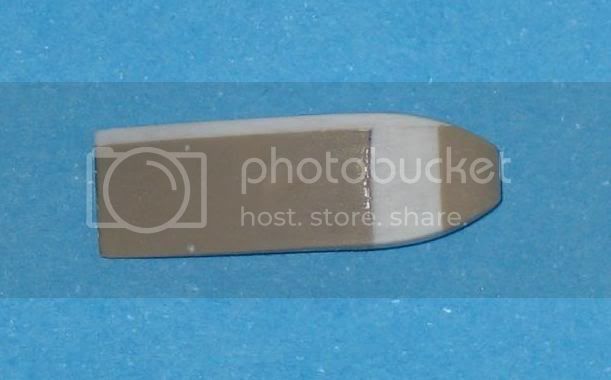
Best regards.
I tried to mold a wheel with resin. On the third try I get an complete wheel. but the hub is poorly reproduced. The wheel is too fragile to be used, it is easily deformed. The resin is placed in the mold with a brush.
I use a hub from first try to glued it on my second wheel (built).
The floats (Fly) are very wrong. It lacks 4mm long, 1 mm wide and the shape is wrong.
I cut the float at the end of the white paper:
added 4 mm:
and 1mmm again:
I glued a copy of the float plan:
The border is remove.
Best regards.

Mgunns
Joined: December 12, 2008
KitMaker: 1,423 posts
AeroScale: 1,319 posts

Posted: Saturday, January 07, 2012 - 07:45 AM UTC
Hello Louis:Absolutely outstanding workmanship. Your patience and effort is truly noteworthy and an example.
Thank you
Mark
 |

WEB HOSTING BY


Copyright ©2021 AeroScale and Kitmaker Network, a subsidiary of Silver Star Enterprises
All Rights Reserved. Please read our Conditions of Use and Privacy Policy.
All Rights Reserved. Please read our Conditions of Use and Privacy Policy.