_GOTOBOTTOM
Early Aviation
Discuss World War I and the early years of aviation thru 1934.
WNW 2009 -10 Alb. D.Va Keith G
Kornbeef
_VISITCOMMUNITY
England - South East, United Kingdom
Joined: November 06, 2005
KitMaker: 1,667 posts
AeroScale: 1,551 posts
Posted: Friday, March 26, 2010 - 07:52 PM UTC
Okay, I'm entering the fray as of now. I picked up both D.Va kit's yesterday from Parcelforce and had to wait all day to get home to get my mitts on the sprues.

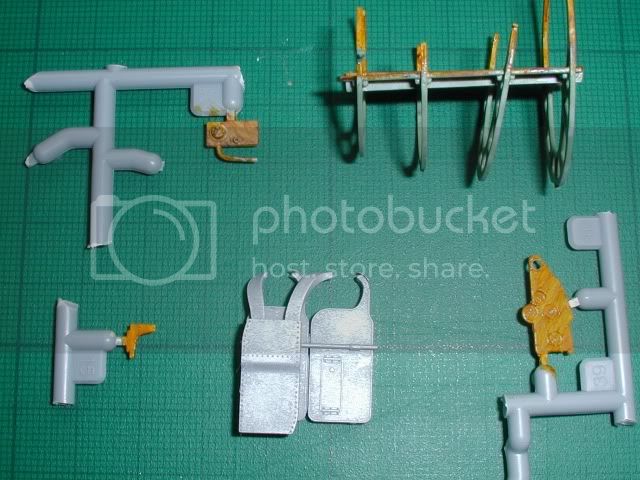
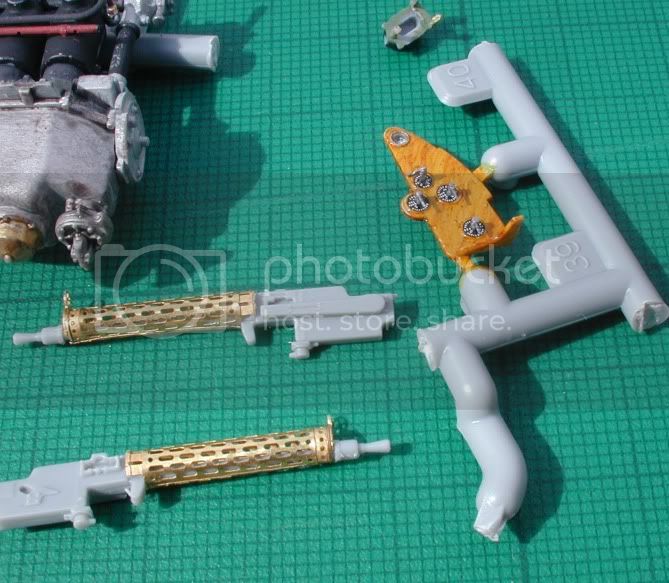
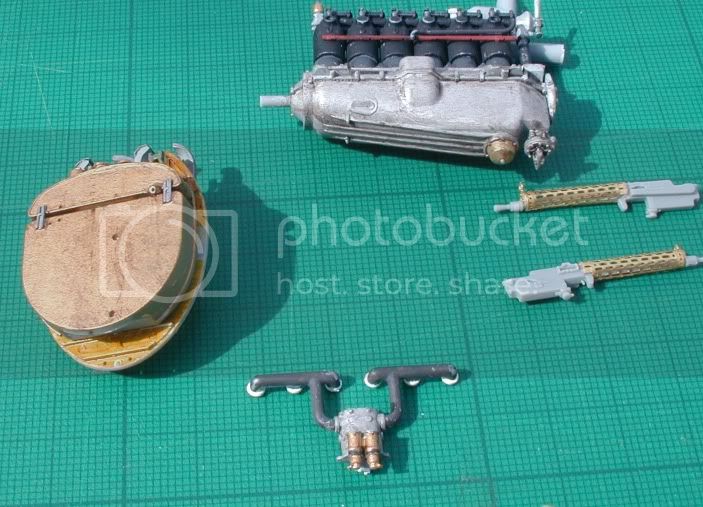
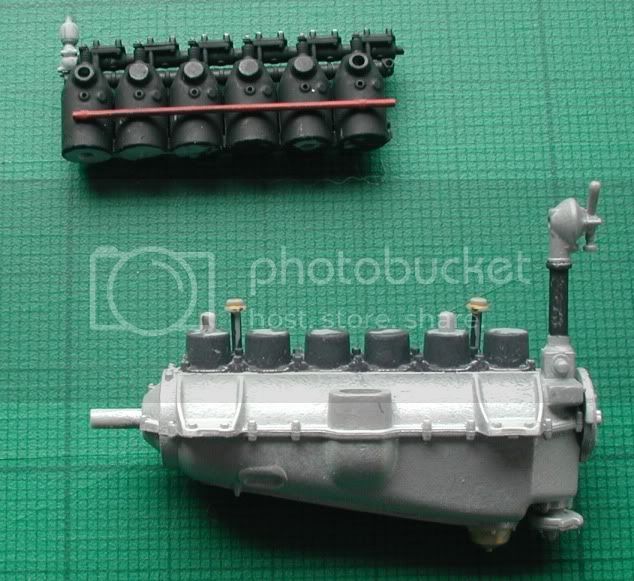
First impressions were very good, some parts are quite exquisite. Yesterday was supposed to be assess and plan....but that engine ....you just cannot resist building

So I assembled a few components, I don't want to go AMD crazy and contain myself to what you really can practically see....*gonna try anyway*

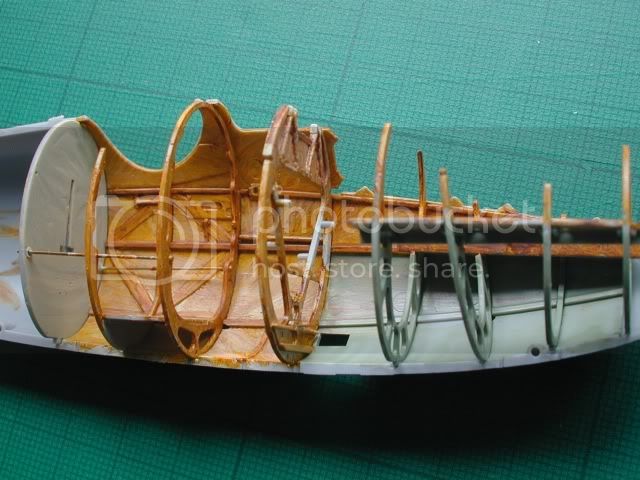
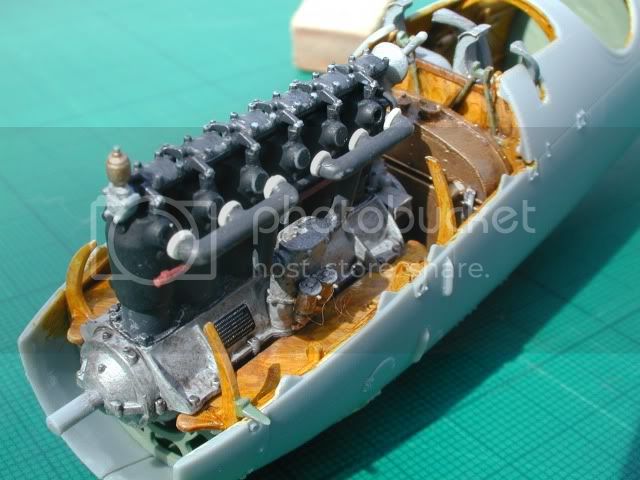
A few issues with ejector pin marks and sinks in some small parts which I was aware of from pics seen earlier seemed my only woes.......till late last night, assessing shape and difference between this and my Roden DIII (OAW) I came to remove the top wing from the sprue...To my dismay the upper wing is incredibly warped. A good 7mm between the wingtip and centre if it is laid upside down and measured. So an hour of almost boiling water and weights had it down to a much reduced curve but it still needs a lot of work, worrying when you see the plastic paling as it is stressed into shape.
The second DVa kit is slightly warped but nothing like as bad, (Just a word of warning for everyone else).

Anyway, work will proceed over the weekend, pics posted once something is worth snapping.

RAGIII
_VISITCOMMUNITY
North Carolina, United States
Joined: June 19, 2007
KitMaker: 604 posts
AeroScale: 600 posts
Posted: Saturday, March 27, 2010 - 01:33 AM UTC
Sorry to hear about your wings! I haven't opened the bags in my DVa yet but the DV wing seems to be perfect!
RAGIII
guitarlute101
_VISITCOMMUNITY
West Virginia, United States
Joined: December 18, 2006
KitMaker: 1,121 posts
AeroScale: 1,063 posts
Posted: Saturday, March 27, 2010 - 01:50 AM UTC
Keith,

I'm really glad to see you building this kit. I have the D.V and will be ordering the D.Va soon.

Mark
Repainted
_VISITCOMMUNITY
Östergötland, Sweden
Joined: April 04, 2006
KitMaker: 1,058 posts
AeroScale: 1,004 posts
Posted: Saturday, March 27, 2010 - 04:49 AM UTC
Hi
I will follow this one too. will be interesting to see what you can do with this

Cheers
Larsa

just waiting for the postman to deliver my Dv

Mgunns
_VISITCOMMUNITY
Arizona, United States
Joined: December 12, 2008
KitMaker: 1,423 posts
AeroScale: 1,319 posts
Posted: Saturday, March 27, 2010 - 06:08 AM UTC
Hi Keith:

Bummer about the wing. I scoped out my DV and it is as it should be. Maybe write WNW and see what they have to say. Good luck with it.
thegirl
_VISITCOMMUNITY
Alberta, Canada
Joined: January 19, 2008
KitMaker: 6,743 posts
AeroScale: 6,151 posts
Posted: Saturday, March 27, 2010 - 09:32 AM UTC
Hey Keith

This will be interesting to see if you can do it out of box , or close to it

Nice to see you back with another project . This is first I have heard about the wing issue . I agree , send WNW an E-mail I'm sure they will help out

Look forward to the pic's .
Kornbeef
_VISITCOMMUNITY
England - South East, United Kingdom
Joined: November 06, 2005
KitMaker: 1,667 posts
AeroScale: 1,551 posts
Posted: Saturday, March 27, 2010 - 10:10 PM UTC
TY all,

I would contact WNW but dont want to risk another attempted highway robbery by parcelforce to get a replacement part sent

But seriously it isnt a great issue, a little time and patience has it almost straight already. It just came as something of a shock seeing it.

I've plodded on a little. One thing all should note is the seat support/reinforcing bars that run through the cockpit are VERY fragile...mine are brass already...ooopsies and the fit of parts is tight...so a little carelessness can see them bent/snapped on the first dryrun...*here speaks the wizard of afterthought*

I have a couple of little things to detail and I may have the interior in basecoat for woodgraining tonight..or tomorrow.

I know I keep saying but the engine is superb, just the right level of detail

K
OEFFAG_153
_VISITCOMMUNITY
Västra Götaland, Sweden
Joined: February 19, 2010
KitMaker: 1,473 posts
AeroScale: 1,450 posts
Posted: Sunday, March 28, 2010 - 08:46 AM UTC
Hi Keith,

Great stuff – I'll be following your build on this one with great interest!

Thanks for the heads-up on the fragile seat support. Shame about the wing warp, hope you can sort it – I'll have to check mine when the box from WNW arrive (its probably being strip searched by the Royal Swedish Customs as we speak).

Mikael
CaptainA
_VISITCOMMUNITY
Indiana, United States
Joined: May 14, 2007
KitMaker: 3,117 posts
AeroScale: 2,270 posts
Posted: Monday, March 29, 2010 - 09:16 AM UTC
Pics? Pics? Where are the pics?

My Albies must be on the slow boat from NZ. Ordered 19 days ago and still a no show.
Mgunns
_VISITCOMMUNITY
Arizona, United States
Joined: December 12, 2008
KitMaker: 1,423 posts
AeroScale: 1,319 posts
Posted: Monday, March 29, 2010 - 01:03 PM UTC

Quoted Text

My Albies must be on the slow boat from NZ. Ordered 19 days ago and still a no show.


Carl: I got mine already. There might, just might be a screw up in NZ. I would write an email and see what their response is. Did you get a shipment confirmation?
I just broke down and ordered another, yes another, LVG.VI and........the DV.a. I sold a bunch of 1/48 WWI subjects and a few Minicraft Airliners on ebay. Fattened my PAYPAL account enough to buy the two WNW kits.
I too will be watching this build with "keen interest".
Cheers

Mark
Kornbeef
_VISITCOMMUNITY
England - South East, United Kingdom
Joined: November 06, 2005
KitMaker: 1,667 posts
AeroScale: 1,551 posts
Posted: Monday, March 29, 2010 - 09:05 PM UTC
Pics?....now why would I give you pics?...laughs maniacally...

I will post pics but my studio (the kitchen) light blew SWMBO wants to get something nicer.......so till we get what she wants the light isnt good enough for photos....and its been poor weather when I've had chance.

But a typed update....... interior wood is grained and drying.... engine is in basecoat, still straightening the upper wing bit by bit, the lower wings are warped too, only expected as they are on the same sprue.

Yes Terri I am building reasonably close to OOB...I have PofP's set for the DIII and there may be an odd brasslet popped onto the DVa.

One thing that has suprised m is the seeming lack of detain on the ammunition feeds, not difficult to detail but a suprise.

While the interior wood dries I've time to tinker and detail some of the rest....pics will follow ASAP

Kornbeef
_VISITCOMMUNITY
England - South East, United Kingdom
Joined: November 06, 2005
KitMaker: 1,667 posts
AeroScale: 1,551 posts
Posted: Wednesday, March 31, 2010 - 09:16 AM UTC
Sorry Guys and girls.

Still no pics but progressing along.

Dryfitted most parts and some are really tight, this is good but needs to be watched out for especiall the framework.

Now one thing to watch out for, unless I have a rogue kit...the lower tail fin, for want of a better word. The tailskid bracket is moulded on one half of the fuselage, I noted on mine how it sat back against the surface of the fin and had to sand the fin thinner so it sat proud as it should. Only a minor thing but best note now than before the woodgrain is on guys.

Currently fighting the AMD addiction in the cockpit

I did take a few pics but then realised this new PC has no card reader....doh! hopefully I'll be able to load them somewhere tomorrow.
Kornbeef
_VISITCOMMUNITY
England - South East, United Kingdom
Joined: November 06, 2005
KitMaker: 1,667 posts
AeroScale: 1,551 posts
Posted: Saturday, April 03, 2010 - 09:11 AM UTC
Okay, time to try and post some pics. I uploaded as BMPs I hope theyre okay??

Hints, tips and points to note will be scattered around so do pay attention kiddies

Odds and sods, being me I never follow sequences of instructions.


in an attempt to keep the wood faily light I used Humbrol matt 103 as a base, over which I oiled, allowed to dry and drybrushed a littl 103 over it before coating it in Tamiya clear yellow and then Klear. (all of which I allowed to dry thoroughly between coats)


the rear panel behind the pilot, I carved to add a few wrinkles, not clear in these pics and will finish it as doped linen. holes were drilled through it to run the cables from the controls before final assy.


Fuel tank, Suprisingly light on detail and as I intend to have the carbside cowling removed I spent a little time and effort to busy it up. I have to add more fuel lines yet but .


these shots show some of the components with a few days more work done than before, I have to commend WNWs decals the detail is excellent on the instrument faces. *Word of warning* I found the WNW brass not so forgiving, rolling the gun jackets I managed to break them very easily, now......something else they are longer than PofP's and Eduards and Toms, but check out against the 1:32 plans in the Jagdstaffeln book for the DRi.. So one can only assume Roden's guns are a little short...none the less the lesser of two evils saw me snip and refit the ends of the barrels to match the shorter PofP jackets.

And take a breath...


Engine, basic assembly, with a smattering of paint.


A little more detailing, still have the leads to do though, since this pic the mags are on too. I added the ring nuts to the top of the inlet manifold, something all the manufacturers seem to miss!


Just a few shots of the bits dryfitted together to give an idea how she looks, yes the manifolds hanging off..LOL

I'll post more as I go, and give more detail of tweaks and mods area by area as I work

Comments always welcome, I've spotted a couple of rough areas to tend to myself while uploading.

Now if only I could get some decent 1/32 loz...sighs All the schemes I fancy have loz...... oh well

Keith


RAGIII
_VISITCOMMUNITY
North Carolina, United States
Joined: June 19, 2007
KitMaker: 604 posts
AeroScale: 600 posts
Posted: Saturday, April 03, 2010 - 03:29 PM UTC
Keith, You have certainly been busy I like the approach you have taken on your build. Just a question, How did you handle those mold pin sink marks?
RAGIII
Kornbeef
_VISITCOMMUNITY
England - South East, United Kingdom
Joined: November 06, 2005
KitMaker: 1,667 posts
AeroScale: 1,551 posts
Posted: Saturday, April 03, 2010 - 08:43 PM UTC
Rick,

Thanks, As I said, I never follow instructions too closely, sometimes it bites me in the bum.

As for the injector marks, they really are very shallow, all I did was to adse (shave) the plastic away with the edge of a sharp blade (I have a favourite modelling xacto knife that has a shape all its own after years of sharpening) till the depression vanished,
A few careful strokes is all you need. I know others fill them but my experiences with filler always seems to end badly.

Theres plenty out of sight ones to practice on in the rear half
JackFlash
_VISITCOMMUNITY
Colorado, United States
Joined: January 25, 2004
KitMaker: 11,669 posts
AeroScale: 11,011 posts
Posted: Sunday, April 04, 2010 - 08:09 AM UTC
Good progression on the build. People get so locked in to the instructions they sometimes miss the real joy of exploring the parts and their place in the build. We as modelers can't just put parts together without trying for the best fit. This makes us put our time and effort into the build and each sub-assembly can become a model unto itself. Now that is an enjoyable build.

I know über-modelers that spend a year on one kit. When completed it truely looks like a scaled down working version. "Satisfaction" is the name of the game. Model On gentle folk!
thegirl
_VISITCOMMUNITY
Alberta, Canada
Joined: January 19, 2008
KitMaker: 6,743 posts
AeroScale: 6,151 posts
Posted: Monday, April 05, 2010 - 01:46 AM UTC
Go Keith Go , very nicely done so far my friend . What colours did you use for painting the tanks , they seem to have a brass/copper apperance to them . It looks kinda cool !
Mgunns
_VISITCOMMUNITY
Arizona, United States
Joined: December 12, 2008
KitMaker: 1,423 posts
AeroScale: 1,319 posts
Posted: Monday, April 05, 2010 - 01:55 AM UTC
Looking good thus far Keith. It seems to be progressing nicely. I am on the Encore D.II so I will be following this and Carl's build for pointers, commentary, and...dare I write....Jocularity.

Cheers

Mark
Kornbeef
_VISITCOMMUNITY
England - South East, United Kingdom
Joined: November 06, 2005
KitMaker: 1,667 posts
AeroScale: 1,551 posts
Posted: Monday, April 05, 2010 - 02:09 AM UTC

Quoted Text

Go Keith Go , very nicely done so far my friend . What colours did you use for painting the tanks , they seem to have a brass/copper apperance to them . It looks kinda cool !


Aww TY Terri...the tanks are painted in Humbrol no 91...its a tin from years ago, I'm not evensure its still in their much revised range, then over brushed with Citadel (Games workshop) burnished gold before being worn in with a little Lifecolor (Tensacrom) Oil to dirty it down, I used this on the engine too. As you know I'm not a big fan of straight metallic finishes but the tank seems right, the engine block was a light grey then drybrushed with a silvergrey/MithrilSilver mix


Mark I have the Encore DII too, it comes in and out the stash periodically, along with my OAW DIII more of which I will talk of at a later date. (thinking of a Roden-WNW mongrel build on this one ).

There is of course ways to improve the DVa, I will if anyone wishes list and update my findings if it helps and hope others will do the same so we can all benefit,

Of course you have to do this smiling, a little legpulling and fun poking, its what makes this forum what others arent... I try to save the grumpiness for the building bench, I know I grumble a little onsite but hope no one takes it negatively, its never aimed here and usually due to frustration...OOH..not that kind..

Happy easter all BTW, hope everyone is as choccied out as myself amf mine are
CaptainA
_VISITCOMMUNITY
Indiana, United States
Joined: May 14, 2007
KitMaker: 3,117 posts
AeroScale: 2,270 posts
Posted: Monday, April 05, 2010 - 03:57 AM UTC
Did I here a request for jocularity? Don't get me started...

How about an Albatros Campaign? Only chochoholics allowed in.

Keith, What can I say? Your build is beautiful. It really looks like an Albatros. Good job on the wood. The engine looks great. As for your offer, "There is of course ways to improve the DVa, I will if anyone wishes list and update my findings if it helps and hope others will do the same so we can all benefit" I am not to proud that I can't pick up some pointers from the Master Builders that hang around here. So list away. (I bet that is a bad thing for somebody in the Navy.) So, we are wondering, what colors will it be? No loz is like a day without chocolate. I bet it will make an appearance in a premium boxing with some interesting resin figures.

How is the fit with all those coats of paint?

Queen Terri, the instructions call for the gas tank to be either brass or Graygreen. I think most of us will do brass because it does look way cooler. And I don't think Uncle Ernie or his left-handed Untergefrieter is going to show up and say his was a different color.

Kornbeef
_VISITCOMMUNITY
England - South East, United Kingdom
Joined: November 06, 2005
KitMaker: 1,667 posts
AeroScale: 1,551 posts
Posted: Monday, April 05, 2010 - 06:21 AM UTC
Carl. do you think a seperate topic for Albi findins is a good idea, to save trawling through build logs for info?

As for colour scheme......for various reasons, detail wise and for other reasons I am building towards Option 5, but if Loz appears soon I would love to do Greims silver bird as in the full page pic, it would match my DRi which needs finishing (whats new) I'm not that impressed with the Daimler radiator to be honest so am looking for a bird with the T&B rad or trying to redetail the Daimler, it's really quite basic. I have reason too not to woodgrain the exterior of this one, smiles.

The tank, I noticed I need to add the bolts and paint the retaining strap that fits around it I'm guessing mild steel or blued black?, I added it but then got carried away before finishing

Fit of parts is tight, without paint they are snug so.....take care please.

Today I worked on the seat, adding dimples buttons and seams. did lots of tinkering and never seemed to get much done...
Dwaynewilly
_VISITCOMMUNITY
New York, United States
Joined: December 15, 2006
KitMaker: 365 posts
AeroScale: 344 posts
Posted: Monday, April 05, 2010 - 03:12 PM UTC
Keith,

Coming along fine and list away if you like, I can always use a few tips.

Captain, was that Uncle Ernst you were speaking of? I'm sure he's lurking but we won't pay him much mind around here.

Keep it going Keith, looking good.

Dwayne
FigureMad
_VISITCOMMUNITY
England - South East, United Kingdom
Joined: May 09, 2006
KitMaker: 118 posts
AeroScale: 89 posts
Posted: Tuesday, April 06, 2010 - 08:57 AM UTC
I will start this when I get the Pup out of the way... nice work

Dave
CaptainA
_VISITCOMMUNITY
Indiana, United States
Joined: May 14, 2007
KitMaker: 3,117 posts
AeroScale: 2,270 posts
Posted: Tuesday, April 06, 2010 - 10:59 AM UTC
Keith, I think it is best to comment within your thread. If we start threads pointing out our findings, it might end up being a place where people go to gripe about the kit. If you keep it in your build thread, it is nothing more than simple observations by a builder. One of the good things about Aeroscale is that we always maintain an informative, positive and light hearted attitude towards our builds and the kits. Some people out there have even said nice things about my builds.

Uncle Ernie is not actually my Uncle. I am very sure he is a distant cousin though. I call him Uncle Ernie because we share the same last name. It is entirely possible my Grandfather saw him flying around in his chrome yellw Albatros, not likely, but possible. My grandfather was in a Field Artillery Unit in the Great War. His WWI Victory medal has bars for "St. Mihiel", "Meuse Argonne", and "Defensive Sector" He had a Platoon Leader, later Battery Commander named Harry Truman. Sorry about the totally off topic history lesson, but isn't a good history lessons one of the best reasons as to why we build these things?
Kornbeef
_VISITCOMMUNITY
England - South East, United Kingdom
Joined: November 06, 2005
KitMaker: 1,667 posts
AeroScale: 1,551 posts
Posted: Tuesday, April 06, 2010 - 12:50 PM UTC
Thats a good point carl, one I never thought of. I would hate to think it would turn into a WNW bashing post. What issues there are to my eye are pretty minor, she would build ino a beauty without any corrections or additions just as WNW intended at the outset.

So yes I'll keep my findings in my post, and anyone wants to can PM me if they wish.

Sometimes the simplest things prove hardest, after spending 45 mins trying to place 6 ignition wires tonight I gave up in disgust...

Modelling time for the next few days is severely limited but I will try to post some progress.
 _GOTOTOP