

Beautiful work so far Keith, I love your wood grain. The engine is really starting to look the part, well done.
I don't think pointing out certain problems with a kit could be called "bashing", I ran across a couple of issues with my Pup build so I mentioned them in my post just so other builders are aware that they could have a small problem.
Keep up the good work Keith and I look forward to seeing more progress photos.
Des.
http://www.ww1aircraftmodels.com
Early Aviation
Discuss World War I and the early years of aviation thru 1934.
Discuss World War I and the early years of aviation thru 1934.
Hosted by Jim Starkweather
WNW 2009 -10 Alb. D.Va Keith G

wombat58

Joined: March 26, 2009
KitMaker: 366 posts
AeroScale: 309 posts
Posted: Wednesday, April 07, 2010 - 12:47 AM UTC


CaptainA

Joined: May 14, 2007
KitMaker: 3,117 posts
AeroScale: 2,270 posts
Posted: Wednesday, April 07, 2010 - 07:51 AM UTC
Des,
Pointing out things you discover in your build log, whether they be good or bad, is part of the build. That is a good thing. We all do that, and we should continue to do that. My point was that it is not a good thing to start a seperate thread for the soul purpose of pointing out kit shortcomings. I have been following your Pup and find your thread to be very informative.
I think the good folk here at Aeroscale are really good about the manner in which they post. I really don't like kitbashing where experts tell you you a kit is worthless because the valve springs coil around 4 times instead of 8. But I really would like to know if the decals don't fit. I don't think of that as bashing. Kitbashing is like porn. It is real hard to draw the line, but we know it when we see it.

wombat58
Joined: March 26, 2009
KitMaker: 366 posts
AeroScale: 309 posts
Posted: Wednesday, April 07, 2010 - 12:48 PM UTC

JackFlash
Joined: January 25, 2004
KitMaker: 11,669 posts
AeroScale: 11,011 posts
Posted: Wednesday, April 07, 2010 - 08:33 PM UTC
I think kitbashing has more to do with a super-ego rather than a thoughtful approach to overcoming a perceived problem. Modelers learning and sharing each other. The Aeroscale approach. Model On!

Kornbeef

Joined: November 06, 2005
KitMaker: 1,667 posts
AeroScale: 1,551 posts

Posted: Thursday, April 08, 2010 - 01:23 PM UTC
minor update, time has been precious but I've managed some.
Got the seat detailed and painted, in place and the basic cockpit fixed into the left side of the fuselage and the throttle linkage? added. After that I added the cables to the rudder actuator and went on to the control column,
It took an age to get the cables in place so I left it and came back to it...then realised I was cabling it up the wrong way around...stripped it and stopped...listened to common sense for once. But with the weekend ahead I could see the fuselage together by mid next week.
K
Kornbeef
Joined: November 06, 2005
KitMaker: 1,667 posts
AeroScale: 1,551 posts
Posted: Sunday, April 11, 2010 - 05:57 AM UTC
Okay update time guys and girls, sadly no pics, the charger discharged the batteries for my camera..seems the fairies fiddly fingers have bin tinkering.
So with batteries a charging, and light failing I have to put fingers to keys to let you know how its going.
I have all the internals almost in the left half of the fuselage, a few control cables to run back and fix in place. I had a fun time trying to get the pulley cables done..I really have to rethink things for the next one. But defying instructions I fixed them to the cross member that holds the tanks and ammo with short sections of T section aligning them with the stringers and letting them set vernight, trying to get the cables on was a daymare and I tried 3 times and I'm still not overjoyed with the result but buried in the bowels of the cockpit you can hardly see them.
So, defying instructions I broke the former that runs just in front of the pilot which in a way was a hidden blessing allowing me to place the pump that overlaps itin and fixing both pieces to the right side before final assembly.
I have a few details to add, some paint to splosh on but hope to have the fuselage sealed together by midweek and then set it to dry thoroughly before sanding out the seam....
I have to say the kit cockpit looks really nice, with just the few aditions I added, almost OOB.
fuel lines carb linkage to add once the engine is in place and I've been tinkering with the rads still undecided even now which scheme but I have managed to salvage some of Doug Baumans *the Aerodrome* beautful lozenge JPGs off my dead PC so I may try making some loz decals myself. *GULP*
hopefully I will get chance to snap some pics tomorrow before I seal her together.
Keith
:)
Kornbeef
Joined: November 06, 2005
KitMaker: 1,667 posts
AeroScale: 1,551 posts
Posted: Sunday, April 11, 2010 - 11:52 AM UTC
okay, batteries charged, apologies for pic quality, its late, por light and kornbeefs tired... Excuses excuses... :-P

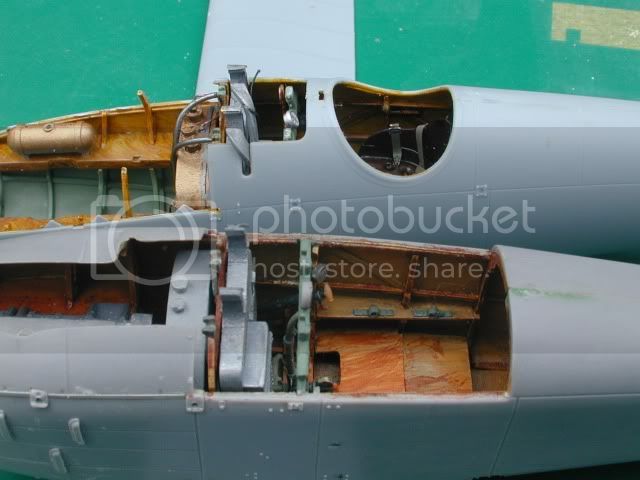
Right hand interior, look close and you'll notice the quarter of the former I broke/cut off accidentally but found useful....going against kit instructions as per normal for moi I assembled the interior in the other half, cabling and such was easier that way.

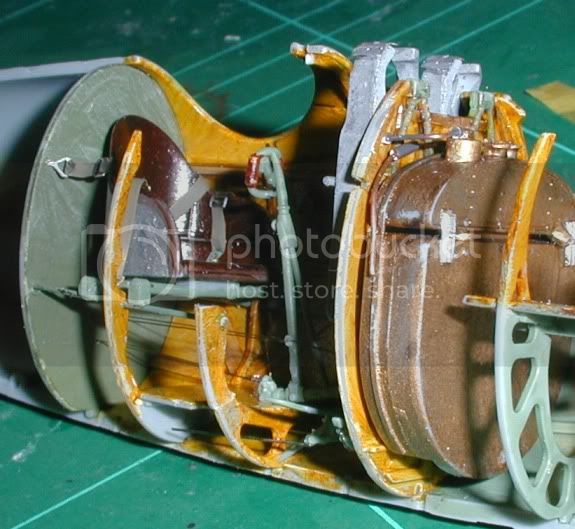
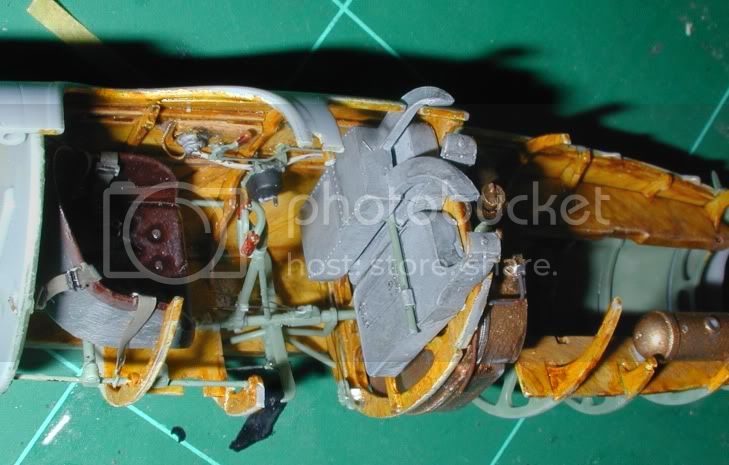
heres a few shots of the assembled left hand..still some paint to touch up and a few bits to add, cables to paint and the wood grips to tidy up again. I was considering assembling and fitting the guns at this stage but think the engine may be hard to squeeze in if I do. I gave the throttle lever a little kink, and added the cable from the ignition under the maneto switch instead of the molded on part by WNW, also I thinned the supports for the magneto unit to make them less blocklike, may have been better to use brass strip but I was trying to stick close to OOB.

the Zorst... I drilled and carved out the end...I think this is pretty essential but I added a rolled lip too, some albi's seem to have one others dont but its a nice touch?. The paint is basecoated Humbrol chocolate brown and a smattering of drybrushed life color hull red, still more to do though.

the undercarriage...together without cement, a really tight interference fit...looks quite femer so take care, not something to fit and pull apart over and over.

A couple of shots of the fuselage nipped together just to give an idea...its dark and the flash didnt help either.
:)
Anyway thats all folks...for now. but now I have pics I can seal her up happily
Keith
Right hand interior, look close and you'll notice the quarter of the former I broke/cut off accidentally but found useful....going against kit instructions as per normal for moi I assembled the interior in the other half, cabling and such was easier that way.
heres a few shots of the assembled left hand..still some paint to touch up and a few bits to add, cables to paint and the wood grips to tidy up again. I was considering assembling and fitting the guns at this stage but think the engine may be hard to squeeze in if I do. I gave the throttle lever a little kink, and added the cable from the ignition under the maneto switch instead of the molded on part by WNW, also I thinned the supports for the magneto unit to make them less blocklike, may have been better to use brass strip but I was trying to stick close to OOB.
the Zorst... I drilled and carved out the end...I think this is pretty essential but I added a rolled lip too, some albi's seem to have one others dont but its a nice touch?. The paint is basecoated Humbrol chocolate brown and a smattering of drybrushed life color hull red, still more to do though.
the undercarriage...together without cement, a really tight interference fit...looks quite femer so take care, not something to fit and pull apart over and over.
A couple of shots of the fuselage nipped together just to give an idea...its dark and the flash didnt help either.
:)
Anyway thats all folks...for now. but now I have pics I can seal her up happily
Keith
CaptainA
Joined: May 14, 2007
KitMaker: 3,117 posts
AeroScale: 2,270 posts
Posted: Sunday, April 11, 2010 - 12:08 PM UTC
Great progress

thegirl

Joined: January 19, 2008
KitMaker: 6,743 posts
AeroScale: 6,151 posts
Posted: Sunday, April 11, 2010 - 01:50 PM UTC
Well what can I say but ......looking really sweet Keith !
I also admire your strenght for trying really hard to keep it out of box It's nice to see new kit's built this way , can see how it builds with out all the add on's . Keep up the excellent progress
I also admire your strenght for trying really hard to keep it out of box
It's nice to see new kit's built this way , can see how it builds with out all the add on's . Keep up the excellent progress Kornbeef
Joined: November 06, 2005
KitMaker: 1,667 posts
AeroScale: 1,551 posts
Posted: Monday, April 12, 2010 - 11:52 AM UTC
Hey thanks you two, putting the gun cables in now and will be giving it the once over before sealing her up tomorrow
:) I hope
:) I hope

RAGIII
Joined: June 19, 2007
KitMaker: 604 posts
AeroScale: 600 posts
Posted: Monday, April 12, 2010 - 02:03 PM UTC
Keith,
Looks really great! could you give some details on how you made the switches on the panel? also I love your seat pad. what material did you use?
RAGIII
Looks really great! could you give some details on how you made the switches on the panel? also I love your seat pad. what material did you use?
RAGIII
Kornbeef
Joined: November 06, 2005
KitMaker: 1,667 posts
AeroScale: 1,551 posts
Posted: Monday, April 12, 2010 - 08:13 PM UTC
Quoted Text
Keith,
Looks really great! could you give some details on how you made the switches on the panel? also I love your seat pad. what material did you use?
RAGIII
Hi Rick
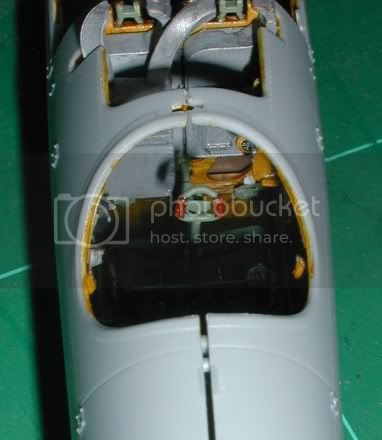
the switches....my little secret...laughs... No seriously the decals etc are WNW and I have to say they are incredibly well done
The levers are from Bronco, they are 1/35th single sided wingnuts pt no AB3501 and are locking catches as used on a lot of German WWII vehicles. you get 3 sprues with 18 on each. They also do wingnuts and a small selection of bolts all of which are very nice
I trimmed them thinner cutting off the top of the butterfly and before painting the panel I just drilled the centres then after painting and decaling inserted the levers once all was done....
The Seat is the kit seat I cut the base out around the edge of the cushion to work on it. After clean up I added the rolled seam to the back with good old stretched sprue and smoothed it once it was set in place. the cushion I just drilled recesses where the dimples where and usiing dremel tools in an exacto type handle and a sharp exacto knife and a lot of wet sanding I shaped the cushion. once it was close to what I wanted I coated it in liguid poly to smooth it and once happy I added the buttons from punched discs of plasticard and the edge with a strip of plasticard which I thinned and rounded the lip of. Then finished it with a further wash of liquid poly to dissolve any rough edges and slooth it all together.
Painted the seat with a basecoat of red brown Humbrol and washed with several coats of Citadel Flesh Wash before two coats of Klear.
cheers Keith
Fuselage is assembled and drying now too
guitarlute101
Joined: December 18, 2006
KitMaker: 1,121 posts
AeroScale: 1,063 posts
Posted: Tuesday, April 13, 2010 - 01:55 AM UTC
Single-sided wingnuts.....BRILLIANT!!!!!!!!!!!!!!!
Great progress, Keith.
Mark

Repainted

Joined: April 04, 2006
KitMaker: 1,058 posts
AeroScale: 1,004 posts
Posted: Tuesday, April 13, 2010 - 05:24 AM UTC
Nice start there my friend, I´ll watching your build.This kit will hit my bench sooner or later.

Larsa
Larsa

gajouette
Joined: February 01, 2007
KitMaker: 365 posts
AeroScale: 356 posts

Posted: Tuesday, April 13, 2010 - 09:15 AM UTC
Keith,
Outstanding work on your interior my friend. I really love the wood graining too.Keep up the great work and please keep us posted.
Regards,
Gregory Jouette
Outstanding work on your interior my friend. I really love the wood graining too.Keep up the great work and please keep us posted.
Regards,
Gregory Jouette
Kornbeef
Joined: November 06, 2005
KitMaker: 1,667 posts
AeroScale: 1,551 posts
Posted: Tuesday, April 13, 2010 - 01:07 PM UTC
TY guys,
I got the fuselage buttoned up as I said...one point to note for all, the mating faces have injector pin marks (Just like Trumpeter kits..co-incidence? :-P)
But she went together quite nicely, no fit issues other than having to hold the engine formers against the side while they set. A little filling to get rid of the afore mentioned pin marks. So she's sanded, ready for a coat of paint..I may paint her and let it dry to check seams tomorrow once SWMBO is finished witth me
One thing might be easy to miss, I've mentioned it before but forgive me I'm gonna do it again...Tail fin, mine needed thinning so the rear tailskid mount bracket stanfds proud...A tiny but naughty detail
side by side with my heavily modded DIII (OAW) fuselage they look good together with no glaring size issues though the nose cowl opening is substantially bigger on the DVa.....I know the wings match reasonably well already
more pics tomorrow I hope
Keith

OEFFAG_153
Joined: February 19, 2010
KitMaker: 1,473 posts
AeroScale: 1,450 posts

Posted: Tuesday, April 13, 2010 - 10:01 PM UTC
Hi Keith
Great and fast progress those interior shots look real good. Some great pointers for me here for when I finally get round to doing one of mine.
Keep them coming
Best Regards
Mikael
Great and fast progress those interior shots look real good. Some great pointers for me here for when I finally get round to doing one of mine.
Keep them coming
Best Regards
Mikael
thegirl
Joined: January 19, 2008
KitMaker: 6,743 posts
AeroScale: 6,151 posts
Posted: Wednesday, April 14, 2010 - 02:05 AM UTC
Pic's you say , tomorrow .......no worries Looking forward to the pic's once the misses ' is finished with you .
Looking forward to the pic's once the misses ' is finished with you . Kornbeef
Joined: November 06, 2005
KitMaker: 1,667 posts
AeroScale: 1,551 posts
Posted: Wednesday, April 14, 2010 - 05:06 AM UTC
Escaped with my skin intact
Pics as promised, not many but some. It shows how tight WNWs tolerances are, the rail surfaces are dryfitted, including the elevator, it just sat there as I tipped the plane up and over...the underside shot was to fuzzy to use though.

I know it looks no different but this time its glued together.

wingroots, theres a small cutaway here at least on the TVAL albi there is, and a couple of small bolts and a drain point on the underside...can anyone see my attempt at nailheads?
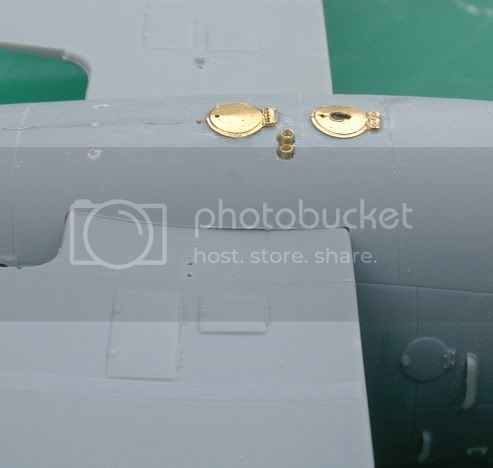
more nailheads.... the inspection flaps on the underside...not to good as expeted moulded where they are, replaced em with P of P parts from their DIII set, still have the fasteners to add. I opened the fore one to take the engine drain off and then drilled out and replaced the two bumps in the fuselage with brass tube reamed out thin to represent the ends of the what I presume are drain off tubes from the gun mechanisms...the gunmetal tubes that run in front of the fuel tanks, I don't think this is a standard on all albi feature as I dont see the holes or tubes poking out on all other A/C but the crashed albi in the WNW handbook shows them quite clearly in place.
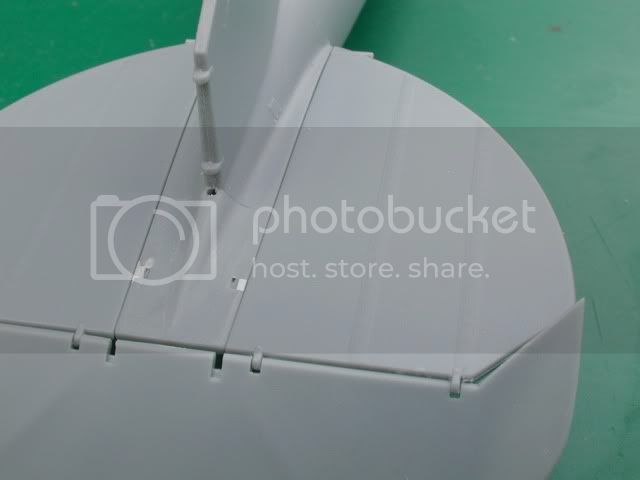
the tail dryfitted...one point to note is the points where the cables enter the upper tail of the fuselage need a little work...limitations of moulding I think. But its no biggie to add a little strip and filler
I was impressed how everything lines up and the elevator sits tightly in place *without paint*
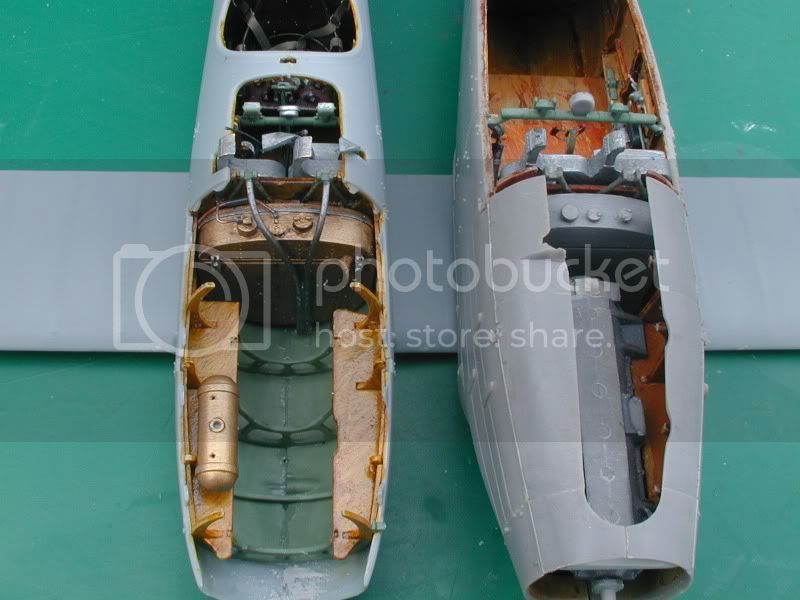
Just a couple of comparison shots between the DVa and the DIII OAW (Roden) this could now become the first recorded WNW/Roden Mongrel
I had hoped to get a good day modelling in today but life and SWMBO had other plans for my time...oh well...now the web is playing up and I cant upload I think so here goes didly.
Pics as promised, not many but some. It shows how tight WNWs tolerances are, the rail surfaces are dryfitted, including the elevator, it just sat there as I tipped the plane up and over...the underside shot was to fuzzy to use though.
I know it looks no different but this time its glued together.
wingroots, theres a small cutaway here at least on the TVAL albi there is, and a couple of small bolts and a drain point on the underside...can anyone see my attempt at nailheads?
more nailheads....
the inspection flaps on the underside...not to good as expeted moulded where they are, replaced em with P of P parts from their DIII set, still have the fasteners to add. I opened the fore one to take the engine drain off and then drilled out and replaced the two bumps in the fuselage with brass tube reamed out thin to represent the ends of the what I presume are drain off tubes from the gun mechanisms...the gunmetal tubes that run in front of the fuel tanks, I don't think this is a standard on all albi feature as I dont see the holes or tubes poking out on all other A/C but the crashed albi in the WNW handbook shows them quite clearly in place.the tail dryfitted...one point to note is the points where the cables enter the upper tail of the fuselage need a little work...limitations of moulding I think. But its no biggie to add a little strip and filler
I was impressed how everything lines up and the elevator sits tightly in place *without paint*
Just a couple of comparison shots between the DVa and the DIII OAW (Roden) this could now become the first recorded WNW/Roden Mongrel
I had hoped to get a good day modelling in today but life and SWMBO had other plans for my time...oh well...now the web is playing up and I cant upload I think so here goes didly.
CaptainA
Joined: May 14, 2007
KitMaker: 3,117 posts
AeroScale: 2,270 posts
Posted: Wednesday, April 14, 2010 - 06:43 AM UTC
Nice update. This is really shaping up to be a great kit, isn't it?
I am doing a dual build also. It is hard to not do a comparison. They are both really nice kits, but in different ways. I am getting ready to head into the office to put a little paint on plastic now.
I am doing a dual build also. It is hard to not do a comparison. They are both really nice kits, but in different ways. I am getting ready to head into the office to put a little paint on plastic now.

Mgunns
Joined: December 12, 2008
KitMaker: 1,423 posts
AeroScale: 1,319 posts

Posted: Wednesday, April 14, 2010 - 07:40 AM UTC
Hi Keith, As Carl said, coming along nicely. I have one of the DV's and the DVa., on the shelf, presently working on the Roden DII. A nice kit in its own right. Looking forward to more updates.
Kornbeef
Joined: November 06, 2005
KitMaker: 1,667 posts
AeroScale: 1,551 posts
Posted: Friday, April 16, 2010 - 09:35 PM UTC
A little update, no pics yet though.
I realised the two inspection doors were in the wrong order, at the same time I realised if I flipped them over I could make a nice bevellled edge to them...resulting of couse in carpetmonster food.. grrrr.
Anyway I redid the one with the opening in, it had to be that one that got consumed of course.
Added the flaps beneath the tail, these are not to well moulded but out of sight to all but the AMS amongst us.
I added the beaded edging to the upper front coaming behind the guns, I suppose this was to protect the pilots hands whem dejamming or cocking the MGs and opened out the cowls a little more. once I've added a few more tweaks she will be ready for her basecoat of Humbrol 103.
the lower wings have the drainpoints and the bolts on the underside of the stubwings added.
When I went to put the eyelets around where the control cables exit the lower wing it seemed to me WNW have them slightly out of place, right or wrong i corrected them...the extra rigging to the outer upper wing looks to be mounte to the Vstrut support and not behind it as in the kit?.
So this weekend I concentrate on the body and get that basecoated so I can tinker with the rest while it dries ...thats the plan anyway.
Keith
OEFFAG_153
Joined: February 19, 2010
KitMaker: 1,473 posts
AeroScale: 1,450 posts
Posted: Saturday, April 17, 2010 - 04:44 AM UTC
Great progress Keith Like the tandem DIII/DV, perhaps something for a "Luft '19" Project?
Best Regards
Mikael
Best Regards
Mikael
Kornbeef
Joined: November 06, 2005
KitMaker: 1,667 posts
AeroScale: 1,551 posts
Posted: Saturday, April 17, 2010 - 05:33 AM UTC
Mikael,
The plan is....
1 DVa by WNW
1 DIII (OAW) Roden fuselage-WNW flying surfaces and odds and sods
1 DVa fuselage, stripped out and being towed by horsecart/on a flatbed train truck.
Well that's the plan anyway but we all know what happens to plans
K
The plan is....
1 DVa by WNW
1 DIII (OAW) Roden fuselage-WNW flying surfaces and odds and sods
1 DVa fuselage, stripped out and being towed by horsecart/on a flatbed train truck.
Well that's the plan anyway
but we all know what happens to plansK

Merlin

#017


Joined: June 11, 2003
KitMaker: 17,582 posts
AeroScale: 12,795 posts

Posted: Saturday, April 17, 2010 - 08:38 AM UTC
Hi Keith
It's looking really good! By coincidence I did a bit of cleaning up on the kit's tank this afternoon - then I saw your pics and thought "Hey, that's got more detail than I remember!" The extras really bring it to life.
All the best
Rowan
It's looking really good! By coincidence I did a bit of cleaning up on the kit's tank this afternoon - then I saw your pics and thought "Hey, that's got more detail than I remember!" The extras really bring it to life.
All the best
Rowan

 |

WEB HOSTING BY


Copyright ©2021 AeroScale and Kitmaker Network, a subsidiary of Silver Star Enterprises
All Rights Reserved. Please read our Conditions of Use and Privacy Policy.
All Rights Reserved. Please read our Conditions of Use and Privacy Policy.