Early Aviation
Discuss World War I and the early years of aviation thru 1934.
WNW GB 2009 - 10 Albatros D.V - Mikael
OEFFAG_153
_VISITCOMMUNITY
Västra Götaland, Sweden
Joined: February 19, 2010
KitMaker: 1,473 posts
AeroScale: 1,450 posts
Posted: Tuesday, August 31, 2010 - 08:47 PM UTC
Hi everyone

Feels like I have Lozenge and ribtapes coming out of my ears. It's been a bit of a struggle – but the wings are finally covered. I do like Lozenge once it's in place – but getting it on is a bit of a struggle for me (I'd rather do a french 5 colour camouflage job any day).

Overall though – I think its gone OK considering they are homeprinted.

The W&N varnish stayed flexible for about a week, then it hardened and started fracturing when I cut the sheets. I was almost done by then, so it never became an issue. But (like I think Stephen mentioned in his Lozenge thread) you need to work fast while the sheets are still flexible enough. I don't think you can make decals like this and put them in a drawer to use at a later date.

Here's the top of the wings. There are stills ome touchups to do, before I seal them in the same W&N flat varnish I used for the sheets.


So what does the learned panel of Aeroscale think? Does it look accurate for Helmut Diltehys DVa?

The radiator is only dryfitted at the moment. I will do some blending, and texturing once the wings have dried thoroghly. Then ofcourse I will have to mask and paint Diltheys green grounded crosses – that'll be fun

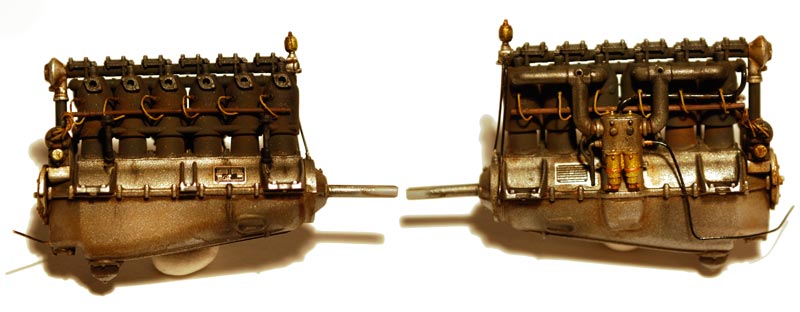
I've also been busy painting details for the engine and cockpit – but I'm still waiting for the oils to dry – its been over a week now (weather has been pretty cold and wet for the season though, this might explain it)


If you think you're seeing double, its only because I painting up my DV interior at the same time.

Well there it is – making some progress i think, itching to start puttinging the cockpit together.

Thank You for looking – any and all comments are most welcome.

Best Regards

Mikael

Kornbeef
_VISITCOMMUNITY
England - South East, United Kingdom
Joined: November 06, 2005
KitMaker: 1,667 posts
AeroScale: 1,551 posts
Posted: Tuesday, August 31, 2010 - 09:58 PM UTC
Loz looks just dandy...I am so jealous..might have to try this now for the OAW if Mrs Korn opens her purse.. Oh I cant..I've already painted the rudder linen ... lol


Lovely work

K

JackFlash
_VISITCOMMUNITY
Colorado, United States
Joined: January 25, 2004
KitMaker: 11,669 posts
AeroScale: 11,011 posts
Posted: Wednesday, September 01, 2010 - 06:53 AM UTC

Quoted Text

Hi All,

Well – time for a first update in my buildlog for the WNW DVa...

So far I’ve enjoyed this kit very much, it does seem to build as beautiful as it looks, with no major hastle so far (althogh I’m only at the starting off point.)

As I have foolishly opted to build Helmut Diltheys DVa that has Lozenge covered wings I had a rather big problem from the start. Soooo, much time has been spent on trying to solve this. (Why build a well enginered kit out of the box when you can complicate things much, much more?)

My plan is or was to:

A: Print out Lozenge on an Ink Jet, and see how I could get this to work (after reading Stephens posts in Lozenge 101 I was not too optimistic)

B: If this failed, use what I had in the cupboard, i.e. 5 colour Loz from Techmond (which after looking at them again seems pretty way off colourwise, and is therefore not an option)

C: Get on my knees and beg WNW to sell me a couple of sheets (This might still happen)

D: Scrap the Lozenge and Dilthey altogehter and build the STROPP version out of the box instead....

Well so far I have explored option A. with a mixed result if I may say so... I started off by using Doug Bowmans 5 colour Lozenge which he kindly has posted at the Aerodrome (I’m a member over there too, althogh I don’t post). Dougs Lozenge

I did however redraw the patterns as vector grapics, to be able to tweak the colours to suit the inkjet printer I have access to. I used Testors white waterslide paper, and I sealed it with W&N matt varnish for artist oils and acrylics. This gave a rather nice matt sheen, and made the waterslides rather ”chewy” to cut. . .

Upper wing with underside Loz – a bit wrinkly in places – paitience, paitence give its some time to dry . . .

The decals went on reasonably well, and settled down OK too – but they are fairly prone to shed the colours on the edges (as you can probably see from my repair on the trailing edge), and are a bit harder to work than the comercial stuff. I’m not alltogether happy with the result yet... i’ll try some upper as well tonight and then we’ll see. i have not used any decal softener so far. . .Mikael


Most impressive Mikael!!! You are doing a fine job on the lozenge! I note your issues with the compound curves and the inked colours refusing to cooperate. Now why can't a company like Eduard get colours right??!
CaptainA
_VISITCOMMUNITY
Indiana, United States
Joined: May 14, 2007
KitMaker: 3,117 posts
AeroScale: 2,270 posts
Posted: Wednesday, September 01, 2010 - 08:39 AM UTC
If you have some of the texture decals, you might want to put them on over the loz and ribtapes. It really makes a noticable defference. It looks great as you have done it, but the texture really make a difference. I did the texture on my LVG and I will always put it on over the loz decals.

The interior bits and pieces look like they are coming along very nicely. I think you are going to end up with a real jaw dropper when you finish.
OEFFAG_153
_VISITCOMMUNITY
Västra Götaland, Sweden
Joined: February 19, 2010
KitMaker: 1,473 posts
AeroScale: 1,450 posts
Posted: Wednesday, September 01, 2010 - 08:46 PM UTC

Quoted Text

Loz looks just dandy...I am so jealous..might have to try this now for the OAW if Mrs Korn opens her purse.. Oh I cant..I've already painted the rudder linen ... lol


Lovely work

K


Thank You Keith for your kind words!

– Like you I'm waiting and hoping for Pheon, or Microscale to come through with some good 5 and 4 colour Lozenge. (I guess WNW must be realeasing this when the DVII comes too?)

I don't think I'll try this homemade stuff again any time soon, unless I really have to (mind you now that I've done it once – I guess it would be a bit easier the second time...).

Best Regards

Mikael
OEFFAG_153
_VISITCOMMUNITY
Västra Götaland, Sweden
Joined: February 19, 2010
KitMaker: 1,473 posts
AeroScale: 1,450 posts
Posted: Wednesday, September 01, 2010 - 08:50 PM UTC

Quoted Text

Most impressive Mikael!!! You are doing a fine job on the lozenge! I note your issues with the compound curves and the inked colours refusing to cooperate. Now why can't a company like Eduard get colours right??!


Thank You Stephen – praise on Lozenge from you is very high praise indeed

I agree, Eduard (and others) should be able to get it right – the information is out there, so are the technical possibilities.

Best Regards

Mikael
OEFFAG_153
_VISITCOMMUNITY
Västra Götaland, Sweden
Joined: February 19, 2010
KitMaker: 1,473 posts
AeroScale: 1,450 posts
Posted: Wednesday, September 01, 2010 - 09:13 PM UTC

Quoted Text

If you have some of the texture decals, you might want to put them on over the loz and ribtapes. It really makes a noticable defference. It looks great as you have done it, but the texture really make a difference. I did the texture on my LVG and I will always put it on over the loz decals.

The interior bits and pieces look like they are coming along very nicely. I think you are going to end up with a real jaw dropper when you finish.


Hi Carl

Thank You for your very nice comments, we'll see how it goes

I do like the textur effect you've shown with the decals, but unfortunately I dont have any at hand.

I do have a plan for texturing the Lozenge though – but I'll probably end up using a broad brush and some guache paint, which is waterbased (I did a test of this, and it seemed to work well) One of the drawbacks of the W&N varninsh, is that it'll come off with white spirit.

I will also do a bit of shadowing around edges and rudders using Tamiya Smoke – perhaps also some sunfading? Not sure how well that will work together with the texturing thogh – so I'll have to test on some left overs first.

Best Regards

Mikael
CaptainA
_VISITCOMMUNITY
Indiana, United States
Joined: May 14, 2007
KitMaker: 3,117 posts
AeroScale: 2,270 posts
Posted: Thursday, September 02, 2010 - 10:03 AM UTC
The texture will cover them up pretty good and might even protect them. I keep 5-6 sheets in my workshop all the time.
Mgunns
_VISITCOMMUNITY
Arizona, United States
Joined: December 12, 2008
KitMaker: 1,423 posts
AeroScale: 1,319 posts
Posted: Thursday, September 02, 2010 - 11:07 AM UTC
Hi Mikael:
I like the lozenge. I think you have done a noteworthy job and it will look great when completed. You work is admirable and I reference it from time to time as I build my own models. I look forward to your next update.
Best

Mark
OEFFAG_153
_VISITCOMMUNITY
Västra Götaland, Sweden
Joined: February 19, 2010
KitMaker: 1,473 posts
AeroScale: 1,450 posts
Posted: Thursday, September 02, 2010 - 07:31 PM UTC
Thank You Mark for you very kind words – I can't think of higher praise than to have my work used as reference by a fellow modeler – Thank You

Warm Regards

Mikael
OEFFAG_153
_VISITCOMMUNITY
Västra Götaland, Sweden
Joined: February 19, 2010
KitMaker: 1,473 posts
AeroScale: 1,450 posts
Posted: Sunday, September 05, 2010 - 10:08 PM UTC
Hi All

I've been a bit busy lately, but managed to get some pieces done in the cockpit and engine areas – I'll post some pics when I've done a bit more on the subassemblies... Promise

Thinking ahead a bit to the outside paintscheme... Most profiles (I have Ospreys Aircraft of the aces series), and indeed built-up kits, have Helmut Diltheys plane painted with the engine panels, propspinner and wheel covers in the same bright green as the green of the fuselage. This does seem to be the general opinion when I look at what other modelers do.

However in the WNW instructions on p 23 (I think) The caption to Diltheys plane says these panels probably were left in the standard grey-green... Its very difficult to tell from the image, the greytones do seem to vary, but this could, in my opinion, be because of the difference between wood and metal?

One thing that does count in favour of the WNW interpretation, is that the broad white band, that should've continued from the fuselage over the engine panels – does'nt.

Then again, if you go OTT and paint almost an entire plane in green and white bands – why leave the engine covers etc. unpainted?

Well – what does the learned modelers of Aeroscale think? And does anyone have any good sources that say one or the other? I mean WNW must have some notion to say what they say.

Any clues, or opinions are most welcome!

Best Regards

Mikael
Kornbeef
_VISITCOMMUNITY
England - South East, United Kingdom
Joined: November 06, 2005
KitMaker: 1,667 posts
AeroScale: 1,551 posts
Posted: Sunday, September 05, 2010 - 10:50 PM UTC
Mikael,

You know me, how I think off the path sometimes.

So this my, and only *My* opinion studying that pic. I would say the nose, cowlings included are green forward of the demarcation line between white and green between the cabane struts, I would hazard a guess the rear half of the cowl is still in its original colour and was still to be painted white.

I cant find any other pics to verify this opinion but the line that runs up following the line of the green white divide isnt caused by shadow, the shadows are clearly visible.

Keith
OEFFAG_153
_VISITCOMMUNITY
Västra Götaland, Sweden
Joined: February 19, 2010
KitMaker: 1,473 posts
AeroScale: 1,450 posts
Posted: Monday, September 06, 2010 - 12:17 AM UTC

Quoted Text

Mikael,

You know me, how I think off the path sometimes.

So this my, and only *My* opinion studying that pic. I would say the nose, cowlings included are green forward of the demarcation line between white and green between the cabane struts, I would hazard a guess the rear half of the cowl is still in its original colour and was still to be painted white.

I cant find any other pics to verify this opinion but the line that runs up following the line of the green white divide isnt caused by shadow, the shadows are clearly visible.

Keith


Ahhhhhh – nice curveball Keith

I do like the way you think – it tends to open my eyes and take a closer fresh look at things. I'll have to sit down again with the picture when I get home tonight!

Thank You for your input

Mikael
OEFFAG_153
_VISITCOMMUNITY
Västra Götaland, Sweden
Joined: February 19, 2010
KitMaker: 1,473 posts
AeroScale: 1,450 posts
Posted: Tuesday, September 14, 2010 - 08:52 PM UTC
Hi All,

Finally time for another update on the DV build from me. I have been a bit busy with other non-modeling things lately, although I’ve managed to squeeze some in here and there.

I usually also underestimate the time it takes to paint and detail the pit, and engine. But I do enjoy it – I think its almost my favourite part.

So far the kit has been a joy to build apart from the PE, I did the anealing, but like some of you have already said, it was still not very cooperative, so the seatbelts does not look as good as it could... Oh well...

The fragile seating arangement also gave me some pain, but thanks to Kornbeefs heads up, I managed not to brake anything.

Here are some pics of the progress so far:


I’ve added some details here mostly plugleads and pipes to liven things up a bit. The sharpeyed can also probably see that I’ve gone for the manifold with the heating pipes... Well, it may not be totally acurate, but I figure it could have been a modification + I wanted to do it this way.


I was very impressed with how Brad C had done his tank, so I wanted to try something similar. I'll use the grey for the DVa and the unpainted for the DV.


And here they are from the cockpit side.


Stick and panel have some extra details, and more to come.


I did a light overspray of Tamyia clear orange on the wooden parts, which I think worked quite well... The screen behind the seat is lozenge, althogh not very clear in this pic.

I’ve added some piping from the pump, greaser and petrol gague. I plan to conect it all behind the petrol/mixture panel, adding the curving pipes. I woun’t do an exact replica of all the pipes, just trying to capture the look.


For some more visual interest I left the flaregun from the kit on the pilots seat, I drilled out the barrell to ad some detail. Maybe I’ll ad some flares too to for some more colour.


Thats if for now I’ll be back with updates when I can.

All and any comments are as usual most welcome

Best Regards

Mikael

Mgunns
_VISITCOMMUNITY
Arizona, United States
Joined: December 12, 2008
KitMaker: 1,423 posts
AeroScale: 1,319 posts
Posted: Wednesday, September 15, 2010 - 01:04 AM UTC
Hi Mikael:

It is really coming along nicely. The engine looks great! Are you planning on leaving the panels off to show off the work? The fuel tanks interior all look great. The flare gun is a nice touch as well. I think the belts turned out nicely. I am not a fan of PE and don't look forward to them, but yours look very nice.
Looking forward to more.

Best
Mark
dmopath
_VISITCOMMUNITY
Kentucky, United States
Joined: July 02, 2010
KitMaker: 175 posts
AeroScale: 174 posts
Posted: Wednesday, September 15, 2010 - 04:44 AM UTC
Hi Mikael

Most impressive. I like the wood grain very much. The engine and tanks are in a class by themselves. How did you get such a nice metallic look?
Kornbeef
_VISITCOMMUNITY
England - South East, United Kingdom
Joined: November 06, 2005
KitMaker: 1,667 posts
AeroScale: 1,551 posts
Posted: Wednesday, September 15, 2010 - 08:06 AM UTC
Sweet work as always...wonderful to see your update...

Keith
MrMox
_VISITCOMMUNITY
Aarhus, Denmark
Joined: July 18, 2003
KitMaker: 3,377 posts
AeroScale: 115 posts
Posted: Wednesday, September 15, 2010 - 08:15 AM UTC
nice wiring !

Cheers/Jan
OEFFAG_153
_VISITCOMMUNITY
Västra Götaland, Sweden
Joined: February 19, 2010
KitMaker: 1,473 posts
AeroScale: 1,450 posts
Posted: Wednesday, September 15, 2010 - 07:38 PM UTC

Quoted Text

Hi Mikael:

It is really coming along nicely. The engine looks great! Are you planning on leaving the panels off to show off the work? The fuel tanks interior all look great. The flare gun is a nice touch as well. I think the belts turned out nicely. I am not a fan of PE and don't look forward to them, but yours look very nice.
Looking forward to more.

Best
Mark


Hi Mark – Thank You for your kind comments they are always very apreciated

The plan at the moment is to leave one half of the engine panel off (right or left?)... But I may also leave them off on the DVa and on on the DV? We'll see. I kind of both want to show off the engine and the beautiful lines of the Albatros.

Best Regards

Mikael
OEFFAG_153
_VISITCOMMUNITY
Västra Götaland, Sweden
Joined: February 19, 2010
KitMaker: 1,473 posts
AeroScale: 1,450 posts
Posted: Wednesday, September 15, 2010 - 08:45 PM UTC

Quoted Text

Hi Mikael

Most impressive. I like the wood grain very much. The engine and tanks are in a class by themselves. How did you get such a nice metallic look?


Thank You or your very nice comments Dennis

The metallics, were done almost exclusively with Tamyia acrylics (which by no means are the best metallic piant – but they are easy to use...) Both their copper and brass paints leave a lot to be desired – the aluminium is better though. I bought some Valejo paints this weekend, so I'll try these later on...

Anyway – to get the effect that I like, I use various shades, done in layers. First, I do a preshading in black or grey. Then, some gun metal (if its a white metal finish). Then light sprays of aluminium to get highligts. I then always do a wash of oilpaints and lots of thinner to get depth, dirt and oil.

If its a brass or copper finish, you can do preshading in rust brown, then the metallic – with a ligth overspray of a lighter or draker shade depending. If for instance you're doing a brass item, it could be nice to add a slight copper hue to get an effect. I also do do a wash after – on brass a very thinded down rich brown oil looks quite good...

Hope this is helpful

Best Regards

Mikael
OEFFAG_153
_VISITCOMMUNITY
Västra Götaland, Sweden
Joined: February 19, 2010
KitMaker: 1,473 posts
AeroScale: 1,450 posts
Posted: Wednesday, September 15, 2010 - 08:47 PM UTC

Quoted Text

Sweet work as always...wonderful to see your update...

Keith


Thank You Keith – always wonderful to read your kind coments

Best Regards

Mikael
OEFFAG_153
_VISITCOMMUNITY
Västra Götaland, Sweden
Joined: February 19, 2010
KitMaker: 1,473 posts
AeroScale: 1,450 posts
Posted: Wednesday, September 15, 2010 - 08:49 PM UTC

Quoted Text

nice wiring !

Cheers/Jan


Thank You Jan

Best Regards

Mikael
edoardo
_VISITCOMMUNITY
Milano, Italy
Joined: November 30, 2007
KitMaker: 642 posts
AeroScale: 382 posts
Posted: Wednesday, September 15, 2010 - 09:35 PM UTC
Hi Mikael!
Your engine is a real beauty!
Also the painting guide for it is very useful!
Keep us posted!
Ciao
edo
OEFFAG_153
_VISITCOMMUNITY
Västra Götaland, Sweden
Joined: February 19, 2010
KitMaker: 1,473 posts
AeroScale: 1,450 posts
Posted: Thursday, September 16, 2010 - 05:32 AM UTC


Hi Edo – Thank You for your kind comments, glad you find my painting descriptions useful I promise to keep you posted of my progress!

Best Regards

Mikael
CaptainA
_VISITCOMMUNITY
Indiana, United States
Joined: May 14, 2007
KitMaker: 3,117 posts
AeroScale: 2,270 posts
Posted: Thursday, September 16, 2010 - 08:55 AM UTC
Flare gun on the pilots seat. Very nice touch.

Interior looks great.