Early Aviation
Discuss World War I and the early years of aviation thru 1934.
WNW GB 2009 - 10 Albatros D.V - Mikael
OEFFAG_153
_VISITCOMMUNITY
Västra Götaland, Sweden
Joined: February 19, 2010
KitMaker: 1,473 posts
AeroScale: 1,450 posts
Posted: Thursday, September 16, 2010 - 09:44 PM UTC

Quoted Text

Flare gun on the pilots seat. Very nice touch.

Interior looks great.


Thank You very much Carl

I do like leaving signs of life in the cockpit. I recently bought some sculpey clay, with the intention of sculting pieces of clothing, (gloves etc). Woun't be for this project though, not enough time...

Best Regards

Mikael
thegirl
_VISITCOMMUNITY
Alberta, Canada
Joined: January 19, 2008
KitMaker: 6,743 posts
AeroScale: 6,151 posts
Posted: Friday, September 17, 2010 - 01:52 AM UTC
I've been away for awhile and just checking in here and your project is coming along very nicely indeed Mikael . The attention to the little details realy adds to the over effect . It's like eye candy !

This might be a little on the late side but I was trying to find ref's for a future project and came across Kagero book Kasier Aces . It has this profile in it and it shows that the metal panels on the nose are the same green for the bands around the fuselage .
OEFFAG_153
_VISITCOMMUNITY
Västra Götaland, Sweden
Joined: February 19, 2010
KitMaker: 1,473 posts
AeroScale: 1,450 posts
Posted: Friday, September 17, 2010 - 10:24 PM UTC
Hi – Terri, and thank you for your kind comments, I really apreciate them

Thank You also on the info on the engine panel colours on Dilthey's profile. You're not too late it'll be a while yet before I can close her up and start painting the exterior...

So I have to think and look hard as how to I'll tackle this – go with what most profiles say i.e. green covers, or with what WNW states i.e. grey covers or... What Kornbeef observed, green and grey, with the white band not yet applied...

All three options are intriguing, and I have not locked myself into any firm opinion as yet...

Best Regards

Mikael
RAGIII
_VISITCOMMUNITY
North Carolina, United States
Joined: June 19, 2007
KitMaker: 604 posts
AeroScale: 600 posts
Posted: Wednesday, September 22, 2010 - 03:48 PM UTC
Mikael,
Really nice effect leaving the pistol on the seat! The interior looks fantastic! I am looking forward to your updates!
RAGIII
OEFFAG_153
_VISITCOMMUNITY
Västra Götaland, Sweden
Joined: February 19, 2010
KitMaker: 1,473 posts
AeroScale: 1,450 posts
Posted: Thursday, September 23, 2010 - 12:24 AM UTC

Quoted Text

Mikael,
Really nice effect leaving the pistol on the seat! The interior looks fantastic! I am looking forward to your updates!
RAGIII


Thank You very much Rick

I am busy putting the subassemblies in the cockpit and engine together, at the moment  – photograping as I go along. Will do an update with pictures soonish.

Best Regards

Mikael
OEFFAG_153
_VISITCOMMUNITY
Västra Götaland, Sweden
Joined: February 19, 2010
KitMaker: 1,473 posts
AeroScale: 1,450 posts
Posted: Saturday, September 25, 2010 - 11:01 PM UTC
Hi all,

A very windy and coldish sunday here today, and I'm about to go out into the garden to do some work – but first an update of my progress with Diltheys DVa, and some images of the paralell DV as well for good measure.

Not too much to actually say about these. I've been adding tubes and lines in my usual fashion – then adding the subassemblies as per the WNW instructions.

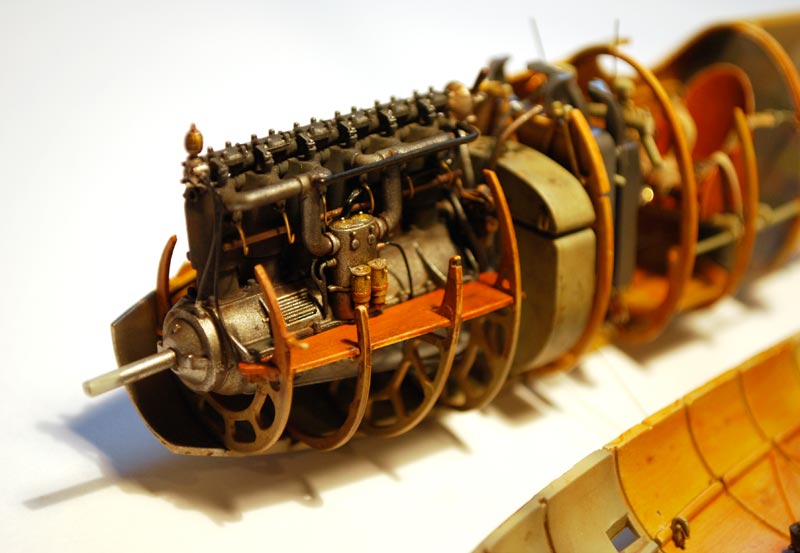
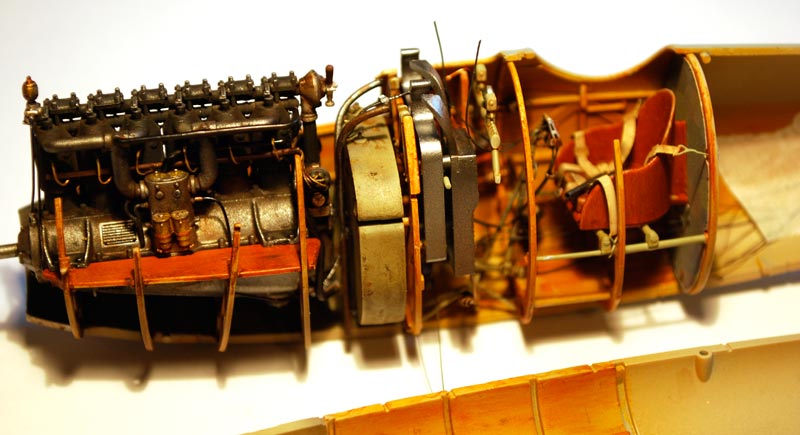
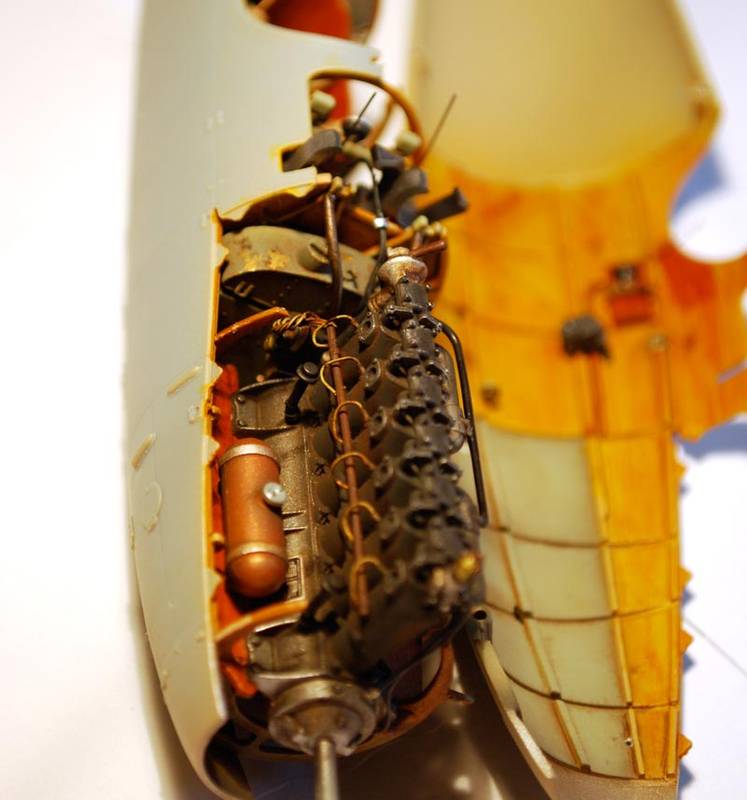
I did get into a bit of trouble when I fitted the engine into the fuselage – it was a very tight fit against the tank and ammo-shute behind. I ended up aking off the PTO wheel on the back of the engine. Other than that, its been pretty smooth – but I think it'll be a bit snug getting the other fuselage half on...


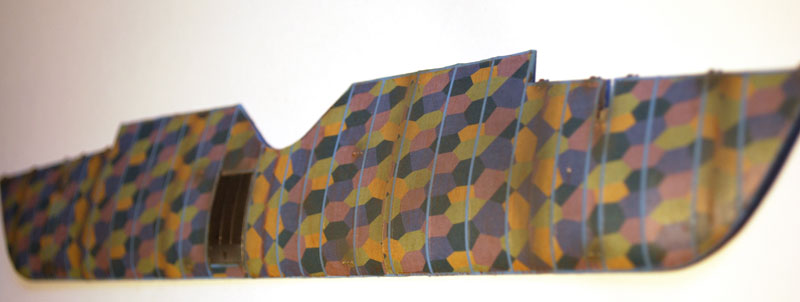
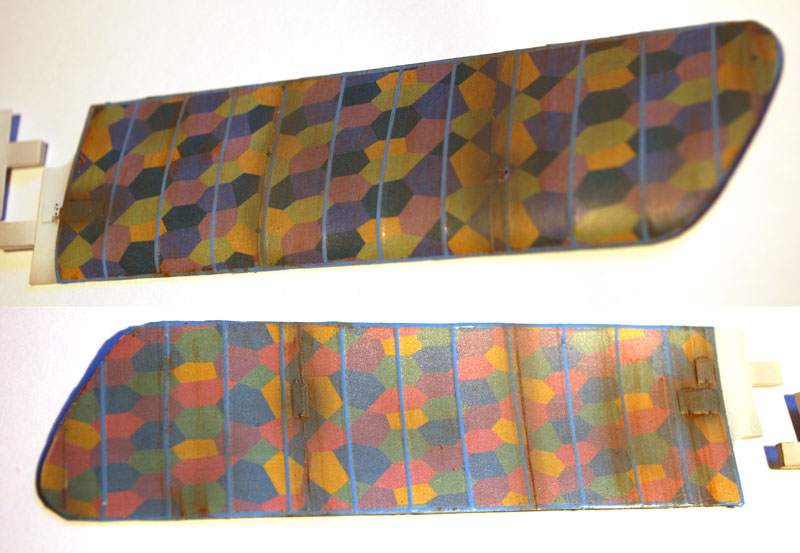
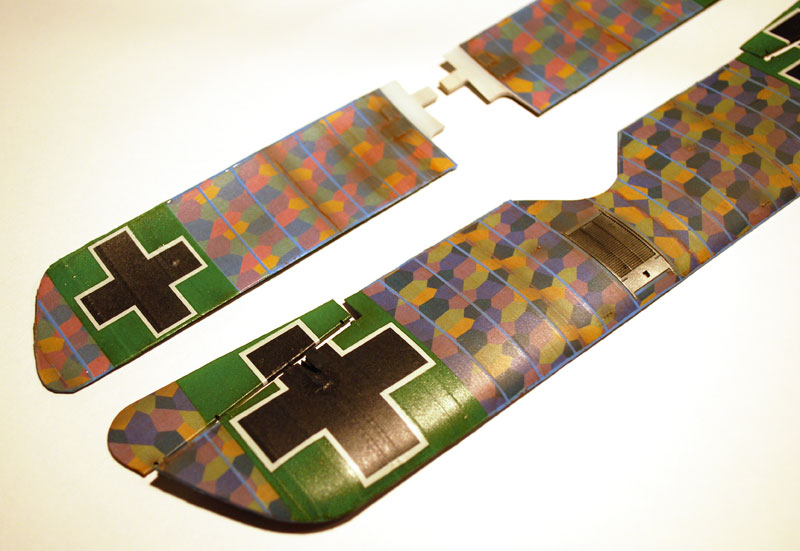
Getting busy in there, and a clear view of the Lozenge screen, which was from one of my test shots on paper before I did the decals.

The fuel and mixture pipes are not an exact replica, I only wanted to create the look of what you see from above the cockpit...


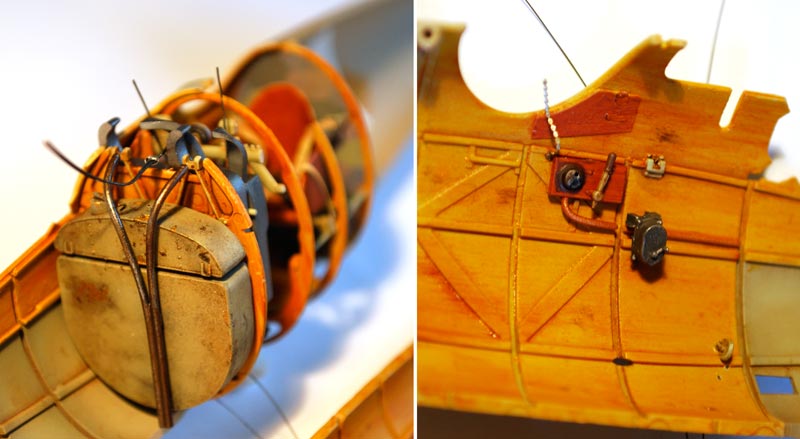
Ammoboxes and bulkhead in place. This is all you can see of the fuelpipe installation...


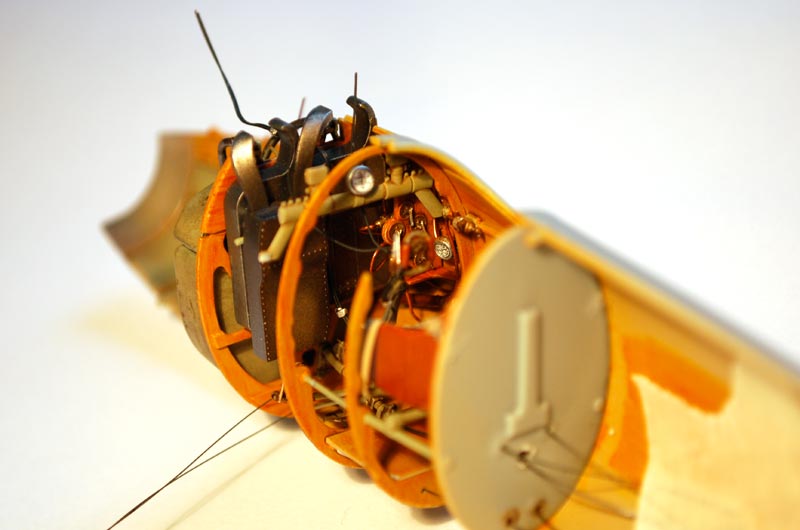
The strand sticking upp over the tank are the trottle lines going to the handle of the stick... and the two lines behind the ammofeeds are the triggerlines. I'll hang the "key" in its chain over the side of the cockpit, like it was hinted in the instructions.

Engine package in place...


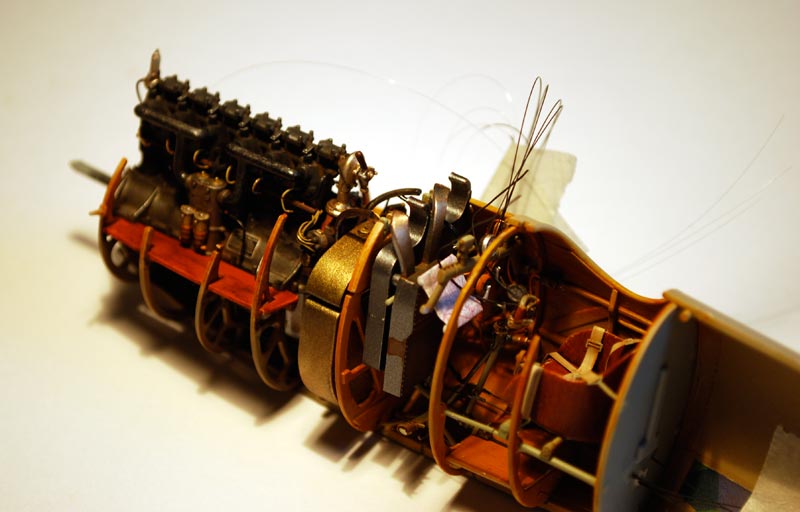
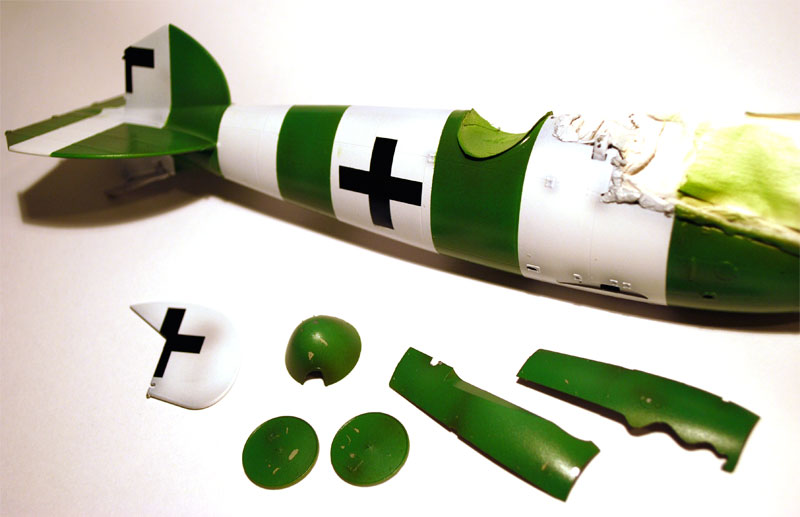
And here's a pic of the DV as well, keeping eaven pace with the DVa... I'll probably do this one up as Paul Baumers Jasta 2 machine. I've got Pheons Albatros DV/DVa volume 2 on their way over to me.

Well thats it for now, the windy garden is beckoning. Im going to ad a few more bits in the cockpit, then it'll be time for closure, and painting preparations  –maybe I'll be able to meet the deadline after all?

Thank You for looking – any and all comments are most welcome

Best Regards

Mikael
RAGIII
_VISITCOMMUNITY
North Carolina, United States
Joined: June 19, 2007
KitMaker: 604 posts
AeroScale: 600 posts
Posted: Sunday, September 26, 2010 - 12:13 AM UTC
In a word, OUTSTANDING!
RAGIII
thegirl
_VISITCOMMUNITY
Alberta, Canada
Joined: January 19, 2008
KitMaker: 6,743 posts
AeroScale: 6,151 posts
Posted: Sunday, September 26, 2010 - 01:56 AM UTC

Quoted Text

In a word, OUTSTANDING!
RAGIII


What Rick said !
OEFFAG_153
_VISITCOMMUNITY
Västra Götaland, Sweden
Joined: February 19, 2010
KitMaker: 1,473 posts
AeroScale: 1,450 posts
Posted: Sunday, September 26, 2010 - 07:45 PM UTC

Quoted Text

In a word, OUTSTANDING!
RAGIII


Thank You Rick for your very kind shout, it is most apreciated

Best Regards

Mikael
OEFFAG_153
_VISITCOMMUNITY
Västra Götaland, Sweden
Joined: February 19, 2010
KitMaker: 1,473 posts
AeroScale: 1,450 posts
Posted: Sunday, September 26, 2010 - 07:47 PM UTC

Quoted Text


Quoted Text

In a word, OUTSTANDING!
RAGIII


What Rick said !


Thank You so much Terri

Best Regards

Mikael
OEFFAG_153
_VISITCOMMUNITY
Västra Götaland, Sweden
Joined: February 19, 2010
KitMaker: 1,473 posts
AeroScale: 1,450 posts
Posted: Wednesday, October 13, 2010 - 04:04 AM UTC
Hi All,

Time for another update on the progress of the Group Build Albatros – not a very exciting update imagewise – more of a work in progress.

Fuselage is closed, primed and first few coats of white is on for the base of Dilthey's profile – masking is the next task. It was pretty straightforward, if a bit fiddly to join the halves together. Filling was not too hard either.

At the moment I’m trying to get a Saxon green hue I like...


I tried it on an old Roden Stripey failure – I leaning towards the darker shade to the left at the moment – maybe with a bit more white in it – what does the learned panel think?


A very white fuselage at the moment...


Remember these? Well some shading and texturung has been applied – I glanced a lot at the Lozenge 201 thread for this...


I used watercolours (designers gouache for the texturing – this was pretty good, letting me use water to remove streaks I was'nt happy with – it smells a lot better than white spirit too


Aerlions too – the other pair is the undersides for the DV...


Other bits and pieces being prepared.

Well that's it – I'm racing to get to the finishing line – but I don't want to rush the job too much either. Hoping to be able to put some more work into it before the end of this month, finishing touches in November – hopping to finish before the 11th.

All and any comments are as usual most welcome

Best Regards

Mikael
Kornbeef
_VISITCOMMUNITY
England - South East, United Kingdom
Joined: November 06, 2005
KitMaker: 1,667 posts
AeroScale: 1,551 posts
Posted: Wednesday, October 13, 2010 - 11:46 AM UTC
Coming along nice, I do like that lozenge.

As for the green I tend to agree with you, the light is too bright, the mid may be okay but I'd go for the darker deeper green personally Mikael.

K
thegirl
_VISITCOMMUNITY
Alberta, Canada
Joined: January 19, 2008
KitMaker: 6,743 posts
AeroScale: 6,151 posts
Posted: Wednesday, October 13, 2010 - 12:18 PM UTC

Quoted Text

Coming along nice, I do like that lozenge.

As for the green I tend to agree with you, the light is too bright, the mid may be okay but I'd go for the darker deeper green personally Mikael.

K


I agree with Keith , why I don't know , but the darker green fits the bill . Most excellent job on the texturing and weathering the lozenge ......looking forward to your next up-date .
OEFFAG_153
_VISITCOMMUNITY
Västra Götaland, Sweden
Joined: February 19, 2010
KitMaker: 1,473 posts
AeroScale: 1,450 posts
Posted: Wednesday, October 13, 2010 - 09:58 PM UTC
Thank You Terri and Keith for your kind comments

Seems we are agreed on the darker green hue for the Saxon bands – I think with a bit of highlight/lowlight this will be a good rendition. Its actually a mix of the very green to the right – which is Tamiya X28, with some brown X9...

Now for the treatment of the enginecovers – Hmmmm

Best Regards

Mikael
RAGIII
_VISITCOMMUNITY
North Carolina, United States
Joined: June 19, 2007
KitMaker: 604 posts
AeroScale: 600 posts
Posted: Thursday, October 14, 2010 - 02:37 PM UTC
Mikael,
Looks really great! I like your interpretation!
RAGIII
OEFFAG_153
_VISITCOMMUNITY
Västra Götaland, Sweden
Joined: February 19, 2010
KitMaker: 1,473 posts
AeroScale: 1,450 posts
Posted: Thursday, October 14, 2010 - 07:38 PM UTC
Thank You Rick for your kind comments

I almost started spraying green yesterday evening – but I was to tired (sleep is at a premium at the moment, as our little girl is getting teeth).

Best Regards

Mikael
Repainted
_VISITCOMMUNITY
Östergötland, Sweden
Joined: April 04, 2006
KitMaker: 1,058 posts
AeroScale: 1,004 posts
Posted: Friday, October 15, 2010 - 03:35 AM UTC
Fan. du bygger ju bra grabben!!!!!!!!!!!


I like what I see, keep up the good work, this will be good

Larsa
OEFFAG_153
_VISITCOMMUNITY
Västra Götaland, Sweden
Joined: February 19, 2010
KitMaker: 1,473 posts
AeroScale: 1,450 posts
Posted: Friday, October 15, 2010 - 10:50 PM UTC
Tackar mannen Du bygger inte så pjåkigt du heller Följer din triplane med stort intresse!

"Thanks Larsa – you're a pretty good builder yourself I am following your triplane build with great interest!"

Best Regards

Mikael
Repainted
_VISITCOMMUNITY
Östergötland, Sweden
Joined: April 04, 2006
KitMaker: 1,058 posts
AeroScale: 1,004 posts
Posted: Saturday, October 16, 2010 - 12:51 AM UTC
This is fun, I´ll have the Dv from Wingnuts on the shelf and following your build, so we would be talking more you and me Keep it up

Larsa
OEFFAG_153
_VISITCOMMUNITY
Västra Götaland, Sweden
Joined: February 19, 2010
KitMaker: 1,473 posts
AeroScale: 1,450 posts
Posted: Saturday, October 16, 2010 - 04:07 AM UTC
Excellent – Looking forward to that

Mikael
OEFFAG_153
_VISITCOMMUNITY
Västra Götaland, Sweden
Joined: February 19, 2010
KitMaker: 1,473 posts
AeroScale: 1,450 posts
Posted: Tuesday, October 19, 2010 - 08:59 PM UTC
Hi Everyone

A quick update of work in progress. I’ve been busy mixing paint and spraying green bands* It was pretty straightforward – and having used gloss white, made the masking pretty easy.

Masking the Lozenged wings were a bit trickier, and more hair-raising... I used post it notes, as the glue on these is pretty weak, putting them on just before I sprayed, so they should’nt stick too hard. The notes also had the added benefit of masking off large portions of the wings in one go.

Although I used post its – they took a away some of the ribtaping when I removed them Nothing that can’t be fixed though. The home made loz stayed in its place – I must say I’m pretty surprised over how good this stuff actually sticks.

I also applyed the homemade crosses, which went down fine in their places – I had anticipated some see through on the white edges – but this was far less than I had feared...

Anyway – here’s the result:


As you can see i succumbed to the most popular view of making the engine panels green as well. I’m not convinced this was the case though – Looking at the picture, WNW may well be right in saying they were left in standard grey. I also think Kornbeef has a very strong case for the partial green/grey panels.

* Think this is the right terminology – from Stephens thread – But are the markings on the wings in this case also called bands?

All and any comments are as usual most welcome

Thank You for looking

Mikael
JackFlash
_VISITCOMMUNITY
Colorado, United States
Joined: January 25, 2004
KitMaker: 11,669 posts
AeroScale: 11,011 posts
Posted: Tuesday, October 19, 2010 - 09:13 PM UTC
Greetings Mikael,
In the case where the national markings on the wings have a background not just a border the backgrounds are called "fields". By the way Nice Work!
OEFFAG_153
_VISITCOMMUNITY
Västra Götaland, Sweden
Joined: February 19, 2010
KitMaker: 1,473 posts
AeroScale: 1,450 posts
Posted: Wednesday, October 20, 2010 - 07:30 PM UTC
Thank You Stephen

Ah – "fields" I suspected this kind of marking had a special name, good to know what ones doing

Best Regards

Mikael
edoardo
_VISITCOMMUNITY
Milano, Italy
Joined: November 30, 2007
KitMaker: 642 posts
AeroScale: 382 posts
Posted: Wednesday, October 20, 2010 - 08:35 PM UTC
Hi Mikael!
I like very much the texturizing and weathering effect on the wings.
I'll try to duplicate it on mt Fokker D.VIII.
What did you used? My guess is a post shade of black and a raw umber oil wash...
Am I correct?

ciao
Edo
OEFFAG_153
_VISITCOMMUNITY
Västra Götaland, Sweden
Joined: February 19, 2010
KitMaker: 1,473 posts
AeroScale: 1,450 posts
Posted: Wednesday, October 20, 2010 - 09:45 PM UTC

Quoted Text

Hi Mikael!
I like very much the texturizing and weathering effect on the wings.
I'll try to duplicate it on mt Fokker D.VIII.
What did you used? My guess is a post shade of black and a raw umber oil wash...
Am I correct?

ciao
Edo


Hi Edo – Thank You for your kind comments

Close, but not quite

– I used a matt medium grey in very light mists from the airbrush – building it up carefully. Then I used burnt umber, but not oils this time – but waterbased designers gouache. (This was because my fixative for the homemade lozenge would be removed with whte spirits).

The pigment is the same as in the oils, but the application is slightly different, and a bit easier to control.

Hope this helps – Stephen has some neat tricks in his therad as well Lozenge 201

Mikael