KotS GB 2011 Alb D.V, CaptainA
Indiana, United States
Joined: May 14, 2007
KitMaker: 3,117 posts
AeroScale: 2,270 posts
Posted: Tuesday, March 01, 2011 - 11:40 PM UTC
Quoted Text
on 2011-03-02 05:10, JackFlash wrote:
Richard Alexander sent this along.
'I note there is some confusion starting on Aeroscale about 32009 Albatros D.V decal placement. While we are not perfect I do not believe we have got this many decal numbers incorrect.
I believe this confusion is being caused by someone trying to use the
instructions from 32009 Albatros D.V to place decals from 32015
Albatros D.Va. It is important to note that these are different models
with different decal sheets.
I would hate for too many people to be mislead by your forum (and now
your review). Anyone looking for decal numbers 72, 73, 74, 75 and
76 on their 32009 Albatros D.V decal sheet they will have a hard time
finding them when they go up to 71.
May I suggest that a quick check of the review samples you have on hand should clear matters up.
If not, please feel free to let me know.
Regards
Richard "
Well good folk, in response to this.
I noticed the decals that go on the dashboard were not the all black switches that appear on the dashboard on the pictures and on the D.Va. Also, there is one guage that goes on the dashboard, which was way oversized, and would not fit on the dashboard. I can't remember, but I think it is the ammo counter. These did not match up, which caused me to have to switch a lot of decals around.
I see the point he is making. I do not have the D.V decals. It is possible the mix up is because the decals might be numbered differently between the two kits. I will go back and make this notation on my post. I will also make an apology as I feel this is my mistake.
So let me be humble and admit my mistake. The decals are numbered correctly in the kits. My notation about incorrect decals is only correct if you are using the D.V instructions with the D.Va kit (and decals). I am sorry if I caused any confusion. These are two wonderful kits that beg to be built, so go out and build them.
I went back and edited my post.
"Treat 'em Rough", Current Builds--Wingnut Rumpler
I am frequently seen with blood shot eyes from staying up past my nap time to get the right colour scheme on my latest WWI model?
Indiana, United States
Joined: May 14, 2007
KitMaker: 3,117 posts
AeroScale: 2,270 posts
Posted: Wednesday, March 02, 2011 - 12:18 AM UTC
Quoted Text
Carl if you are replacing all the access panels please be aware the foremost under the nose is moulded on by WNW too far back, it should be under the sump in other words just in front of the panel line forwards of the one its moulded in front of. Place the engine in the frame and you'll see what I mean. front one is for the sump/pump. the rear for the fuel tank drain cock.
Thanks for the reminder. Now that you have brought it up, I remember this. I would have forgotten it when the time came aroumd to do it though. I wont be making a big hole in the fuselage as it would have been on the actual aircraft. I will only be sanding of the molded detail to replace it with the PE. So this will be an easy modification.
"Treat 'em Rough", Current Builds--Wingnut Rumpler
I am frequently seen with blood shot eyes from staying up past my nap time to get the right colour scheme on my latest WWI model?
England - South East, United Kingdom
Joined: November 06, 2005
KitMaker: 1,667 posts
AeroScale: 1,551 posts
Posted: Wednesday, March 02, 2011 - 07:52 PM UTC
Oh yes of course Carl, Mine is a big hole cos I have no engine in, building her as a strip out....the engine is in the Roland now. which reminds me I better get on with it.
Keith
Still can't cure the AMS even with sausage finger implants & olde eyes.
Missouri, United States
Joined: November 10, 2009
KitMaker: 27 posts
AeroScale: 26 posts
Posted: Thursday, March 03, 2011 - 01:35 PM UTC
Dumb question from the back of the room:

What did you do to keep the bulkhead channels clean? Second question, (not so dumb, as I think this is where Ray Rimell may have had some challenge on the wing alignment) the bulkhead with the fuel tank and the ammo cases have the wing alignment grooves. Alas, this bulkhead should have had an alignment tab key as a couple other bulkheads do, especially as it affects the lower wing alignment. Any trick to having this one on the level?
Indiana, United States
Joined: May 14, 2007
KitMaker: 3,117 posts
AeroScale: 2,270 posts
Posted: Thursday, March 03, 2011 - 11:36 PM UTC
Quoted Text
Dumb question from the back of the room:
What did you do to keep the bulkhead channels clean? Second question, (not so dumb, as I think this is where Ray Rimell may have had some challenge on the wing alignment) the bulkhead with the fuel tank and the ammo cases have the wing alignment grooves. Alas, this bulkhead should have had an alignment tab key as a couple other bulkheads do, especially as it affects the lower wing alignment. Any trick to having this one on the level?
Hello Brother,
I didnt keep them clean. I scraped them out with the side of a jewelers file. But remember the plastic is very, very thin here. So scrape the paint, not the plastic. As for the alignment, Test Fit before gluing everything in place. I didn't have any trouble on the first Alby. Any pictures Dave?
Dave, Are you going to the Pig Dinner?
"Treat 'em Rough", Current Builds--Wingnut Rumpler
I am frequently seen with blood shot eyes from staying up past my nap time to get the right colour scheme on my latest WWI model?
England - South East, United Kingdom
Joined: November 06, 2005
KitMaker: 1,667 posts
AeroScale: 1,551 posts
Posted: Friday, March 04, 2011 - 02:02 AM UTC
Quoted Text
Dumb question from the back of the room:
What did you do to keep the bulkhead channels clean? Second question, (not so dumb, as I think this is where Ray Rimell may have had some challenge on the wing alignment) the bulkhead with the fuel tank and the ammo cases have the wing alignment grooves. Alas, this bulkhead should have had an alignment tab key as a couple other bulkheads do, especially as it affects the lower wing alignment. Any trick to having this one on the level?
Dave, reference the wing issue, The wings tend to drop they seem sprung, the slots in the front of the bulkhead arn't anywhere pronounced enough to hold them. Of course on the real A/C they dont exist anyway.
This is what I did, I dryfitted and taped the fuselage and bulkhead together. I seriously opened out the edges of the locating hole the wingstub goes through in the fuselage taking some out of the outside top edge and the inside lower edge with a needle file. Checking and file then check again....repeatedly. I took a sliver of the inner wing top edge too to try to ease the tendancy for the wing to spring down. and lots of constant checking. Make absolutely sure no paint gets into the wing location recess, I opened mine up a little with a knife till everything fitted snug with no tip droop. I suppose you could beef up the bulkhead area and create slots out of sections of thick plasticard for the stubs to slide into, this area is hidden behind the fuel tank after all, but I think you still need to open up the slots.
Rgds
Keith
Still can't cure the AMS even with sausage finger implants & olde eyes.
Indiana, United States
Joined: May 14, 2007
KitMaker: 3,117 posts
AeroScale: 2,270 posts
Posted: Wednesday, March 09, 2011 - 12:06 PM UTC
I have had a lot of appointments and other things going on this week. So I haven't had the time to focus on this build. I haven't had enough uninterupted time to accomplish anything on the Albatros, just a few minutes here and there, so I spent that little time working on the darkside (auto modeling). Right now I have three cars and four aircraft competing for space on the work desk. Tomorrow, I have nothing going on, so I am going to clear everything off the desk, and see if I can get the fuselage buttoned up. Tonight, I think I am going to sleep early. Nighty-night all.

"Treat 'em Rough", Current Builds--Wingnut Rumpler
I am frequently seen with blood shot eyes from staying up past my nap time to get the right colour scheme on my latest WWI model?
Indiana, United States
Joined: May 14, 2007
KitMaker: 3,117 posts
AeroScale: 2,270 posts
Posted: Sunday, May 22, 2011 - 07:01 AM UTC
Hello good friends. It has been well over a month since my last post. As you know, I have had back surgery, which left me in a lot of pain. I have been recovering much slower than I had hoped. But I am able to sit and do some modeling now. Not much more than a few hours a day, or I will end up in a lot of pain. But, at least, I am able to do some things.
Here is my interior, just before I sealed it up.

And now the decals are on the fuselage.


And the other side


This morning, I got the lower wings on. I will try to post some more pics in a few days.
Here is where my other Albie stands at this time.

"Treat 'em Rough", Current Builds--Wingnut Rumpler
I am frequently seen with blood shot eyes from staying up past my nap time to get the right colour scheme on my latest WWI model?
Colorado, United States
Joined: January 25, 2004
KitMaker: 11,669 posts
AeroScale: 11,011 posts
Posted: Sunday, May 22, 2011 - 08:08 AM UTC
Excellent Carl!
Glad to see your back at it!
Great progress.
". . .The most important thing is to know why you build and then get the most that you can out of building." via D.D.
New Jersey, United States
Joined: June 02, 2006
KitMaker: 1,212 posts
AeroScale: 468 posts
Posted: Sunday, May 22, 2011 - 11:09 AM UTC
You left just as I was arriving. Back surgery? Ouch. Glad to hear you are on the mend. The D.V looks great. Are those decals as difficult as they look like they "should" be? either way it looks great.
North Carolina, United States
Joined: June 19, 2007
KitMaker: 604 posts
AeroScale: 600 posts
Posted: Sunday, May 22, 2011 - 02:49 PM UTC
Carl,
welcome back, and they both are looking fantastic!
RAGIII
Alberta, Canada
Joined: July 26, 2010
KitMaker: 1,032 posts
AeroScale: 1,025 posts
Posted: Sunday, May 22, 2011 - 03:21 PM UTC
Carl,
I can relate, been 5 weeks since I did my time on the big marble slab and I'm still a wee bit tender here and there. Don't envy you at all, double Hernia procedure isn't minor however back surgery........ I feel for you!
On the brighter side fewer excuses / reasons then usual to pull you away from the modeling desk and both your Albies look great; especially impressed with the Diamond Beauty of Wolf's. Keep the updates flowing and welcome back, look forward to more.
Cheers,
Lance
Officially Retired as of 20 August 2013 and looking forward to some un-interrupted bench time. Currently starting Roden's Nieuport 28 and hoping to follow that with another WNW Fokker DVII.
Västra Götaland, Sweden
Joined: February 19, 2010
KitMaker: 1,473 posts
AeroScale: 1,450 posts
Posted: Sunday, May 22, 2011 - 08:07 PM UTC
Hey Carl Nice to see you're getting back into the saddle again nice progress too those bavarian decals look absolutely great! Was it difficult to get it all to fit?
Looking forward to more as it develops
Mikael
_________________________________________________________
Just finished the Wingnut Wings Taube. On to the Junkers D.1
Indiana, United States
Joined: May 14, 2007
KitMaker: 3,117 posts
AeroScale: 2,270 posts
Posted: Monday, May 23, 2011 - 01:50 AM UTC
Quoted Text
You left just as I was arriving. Back surgery? Ouch. Glad to hear you are on the mend. The D.V looks great. Are those decals as difficult as they look like they "should" be? either way it looks great.
They went on really well. It takes a little work to line them up right, and I would not reccomend them to somebody with limited experience. But if you can put Loz on the wings of an Albie or an LVG, you shouldn't have any problems.
Thanks folks. Good to be back. I will be a bit slow in my posts until I can build up some back strength. But I will be around often.
"Treat 'em Rough", Current Builds--Wingnut Rumpler
I am frequently seen with blood shot eyes from staying up past my nap time to get the right colour scheme on my latest WWI model?
Arizona, United States
Joined: December 12, 2008
KitMaker: 1,423 posts
AeroScale: 1,319 posts
Posted: Tuesday, May 24, 2011 - 02:50 AM UTC
Hi Carl:
Welcome back. The progress looks good on both of the Albies. You are a lot further than I am. It has been over a month since I last worked on mine. Too much in the way at this time. Glad that you are able to be back at the bench and that you are on the mend.
Looking forward to more.
Best wishes for your recovery
Mark
We few, we happy few........
Indiana, United States
Joined: May 14, 2007
KitMaker: 3,117 posts
AeroScale: 2,270 posts
Posted: Thursday, May 26, 2011 - 06:08 AM UTC
Mark, I hope those tornados missed you. I saw they were in your neighborhood.
Got the top wing on and most of the rigging done on both Albies. I will get some pictures posted this weekend.
"Treat 'em Rough", Current Builds--Wingnut Rumpler
I am frequently seen with blood shot eyes from staying up past my nap time to get the right colour scheme on my latest WWI model?
South Australia, Australia
Joined: August 14, 2007
KitMaker: 5,926 posts
AeroScale: 2,201 posts
Posted: Thursday, May 26, 2011 - 09:09 AM UTC
Keep at it Carl. Looking great at the moment.
Hope you weren't affected by the tornadoes.
You may be right, I may be crazy.
Indiana, United States
Joined: May 14, 2007
KitMaker: 3,117 posts
AeroScale: 2,270 posts
Posted: Friday, May 27, 2011 - 09:37 AM UTC
The tornados stayed a comfortable distance from my little corner of the earth. After the two windstorms, I had bark all over my yard. Wierd. We also had to move the 5 cats down to our storm room because there was a lot of rotation in the clouds around us. At least now we know it takes 10-15 minutes for two adults to move 5 cats down one flight of stairs.

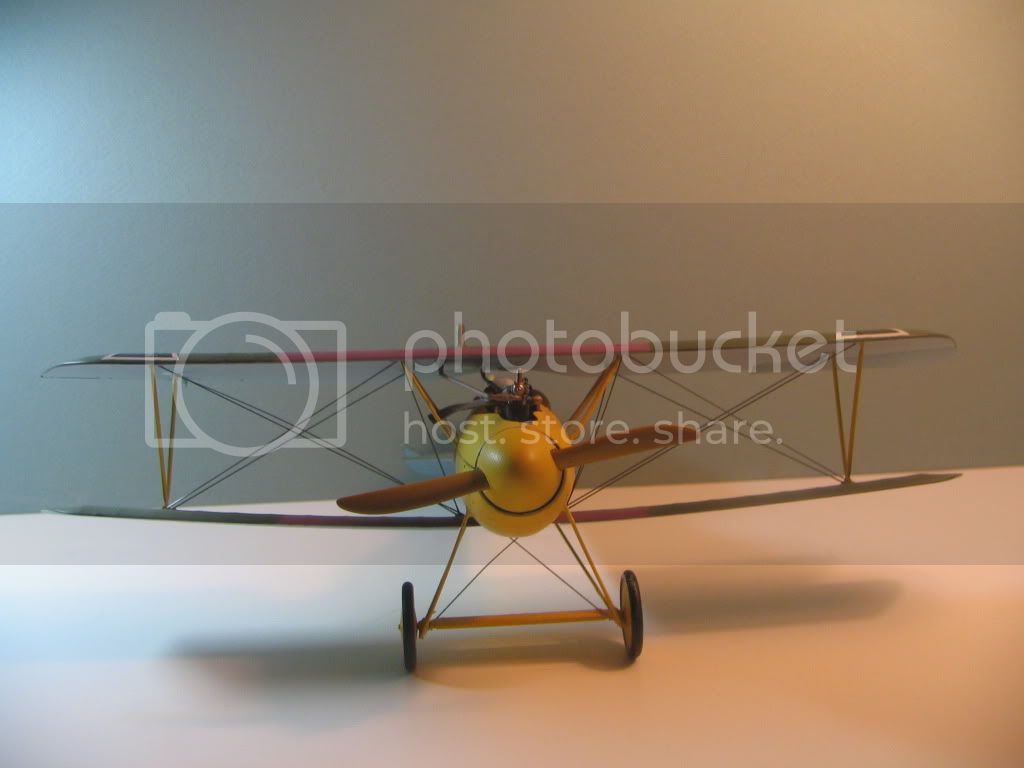
But to stay on topic here...
I got the albie up on its feet. I will try to get the wheels painted and attached in the morning.
"Treat 'em Rough", Current Builds--Wingnut Rumpler
I am frequently seen with blood shot eyes from staying up past my nap time to get the right colour scheme on my latest WWI model?
South Australia, Australia
Joined: August 14, 2007
KitMaker: 5,926 posts
AeroScale: 2,201 posts
Posted: Saturday, May 28, 2011 - 10:07 AM UTC
Herding cats is not possible..

You may be right, I may be crazy.
Kentucky, United States
Joined: July 02, 2010
KitMaker: 175 posts
AeroScale: 174 posts
Posted: Saturday, May 28, 2011 - 11:13 AM UTC
Hi Carl
Anxious to see the photo updates.
Your side of the river always seems to get it worse than our side...
"I took German in school...but I can't understand the way these foreigners speak it." The Dawn Patrol (1938)
Dennis O'C
Alberta, Canada
Joined: January 19, 2008
KitMaker: 6,743 posts
AeroScale: 6,151 posts
Posted: Thursday, June 09, 2011 - 12:46 AM UTC
Glad to see you back at the bench once more ! Both albbies are looking great so far
South Australia, Australia
Joined: August 14, 2007
KitMaker: 5,926 posts
AeroScale: 2,201 posts
Posted: Thursday, June 09, 2011 - 07:44 AM UTC
Quoted Text
Dumb question from the back of the room:
What did you do to keep the bulkhead channels clean? Second question, (not so dumb, as I think this is where Ray Rimell may have had some challenge on the wing alignment) the bulkhead with the fuel tank and the ammo cases have the wing alignment grooves. Alas, this bulkhead should have had an alignment tab key as a couple other bulkheads do, especially as it affects the lower wing alignment. Any trick to having this one on the level?
@ Carl, marvellous work and hope you are getting over your bad back. I have one as well but am staying away from the surgeons as much as possible.
@ David, there is never a dumb question, only a dumb person who doesn't ask a question and ruins things. Regarding the channels, I use Tamiya Extra Thin liquid cement for almost everything nowadays and have found that unlike the old days you don't need to remove paint before you glue. The cement just seems to remove it by itself.
You may be right, I may be crazy.
Indiana, United States
Joined: May 14, 2007
KitMaker: 3,117 posts
AeroScale: 2,270 posts
Posted: Friday, June 10, 2011 - 09:42 AM UTC
Yes. Keep the channels clear. I actually found a small file and scraped the channels clear of all paint. I took it to the point that I actually made them a little deeper. Fit ended up being great with the channel scrape. It is important for two reasons. First is the fit. If there is paint in the channels, the fuselage will be hard to close up. Secondly is the cement has to be attached to plastic instead of paint. But the reality of it is I didn't glue the bulkheads. They sat nicely in their channels.
I have all three of my stalled Albatri finished, and I have moved the SE 5a to the desktop. I will try to shoot some photos if I can find some batteries.

"Treat 'em Rough", Current Builds--Wingnut Rumpler
I am frequently seen with blood shot eyes from staying up past my nap time to get the right colour scheme on my latest WWI model?
Indiana, United States
Joined: May 14, 2007
KitMaker: 3,117 posts
AeroScale: 2,270 posts
Posted: Saturday, June 11, 2011 - 03:26 AM UTC
"Treat 'em Rough", Current Builds--Wingnut Rumpler
I am frequently seen with blood shot eyes from staying up past my nap time to get the right colour scheme on my latest WWI model?
New Jersey, United States
Joined: June 02, 2006
KitMaker: 1,212 posts
AeroScale: 468 posts
Posted: Saturday, June 11, 2011 - 10:58 AM UTC
Both are gorgeous but the Bavarian is seriously smokin' hot. I have to keep the photos moving or I am afraid it may burn my monitor.