KotS GB 2011 Junkers J.I dmopath
Kentucky, United States
Joined: July 02, 2010
KitMaker: 175 posts
AeroScale: 174 posts
Posted: Tuesday, February 08, 2011 - 11:59 AM UTC
Now that the Encore is done, it's time to tap into the WNW pile in the stash. I'll be doing the Junkers


I've decided to do 138/17 Flieger-Abteilung 17 with the mauve stripes. It will give me a chance to improve my airbrush skills. If I mess up, I'll switch to an all green version.

I've already started cleaning parts and joining wing halves. It's going much faster than I'm used to, as cleaning and filling gaps are practically nonexistent. The detail is stunning. One other item of note: this airplane is much bigger than I expected. If the pictures don't show, the links should work. I'll be back when the interior is coming together.
"I took German in school...but I can't understand the way these foreigners speak it." The Dawn Patrol (1938)
Dennis O'C
Alberta, Canada
Joined: January 19, 2008
KitMaker: 6,743 posts
AeroScale: 6,151 posts
Posted: Tuesday, February 08, 2011 - 11:40 PM UTC
Nice choice of subject !
Looking forward to your build Dennis

Arizona, United States
Joined: December 12, 2008
KitMaker: 1,423 posts
AeroScale: 1,319 posts
Posted: Wednesday, February 09, 2011 - 07:53 AM UTC

Hi Dennis:
It's been awhile since we have seen one of these here. Good choice, and looking forward to seeing the build.
Best
Mark
We few, we happy few........
Indiana, United States
Joined: May 14, 2007
KitMaker: 3,117 posts
AeroScale: 2,270 posts
Posted: Wednesday, February 09, 2011 - 08:44 AM UTC
True, it has been a while since we have had one of these built here. When the original 4 kits came out, this is the only one I didn't want. I watched a few builds, and fell in love with it. I am glad to see you join us with this one.
"Treat 'em Rough", Current Builds--Wingnut Rumpler
I am frequently seen with blood shot eyes from staying up past my nap time to get the right colour scheme on my latest WWI model?
Kentucky, United States
Joined: July 02, 2010
KitMaker: 175 posts
AeroScale: 174 posts
Posted: Wednesday, February 09, 2011 - 11:15 AM UTC
Thanks gentlemen (and lady). I will try to do this kit justice.
I forgot the references:
The WNW instructions and WNW website with their abundance of archival photos.
Grosz PM. Windsock Datafile 39: Junkers J.I, 1993
The Junkers build on Des Delatorre's website (www.ww1aircraftmodels.com)
"I took German in school...but I can't understand the way these foreigners speak it." The Dawn Patrol (1938)
Dennis O'C
Västra Götaland, Sweden
Joined: February 19, 2010
KitMaker: 1,473 posts
AeroScale: 1,450 posts
Posted: Friday, February 11, 2011 - 02:01 AM UTC
Hi Dennis
A large and good choice of a GB project I have this one in the stash, looking forward to your build

Best Regards
Mikael
_________________________________________________________
Just finished the Wingnut Wings Taube. On to the Junkers D.1
Kentucky, United States
Joined: July 02, 2010
KitMaker: 175 posts
AeroScale: 174 posts
Posted: Friday, February 11, 2011 - 02:38 AM UTC
Hi Mikael and thanks
Right now I'm deciding how to fix the gap next to the upper wing ailerons. Although I realize that there have been produced replacement resin parts, I'll probably use some sheet styrene.
"I took German in school...but I can't understand the way these foreigners speak it." The Dawn Patrol (1938)
Dennis O'C
Victoria, Australia
Joined: August 23, 2007
KitMaker: 629 posts
AeroScale: 539 posts
Posted: Friday, February 11, 2011 - 11:00 AM UTC
Quoted Text
Hi Mikael and thanks
Right now I'm deciding how to fix the gap next to the upper wing ailerons. Although I realize that there have been produced replacement resin parts, I'll probably use some sheet styrene.
Hi Dennis, the Junkers is an excellent kit and it makes a perfect large canvas for practising your airbrushing skills like you mentioned.
I used the method you mentioned for fixing up the aileron gap: i simply used styrene sheet and sanded it down to shape- very easy. However i cheated and took the easy option by glueing the styrene onto the wing to close the gap instead of extending the ailerons- which i read somewhere would be the more dimensionally accurate way, but would need you to replicate the corrugations. So it depends how important it is to you, i'm a slacker so i took the easier way.
Andrew
Current Projects:
Eduard 1/48 F6F-3 Hellcat
Hasegawa 1/350 Yukikaze
1/6 JJ Models Sarah "Gothic"
Kentucky, United States
Joined: July 02, 2010
KitMaker: 175 posts
AeroScale: 174 posts
Posted: Friday, February 11, 2011 - 11:19 AM UTC
Hi Andrew
Your plan is exactly what I had in mind. It looks like I'm going to be a slacker also.

Looking at the illustration of the top of 138/17, it seemed to me to be acceptable to close it on the wing side, and a lot easier.
"I took German in school...but I can't understand the way these foreigners speak it." The Dawn Patrol (1938)
Dennis O'C
Kentucky, United States
Joined: July 02, 2010
KitMaker: 175 posts
AeroScale: 174 posts
Posted: Sunday, February 20, 2011 - 03:33 AM UTC
Progress note: Fixing the gap in the center wing
Checking archival photos, many imply that the majority of the gap is made up by the aileron and its cover, while illustrations in the instructions seem to show the gap filled in by the center wing section. The DataFile drawings seem to indicate that it was half and half. Weighing all the evidence, and after considering my limited skills and patience, I opted for the easy way out.

I used sheet styrene to fill in the center wing (two pieces fit exactly). I recreated the corrugations by scribing and using styrene strips. At this point it doesnt look too bad.
Im in the process of matching colors, which is a little hard for someone who is red-blue-green colorblind. I use Pollyscale/Testors Acryl paints. It looks like their Warsaw Pact Grey Green is a pretty good match for the Tamyia and Humbrol Cockpit Green.
Be back later.
"I took German in school...but I can't understand the way these foreigners speak it." The Dawn Patrol (1938)
Dennis O'C
Removed by original poster on 03/16/11 - 12:09:31 (GMT).
Kentucky, United States
Joined: July 02, 2010
KitMaker: 175 posts
AeroScale: 174 posts
Posted: Wednesday, March 16, 2011 - 12:12 AM UTC
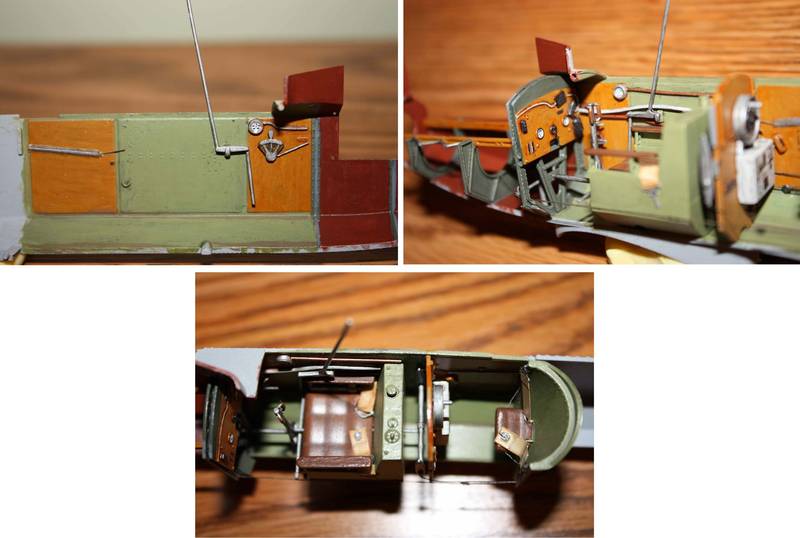
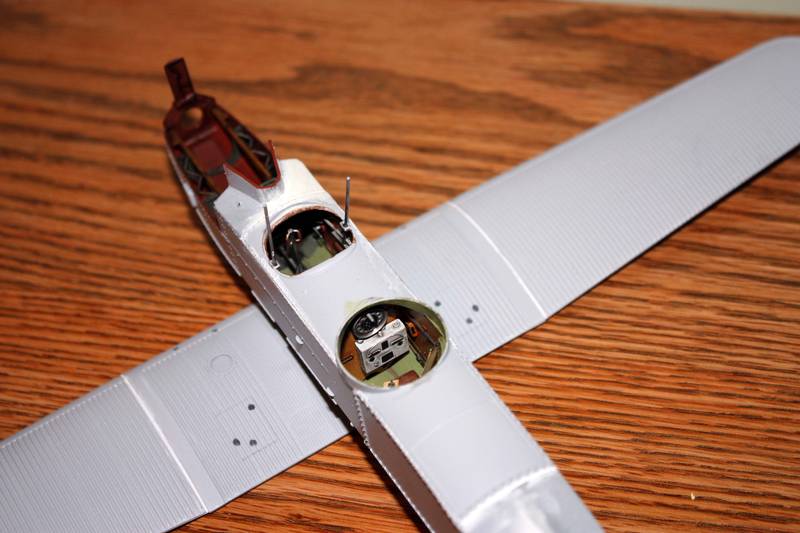
The interior is finished. I know others have built various WNW kits, but this is my first experience. I continue to marvel at the level of detail and ease of construction. The fit and finish are excellent. I learned quickly not to sand edges too much. My only problem involved the decals for the gauges. They were a bit oversized, and I tried to heed the WNW warnings about using set and sol solutions. Unfortunately, they didnt adhere well, and I lost two of them. I found one and reapplied it with Future. The other was lost forever, so I had to recreate it using a computer graphics program. At least I could use a set solution on that one.
The instructions do not give diagrams for the control cables, so I used the photos in the Datafile and those provided by WNW to come up with a best guess. In any event, theyll be inconspicuous when the interior is closed up.
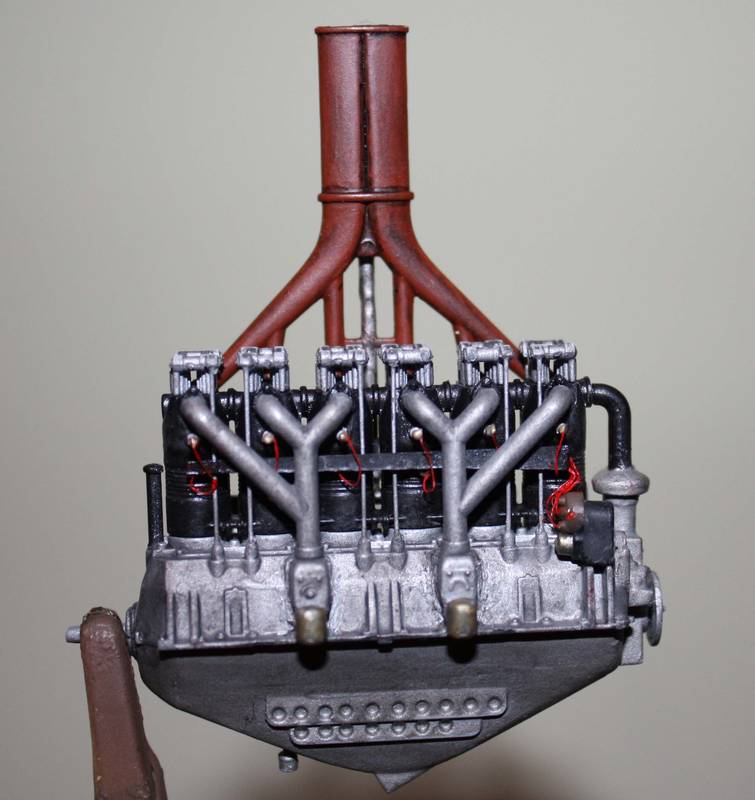
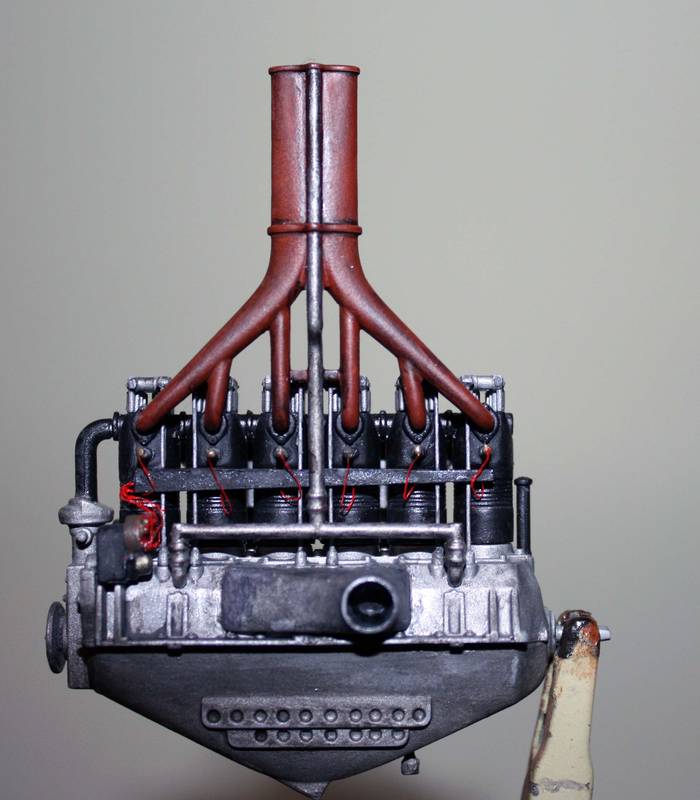
Next: the Benz engine.
"I took German in school...but I can't understand the way these foreigners speak it." The Dawn Patrol (1938)
Dennis O'C
Alberta, Canada
Joined: January 19, 2008
KitMaker: 6,743 posts
AeroScale: 6,151 posts
Posted: Friday, March 18, 2011 - 12:05 AM UTC
Very nice up-date Dennis !
Your project is coming along really well so far . Interoir looks super
Looking forward to your next up-date
Kentucky, United States
Joined: July 02, 2010
KitMaker: 175 posts
AeroScale: 174 posts
Posted: Friday, March 18, 2011 - 04:05 AM UTC
Thanks Terri
Your support and encouragement is most appreciated.
"I took German in school...but I can't understand the way these foreigners speak it." The Dawn Patrol (1938)
Dennis O'C
England - South East, United Kingdom
Joined: November 06, 2005
KitMaker: 1,667 posts
AeroScale: 1,551 posts
Posted: Friday, March 18, 2011 - 07:10 PM UTC
Yes coming along well there Deniss, I too am looking forwards to the next update.
Keith.
Still can't cure the AMS even with sausage finger implants & olde eyes.
Kentucky, United States
Joined: July 02, 2010
KitMaker: 175 posts
AeroScale: 174 posts
Posted: Saturday, March 19, 2011 - 06:56 AM UTC
Thanks Keith
I'll try not to stall too long on the motor. I'm dreading that two tone upper paint job.
"I took German in school...but I can't understand the way these foreigners speak it." The Dawn Patrol (1938)
Dennis O'C
Arizona, United States
Joined: December 12, 2008
KitMaker: 1,423 posts
AeroScale: 1,319 posts
Posted: Saturday, March 19, 2011 - 08:26 AM UTC
Hi Dennis:
No worries on the engine, are you talking about the two tone engine with the red stripes? That is a bit fiddly to do, as I did that on the LVG as I thought it looked neat, it was worth it in the end.
Looking good thus far.
Best
Mark
We few, we happy few........
Kentucky, United States
Joined: July 02, 2010
KitMaker: 175 posts
AeroScale: 174 posts
Posted: Saturday, March 19, 2011 - 10:10 AM UTC
Sadly no, Mark
I was thinking about the upper wings and fuselage, with it's two tone grey-green and mauve pattern with an airbrush.

I had considered just leaving the cylinder heads black, as in the photos I've examined, but I like your idea (as with the LVG), particularly since I was going to leave the Benz exposed.
Thanks for the tip
"I took German in school...but I can't understand the way these foreigners speak it." The Dawn Patrol (1938)
Dennis O'C
Kentucky, United States
Joined: July 02, 2010
KitMaker: 175 posts
AeroScale: 174 posts
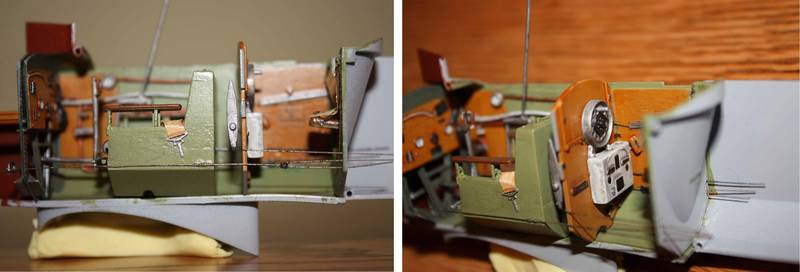
Posted: Sunday, April 10, 2011 - 07:25 AM UTC
"I took German in school...but I can't understand the way these foreigners speak it." The Dawn Patrol (1938)
Dennis O'C
New Jersey, United States
Joined: June 02, 2006
KitMaker: 1,212 posts
AeroScale: 468 posts
Posted: Sunday, April 10, 2011 - 12:05 PM UTC
I'm liking it. Engine looks great.
California, United States
Joined: July 14, 2008
KitMaker: 18 posts
AeroScale: 6 posts
Posted: Sunday, April 10, 2011 - 12:52 PM UTC
realy good looking model . the engine looks like it ready to fire up at anytime
Västra Götaland, Sweden
Joined: February 19, 2010
KitMaker: 1,473 posts
AeroScale: 1,450 posts
Posted: Sunday, April 10, 2011 - 10:15 PM UTC
Great Stuff Dennis, this is shaping up very nicely indeed looking forward to seeing it with some more paint on.
Mikael
_________________________________________________________
Just finished the Wingnut Wings Taube. On to the Junkers D.1
Kentucky, United States
Joined: July 02, 2010
KitMaker: 175 posts
AeroScale: 174 posts
Posted: Monday, April 11, 2011 - 01:28 AM UTC
Thanks Marc, Steve and Mikael
I would have to say that just about all of the credit has to go to WingNuts. Their attention to detail makes a basic modeler like myself look like I've been doing this for a long time.
"I took German in school...but I can't understand the way these foreigners speak it." The Dawn Patrol (1938)
Dennis O'C
Arizona, United States
Joined: December 12, 2008
KitMaker: 1,423 posts
AeroScale: 1,319 posts
Posted: Monday, April 11, 2011 - 04:01 AM UTC
Hi Dennis:
It is really coming along nicely. I like the way the radio turned out, very realistic looking. The engine is nice, like previously mentioned, looks like an in service motor.
Looking forward to more.
Best
Mark
We few, we happy few........
Kentucky, United States
Joined: July 02, 2010
KitMaker: 175 posts
AeroScale: 174 posts
Posted: Monday, April 11, 2011 - 11:37 AM UTC
Hi Mark and Thanks
I was wondering what that contraption was in front of the gunner/observer-my guess was that it might be a radio of some type. That would be my only recommendation to WNW for novices like me
(state what the parts are that are being assembled).
"I took German in school...but I can't understand the way these foreigners speak it." The Dawn Patrol (1938)
Dennis O'C