

Here is a further bit of fun on the German (Fokker) streaking camouflage.
Click here.
Early Aviation
Discuss World War I and the early years of aviation thru 1934.
Discuss World War I and the early years of aviation thru 1934.
Hosted by Jim Starkweather
Roden Fokker Dr.I LCarroll

JackFlash

Joined: January 25, 2004
KitMaker: 11,669 posts
AeroScale: 11,011 posts
Posted: Sunday, December 18, 2011 - 11:17 PM UTC

lcarroll

Joined: July 26, 2010
KitMaker: 1,032 posts
AeroScale: 1,025 posts

Posted: Monday, December 19, 2011 - 02:34 PM UTC
Thanks Stephen; read thru it several times................great stuff!
Cheers,
Lance


lcarroll
Joined: July 26, 2010
KitMaker: 1,032 posts
AeroScale: 1,025 posts
Posted: Monday, December 19, 2011 - 04:27 PM UTC
Mikael,
Thanks for the comments. It is a little busy in the cockpit and I'm relieved that part is done. I've closed up the fuselage now and have filled/sanded the seams along with adding the large under cowling access panel. I'll be filling in the forward fuselage gas/oil tank and ammo cans next and then it's time for the initial painting.
I like the look of the decals on your link but will attempt to paint the scheme for now. Your color suggestion for the streaking matches my thoughts; 2 parts olive green tone to 1 part dark brown is the most common recommendation I've seen. I've used a 2 to 1 mix of Model Master French Khaki with their RLM8017 "schokoladenbraun" in the past and another recommendation was the same ratio of Tamya Olive Drab with their XF 10 Flat Brown. I think I'll use the Tamya acrylics over an enamel basecoat of CDL and so be able to easily remove the streaking if it doesn't work out and try again.
I'll try for a few pictures before I get too much further along.
Cheers,
Lance
lcarroll
Joined: July 26, 2010
KitMaker: 1,032 posts
AeroScale: 1,025 posts
Posted: Wednesday, December 21, 2011 - 04:49 AM UTC
I've made some progress over the last several days despite the busy schedule of "things to be done" imposed by the imminent Holidays.
The ammo cans and fuel/oil tank are ready for installation however I've decided to hold off on that until the fuselage is fully painted. Handling of the model has resulted in some "pop-offs", most recently the fuel cock mechanism from the right fuselage wall and one of the frame cross members so I'll just mask and cover it up and then once done go back and re-install before adding the top forward deck cowling. As mentioned earlier the delicacy of many of the components both during removal from the sprues and during construction are giving me no end of pain!
The 3 components with the Eduard placards added:

I have also completed the Spandaus, electing to use the very well done Kit versions and Eduard rolled cooling jackets and "fiddlly bits" in lieu of the Master sets I had on hand - they'll be used in future builds. The barrels drilled out nicely, the flat black basecoat was heavily hi-lighted with Tamiya Gun Metal and I am happy with the results. They are actually less silver then the photos indicate; I used very bright lighting on these photos.


The undersides of all the flight controls were pre-shaded in the usual manner, taping and spraying taking very little time. I reasoned that the nature of the painting/striping finish being applied to top surfaces would result in shading being invisible if applied. (it was during this step that I somehow got one fat finger inside the cockpit and cleaned off the previously mentioned components)
Taped components ready for the Iwata.............

Pre-shading complete albeit a little heavy handed on a few pieces.....

At this stage I added the wing stacking pads to replace those inadvertantly removed during a "Senior moment" while sanding and prepping the wings. I used Vectorcut 1mm nuts and the cyano, once the paint's on, should fair them into the leading edges.

Last, I finished the lower cowling inspection panel again using the Vectorcut product for fasteners and adding the front piano hinge. The hinge may be removed and a thinner version installed, I'll see if it still looks oversized after a few more sessions of AMS quality control checks.

Hopefully I'll get the light CDL enamel on today, let it dry over the holidays, and start the striping once back home. The undersides will get their dose of turquoise once the top sides are completed.
We are departing soon to spend Christmas at the Daughter's so I'll be missing the workbench by the time we return! I'll get another brief update in prior to departure.
Thanks for looking and I look forward to your comments and suggestions.
Cheers,
Lance
The ammo cans and fuel/oil tank are ready for installation however I've decided to hold off on that until the fuselage is fully painted. Handling of the model has resulted in some "pop-offs", most recently the fuel cock mechanism from the right fuselage wall and one of the frame cross members so I'll just mask and cover it up and then once done go back and re-install before adding the top forward deck cowling. As mentioned earlier the delicacy of many of the components both during removal from the sprues and during construction are giving me no end of pain!
The 3 components with the Eduard placards added:
I have also completed the Spandaus, electing to use the very well done Kit versions and Eduard rolled cooling jackets and "fiddlly bits" in lieu of the Master sets I had on hand - they'll be used in future builds. The barrels drilled out nicely, the flat black basecoat was heavily hi-lighted with Tamiya Gun Metal and I am happy with the results. They are actually less silver then the photos indicate; I used very bright lighting on these photos.
The undersides of all the flight controls were pre-shaded in the usual manner, taping and spraying taking very little time. I reasoned that the nature of the painting/striping finish being applied to top surfaces would result in shading being invisible if applied. (it was during this step that I somehow got one fat finger inside the cockpit and cleaned off the previously mentioned components)
Taped components ready for the Iwata.............
Pre-shading complete albeit a little heavy handed on a few pieces.....
At this stage I added the wing stacking pads to replace those inadvertantly removed during a "Senior moment" while sanding and prepping the wings. I used Vectorcut 1mm nuts and the cyano, once the paint's on, should fair them into the leading edges.
Last, I finished the lower cowling inspection panel again using the Vectorcut product for fasteners and adding the front piano hinge. The hinge may be removed and a thinner version installed, I'll see if it still looks oversized after a few more sessions of AMS quality control checks.
Hopefully I'll get the light CDL enamel on today, let it dry over the holidays, and start the striping once back home. The undersides will get their dose of turquoise once the top sides are completed.
We are departing soon to spend Christmas at the Daughter's so I'll be missing the workbench by the time we return! I'll get another brief update in prior to departure.
Thanks for looking and I look forward to your comments and suggestions.
Cheers,
Lance
lcarroll
Joined: July 26, 2010
KitMaker: 1,032 posts
AeroScale: 1,025 posts
Posted: Thursday, December 22, 2011 - 11:55 AM UTC
A very brief update before I hit the road at the crack of dawn tomorrow; Christmas at the Daughter's this year. Long drive of 7 hours however should be reasonably pleasant as we Canadians have cleverly exported our snow, cold, and generally nasty winter weather to our good neighbors to the south this year....enjoy Y'all!
The top surfaces have recieved their 2 coats of Linen (Humbrol Satin Oak #71 lightened slightly with satin white). All the filled and primed seams passed the test as well, so far so good.
First, after the first coat and sanding of some imperfections prior to coat #2: (the Hor. stab. filled in nicely with the second coat)

And next the second coat on the fuselage/lower wing assembly:

Once I return in 5-6 days it will be time for the striping adventure. I airbrushed 4 chunks of scrap to experiment with; hopefully I can transfer all the great info and advice I've recieved into a reasonable effect.
Last, I found the mix I had used for the striping years ago too "greenish" so I mixed a batch of the Tamya recommendation I had read somewhere; 2 parts Khaki Drab to 1 of Dark Brown. A complete failure as the result came out all brown and the amount of Khaki on hand did not cure the problem. Thus I've increased the brown in the Model Master enamel mix using 3 of French Khaki to 2 of "Schokoladenbraun" with great results.
Hope this finds all enjoying a very Merry Christmas and sincere Best Wishes for the New Year. Be safe, be happy, and above all else be with those you love if only in spirit.
Cheers All,
Lance
The top surfaces have recieved their 2 coats of Linen (Humbrol Satin Oak #71 lightened slightly with satin white). All the filled and primed seams passed the test as well, so far so good.
First, after the first coat and sanding of some imperfections prior to coat #2: (the Hor. stab. filled in nicely with the second coat)
And next the second coat on the fuselage/lower wing assembly:
Once I return in 5-6 days it will be time for the striping adventure. I airbrushed 4 chunks of scrap to experiment with; hopefully I can transfer all the great info and advice I've recieved into a reasonable effect.
Last, I found the mix I had used for the striping years ago too "greenish" so I mixed a batch of the Tamya recommendation I had read somewhere; 2 parts Khaki Drab to 1 of Dark Brown. A complete failure as the result came out all brown and the amount of Khaki on hand did not cure the problem. Thus I've increased the brown in the Model Master enamel mix using 3 of French Khaki to 2 of "Schokoladenbraun" with great results.
Hope this finds all enjoying a very Merry Christmas and sincere Best Wishes for the New Year. Be safe, be happy, and above all else be with those you love if only in spirit.
Cheers All,
Lance
lcarroll
Joined: July 26, 2010
KitMaker: 1,032 posts
AeroScale: 1,025 posts
Posted: Thursday, December 29, 2011 - 03:23 PM UTC
Had a reasonably productive first day back; got the Striped Camo on all the upper surfaces as planned. This was an "enamel over enamel" procedure and I'm satisfied with the results. I did, however, spend and hour or more practising on some of the base coated scrap I did up.
All of the components; note the elevator is in two pieces per my earlier comments. Very fragile and the plastic is very soft with predictable results ...............

The wing sections follow: (the upper wing celon inspection panel and control horns will be added later)


The fuselage; the wing/fuselage join area was a little tricky given the larger ( 8-10 mm width flat brush) I was using:


Next steps are to add white cross fields to the upper and (once the bottom turquoise is on) lower wings and then spray thin coat(s) of red over the fuselage portions where indicated and the upper wing top surface. I'm hoping to have a hint of the striped camo show thru the red where applied and a paler/lighter red cover over the crossfield areas as shows in the photos of 152, 127, and 161/17 etc. as flown by MvR.
The red will be a 50/50 mix of Model master Enamel Insignia Red and Guards Red; in my notes from Gawd knows what source of years ago I recorded that this was close to the red overcoat applied to 425/17 thus should be a match for the Baron's "partial" red machines.
I'm still very much enjoying this build and will probably do another in future; need some yellow on the shelf so maybe Lothar's machine..........!
More to follow soon.
Cheers,
Lance
All of the components; note the elevator is in two pieces per my earlier comments. Very fragile and the plastic is very soft with predictable results ...............
The wing sections follow: (the upper wing celon inspection panel and control horns will be added later)
The fuselage; the wing/fuselage join area was a little tricky given the larger ( 8-10 mm width flat brush) I was using:
Next steps are to add white cross fields to the upper and (once the bottom turquoise is on) lower wings and then spray thin coat(s) of red over the fuselage portions where indicated and the upper wing top surface. I'm hoping to have a hint of the striped camo show thru the red where applied and a paler/lighter red cover over the crossfield areas as shows in the photos of 152, 127, and 161/17 etc. as flown by MvR.
The red will be a 50/50 mix of Model master Enamel Insignia Red and Guards Red; in my notes from Gawd knows what source of years ago I recorded that this was close to the red overcoat applied to 425/17 thus should be a match for the Baron's "partial" red machines.
I'm still very much enjoying this build and will probably do another in future; need some yellow on the shelf so maybe Lothar's machine..........!
More to follow soon.
Cheers,
Lance
lcarroll
Joined: July 26, 2010
KitMaker: 1,032 posts
AeroScale: 1,025 posts
Posted: Thursday, December 29, 2011 - 03:32 PM UTC
Reference the foregoing forgot to include that two WNW Boxes appeared under the tree Christmas Morning.....a Roland DVI and the much wanted Pfalz DXII thus time is of the essence, need to get the production line moving!
Cheers,
Lance
Cheers,
Lance
lcarroll
Joined: July 26, 2010
KitMaker: 1,032 posts
AeroScale: 1,025 posts
Posted: Thursday, January 05, 2012 - 05:28 AM UTC
Just a brief update to keep this Build Thread going. No pics at this time as I've just buried the old demised Desktop and we are still struggling to get the new one up to speed. Hopefully I'll get the photo program working and be back in business in the next week. (I am " IT Challenged" to say the very least)
The project is moving along nicely, have the linen cross fields done, red over-spray completed and happy to say the streaking shows through very nicely. Red as planned, 50/50 mix of Model Master Insignia and Guards Reds is a dark blood red color, Blue bottom color of 1/3 each M.M. Semi Gloss White/USSR Interior blue-green and USN Blue-grey came off beautifully as well. I replaced the piano hinge on the added nose underside access door with a smaller one more to scale.
Presently working on struts and the landing gear assembly.....looks like I'll be replacing the gear struts with brass "STRUTZ" ones per Stephen's recommendation a while back as they are really flimsy. Once the foregoing painting has a few days of drying completed I'll be spraying an overall gloss coat and getting on with the decalling, looking forward to that part as completion gets closer.
I'll get cracking on the photos; been photographing as I progress.
Cheers,
Lance

wing_nut
Joined: June 02, 2006
KitMaker: 1,212 posts
AeroScale: 468 posts
Posted: Thursday, January 05, 2012 - 09:37 AM UTC
Boy oh boy am I glad I decided to check in here today. Otherwise I would have likely continued to missed this build. And that would be a shame. Nice Lance.. real nice.

thegirl
Joined: January 19, 2008
KitMaker: 6,743 posts
AeroScale: 6,151 posts
Posted: Thursday, January 05, 2012 - 02:39 PM UTC
Thumbs up !
Don't worry about being heavy handed on the per-shading . I do this as well on my builds . It helps break up the uniform appearance and will give the shading some depth . To add more to this , when spraying the CDL to this in the same fashion . Key areas to build up alittle more with the CDL is leading edge of the wing(s)
Nice job on the streaking
lcarroll
Joined: July 26, 2010
KitMaker: 1,032 posts
AeroScale: 1,025 posts
Posted: Friday, January 06, 2012 - 01:29 AM UTC
Mark, Terri,
Thanks for the positive comments. This one is going slowly but surely; today I hope to find time to get the gloss coat on. Spent a good hour or two working on the fit of the inter-plane struts yesterday, lots of sanding and scraping however it's done and they now fit very nicely.
Still getting this &^$%%$^%#^%$#^% computer up to speed; we are now considering getting a pro in to help as it's becoming a large pain in the you know where. Hope to get capable of posting photos again soon.....
Cheers,
Lance
lcarroll
Joined: July 26, 2010
KitMaker: 1,032 posts
AeroScale: 1,025 posts
Posted: Friday, January 06, 2012 - 04:37 AM UTC
Here are some photos showing progress to just prior to spraying on the blue undersides. I am still struggling with the photo program; some progress but it may be a few days before I can produce photos up to today's status.
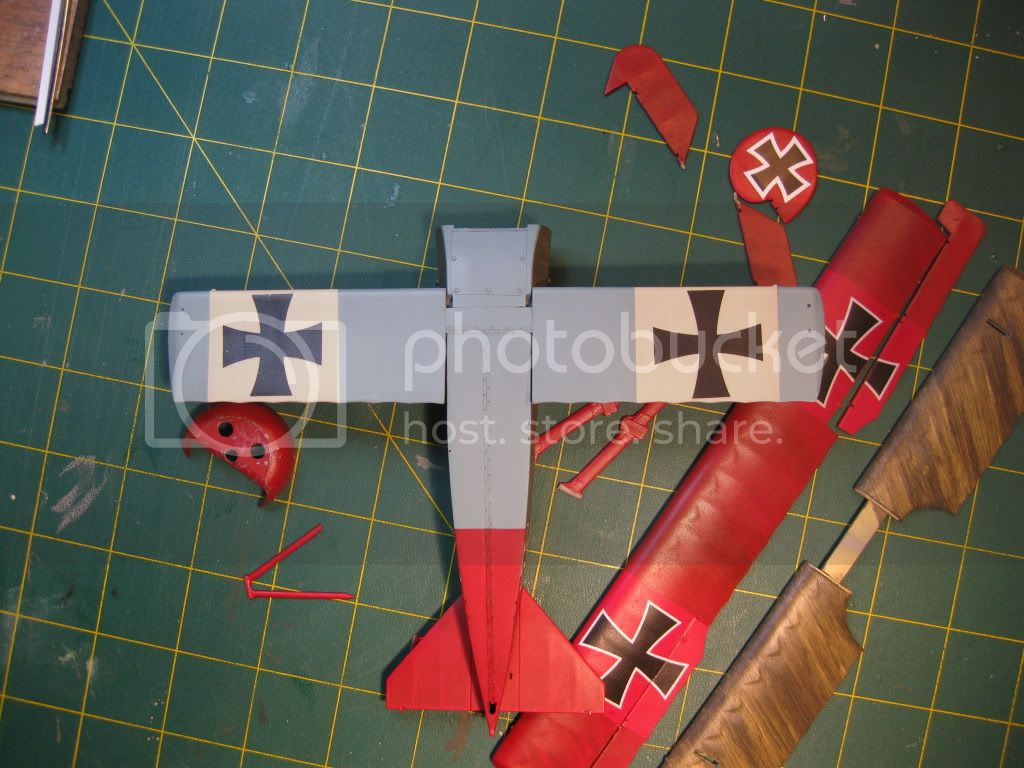
The linen cross fields applied to top and bottom wings:


Three views of the red overspray, a thin application to allow the streaked camo to show through. I read in one of my references that many oversprayed applications of personal colors did not fully cover the streaked camo, particularly red and yellow which is confirmed in many photos of MVR's "other" red trimmed DR.1's.


The dust bits in the side view above are thankfully not permanent fixtures; strong reminder to thoroughly clean up before the clear topcoat goes on.
Next step is to take some up to date photos today and test my skills at getting them uploaded to photobucket. Computers save you "time" don't you know. I'm afraid in my case it's taking years off the "time" I have remaining at my advanced age. Hopefully I'll get my head around the new system and spend more time at the work bench & less wrestling with this, for now, challenging obstacle to progress!
Cheers,
Lance

The linen cross fields applied to top and bottom wings:
Three views of the red overspray, a thin application to allow the streaked camo to show through. I read in one of my references that many oversprayed applications of personal colors did not fully cover the streaked camo, particularly red and yellow which is confirmed in many photos of MVR's "other" red trimmed DR.1's.
The dust bits in the side view above are thankfully not permanent fixtures; strong reminder to thoroughly clean up before the clear topcoat goes on.
Next step is to take some up to date photos today and test my skills at getting them uploaded to photobucket. Computers save you "time" don't you know. I'm afraid in my case it's taking years off the "time" I have remaining at my advanced age. Hopefully I'll get my head around the new system and spend more time at the work bench & less wrestling with this, for now, challenging obstacle to progress!
Cheers,
Lance
lcarroll
Joined: July 26, 2010
KitMaker: 1,032 posts
AeroScale: 1,025 posts
Posted: Friday, January 06, 2012 - 06:01 AM UTC
More; hopefully I can remember how I got these photos onto photobucket so more can follow in future!
Quick shot of the cowling complete with the "hairspray weathering" results. The rivets were applied with a "Rosie the Riviter " tool, the photo reminds me to drop some silver or grey hi-liting into the depressions.

The forward underside with the new Piano Hinge added to the large access panel, doesn't show very well as I scaled it down significantly. A future shot after some hi-liting and weathering will better represent it.

Overall underside with Eduard Stitching and the light blue applied:

Two shots showing the undersides and "wrap around" of the blue:


I love how the dog hair turns up once the photo is enlarged here. We're having a spectacularly mild winter and my little 4 legged buddy is blowing his winter coat in record fashion. Maybe I'll post a photo sometime if there are any Alsatian/German Shepherd fans out there. Then again maybe not?! (Off topic!)
I am now up to date: it's back to the bench thankfully as I must admit it's far more enjoyable and relaxing then "re-inventing the wheel" with a new PC and programs. The big challenge is to remember how I got this entry done the next time!
As always comments and suggestions most welcome.
Cheers,
Lance
Quick shot of the cowling complete with the "hairspray weathering" results. The rivets were applied with a "Rosie the Riviter " tool, the photo reminds me to drop some silver or grey hi-liting into the depressions.
The forward underside with the new Piano Hinge added to the large access panel, doesn't show very well as I scaled it down significantly. A future shot after some hi-liting and weathering will better represent it.
Overall underside with Eduard Stitching and the light blue applied:
Two shots showing the undersides and "wrap around" of the blue:
I love how the dog hair turns up once the photo is enlarged here. We're having a spectacularly mild winter and my little 4 legged buddy is blowing his winter coat in record fashion. Maybe I'll post a photo sometime if there are any Alsatian/German Shepherd fans out there. Then again maybe not?! (Off topic!)
I am now up to date: it's back to the bench thankfully as I must admit it's far more enjoyable and relaxing then "re-inventing the wheel" with a new PC and programs. The big challenge is to remember how I got this entry done the next time!
As always comments and suggestions most welcome.
Cheers,
Lance

Mgunns
Joined: December 12, 2008
KitMaker: 1,423 posts
AeroScale: 1,319 posts

Posted: Friday, January 06, 2012 - 03:04 PM UTC
Hello Lance:
The cockpit is really neat. It is busy, but not cluttered and looks to be functional as well. I like the discussion and it sounds as from your research you took the best guess approach. As you mentioned in two years we will be at the 100th anniversary of the "great war". My grandfather served in the U.S. Army, never deployed, but served none the less. It is hard to imagine that it is now 100 years ago. Your tripe is progressing nicely and I am looking forward to the next installation.
As Stephen would say, "Model on".
Best
Mark

Jessie_C

Joined: September 03, 2009
KitMaker: 6,965 posts
AeroScale: 6,247 posts

Posted: Friday, January 06, 2012 - 03:55 PM UTC
Do you still have one of your old uniforms? Take it out and hang it near your workbench. All the dog hair will magically zip onto the uniform 
That paintjob is among the best I've ever seen for this aircraft. I have the Hobbycraft 1/28 Revell knockoff that I have long intended to do in this scheme and I've been reluctant because I've feared I can't do it justice.
That paintjob is among the best I've ever seen for this aircraft. I have the Hobbycraft 1/28 Revell knockoff that I have long intended to do in this scheme and I've been reluctant because I've feared I can't do it justice.
Mgunns
Joined: December 12, 2008
KitMaker: 1,423 posts
AeroScale: 1,319 posts
Posted: Friday, January 06, 2012 - 04:00 PM UTC
Quoted Text
...I have the Hobbycraft 1/28 Revell knockoff that I have long intended to do in this scheme and I've been reluctant because I've feared I can't do it justice.
Hello Jessie C: Take it out of the box, and do it. It will be a learning experience, and will probably turn out better than you ever thought it would.
Good luck
Mark
lcarroll
Joined: July 26, 2010
KitMaker: 1,032 posts
AeroScale: 1,025 posts
Posted: Saturday, January 07, 2012 - 07:56 AM UTC
Quoted Text
Hello Lance:
The cockpit is really neat. It is busy, but not cluttered and looks to be functional as well. I like the discussion and it sounds as from your research you took the best guess approach. As you mentioned in two years we will be at the 100th anniversary of the "great war". My grandfather served in the U.S. Army, never deployed, but served none the less. It is hard to imagine that it is now 100 years ago. Your tripe is progressing nicely and I am looking forward to the next installation.
As Stephen would say, "Model on".
Best
Mark
Mark,
The best of all inputs combined with a "best guess" is how I approached the seat belt and cockpit layout. In the lattter case I think it's reasonably safe to assume that some of the different presentations we see in available references are the result of unit changes or mods. in the field as is still practiced today, albeit to a much lessor degree.
As for the 100th Anniv. of WWI I too find it hard to believe as well. My Grandfather served in France and Belgium with the Canadian Army, had a tough war from what I'm told and, unfortunately, died at an early age before I was born. That generation throughout the world can only be admired; they truly believed in their cause(s) and followed through.
Thanks for the compliment on the DR.1, she's a bit of a bear but overall a nice kit and I'm looking forward to the completion.
Cheers,
Lance
lcarroll
Joined: July 26, 2010
KitMaker: 1,032 posts
AeroScale: 1,025 posts
Posted: Saturday, January 07, 2012 - 09:31 AM UTC
Quoted Text
Do you still have one of your old uniforms? Take it out and hang it near your workbench. All the dog hair will magically zip onto the uniform
That paintjob is among the best I've ever seen for this aircraft. I have the Hobbycraft 1/28 Revell knockoff that I have long intended to do in this scheme and I've been reluctant because I've feared I can't do it justice.
Jessie,
I'm with Mark, take it out of the box and "get at it"! Thanks for the endorsement, the streaking isn't that tough if you try it out on some scrap first to iron out the bugs.
As for the uniform solution to the dog hair thing, Wow, do I remember that phenomenon. Since it won't fit anymore I may give it a try; I swear the "spec" for CF Uniforms included magnetic hair qualities however at least it didn't show as badly on light blue as it would have on Navy dark blue. That was probably awarded to the "Senior Service" in recognition of your unique status!
Cheers,
Lance


OEFFAG_153

Joined: February 19, 2010
KitMaker: 1,473 posts
AeroScale: 1,450 posts
Posted: Sunday, January 08, 2012 - 08:38 PM UTC
Wow Lance, you've been busy very nice progress I really like the way this is going
Mikael
Mikael
lcarroll
Joined: July 26, 2010
KitMaker: 1,032 posts
AeroScale: 1,025 posts
Posted: Monday, January 09, 2012 - 02:02 AM UTC
Quoted Text
Wow Lance, you've been busy very nice progress I really like the way this is going
Mikael
Thanks for the encouragement Mikeal. Got the decals on last night and hope to get a coat of semi-gloss overcoat done today. Also completing the brass landing gear struts. I'll attempt a photo update later today or tomorrow.
Cheers,
Lance
Mgunns
Joined: December 12, 2008
KitMaker: 1,423 posts
AeroScale: 1,319 posts
Posted: Monday, January 09, 2012 - 02:11 AM UTC
Quoted Text
As for the uniform solution to the dog hair thing, Wow, do I remember that phenomenon. Since it won't fit anymore I may give it a try; I swear the "spec" for CF Uniforms included magnetic hair qualities... Lance
Hello Lance: I don't the CF had the market on Animal Hair Magnetism specs in their uniforms. I remember my USMC winter service "A" had the same quality to include not only dog hair, but all manner of lint as well. Truly a phenomenon!
Mark

lcarroll
Joined: July 26, 2010
KitMaker: 1,032 posts
AeroScale: 1,025 posts
Posted: Monday, January 09, 2012 - 11:12 AM UTC
Another progress update; managed to defeat the gods of software and get some photos on board.
The entire structure(s) were given 2 coats of Micro Gloss in lieu of Future which gave me a hard time on my previous project. After an overnight drying period the decals were applied using a mix of Pheon's DR.1 Sheet (Excellent) and some spares from WNW's DVa Kit.(also top quality) I attempted to use the Roden Decals and as I feared they were a "throw-away exercise" save one which I used of necessity after a bit of a set-back. I spilled a full bottle of Microset soaking a bunch of decals still to be applied, salvaged all but one lower wing cross which rolled up in a ball and turned into a string I could not untie. At that point I was forced to use one of the Roden crosses (took both to get one to work albeit in three pieces.) Very exciting and tense moments!
Again the decals were left to dry overnight and then the works got a coat of Model Master Acryl Semi Gloss.
Shot from the top; my horrible lighting washes out portions of the red areas however the streaking shows through uniformly on the model.

Side views, the numbers were applied using the Pheon extra ones to get the proper S/N. No Werk Number was applied just behind the cowling as it is absent in my photos and refs state this one was often not applied.

The bits of stuff on the turtle deck are not permanent, just pieces of foam from my foam anchor board.

And last a view of the underside and Yes! the crosses are slightly different due to my f&*&%^% flying finger fumble event with the Microset..............(Aliteration as I recall from my one room Grade 5 School House)
Still a long way to go to completion. Next I'll install the Cellon inspection window on the top wing. Also need to add the rectangular inspection door on the left centerline adjacent to the cowling which was a non typical feature of this airframe. I should have done so earlier however hopefully an easy fix. Last, more work on the brass Landing Gear struts, finishing and installing of the forward upper deck, and the list goes on.
Still very much enjoying this build, most (if not all) problems so far have been "self-induced" for sure.
Thanks for the encouragement to date and don't be shy with suggestions or comments.
Cheers,
Lance
The entire structure(s) were given 2 coats of Micro Gloss in lieu of Future which gave me a hard time on my previous project. After an overnight drying period the decals were applied using a mix of Pheon's DR.1 Sheet (Excellent) and some spares from WNW's DVa Kit.(also top quality) I attempted to use the Roden Decals and as I feared they were a "throw-away exercise" save one which I used of necessity after a bit of a set-back. I spilled a full bottle of Microset soaking a bunch of decals still to be applied, salvaged all but one lower wing cross which rolled up in a ball and turned into a string I could not untie. At that point I was forced to use one of the Roden crosses (took both to get one to work albeit in three pieces.) Very exciting and tense moments!
Again the decals were left to dry overnight and then the works got a coat of Model Master Acryl Semi Gloss.
Shot from the top; my horrible lighting washes out portions of the red areas however the streaking shows through uniformly on the model.
Side views, the numbers were applied using the Pheon extra ones to get the proper S/N. No Werk Number was applied just behind the cowling as it is absent in my photos and refs state this one was often not applied.
The bits of stuff on the turtle deck are not permanent, just pieces of foam from my foam anchor board.
And last a view of the underside and Yes! the crosses are slightly different due to my f&*&%^% flying finger fumble event with the Microset..............(Aliteration as I recall from my one room Grade 5 School House)
Still a long way to go to completion. Next I'll install the Cellon inspection window on the top wing. Also need to add the rectangular inspection door on the left centerline adjacent to the cowling which was a non typical feature of this airframe. I should have done so earlier however hopefully an easy fix. Last, more work on the brass Landing Gear struts, finishing and installing of the forward upper deck, and the list goes on.
Still very much enjoying this build, most (if not all) problems so far have been "self-induced" for sure.
Thanks for the encouragement to date and don't be shy with suggestions or comments.
Cheers,
Lance
lcarroll
Joined: July 26, 2010
KitMaker: 1,032 posts
AeroScale: 1,025 posts
Posted: Friday, January 13, 2012 - 06:56 AM UTC
More progress to report; mostly good with a (hopefully) fixable bad ending!
The brass landing gear struts are done. I used the blue (1mm) "STRUTZ" brass tubing with CA joins to Evergreen styrene bottom joins. Some touch up and sanding cleaned them up nicely and they are trimmed to fit. A spray coat of the red completed the job.

....and the finished product.

Also completed the Celon Inspection window for the upper wing using clear styrene salvaged from a blister pak painted wood brown on the bottom face and added the unique (for Jasta 11) rectangular magneto inspection door to the port forward cowling area. The dent in the window is from application with a pin for alignment; the camera really shows not so apparent flaws in machro mode for sure.


The firewall was shaved down to provide a recess behind the cowling to add the cowling retention cable later.

The guns and flash shields are ready to install on the forward upper deck panel.

Last, the fuel and oil filler caps were made from styrene using the Waldron Punch tool, painted, and are ready to install.

And then the problems started. Getting a decent fit of the cowling over the middle wing was a huge problem, and the results are very poor.The gap between the top of the wing and the cowling was too apparent and I attempted to fill it in with CA with poor results. After scanning a million photos I determined that the gap varied considerably on the aircraft, a photo of Stark in 146/17 showed a considerable space so I painted over the CA and left it for a day.


This A.M. I had a fit of AMS and decided I couldn't live with it as is; my next step is to go crazy with a razor saw and some de-bonder and remove it. During dry fitting the cowling fitted nicely over the wing fairings; my mistake was attaching the wing to the fuselage (to "catch" the interplane struts) rather then to the cowling and then trying to fit the cowling over top if that makes sense. Hope this confession will save some future builder the pain!!
I feel like the proverbial first man to ever eat a raw oyster.........hopefully the demolition exercise goes well and the job can be redone properly! More of which next time....
Cheers,
Lance
The brass landing gear struts are done. I used the blue (1mm) "STRUTZ" brass tubing with CA joins to Evergreen styrene bottom joins. Some touch up and sanding cleaned them up nicely and they are trimmed to fit. A spray coat of the red completed the job.
....and the finished product.
Also completed the Celon Inspection window for the upper wing using clear styrene salvaged from a blister pak painted wood brown on the bottom face and added the unique (for Jasta 11) rectangular magneto inspection door to the port forward cowling area. The dent in the window is from application with a pin for alignment; the camera really shows not so apparent flaws in machro mode for sure.
The firewall was shaved down to provide a recess behind the cowling to add the cowling retention cable later.
The guns and flash shields are ready to install on the forward upper deck panel.
Last, the fuel and oil filler caps were made from styrene using the Waldron Punch tool, painted, and are ready to install.
And then the problems started. Getting a decent fit of the cowling over the middle wing was a huge problem, and the results are very poor.The gap between the top of the wing and the cowling was too apparent and I attempted to fill it in with CA with poor results. After scanning a million photos I determined that the gap varied considerably on the aircraft, a photo of Stark in 146/17 showed a considerable space so I painted over the CA and left it for a day.
This A.M. I had a fit of AMS and decided I couldn't live with it as is; my next step is to go crazy with a razor saw and some de-bonder and remove it. During dry fitting the cowling fitted nicely over the wing fairings; my mistake was attaching the wing to the fuselage (to "catch" the interplane struts) rather then to the cowling and then trying to fit the cowling over top if that makes sense. Hope this confession will save some future builder the pain!!
I feel like the proverbial first man to ever eat a raw oyster.........hopefully the demolition exercise goes well and the job can be redone properly! More of which next time....
Cheers,
Lance
Mgunns
Joined: December 12, 2008
KitMaker: 1,423 posts
AeroScale: 1,319 posts
Posted: Friday, January 13, 2012 - 07:12 AM UTC
Hi Lance:
There always seems to be something. It was coming a long nicely for you. Good luck with the surgery. The guns look nice, as does that little "leather" pouch in the cockpit.
Best
Mark
There always seems to be something. It was coming a long nicely for you. Good luck with the surgery. The guns look nice, as does that little "leather" pouch in the cockpit.
Best
Mark

Kornbeef

Joined: November 06, 2005
KitMaker: 1,667 posts
AeroScale: 1,551 posts

Posted: Friday, January 13, 2012 - 08:10 AM UTC
Lance, ref your cowl/coaming issues, There appears there was a lip where the metal coaming sat over the fuselage side, maybe an easy fix is to add this and sand the edge of the coaming join smooth, a less damaging repair route?
Thes things have a way of biting you in the bum when you are getting a little too comfortable for sure.
Keith
Thes things have a way of biting you in the bum when you are getting a little too comfortable for sure.
Keith
 |

WEB HOSTING BY


Copyright ©2021 AeroScale and Kitmaker Network, a subsidiary of Silver Star Enterprises
All Rights Reserved. Please read our Conditions of Use and Privacy Policy.
All Rights Reserved. Please read our Conditions of Use and Privacy Policy.