_GOTOBOTTOM
Early Aviation
Discuss World War I and the early years of aviation thru 1934.
KotS GB 2012 Albatros D.V - lcarroll
lcarroll
_VISITCOMMUNITY
Alberta, Canada
Joined: July 26, 2010
KitMaker: 1,032 posts
AeroScale: 1,025 posts
Posted: Sunday, April 01, 2012 - 04:26 AM UTC
I've decided to add a second build to this Campaign, the supurb Wingnut Wings Albatros DV. I've had this kit since shortly after it's release and have been gathering material and info for the build for some time. Per my last entry I'll be following what appears to be the Aeroscale Build Log format throughout. Having said that, I'll begin with the standard Box Art shot.

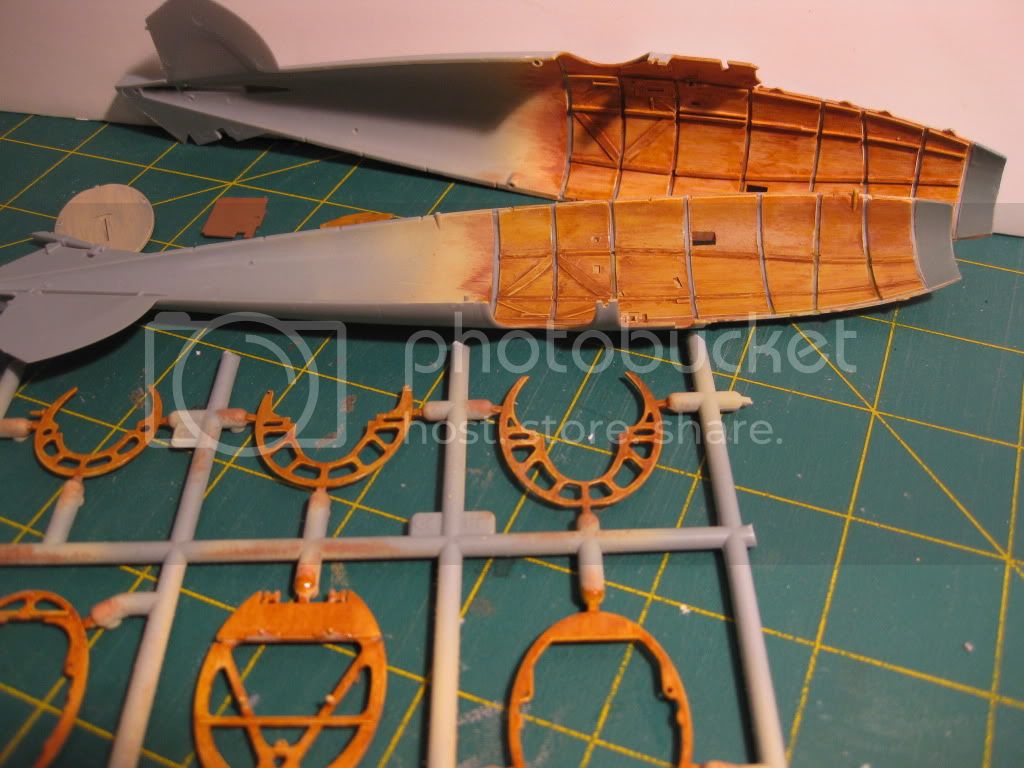
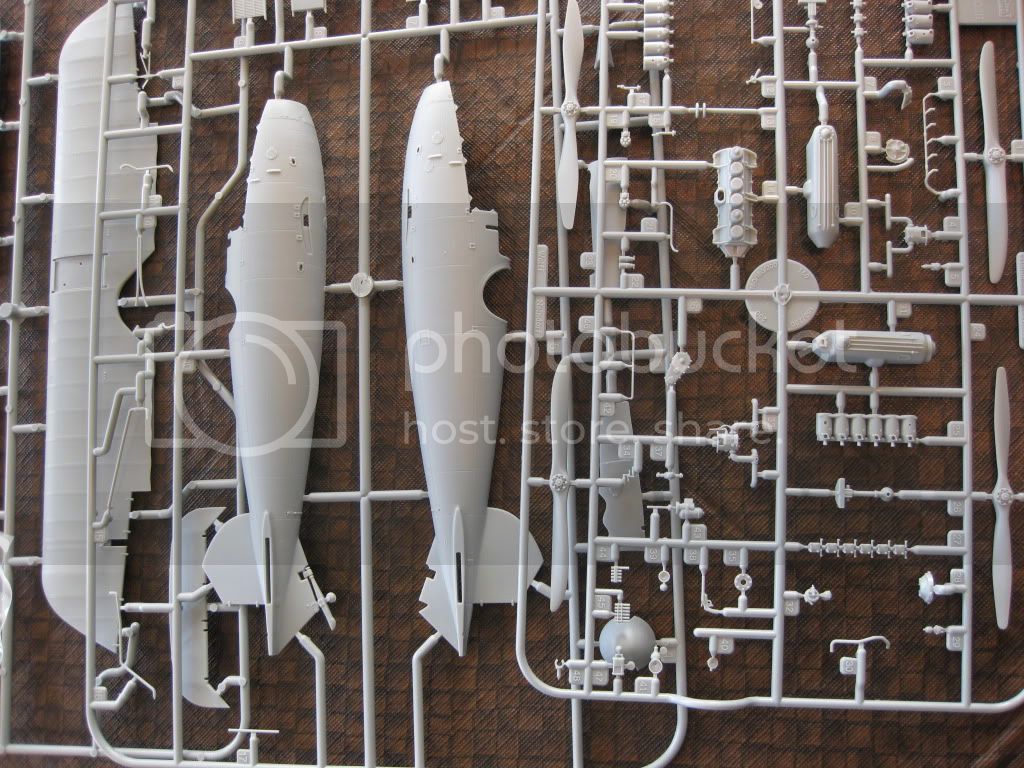
And the good old "sprues shot"! The sprues contain absolutely beautifully molded and detailed parts throughout. I'm also delighted that mine has nice straight wing components; apparently some of the earlier kits had warped/bent wings.

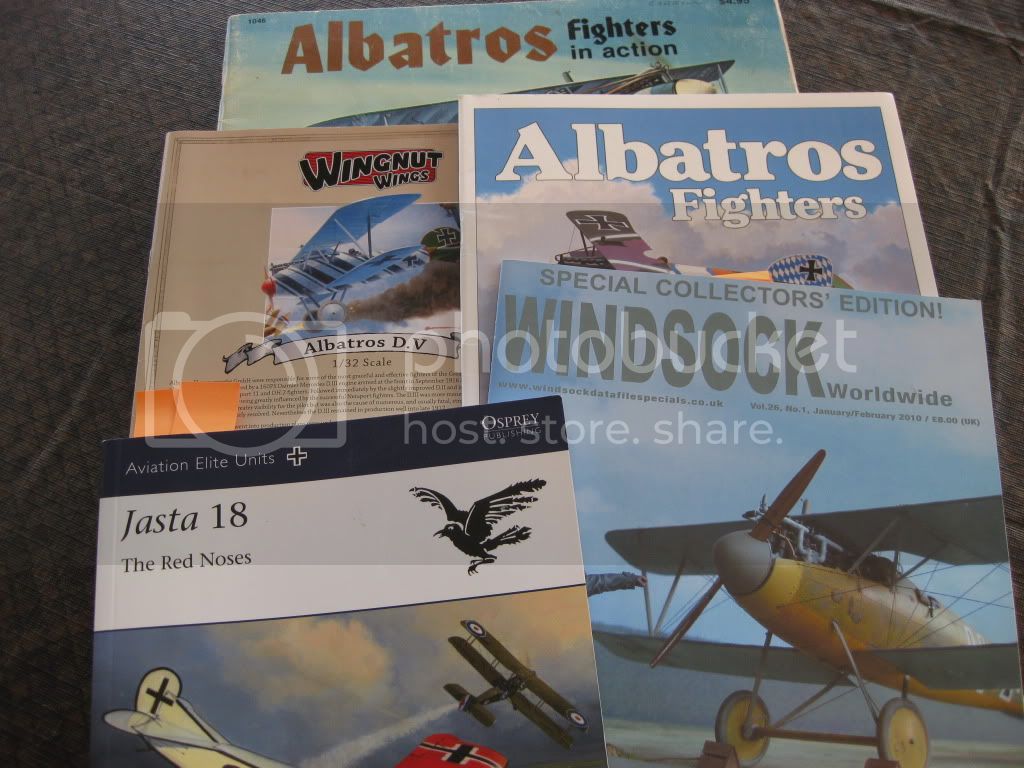
In addition to the KIt Instructions and the reference material on the WNW Website I'll be using a number of reference publications I've collected over the years.
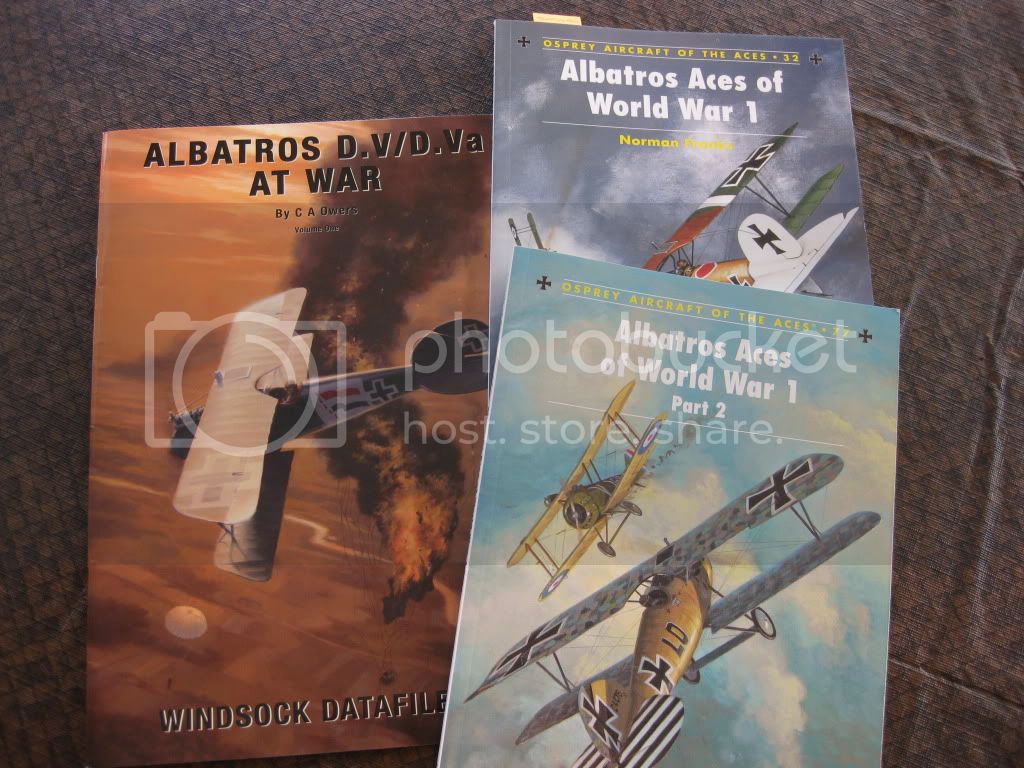
Notable among the Refs is the new Windsock Datafile #151, Albatros DV/Va at War which I just purchased last month and am very impressed with. The Windsock Worldwide from Jan/Feb 2010 has the original (Ray Rimmel?) BLOG which should prove very helpful. The Albatros Fighters Datafile Special, as is often the case with me, will no doubt be the most used of all. Their Specials are absolutely the greatest of references IMHO. Last, I've got several builds here bookmarked for reference along the way as well as the excellent thread that captures all the (minor) shortcomings and potential pitfalls of the kit.


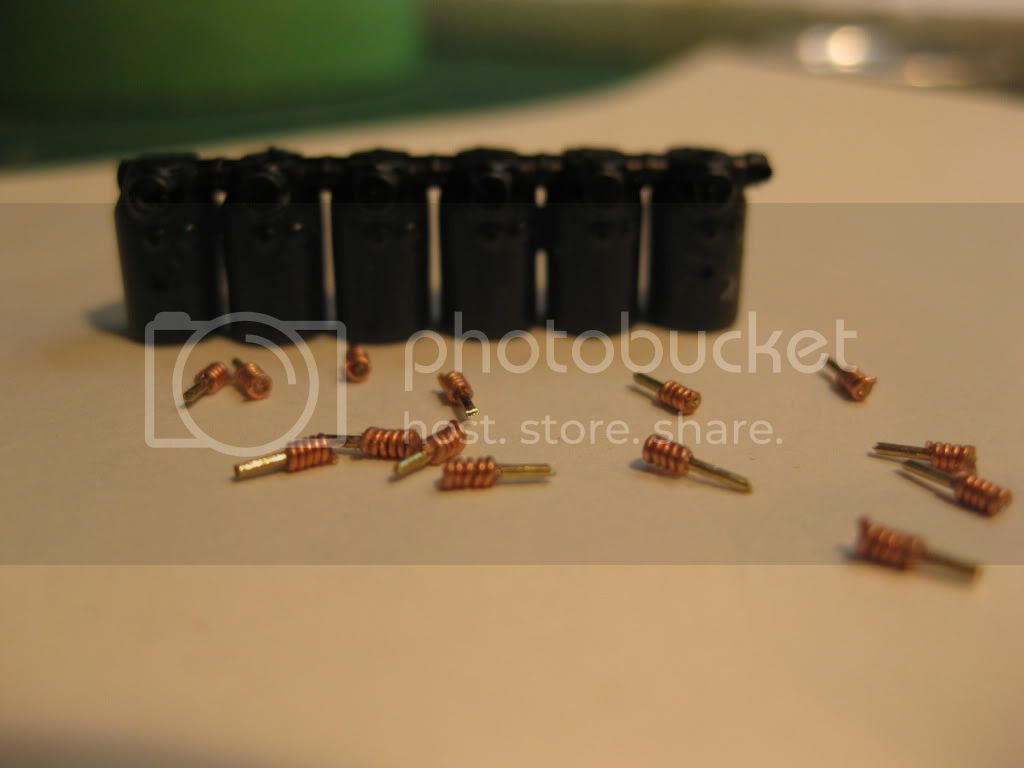
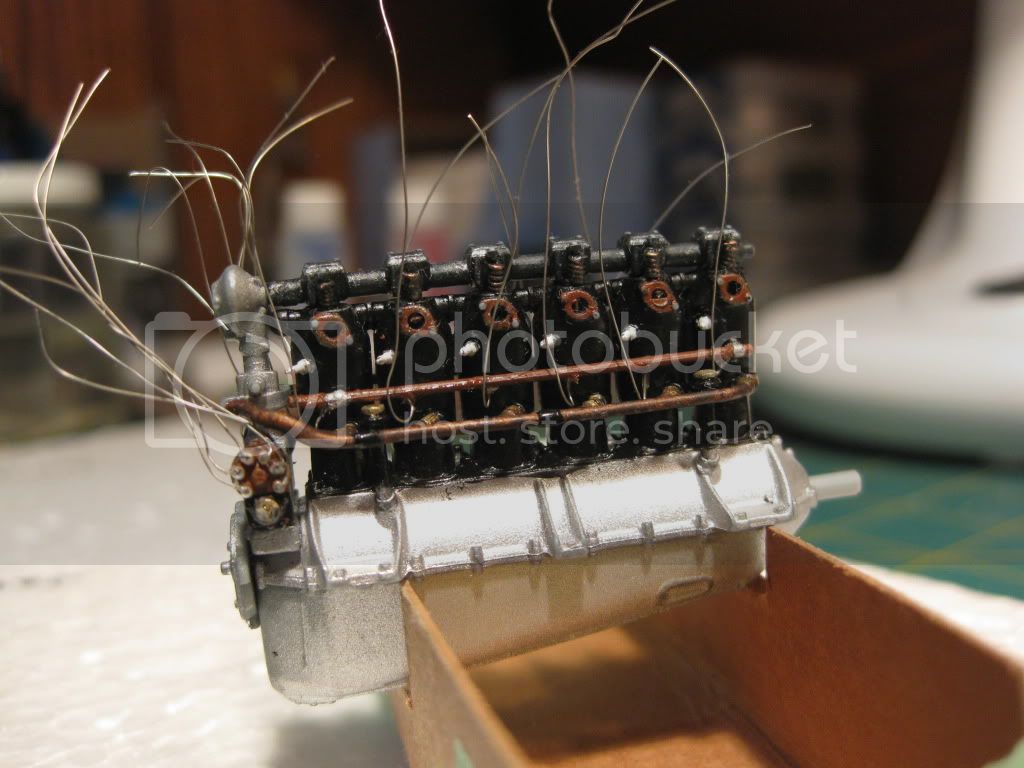
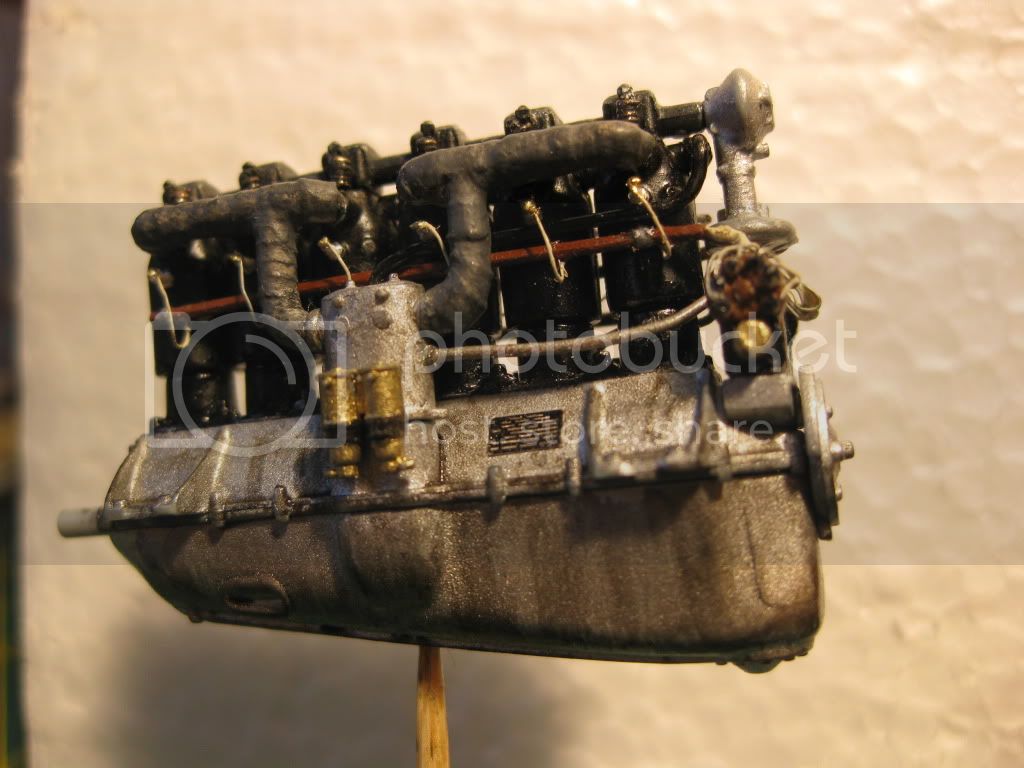
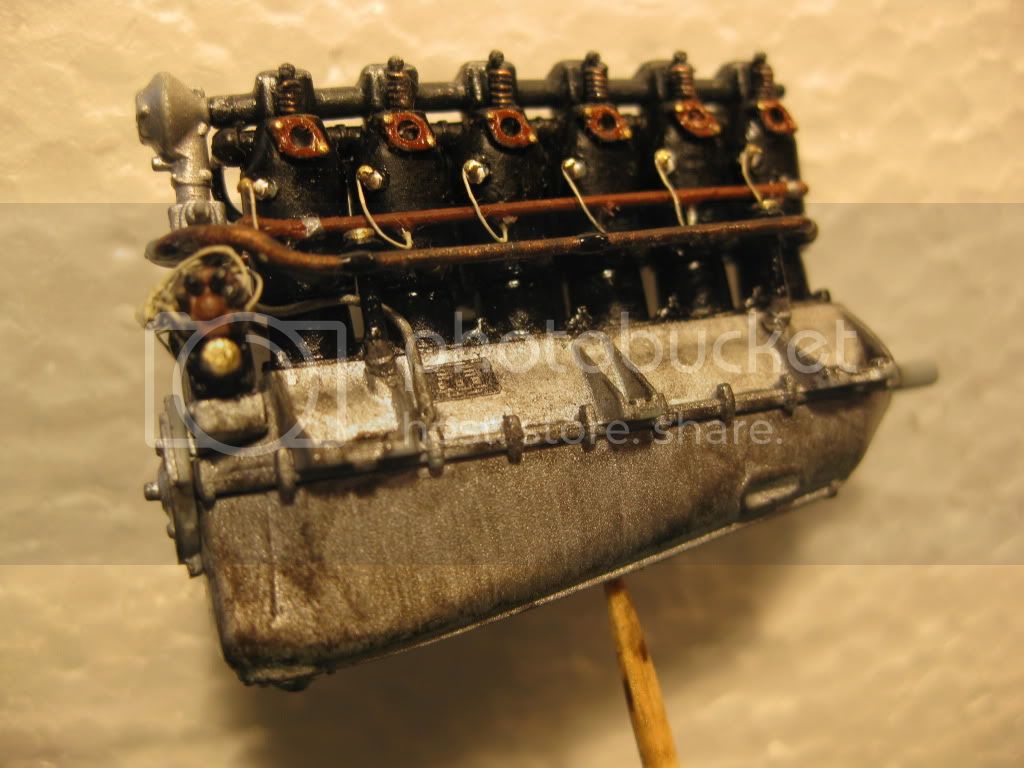
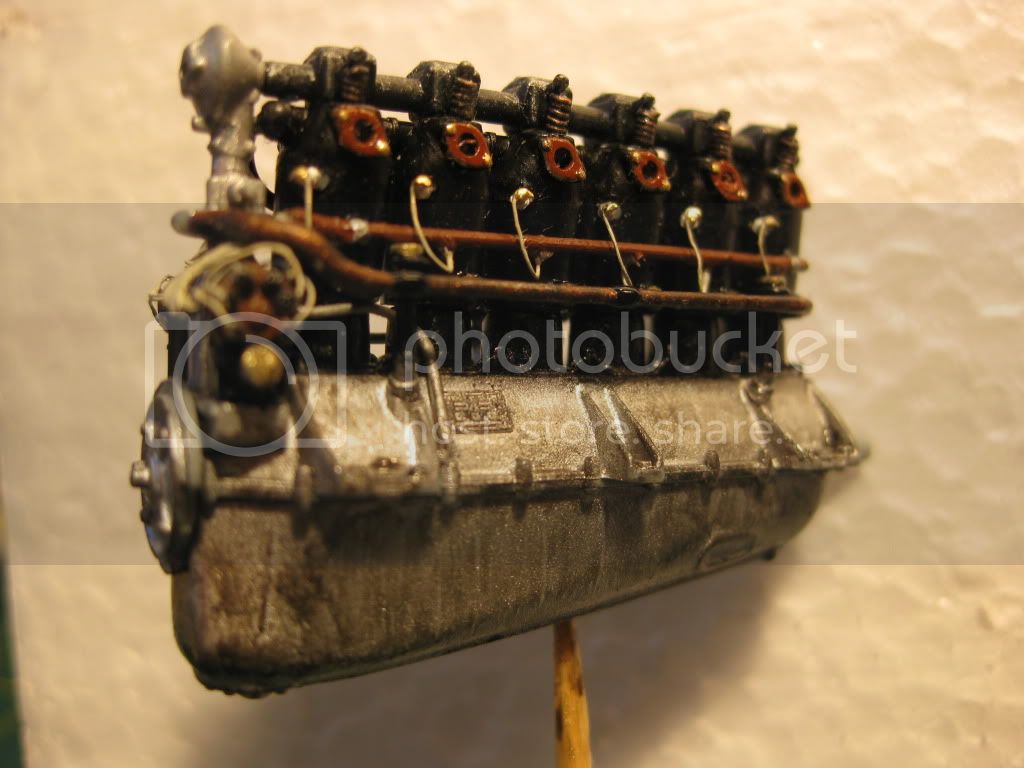
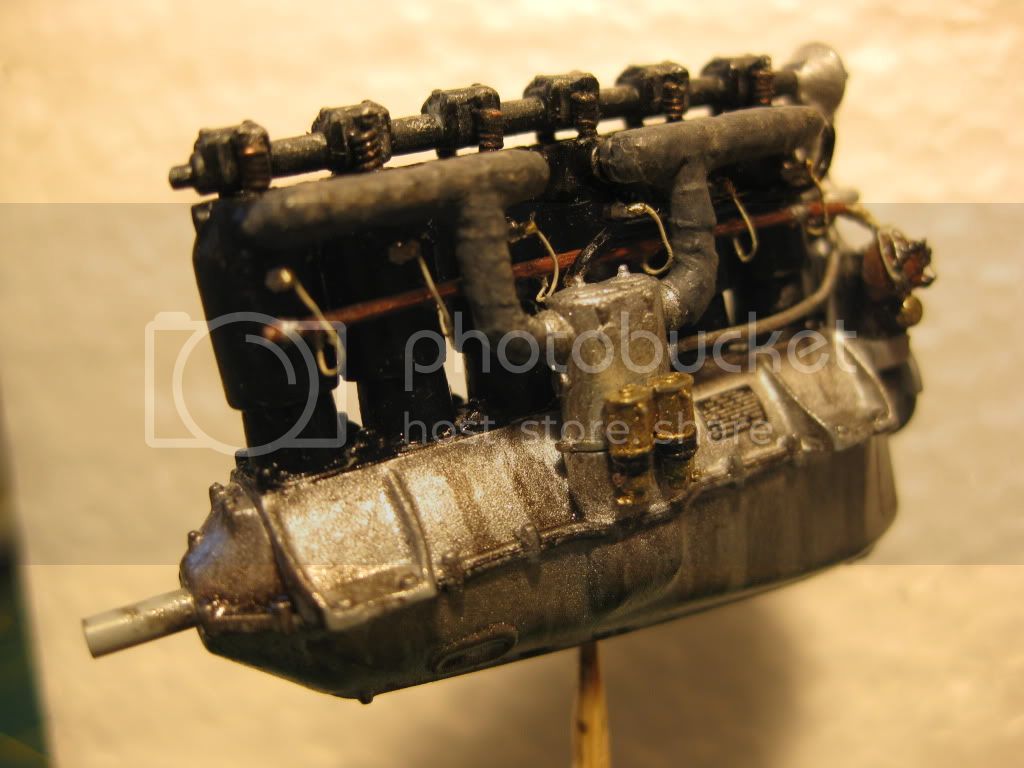
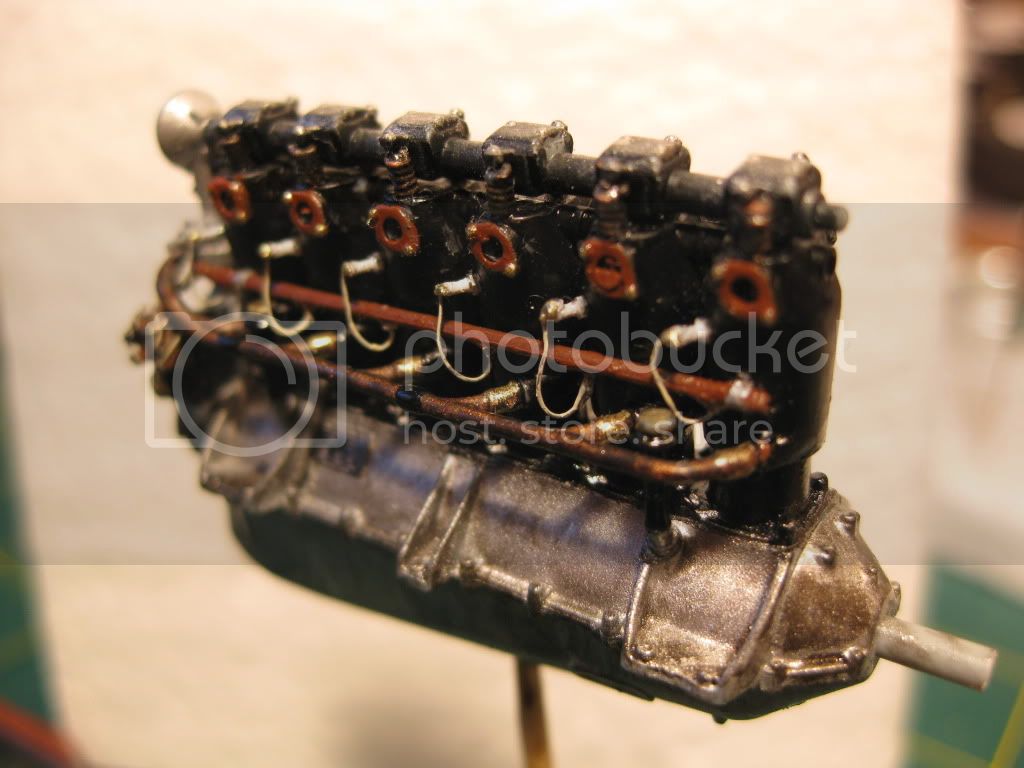
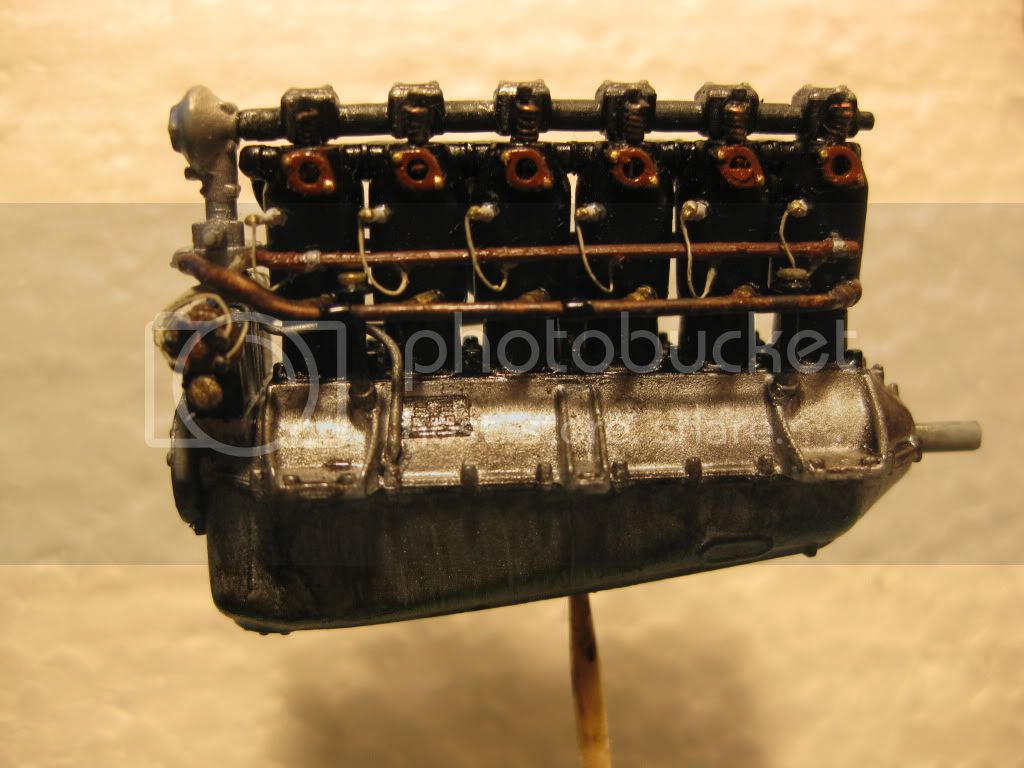
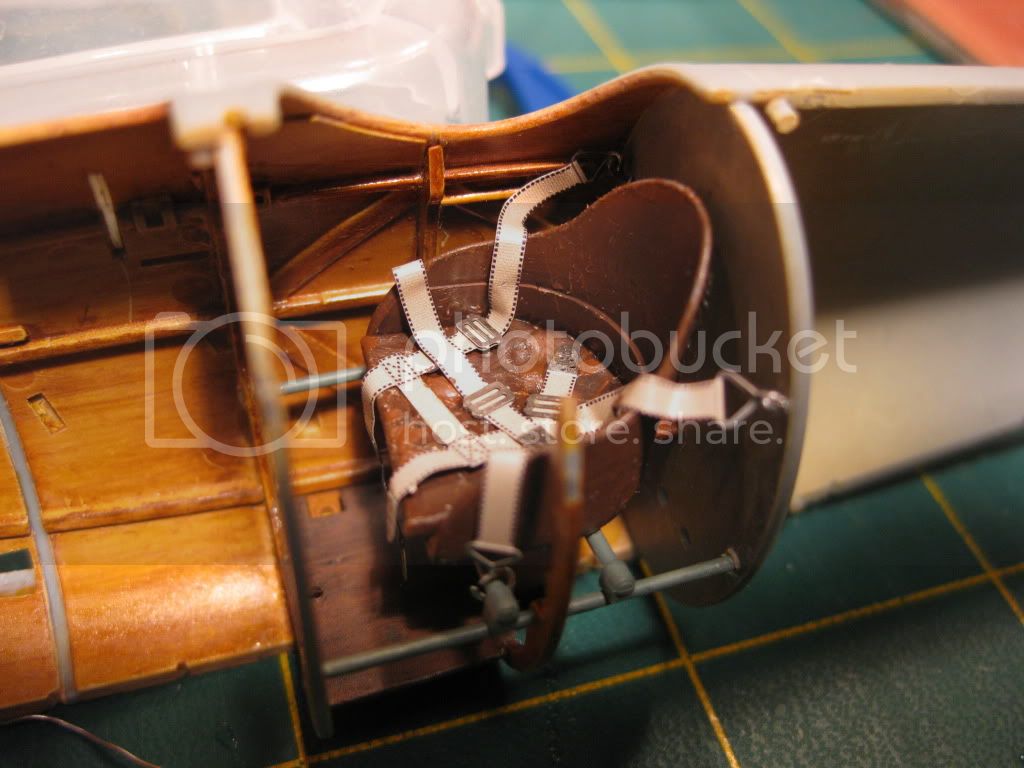
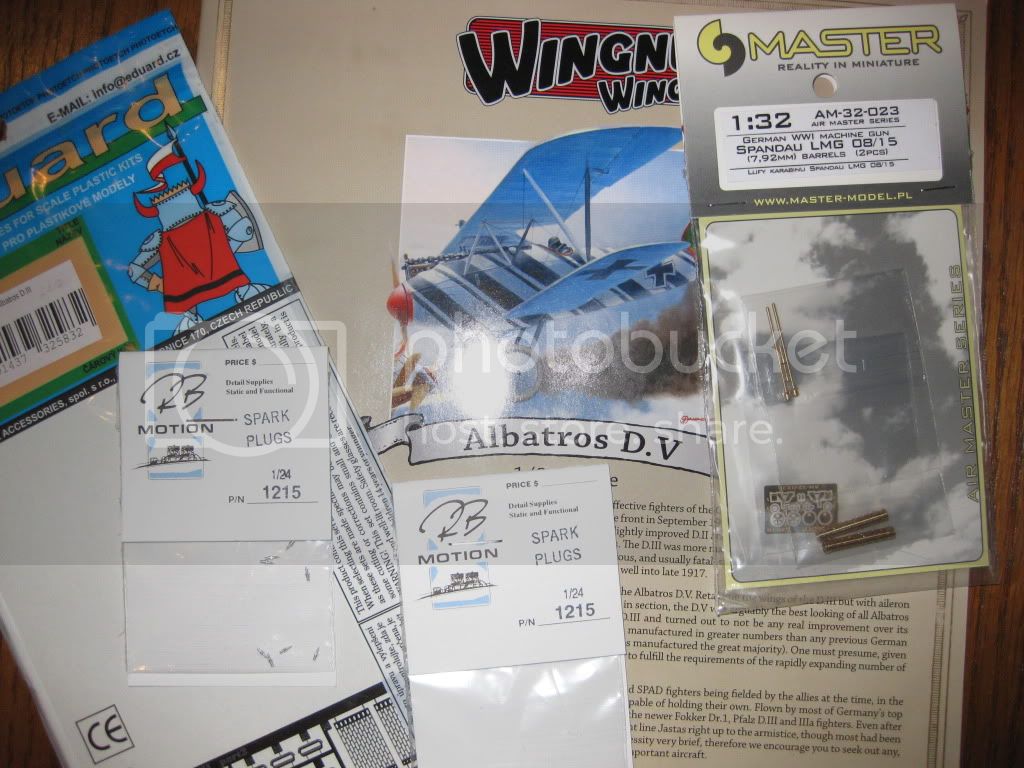
I'll be using several After Market items in this build. The Eduard Photo Etch Set, Air Master Series Spandaus, and for the engine I'm going to try the RB Motion 1/24th Auto Sparkplugs which I've seen several of our members use with great results. Standard and not illustrated are Bob's Buckles for the rigging.

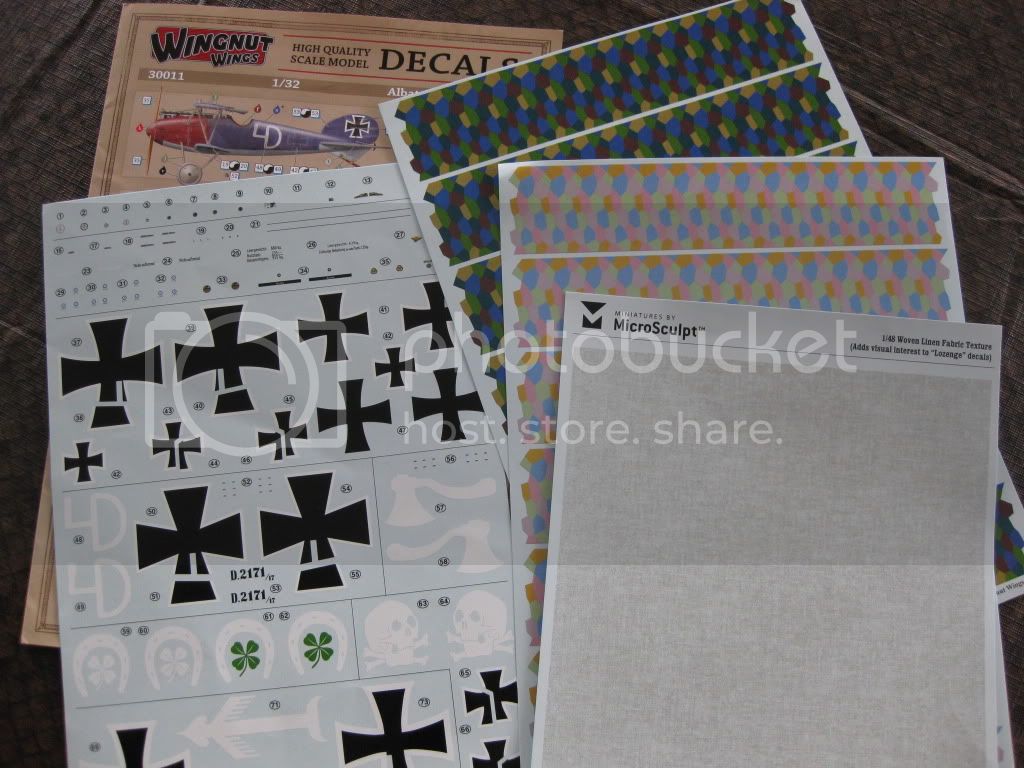
I've also amassed quite a lot of A/M Decals for this build. In addition to the excellent Kit Sheet I'll be using the WNW Sheet #30011 Albatros DV Jasta 18 Sheet, their upper and lower 5 colour Lozenge, and most likely the Microsculpt textures decals over the lozenge.

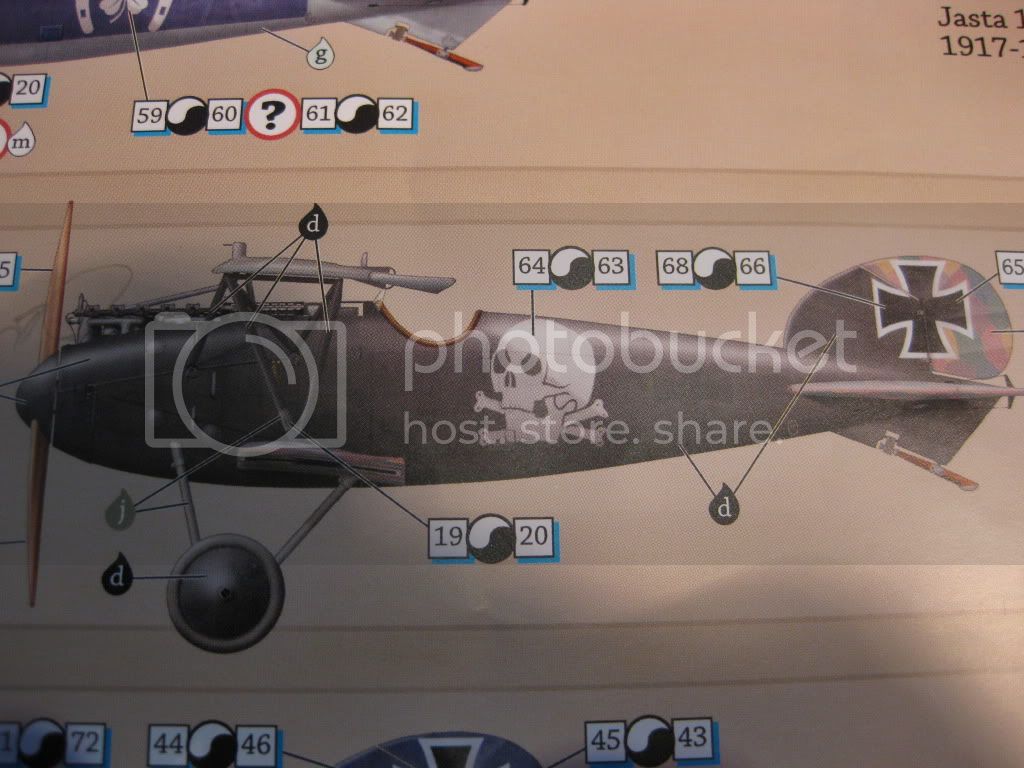
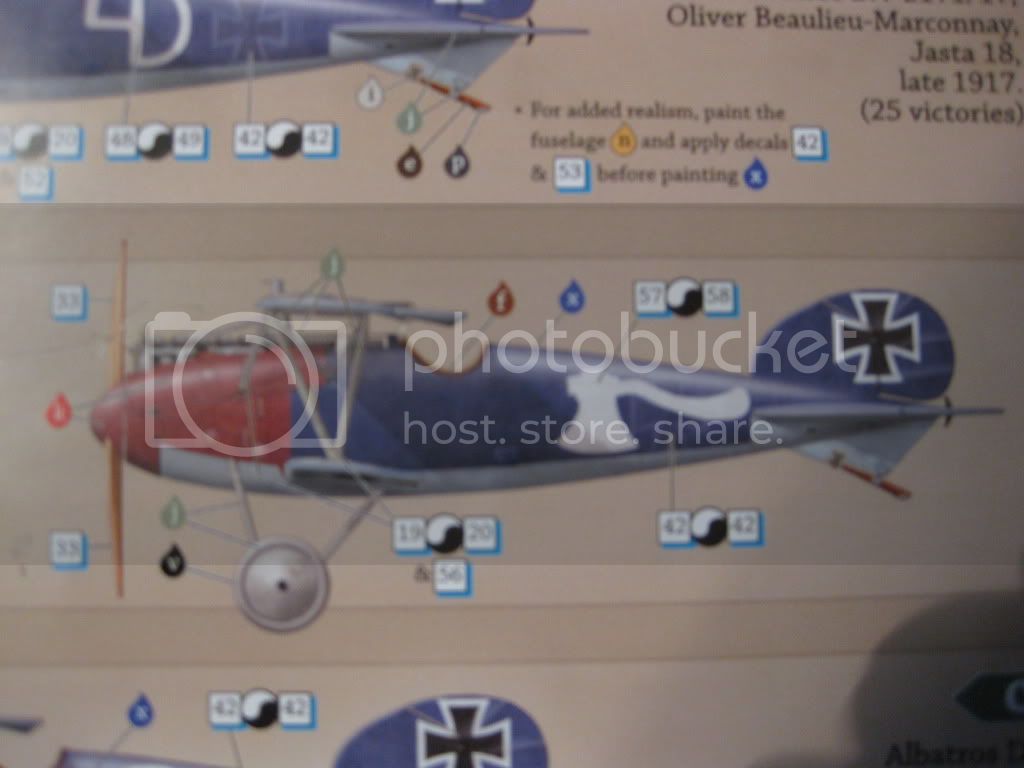
At this point I'm still trying to decide which of two aircraft I'll model; Kurt Monnington's black and lozenge "Totenkopf" version with Jasta 15 and then on to Jasta 18 or Paul Strahle's Jasta 18 red and blue with lozenge 4594/17. After seeing Mark's (Mgunns) beautiful black DIIIa I'm leaning hard towards the black scheme.


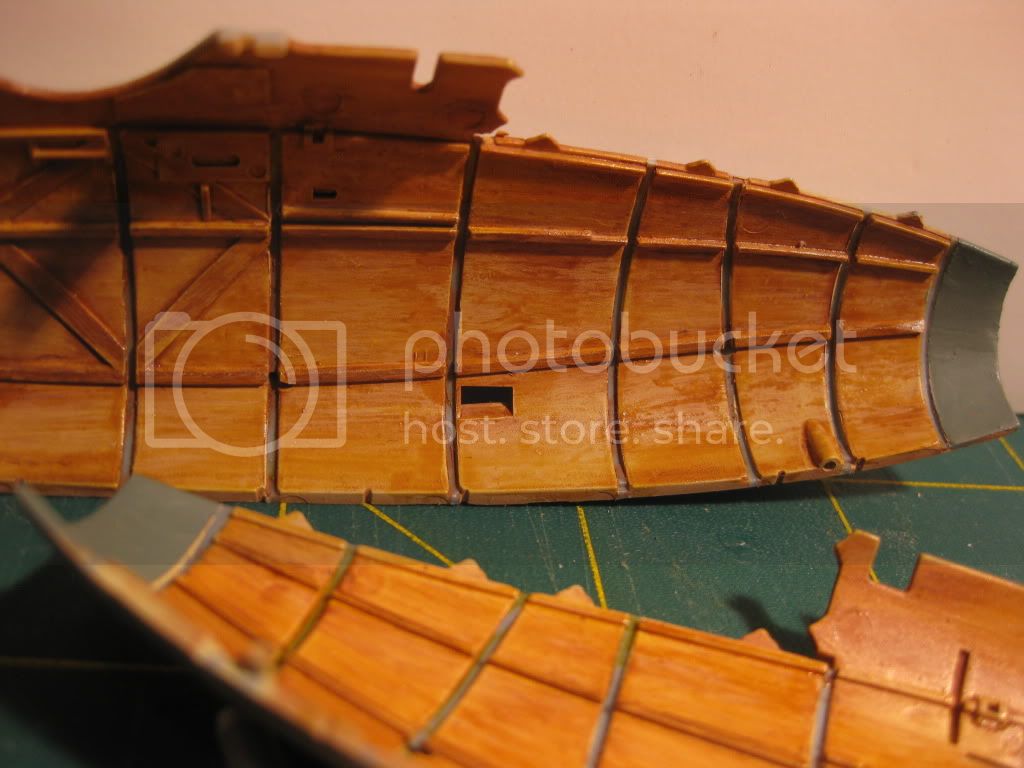
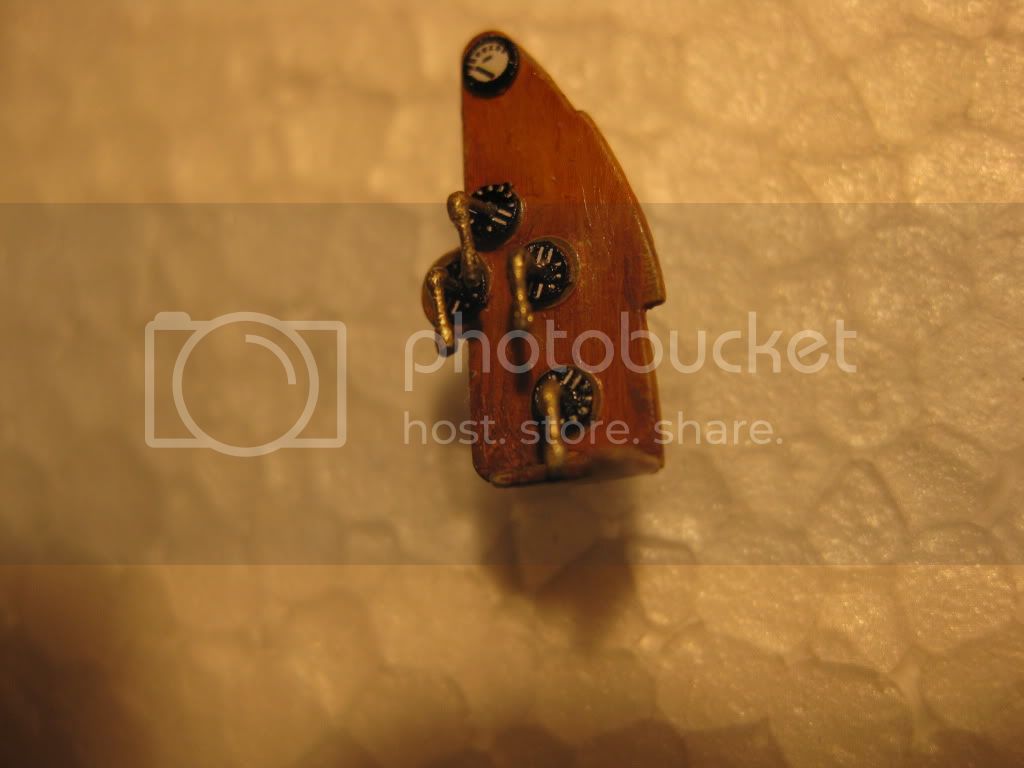
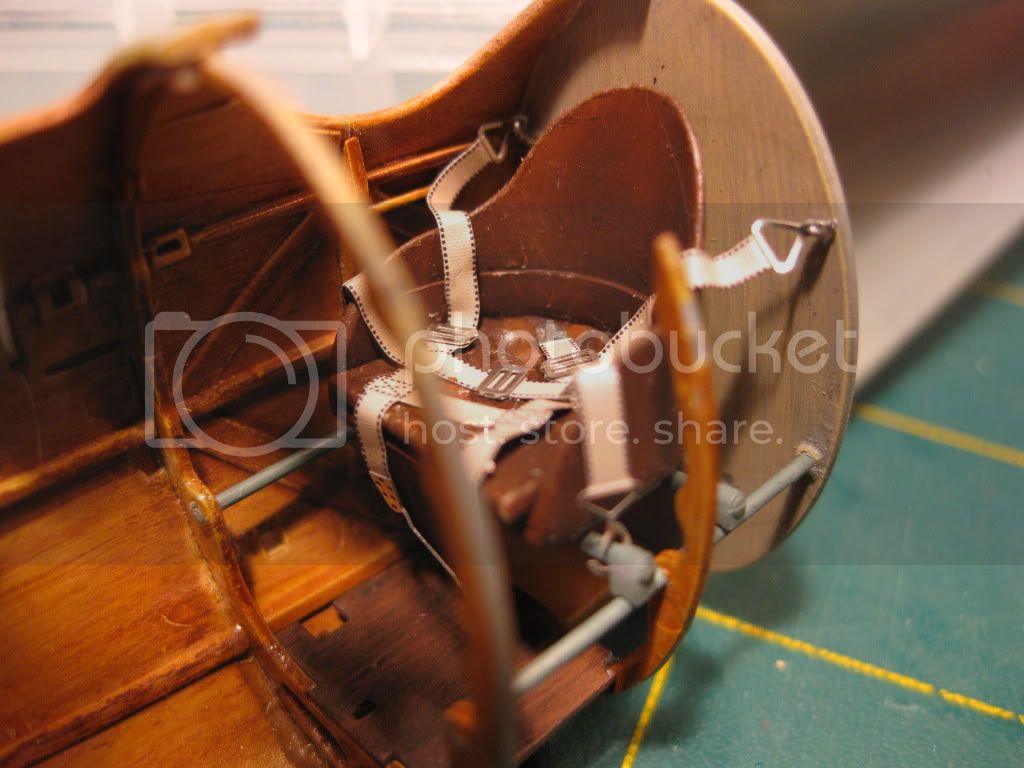
Yesterday I cleaned up and prepared the engine components and fuselage formers for painting. I intend to build the engine first followed by all the cockpit work. I'll probably install all the engine cowlings "buttoned up" and with the experience of this build hopefully do my DVa as a fully opened super detailed project. So many plans, so little time!
Any suggestions or recommendations from this point on much appreciated as always. This will be my third WNW build and the "Albie" is one of my all-time favorites; simply a beautiful machine and I'm really looking forward to this build.
Cheers,
Lance
mtnflyer
_VISITCOMMUNITY
Alberta, Canada
Joined: March 08, 2009
KitMaker: 394 posts
AeroScale: 360 posts
Posted: Sunday, April 01, 2012 - 04:49 AM UTC
A wonderful choice, Lance, and with excellent backup resources. I'll be making popcorn and watching with excited anticipation.
Kornbeef
_VISITCOMMUNITY
England - South East, United Kingdom
Joined: November 06, 2005
KitMaker: 1,667 posts
AeroScale: 1,551 posts
Posted: Sunday, April 01, 2012 - 05:00 AM UTC
A fine choice, I'll be interested to see how the texture decal comes out, I was thinking of a DV myself as a future project using the new HGW Loz and Microscale texture (Helps that Hannants now stock Microscale and HGW here now... and WNW kits so its a one stop shop so to speak.)

Personally I'd go with the Totenkopf profile... that means I can do the other.

Loking forwards to seeing what you do with this.

Pointers...

Try to dryfit the engine block while constructing the bearer assembly to ensure its square, check this assembly 4 times to make sure before it sets... it can loook right but be misaligned.

Lower wing attachment... well documented all over this forums builds worth some time getting it right early to save heartache later.


Missing fuel control levers.

Cowlings, if theres any misalignment during the build it will show when you button her up. If you are showing her cowled consider building the cylinder assembly and block seperate with just what you see detailed and slipping it into the opening once the fuselage is finished.


Detailing.... I won't bore you with I'm sure you've worked out the level of extra detail you want to add.fix. replace already.

Model on and enjoy

lcarroll
_VISITCOMMUNITY
Alberta, Canada
Joined: July 26, 2010
KitMaker: 1,032 posts
AeroScale: 1,025 posts
Posted: Sunday, April 01, 2012 - 08:56 AM UTC

Quoted Text

A wonderful choice, Lance, and with excellent backup resources. I'll be making popcorn and watching with excited anticipation.


Guy,
Thanks, it is one of my favorites as I said. Hope you don't nod off watching; this is going to be a slow, meticulous project.
Cheers,
Lance
lcarroll
_VISITCOMMUNITY
Alberta, Canada
Joined: July 26, 2010
KitMaker: 1,032 posts
AeroScale: 1,025 posts
Posted: Sunday, April 01, 2012 - 09:11 AM UTC
Keith,
Thanks for all the pointers and cautions; I'll mind them carefully.
Hannants sounds like a wonderful shop; HGW looks like great stuff however I've been "raped" so bad by the Customs/Border folks lately that I don't think it's worth the high cost. Exception seems to be Great Britain and New Zealand; it just slides through no problen, no charge.
I'm afraid if I got loose in a shop with WNW and the rest in stock I'd be in real trouble.
As for the choice of aircraft, I'm still waiting for a reply to a query to Wingnut Wings on their sources for the black bird; only photos I can locate show lozenge on the rudder but not the stab & elevator.
Do you mean Microsculpt vs. Microscale Texture Decals or is there a new source I've missed?
Now, back to the bench; presently making lifter springs for the top of the engine.
Cheers,
Lance
Kornbeef
_VISITCOMMUNITY
England - South East, United Kingdom
Joined: November 06, 2005
KitMaker: 1,667 posts
AeroScale: 1,551 posts
Posted: Sunday, April 01, 2012 - 10:55 AM UTC
yes, microwotsit... its the age dont you know... the one you show anyway.

As for VAT raped well its Europe so we get raped before the postman gets here. quite the oposite when oredering from WNW direct, still VAT but the carrier rapes us a little more just for the hell of it. I suppose everyone gets it form one end or another somehow.

Oh and as an after thought, dry fit the engine bearers and block into the fuselage and let it set off with the whole assembly an fuselage together to ensure its in alignment.

ATB with this beauty Keith
JackFlash
_VISITCOMMUNITY
Colorado, United States
Joined: January 25, 2004
KitMaker: 11,669 posts
AeroScale: 11,011 posts
Posted: Monday, April 02, 2012 - 01:53 PM UTC
Hhhhhmmmm the "Albatros at War" looks interesting. Maybe you could do a review on it for us?
Mgunns
_VISITCOMMUNITY
Arizona, United States
Joined: December 12, 2008
KitMaker: 1,423 posts
AeroScale: 1,319 posts
Posted: Monday, April 02, 2012 - 02:32 PM UTC
Holy Reference Material Lance: You have quite a bit of it there. As has already been said, be sure to check fitement of the engine formers as the cabane struts also fit into the small grooves of the formers. I am looking forward as you progress through this kit and what markings you eventually choose to use.

Best

Mark
lcarroll
_VISITCOMMUNITY
Alberta, Canada
Joined: July 26, 2010
KitMaker: 1,032 posts
AeroScale: 1,025 posts
Posted: Tuesday, April 03, 2012 - 01:49 AM UTC

Quoted Text

Hhhhhmmmm the "Albatros at War" looks interesting. Maybe you could do a review on it for us?


I'd be delighted. I'll submit through you per the last one; it'll take me a few weeks to cobble it together if that's acceptable.
Cheers,
Lance
lcarroll
_VISITCOMMUNITY
Alberta, Canada
Joined: July 26, 2010
KitMaker: 1,032 posts
AeroScale: 1,025 posts
Posted: Tuesday, April 03, 2012 - 01:59 AM UTC

Quoted Text

Holy Reference Material Lance: You have quite a bit of it there. As has already been said, be sure to check fitement of the engine formers as the cabane struts also fit into the small grooves of the formers. I am looking forward as you progress through this kit and what markings you eventually choose to use.

Best

Mark


Mark,
I'm pretty well settled on the Monnington black and lozenge version. I got confirmation of the sources for the colour scheme from WNW (my thread on DV/Va Engines below)so my mind's at ease with it's accuracy. Which leads to a quick question; what black paint did you use on your Degelow Pfalz?

Cheers,
Lance
Mgunns
_VISITCOMMUNITY
Arizona, United States
Joined: December 12, 2008
KitMaker: 1,423 posts
AeroScale: 1,319 posts
Posted: Tuesday, April 03, 2012 - 03:03 AM UTC
[/quote]
Which leads to a quick question; what black paint did you use on your Degelow Pfalz?

Cheers,
Lance [/quote]
Hi Lance:

I used Tamiya Acrylic Semi gloss thinned with MEK and Future: I know, a lethal mix; but I use a respirator.

Looking forward to seeing you get started on this one.

Best

Mark
lcarroll
_VISITCOMMUNITY
Alberta, Canada
Joined: July 26, 2010
KitMaker: 1,032 posts
AeroScale: 1,025 posts
Posted: Sunday, April 08, 2012 - 02:39 AM UTC
Happy Easter to all!
Very little news on this Build; barely got started and Family arrived for a Long Holiday Weekend visit.
I started with a session building lifter springs as step one on the engine, fine copper wire over brass wire, old springs trimmed off the cylinder assembly and locator holes drilled for the individual springs. Once attached the rocker box assembly was installed.
The springs before painting and install:

I used very fine wire for the ignition harness both to the plugs and back at the magnetos; bit of a "hairy" mess at present and lots of time to schedule for attachment and painting once our "nest" becomes empty again. The ignition wire conduit had to be installed before wiring and also the water pipe below on the right side. Once cleaned up a bit and with the wires all completed and painted I believe it'll look quite realistic. A bit of dirt and weathering plus the remaining "plumbing " will add a lot as well.

Also got the base coat on for the fuselage interior; all former locations and lower wing attachment slots masked off per all the good advice recieved prior to starting..Thanks Folks!


And that snippet is all for now. I was later starting then I'd hoped, wanted to get going on a Book Review on the Windsock Albatros DV/Va at War book shown in the opening of this Blog.
More to follow soon, comments and suggestions as always most welcome.
Cheers,
Lance
Mgunns
_VISITCOMMUNITY
Arizona, United States
Joined: December 12, 2008
KitMaker: 1,423 posts
AeroScale: 1,319 posts
Posted: Sunday, April 08, 2012 - 05:33 AM UTC
Holy Valve Springs Lance! You are really going to town on this one. The Engine looks good up to this point. It looks like a real show stopper in the making here. Have you decided on a marking yet?

Best

Mark
mtnflyer
_VISITCOMMUNITY
Alberta, Canada
Joined: March 08, 2009
KitMaker: 394 posts
AeroScale: 360 posts
Posted: Sunday, April 08, 2012 - 05:36 AM UTC
Wow Lance!!!!!

I love your detail work. I absolutely admire your attention to detail.

Just wondering if you'll see it. Perhaps all that fine work for naught.

The first three cylinders are of serious concern. The rest are just modeling practice. But I guess you'll know its there. So I bow to your excellent modelling skill.

I think your like me. All or nothing. Its harder to model just parts.
lcarroll
_VISITCOMMUNITY
Alberta, Canada
Joined: July 26, 2010
KitMaker: 1,032 posts
AeroScale: 1,025 posts
Posted: Sunday, April 08, 2012 - 07:50 AM UTC
Mark,
I'm pretty well decided on the black and lozenge Jasta 15 scheme (Monnington) from the WNW Sheet. I can always switch to another until it's actually time to start the exterior paint. My second/backup choice from the same source, Jasta 18 (Paul Strahle) blue and red with the axe fuselage motif.

Guy,
If all continues O.K. I may be leaving off some panels. My original logic was practice/learn on this one and then go for the full deal on the DVa I have stashed. Not sure yet.......
Both of you Guys, thanks for the kind remarks; does wonders for a guy's confidence!
Cheers,
Lance
Emilio_Lizardo
_VISITCOMMUNITY
Missouri, United States
Joined: November 10, 2009
KitMaker: 27 posts
AeroScale: 26 posts
Posted: Monday, April 09, 2012 - 02:46 PM UTC
Did you mask the fuselage former stations with tape or did you use a liquid mask?
lcarroll
_VISITCOMMUNITY
Alberta, Canada
Joined: July 26, 2010
KitMaker: 1,032 posts
AeroScale: 1,025 posts
Posted: Tuesday, April 10, 2012 - 12:27 AM UTC

Quoted Text

Did you mask the fuselage former stations with tape or did you use a liquid mask?


David,
I used Tamiya Tape cut into strips; there were a few bits of green "painters" masking tape mixed in as well. The reason it looks a bit different is after I let the base coat dry I had a bit of a mental lapse (read "Senior's Moment"!)and removed the tape to see how it all worked. Then realized that I had to re-do it of course to protect the recesses from the coat of woodgrain and clear coat that follow.
Cheers,
Lance
gajouette
_VISITCOMMUNITY
Texas, United States
Joined: February 01, 2007
KitMaker: 365 posts
AeroScale: 356 posts
Posted: Tuesday, April 10, 2012 - 02:20 AM UTC
Lance,
Outstanding first porgress my friend.Love those additional details you've added to the Mercedes. What a excellent stack of reference books and A/M goody's too. Looking forward to one awesome Albatros project from your bench.
Highest Regards,
Gregory Jouette
thegirl
_VISITCOMMUNITY
Alberta, Canada
Joined: January 19, 2008
KitMaker: 6,743 posts
AeroScale: 6,151 posts
Posted: Tuesday, April 10, 2012 - 12:46 PM UTC
Off to a nice start so far there Lance
lcarroll
_VISITCOMMUNITY
Alberta, Canada
Joined: July 26, 2010
KitMaker: 1,032 posts
AeroScale: 1,025 posts
Posted: Wednesday, April 11, 2012 - 12:27 AM UTC
Terri, Gregory,
Thanks for the kind words; it is a great kit and has unlimited potential.
I'm almost finished with the engine; some good results, others............well, we'll see how they look when done. Hopefully photos by end of today or early tomorrow. Then it's time to turn the little workers loose in the cockpit, speaking of potential!
Cheers,
Lance
lcarroll
_VISITCOMMUNITY
Alberta, Canada
Joined: July 26, 2010
KitMaker: 1,032 posts
AeroScale: 1,025 posts
Posted: Wednesday, April 11, 2012 - 09:13 AM UTC
Finally made a little progress. The engine is as finished as it can be prior to installation, I'll put the air pump plumbing on along with the pump and the rad coolant lines once the engine is in place.
Additions to the engine were the ignition wires both at the plug and magneto ends. Two extra pipes: one from the intake assembly to the water pump (?) at the rear left side and another from the left crankcase seam (below Data Plate)to the same area. Both of these picked up from photos of the Daimler Mercedes DIII 160 PS versions. The only hard rule on configuration of plumbing appears to be there was no hard rule. I tried to replicate the most common layout(s).
Left side with the added steel coloured line;

And right side with the added line running up vertically on the left of the Data Plate;


The ignition wires were built from fine steel wire, the plugs are from a model vehicle AM source called RB Motion (they are sold as 1:24 Scale), and weathering/oil etc was done with Tamiya Smoke and flat black.As per all my builds I tend to go fairly heavy on the weathering. Having flown myself for 40 years a `Clean` aircraft meant no tanks and stuff hanging, like all machines they get dirty and tend to stay somewhat that way. The dirty look is also a great way to hide my minor slip ups! The intake manifolds (I think?!) were wrapped in Tamaya Tape, thin CA applied and a coat of Model Master Engine Grey followed by some "Smoke" highlites and a coat of Acryl Flat finished the job.
Some quick shots; obviously I'm not nuch of a photographer.


Now it's time to woodgrain the fuselage and frame members, then into the cockpit for at least a week. I always enjoy the cockpit detailing however the best part is admittedly calling it done.
More to follow soon...............and thanks for dropping by, comments always welcome.
Cheers,
Lance
Mgunns
_VISITCOMMUNITY
Arizona, United States
Joined: December 12, 2008
KitMaker: 1,423 posts
AeroScale: 1,319 posts
Posted: Friday, April 13, 2012 - 03:45 AM UTC
Hello Lance:

It is the journey, not the destination. You are obviously going to leave this opened up. The engine is really top notch Lance! The weathering is realistic, you can almost smell the oil and grease, and the valve springs enhance the whole appearance of it.
Looking forward to more.

Best
Mark
lcarroll
_VISITCOMMUNITY
Alberta, Canada
Joined: July 26, 2010
KitMaker: 1,032 posts
AeroScale: 1,025 posts
Posted: Friday, April 13, 2012 - 06:05 AM UTC
Thanks Mark,
I am leaning towards an open engine approach, depends on how the rest of it progresses. You are absolutely right about the "journey vs. the destination"; I find it inevitable in every build that I get immersed and down in the weeds and have to bring the desired end back into the picture. I had intended to "practice" on this engine and go for an open one on the DVa kit in future. Once I got started, and spent a great deal of time studying the references, AMS started to rage and here I am. I took an hour this morning to just go through the plans once more, check all the sprues, re-check a few things in my references, and decided the cockpit would have to get the "full meal deal" treatment as well. My good Wife may have a point when she states that "you may need professional help"! There is comfort in company however (and great company it is), a lot of us have the same affliction, one which brings infinitely more enjoyment to the hobby then the OOB approach.
Now it's back to the workbench to see how far I can go with the fuel control/valve sub panel. A couple of folks including you have mentioned the lack of valve handles; "we're off" he cried with a maniacal grin!
Cheers,
Lance
lcarroll
_VISITCOMMUNITY
Alberta, Canada
Joined: July 26, 2010
KitMaker: 1,032 posts
AeroScale: 1,025 posts
Posted: Friday, April 20, 2012 - 12:09 PM UTC
Not nearly as much progress in the past week as I had hoped for; my little part time job got in the way, such is the nature of real life!
I have completed the woodgrain on the interior and formers. I used a lighter base this time around; after some experimenting I settled on an enamel mix of 60% ModelMaster Radome Tan with 40% Humbrol Linen and I'm quite pleased with the result. I used my standard acrylic streaking mix of Raw Sienna and a touch of Burnt Sienna for the "graining" and finally an overcoat of Tamiya Clear Yellow.


The first cockpit item completed was the fuel control panel. As mentioned in several threads and reviews the levers are not included in the kit.(one of the very few shortfalls) The bases and gauge are from the Eduard DIII PE set, the bezels by Aeroclub, and the fuel levers/cocks were scratched from brass wire with several applications of thick CA on the "ends and bends" to achieve the shape. Yet to be added are the few fuel lines that project from the left rear side of the wood panel.


Last, I assembled the seat and cockpit former module. I found it a challenge to assemble this portion as the fit of the formers into the recesses in the fuselage sides is critical, especially for the second side when the fus. halves are mated. The tubular longerons below the seat were replaced with steel wire to tighten up the assembly and each former was glued in turn and verified with the second fus. half alignment. The seat was added last. I added a strip to the lower one third as seen in reference photos and built a cushion from styrene and wine bottle foil using a burnishing tool for the depressed buttons. Some lighter leather enamel touch ups were added, the leather portions "beat up and scratched" and further wear added with a bit of charcoal pigment and the Eduard PE Belts added.


And that's where I am presently; next is completion of the cockpit and then I can move my attention forward to the fuel, ammo, and engine bay areas.
Oh, and forgot to mention earlier, the tolerances on the formers to fuselage areas are as critical as many have stated; despite my best efforts at masking the "channels" on the fus. sides there was a lot of scraping done to get a good fit of the halves on dry fitting.
As always, comments welcome.
Cheers,
Lance
Kornbeef
_VISITCOMMUNITY
England - South East, United Kingdom
Joined: November 06, 2005
KitMaker: 1,667 posts
AeroScale: 1,551 posts
Posted: Friday, April 20, 2012 - 05:42 PM UTC
Coming along well Lance. Nice extra detail on the seat, Seats tend to get sort of ignored I dunno why as its the biggest thing in the cockpit after all. Yes those pesky strengthener/seat rails, I replaced them too, not by choice after strugling dry fitting the tight interior they gave up the ghost and snapped.

Keith.
 _GOTOTOP