Early Aviation
Discuss World War I and the early years of aviation thru 1934.
KotS GB 2012 Albatros D.V - lcarroll
lcarroll
_VISITCOMMUNITY
Alberta, Canada
Joined: July 26, 2010
KitMaker: 1,032 posts
AeroScale: 1,025 posts
Posted: Saturday, April 21, 2012 - 02:20 AM UTC

Quoted Text

Coming along well Lance. Nice extra detail on the seat, Seats tend to get sort of ignored I dunno why as its the biggest thing in the cockpit after all. Yes those pesky strengthener/seat rails, I replaced them too, not by choice after strugling dry fitting the tight interior they gave up the ghost and snapped.

Keith.


Thanks for the kind words, Keith,
My rails actually broke on removal from the sprue; I tried repairing briefly and then resorted to logic and replaced them. As for the seat, I agree. The addition of a cushion adds a lot to the cockpit appearance. I believe most types had either a cushion integral to the seat or one scavenged and added at the units; makes sense for both warmth and comfort. I notice a vast selection of cushions in the SE5a material I've got.
Cheers,
Lance


lcarroll
_VISITCOMMUNITY
Alberta, Canada
Joined: July 26, 2010
KitMaker: 1,032 posts
AeroScale: 1,025 posts
Posted: Friday, April 27, 2012 - 10:25 AM UTC
Not a great progression from a week ago; too much work world and too little time for important things like this project!
I installed the fuel valve panel once the "plumbing" that loops into view on the left side was added. There were two copper loops to add pre-installation.

Also added the two hand pumps to the right fuselage wall with their pipes and the compass. The compass has a decal face from the WNW Sheet, bezel from Aeroclub, and I put a few drops of future on the face to glass it over.


The fuel tank and Ammo cans were completed and added to the former and at this point are posed for the photo. The upper portions of the two fuel lines at the front had to be replaced as I had broken them in a clumsy moment on sprue removal and they are now long lost to the "floor monster". The door on the ammunition can face is Eduard PE. Last, I attempted to replicate a stained and oxidized effect on the fuel tank; depending on the light I quite like it or hate the result, can't make up my mind on it.


Just two more days of six straight of what was supposed to be a very much part time low key job and I can get going again. Next step is to get the rudder and control column added, rig the flight controls, and then switch to the left side of the cockpit.
Thanks for looking and all suggestions/comments most welcome as always.
Cheers,
Lance
mike_espo
_VISITCOMMUNITY
Illinois, United States
Joined: September 26, 2011
KitMaker: 125 posts
AeroScale: 115 posts
Posted: Friday, April 27, 2012 - 11:27 AM UTC
Beautiful detail! Feel like I could climb in.....
OEFFAG_153
_VISITCOMMUNITY
Västra Götaland, Sweden
Joined: February 19, 2010
KitMaker: 1,473 posts
AeroScale: 1,450 posts
Posted: Saturday, April 28, 2012 - 02:53 AM UTC
Nice and busy detailing in the cockpit, Lance - like it a lot!

Mikael
thegirl
_VISITCOMMUNITY
Alberta, Canada
Joined: January 19, 2008
KitMaker: 6,743 posts
AeroScale: 6,151 posts
Posted: Saturday, April 28, 2012 - 03:13 AM UTC
Agree with Mikael , you doing one hell of job on this build !


Terri
Kornbeef
_VISITCOMMUNITY
England - South East, United Kingdom
Joined: November 06, 2005
KitMaker: 1,667 posts
AeroScale: 1,551 posts
Posted: Saturday, April 28, 2012 - 04:35 AM UTC
Oh My lovely work Lance but you missed the drain off for the fuel control valves... (joking... or am I? knowing how AMS grabs you.)


Keith
lcarroll
_VISITCOMMUNITY
Alberta, Canada
Joined: July 26, 2010
KitMaker: 1,032 posts
AeroScale: 1,025 posts
Posted: Saturday, April 28, 2012 - 02:12 PM UTC

Quoted Text

Oh My lovely work Lance but you missed the drain off for the fuel control valves... (joking... or am I? knowing how AMS grabs you.)


Keith


Mike, Mikael, Terri and Keith,
Thank you all for the comments; means a lot coming from the folks I'm trying to at least come close to on the talent and results scales!

Keith,
"Dohhhhhhh"!!! However I saw a TVAL DVa photo spread on another newer site several days back that showed a "cockpit fuel drain" tube in the area of the right lower wing root and I was considering a session back in the books to find details on the interior layout of the drain. Is that the one you refer to? I was unsure if the DV had it as well however logic would say yes. Can you direct me to a reference that illustrates the inside layout of the drain from the fuel valves panel? (it's not too late to add it in)
Nice catch, and appreciated!
Cheers,
Lance

P.S.
For Keith,
Ignore my request; the same source has several good views of the drain inside and out. It will be added; thanks for the heads up on this one.
Cheers
guitarlute101
_VISITCOMMUNITY
West Virginia, United States
Joined: December 18, 2006
KitMaker: 1,121 posts
AeroScale: 1,063 posts
Posted: Sunday, April 29, 2012 - 06:05 PM UTC


Wow Lance, this is looking great! Awesome cockpit detail! Keep up the good work.

Mark
lcarroll
_VISITCOMMUNITY
Alberta, Canada
Joined: July 26, 2010
KitMaker: 1,032 posts
AeroScale: 1,025 posts
Posted: Monday, April 30, 2012 - 05:56 AM UTC
Thanks for the compliment, Mark. I've got a few days at home now, hope to get the cockpit and engine etc. wrapped up. More photos soon.
Cheers,
Lance
thegirl
_VISITCOMMUNITY
Alberta, Canada
Joined: January 19, 2008
KitMaker: 6,743 posts
AeroScale: 6,151 posts
Posted: Monday, April 30, 2012 - 03:21 PM UTC
Will be looking forward to your up-date Lance


Terri
Mgunns
_VISITCOMMUNITY
Arizona, United States
Joined: December 12, 2008
KitMaker: 1,423 posts
AeroScale: 1,319 posts
Posted: Tuesday, May 01, 2012 - 04:27 AM UTC
Hello Lance:

This is really coming along nicely. I like the knob addition. Very convincing. Your fuel tank pressurizing bycicle pump apperatus is nicely done as well.
Looking forward to the next update.

Best

Mark
lcarroll
_VISITCOMMUNITY
Alberta, Canada
Joined: July 26, 2010
KitMaker: 1,032 posts
AeroScale: 1,025 posts
Posted: Tuesday, May 01, 2012 - 01:33 PM UTC
Terri, Mark,
The "imminent" update will be somewhat behind; spent most of today in the various TVAL Photo spreads on-line and also re-read Stephen's initial Review of the kit. I did get the the Fuel Control Panel drain line in, hang up presently is how much detail to include on the left side of the cockpit and on the various flight control components.Having a ball with all this which is what it`s all about.
More to follow as soon as I can get control of the tremendous influx of information. Hard to believe the sources out there..............

Cheers,
Lance
lcarroll
_VISITCOMMUNITY
Alberta, Canada
Joined: July 26, 2010
KitMaker: 1,032 posts
AeroScale: 1,025 posts
Posted: Sunday, May 13, 2012 - 01:56 PM UTC
I'm not sure where the time has gone; haven't had a minute for this build for a week or more. Between "real world" things, an inventory of yard equipment to get running post Winter, and working on a simple thread for another site the week has flown by! I intend to get going this coming week; in the interim thought I'd update with a few pics of the Neindorf Prop I hand made for this build. It was convenient to do this stage of the build now as hand carved props were the subject of my "How To " article.
The prop is still unfinished; that is to say not yet stained, sealed, nor varnished. I have two to chose from; each has its' high points. I really prefer the laminated effect of the second one however the shape of the other is, in my eyes, more accurate.


If all goes well I'll be working away at the remaining cockpit items nlt then Tues. but hopefully tomorrow.
I am really looking forward to getting back into this build!
Cheers,
Lance
JackFlash
_VISITCOMMUNITY
Colorado, United States
Joined: January 25, 2004
KitMaker: 11,669 posts
AeroScale: 11,011 posts
Posted: Sunday, May 13, 2012 - 04:26 PM UTC
Even naked she's a beauty.
Kornbeef
_VISITCOMMUNITY
England - South East, United Kingdom
Joined: November 06, 2005
KitMaker: 1,667 posts
AeroScale: 1,551 posts
Posted: Sunday, May 13, 2012 - 06:11 PM UTC
Plays devil's advocate and votes for prop no 1

To my eye it looks better, unless you plan to stain the laminations on the second... Then the jury would be out again.

Keith
lcarroll
_VISITCOMMUNITY
Alberta, Canada
Joined: July 26, 2010
KitMaker: 1,032 posts
AeroScale: 1,025 posts
Posted: Monday, May 14, 2012 - 12:18 AM UTC
Thanks Stephen; she's growing on me for sure.
The "Albies" have to be the best looking of the warbirds of the Great War,sleek, lean, and mean all over.
As for the props Keith, I plan to stain both today, will get some photos posted to compare the effects later.

Cheers,
Lance
Mgunns
_VISITCOMMUNITY
Arizona, United States
Joined: December 12, 2008
KitMaker: 1,423 posts
AeroScale: 1,319 posts
Posted: Monday, May 14, 2012 - 01:20 AM UTC

Quoted Text

Plays devil's advocate and votes for prop no 1

To my eye it looks better, unless you plan to stain the laminations on the second... Then the jury would be out again.

Keith


Hi Lance:

I have to agree with Keith. Whatever you decide, they both look outstanding. Kudos and accolades and I am sure that awards will be forthcoming and be part of your permanent file.

Best

Mark
OEFFAG_153
_VISITCOMMUNITY
Västra Götaland, Sweden
Joined: February 19, 2010
KitMaker: 1,473 posts
AeroScale: 1,450 posts
Posted: Sunday, May 20, 2012 - 07:57 PM UTC
Lance – I have to agree with the others – the props look absolutely awesome. Looking forward to seeing them with some stain/laquer


Mikael
lcarroll
_VISITCOMMUNITY
Alberta, Canada
Joined: July 26, 2010
KitMaker: 1,032 posts
AeroScale: 1,025 posts
Posted: Monday, May 21, 2012 - 01:32 AM UTC

Quoted Text

Lance – I have to agree with the others – the props look absolutely awesome. Looking forward to seeing them with some stain/laquer


Mikael


Very little progress, this is really going slowly with all the distractions and chores to be done. I did finish off the props; stained in a medium brown colour and sealed with two sanded coats of Uretane and a third thinned down one. I decided to forego the usual final coat of Tamiya Clear Yellow or Orange as the shade looked good as it was. Here are two views of the final choice and one of the "spare" which didn't measure up. Poor lamination effect and I definitely shaved it too much, got a front profile that's far too narrow.
This one will be used:


And this one will go to the spares box:

After Keith pointed out that I missed the drain pipe from the Fuel Control Panel I was able to install it using some of the TVAL DVa photos as a Reference. It still needs a bit of black "wash" to tone it down, if I can get a brush in there........

I've been slowly working on the control stick adding the throttle, gun trigger wires and throttle cables, control locking lever, and the elevator flight control cables. Lots of fiddling around however it's ready to install, hopefully early tomorrow as I have a full day of window and door trim painting to do and any leftover minutes will go to more "Spring Cleaning' of the home spread.
Thanks for looking and for the comments; more to follow if I survive the "Home Improvement" frenzy.
Cheers,
Lance
Kornbeef
_VISITCOMMUNITY
England - South East, United Kingdom
Joined: November 06, 2005
KitMaker: 1,667 posts
AeroScale: 1,551 posts
Posted: Monday, May 21, 2012 - 06:32 AM UTC
Awful when life gets in the way, good to see some excellent progress, Now I've something to chase...


Keith
lcarroll
_VISITCOMMUNITY
Alberta, Canada
Joined: July 26, 2010
KitMaker: 1,032 posts
AeroScale: 1,025 posts
Posted: Saturday, May 26, 2012 - 03:20 PM UTC
Finally, some significant progress; I'm just about ready to button her up.
The sequence of construction for the cockpit was rather complicated; I wanted a fully rigged flight control set up and that necessitated a "one sided" approach. (The cockpit detail had to be built into one side of the fuselage prior to "close up".)
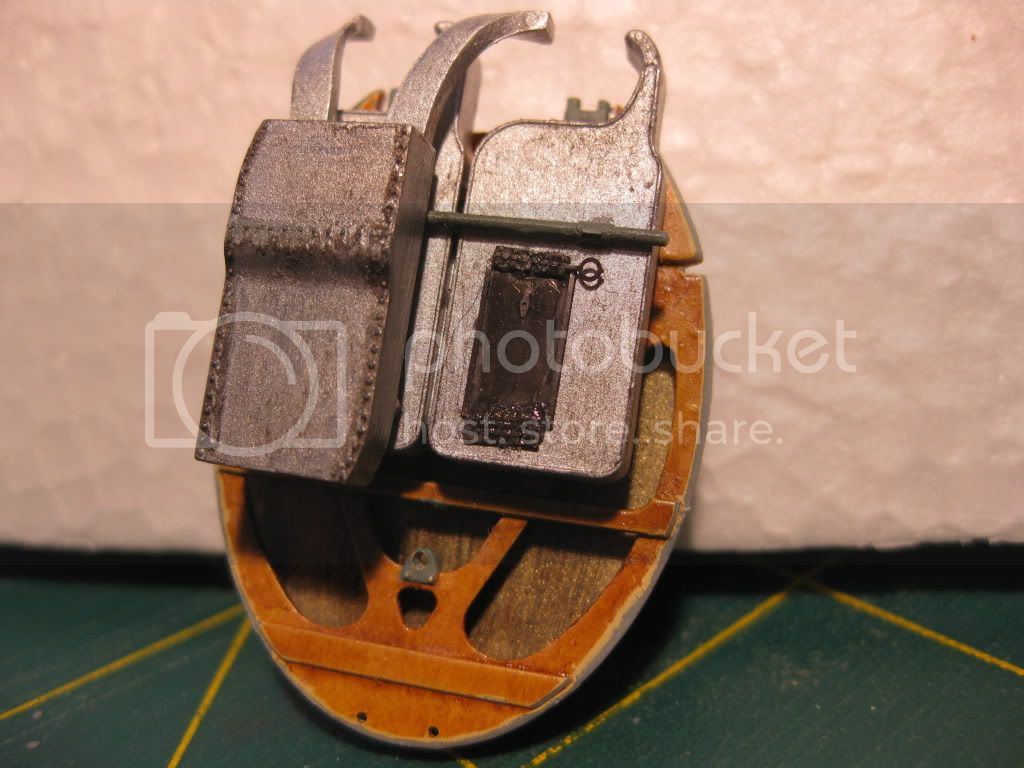
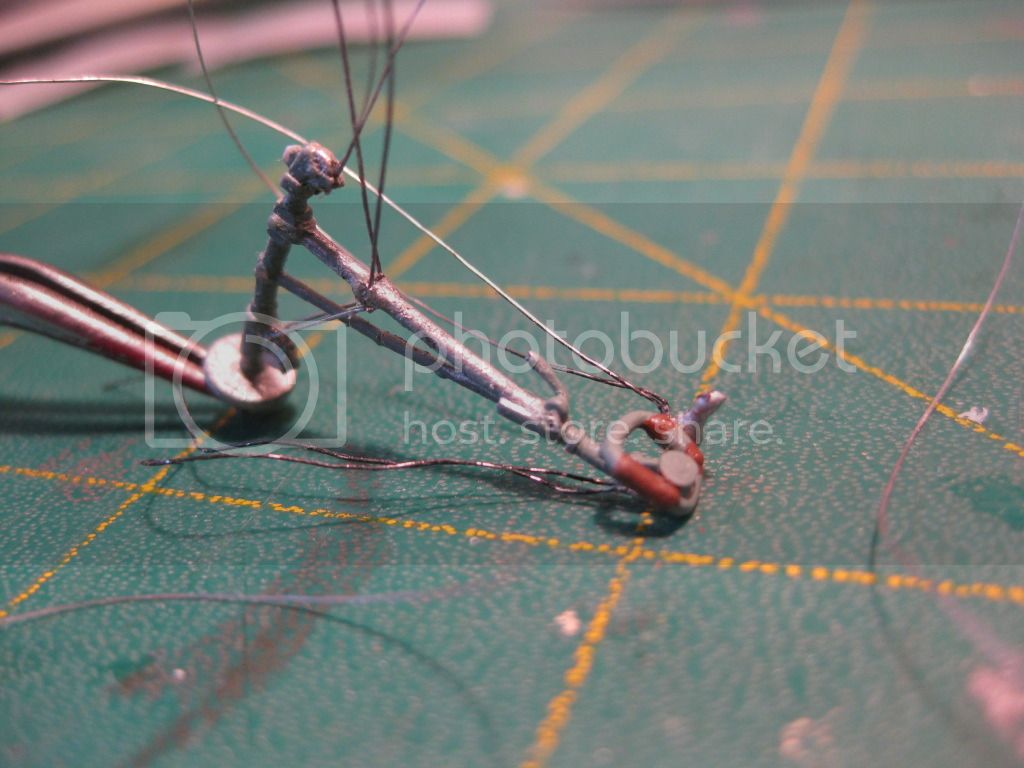
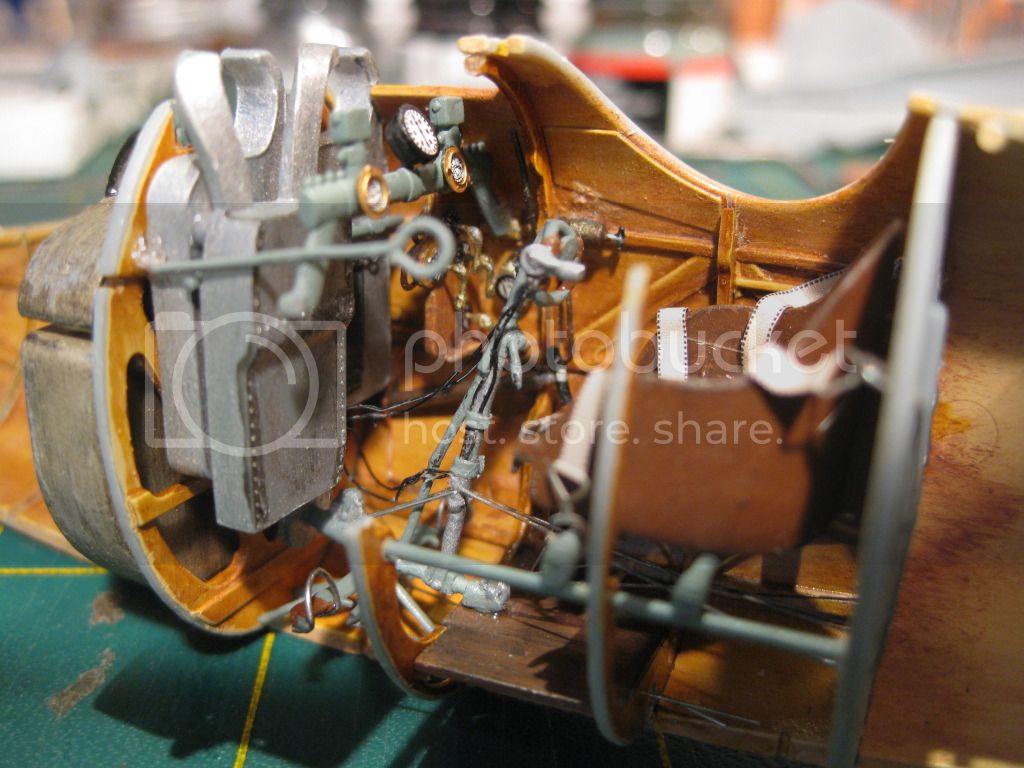
Over the past couple of days I've completed the control stick add-ons including throttle and cables, gun trigger wires, control locking lever and all associated flight control cables. It looks pretty "rough" here, prior to final painting, but once painted and installed, I was very pleased with it.

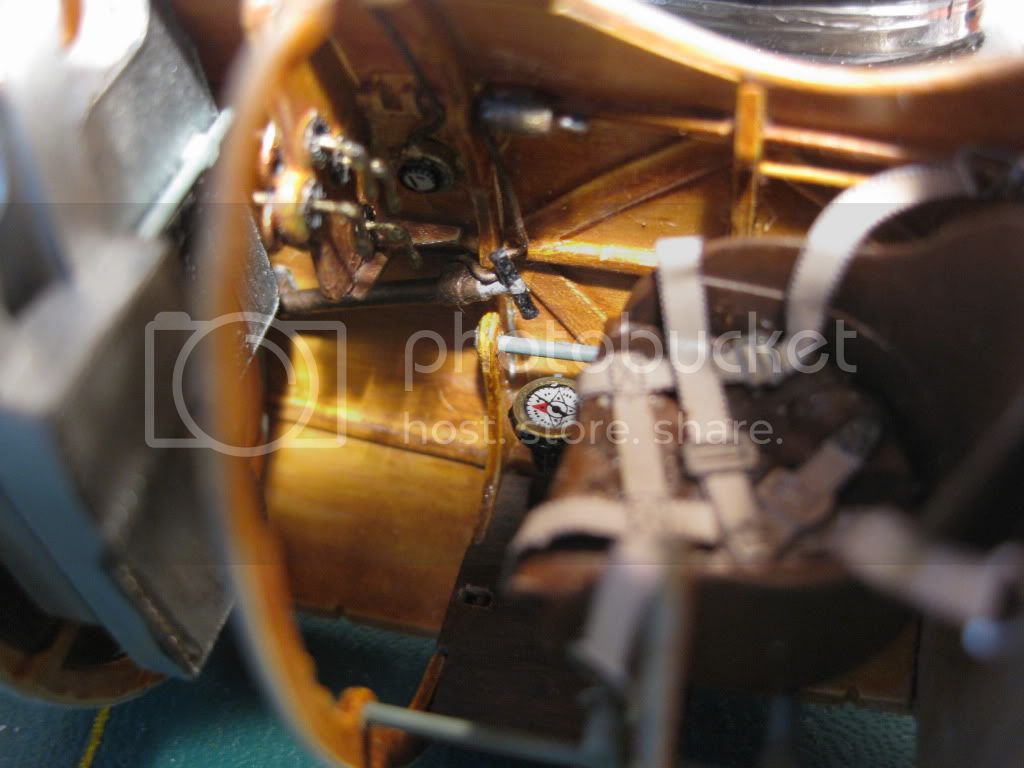
The comparatively small number of components for the left fuselage side were completed and installed; the magneto wires and spark advance control rod were "scratched" from sprue and copper wire respectively and the magneto key and chain were added from the Eduard PE Set. Note also the partial fuselage former that was cut away earlier and installed on the left Fuselage half to accomodate routing of the mag. wires and spark control rod.

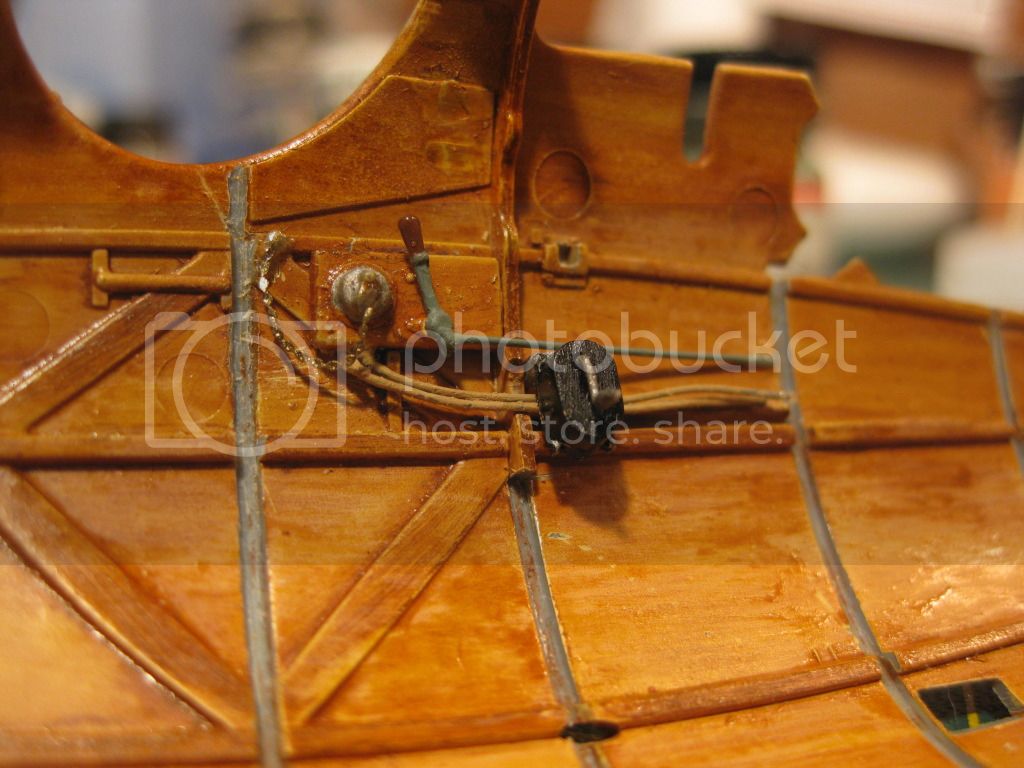
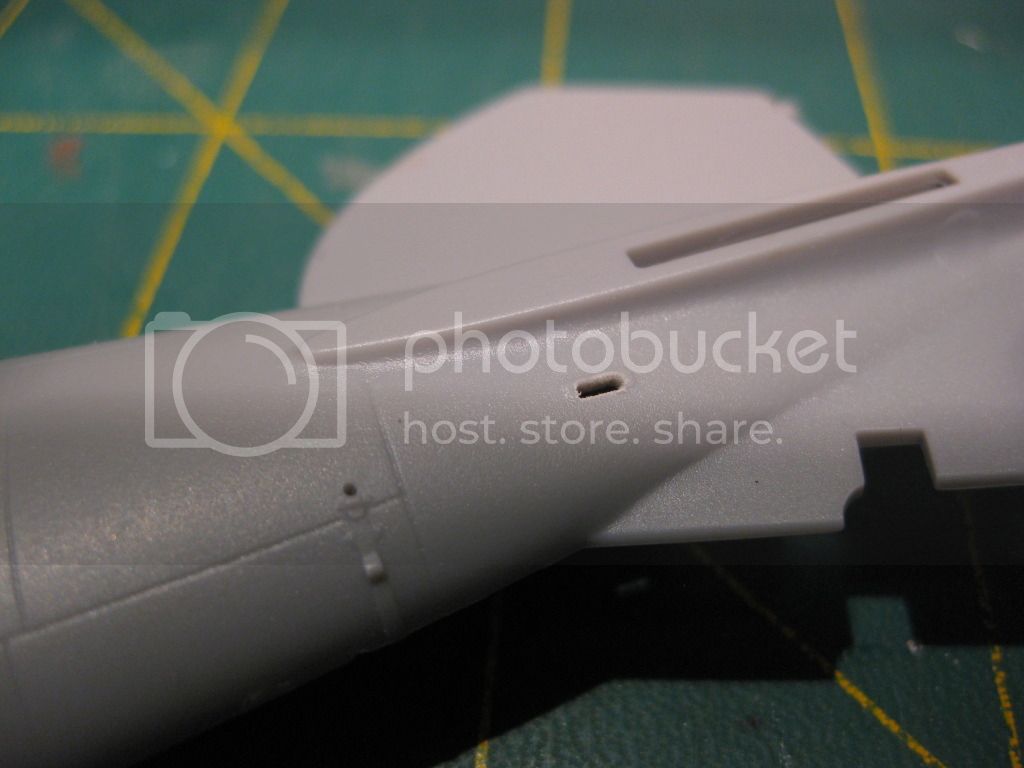
The fairlead openings for the elevator control cables were drilled out and cleaned up. I'll be adding the Photo Etch fairlead grommets prior to painting the fuselage.

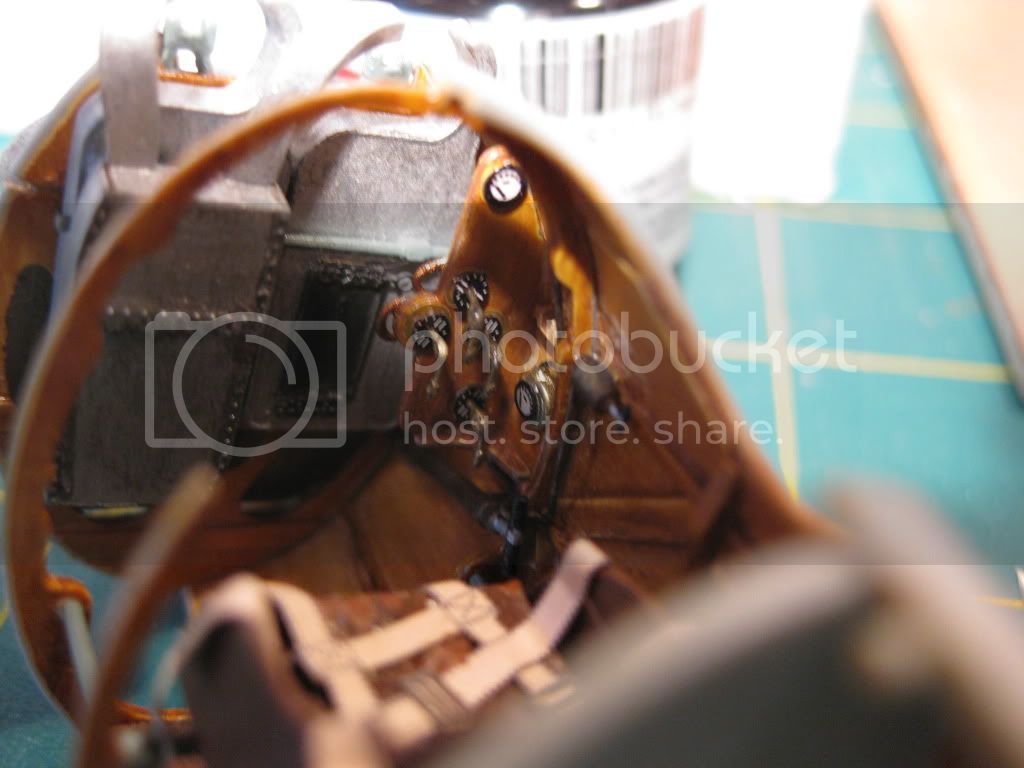
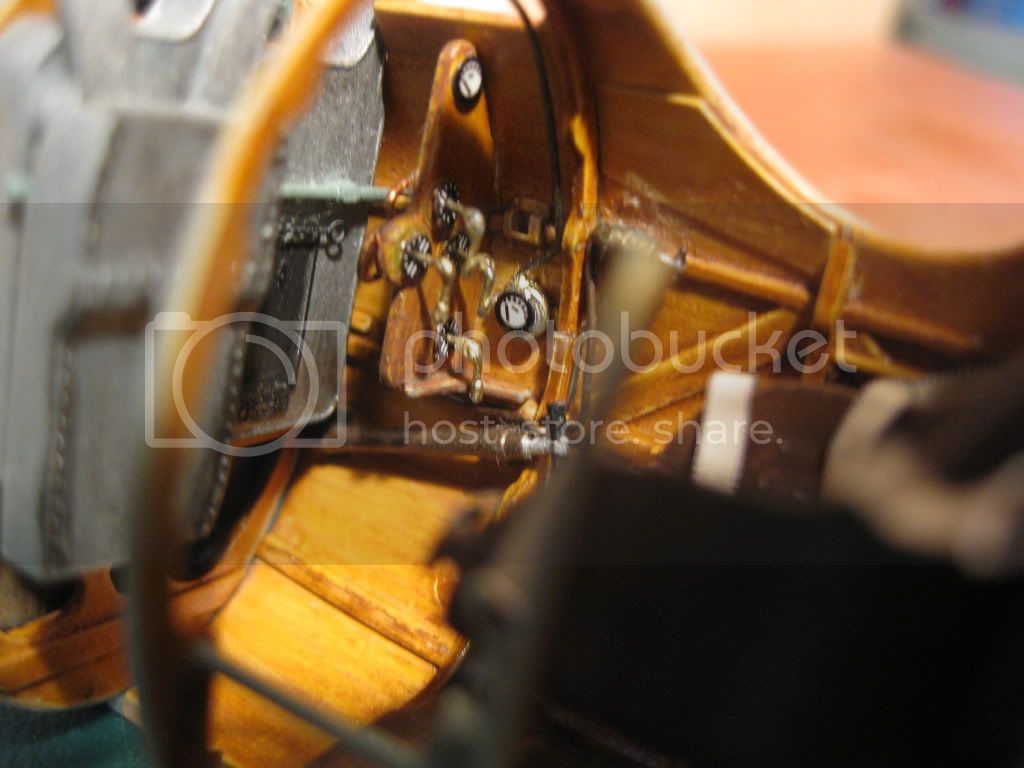
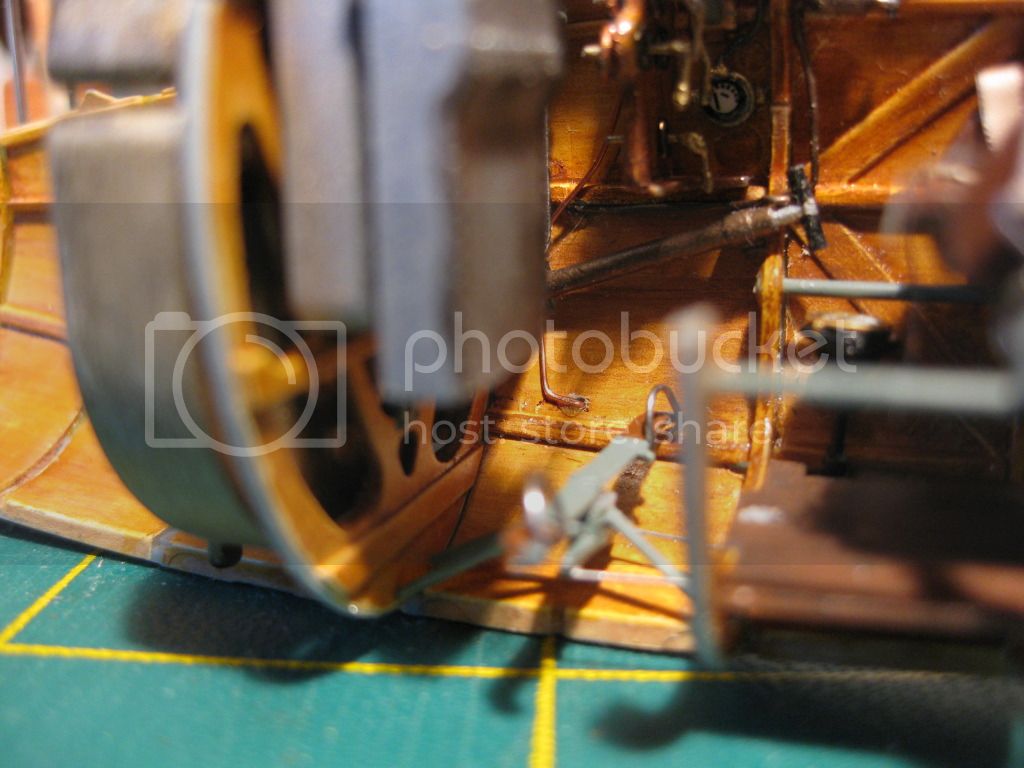
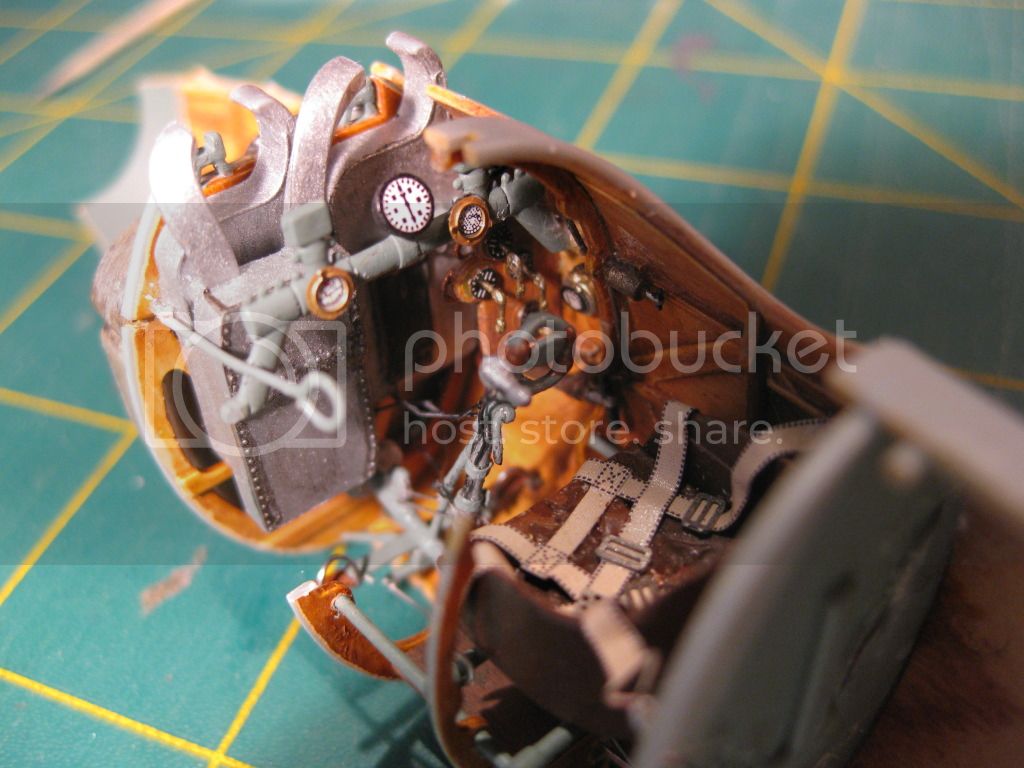
And now the cockpit; very busy in there! Additions were the Aux. Throttle seen on the extreme left, the altimeter and clock on either side of the Tachometer on the heavy pipe cross brace/LMG Mount (Done with Waldron punch bases, Aeroclub bezels, and WNW Decal faces with a coat of Future to form a lense.) , and of course the flight control stick finally in place. Once the stick was positioned and secured the flight control (elevator) cables were tightened and secured with CA.
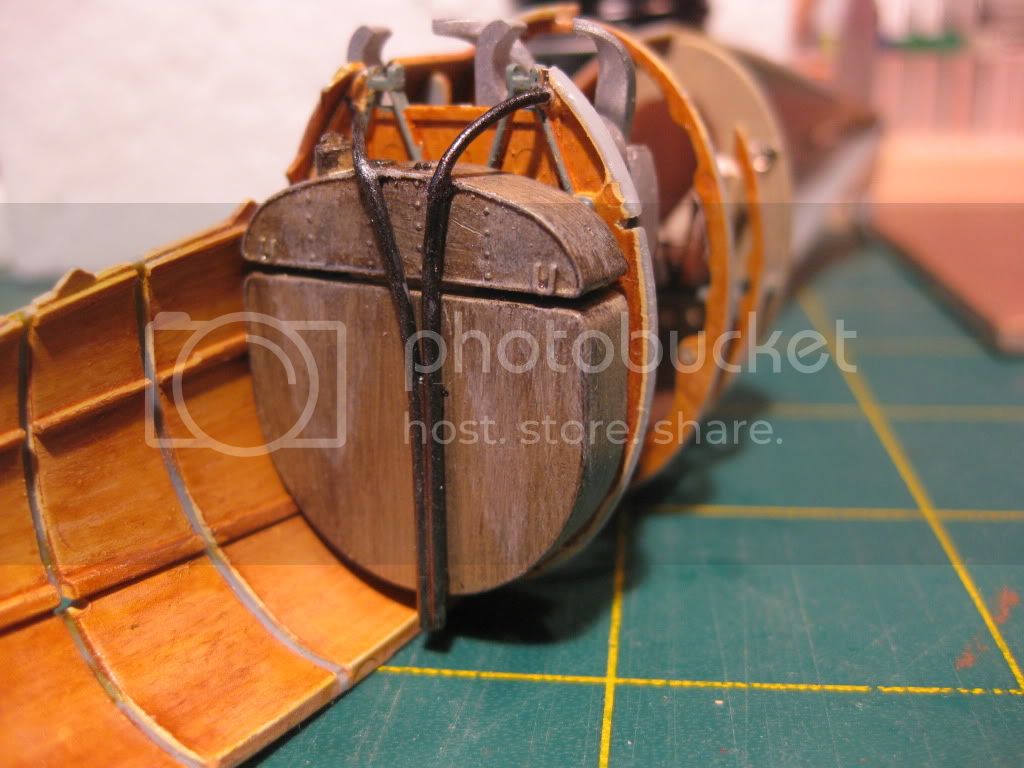
Here she is in all her "Pre Button UP" glory; a lot will not be visible however I know it's there. The only detail left out were the aileron control cables from the wheel on the joystick base going up (eventually) to the upper wing. Those will be added from upper wing down into the fuselage behind the fuel tanks once the upper wing is in place.


So now I'm ready to button her up. I'll be doing that tomorrow along with a lot of drilling for rigging points and getting the forward (engine compartment) formers and engine mounts done.
I am really looking forward to getting some paint on the fuselage and getting at the wings etc.
Thanks for looking and all comments welcome!
Cheers,
Lance
Kornbeef
_VISITCOMMUNITY
England - South East, United Kingdom
Joined: November 06, 2005
KitMaker: 1,667 posts
AeroScale: 1,551 posts
Posted: Sunday, May 27, 2012 - 05:31 AM UTC
Nice to see you getting there with this one Lance. Looking good.

Keith
OEFFAG_153
_VISITCOMMUNITY
Västra Götaland, Sweden
Joined: February 19, 2010
KitMaker: 1,473 posts
AeroScale: 1,450 posts
Posted: Saturday, June 02, 2012 - 02:25 AM UTC
Yep, looking really nice Lnace!

Mikael
gajouette
_VISITCOMMUNITY
Texas, United States
Joined: February 01, 2007
KitMaker: 365 posts
AeroScale: 356 posts
Posted: Wednesday, June 06, 2012 - 04:34 AM UTC
Lance,
What can I say other than Outstanding work,from paint to details my old friend.
Highest Regards,
Gregory Jouette
ChrisJohnson
Joined: June 02, 2005
KitMaker: 65 posts
AeroScale: 2 posts
Posted: Tuesday, June 12, 2012 - 11:05 AM UTC
I'm late coming to this build Lance, but you sure are doing this kit up nicely. Your attention to detail is outstanding, and far beyond my humble efforts when I built this bird. In looking at your engine, I particularly like the rocker springs you made. As for your cockpit, all I can say is that it's top drawer all around. I'll be watching this thread with interest.

Cheers,

Chris