


Hope this helps.


Mal, knowing and being artistically enabled is too different things. If it wasn't for someone inventing the ruler, I couldn't draw a straight line.
Joel
 well Joel I'll take that as a compliment then
  I was considering offering a free set of masks, a cream tea (that's worth £10.00 here in Cornwall) and possibly a bacon butty to modellers who hire our caravan here at the Mullion holiday park. I thought that if anyone took me up on this that they could spend the day with me and draw their own set of masks and cut them. Maybe that might be wishful thinking?
 Gentlemen, I certainly feel for your frustration. Just as a point of curiosity, did you find the errata by Brett Green helpful that I had suggested earlier? Take care
Jim
Wonderful wespe, Mal! I wonder how this will work in 1/48? I've take a look into those exhaust deflectors- in addition to keeping the instrument cluster clean, they do a nice job of keeping all that nasty burnt gas out of the supercharger intake as well. Handy, those German engineers. ;D
As for the cowling windows, photos show them on both sides- and on early and late aircraft. Photos also show them not in evidence on the outer sides of the nacelles- and one pic of a G model I found definitely shows the window partially painted over. The instrument cluster was mounted to the engine mount at it's top vertice. I doubt there were clusters on the outer sides- I have seen photos of exposed engines with no outer clusters mounted. Check your kit's engine mounts for a pinhole to attach the cluster. The Squadron walk Around has some decent shots of the Battle of Britain museum' G engines in all their neglected glory!
Roll cage? I've heard that it's only for later models, but can't confirm.
Chuck
Now the one deflector makes sense, I hadn't seen the fact that there is only an intake on the starboard cowling. Dragons poor instructions do not instil a sense of belief! The dials on the engine. Here's Fernando Estanislau's drawing of it for our book on the 'C, D & E':
So thank you very much for all of the input on this, it is very much appreciated and I will be getting your book John, can you give me the title please?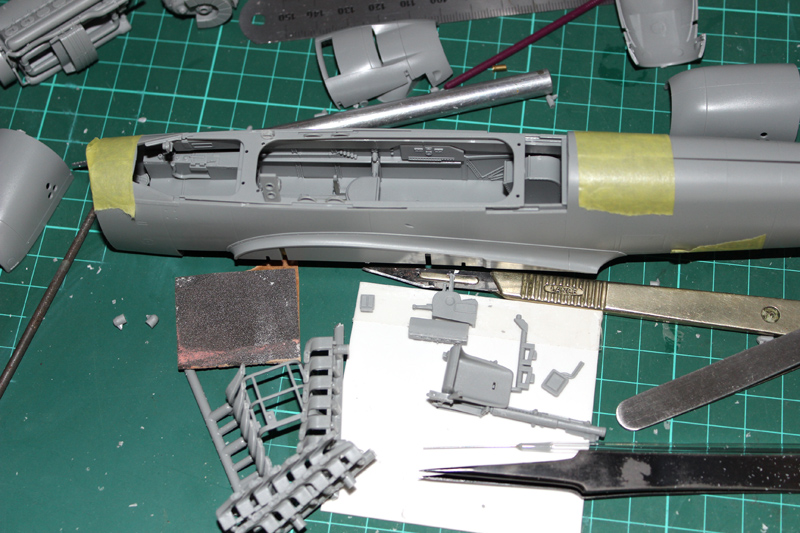 I have done something everyday, still and yesterday I glued the nose MGs into position, another area with less than adequate instructions, but I over came that. I did make the mistake of test fitting the tray and guns into the nose. It seemed to be a bit of a squeeze, which was worrying, but the reason became clear after I bit the bullet and gave it a little more force. The clamp on the most forward MG was fouling the innards slightly and when this came clear everything was fine However I can't now remove the tray without damaging the clamp! It won't be a major deal, but I will have to paint the guns in situe which is something that I wanted to avoid
  I won't sweat it though and the guns do fit perfectly I will be try the wasp mask out today, hopefully but I have a set of interesting masks to complete for Jamie Haggo which involve a snake So hopefully some more pictures soon


John, can you give me the title please?
And now a couple of other questions:
1. What is the piece of equipment that is on the forward port side of the cockpit decking, the piece with the 2 holes in it that look like instrument bezels. It looks like some sort of signalling device, I really just want to know if the apertures should be glazed and should they be coloured? This is the part that I asked about on Hypertension and got told to go and check out Google! I have never been able to find out what it is so I am curious.
2. Can anyone confirm if the roll cage should be fitted?


 )
) 

Hi Mal
Google is a wonderful thing - but so are books. Squadron's Bf 110G Walk Around seems to identify your mystery box as the marker beacon receiver set. Hopefully John can confirm that. It shows up in his book on the earlier variants too, and seems to be basically a plain unit with a data-plate on the front lower right. A cable runs up to the base of the antenna mast, with more cables running down the canopy frame through the cockpit decking and away to the rear.
I think the "roll cage" is just Dragon's way of representing the interior structure of the middle canopy section.
All the best
Rowan


John - thank you! These original colour photos are amazing! - a gold mine of info showing the mix of RLM 02 and RLM 66 pre-painted components in a way that B&W shots leave you only guessing at. And where's all that yellow cabling that we modellers go to such lengths to depict ?! (because someone must have once said all Luftwaffe electrical cables were yellow... )
The pictures also give me a heads up for the labeling and data plates around the cockpit for which I have bought some Airscale stickers I have also bought some of their instrument stickers (I don't do decals!).Following this build thread is just a complete joy. The level and amount of detail photographs supplied by John is something I've never seen before, and the written information is just as astonishing. To say I'm getting a 1st class education, is putting it mildly.
Joel
Hi Mal
Re-reading your question, I've mistaken the part you're asking about. I think the part with holes in that attaches to the cockpit decking is just a mounting plate for the Fernbedienungsgerät F9 (long range reception equipment). The unit is shown on page 45 of John's book and seems to have been moved from below the cockpit decking to a bracket above it on the inside of the canopy. You can see it in the fifth of John's colour photos in this thread.
I though you meant the item mounted further up with cables attached, which is apparently the marker beacon receiver.
All the best
Damm, all these fabulous photos made me realized the huge amounts of euros spent on luftwaffe books, some of them focusing the 110, and none delivers anything remotly as clear as these presented by John Vasco. Here's a good one for Santa
Hi Mal, I don't blame you for feeling that way, I apologize for bringing it up and certainly meant no disrespect. I too fee at home here and have always been treated with respect. I. Was just trying to help and found the errata helpful when I built my Dragon Zoerster. Anyway, keep up the good work, you are making good progress. I'm looking forward to seeing how the mask works out. Even the AM decals were a pain. I think they turned out ok though. I posted my Wesspe build here, not "the other guy" BTW. Take care
Jim
I would certainly take a look if I thought that I could find it but it is impossible on Hypertension. The only time I look in there is when my customers post pictures and send me a link. There are some great modellers on there but there are many, sorry, some, who think that they are the only ones who's opinion counts!reat thread, loads of use full information, but waiting for more build photo's from Mal


By the way, the photos John has graciously posted are also in his excellent book... Doug
Quoted TextBy the way, the photos John has graciously posted are also in his excellent book... Doug
Hi there
Has there been a revised edition of the book? The colour shots aren't in my 2008 copy, and I was a bit bemused by the mention of the profile in Mal's other thread - again, not in my book.
All the best
Rowan
In the photos above (Posted: Friday, November 29, 2013 - 11:11 AM GMT), the front cockpit (and decking) are in RLM66 and the entire rear cockpit area was in RLM02 (except for some equipment boxes.
I see RLM66 rear cockpit with RLM02 upper decking, radio bulkhead and glazing frames?


I think that's just shadow. Compare the colour of the radio boxes to the sidewalls they're mounted on.
So either there is some good light or a flash was used?
Personally, as that is the reason for the repaint, I can't see why they would bother to repaint any part of the cockpit in RLM 66 (black grey) while leaving the upper parts that would reflect glare on the glass in RLM 02 (grey green).
However another spanner has been thrown into the works Chuck has sent me a picture from the Eduard Royal boxing of their Bf110 and it is of their interpretation of the paint scheme of this actual aircraft:
 |


