World War II: Germany
Aircraft of Germany in WWII.
Hosted by Rowan Baylis
1/32 Bf110 + painted on markings
Merlin
Staff MemberSenior Editor
AEROSCALE
#017
_VISITCOMMUNITY
United Kingdom
Joined: June 11, 2003
KitMaker: 17,582 posts
AeroScale: 12,795 posts
Posted: Monday, December 02, 2013 - 09:57 PM UTC

Quoted Text

... I can see this stalling now, unless I make a decision!


Hi Mal

After you've gathered as much info as you can, at some point you've just got to make a call.

Unless there are other photos of SN+LP, I think there's a fair amount of speculation in Eduard's profile - it doesn't tally to my eyes with the shot in John's book. For instance, in the photo there appears to be a clear division between darker camo along the fuselage spine and the sides, while the fuselage codes look thicker and the "S" appears to overlap the fuselage band.

All the best

Rowan
spaarndammer
_VISITCOMMUNITY
Noord-Holland, Netherlands
Joined: January 28, 2007
KitMaker: 1,945 posts
AeroScale: 388 posts
Posted: Tuesday, December 03, 2013 - 12:39 AM UTC
Great blog already. I like the attention for detail you are showing.

I am looking forward to see the painting stage as painting on markings is something I would like to try as well in the future.


Jelger
Joel_W
Staff MemberAssociate Editor
AUTOMODELER
_VISITCOMMUNITY
New York, United States
Joined: December 04, 2010
KitMaker: 11,666 posts
AeroScale: 7,410 posts
Posted: Tuesday, December 03, 2013 - 05:02 AM UTC
Mal, I know absolutely nothing about German WW11 aircraft.

There comes a time, which you realize you've reached, that you need to make the best educated decision you can based on the vast amount of solid research information you've obtained, and go for it. Just don't look back and 2nd guess yourself, as it serves no purpose.

Personally, I would discredit Edward's paint sheet, and go with the information you've compiled previously. Kit makers are notorious for taking short cuts, that end in erroneous & incorrect decisions.

Joel
DougN1
_VISITCOMMUNITY
Georgia, United States
Joined: August 08, 2011
KitMaker: 410 posts
AeroScale: 409 posts
Posted: Tuesday, December 03, 2013 - 05:34 AM UTC
As Rowan and Joel have said, you've gathered plenty of good info now, so it's time to analyze the info and decide what seems right for the model you're building. Don't get into "analysis paralysis" though! As you can see, there are different interpretations and you just have to go with the one (or combo) that makes sense to you.

And most importantly, remember it's your model, and as long as you are happy with your choices that is all that matters in the end

Doug
Holdfast
Staff MemberPresident
IPMS-UK KITMAKER BRANCH
#056
_VISITCOMMUNITY
England - South West, United Kingdom
Joined: September 30, 2002
KitMaker: 8,581 posts
AeroScale: 4,913 posts
Posted: Tuesday, December 03, 2013 - 10:36 PM UTC
Rowan, Doug, Joel,
Thanks for that I was thinking along the same lines, and not wanting to get bogged down. I do like the idea of the 70,71 scheme with the 02 over spray, but I have never seen the 02 added like that. I do like the idea of the upgrade and re-paint to 74, 75 and therefore the repainted cockpit. To show the repainted cockpit I am going to go with my interpretation of the colour pictures that John posted. I fully take on board what you guys say and I am possibly wrong but it makes so much sense to me and I do think that the light in them is playing tricks, and they are stills from cine film afterall. As for the undersides it doesn't make sense to me that they would paint a blue shade over an existing blue, so I am planning on painting the under surface RLM65, not 76; but I'm interested in any thoughts about this?

I had a play with the Wespe markings yesterday and I took some pics, I will add them later today. I have stuck to doing something everyday, so the build is moving forward and I hope to get some paint on before going away for my grand daughters birthday. This morning I broke a piece off one of the undercarriage sub assemblies and, as yet, I haven't been able to find it!


Quoted Text

Great blog already. I like the attention for detail you are showing.

I am looking forward to see the painting stage as painting on markings is something I would like to try as well in the future.

Jelger


Thanks, yes I am looking forward to the painting stage too, painted on markings are easy, when you understand what is involved. The wespe markings will be more taxing but only because off the compound curvature of the nose; the design of the masks will have to take this into account so this will make them more difficult to use. I hope to show that it isn't too difficult though, but the designing will likely take some time because of the trial end error method that I need to employ
Holdfast
Staff MemberPresident
IPMS-UK KITMAKER BRANCH
#056
_VISITCOMMUNITY
England - South West, United Kingdom
Joined: September 30, 2002
KitMaker: 8,581 posts
AeroScale: 4,913 posts
Posted: Friday, December 06, 2013 - 12:58 AM UTC
Sorry for the delay in posting more pics, time just flies when you aren't working for anyone and I really do not realize that days are going past

I have been keeping up with doing something everyday but I don't now think that I will get any paint on this before Christmas but I am going to try when we get back from visiting up country The under fuselage bomb rack and bombs have been built; well not completely as, again, the instructions aren't very helpful but I sussed it when I checked the sprues and found that there are enough bomb shackles for the 4 required for each bomb, not just the 2 that the instructions suggest! I haven't fitted them yet though as they are rip for pinging off into the wild blue yonder. I bought a set of sprue cutters that should help solve that problem a little.

I built the rear defense MG which is a nicely moulded with hollowed out flash hider.

I have added the flexi hose and the (hydraulic oil?)tank in the undercarriage bays.

Blanked off the back of the radio boxes and added the retraction arms on the gear (one of these is now broken as I tried to fit it temporarily to the bay) I was checking again that it would all fit passed the bay bracing if fully assembled. I have failed to find the broken piece even though there is no carpet monster in hear! I will have to scratch build the darn thing, but no big deal


I built up the nose MG bay tray and then went to test fit it in the nose. It seemed a little tight but at first I couldn't see why and all of the gun muzzles were lining up so I gave it a little more pressure, and it moved without any breaking noise, so I pushed again and everything eased up and fitted perfectly. Then I found the reason for the tightness, the clamp on the most forward MG sits just outside of the opening, that's cool the opening for it was is a different shape to allow for it. However the assembly cannot now be removed without causing damage! I can live with it but the MGs will now have to be painted in situe. Thanks for the heads up Dragon! Not
Again though some nice detail on the MGs with hollowed out flash hiders.


The first trial of the blank Wespe mask on the nose, as expected it rucks up in places because of the compound curves.


Lets try some cutouts:
[

That's a little better:


Now the tweaks are necessarily small, so not much difference here but it is a little better:

Particularly on the top of the nose where the edges didn't meet after the first tweak.

The fact that there might still be a little rucking over the mask shouldn't cause a major problem, but the blank is easy to work with compared to the actual cut mask. I might have to rethink how the transfer tape holds it all together but still allows the mask to conform. A bit of creative thinking is required and many more trials

I have the solution to the dial detail on the instrument panel, Airscale instrument decals, I have the placards as well
Joel_W
Staff MemberAssociate Editor
AUTOMODELER
_VISITCOMMUNITY
New York, United States
Joined: December 04, 2010
KitMaker: 11,666 posts
AeroScale: 7,410 posts
Posted: Friday, December 06, 2013 - 03:13 AM UTC
Mal, I must confess that I'm really enjoying following your build. One reason is the many small updates so it's always stay fresh. Those machine gun flash suppressors really look good. There is a lot to be said for 1/32 scale. That's what I use to say in the good old days when I was a 1/72 scale guy about 1/48 scale.

Your evolving mask is truly amazing. That would have taken me forever, and never been anywhere that good.
Joel
Holdfast
Staff MemberPresident
IPMS-UK KITMAKER BRANCH
#056
_VISITCOMMUNITY
England - South West, United Kingdom
Joined: September 30, 2002
KitMaker: 8,581 posts
AeroScale: 4,913 posts
Posted: Friday, December 06, 2013 - 08:25 PM UTC
Thanks Joel I am aiming off a bit as I go away next week and if I start painting I will be itching to crack on with it. I foresee many potential problems with the Wespe mask but I have learned a lot while developing my Spitfire and Hurricane Camouflage masks, because they had to be done using the trial and error method I will try and post another update before I leave, but I can't promise. It should hopefully be saying that I am ready for painting the interior. I would like to try the "hair spray" method for revealing the worn floor, through the RLM66 and 02 to the aluminium, but I don't think that it works with enamels,Does anyone know for sure?
DougN1
_VISITCOMMUNITY
Georgia, United States
Joined: August 08, 2011
KitMaker: 410 posts
AeroScale: 409 posts
Posted: Saturday, December 07, 2013 - 02:33 AM UTC
Mal, you should be able to remove and reattach the nose without issue, even with the gun part that sticks out.

Also, as you get ready to paint, this RLM T/O guide posted elsewhere might be useful

I hope you're successful with the Wespe masks, as I really don't want to try to fit a decal over that nose when it comes time to do my next 110 build!

Doug
Holdfast
Staff MemberPresident
IPMS-UK KITMAKER BRANCH
#056
_VISITCOMMUNITY
England - South West, United Kingdom
Joined: September 30, 2002
KitMaker: 8,581 posts
AeroScale: 4,913 posts
Posted: Saturday, December 07, 2013 - 07:34 AM UTC

Quoted Text

Mal, you should be able to remove and reattach the nose without issue, even with the gun part that sticks out.


Not without damage Doug, so it will be left where it is, no big deal
Thanks for the link to the guide
Holdfast
Staff MemberPresident
IPMS-UK KITMAKER BRANCH
#056
_VISITCOMMUNITY
England - South West, United Kingdom
Joined: September 30, 2002
KitMaker: 8,581 posts
AeroScale: 4,913 posts
Posted: Monday, December 09, 2013 - 07:07 PM UTC
Well I don't think that I will be ready for painting before leaving to go up country on Friday but I am getting on with stuff. I found the broken off retraction strut and that has been glued back together, so that's good. I have started adding the bomb braces to the bomb carrier, another area where the instructions leave a lot to be desired! I think that I have worked out a method, but it requires thinning plastic. I have glued the tyres together but I am still trying to work out why the outer hub pieces have different numbers when there is no difference at all with them! The axles have a key slot in the them but there is nothing for them to key into, that I can find; more frustrating/irritating inclusions/omissions in the kit! I'll try and post pictures later
Holdfast
Staff MemberPresident
IPMS-UK KITMAKER BRANCH
#056
_VISITCOMMUNITY
England - South West, United Kingdom
Joined: September 30, 2002
KitMaker: 8,581 posts
AeroScale: 4,913 posts
Posted: Wednesday, January 08, 2014 - 08:54 PM UTC

Quoted Text

Mal, I must confess that I'm really enjoying following your build. One reason is the many small updates so it's always stay fresh.


Then I apologies for not updating for so long Joel

I have been getting on though and, after getting home after visiting my grand daughter for her first birthday 
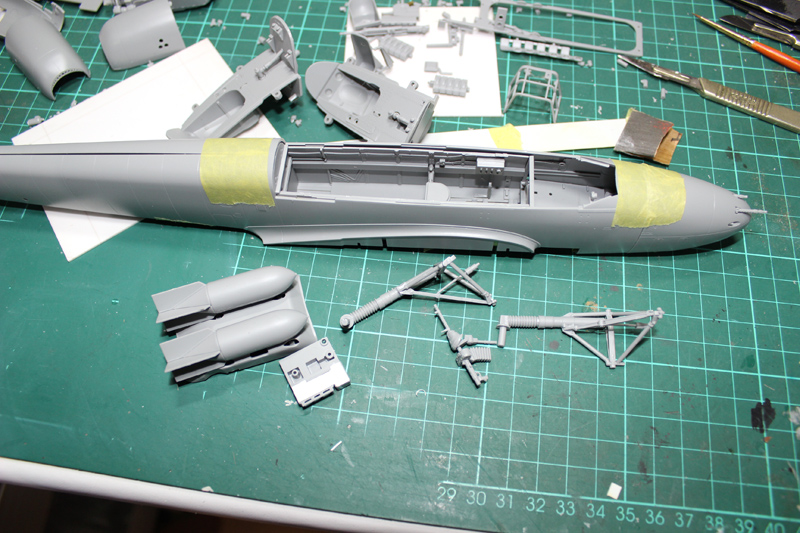
and the Christmas festivities, I continued to do just a little every day; so the wheels have been sorted, the bombs and bomb racks, are all together apart from the inner sway brace on the central rack (more in a minute), the tail plane is together, as are the fins and a few other bits and pieces have been sorted. I broke off the second retraction jack, on the other undercarriage assembly and fixed it! So it was about time to get some paint on the beast.

I have decided not to try and show a repainted cockpit, I just can't be arsed with the hassle, and it won't be seen very well and certainly won't be appreciated by those that do see it. My apologies to all those that gave valuable input on the cockpit colour question, I do feel that I am letting you all down a bit but for my own sanity, and a need to get this done, the cockpit will be RLM66, a total repaint Few that makes me feel better

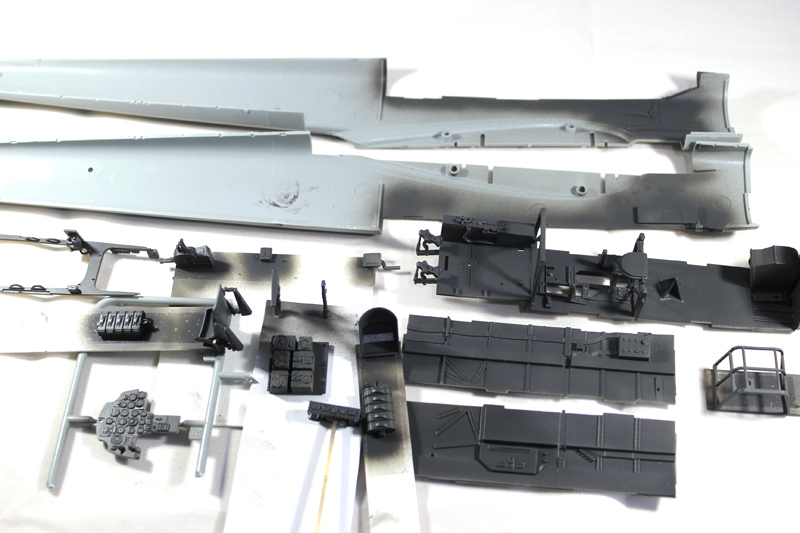
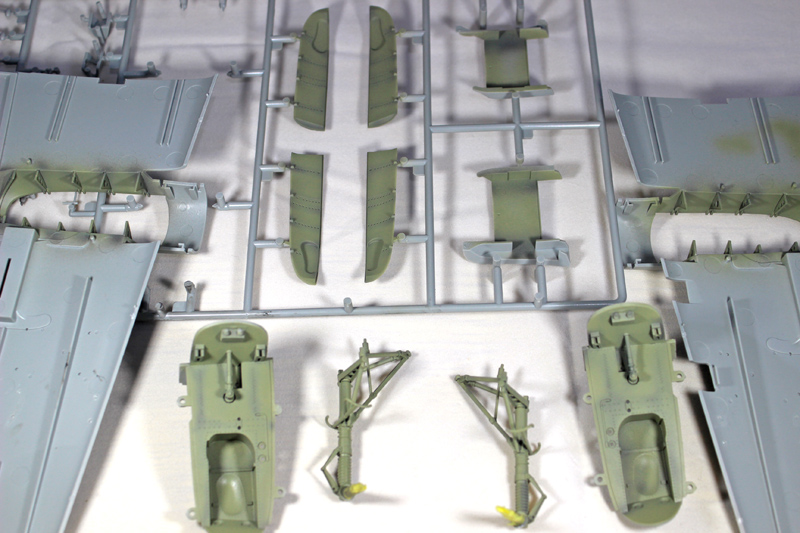
So having decided that I just need to paint the interior of the cockpit RLM66 and the undercarriage and bays RLM02 Then I found that I didn't have the paint, what! I could have sworn that I did but I ordered all the colours that I need from WEM and they arrived yesterday afternoon. I aim to get paint on the interiors over this week end

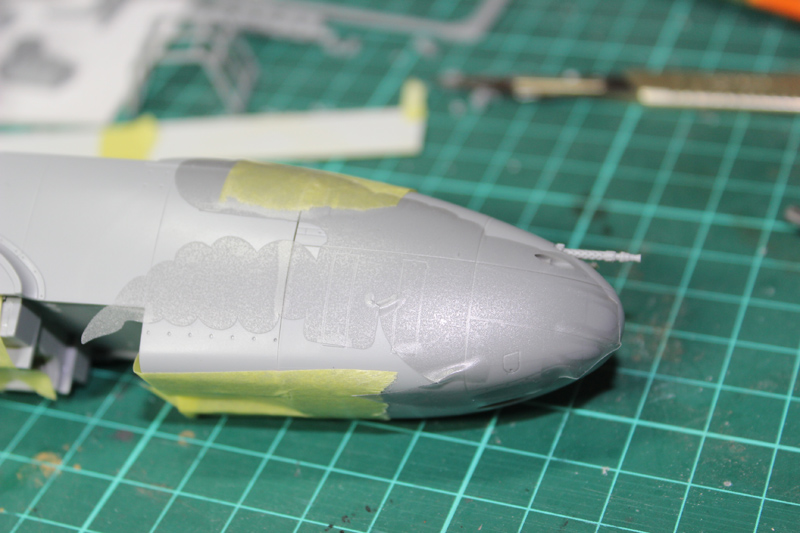
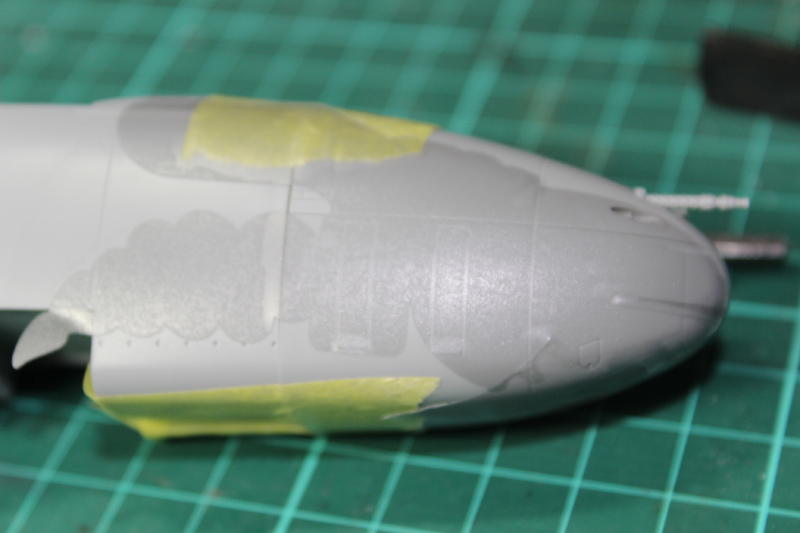
I washed some cockpit parts in Iso' then dipped them in Klear, but I wasn't happy with the result so I tried cleaning it off in the Iso' which does work, but it needs lots of effort and I had just made them look bad. So I needed some Amonia, which I picked up yesterday. I will be trying out my "Generic Canpy Masks" on this, and a few other canopies, so wish me luck. The canopies will be closed, which is another reason why I am going the RLM66 route.

OK, a question regarding the central bomb rack; is the rack painted RLM02? The outer cover will be the underside colour, but is the actual bomb rack and sway brace mechanism RLM02 or is it over painted in situ? The inner sway brace can only be fitted after the outer cover is in place and if the iner and outer parts are to be different colours then they will have to be painted separately.

Doug, what is the wing to fuselage joint like? To have good access to the fuselage to paint on the Wespe I plan on painting it and the fuselage separately; something that I have not done before.

I will aim to post pics next week after I have some paint on I have however been looking at other models that have been partly finished after having had requests for masks for the very same kits; one is the Profimodeller Do217E-5, which I had started when it first came out. As the crosses under the wing go over the pylons there, I have had to fit one to try out the masks for it. This is another reason that I have been delayed with the 110 build. There should be a thread on the 217, I'll see if I can find it and bring it back to life There's also the He162 and a P-47 to crack on with, oh and a Mistel
DougN1
_VISITCOMMUNITY
Georgia, United States
Joined: August 08, 2011
KitMaker: 410 posts
AeroScale: 409 posts
Posted: Thursday, January 09, 2014 - 02:39 AM UTC
Mal,

The wing to fuselage fit is excellent, and I painted mine separately, and then touched up the wing root fillet after I attached them permanently. Check out my build thread for more info

Also, bomb rack and braces should be semi-gloss black.

Doug
Holdfast
Staff MemberPresident
IPMS-UK KITMAKER BRANCH
#056
_VISITCOMMUNITY
England - South West, United Kingdom
Joined: September 30, 2002
KitMaker: 8,581 posts
AeroScale: 4,913 posts
Posted: Thursday, January 09, 2014 - 10:08 PM UTC
Great news on the wing fuselage joint, thanks Doug

I guess that its in you build thread which I will take another look at, promise but did you have to fit the inner sway braces after joining the the inner mechanism to the outer cover? To get the sway brace to contact the bombs I had to thin the walls of the outer cover where the sway brace pass through. If I were to fit the inner sway brace, prior to joining to the outer cover, they would pass through it, so O need to fit them after, which will be interesting
greif8
_VISITCOMMUNITY
Bayern, Germany
Joined: January 17, 2006
KitMaker: 673 posts
AeroScale: 492 posts
Posted: Tuesday, January 14, 2014 - 07:09 PM UTC
Hi Mal, I just finished reading through the entire thread and I must say your build is progressing very nicely. The construction thus far is really first rate. The information that John Vasco supplies is also a real treasure trove. I really like the Corel Draw "Wespe" you made; I shudder to think what horror would turn out if I attmpted to draw something that complex. Keep uo the good work!

Sincerely,
Ernest
Joel_W
Staff MemberAssociate Editor
AUTOMODELER
_VISITCOMMUNITY
New York, United States
Joined: December 04, 2010
KitMaker: 11,666 posts
AeroScale: 7,410 posts
Posted: Wednesday, January 15, 2014 - 02:35 AM UTC
Those certainly are amazing engine detail pictures.
Rowan, I would assume that the oil on the tires are from the engine removal, rather then from operational use.
Joel
Holdfast
Staff MemberPresident
IPMS-UK KITMAKER BRANCH
#056
_VISITCOMMUNITY
England - South West, United Kingdom
Joined: September 30, 2002
KitMaker: 8,581 posts
AeroScale: 4,913 posts
Posted: Wednesday, January 15, 2014 - 02:51 AM UTC
Hi Ernest, thanks on 2 counts, one for you comments the other for bringing this thread to the front and saving me looking for it to add this update

I have finally got some paint on the interior parts I painted cockpit parts RLM66, pre-shading the undercarriage parts with it at the same time. yesterday I painted the undercarriage parts RLM02:


I have kept up with doing something with the kit everyday, no matter how small, apart from today! Although I have re-found my modelling mojo I seem to have not found the part that tells me how to proceed? I'm working on it

While painting this kit I also painted the cockpit and undercarriage parts of the 1/32 He162 that has been languishing part build since it first came out because of a wrong fin half in the box, which I was recently sent by Revell I also repainted the cockpit and some other parts that were ruined when I did add a wash; that is sort of why I have lost the bit of my mojo associated with applying a wash! I shall overcome
Joel_W
Staff MemberAssociate Editor
AUTOMODELER
_VISITCOMMUNITY
New York, United States
Joined: December 04, 2010
KitMaker: 11,666 posts
AeroScale: 7,410 posts
Posted: Wednesday, January 15, 2014 - 03:27 AM UTC
Mal, nice job on the pre-shading. It's looking real good.
Joel
DougN1
_VISITCOMMUNITY
Georgia, United States
Joined: August 08, 2011
KitMaker: 410 posts
AeroScale: 409 posts
Posted: Wednesday, January 15, 2014 - 05:14 AM UTC
Looking good Mal!

I didn't put the sway braces on my bomb rack as I couldn't figure out how to get them to fit properly.

Also, I've stopped using a wash for cockpits, etc as I find I can get the result I want with preshading, and find that washes tend to get the cockpit far dirtier than it really would have been in real life.

Doug
greif8
_VISITCOMMUNITY
Bayern, Germany
Joined: January 17, 2006
KitMaker: 673 posts
AeroScale: 492 posts
Posted: Wednesday, January 15, 2014 - 06:10 AM UTC
Very nice progress Mal. What brand of paints are you using?

Ernest
Holdfast
Staff MemberPresident
IPMS-UK KITMAKER BRANCH
#056
_VISITCOMMUNITY
England - South West, United Kingdom
Joined: September 30, 2002
KitMaker: 8,581 posts
AeroScale: 4,913 posts
Posted: Wednesday, January 15, 2014 - 08:13 PM UTC

Quoted Text

Mal, nice job on the pre-shading. It's looking real good.
Joel


Thanks Joel, I'm pleased with it, apart from the gear legs where I ended up with too much paint and covered it up. No worries though it was in the gear bays that I wanted the effect more than anything; my normal wash will sort out the legs, when I can remember how I do it!


Quoted Text

Looking good Mal!

I didn't put the sway braces on my bomb rack as I couldn't figure out how to get them to fit properly.

Also, I've stopped using a wash for cockpits, etc as I find I can get the result I want with preshading, and find that washes tend to get the cockpit far dirtier than it really would have been in real life.

Doug


Hi Doug, Yes it took a bit of thought and I wracked my brains for days to figure it out. In the end I had to thin the interior of the cut outs in the cover so that the sway brace would fit through and contact the bombs. The out pair on each side can be glued in position, separately from the cover and still allow both parts to fit together; however the inner pairs have to be added after the mechanism and cover are glued together and must be fed through the outer cover cut outs!

Yes I remember way back when I was still building that I had started to experiment with a form of pre-shading for cockpits, much as you describe in your build and I'm beginning to think that I might give it a go with the cockpit of this, by lightening the RLM66 just a tad and spraying only from above? The wheel bays will receive a wash though.


Quoted Text

Very nice progress Mal. What brand of paints are you using?

Ernest


Thanks Ernest, I use White Ensign Models (WEM) Colourcoats enamels
greif8
_VISITCOMMUNITY
Bayern, Germany
Joined: January 17, 2006
KitMaker: 673 posts
AeroScale: 492 posts
Posted: Thursday, January 16, 2014 - 06:22 PM UTC
WEM makes excellent paint, I have a few tins of their uboot colors and I think the color matching is very good.

Ernest
Holdfast
Staff MemberPresident
IPMS-UK KITMAKER BRANCH
#056
_VISITCOMMUNITY
England - South West, United Kingdom
Joined: September 30, 2002
KitMaker: 8,581 posts
AeroScale: 4,913 posts
Posted: Thursday, January 16, 2014 - 07:00 PM UTC

Quoted Text

WEM makes excellent paint, I have a few tins of their uboot colors and I think the color matching is very good.

Ernest


Yep, that's why I like WEM paints, and also because they spray so nicely I have used their paints exclusively since reviewing them on Aeroscale; I have also had a chat with John Snyder about them, which confirmed to me how diligent he is about getting the colours matched accurately
Snorri23
_VISITCOMMUNITY
Ontario, Canada
Joined: March 25, 2010
KitMaker: 514 posts
AeroScale: 244 posts
Posted: Tuesday, January 28, 2014 - 11:48 AM UTC
I have just stumbled upon your thread here. It must be a tedious build for you. Looking forward to your completed projeck.
Holdfast
Staff MemberPresident
IPMS-UK KITMAKER BRANCH
#056
_VISITCOMMUNITY
England - South West, United Kingdom
Joined: September 30, 2002
KitMaker: 8,581 posts
AeroScale: 4,913 posts
Posted: Wednesday, January 29, 2014 - 08:21 PM UTC
Hi Trever, not tedious, I'm just re-finding my mojo This probably wasn't the best kit to do that with but I really want to create masks for the Wespe so I am trying to get on with it.

I haven't quite kept up with doing something every day, unless you count trying to work out what to do! I have painted the interior and undercarriage parts and things were going well until I came to do the wash on the undercarriage parts. I use, or I should now say that, I used to use "Davy's Grey" oil paint for washes on RLM02, Sky, and other similar greeny grey colours, as Davy's Grey is a a brown grey which, in the past, has worked perfectly. For some reason it turned to a very light brown colour when it dried and just didn't look very good. As I said it always worked fine in the past so I tried to discover what the problem was, but nothing that I did made any difference. After days of trying I decided that it was never going to work and out of desperation I turned to Paynes Grey. Paynes Grey is a blue grey so I added a little yelow ochre to it which made it greener. As a wash it worked fine, I used the same white spirit that I had been using for the Davy's Grey, so I'm still baffled by what occurred!

However, when I painted the 110, I also painted the He 162 that I have had for years part built, and I repainted the interior of my Bf109E, that I had given a wash some time ago but used turpentine which ruined it so they received a wash too So I now have 2 other models on the go. I haven't posted because I want to detail paint the interior of the 110 before I do, but I'm not sure which "boxes"re black and which are RLM66?

Overall though things are moving forward slowly so I will post when I have some detail painting done