


Hosted by Rowan Baylis
1/32 Bf110 + painted on markings

simon64

Joined: August 19, 2013
KitMaker: 29 posts
AeroScale: 23 posts
Posted: Monday, November 07, 2016 - 10:11 PM UTC
I've only just caught up with this thread - sorry - and I can say that dragon instructions caused me to walk away from modelling (afv's) for months at least having bought a load of there kits. I've vowed i'll NEVER get one again
Holdfast

#056

Joined: September 30, 2002
KitMaker: 8,581 posts
AeroScale: 4,913 posts

Posted: Wednesday, November 23, 2016 - 01:01 PM UTC
I see that my last post on this was in April last year! Having come across this I thought that I would add an update, which may also get me to get on with it!
I showed the masked up canopy and the armoured windscreen, which had to be painted separately. I have done more work with the Wespe and it is close to being perfect (which it must be to work) but this build has totally stalled because I have lost the armoured screen!
i have a ticket in with Dragon but its been there for months now so I don't expect anything to come of it! I have requested the part on forums on Face Book but, of course, nothing, it was a very long shot that if someone had the kit they would let me have the part.
So every time I think about finishing the mask I just think about the lack of armoured screen and think....na!
I am hoping that adding this update it might inspire me to get on with it and deal with the screen later. It looks like I'll have to scratch build it?

Joel_W

Joined: December 04, 2010
KitMaker: 11,666 posts
AeroScale: 7,410 posts
Posted: Thursday, November 24, 2016 - 09:22 PM UTC
Mal,
I'm glad that you're trying to get your Mojo up & running on this build. The effort you've put into your mask would be a shame to waste and not finish the project and the model as well.
Believe me, I know your frustration when it comes to loosing parts, and having to resort to scratching them out. some have turned out better then others, but all are better then just omitting them, or putting the build on indefinite hold.
Joel

Holdfast
#056
Joined: September 30, 2002
KitMaker: 8,581 posts
AeroScale: 4,913 posts
Posted: Friday, November 25, 2016 - 11:35 AM UTC
I didn't lose my Mojo with this Joel, I want to get it done. I can scratch build, or fix the missing part, if it turns up, or Dragon finally get their finger out but that lack of the part is the cause of this going on the back burner in as much as not getting on with adjusting the Wespe mask. I suppose in the back of my mind it is something that I have to deal with that I didn't need to and I still expect to find it because "I put it away safely!" Scratch building it shouldn't be mega difficult, so I will try and do some more adjustments to the Wespe mask today. That might give me the kick up the arse that I need 

kahunaminor

Joined: April 06, 2008
KitMaker: 151 posts
AeroScale: 141 posts

Posted: Tuesday, December 13, 2016 - 02:32 AM UTC
Mal,
I have sent a PM are the armoured glass.
Regards
I have sent a PM are the armoured glass.
Regards
Holdfast
#056
Joined: September 30, 2002
KitMaker: 8,581 posts
AeroScale: 4,913 posts
Posted: Tuesday, December 13, 2016 - 12:39 PM UTC
Hi Kent, I have replied, thank you very much
Holdfast
#056
Joined: September 30, 2002
KitMaker: 8,581 posts
AeroScale: 4,913 posts
Posted: Saturday, December 17, 2016 - 12:20 PM UTC
Kent has sent me the missing armoured windscreen, it hasn't arrived but I have been inspired to get on with fitting the Wespe masks. I'm a bit stuck on what I need to do next in as much as the best piece to alter. I will be doing some more test fitting today though.
So very many thanks Kent for doing this it will make this build
So very many thanks Kent for doing this it will make this build
kahunaminor
Joined: April 06, 2008
KitMaker: 151 posts
AeroScale: 141 posts
Posted: Sunday, December 18, 2016 - 02:28 AM UTC
Not a problem Mal,
I won't be using it so it will have a good home. I'm just sorry I missed the thread earlier.
Regards
I won't be using it so it will have a good home. I'm just sorry I missed the thread earlier.
Regards
Holdfast
#056
Joined: September 30, 2002
KitMaker: 8,581 posts
AeroScale: 4,913 posts
Posted: Tuesday, December 20, 2016 - 01:01 PM UTC
Quoted Text
I won't be using it so it will have a good home. I'm just sorry I missed the thread earlier.
It certainly will have a good home and good things come to those who wait
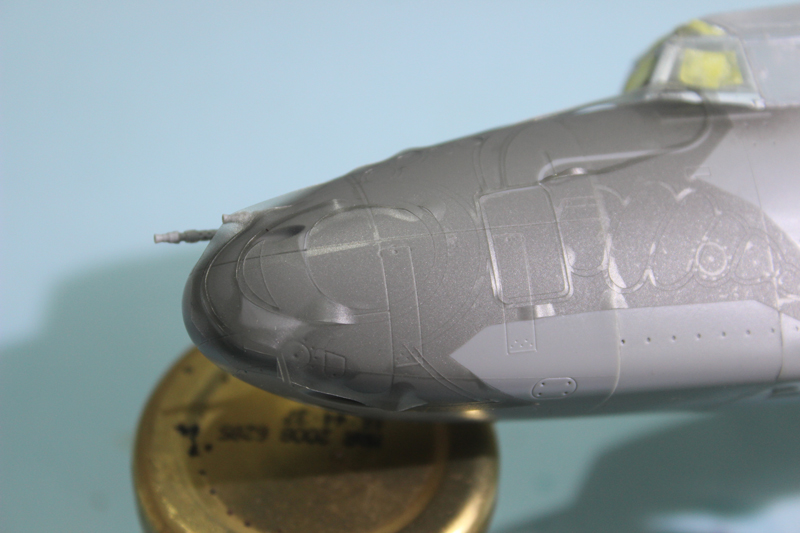
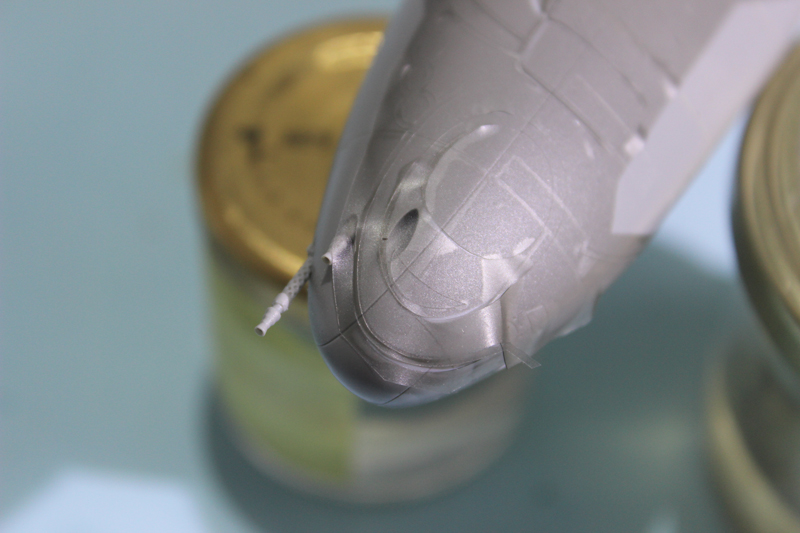
Just to give you an idea of what I am dealing with here are a couple of photos. I had realised that I had been placing the mask too far to the rear and that I had been trying to position the underside part, where the to separate masks will meet, first. This was squwing the whole thing. I started placing the mask further forward and square on to the centre line. This then looked very much more promising. In these 2 photos the mask is a little high, I haven't yet found the reference point to which I can align it! It also need to be further forward. Moving it further forward will compound the problem of the mask not being able to conform to the nose but I think that I can see the way forward.
It took me 5 trial fittings, without any adjustment, to get to here and you can see the problem. Different parts of the mask are rucked up. The good thing is that they are really only the outer edge, the surrounding part of the mask and the black outline and the yellow main body of the actual mask but only at the extreme nose.
You may appreciate that transferring this 5 times (I've already done it quite a number of times in the past) becomes quite a chore, mainly in the removal! The fact that I am only trying to get the position right at the moment means that I know that there is still a lot of this to do when I start doing the adjustments. I could just transfer a shape but I have also been trying to find out what I need to do to get it to fit. As I think that I know what I can do I will concentrate on getting the positioning right, using just a blank (that I will be able to re-position as much as I need until I know, then I can work out the ideal reference positions). With that achieved I can then take some measurements and start doing the necessary adjustments.
In these pictures, ignore the lifted mask at the wing, I cocked this up when lifting it off the backing sheet. and this sort of issue is one of the reasons why I supply 4 of everything. The lifted part is actually part of the thin black outline. The actual area of concern is at the nose, you can see where the mask elements of rucked up.
Wish me luck I aim to have this sorted by the new year
Holdfast
#056
Joined: September 30, 2002
KitMaker: 8,581 posts
AeroScale: 4,913 posts
Posted: Sunday, January 01, 2017 - 05:43 PM UTC
Well I never did find the time to get this sorted by the new year but I have progressed.
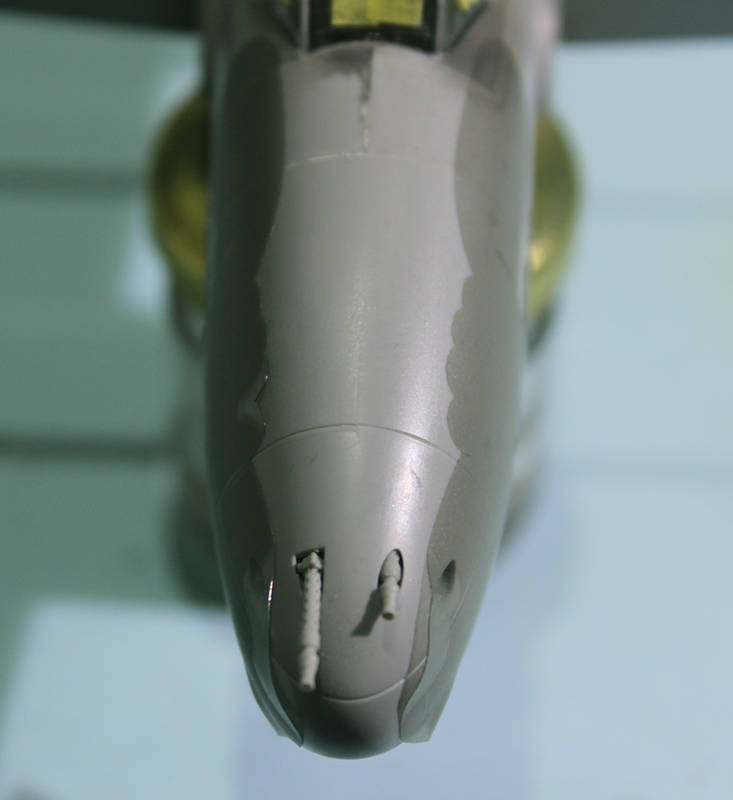
I cut the blank of the Wespe, for both sides and played around to find the proper position and to work out how I can position the actual masks.
This first picture shows the position.

This second one shows that the underside needs moving so that these 2 lower parts actually meet. The points should hit the panel lines, or there abouts and the straight edges should meet. If I can get this right it might be the point at which to centralise the pair of masks?

Or I might just make a mask that is designed to accommodate this shape on the upper nose, to centralise the masks?
I cut the blank of the Wespe, for both sides and played around to find the proper position and to work out how I can position the actual masks.
This first picture shows the position.
This second one shows that the underside needs moving so that these 2 lower parts actually meet. The points should hit the panel lines, or there abouts and the straight edges should meet. If I can get this right it might be the point at which to centralise the pair of masks?
Or I might just make a mask that is designed to accommodate this shape on the upper nose, to centralise the masks?
Joel_W
Joined: December 04, 2010
KitMaker: 11,666 posts
AeroScale: 7,410 posts
Posted: Sunday, January 01, 2017 - 08:16 PM UTC
Mal,
Amazing work. Seems to me that you're making masks do things that one would have thought impossible.
Joel
Amazing work. Seems to me that you're making masks do things that one would have thought impossible.
Joel
Holdfast
#056
Joined: September 30, 2002
KitMaker: 8,581 posts
AeroScale: 4,913 posts
Posted: Monday, January 02, 2017 - 01:02 PM UTC
Quoted Text
Mal,
Amazing work. Seems to me that you're making masks do things that one would have thought impossible.
Joel
Well I try
and this is why it takes so long. There's a lot of thinking involved in how its all going to work. Not so bad if its just a one off for me but it is a dead cert that others will want to use these masks as well. That means writing instructions.It would all be a lot easier if I used positive masks but that isn't the way that these markings were applied so that would defeat any need/want to realistically weather the markings. Applying the masks will get a whole lot more difficult when it is all the cut elements and then transfer tape is added, so there has got to be a specific starting point. At each trial fitting though I can start to see how it will work
Holdfast
#056
Joined: September 30, 2002
KitMaker: 8,581 posts
AeroScale: 4,913 posts
Posted: Friday, January 06, 2017 - 08:19 PM UTC
Kent Strickland, very many thanks. The armoured wind screen arrived today. I have put it safely away and you have saved this build
kahunaminor
Joined: April 06, 2008
KitMaker: 151 posts
AeroScale: 141 posts
Posted: Saturday, January 07, 2017 - 03:12 AM UTC
Quoted Text
Kent Strickland, very many thanks. The armoured wind screen arrived today. I have put it safely away and you have saved this build
My pleasure,
I trust it isn't the same safe place you've used before? 😉
Regards
Holdfast
#056
Joined: September 30, 2002
KitMaker: 8,581 posts
AeroScale: 4,913 posts
Posted: Saturday, January 07, 2017 - 12:45 PM UTC
Quoted Text
I trust it isn't the same safe place you've used before?
 Absolutely not! I don't even know where that "safe" place is I do know that after painting it will go into a zip lock bag and put into the kit box until it is fitted.
 Many thanks again, you have got this build back on track. I will get the Wespe mask finalised then I can paint the fuselage and get it painted. It will take a while yet but I am now aiming for Telford this year
 |

WEB HOSTING BY


Copyright ©2021 AeroScale and Kitmaker Network, a subsidiary of Silver Star Enterprises
All Rights Reserved. Please read our Conditions of Use and Privacy Policy.
All Rights Reserved. Please read our Conditions of Use and Privacy Policy.