_GOTOBOTTOM
World War II: Germany
Aircraft of Germany in WWII.
Hosted by Rowan Baylis
1/32 Bf110 + painted on markings
Holdfast
Staff MemberPresident
IPMS-UK KITMAKER BRANCH
#056
_VISITCOMMUNITY
England - South West, United Kingdom
Joined: September 30, 2002
KitMaker: 8,581 posts
AeroScale: 4,913 posts
Posted: Wednesday, November 20, 2013 - 11:08 PM UTC
Well I intend to paint on all the markings, the main markings wont be a problem but we'll have to wait and see about the big wasp on the nose.

After returning from the Scale Modelworld show in Telford the other week end I was determined to crack on and get some modelling done. Having effectively done no modelling for getting on for 5 years I felt that my modelling mojo had been lost. I have completed 3 models in that time but they were all a struggle. I decided to start this Dragon Bf110C-7 as I bought it when it first came out and I really wanted to do the "Wespe" nose art as a mask. I intend to do something on this every day until completion (apart from the time that I will be "up country" for my grand daughters 1st birthday celebrations

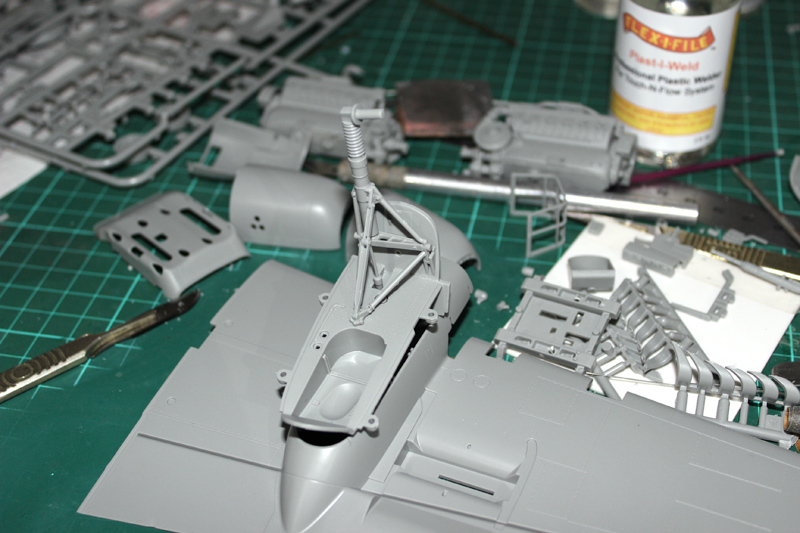
So far I have achieved that aim and I actually feel my mojo gradually returning. I am building this out of the box and I won't be showing any of the superb engine detail but I have built the engines almost completely because I did actually enjoy doing it. The only part that will be visible will be the oil cooler radiator faces, but but I did like the idea of actually attaching them to the engine and I used the building of the engines to help kickstart the return of my mojo

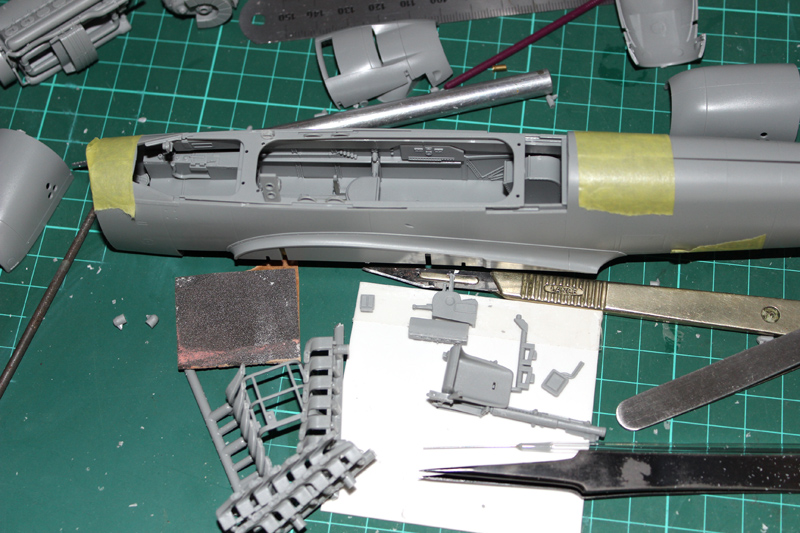
This pictures was taken 3 days ago and is just to show that I have done something. I will post more pics every few days, hopefully, to show the progress.


The fit of parts,so far is good but the instructions leave a lot to be desired! some parts aren't mentioned, some are shown fixed to the the wrong part! And there are no colour call outs for any of the internal parts (I also think that the external colours may be wrong, look out for a nother post about this) Doesn't dragon have someone do a test build? Having found this out I trawled the internet for reviews and found some conflicting information about the fit of parts and the fact that parts weren't mentioned or were shown fitted wrongly. Anyway I have checked the instructions carefully and test fitted and sorted out construction as I have gone and, so far, I haven't had any problems and the fit seems to be really good. The best bit of advice that I found was from Rowan, our esteemed editor, suggesting to another member, who asked about the internal colours, that he download Eduards instructions. I did and that solves that problem, thanks Rowan
Joel_W
Staff MemberAssociate Editor
AUTOMODELER
_VISITCOMMUNITY
New York, United States
Joined: December 04, 2010
KitMaker: 11,666 posts
AeroScale: 7,410 posts
Posted: Thursday, November 21, 2013 - 03:29 AM UTC
Mal, I was some what surprised to read that you've been basically a non-builder for the past 5 years, with just 3 completed models to your credit. I'm sure that the time & effort it takes to create sets of masks, makes staying focused (Mojo) on a build is rather difficult to plain impossible. Glad to read that your Mojo has returned.

I'll be following your Me-110C build with interest. Wish I could help you with the proper colors, but I build mostly USA WW11 aircraft these days.

Just keep those updates coming.

Joel
Holdfast
Staff MemberPresident
IPMS-UK KITMAKER BRANCH
#056
_VISITCOMMUNITY
England - South West, United Kingdom
Joined: September 30, 2002
KitMaker: 8,581 posts
AeroScale: 4,913 posts
Posted: Thursday, November 21, 2013 - 08:56 PM UTC
Thanks Joel
When I put my house up for sale I had to clear my room so that it could be re plastered, so everything went into packing boxes ready for the move. It then took 3 years before the house sold. Moving from a large 4 bedroom house to a 3 bedroom bungalow meant that I had to build a man cave, as well as having to re-furbish the new home. The garden came next and that is just about finished 2 years after moving here. I am basically aiming at building the 1/32 scale kits that I bought first before tackling the later ones, like the Tamiya Spits and P-51. If I am to get around to building them under that premise I need to get a wiggle on The recent Telford show has been the catalyst which I have channeled into getting things moving. I am actually really looking forward to moving on each day with this build, I even do something while my PC is booting up in the morning


Quoted Text

Just keep those updates coming.


If interest is shown I will keep the updates coming. It does seem as if most only post within the group build threads, which is fine if that's what members want to do, but posting when there are a 100+ views and no comments just seems a bit pointless. When I was posting regularly there was nearly always a discussion started about techniques or something which helped to pass on information. It seems to me that many don't post because they feel that they are ignored; regardless of the argument (in the thread on the subject) that a load of views is the same as getting loads of comments. I don't think that it is; if you have loads of views and no comments that sort of shows that no one is interested?

Sorry gripe over

I have taken some pics this morning and I need to take a couple more, I should be posting them later today if I get the masks posted that need to go out today
DougN1
_VISITCOMMUNITY
Georgia, United States
Joined: August 08, 2011
KitMaker: 410 posts
AeroScale: 409 posts
Posted: Friday, November 22, 2013 - 01:38 AM UTC
Mal,

The lots of views and few comments does seem to be the "norm" here on Aeroscale

Having built the kit myself (build blog here on Aeroscale) I'll be interested to see how you tackle the kit! Overall mine was actually a pretty good build.

Doug
Joel_W
Staff MemberAssociate Editor
AUTOMODELER
_VISITCOMMUNITY
New York, United States
Joined: December 04, 2010
KitMaker: 11,666 posts
AeroScale: 7,410 posts
Posted: Friday, November 22, 2013 - 03:40 AM UTC
Mal, I was and still part of the that thread. There are a lot of guys here that feel the same way. Why post a build blog, only to have views after views but hardly a post. Just look at my Devastator blog. Over 3,200 views and less then 60 posts, of which more then 40 are mine. My SBD-4 Blog is even worse. 71+ posts and 4,200 views, and most of the posts are mine. Campaigns gets more posts, but you have to take into consideration that the posts to a great extent are members posting their progress. Usually there are just a few posts in reference to your build. Like you said, that's just the way it is here, and for that matter on most modeling forums.

I take views in a positive manner, that at least someone is looking.

Joel
ludwig113
_VISITCOMMUNITY
England - South East, United Kingdom
Joined: February 05, 2008
KitMaker: 1,381 posts
AeroScale: 1,110 posts
Posted: Friday, November 22, 2013 - 07:18 AM UTC
keep the updates coming !

paul
Holdfast
Staff MemberPresident
IPMS-UK KITMAKER BRANCH
#056
_VISITCOMMUNITY
England - South West, United Kingdom
Joined: September 30, 2002
KitMaker: 8,581 posts
AeroScale: 4,913 posts
Posted: Friday, November 22, 2013 - 07:26 PM UTC
The whole idea about posting is not for self gratification but to show what you are doing and to a) help others with there progress in the hobby by answering questions on your techniques, and b) listening to the point of view of others and learning from there methods and excepting criticism to help you improve your own modelling. If no one is commenting or asking questions or showing any interest there seems, to me, to be no point in the exercise. It takes time to get the pictures together, edit them, write the post and post the pics. Not an onerous task but I am pretty busy with the Mask business and as the ultimate reason for posting this is to show the painted on markings I will find myself questioning whether to post here or elsewhere. I usually post the build log here and only post the finished pics elsewhere, but it might be that the other way around would be a better option. Ultimately I am trying to get the idea of painted on markings to a wider audience. Of course so far there is nothing to see or comment about with this build but we will see what happens as paint starts to be applied, I will be trying something that is not new, nor to me, but I'm going to approach it from a different angle, for me

Seeing some of Jim's videos and others on you tube I plan on trying to put together a couple of videos of the process of painting on the markings. I only have a cheap little video camera but it could be the start of something big I have a Mistel that has been languishing for years, waiting for the markings. It was in this state long before I even thought about paint masks, so maybe that could be the guinea pig for my film efforts?

Anyway, progress has been made and I have taken a couple of pics but I want to take some more so I should be able to post them later today. I really do think that my modelling mojo has returned, I turn to the modelling bench while my PC is booting up and do a little bit, even if just studying the instructions I also find my self looking forward to cracking on with the model. So all is good at the moment

Doug, can you put up a link to your build please?
MrMtnMauler
_VISITCOMMUNITY
Washington, United States
Joined: January 15, 2011
KitMaker: 224 posts
AeroScale: 223 posts
Posted: Saturday, November 23, 2013 - 05:38 AM UTC
Hi Mal, in case you are interested, there is a very helpful instruction errata on Hyperscale from 2008 by Brett Green. I really appreciated having it when I built this kit. I posted my build here on Aeroscale for what it's worth. I used aftermarket markings for the Wesspe machine. I hope this is helpful, take care.
Jim.
Littorio
_VISITCOMMUNITY
England - South East, United Kingdom
Joined: September 15, 2004
KitMaker: 4,728 posts
AeroScale: 1,351 posts
Posted: Saturday, November 23, 2013 - 07:01 AM UTC
Following along Mal, I'll be interested in how you tackle the wasp paint mask.
Unfortunately my Bf-110 knowledge is quite small so I can't help with your filter/camo questions.

I have an Eduard 1/48 profipack 110C which I got cheap (BoB markings) but thats it.
Joel_W
Staff MemberAssociate Editor
AUTOMODELER
_VISITCOMMUNITY
New York, United States
Joined: December 04, 2010
KitMaker: 11,666 posts
AeroScale: 7,410 posts
Posted: Saturday, November 23, 2013 - 09:20 AM UTC
Mal, the instructional video is a fantastic idea. For someone like me (old and & slow), it could get me started with using masks to a greater degree then I do now.

For builds that I'm really interested in, whether super detailing, modifications, painting with Masks, etc. I tend to post after just about every update. For me the interaction is a win/win deal. Of course there is one other aspect of posting that slowly has been a very positive experience for me, and that's making new friends, and others knowing who I am, as well as the level of my modeling.
Joel
DougN1
_VISITCOMMUNITY
Georgia, United States
Joined: August 08, 2011
KitMaker: 410 posts
AeroScale: 409 posts
Posted: Saturday, November 23, 2013 - 04:29 PM UTC
Mal,

I certainly agree with you on why we post build threads and the challenge of lack of feedback. As mentioned, I figure if I am getting high view numbers that there has to be a lot of repeat visitors to the thread so they must be coming back again for a reason, lol

As requested, here is my 1/32 Dragon 110D-3 Build thread - hope it can give you some useable tips

Doug
Holdfast
Staff MemberPresident
IPMS-UK KITMAKER BRANCH
#056
_VISITCOMMUNITY
England - South West, United Kingdom
Joined: September 30, 2002
KitMaker: 8,581 posts
AeroScale: 4,913 posts
Posted: Saturday, November 23, 2013 - 10:03 PM UTC
Doug, thanks for that, a fantastic build and lots to view again during mine, stay close I will have a few questions
AIRGUNNER
_VISITCOMMUNITY
England - South East, United Kingdom
Joined: September 27, 2006
KitMaker: 246 posts
AeroScale: 234 posts
Posted: Saturday, November 23, 2013 - 11:44 PM UTC
Hi Mal,

I certainly will be following your build, I for one am hugely interested in how you will tackle the wasp. Also a video on use of the masks would be very handy, I've used yours for code letters, but have been a bit wary for roundels etc. I have an Airfix Lanc in the pipeline I would like to go to town on and will be in touch shortly to order up some masks as soon as the scheme is decided. Can you do bomber serials in 1/72nd? I thought they maybe a bit small.
Holdfast
Staff MemberPresident
IPMS-UK KITMAKER BRANCH
#056
_VISITCOMMUNITY
England - South West, United Kingdom
Joined: September 30, 2002
KitMaker: 8,581 posts
AeroScale: 4,913 posts
Posted: Sunday, November 24, 2013 - 09:10 PM UTC
Hi Steve,

Quoted Text

I certainly will be following your build, I for one am hugely interested in how you will tackle the wasp.


Yes me too

Quoted Text

Can you do bomber serials in 1/72nd? I thought they maybe a bit small.


Yes, no they are well within the capabilities of what I can now do, Check this out:
1/72 scale Spitfire with all the markings painted on

I have been doing something with the bf110 every day as planned and it is coming together slowly but surely a lot of the time has been spent trying to understand where exactly the parts actually go because the instructions leave a lot to be desired in the this bit goes here, that bit goes there department!

This shows the fuselage test fitted around the cockpit, a nice fit and I was also deciding whether or not to fit the side walls to the fuselage halves rather than to the floor and bulkheads, as suggested in another online build; that said that was the only way to make sure that the upper decking fits properly. Not true, fit the side walls to the cockpit internals and everything fits very well I also hollowed out the exhausts, I may do it again on the other set just to see if I can do it a little better as the ball burr kicked of a couple of times. It is odd that dragon have hollowed out the cannon and machine guns but not the exhaust pipes? especially as 2 sets point upwards and it will be pretty obvious!


The instructions are not very clear on which of the undercarriage bay upper and front end walls go where so, as they are a critical part of the wing assembly, I fitted them into the nacelle and glued them together while in situe. As you can see there is a very positive fixing for the roof part and then only the correct forward wall will fit.


With the previous parts temporarily in place I fitted the strengthening ribs. These, again, took some working out as the instructions only show one side of one bay numbered, with other numbers in brackets. Within the instructions, and as is usually the case, this usually indicates similar parts in a handed part, in this case the opposite wing. But looking at the bracketed numbered parts they look totally different, the bracket numbers refer to the opposite side of the nacelle! The parts for the opposite nacelle are not illustrated in the instructions at all but, luckily, they are adjacent to and numbered consecutively with the parts that are illustrated. Once you realise that it is then easy, but it didn't have to be that complicated! Also the rear hooped rib is shown fitted to the roof part! there are no positioning guides there but there is a groove in the nacelle, so it is fitted there!


Similarly the undercarriage has only the 1 illustration and needs a bit of care to make sure that the parts are correctly orientated. I built up the first one using the previously build forward and roof bulkheads to make sure that everything is aligned properly. the struts are not glued to the bulkheads at this stage, to ease painting. Again a very good fit when you have sorted out where everything goes!


I'll take some pictures of the instructions to better illustrate the issues and more pictures of progress when there is something to show. Even though the instructions are a real pain I'm not complaining too much as I feel that having to and being able to sort out the issues is actually helping me to re-find my modelling mojo, as I really look forward to being able to get on with the build.
Joel_W
Staff MemberAssociate Editor
AUTOMODELER
_VISITCOMMUNITY
New York, United States
Joined: December 04, 2010
KitMaker: 11,666 posts
AeroScale: 7,410 posts
Posted: Monday, November 25, 2013 - 01:59 AM UTC
Mal,
Looks like you're making slow but steady progress, which is your plan of attack. Boy, do I feel your frustrations with the instructions. It's one thing with the older, simpler kits, but the newer generation of models are well detailed, and need far superior instructions then the hand drawn after thoughts we get with so many kits today. Leaving part numbers off, wrong part numbers, incomplete line drawings, omitting parts, and having steps in the wrong order is something that they really need to address.

Perhaps they feel that only advanced modelers build their kits, and that we don't read nor follow the instructions.

I can attest to how consistently poor Dragon's instructions are when building their excellent 1/35 scale Armor kits (specifically their M4 Sherman's).

I often wonder if anyone actually test builds these kits following the instructions. More then likely they don't report these issues as they don't want to cause problems with the production of the kit. And when they do, we often get a little add on piece of paper with the correction rather then them taking the time to correct the instruction sheet, which I'm sure already went to the printers.

Joel
Holdfast
Staff MemberPresident
IPMS-UK KITMAKER BRANCH
#056
_VISITCOMMUNITY
England - South West, United Kingdom
Joined: September 30, 2002
KitMaker: 8,581 posts
AeroScale: 4,913 posts
Posted: Monday, November 25, 2013 - 08:38 PM UTC

Quoted Text

I often wonder if anyone actually test builds these kits following the instructions. More then likely they don't report these issues as they don't want to cause problems with the production of the kit. And when they do, we often get a little add on piece of paper with the correction rather then them taking the time to correct the instruction sheet, which I'm sure already went to the printers.

Joel


My thoughts exactly! with the CAD drawings that they make there are no excuses for not using them to save what would probably be 1 page in the instructions. Maybe the guy that writes the instructions does the test builds? Then he wouldn't find any fault
Holdfast
Staff MemberPresident
IPMS-UK KITMAKER BRANCH
#056
_VISITCOMMUNITY
England - South West, United Kingdom
Joined: September 30, 2002
KitMaker: 8,581 posts
AeroScale: 4,913 posts
Posted: Wednesday, November 27, 2013 - 08:24 PM UTC
OK I have continued with my quest to try and do something with this every day (within reason as Christmas is on its way and I will be away for a week prior to that for my grand daughters first birthday ). I have completed the other undercarriage and glued the 2 larger bombs together and prepped some other internal details for painting, but nothing worth photographing yet.

Having had plenty of help to confirm the colour scheme and the internal colour I have a couple more questions:
1. The instructions show what I assume is a deflector shield over/under the starboard inner exhausts, but there is only the one, nothing over the opposite exhuast. So does anyone know what it is for and if it should actually be fitted or not, and why not one on the opposite side?

2. I would understand the shield above if it was on both sides to prevent the engine instruments on the internal faces of the engine nacelles from getting covered in soot from the exhausts. My next question is about these instruments; the instructions seem to show glazed parts fitted to both sides of the nacelle, so:
a). I know that the instruments were only on the inside face so were there holes on both sides and were they blanked off on the outer side and if so was it with an internal or external blanking plate? Or were they glazed and painted over?
b). The instruments are provided in the grey plastic but they are not mentioned in the instructions and I cannot find them fitted in any of the drawings. There is a pin on the back side of the part which suggests that it might be fitted to the engine or engine support, but I can't find any likely location for it, does anyone know where they fit?
3. I have thought of another one, should the roll cage be fitted, I've read that it shouldn't but every build of this model that I have seen has it fitted?
Holdfast
Staff MemberPresident
IPMS-UK KITMAKER BRANCH
#056
_VISITCOMMUNITY
England - South West, United Kingdom
Joined: September 30, 2002
KitMaker: 8,581 posts
AeroScale: 4,913 posts
Posted: Thursday, November 28, 2013 - 02:17 AM UTC
I first drew the nose art of the "Wespe" some years ago, when I was new to Corel Draw and when I took a look at the file to see if I would need to do anything I was a bit shocked as to how bad it actually was! It had taken me quite some time over a few days to draw it back then so I wasn't relishing the thought of re-drawing it! However I need to get it done so I made a start and in 40-45mins I had finished It is so much better than the original and took me no time at all I have clearly tought myself well;I still need to try it out on the nose of the model and see what,if any adjustments need to be made, but its drawn which is the main thing, the rest of the markings will be easy

Joel_W
Staff MemberAssociate Editor
AUTOMODELER
_VISITCOMMUNITY
New York, United States
Joined: December 04, 2010
KitMaker: 11,666 posts
AeroScale: 7,410 posts
Posted: Thursday, November 28, 2013 - 02:29 AM UTC
Mal, Impressive. I have no artistic talent, and couldn't manage to accomplish that in a life time of trying.
Joel
Holdfast
Staff MemberPresident
IPMS-UK KITMAKER BRANCH
#056
_VISITCOMMUNITY
England - South West, United Kingdom
Joined: September 30, 2002
KitMaker: 8,581 posts
AeroScale: 4,913 posts
Posted: Thursday, November 28, 2013 - 02:55 AM UTC
Well Joel, like modelling, its easy(ish) when you know how The trick will be in how easy I can make it to actually use!
Joel_W
Staff MemberAssociate Editor
AUTOMODELER
_VISITCOMMUNITY
New York, United States
Joined: December 04, 2010
KitMaker: 11,666 posts
AeroScale: 7,410 posts
Posted: Thursday, November 28, 2013 - 03:04 AM UTC

Quoted Text

Well Joel, like modelling, its easy(ish) when you know how The trick will be in how easy I can make it to actually use!


Mal, knowing and being artistically enabled is too different things. If it wasn't for someone inventing the ruler, I couldn't draw a straight line.

Joel
MrMtnMauler
_VISITCOMMUNITY
Washington, United States
Joined: January 15, 2011
KitMaker: 224 posts
AeroScale: 223 posts
Posted: Thursday, November 28, 2013 - 05:40 AM UTC

Quoted Text


Quoted Text

I often wonder if anyone actually test builds these kits following the instructions. More then likely they don't report these issues as they don't want to cause problems with the production of the kit. And when they do, we often get a little add on piece of paper with the correction rather then them taking the time to correct the instruction sheet, which I'm sure already went to the printers.

Joel


My thoughts exactly! with the CAD drawings that they make there are no excuses for not using them to save what would probably be 1 page in the instructions. Maybe the guy that writes the instructions does the test builds? Then he wouldn't find any fault


Gentlemen, I certainly feel for your frustration. Just as a point of curiosity, did you find the errata by Brett Green helpful that I had suggested earlier? Take care
Jim
chukw1
_VISITCOMMUNITY
California, United States
Joined: November 28, 2007
KitMaker: 817 posts
AeroScale: 729 posts
Posted: Thursday, November 28, 2013 - 08:41 AM UTC
Wonderful wespe, Mal! I wonder how this will work in 1/48? I've take a look into those exhaust deflectors- in addition to keeping the instrument cluster clean, they do a nice job of keeping all that nasty burnt gas out of the supercharger intake as well. Handy, those German engineers. ;D

As for the cowling windows, photos show them on both sides- and on early and late aircraft. Photos also show them not in evidence on the outer sides of the nacelles- and one pic of a G model I found definitely shows the window partially painted over. The instrument cluster was mounted to the engine mount at it's top vertice. I doubt there were clusters on the outer sides- I have seen photos of exposed engines with no outer clusters mounted. Check your kit's engine mounts for a pinhole to attach the cluster. The Squadron walk Around has some decent shots of the Battle of Britain museum' G engines in all their neglected glory!

Roll cage? I've heard that it's only for later models, but can't confirm.
JohnVasco
_VISITCOMMUNITY
England - East Anglia, United Kingdom
Joined: July 27, 2008
KitMaker: 54 posts
AeroScale: 49 posts
Posted: Thursday, November 28, 2013 - 09:25 AM UTC
The dials on the engine. Here's Fernando Estanislau's drawing of it for our book on the 'C, D & E':


As for placement, look here:


Hope this helps.
Merlin
Staff MemberSenior Editor
AEROSCALE
#017
_VISITCOMMUNITY
United Kingdom
Joined: June 11, 2003
KitMaker: 17,582 posts
AeroScale: 12,795 posts
Posted: Thursday, November 28, 2013 - 09:29 AM UTC
Hi John

Many thanks - those shots are amazing! Just look at some of the details, like the oil(?) drips all over the tyre.

All the best

Rowan
 _GOTOTOP