Cold War (1950-1974)
Discuss the aircraft modeling subjects during the Cold War period.
Hosted by Tim Hatton
Academy's 1/48 scale F4B Phantom 11
Joel_W
Staff MemberAssociate Editor
AUTOMODELER
_VISITCOMMUNITY
New York, United States
Joined: December 04, 2010
KitMaker: 11,666 posts
AeroScale: 7,410 posts
Posted: Tuesday, April 22, 2014 - 06:02 AM UTC

Quoted Text

Joel

Great job on the NMF, it looks great. I'm doing the same model and I had only two small gaps at the bottom side of the intake parts. The rest of the parts did not need any filler or sanding. Very impressed with the quality of the parts fit so far.


Ernie,
Thanks for the compliments. And yes, the parts fit is 2nd to none.

For what it's worth, I'm just about done decaling the top of the F4B, then will do some touch up painting, and finally post another update. Feels like I haven't done one forever.
Joel
plastickjunkie
_VISITCOMMUNITY
Florida, United States
Joined: December 31, 2009
KitMaker: 399 posts
AeroScale: 132 posts
Posted: Wednesday, April 23, 2014 - 12:54 AM UTC
Did the F-4B have the dual mounted intake pitot tubes? The kit doesn't bring any and I have been unable to verify from the reference material I have.
Joel_W
Staff MemberAssociate Editor
AUTOMODELER
_VISITCOMMUNITY
New York, United States
Joined: December 04, 2010
KitMaker: 11,666 posts
AeroScale: 7,410 posts
Posted: Thursday, April 24, 2014 - 06:45 AM UTC
It's been a while since my last update, but that's because I've been strictly decaling, including the more then a hundred stencil decals that come with the excellent Cartograf decal sheets. Well, I finally finished the topside of the F4B, leaving just the lower part to decal.

I applied all the decals, no matter their size using the Microscale system:
soak decals in warm water
apply Set to the surface
slide decal on to the surface
apply Set to the top of the decal, and leave for 2 mins. Then pat & roll Qtip to get any trapped air out.
Apply Sol and leave alone To dry.

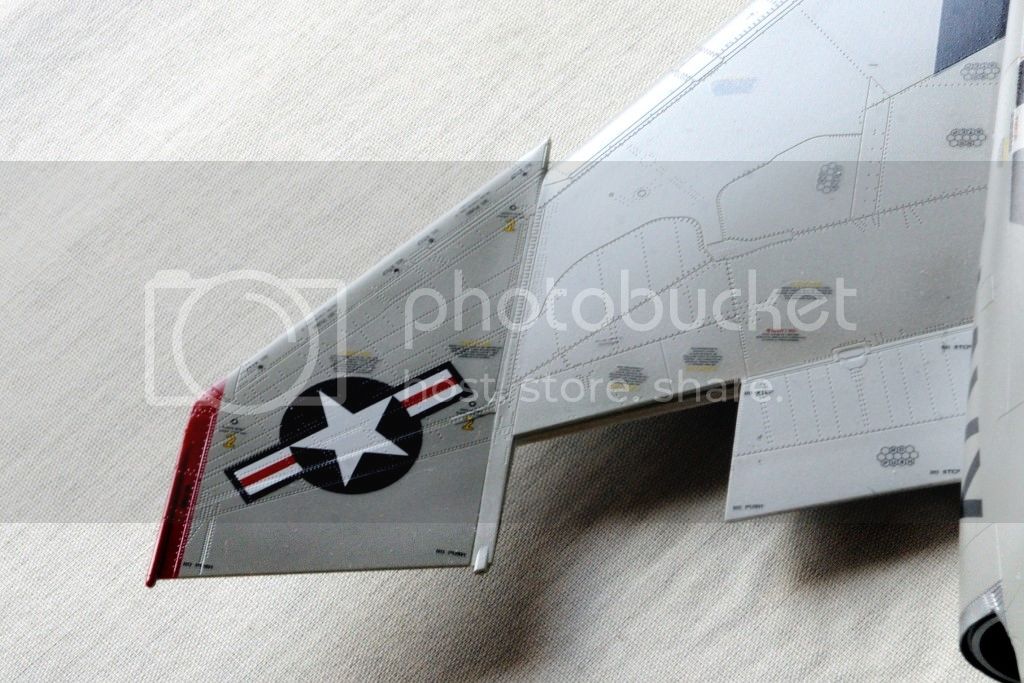
Every single decal snuggled down into any recesses they were over perfectly.


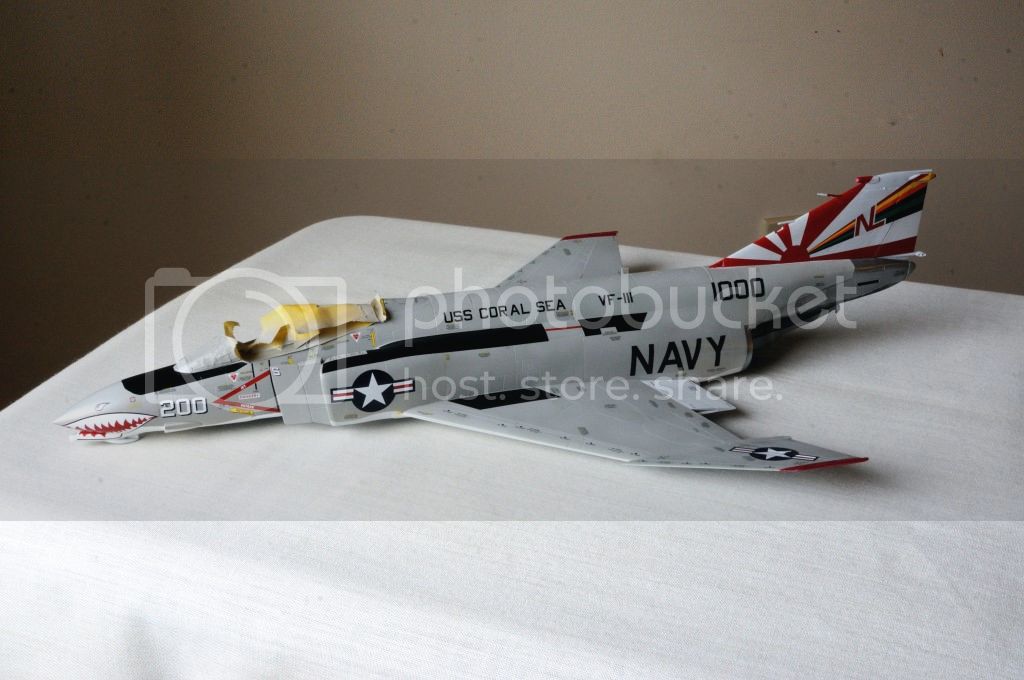
I did have some major concerns with the Sundowners massive tail sun rays and the full multi colored rudder decals. On the 1st side I cut the main decal into two pieces to aid in placement, and cut out the large clear section in the rudder decal. On the other side I cut out every ray, so that there is no clear film to deal with. In either case, the Cartograf decals laid down so well, that wrinkles and flash weren't an issue.


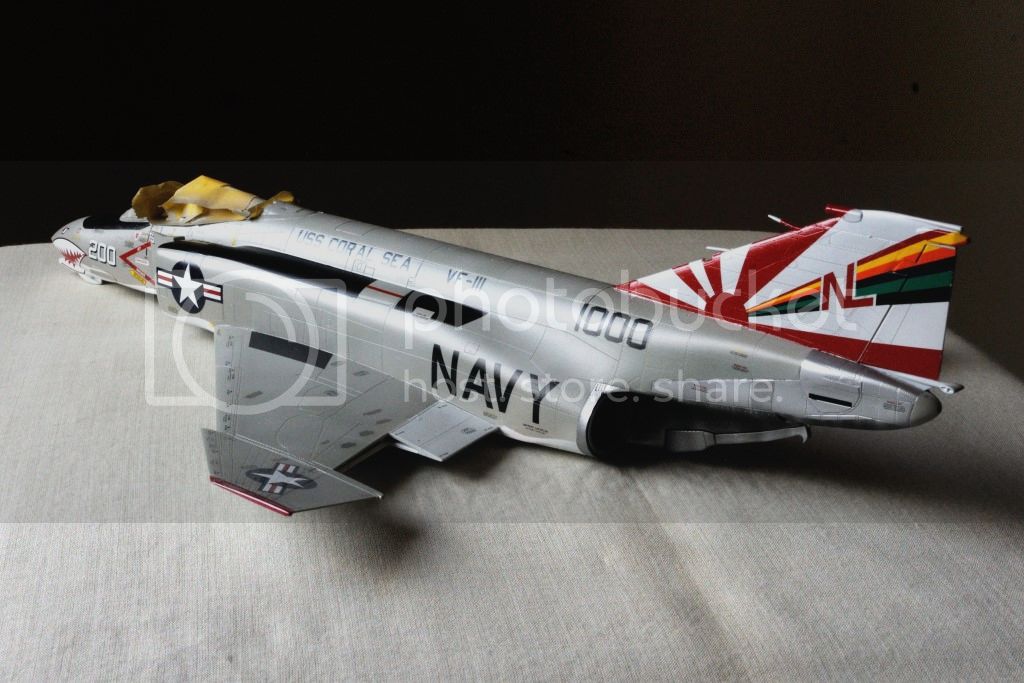
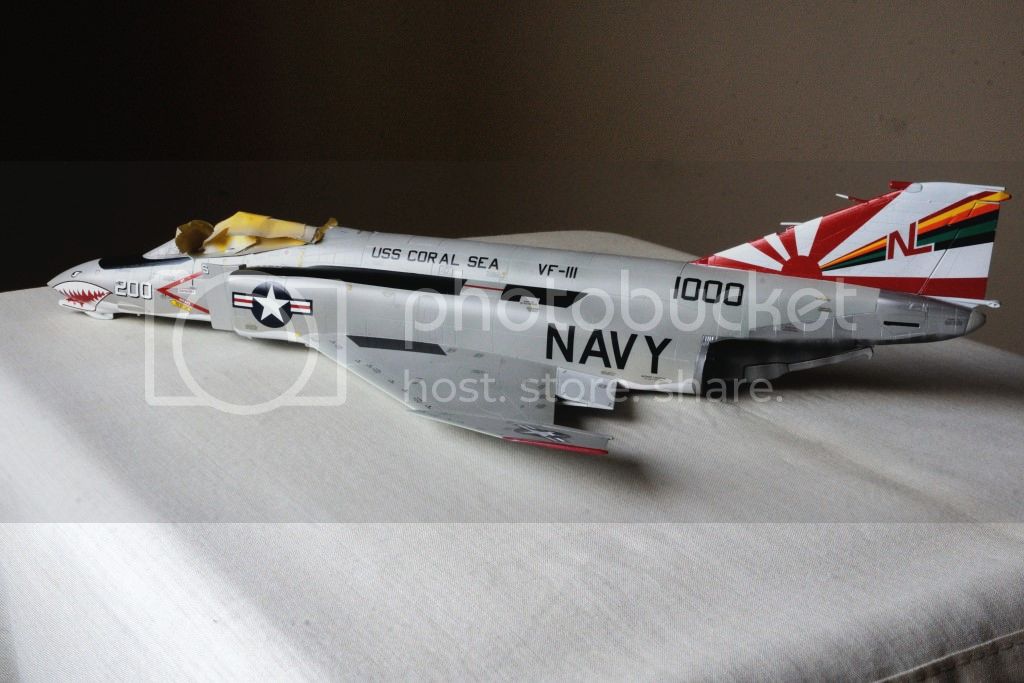
Then came the dreaded sharks mouth. I just knew that I was going to have issues with them as there are compounds curves that just won't make it an easy task. The Shark Mouth does come as a separate upper and lower decals, but I still had little confidence in my ability to get the job done. I started with a upper decal, and the issues just jumped out at me. Struggle I did. Finally I decided to cut the decal where there was either a major bubble or roll that would eventually become an unsightly crease. I then flooded the decals with Set over and over till they started to lay down. Cut and used a needle to get rid of the rest of the issues, then started with coat after coat of Sol. Eventually I just decided to let the decals fully dry and see where I was. To my surprise, the next day, they were really pretty decent. Did a few more touch ups, another coat of Sol, and let them dry. Here's the results:


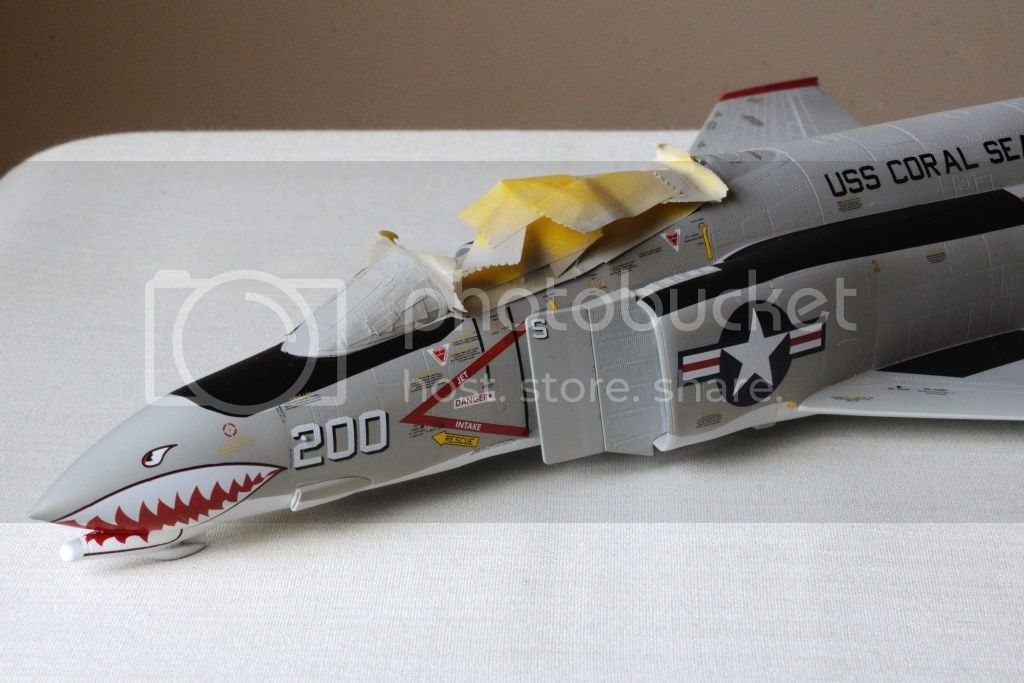
I did have some touch up painting to do where the two jaws meet. This isn't the fault of the decals, it is 100% my fault. I just plain screwed up with their placement.

Here's a few pictures of the overall F4B.

Joel


thegirl
_VISITCOMMUNITY
Alberta, Canada
Joined: January 19, 2008
KitMaker: 6,743 posts
AeroScale: 6,151 posts
Posted: Thursday, April 24, 2014 - 11:59 AM UTC
That's a lot of decals to apply . Your results are note worthy , well done Joel The shark month turned out great , not easy with so many curves . If you had to do this again how would you do it different ?


Terri
darreng
_VISITCOMMUNITY
England - South East, United Kingdom
Joined: January 21, 2006
KitMaker: 789 posts
AeroScale: 118 posts
Posted: Thursday, April 24, 2014 - 09:38 PM UTC
Excellent work Joel!
Joel_W
Staff MemberAssociate Editor
AUTOMODELER
_VISITCOMMUNITY
New York, United States
Joined: December 04, 2010
KitMaker: 11,666 posts
AeroScale: 7,410 posts
Posted: Friday, April 25, 2014 - 04:20 AM UTC

Quoted Text

That's a lot of decals to apply . Your results are note worthy , well done Joel The shark month turned out great , not easy with so many curves . If you had to do this again how would you do it different ?

Terri


Terri,
Thanks for those most kind words. Up close and personal the shark mouth does have a few small wrinkles. If and when I had to do something similar, I would have cut the shark mouth with slits every so often like a pie. That would allow the decal to settle down more naturally without having to deal with so many different compound curves. The Cartograf decals are incredible, and work very well with the Micro system. The other thing I would do is to just let the decal dry after a few applications of Sol rather then keep on poking bubbles and making ad hoc cuts, then applying more Sol. I really think that I over did it needlessly.

Last night I worked the overnight shift, so I'm home till Saturday opening shift. I'll start on the bottom and hopefully will get through all the stencils a lot quicker. I also want to start working on the cans. A friend has sent me some excellent pictures of the real deal, and anything short of dead flat, burn metal, with carbon deposits on the inside is just plain wrong.

Joel
Joel_W
Staff MemberAssociate Editor
AUTOMODELER
_VISITCOMMUNITY
New York, United States
Joined: December 04, 2010
KitMaker: 11,666 posts
AeroScale: 7,410 posts
Posted: Friday, April 25, 2014 - 04:22 AM UTC

Quoted Text

Excellent work Joel!


Darren,
Thank you for taking the time to stop by, and posting your positive comments.
Joel
DougN1
_VISITCOMMUNITY
Georgia, United States
Joined: August 08, 2011
KitMaker: 410 posts
AeroScale: 409 posts
Posted: Friday, April 25, 2014 - 06:02 AM UTC
Looks good Joel, that sure is a lot of stencils!

I always forget to come over to this forum to check your build, but remembered when I saw it as the newest item

Should be a really sharp model when you get it finished!

Doug
Joel_W
Staff MemberAssociate Editor
AUTOMODELER
_VISITCOMMUNITY
New York, United States
Joined: December 04, 2010
KitMaker: 11,666 posts
AeroScale: 7,410 posts
Posted: Friday, April 25, 2014 - 07:20 AM UTC

Quoted Text

Looks good Joel, that sure is a lot of stencils!

I always forget to come over to this forum to check your build, but remembered when I saw it as the newest item

Should be a really sharp model when you get it finished!

Doug


Thanks Doug.
Sometimes I think that it will never get finished. As for this forum not getting as many views as the other forums, that seems to be about right. Guess not many members relate to the cold war aircraft.
Joel
eclarson
_VISITCOMMUNITY
Ohio, United States
Joined: February 22, 2010
KitMaker: 171 posts
AeroScale: 166 posts
Posted: Friday, April 25, 2014 - 03:45 PM UTC

Quoted Text

... A friend has sent me some excellent pictures of the real deal, and anything short of dead flat, burn metal, with carbon deposits on the inside is just plain wrong.

Joel


Joel, you're doing an excellent job on your first jet. Your friend is correct. The early Phantoms were heavy smokers and a properly done model reflects that. And not just the burner cans. As painful as it may be, you've got to cover some of that beautiful metal work under the tail with a few layers of soot and filth. Don't forget the horizontal stabs either! :-)


Cheers,
Eric

Joel_W
Staff MemberAssociate Editor
AUTOMODELER
_VISITCOMMUNITY
New York, United States
Joined: December 04, 2010
KitMaker: 11,666 posts
AeroScale: 7,410 posts
Posted: Saturday, April 26, 2014 - 09:28 AM UTC
Eric,
Thanks posting that picture. Yep, I'm going to have to do more then a little weathering on those cans, and the entire exhaust area. Will still leave enough of the NMF to show through.

Joel
thegirl
_VISITCOMMUNITY
Alberta, Canada
Joined: January 19, 2008
KitMaker: 6,743 posts
AeroScale: 6,151 posts
Posted: Tuesday, April 29, 2014 - 02:31 PM UTC
Well , how are those stickers coming along


Terri
Joel_W
Staff MemberAssociate Editor
AUTOMODELER
_VISITCOMMUNITY
New York, United States
Joined: December 04, 2010
KitMaker: 11,666 posts
AeroScale: 7,410 posts
Posted: Wednesday, April 30, 2014 - 03:38 AM UTC

Quoted Text

Well , how are those stickers coming along

Terri


Terri,
Thanks for asking. I've put in 3 solid work sessions of 4-6 hrs each, and have only managed to decal the bottom of one wing and a 1/3 of the bottom of the fuselage. It's certainly slow going for me.

The issue is that I'm using my regular decal method with each stencil, and it just takes a lot of time. The advantage is that they end up laying down like they were painted on.

Of course I keep on asking myself why I'm spending so much time on stenciling the bottom, when no one will ever see it in my display case (the one I still haven't bought. Still using shelving units and semi clear plastic storage containers).

At my present rate of completion, I'm not sure if I'll be done with the F4B by the time the Grumman campaign starts July 1st.

Joel
Mcleod
_VISITCOMMUNITY
Alberta, Canada
Joined: April 07, 2010
KitMaker: 1,028 posts
AeroScale: 939 posts
Posted: Wednesday, April 30, 2014 - 04:09 AM UTC

Quoted Text

At my present rate of completion, I'm not sure if I'll be done with the F4B by the time the Grumman campaign starts July 1st.


Yes, but, she is smartly done. A fine looking F-4, very well modeled, and offering up a great sales pitch for the kit. Academy should be paying you for that kind of advertising.
Joel_W
Staff MemberAssociate Editor
AUTOMODELER
_VISITCOMMUNITY
New York, United States
Joined: December 04, 2010
KitMaker: 11,666 posts
AeroScale: 7,410 posts
Posted: Wednesday, April 30, 2014 - 10:05 AM UTC

Quoted Text


Quoted Text

At my present rate of completion, I'm not sure if I'll be done with the F4B by the time the Grumman campaign starts July 1st.


Yes, but, she is smartly done. A fine looking F-4, very well modeled, and offering up a great sales pitch for the kit. Academy should be paying you for that kind of advertising.


Ben,
Thanks for those kind words. Maybe I should send Academy a bill for advertising.
Joel
Joel_W
Staff MemberAssociate Editor
AUTOMODELER
_VISITCOMMUNITY
New York, United States
Joined: December 04, 2010
KitMaker: 11,666 posts
AeroScale: 7,410 posts
Posted: Thursday, May 01, 2014 - 05:40 AM UTC
Just a quick update. I'm past the 50% point of decaling the bottom. I can actually see the end of this phase sooner then later. Now I love decaling, but I've been at it for nearly a month now. Really looking forward to moving on.
Joel
chris1
_VISITCOMMUNITY
Auckland, New Zealand
Joined: October 25, 2005
KitMaker: 949 posts
AeroScale: 493 posts
Posted: Thursday, May 01, 2014 - 07:32 AM UTC
Hi Joel,
F-4 Phantom. Best jet aircraft ever(A-10 comes in 2nd)

Decaling can be a chore but hurry,hurry,hurry we want to see her finished.

Cheers

Chris
plastickjunkie
_VISITCOMMUNITY
Florida, United States
Joined: December 31, 2009
KitMaker: 399 posts
AeroScale: 132 posts
Posted: Friday, May 02, 2014 - 04:47 AM UTC
Joel

Don't know if you have gotten to decaling the weapons but the bomb rings did not properly align for me and had to slice them to tighten the curve around the bombs. The shark mouth was a PITA to deal with as you said. I also had to carefully slice it in strategic locations to make it conform. Tons of Solvaset snuggled things down and looks quite good. The decals are really good quality and have no silvering which is good but I think they could have been just a tad thinner.
Joel_W
Staff MemberAssociate Editor
AUTOMODELER
_VISITCOMMUNITY
New York, United States
Joined: December 04, 2010
KitMaker: 11,666 posts
AeroScale: 7,410 posts
Posted: Friday, May 02, 2014 - 05:25 AM UTC

Quoted Text

Joel

Don't know if you have gotten to decaling the weapons but the bomb rings did not properly align for me and had to slice them to tighten the curve around the bombs. The shark mouth was a PITA to deal with as you said. I also had to carefully slice it in strategic locations to make it conform. Tons of Solvaset snuggled things down and looks quite good. The decals are really good quality and have no silvering which is good but I think they could have been just a tad thinner.


Ernie,
The only thing I've done to date on the bombs, and missiles is gluing them together. Same for the pylon stations.

It's some what comforting knowing that I wasn't the only one who struggled with that Sharks Mouth decal. You read reviews, and it's never mentioned, so I figured it's just me.

I don't use Solvoset unless the decals are really thick, and like you said these aren't. It's just those darn compound curves. MicroSet and Sol eventually tamed the beast.

Chris, I'm actually putting in several multi hour sessions per week, but it's just taking forever. I apply the stencils just like I apply a larger decal, so it's doing everything at a snails pace. The up side is the by the next day when they're fully dried, they look like they were painted on.

Eventually I'll get to the finish line. I'm hoping that I get it done before the Grumman Campaign (7/1 start date), or it's going to be on hold till I build two models for the campaign, which I've changed again for the millionth time.
Joel
Joel_W
Staff MemberAssociate Editor
AUTOMODELER
_VISITCOMMUNITY
New York, United States
Joined: December 04, 2010
KitMaker: 11,666 posts
AeroScale: 7,410 posts
Posted: Sunday, May 04, 2014 - 09:01 AM UTC
Finally finished all the lower fuselage and wing stenciling. I'm burnt out. Will be glossing tomorrow, then I'll post a few pictures of the bottom of the F4B.

Up next is the main and front gear, and main gear doors. Yep, haven't even painted the main gear doors yet, so I still have plenty of stenciling to do. For some strange reason I did paint the front wheel bay doors, and they're decaled.

Joel
thegirl
_VISITCOMMUNITY
Alberta, Canada
Joined: January 19, 2008
KitMaker: 6,743 posts
AeroScale: 6,151 posts
Posted: Tuesday, May 06, 2014 - 12:15 AM UTC
Looking forward to those pic's Joel


Terri
Joel_W
Staff MemberAssociate Editor
AUTOMODELER
_VISITCOMMUNITY
New York, United States
Joined: December 04, 2010
KitMaker: 11,666 posts
AeroScale: 7,410 posts
Posted: Tuesday, May 06, 2014 - 05:20 AM UTC
Terri,
Well you're in luck. Just finished taking and editing those pictures.

The lower fuselage/wing stenciling took 2 weeks, it's finished except for the main gear doors that I haven't even painted yet. Figured I do that when I do the gear, station pylons, and out loads.

Started off with glossing the surface with Glosscoat rather then Pledge. Drying time is the same, but the clean up is just much faster and easier with the Glosscoat.

Each stencil was applied to a wet surface, then a dab of Micro Set, one minute later a Q-tip rolled over it to get any air out, and smooth out the stencil. Then a dab of Micro Sol, and just let it dry. Basically, the stencils look like they were applied with a mask and air brush.

Joel


Up close and personal, the stencils are so well printed that you can read each one. No flash shows even at this magnification.


Joel_W
Staff MemberAssociate Editor
AUTOMODELER
_VISITCOMMUNITY
New York, United States
Joined: December 04, 2010
KitMaker: 11,666 posts
AeroScale: 7,410 posts
Posted: Tuesday, May 06, 2014 - 05:33 AM UTC
Originally, I painted the dive brake recessed area on the lower portion of each wing red to match the inside color of the dive flap.


It was pointed out to me that in fact that area was either white or natural aluminum. So I went looking for pictures to verify it one way or the other. I found pictures both ways. Since they were already primed, then painted red, I went with white. Here's a picture with them as natural metal.


So I repainted them white.


Joel
plastickjunkie
_VISITCOMMUNITY
Florida, United States
Joined: December 31, 2009
KitMaker: 399 posts
AeroScale: 132 posts
Posted: Tuesday, May 06, 2014 - 09:51 AM UTC

Quoted Text


It was pointed out to me that in fact that area was either white or natural aluminum. So I repainted them white.

Joel


Glad you verified that as I was unclear too and almost painted mine red. I think I counted 129 stencils on the bottom side! I left off some of the real tiny ones that look like little specs. I also verified that you need to add the two small T fittings on the intake wall that measures the air intake speed.
Joel_W
Staff MemberAssociate Editor
AUTOMODELER
_VISITCOMMUNITY
New York, United States
Joined: December 04, 2010
KitMaker: 11,666 posts
AeroScale: 7,410 posts
Posted: Tuesday, May 06, 2014 - 12:31 PM UTC

Quoted Text


Quoted Text


It was pointed out to me that in fact that area was either white or natural aluminum. So I repainted them white.

Joel


Glad you verified that as I was unclear too and almost painted mine red. I think I counted 129 stencils on the bottom side! I left off some of the real tiny ones that look like little specs. I also verified that you need to add the two small T fittings on the intake wall that measures the air intake speed.


Ernie,
Glad I saved you from the same mistake I made. I have several small parts that I'm leaving till the very end. As for those two small T fittings, I'll have to do a little more research as they're not shown on the kit instructions.
Joel