OFFICIAL: Grumman Campaign

#392
Hessen, Germany
Joined: January 09, 2013
KitMaker: 696 posts
AeroScale: 608 posts
Posted: Thursday, August 14, 2014 - 08:38 AM UTC
Hi Thomas,
seems I have to be careful with these decals, but they come in three parts already, so I'm not frightened (yet)

Weight should be enough, Revell recommend 10g anyway.
So let's go on, Thomas!
Peter
On the bench:
EE(BAC) Lightning F.2A (Airfix 1:72)
Joel_W
 Associate Editor
New York, United States
Joined: December 04, 2010
KitMaker: 11,666 posts
AeroScale: 7,410 posts
Posted: Friday, August 15, 2014 - 12:02 PM UTC
I just posted another update to my A-6E build thread in the Cold War forum. After a few days of thinking and tinkering, I decided to fit and glue up the outer wings to the inner wings. Here's one picture to give you an idea of where I'm at with the build.
Joel

On my Workbench:
Monogram 1/24 scale 427 Shelby Cobra
Just Completed:
Beemax 1/24 scale BMW M3 E30 1992 Evolution II
United Kingdom
Joined: May 25, 2013
KitMaker: 137 posts
AeroScale: 103 posts
Posted: Friday, August 15, 2014 - 08:55 PM UTC
Hellbent - sorry it has taken me a while to reply, but I am not using an airbrush for this model, I prefer not to for smaller kits like this one, that is just a personal preference thing though

more progress pics soon, rigging is taking a while, as I expected it would, it is not an easy job
Cheers
Georgia, United States
Joined: January 07, 2013
KitMaker: 572 posts
AeroScale: 130 posts
Posted: Saturday, August 16, 2014 - 08:42 AM UTC
Hello all I have Enlisted here is what I am going to build.

it's an AMT F9F-2 Panther 1/48 Scale Going with the VF-91 Markings. There's maybe 30 pieces altogether in the kit but a lot of cleaning to do so i'm gonna get cracking and go make some progress.
Sascha(Ironowl)

Georgia, United States
Joined: January 07, 2013
KitMaker: 572 posts
AeroScale: 130 posts
Posted: Saturday, August 16, 2014 - 08:50 AM UTC

clean up time
Joel_W
Associate Editor New York, United States
Joined: December 04, 2010
KitMaker: 11,666 posts
AeroScale: 7,410 posts
Posted: Saturday, August 16, 2014 - 09:02 AM UTC
Sascha,
Welcome to our Grumman campaign. You're certainly building a oldie but a goodie, as the kit was 1st issued during the 1960's. I googled the kit as I wasn't sure what variant it depicted. Turns out it's a -2. From what I've read, the kit builds up into a nice model without any major issues. The only thing that would concern me is the age of the decals. Joel
On my Workbench:
Monogram 1/24 scale 427 Shelby Cobra
Just Completed:
Beemax 1/24 scale BMW M3 E30 1992 Evolution II
#392
Hessen, Germany
Joined: January 09, 2013
KitMaker: 696 posts
AeroScale: 608 posts
Posted: Sunday, August 17, 2014 - 12:22 AM UTC
Hi there,
going on with my Hawkeye....


On the bench:
EE(BAC) Lightning F.2A (Airfix 1:72)
Joel_W
Associate Editor New York, United States
Joined: December 04, 2010
KitMaker: 11,666 posts
AeroScale: 7,410 posts
Posted: Sunday, August 17, 2014 - 01:14 AM UTC
Peter,
I can't believe the amount of progress you've made. You're through paint and glossing. Really looking forward to those decals.
Joel
On my Workbench:
Monogram 1/24 scale 427 Shelby Cobra
Just Completed:
Beemax 1/24 scale BMW M3 E30 1992 Evolution II
Georgia, United States
Joined: January 07, 2013
KitMaker: 572 posts
AeroScale: 130 posts
Posted: Sunday, August 17, 2014 - 06:07 AM UTC

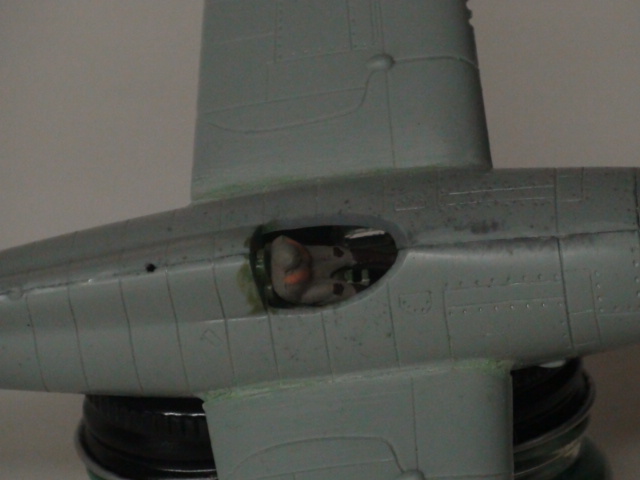
small update clean up is done fuselage assembly and wing assembly in the works
Sascha(Ironowl)
#392
Hessen, Germany
Joined: January 09, 2013
KitMaker: 696 posts
AeroScale: 608 posts
Posted: Monday, August 18, 2014 - 12:03 AM UTC
Quoted Text
Peter,
I can't believe the amount of progress you've made. You're through paint and glossing. Really looking forward to those decals.
Joel
Hi Joel,
yes it went well so far, now the props and engines are painted as well. Now I'm sitting at my "real desk" at the office

planning to do the undercarriage in the evening and maybe some decals in difficult places
BTW, I'm really looking forward to that A-6E of yours
Pete
On the bench:
EE(BAC) Lightning F.2A (Airfix 1:72)
Joel_W
Associate Editor New York, United States
Joined: December 04, 2010
KitMaker: 11,666 posts
AeroScale: 7,410 posts
Posted: Monday, August 18, 2014 - 01:29 AM UTC
Pete,
The A-6E is a real bear of a kit. Hobby Boss created a real challenge especially after just completing Academy's F-4B.
I painted the undersides yesterday, taking much care not to damage or knock off the refueling boom. Of course I knocked it off anyway.

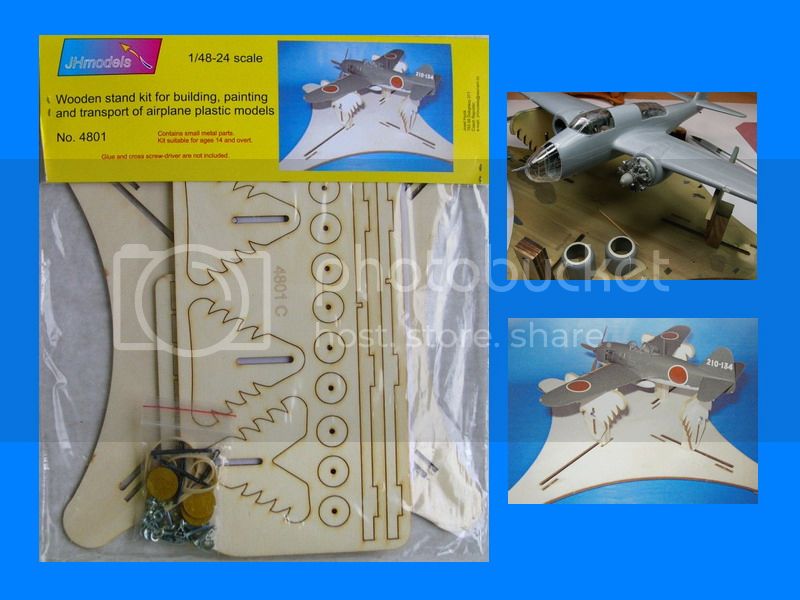
So now I have to come up with a better way to glue it on: like epoxy

I also bit the bullet and ordered from UMM-USA a JH wooden modeling stand for $35. Expensive, but well worth it. I'll just use a large plastic tub that I bought from Walmart to cover it once the model is resting on it.
Joel
On my Workbench:
Monogram 1/24 scale 427 Shelby Cobra
Just Completed:
Beemax 1/24 scale BMW M3 E30 1992 Evolution II
#363
Pennsylvania, United States
Joined: January 08, 2014
KitMaker: 425 posts
AeroScale: 401 posts
Posted: Monday, August 18, 2014 - 12:46 PM UTC
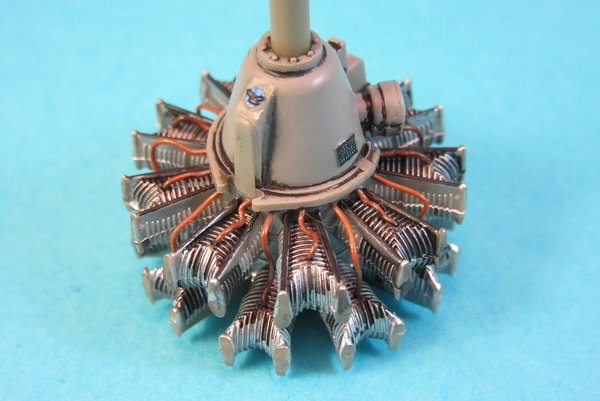
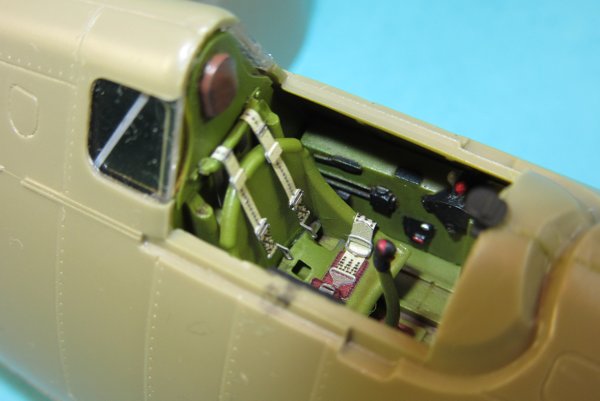
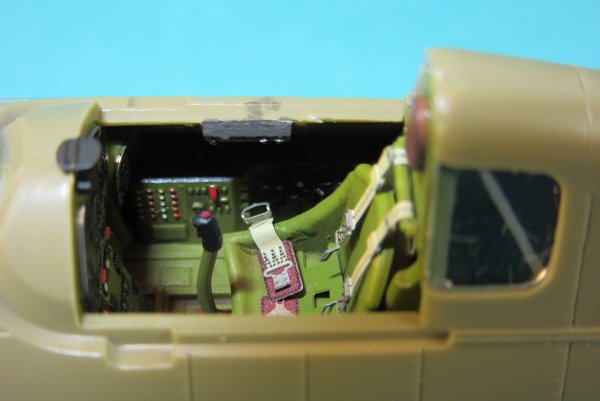
I managed to get the cockpit parts painted and detailed, it just needs assembled.
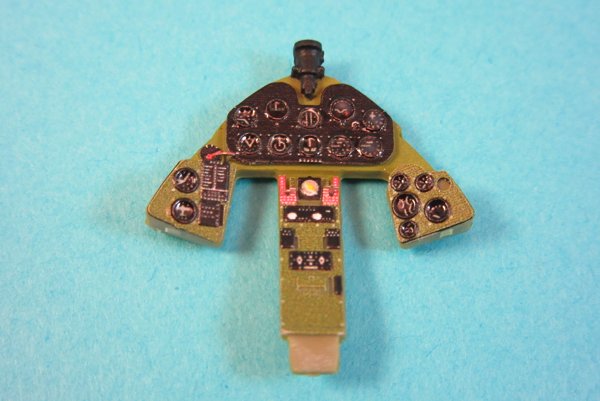
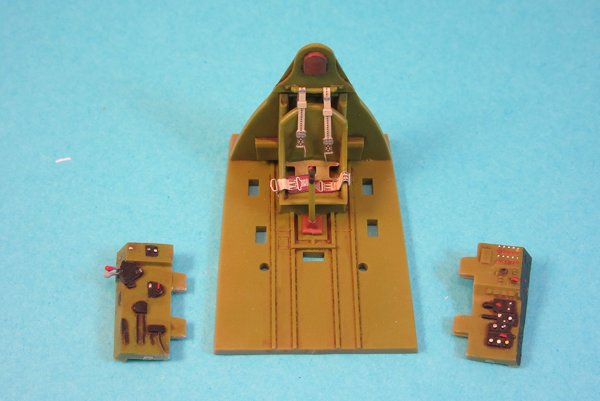
The seatbelts and the PE panel come with Eduard's F6F-3 profipack kit, the only details I added were the levers to the port sidewall to match my Detail & Scale reference.
I started working on the engine as well, adding my own wiring. More pics soon...
On the Bench:
The Big Three: Eduard 1:48 Bf 109G-2 Trop
Radial Fighters: Hasegawa 1:48 Ki84 Frank
The Mighty Eighth: Eduard 1:48 P-51D-10
Joel_W
Associate Editor New York, United States
Joined: December 04, 2010
KitMaker: 11,666 posts
AeroScale: 7,410 posts
Posted: Monday, August 18, 2014 - 01:03 PM UTC
Paul,
Welcome to our Grumman Campaign.
The Eduard PE IP looks fantastic, as does the seatbelts and harness. Nice to see the harness attached to the seat support instead of the usual gluing it to the back of the seat, of which I'm famous for.
Joel
On my Workbench:
Monogram 1/24 scale 427 Shelby Cobra
Just Completed:
Beemax 1/24 scale BMW M3 E30 1992 Evolution II
Kansas, United States
Joined: August 17, 2005
KitMaker: 725 posts
AeroScale: 55 posts
Posted: Monday, August 18, 2014 - 04:13 PM UTC
Quoted Text
Hellbent - sorry it has taken me a while to reply, but I am not using an airbrush for this model, I prefer not to for smaller kits like this one, that is just a personal preference thing though
more progress pics soon, rigging is taking a while, as I expected it would, it is not an easy job
Cheers
No problem! I know how life goes. I thought your finish looked immaculate and now even more impressive since you brushed it! Really glossy and very even and smooth. What paints and finish are you using?
Thanks, Hellbent
"The Marines I have seen around the world have the cleanest bodies, the filthiest minds, the highest morale, and the lowest morals of any group of animals I have ever seen. Thank God for the United States Marine Corps!" Eleanor Roosevelt
Kansas, United States
Joined: August 17, 2005
KitMaker: 725 posts
AeroScale: 55 posts
Posted: Monday, August 18, 2014 - 04:15 PM UTC
Quoted Text
I managed to get the cockpit parts painted and detailed, it just needs assembled.
The seatbelts and the PE panel come with Eduard's F6F-3 profipack kit, the only details I added were the levers to the port sidewall to match my Detail & Scale reference.
I started working on the engine as well, adding my own wiring. More pics soon...
Very nice work! I hope mine turns out as good as yours! Hellbent
"The Marines I have seen around the world have the cleanest bodies, the filthiest minds, the highest morale, and the lowest morals of any group of animals I have ever seen. Thank God for the United States Marine Corps!" Eleanor Roosevelt
Lisboa, Portugal
Joined: March 04, 2008
KitMaker: 5,386 posts
AeroScale: 635 posts
Posted: Tuesday, August 19, 2014 - 06:07 AM UTC
Flat black part, a little wash too.
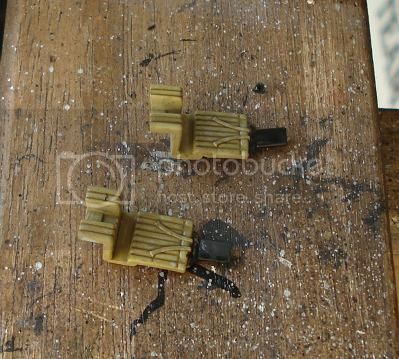
I hope to finish the Tomcat seats this month...

Active Builds: 0
Active Campaigns: 0
#392
Hessen, Germany
Joined: January 09, 2013
KitMaker: 696 posts
AeroScale: 608 posts
Posted: Tuesday, August 19, 2014 - 07:28 AM UTC
Well, the Hawkeye is progressing. Got the undercarriage done and the decal on the big radome.


Now it gets one or two days rest, before I start with the decals.
Cheers to everybody out there! Pete
On the bench:
EE(BAC) Lightning F.2A (Airfix 1:72)
Joel_W
Associate Editor New York, United States
Joined: December 04, 2010
KitMaker: 11,666 posts
AeroScale: 7,410 posts
Posted: Wednesday, August 20, 2014 - 12:11 AM UTC
Peter,
That huge decal on the radar dome looks great. It's certainly very impressive.
Joel
On my Workbench:
Monogram 1/24 scale 427 Shelby Cobra
Just Completed:
Beemax 1/24 scale BMW M3 E30 1992 Evolution II
Michigan, United States
Joined: January 02, 2012
KitMaker: 139 posts
AeroScale: 70 posts
Posted: Thursday, August 21, 2014 - 12:55 PM UTC
Greetings,
Making progress, more assembly, and filling wing roots.


Regards,
Firstsergeant
In progress:
MPC Boeing B-17G Mighty Eighth Campaign
Joel_W
Associate Editor New York, United States
Joined: December 04, 2010
KitMaker: 11,666 posts
AeroScale: 7,410 posts
Posted: Friday, August 22, 2014 - 04:05 AM UTC
Firstsergeant,
You're making a nice amount of progress on your Academy FrF-4 Wildcat. Looking forward to seeing some primer and or paint on it soon.
Joel
On my Workbench:
Monogram 1/24 scale 427 Shelby Cobra
Just Completed:
Beemax 1/24 scale BMW M3 E30 1992 Evolution II
#439
Washington, United States
Joined: November 05, 2005
KitMaker: 4,950 posts
AeroScale: 3,192 posts
Posted: Friday, August 22, 2014 - 05:32 AM UTC
Got this from Bert Kinzey and Gang today.
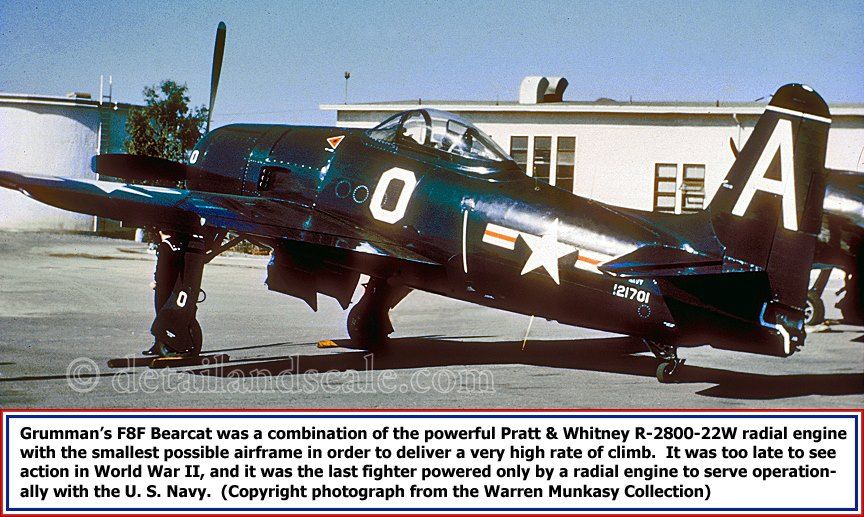
The F8F Bearcat is 70 Years old today.
I hope I get mine built before it's 140 years old

Hanger Queens in Waiting:
Monogram 1/72 F8F-1
Corsair the Sky Pirate - 1/72 Ace A-7D
Century Series - Airfix 1/72 F-105G
Anti Shipping - Academy 1/72 PBJ-1D
Academy 1/72 F-84E
Joel_W
Associate Editor New York, United States
Joined: December 04, 2010
KitMaker: 11,666 posts
AeroScale: 7,410 posts
Posted: Friday, August 22, 2014 - 06:05 AM UTC
Quoted Text
Got this from Bert Kinzey and Gang today.
The F8F Bearcat is 70 Years old today.
I hope I get mine built before it's 140 years old
We all have complete confidence that you'll be done with your build way before that.
Joel
On my Workbench:
Monogram 1/24 scale 427 Shelby Cobra
Just Completed:
Beemax 1/24 scale BMW M3 E30 1992 Evolution II
#439
Washington, United States
Joined: November 05, 2005
KitMaker: 4,950 posts
AeroScale: 3,192 posts
Posted: Friday, August 22, 2014 - 10:42 AM UTC
Well, I hope your faith isn't misplaced...
I dropped by a local Hobby Town to try out some Vallejo metallic paints. I'm headed back to Malaysia on Labor Day and hope to get some work done on it. I found out that the FAA frowns on packing flammable liquids in your suitcase, so I'm going to try out Vallejo's putty and Plastruct's Bondene Cement this trip..

Hanger Queens in Waiting:
Monogram 1/72 F8F-1
Corsair the Sky Pirate - 1/72 Ace A-7D
Century Series - Airfix 1/72 F-105G
Anti Shipping - Academy 1/72 PBJ-1D
Academy 1/72 F-84E
#363
Pennsylvania, United States
Joined: January 08, 2014
KitMaker: 425 posts
AeroScale: 401 posts
Posted: Friday, August 22, 2014 - 10:49 AM UTC
Continuing with my Eduard F6F-3:
The engine with weathering and PE added, I replaced the kit PE ignition wires with some basic detail from lead wire. It's not as detailed but I don't care for the flat wires PE provides. I should have done twice as many wires but oh well.
The cockpit after I closed the fuselage up. All the little colored details were added with Sharpie Extra Fine Paint Markers. I totally recommend them!
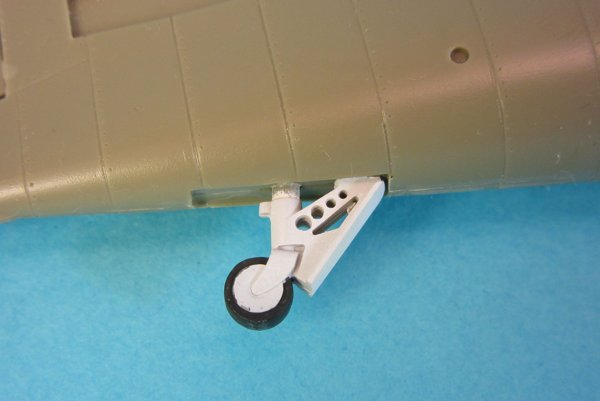
The tailwheel with lightening holes drilled out.
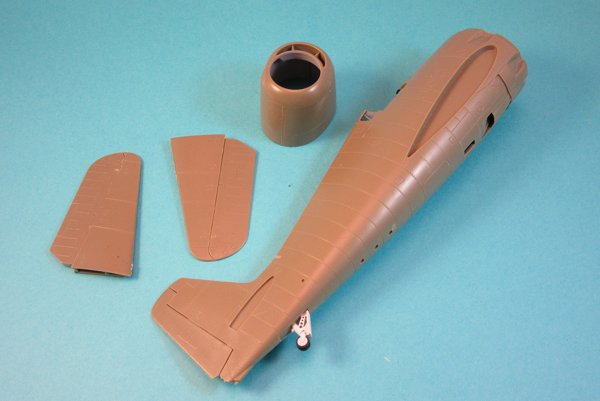
The fuselage, tailplanes, and cowl all built and set aside to await painting. Now it's time to break out Wolfpack's resin wingfold set and start on it.
On the Bench:
The Big Three: Eduard 1:48 Bf 109G-2 Trop
Radial Fighters: Hasegawa 1:48 Ki84 Frank
The Mighty Eighth: Eduard 1:48 P-51D-10
#439
Washington, United States
Joined: November 05, 2005
KitMaker: 4,950 posts
AeroScale: 3,192 posts
Posted: Friday, August 22, 2014 - 11:13 AM UTC
Nice job, 1/48 I'm assuming?
Hanger Queens in Waiting:
Monogram 1/72 F8F-1
Corsair the Sky Pirate - 1/72 Ace A-7D
Century Series - Airfix 1/72 F-105G
Anti Shipping - Academy 1/72 PBJ-1D
Academy 1/72 F-84E


