Air Campaigns
Want to start or join a group build? This is where to start.
Want to start or join a group build? This is where to start.
Hosted by Frederick Boucher, Michael Satin
OFFICIAL: Grumman Campaign
Joel_W

Joined: December 04, 2010
KitMaker: 11,666 posts
AeroScale: 7,410 posts

Posted: Sunday, July 27, 2014 - 11:52 AM UTC
Robert,
Welcome to our Grumman Campaign. The Grumman Avenger is one of my all time favorite Grumman WWII aircraft, so I'll be following your build with much interest and enthusiasm. I built The TBM-3 Hobby Boss Avenger several years ago, and I'm thinking of replacing it with a Accurate Miniature's build, so there's another reason to follow your build with much interest.
Joel
Posted: Sunday, July 27, 2014 - 11:02 PM UTC
Only a little progress was made on the Tomcat over the weekend.
More detail can be found in my blog but all that was really done was repainting the instruments with Nato Black and starting the laborious job of painting the switches
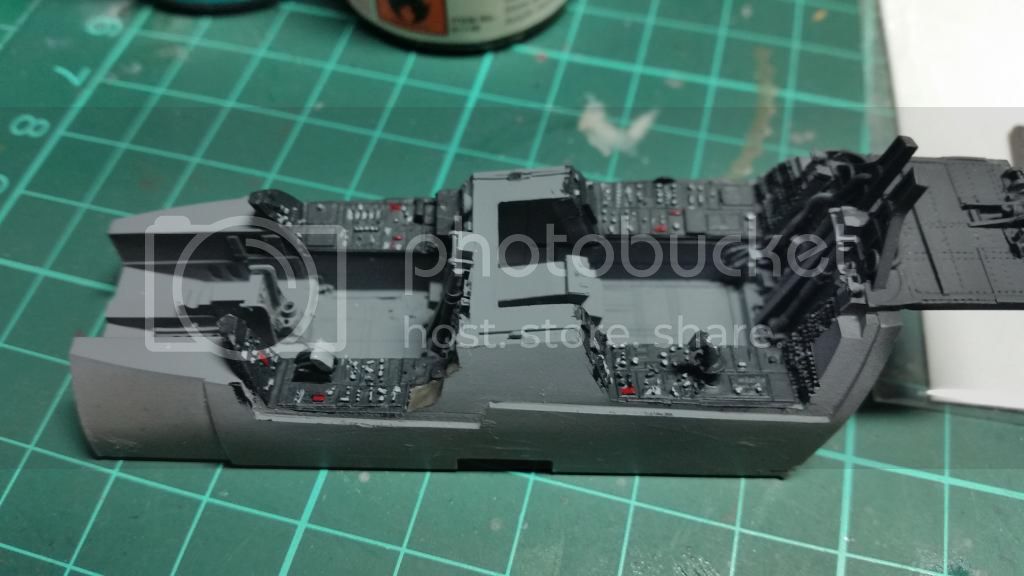
And I also started sanding the nose wheel bay in preparation for installing all the cockpit parts in the nose section.
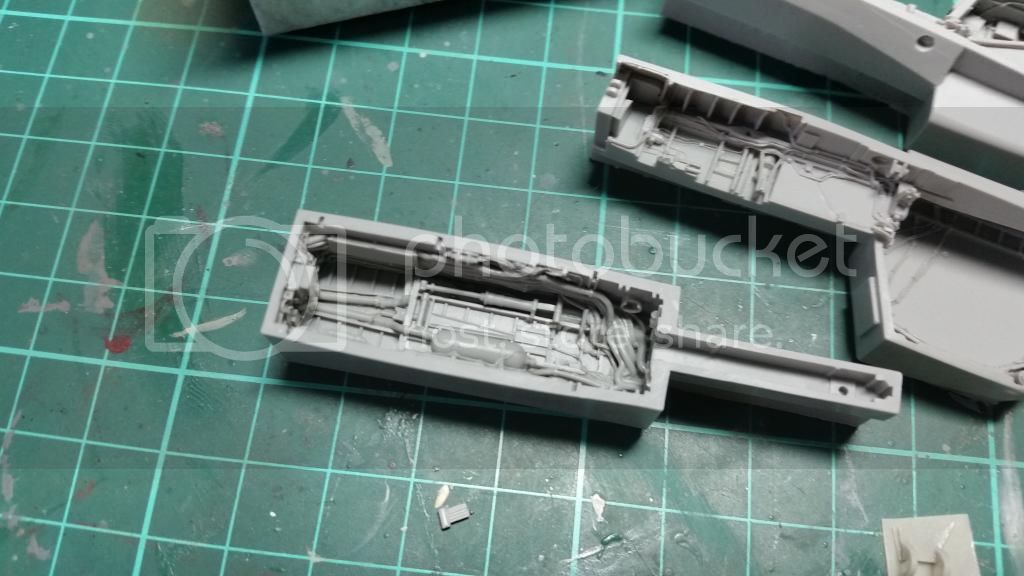
As always comments, suggestions and critique is always welcomed
More detail can be found in my blog but all that was really done was repainting the instruments with Nato Black and starting the laborious job of painting the switches

And I also started sanding the nose wheel bay in preparation for installing all the cockpit parts in the nose section.

As always comments, suggestions and critique is always welcomed

Joel_W

Joined: December 04, 2010
KitMaker: 11,666 posts
AeroScale: 7,410 posts

Posted: Monday, July 28, 2014 - 01:15 AM UTC
Allen,
The cockpit looks great. Filing and sanding all those Aires parts and getting them to fit is a major undertaking.
Heading over to your blog to see the full update,
Joel
The cockpit looks great. Filing and sanding all those Aires parts and getting them to fit is a major undertaking.
Heading over to your blog to see the full update,
Joel
Posted: Sunday, August 03, 2014 - 05:51 AM UTC
I join this campaign with reservations. the only Grumman aircraft I am interested in building are 1/144 scale Albatrosses, and that means Amodel. 
I have finished this kit once before, with good results, but I also have more than one Amodel kit stalled in the hanger of queens, so we will have to see.

There were a number of these employed in the Trust Territory of the Pacific from the mid 1950s to about 1970.
Transocean Airlines were given at least four to operate inter island services for the Trust Territory from sometime in the 1950s (various sources say 1953 or 1958), until they handed over to Pan Am in 1960.
so there are two possible paint schemes, which means ultimately, I will build this model twice, the Taloa is a basic service gray and white with TAL logo and titles,

and the Pan Am Trust Territory version is Pan Am blue and white with Trust Territory titles and flag

stamp in my collection
a nice photo by Jim Voss here
Since i am building a TALOA PBY over in the seaplane thread, its tempting to go with the TALOA Albatross first, but lets see if I get it (them) built, then I'll think about decorating.

I have finished this kit once before, with good results, but I also have more than one Amodel kit stalled in the hanger of queens, so we will have to see.

There were a number of these employed in the Trust Territory of the Pacific from the mid 1950s to about 1970.
Transocean Airlines were given at least four to operate inter island services for the Trust Territory from sometime in the 1950s (various sources say 1953 or 1958), until they handed over to Pan Am in 1960.
so there are two possible paint schemes, which means ultimately, I will build this model twice, the Taloa is a basic service gray and white with TAL logo and titles,

and the Pan Am Trust Territory version is Pan Am blue and white with Trust Territory titles and flag

stamp in my collection
a nice photo by Jim Voss here
Since i am building a TALOA PBY over in the seaplane thread, its tempting to go with the TALOA Albatross first, but lets see if I get it (them) built, then I'll think about decorating.
Joel_W

Joined: December 04, 2010
KitMaker: 11,666 posts
AeroScale: 7,410 posts

Posted: Sunday, August 03, 2014 - 06:05 AM UTC
Jonathan,
Welcome to our Grumman Aircraft Campaign. I believe your 1/144 scale Albatross is the 1st model in that scale. Hopefully, you'll find the build interesting and challenging enough to finish it.
Joel
Welcome to our Grumman Aircraft Campaign. I believe your 1/144 scale Albatross is the 1st model in that scale. Hopefully, you'll find the build interesting and challenging enough to finish it.
Joel
Joel_W

Joined: December 04, 2010
KitMaker: 11,666 posts
AeroScale: 7,410 posts

Posted: Sunday, August 03, 2014 - 06:12 AM UTC
A few days ago I posted my latest update on my A-6E Intruder build. This one concerns the start of the outer wings, slats, flaps, and flap cover plates.
The full build thread is located in our Cold War forum:
A-6E
Here's a quick picture of the update:

Joel
The full build thread is located in our Cold War forum:
A-6E
Here's a quick picture of the update:
Joel
Posted: Sunday, August 03, 2014 - 09:20 AM UTC
Well it has taken some work and lots of filling, but the fuselage is together and the wing is on.
The clear bits are all either too- big, small or thick. The clear parts were glued in place and then sanded to fit. Afterwards they were polished to eliminate all the scratches.
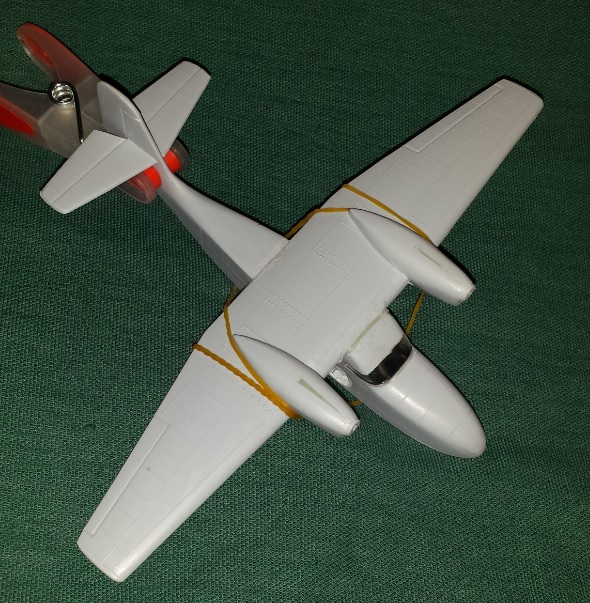
The clear bits are all either too- big, small or thick. The clear parts were glued in place and then sanded to fit. Afterwards they were polished to eliminate all the scratches.

Joel_W

Joined: December 04, 2010
KitMaker: 11,666 posts
AeroScale: 7,410 posts

Posted: Sunday, August 03, 2014 - 09:51 AM UTC
Eric,
Your Grumman Widgeon is looking quite good. Looking forward to your next update.
Joel
Your Grumman Widgeon is looking quite good. Looking forward to your next update.
Joel
Posted: Sunday, August 03, 2014 - 11:33 AM UTC
Savage - I'm glad to see another water bird in this campaign! the Widgeon will be worth the effort to make it look good! cheers 
I found I have two of the SA-16A kits, so Im building both.
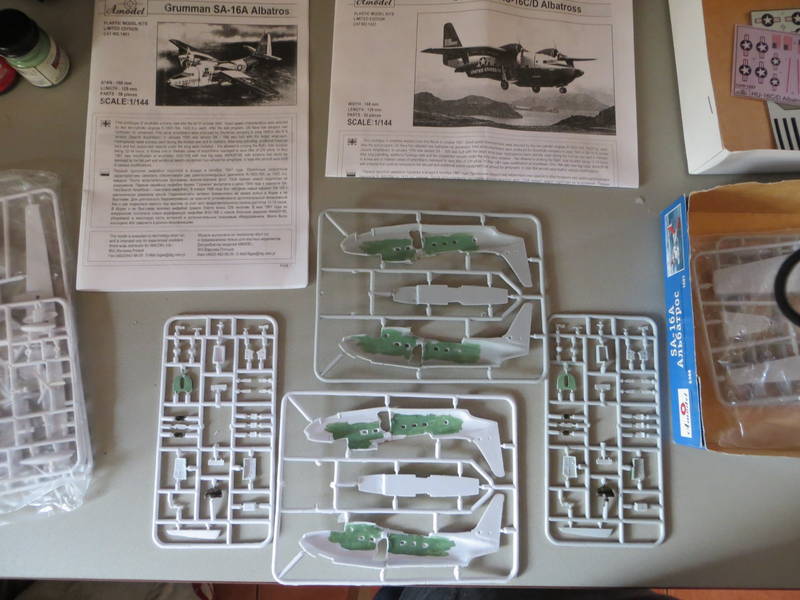
1401 and 1423 are identical plastic.
this evening i have assembled the first hull. a rudamentary interior is provided, which is all that is warrented in this scale. you cant actually see anything through the tiny windows. I splashed around some green paint in there, to give a flash of color.
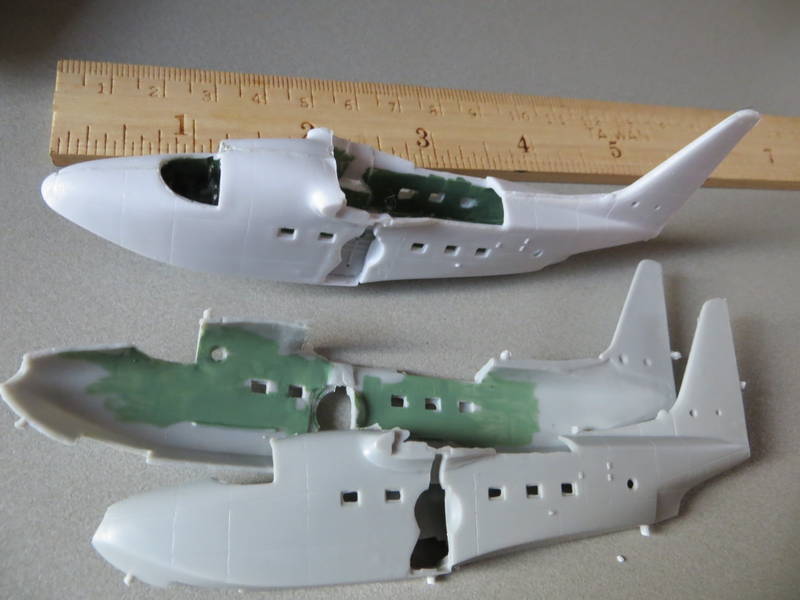
Every single join of an Amodel kit requires filling and fairing. thats a given. flash everywhere. some of the window opennings are completely full of flash. will take care of that later.
onward.

I found I have two of the SA-16A kits, so Im building both.

1401 and 1423 are identical plastic.
this evening i have assembled the first hull. a rudamentary interior is provided, which is all that is warrented in this scale. you cant actually see anything through the tiny windows. I splashed around some green paint in there, to give a flash of color.

Every single join of an Amodel kit requires filling and fairing. thats a given. flash everywhere. some of the window opennings are completely full of flash. will take care of that later.
onward.

Nito74

Joined: March 04, 2008
KitMaker: 5,386 posts
AeroScale: 635 posts

Posted: Sunday, August 03, 2014 - 02:41 PM UTC
Jonathan, that's A-model in all it's glory !! good luck !! 

Joel_W

Joined: December 04, 2010
KitMaker: 11,666 posts
AeroScale: 7,410 posts

Posted: Monday, August 04, 2014 - 01:07 AM UTC
Jonathan,
Two more Grumman Widgeons for a total of three!! Who would have thought that they would be out numbering Albatrosses.
Joel
Two more Grumman Widgeons for a total of three!! Who would have thought that they would be out numbering Albatrosses.
Joel
Posted: Monday, August 04, 2014 - 02:11 AM UTC
I think you are confused, sir. I am building two Albatrosses... 

scribbles101

Joined: May 25, 2013
KitMaker: 137 posts
AeroScale: 103 posts
Posted: Monday, August 04, 2014 - 03:58 AM UTC
Hi all,
mind f I jump in on this one?
I thought that this little bugger would make a good subject for this particular campaign, its the Grumman Duck in 1:72 scale from airfix


As you can see there is nothing too complex here so this should all go together quite nicely (famous last words), this will be an OOTB build because have not found any good after market details for this kit
so suppose I had better get started, I have some catching up to do!
mind f I jump in on this one?
I thought that this little bugger would make a good subject for this particular campaign, its the Grumman Duck in 1:72 scale from airfix


As you can see there is nothing too complex here so this should all go together quite nicely (famous last words), this will be an OOTB build because have not found any good after market details for this kit
so suppose I had better get started, I have some catching up to do!

Joel_W

Joined: December 04, 2010
KitMaker: 11,666 posts
AeroScale: 7,410 posts

Posted: Monday, August 04, 2014 - 05:53 AM UTC
Quoted Text
I think you are confused, sir. I am building two Albatrosses...
Jonathan,
My apologies for the confusion. This is what happens when I try to type, and talk on the phone (business), at the same time.
Joel
Joel_W

Joined: December 04, 2010
KitMaker: 11,666 posts
AeroScale: 7,410 posts

Posted: Monday, August 04, 2014 - 05:56 AM UTC
Simon,
Welcome to our Grumman Aircraft campaign. And now we'll have a Duck added to the ever growing list of aircraft. Looking forward to following your build.
Joel
Welcome to our Grumman Aircraft campaign. And now we'll have a Duck added to the ever growing list of aircraft. Looking forward to following your build.
Joel
MichaelSatin


Joined: January 19, 2008
KitMaker: 3,909 posts
AeroScale: 2,904 posts

Posted: Monday, August 04, 2014 - 09:47 AM UTC
Great work, and interesting stuff everyone!
I'm having a really hard time getting going on this one and the FAA campaign. I'm wondering if a theme would help me, so I'm going to see if a Sub Hunter dual build might do it:
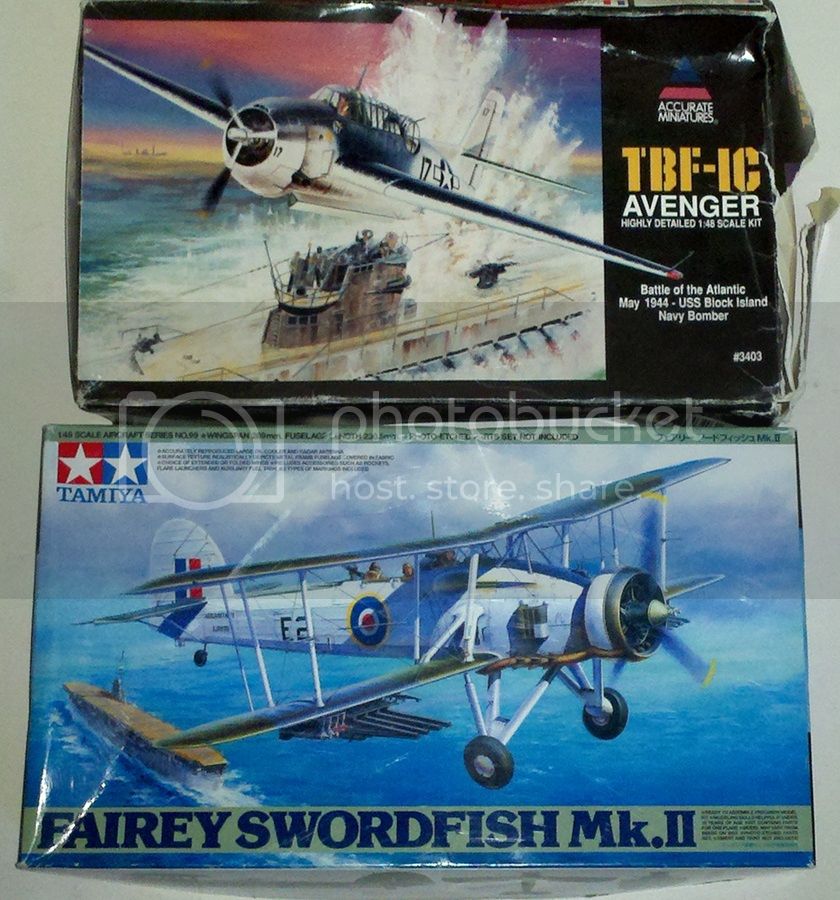
That's an original Accurate Miniatures boxing of the TBF and, while the box itself is in kind of rough shape, the kit is just fine and unstarted:
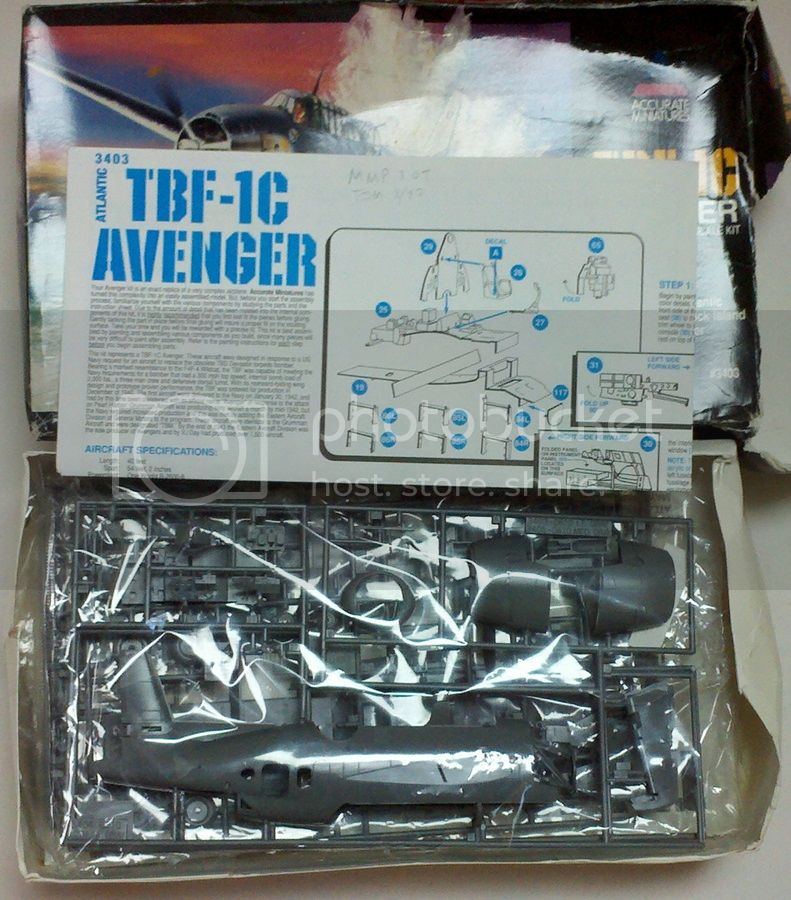
Let's see if this gets me off the deck!
Michael
I'm having a really hard time getting going on this one and the FAA campaign. I'm wondering if a theme would help me, so I'm going to see if a Sub Hunter dual build might do it:

That's an original Accurate Miniatures boxing of the TBF and, while the box itself is in kind of rough shape, the kit is just fine and unstarted:

Let's see if this gets me off the deck!
Michael

Joel_W

Joined: December 04, 2010
KitMaker: 11,666 posts
AeroScale: 7,410 posts

Posted: Monday, August 04, 2014 - 10:12 AM UTC
Michael,
By duel build you're going to be building both kits at the same time. Neither kit is what I'd call a easy beginners kit. I'll certainly be following your Avenger every step of the way. Good luck with the Swordfish. All that rigging would scare me half to death.
Joel
By duel build you're going to be building both kits at the same time. Neither kit is what I'd call a easy beginners kit. I'll certainly be following your Avenger every step of the way. Good luck with the Swordfish. All that rigging would scare me half to death.
Joel
Posted: Monday, August 04, 2014 - 11:02 AM UTC
Quoted Text
Great work, and interesting stuff everyone!
I'm having a really hard time getting going on this one and the FAA campaign. I'm wondering if a theme would help me, so I'm going to see if a Sub Hunter dual build might do it:
That's an original Accurate Miniatures boxing of the TBF and, while the box itself is in kind of rough shape, the kit is just fine and unstarted:
Let's see if this gets me off the deck!
Michael
Hey Michael, that's an excellent plan.
It so happens I'm doing a sub hunter dual build as well, in the Rising Sun thread
Go man!

scribbles101

Joined: May 25, 2013
KitMaker: 137 posts
AeroScale: 103 posts
Posted: Wednesday, August 06, 2014 - 10:26 AM UTC
Quoted Text
Simon,
Welcome to our Grumman Aircraft campaign. And now we'll have a Duck added to the ever growing list of aircraft. Looking forward to following your build.
Joel
cheers Joel, I hope don't lower the tone much with my perhaps less advanced skills

oh well here we go:

the cockpit interior and lower cabin are somewhat lacking in detail, but go together quite nicely once all the flash has been removed from the parts - the pilot and observer figures were particularly bad in that respect, oh and the observer has no legs.......

The cockpit interior and lower cabin fixed into one of the fuselage halves, the hole towards the nose of the aircraft is for the under carriage, and is (like the central float of the version I have chosen to show) a rather fetching dark blue colour

The engine assembly - the small exhaust stubs just below the cowling (not too clear in the pic) are in fact a single sort of 'w' shaped part which is too big to fit into the locating holes without a little 'modification'
Hope you all like the results so far - any constructive criticism is always welcome!
cheers
Joel_W

Joined: December 04, 2010
KitMaker: 11,666 posts
AeroScale: 7,410 posts

Posted: Thursday, August 07, 2014 - 01:50 AM UTC
Simon,
Nice start to an old and difficult build by today's standards. There is no such thing as lowering the campaign standards. It's all our work combined at each one's personal level. Do your best, enjoy your build and efforts, and so shall we. It's that simple. Your work is just as important to the overall build as anyone's.
Your engine/cowling looks pretty good, but the fussiness of the picture makes it somewhat harder to view. If you're exceeding your max close up range, move back, then crop with whatever editing program you use.
Joel
hellbent11

Joined: August 17, 2005
KitMaker: 725 posts
AeroScale: 55 posts

Posted: Thursday, August 07, 2014 - 03:57 PM UTC
here is my entry
hellbent11

Joined: August 17, 2005
KitMaker: 725 posts
AeroScale: 55 posts

Posted: Thursday, August 07, 2014 - 05:54 PM UTC
Finally getting to start! I've been crazy busy but I guess it beats the alternative...
Harvest wrapped up a while back and just to give you a fun perspective on things we ended up with enough wheat to make about 1.7 million, 1lb loaves of bread. Driving the combine at a normal pace we cut enough wheat to make 70 loaves of bread every 9 seconds... Puts a 10-12 hour day in focus!
Right after all that I had to go for a week to take classes and the tests for becoming a certified welding inspector/educator. I now have a good idea of those "enhanced interrogation" techniques everyone keeps talking about in the news, except they didn't blair Justin Beiber music while I was trying to sleep
After all that I cannot wait to sand seams and fill ejector pin marks! No kidding! I just want to get back to my happy place on the bench
Thanks, Hellbent
Harvest wrapped up a while back and just to give you a fun perspective on things we ended up with enough wheat to make about 1.7 million, 1lb loaves of bread. Driving the combine at a normal pace we cut enough wheat to make 70 loaves of bread every 9 seconds... Puts a 10-12 hour day in focus!
Right after all that I had to go for a week to take classes and the tests for becoming a certified welding inspector/educator.
 I now have a good idea of those "enhanced interrogation" techniques everyone keeps talking about in the news, except they didn't blair Justin Beiber music while I was trying to sleep
After all that I cannot wait to sand seams and fill ejector pin marks! No kidding! I just want to get back to my happy place on the bench

Thanks, Hellbent
scribbles101

Joined: May 25, 2013
KitMaker: 137 posts
AeroScale: 103 posts
Posted: Thursday, August 07, 2014 - 10:24 PM UTC
Cheers for the words of encouragement Joel, been a long time since I built an aeroplane of any kind, and even longer since I built a Bi-plane
On that subject, here is a little more progress on the Duck

As you can see the fuselage halves did not meet very well on the central float, as such....

Large amounts of milliput were needed to fill the gap - somehow don't think I'm going to get away without having to do any more filling

Fuselage halves are together (and crammed full of milliput) and the engine assembly fitted - whenI tried to fit the canopy I found that the pilot was too tall, so I had to lever him out of the cockpit and replace his seat with some small plasticard squares so that he now sits low enough in the cockpit for the canopy to fit.
As always - constructive criticism is very welcome!
cheers
On that subject, here is a little more progress on the Duck

As you can see the fuselage halves did not meet very well on the central float, as such....

Large amounts of milliput were needed to fill the gap - somehow don't think I'm going to get away without having to do any more filling

Fuselage halves are together (and crammed full of milliput) and the engine assembly fitted - whenI tried to fit the canopy I found that the pilot was too tall, so I had to lever him out of the cockpit and replace his seat with some small plasticard squares so that he now sits low enough in the cockpit for the canopy to fit.
As always - constructive criticism is very welcome!
cheers
Joel_W

Joined: December 04, 2010
KitMaker: 11,666 posts
AeroScale: 7,410 posts

Posted: Friday, August 08, 2014 - 05:15 AM UTC
Simon,
Your making excellent progress. When you're going to be doing some major filling, sanding, etc. it's a good idea to use a strip of masking tape as close to the seam as possible. This will make it easier to keep the filler just in the open joints, and protect the adjacent detail from being damaged from the sanding process.
As an alternative to replacing the seat with scrap plastic to lower the pilot, you could have filed his bottom down until he was low enough, that way anyone looking into the cockpit will still see the pilots seat.
Joel
Joel_W

Joined: December 04, 2010
KitMaker: 11,666 posts
AeroScale: 7,410 posts

Posted: Friday, August 08, 2014 - 05:17 AM UTC
Hellbent,
That's sure a lot of wheat, but it will help feed the nation. Personally, love bread & rolls, which are a major portion of my 2,500 cal intake per day.
Looking forward to your F6F-3 build.
Joel
That's sure a lot of wheat, but it will help feed the nation. Personally, love bread & rolls, which are a major portion of my 2,500 cal intake per day.
Looking forward to your F6F-3 build.
Joel
 |


