World War II
Discuss WWII and the era directly before and after the war from 1935-1949.
Hosted by Rowan Baylis
1/32 A6M2N Rufe & A6M5
Scrodes
_VISITCOMMUNITY
Ontario, Canada
Joined: July 22, 2012
KitMaker: 771 posts
AeroScale: 763 posts
Posted: Thursday, September 15, 2016 - 01:32 AM UTC

Quoted Text

Are you finished with the wiring?


I'm going to give Mal Mayfield's technique of "weeding out" the background tape all at once so


Maybe I am, maybe I'm not


I tried that actually - these masks aren't cut well enough and the whole sheet lifts up.


Which reminds me- why the heck does a company like Tamiya provide masks for these kits with the pieces marked, but not cut? It's essentially a square of masking tape with panels drawn on them.
Joel_W
Staff MemberAssociate Editor
AUTOMODELER
_VISITCOMMUNITY
New York, United States
Joined: December 04, 2010
KitMaker: 11,666 posts
AeroScale: 7,410 posts
Posted: Friday, September 16, 2016 - 06:52 PM UTC
Chuck,
Glad to see that you're still around these parts, as you've been missed.
Joel
Scrodes
_VISITCOMMUNITY
Ontario, Canada
Joined: July 22, 2012
KitMaker: 771 posts
AeroScale: 763 posts
Posted: Saturday, September 17, 2016 - 05:43 AM UTC
Hey guys.


I'm trying a new technique for preshading. It's a technique from the AK interactive Aircraft modelling FAQ.

Hard edged pre-shading for control surfaces to bring out the underlying structure.

The best part about it is that if I don't like how it turns out - I just lay the final colour on heavier and it will be like I never tried this technique in the first place.


GazzaS
#424
_VISITCOMMUNITY
Queensland, Australia
Joined: April 23, 2015
KitMaker: 4,648 posts
AeroScale: 1,938 posts
Posted: Saturday, September 17, 2016 - 10:03 AM UTC
Matt,
I imagine that could look great once painted. Wouldn't be very easy in smaller scales, I reckon.

Gaz
Joel_W
Staff MemberAssociate Editor
AUTOMODELER
_VISITCOMMUNITY
New York, United States
Joined: December 04, 2010
KitMaker: 11,666 posts
AeroScale: 7,410 posts
Posted: Saturday, September 17, 2016 - 08:11 PM UTC
Matt,
I've always struggled with the differences in shading on cloth flying surfaces. This method does solve a lot of the issues I face. I'm going to try it out myself on the Mossie as I think it has great potential.
Joel
Scrodes
_VISITCOMMUNITY
Ontario, Canada
Joined: July 22, 2012
KitMaker: 771 posts
AeroScale: 763 posts
Posted: Saturday, September 17, 2016 - 11:45 PM UTC

Quoted Text

Matt,
I've always struggled with the differences in shading on cloth flying surfaces. This method does solve a lot of the issues I face. I'm going to try it out myself on the Mossie as I think it has great potential.
Joel


If you give me a few more days you'll be able to see how mine turns out.

The alternative is to paint the control surfaces along with the wing, and then mask them off and spray them with a very diluted flat white or tan (a single drop to twenty parts thinner)
Scrodes
_VISITCOMMUNITY
Ontario, Canada
Joined: July 22, 2012
KitMaker: 771 posts
AeroScale: 763 posts
Posted: Tuesday, October 11, 2016 - 06:52 AM UTC
Hey kids! Here’s a long overdue update – and some substantial progress.


As I mentioned before, these builds are an opportunity for me to experiment and try some new techniques. This is critical so your building doesn’t become stale. We all have those modeller’s in our chapter – the ones who always build the same and you could pick their builds out of a lineup, which isn’t always a good thing.


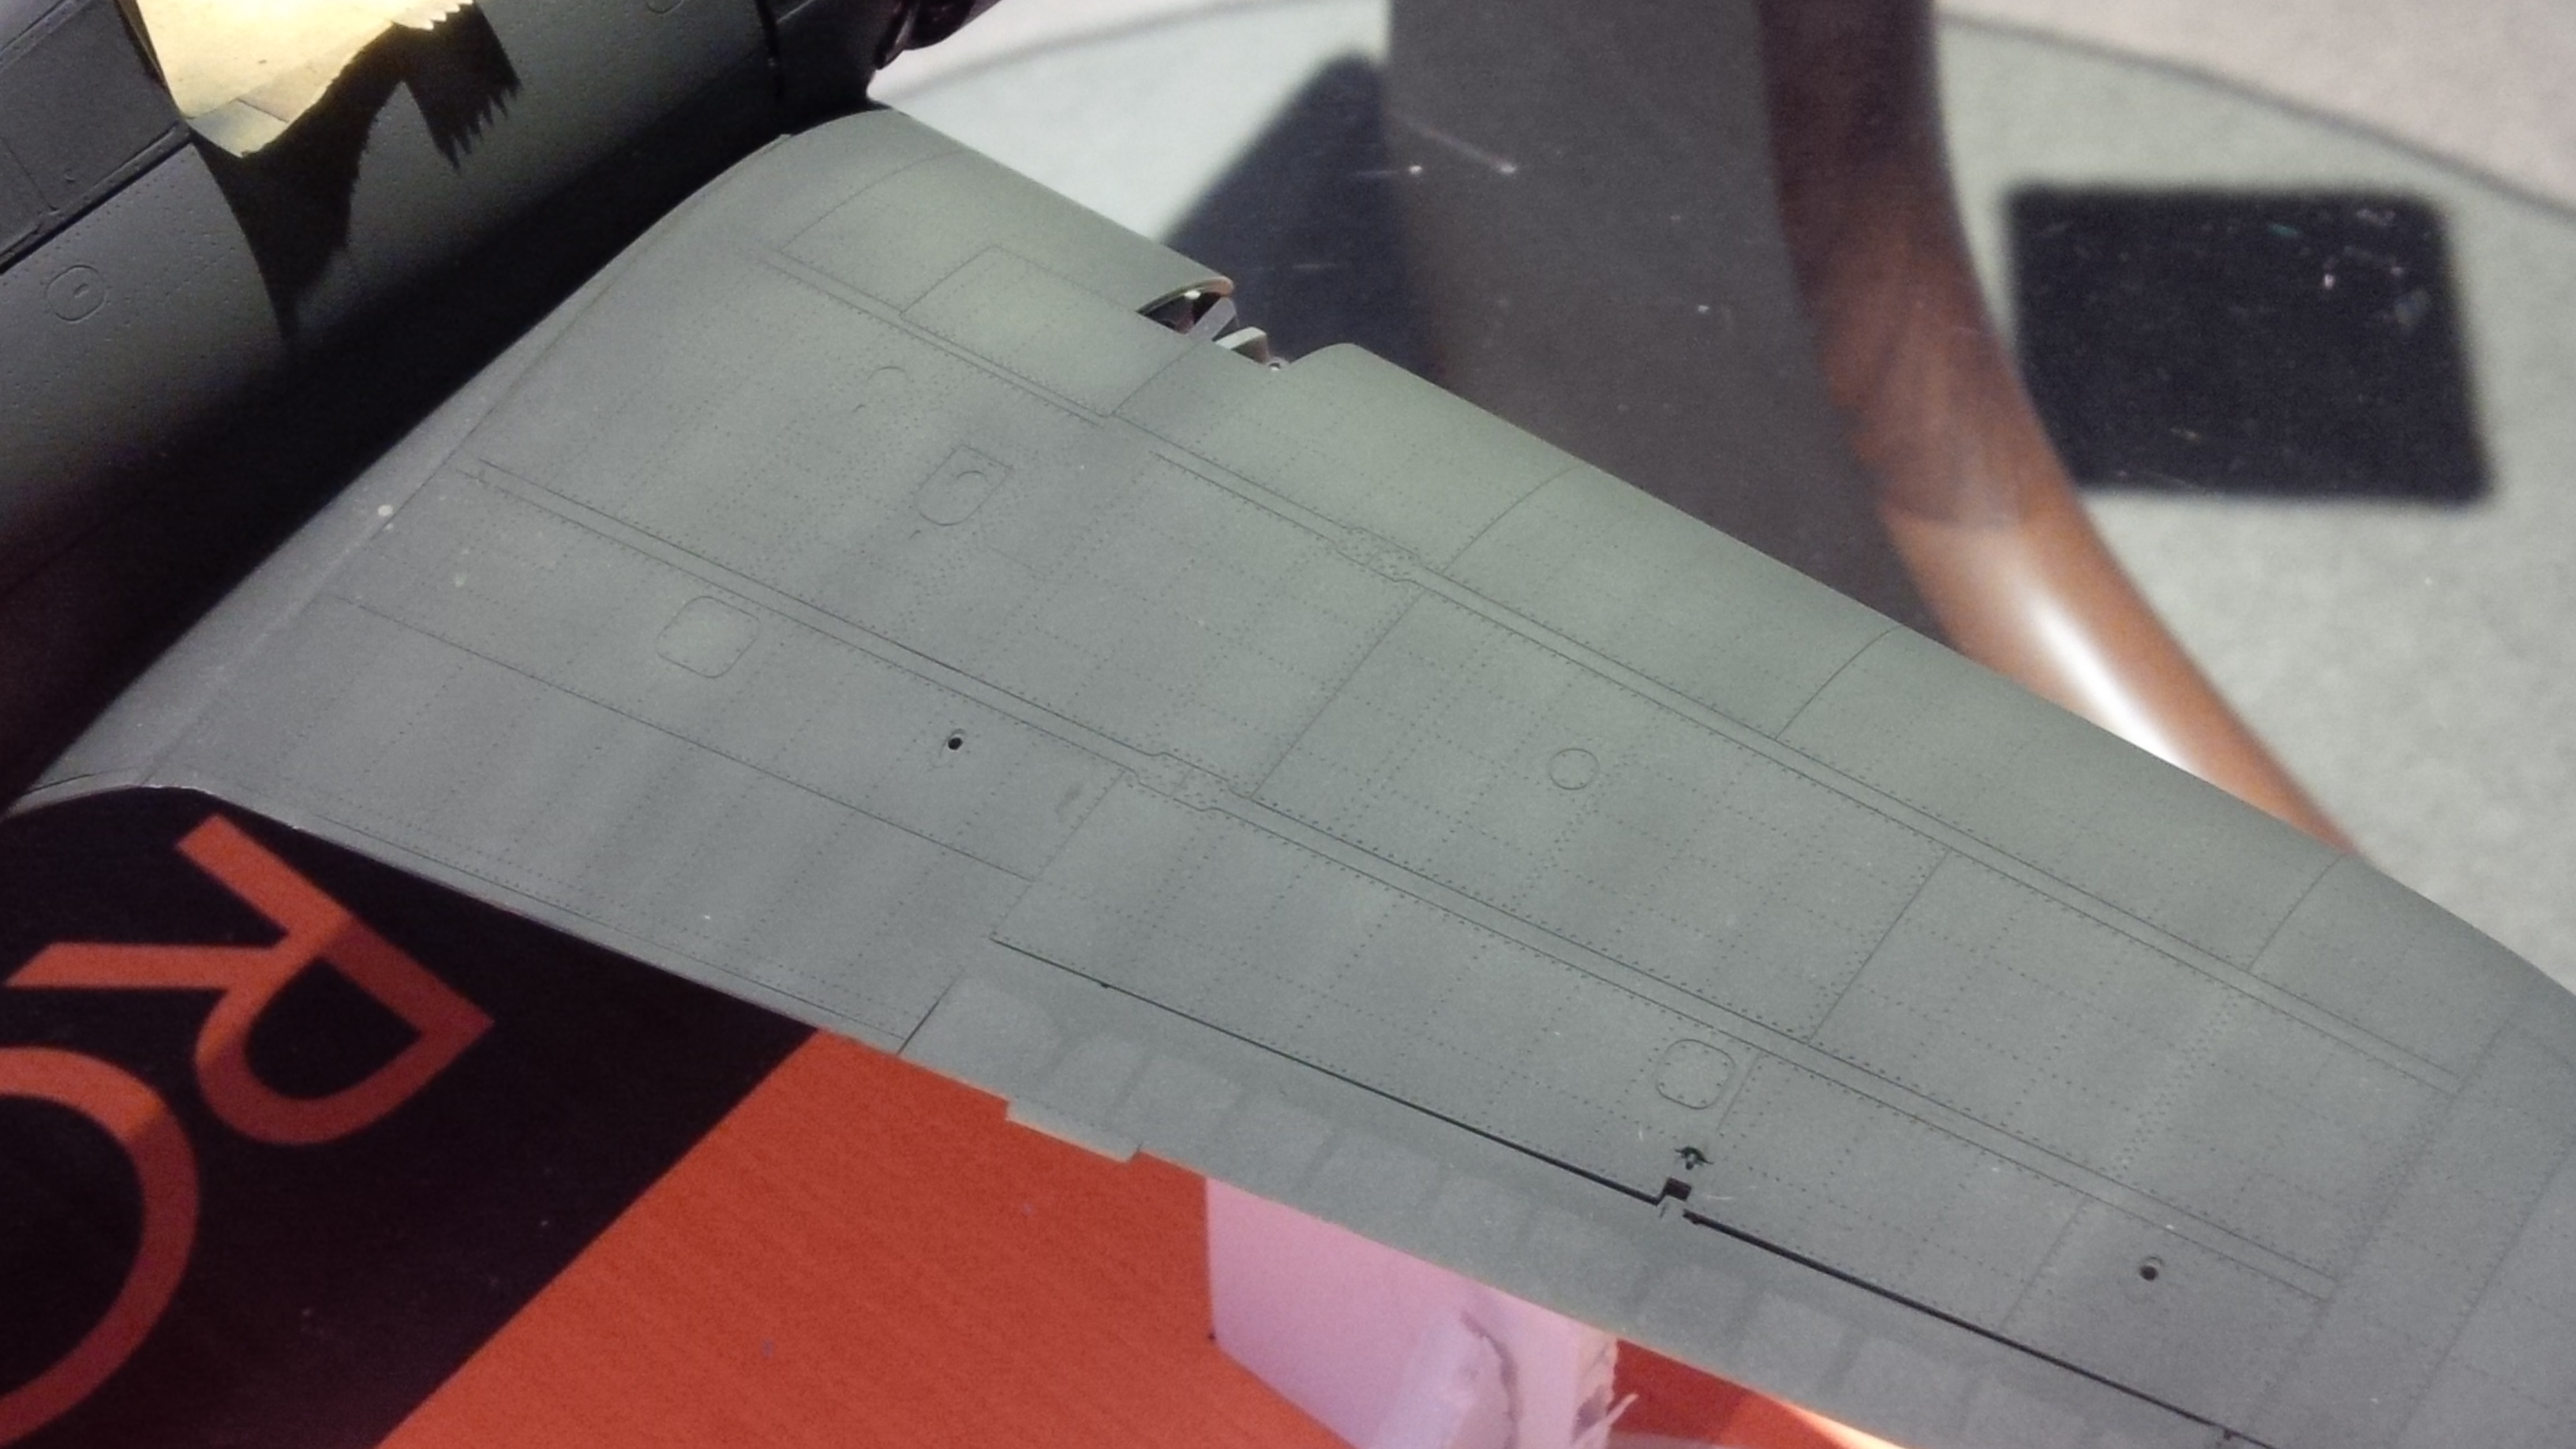
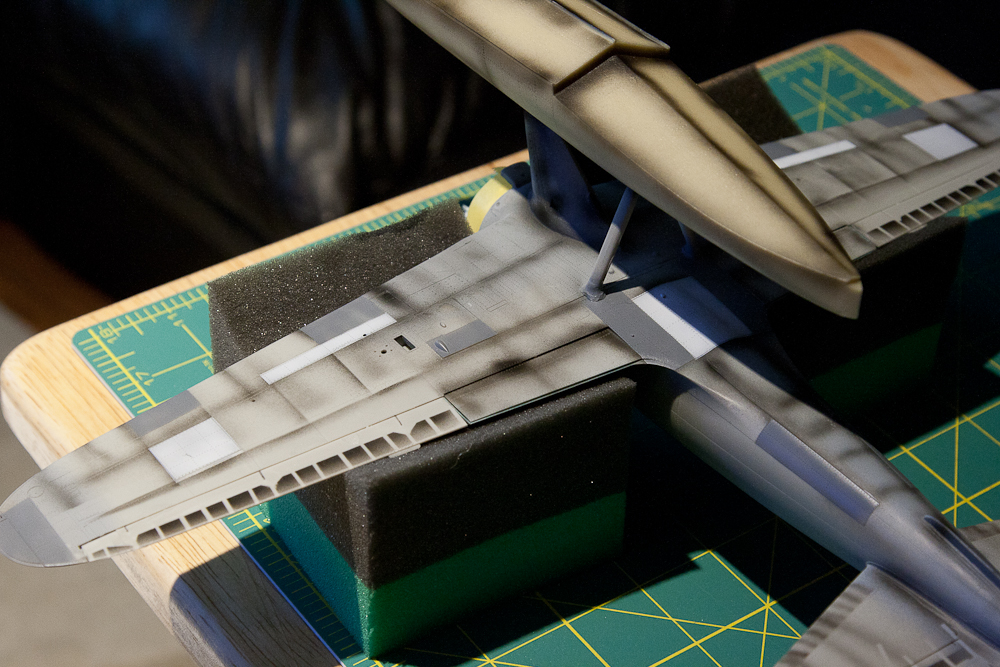
For these builds, I thought I would try panel-preshading. I’m not abandoning the traditional preshading that has served me so well, but rather I’m augmenting it. Hopefully this adds more depth to my finishes.


The panel method is simple - various panels are painted lighter or darker than the base colour (sometimes primer, in this case just the gray plastic). Note that I still am using the traditional method of preshading as well.


This step had been done for quite a while.... I was staring at the two Zeros for weeks before I commited to a plan.

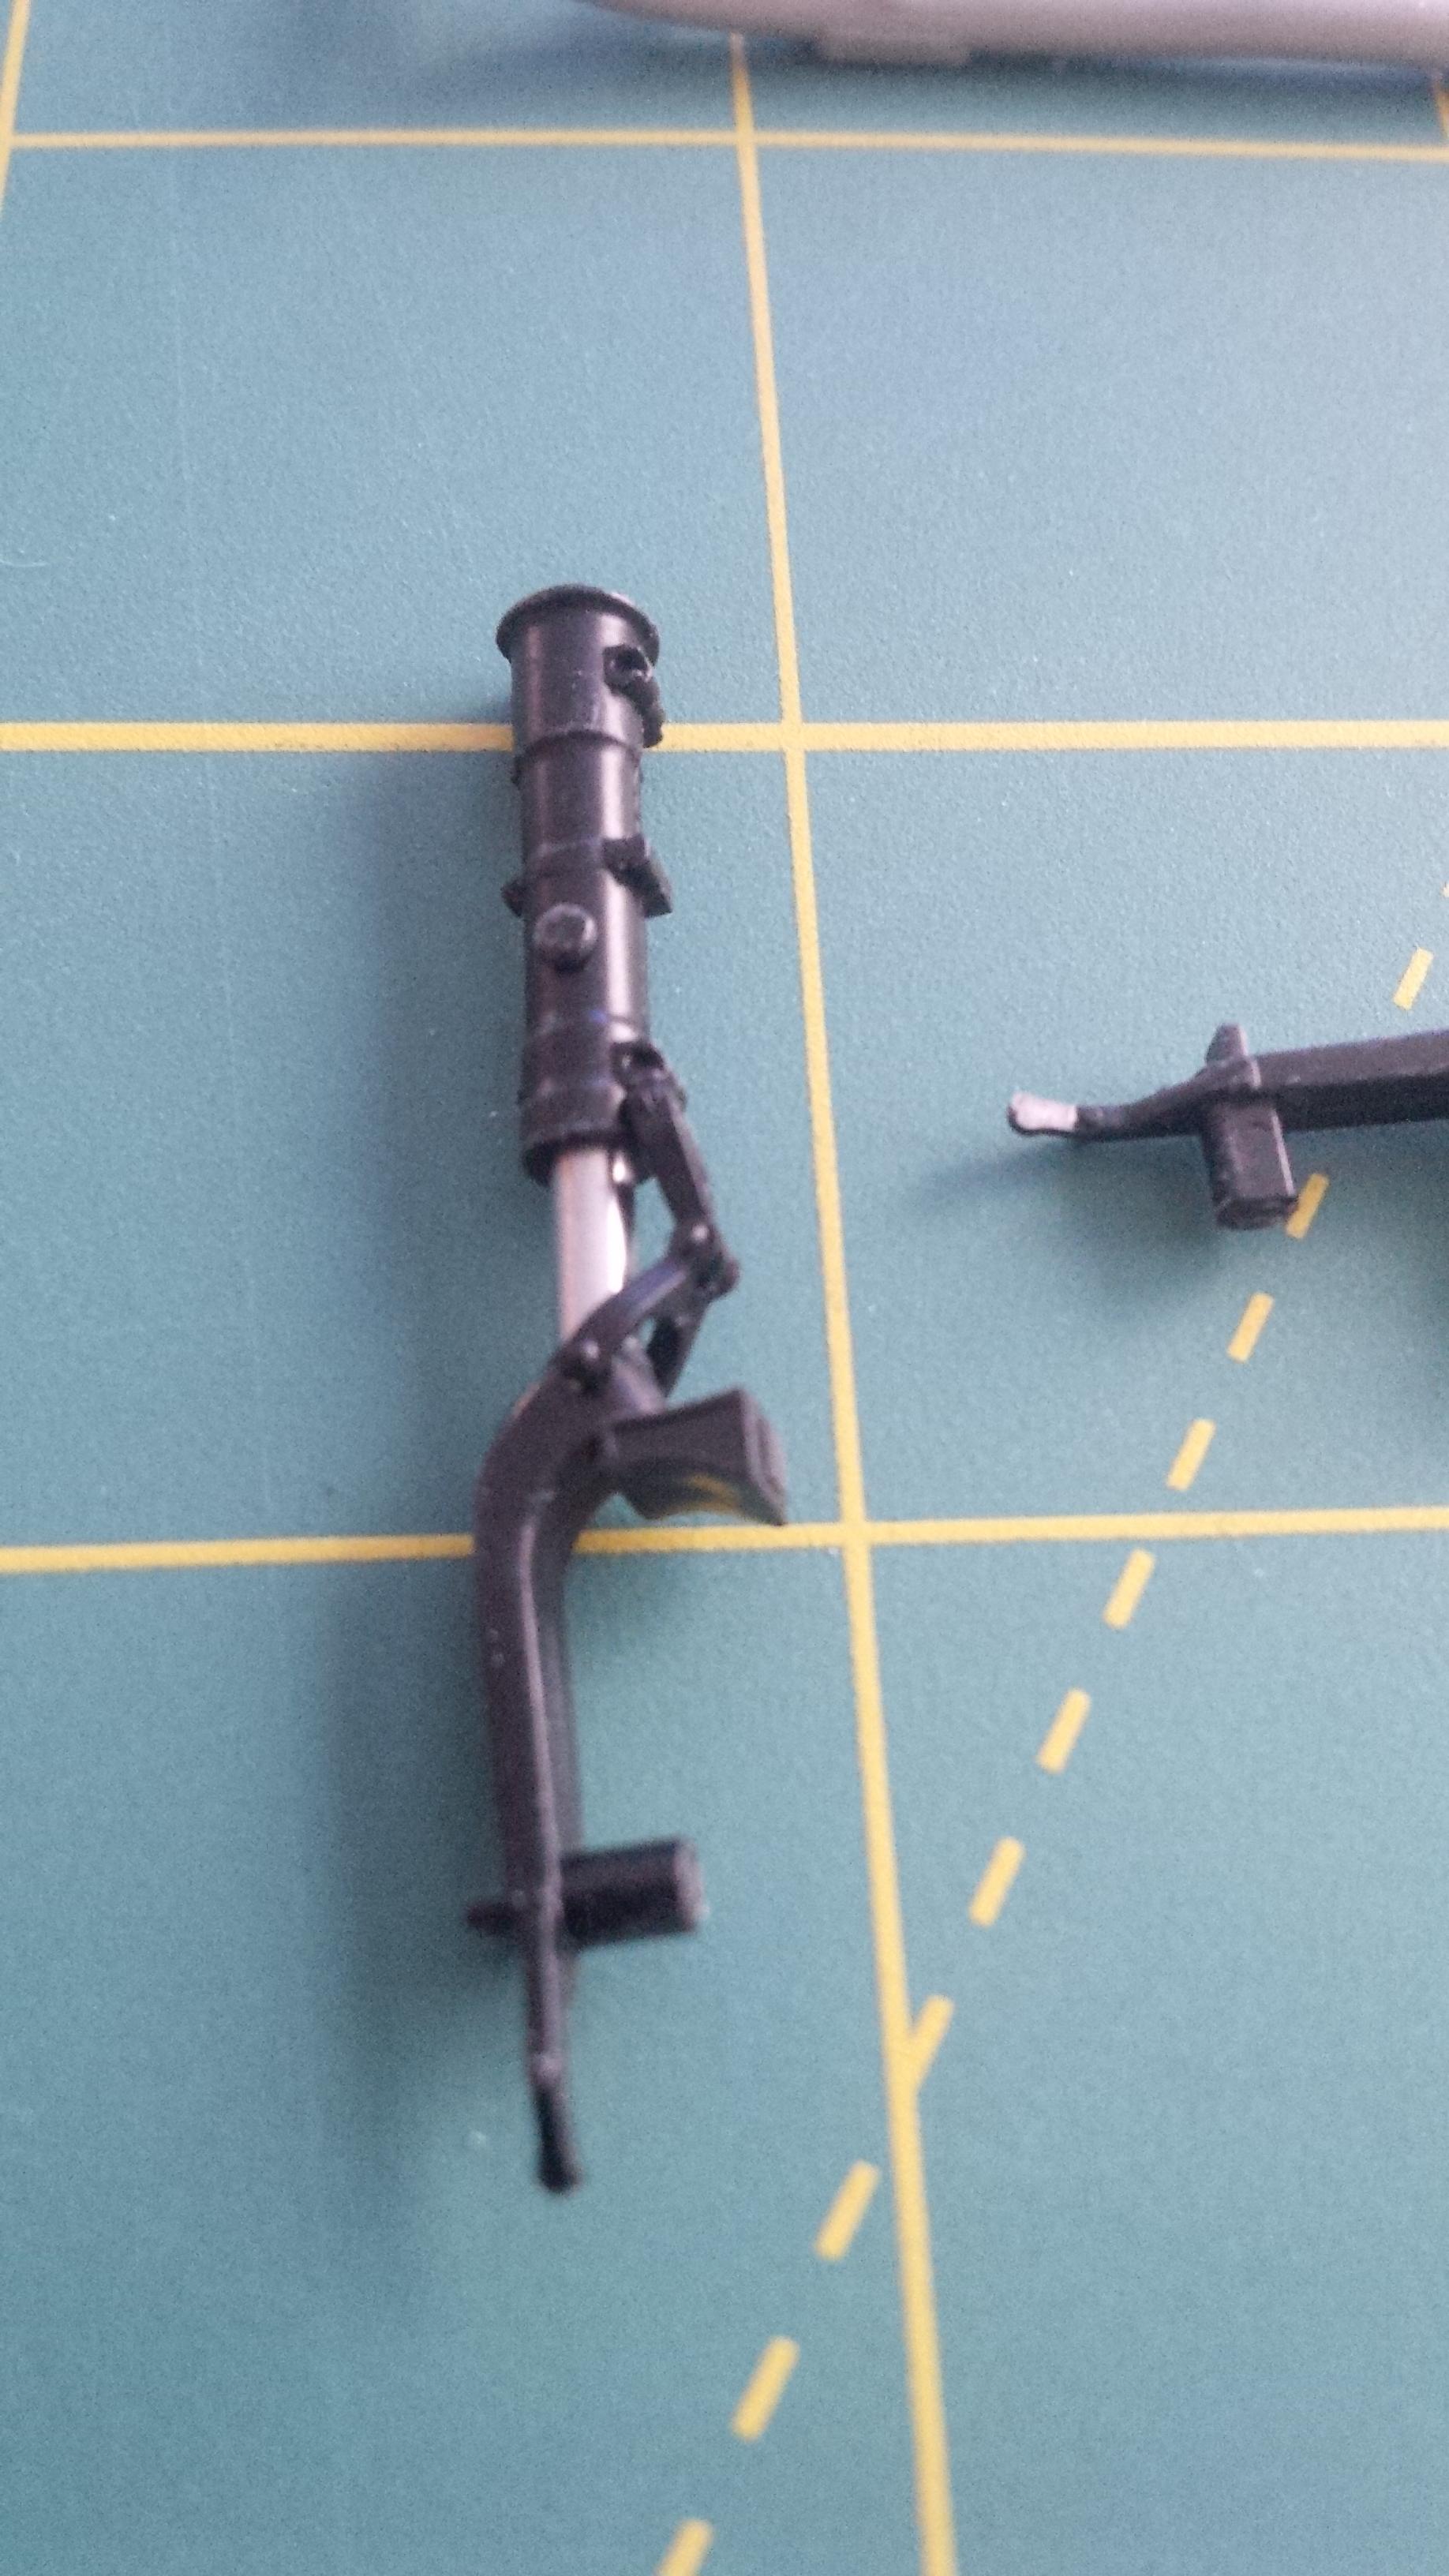
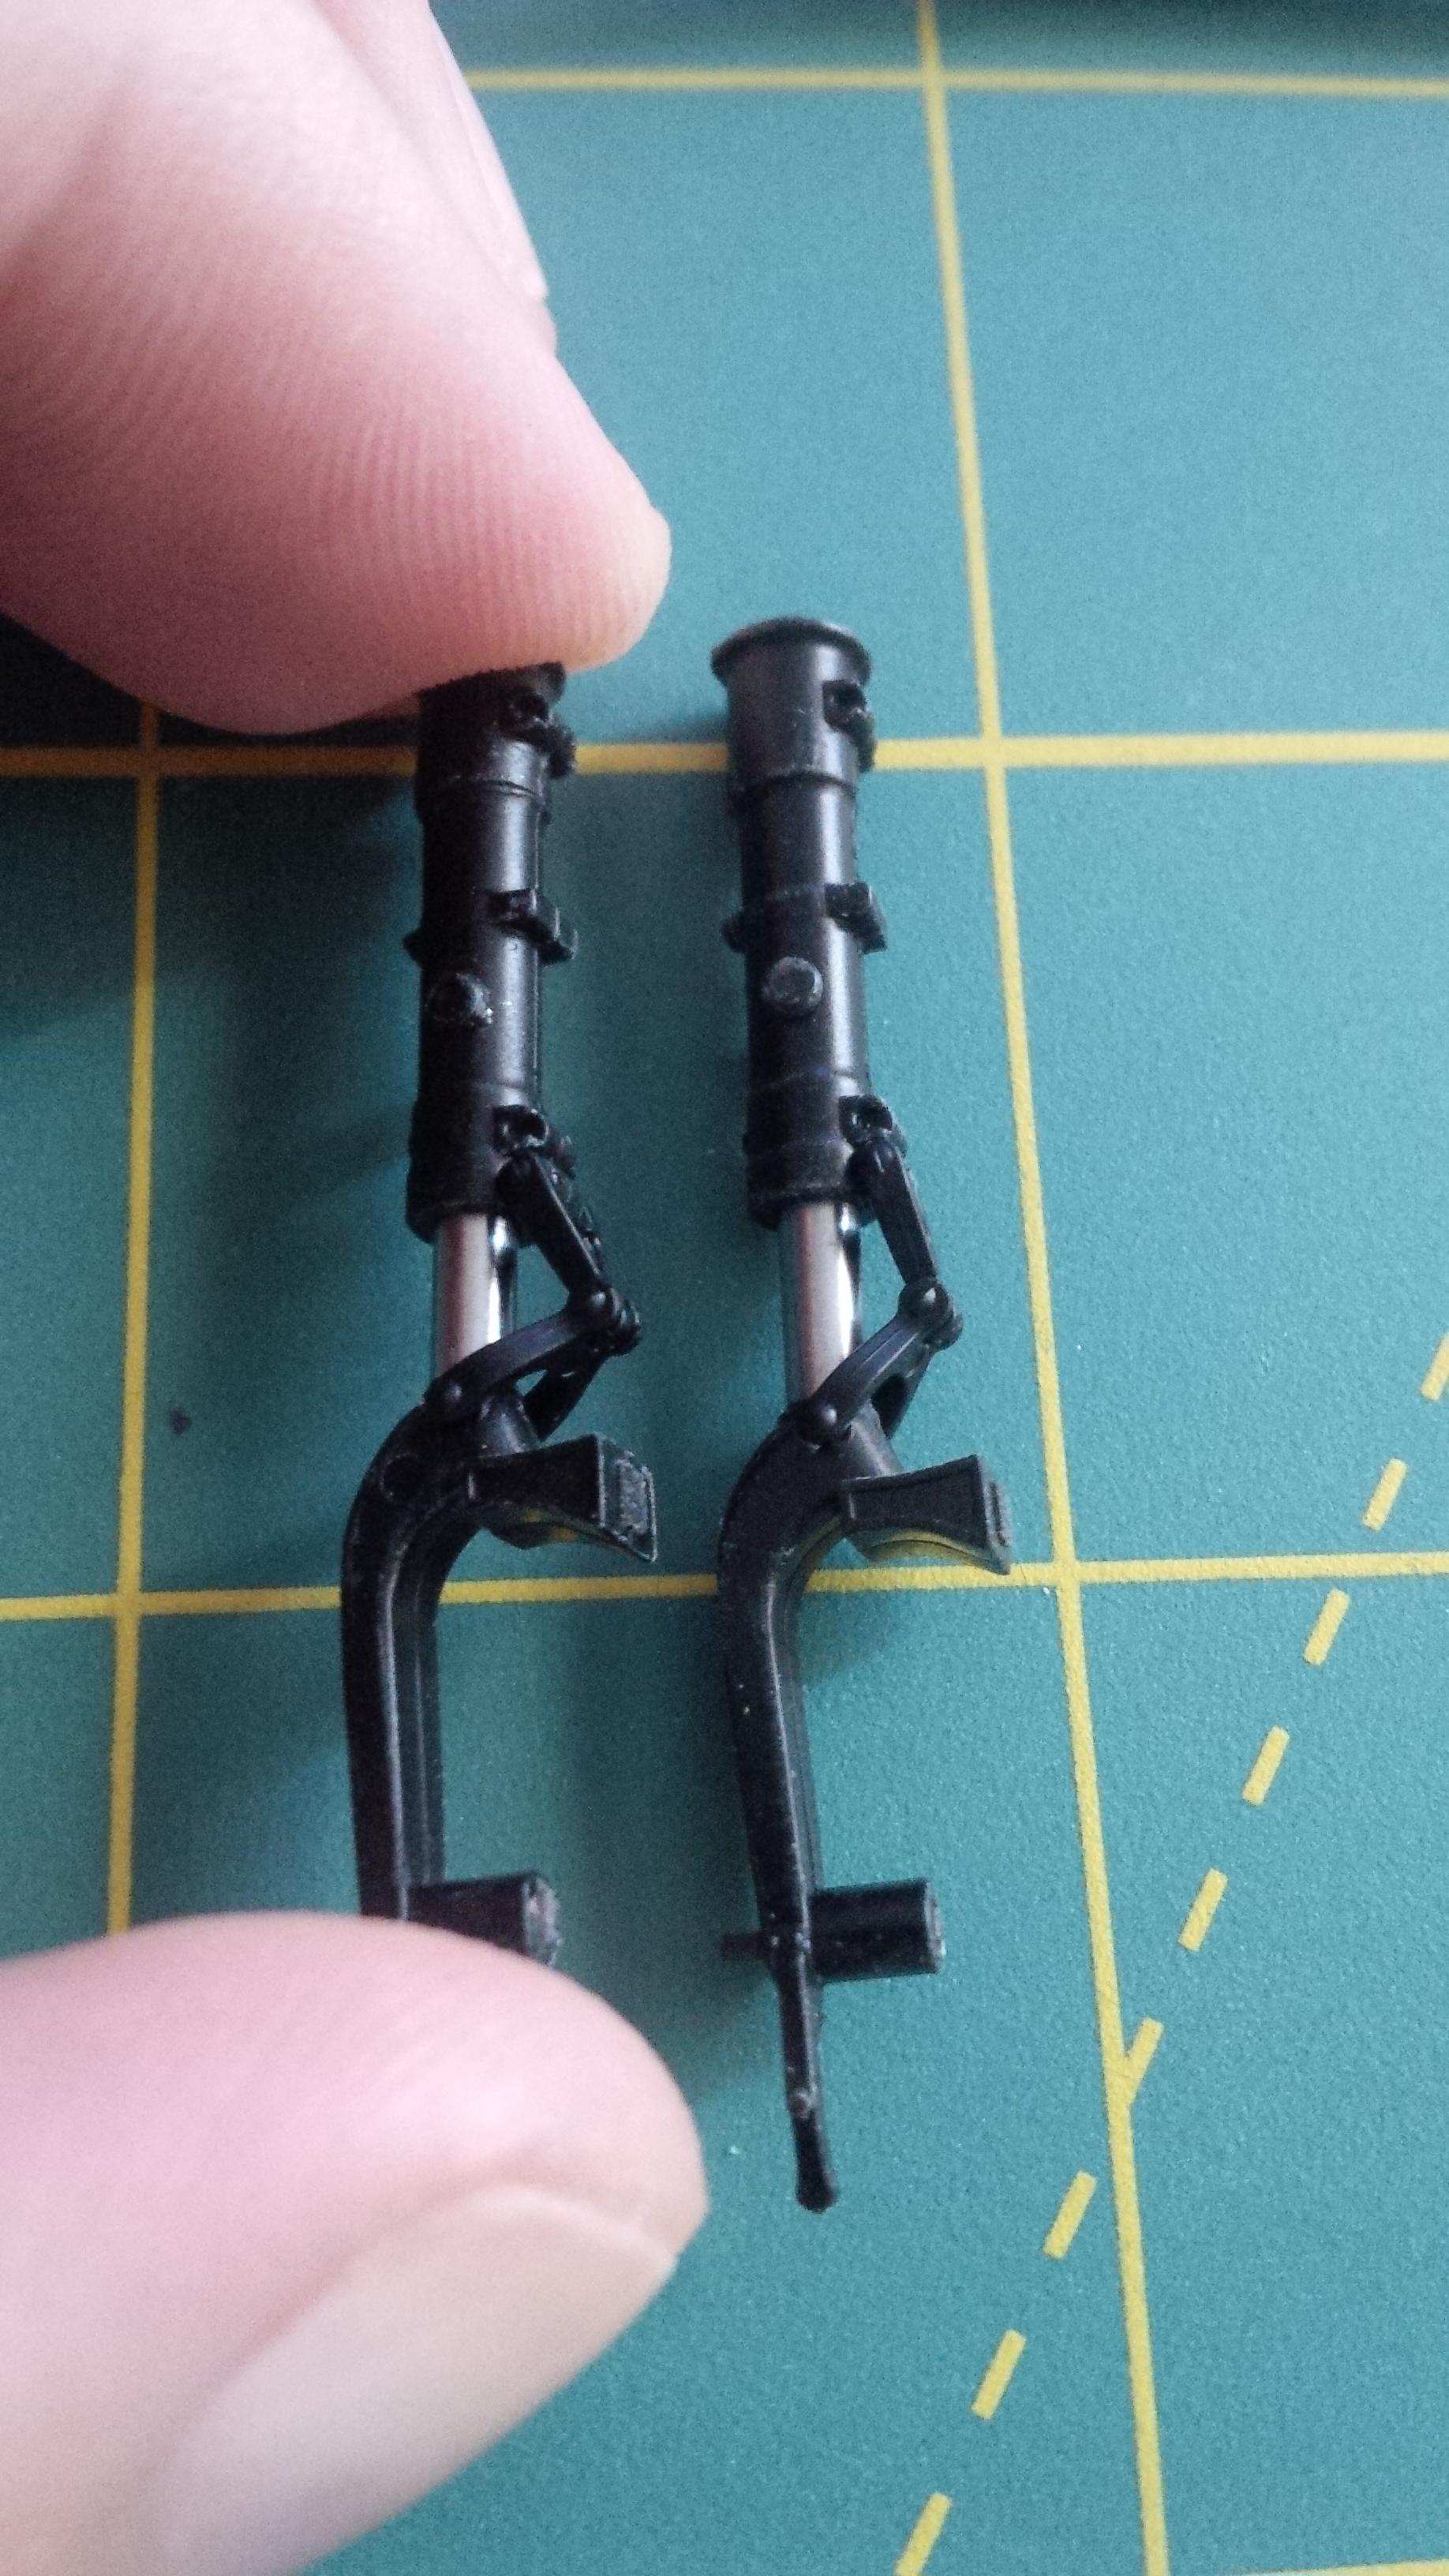
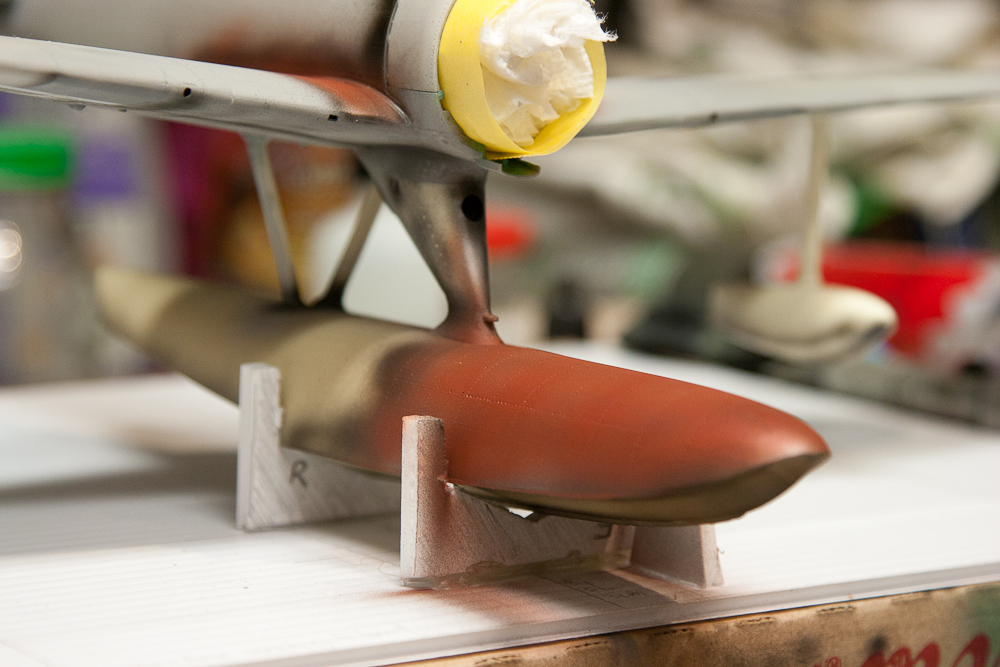
Against all advice, I decided to mount the wingtip floats on the Rufe before painting. The reason it simple - I don't want to have to blend the struts into the wing after the painting is complete and then have to do more painting that may or may not match the work already done.


It took me so long because I needed to figure out how to make a jig so the floats were aligned properly the first time.


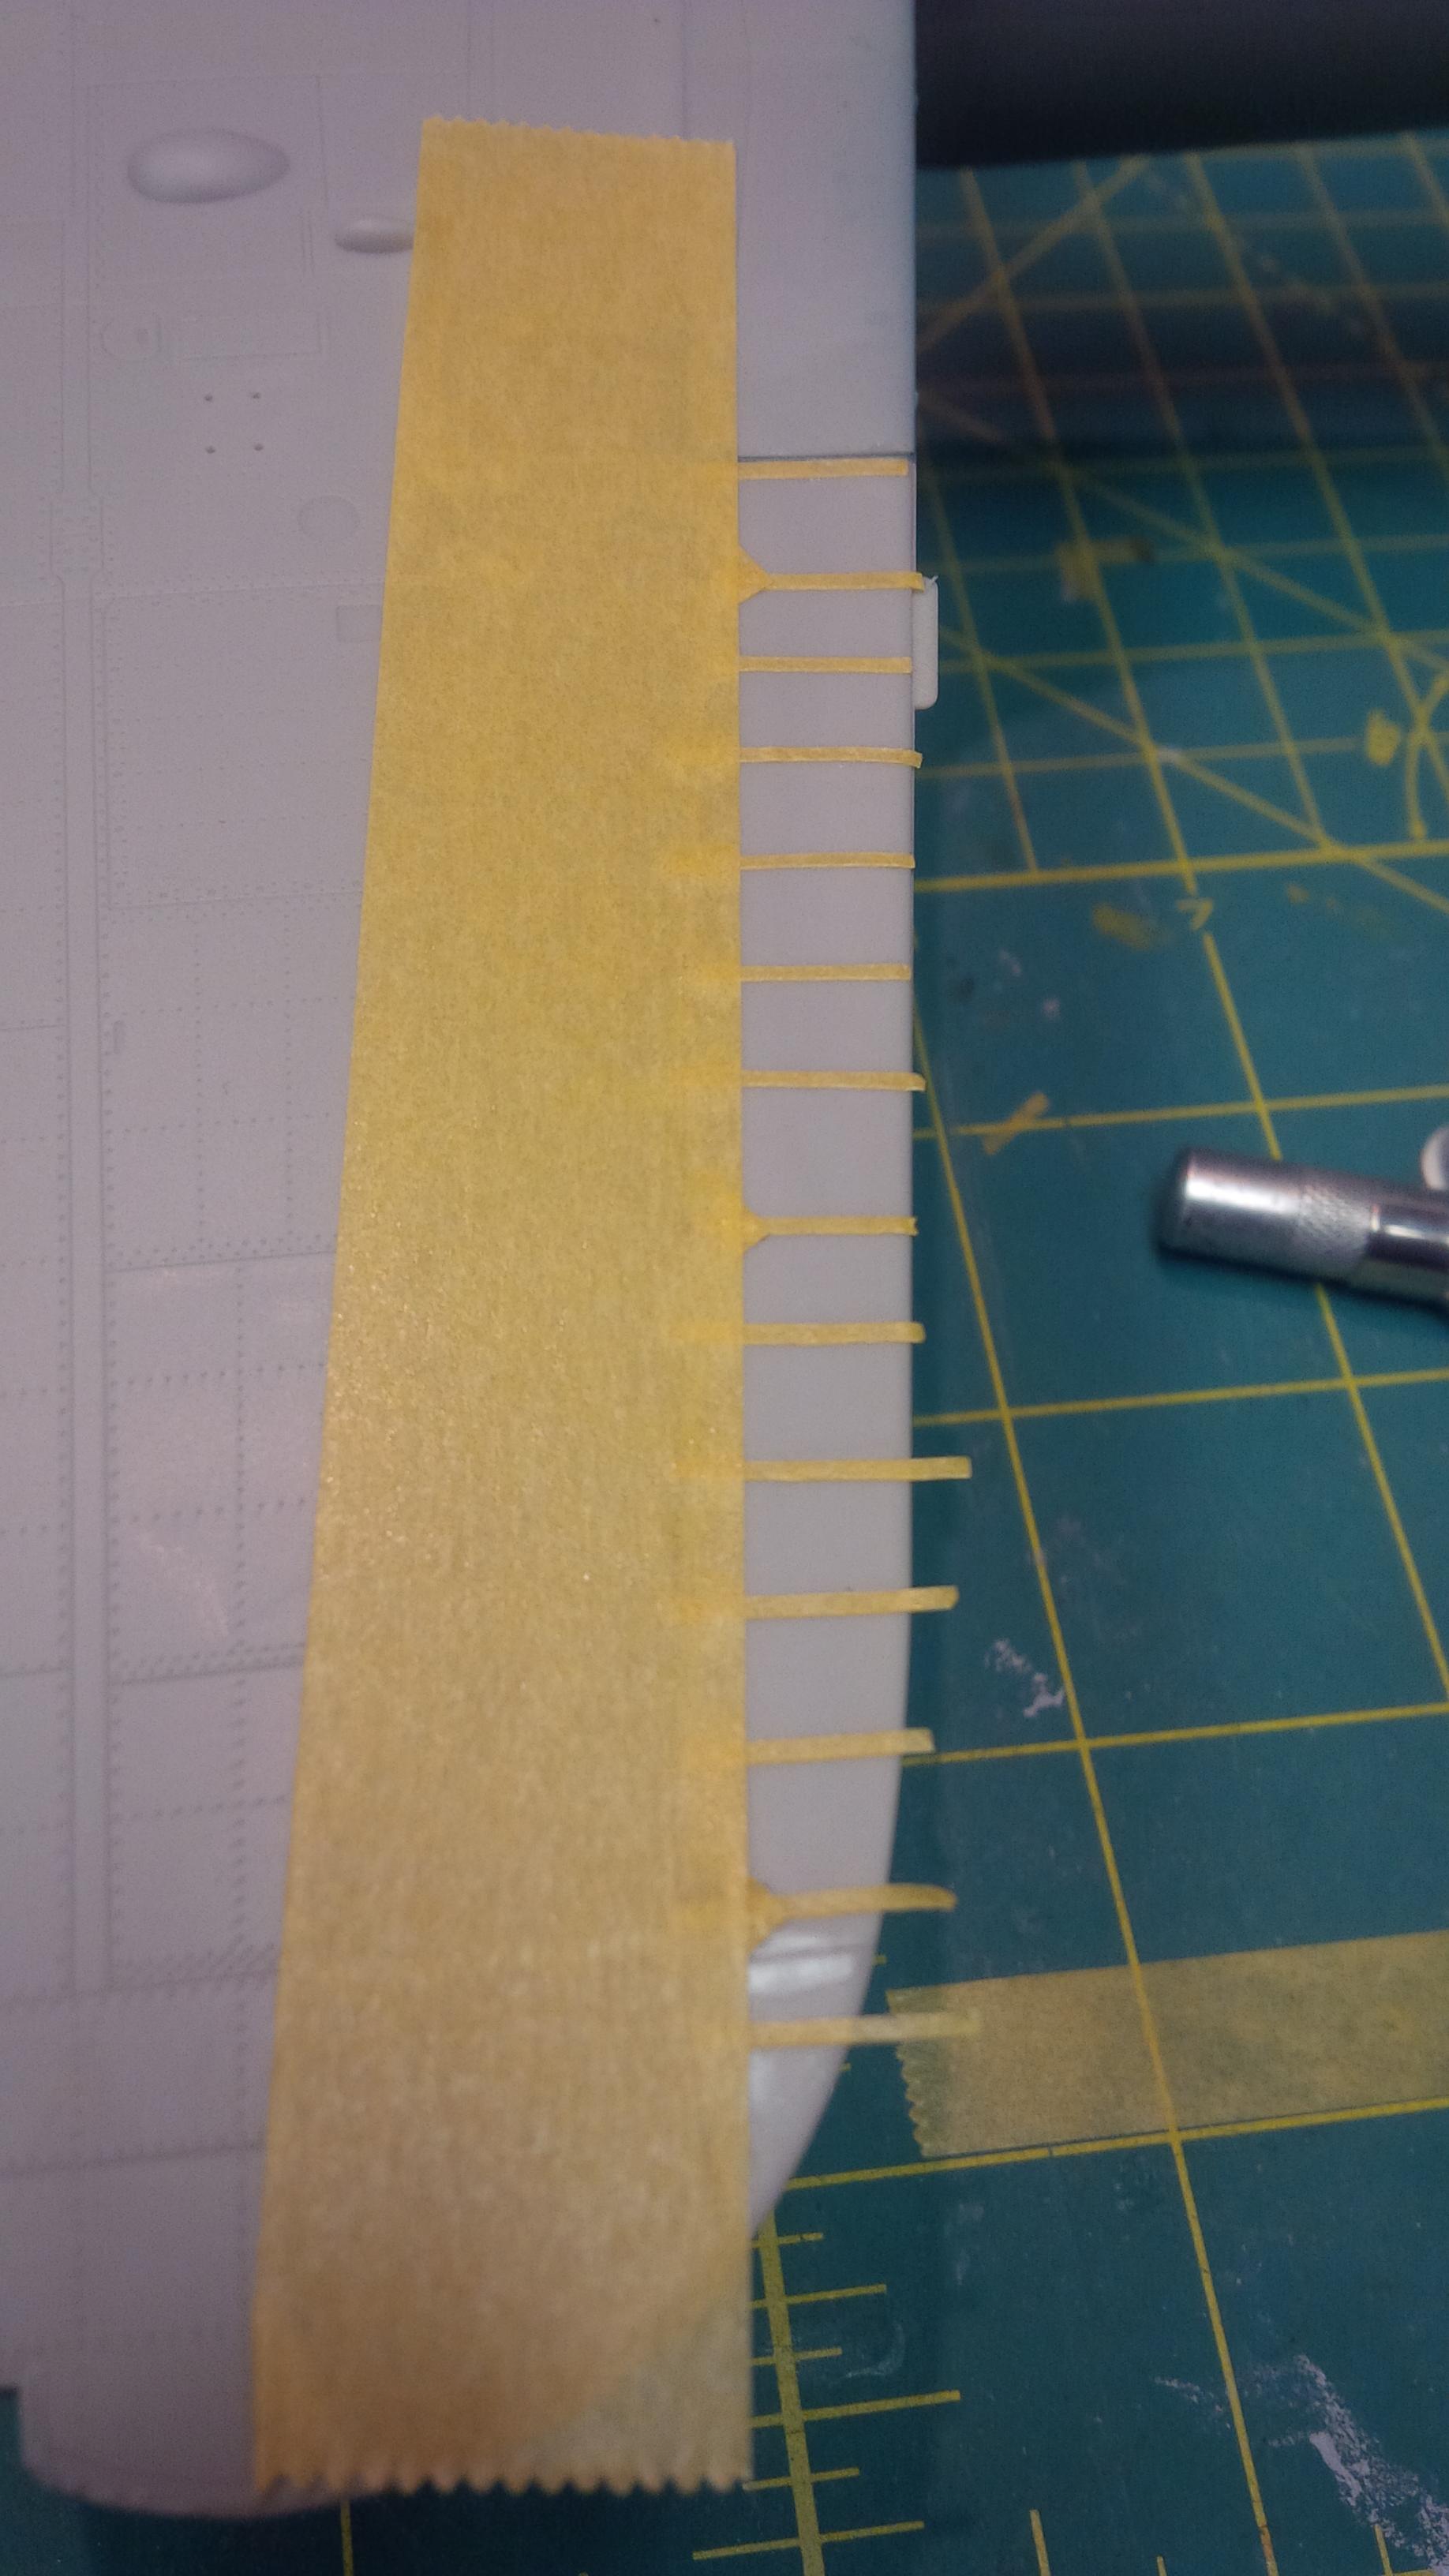
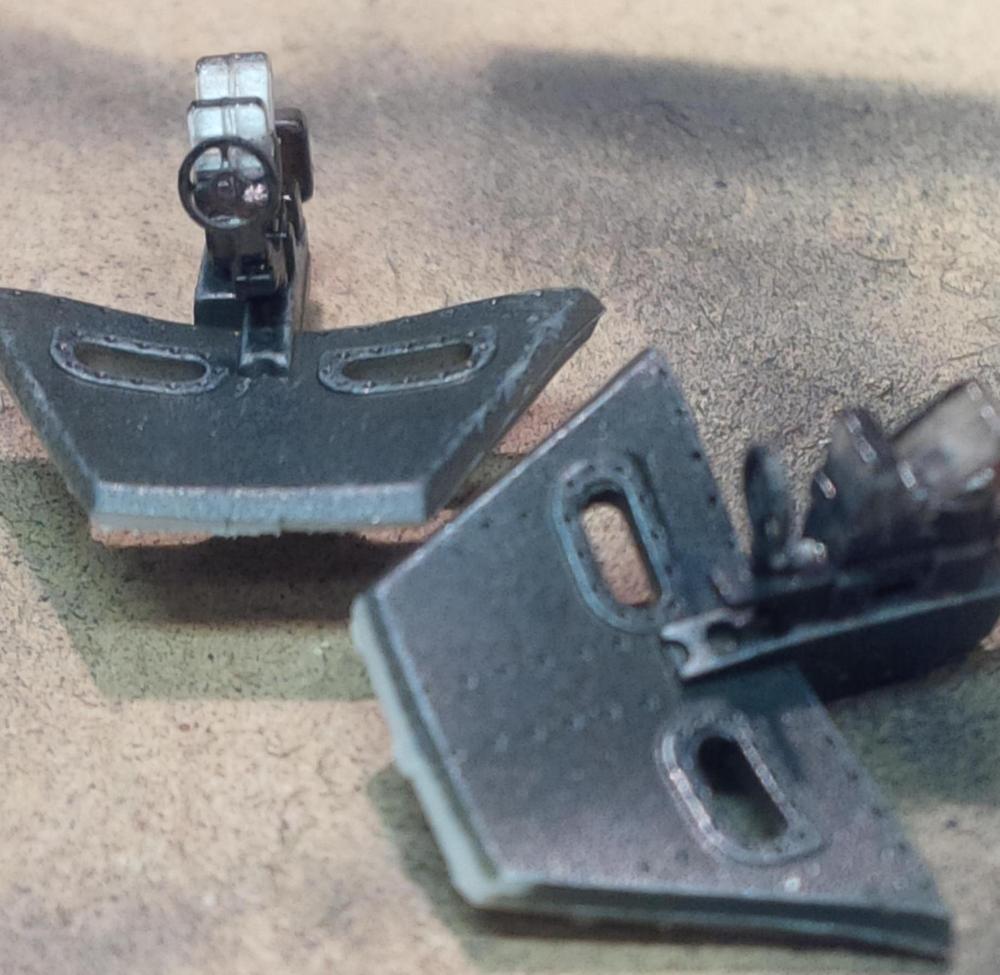
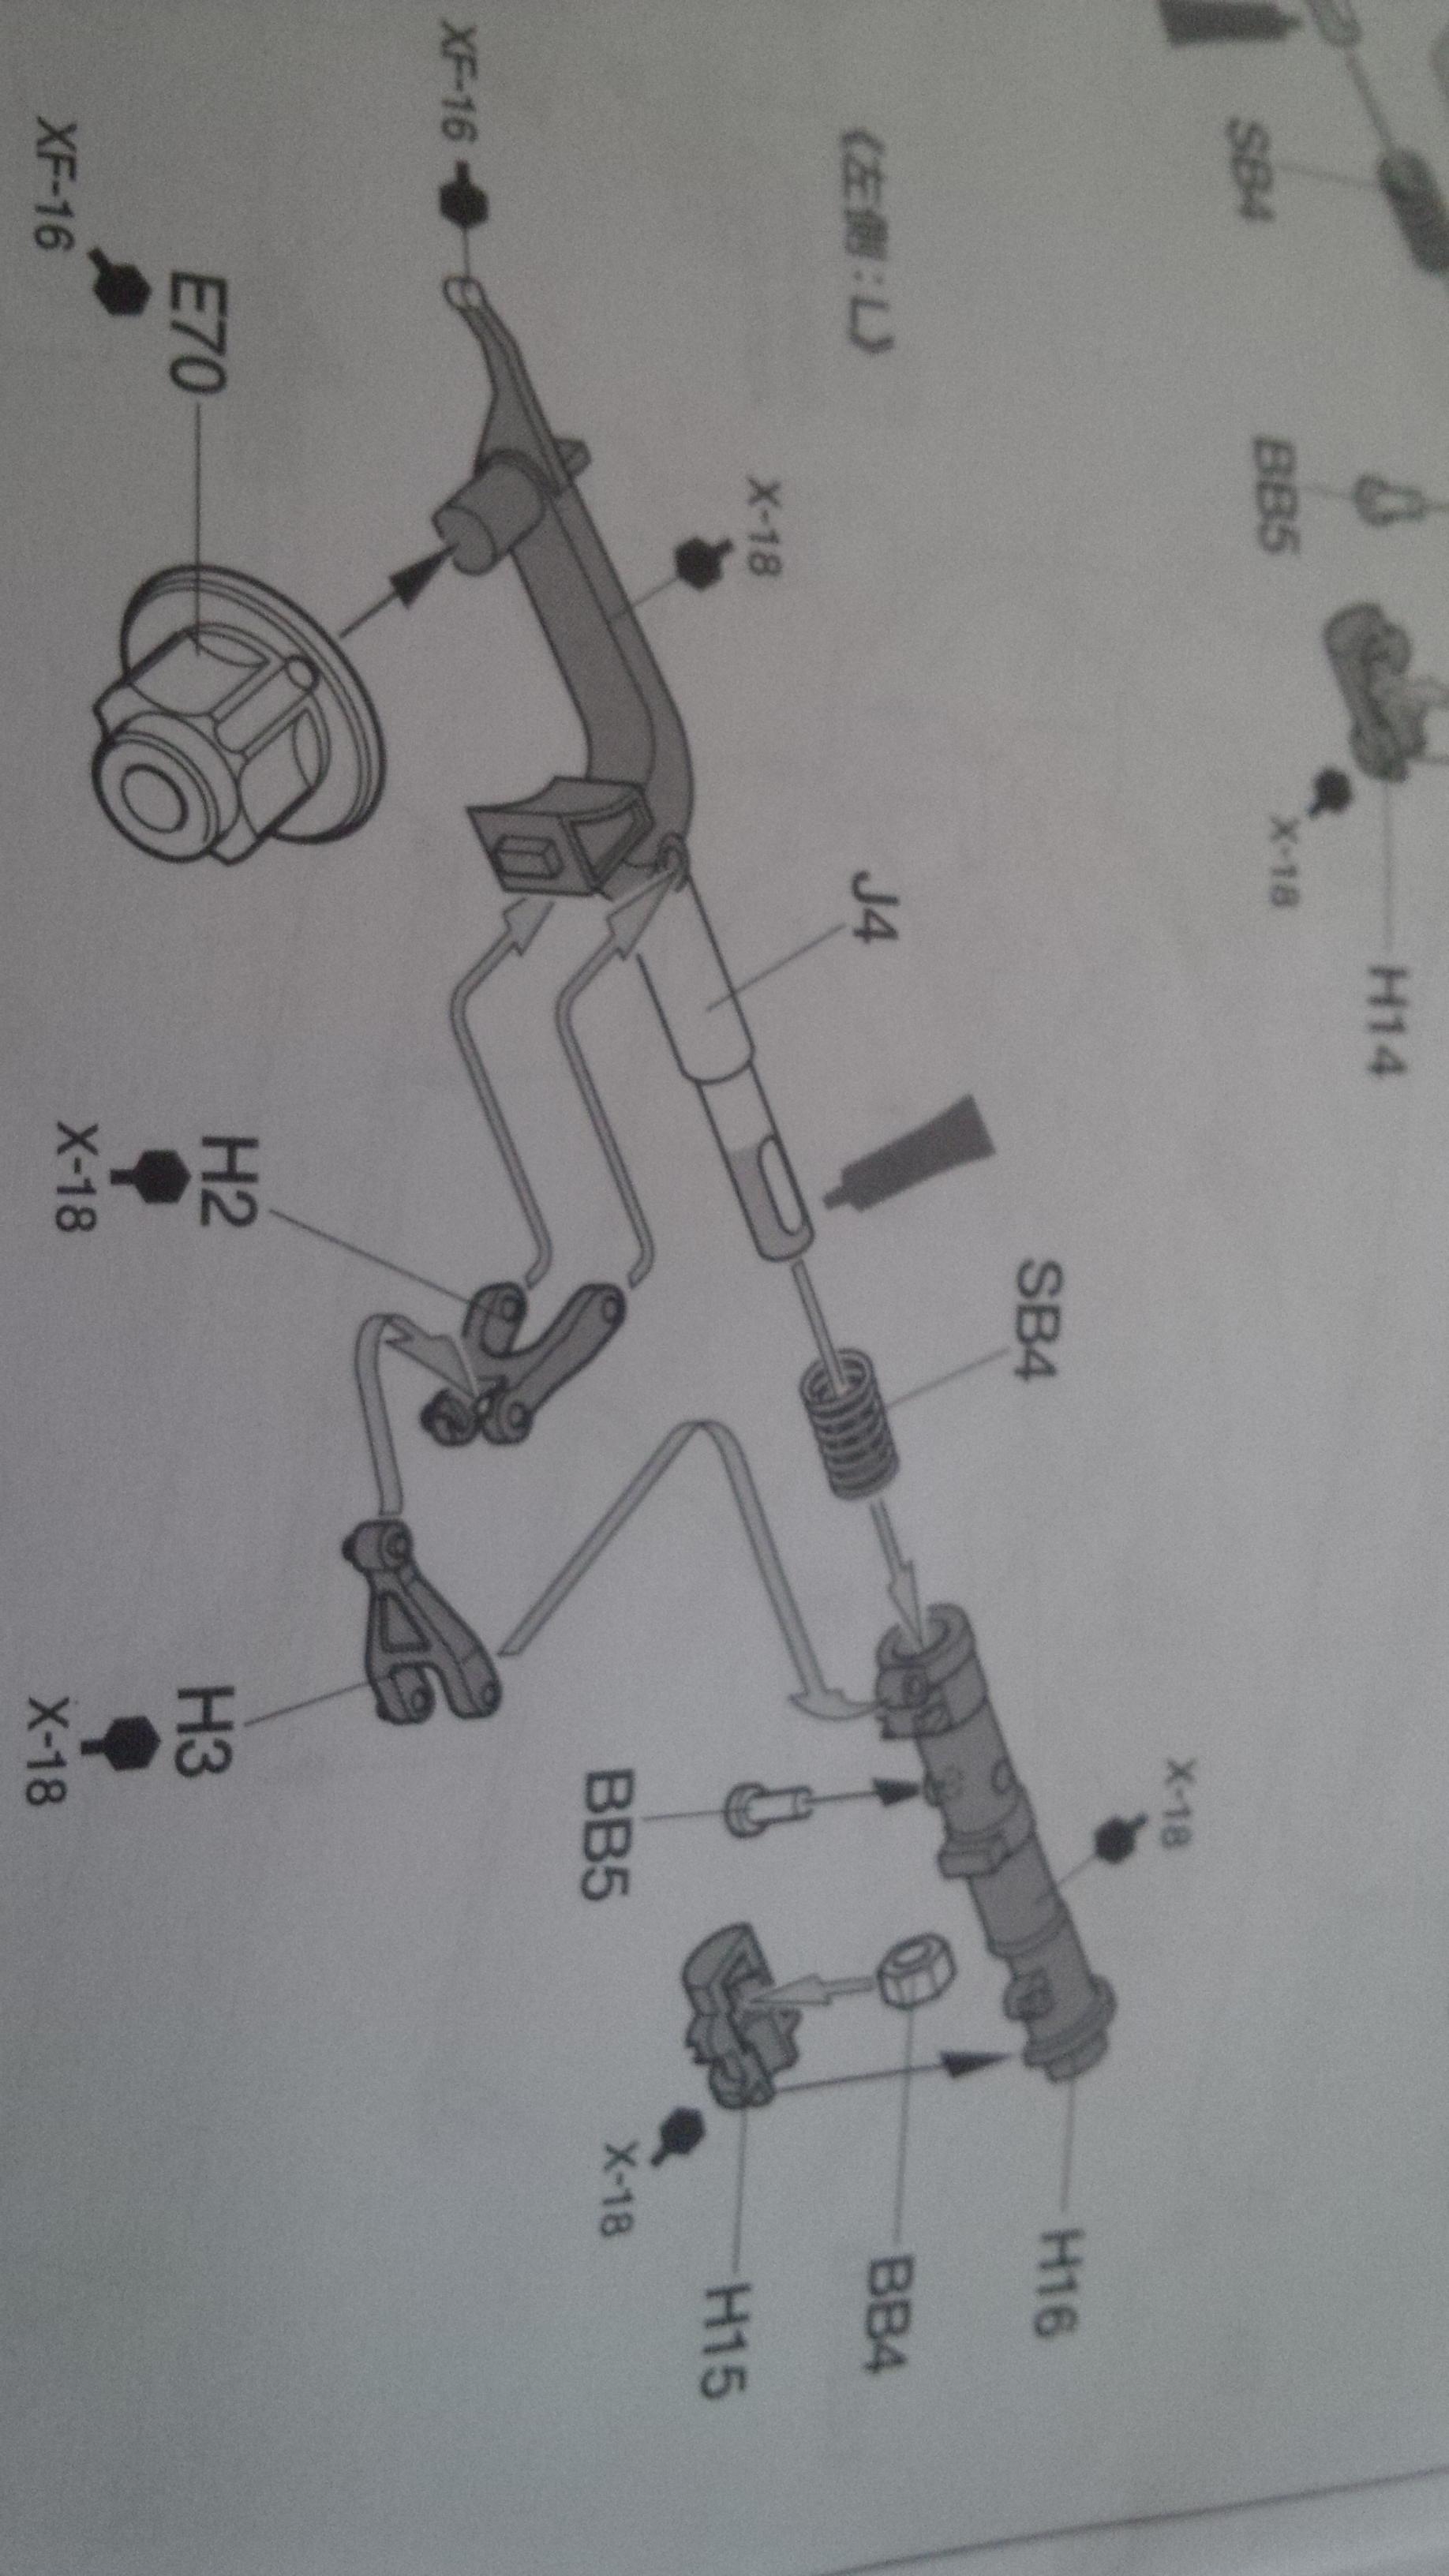
Step 1 - PIN THAT RESIN!!!


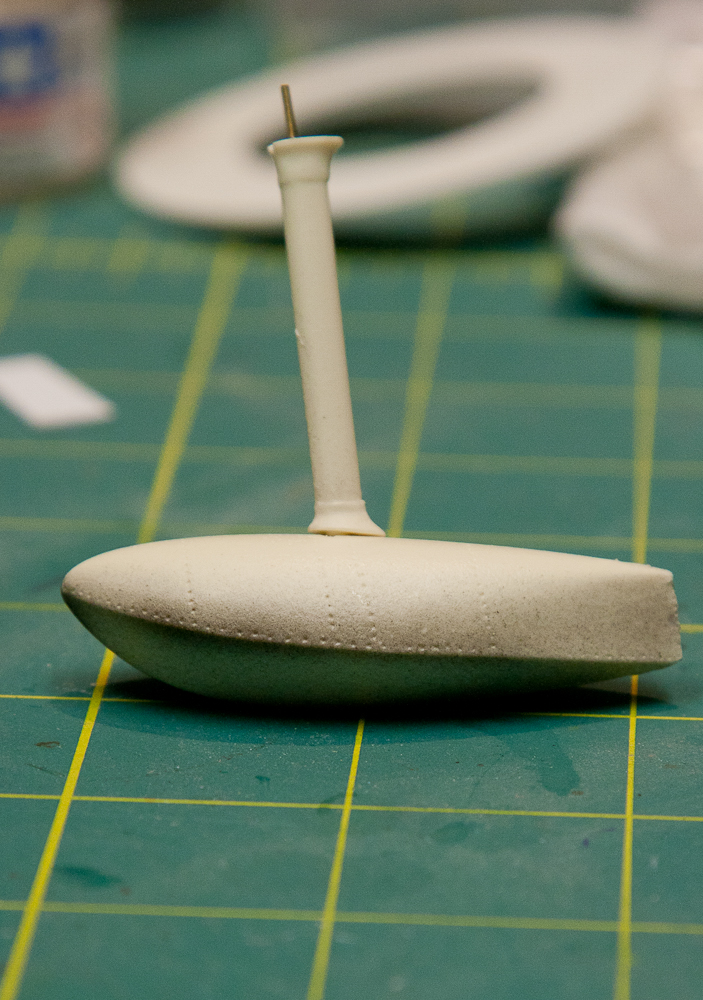
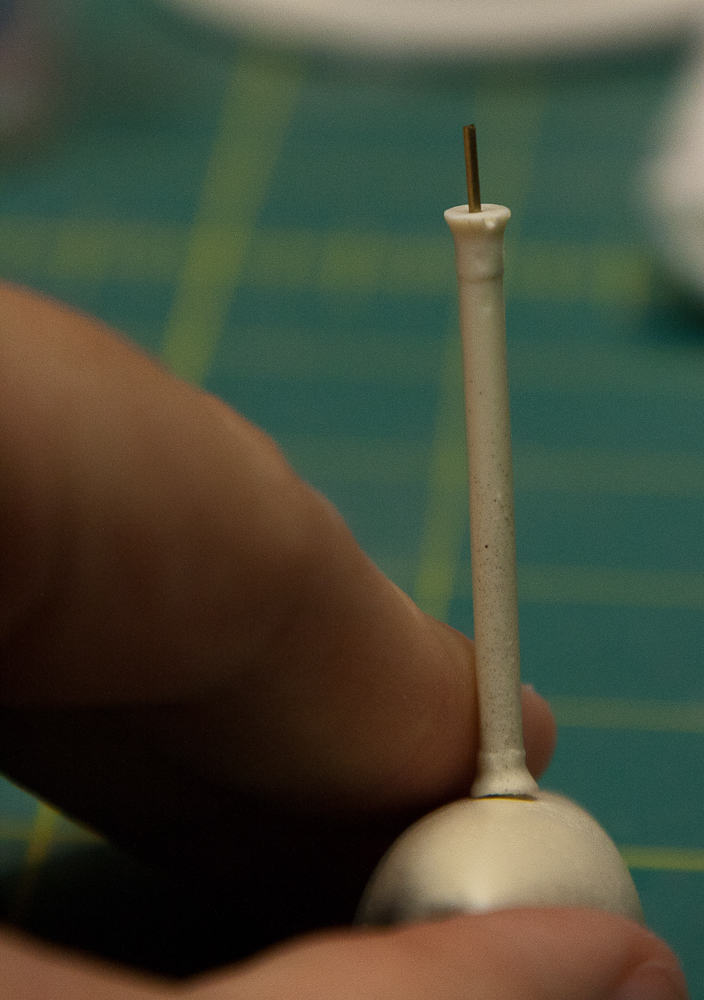
The strut is pinned into the top of the float as well as into the bottom of the wing to add strength. This is tedious work, but the metal pin allowed me to bend the angle which the strut attached to the float until it was correct. The floats are distinctly nose up.
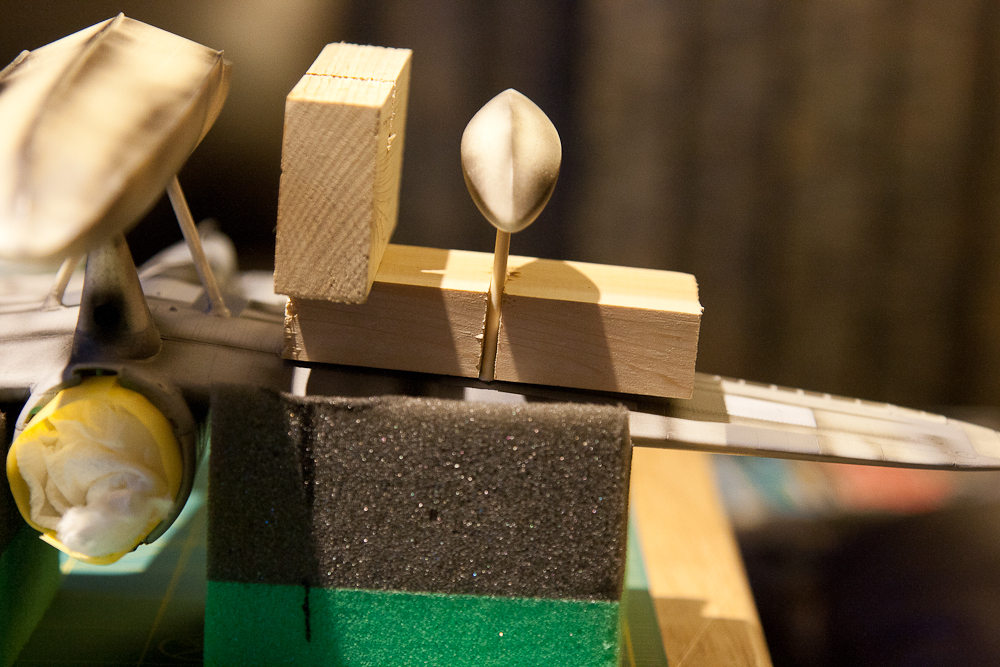
The Jig

An easy and equally crazy solution - it's not hoarding when you use what you've got!

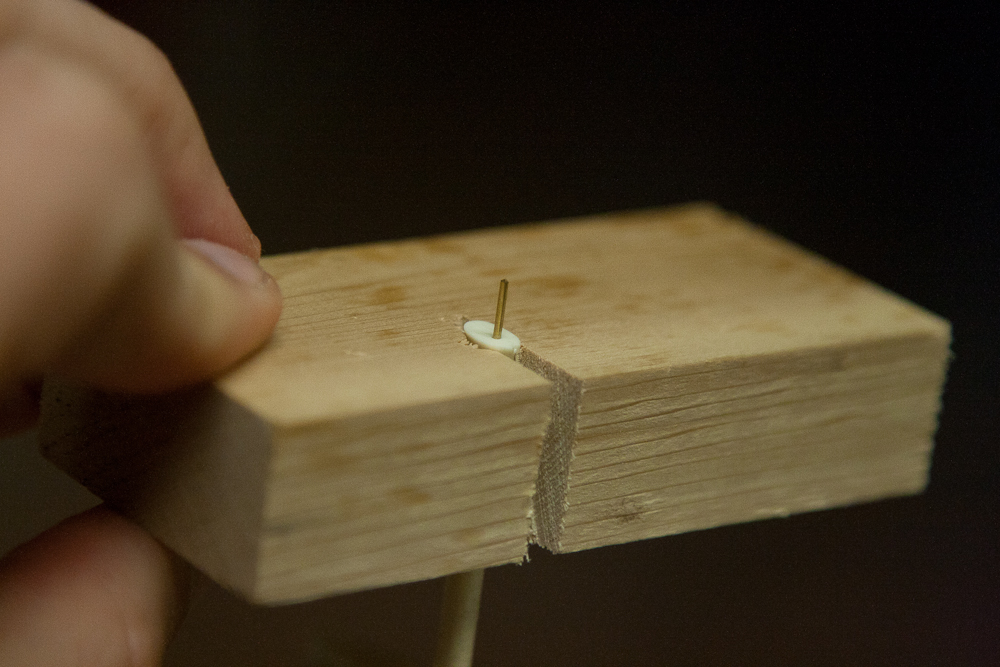
I took a small block of wood, and wouldn't you know it - the width of a drop cut is perfect for the strut.


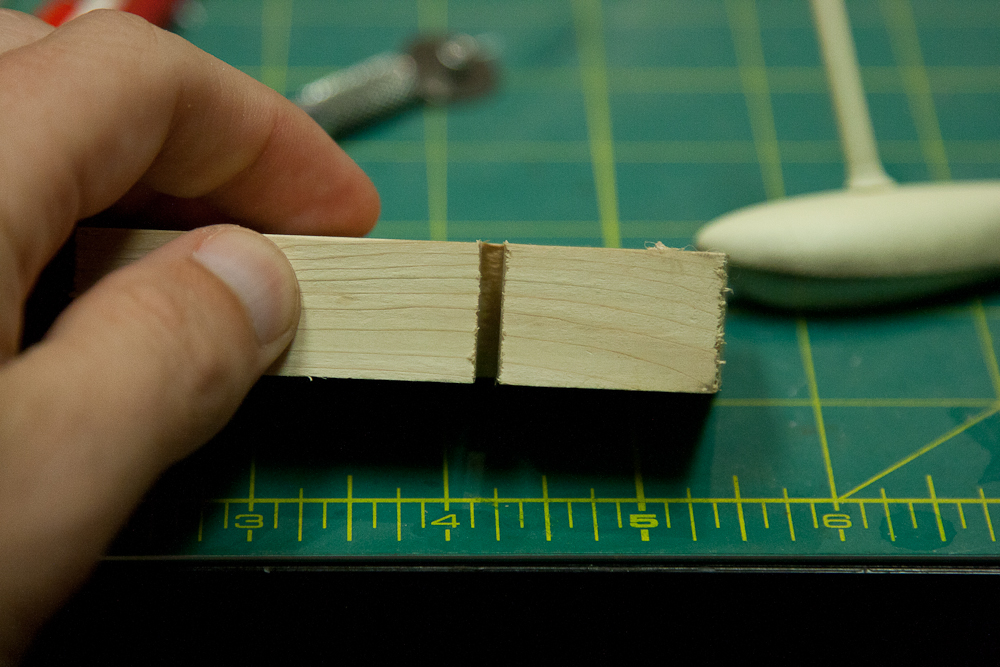
This will allow me to keep the strut at 90 degrees to the dihedral of the wing. This way I can concentrate on getting the longitudinal alignment correct. Dealing with one axis is enough work when opting for a slow cure time.

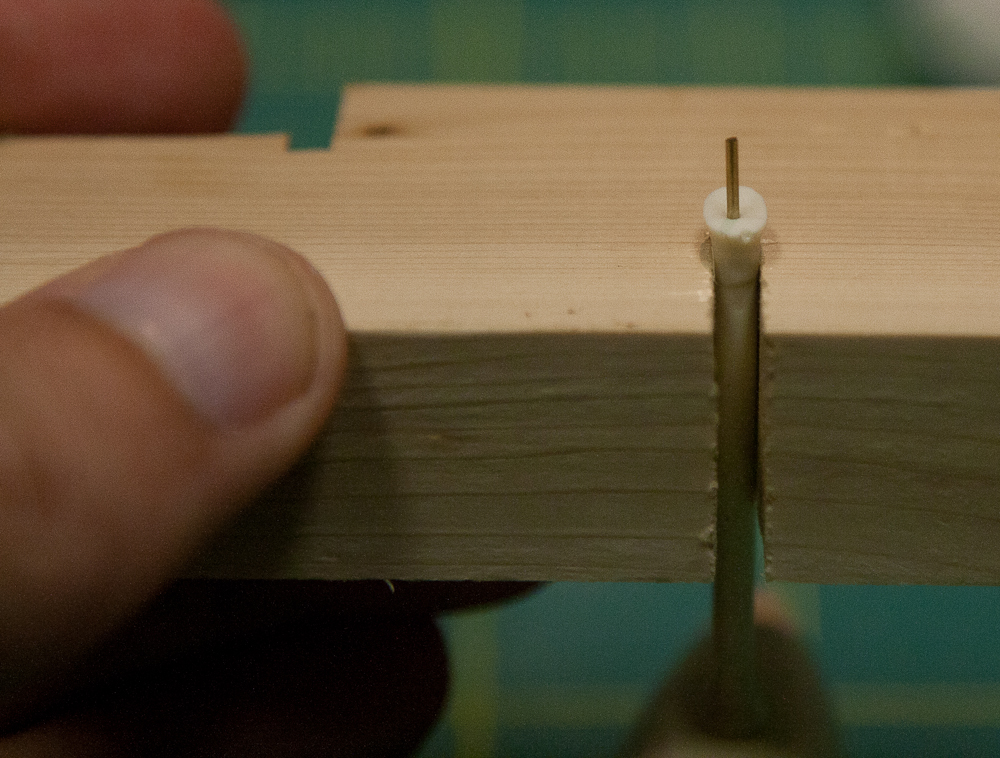
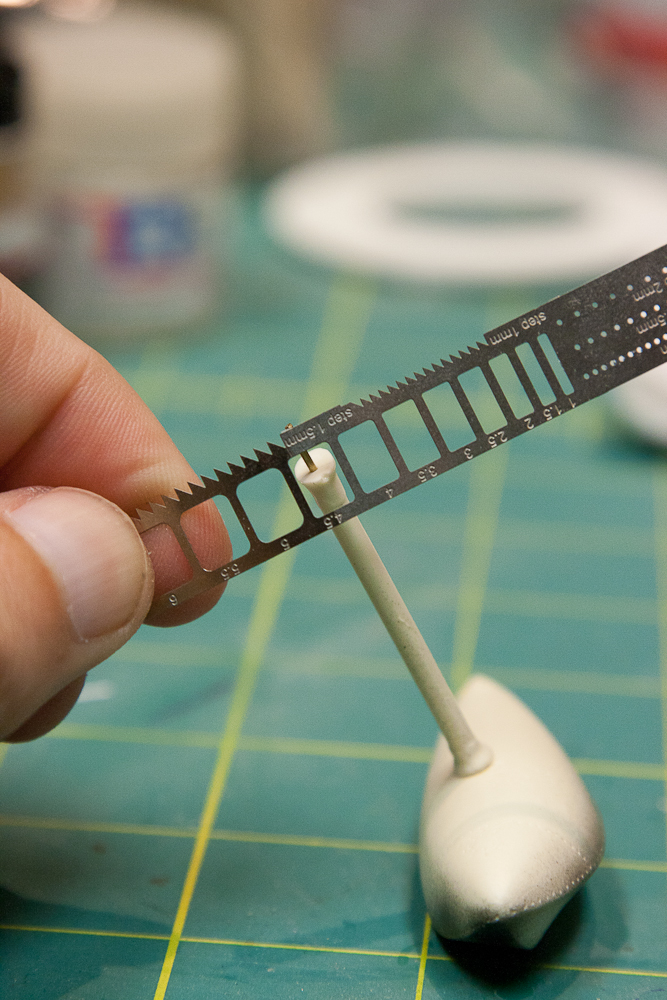
The fairing on the end of the strut is wider than the strut itself..... hmmm - I think I have an idea (although I don't have a router)

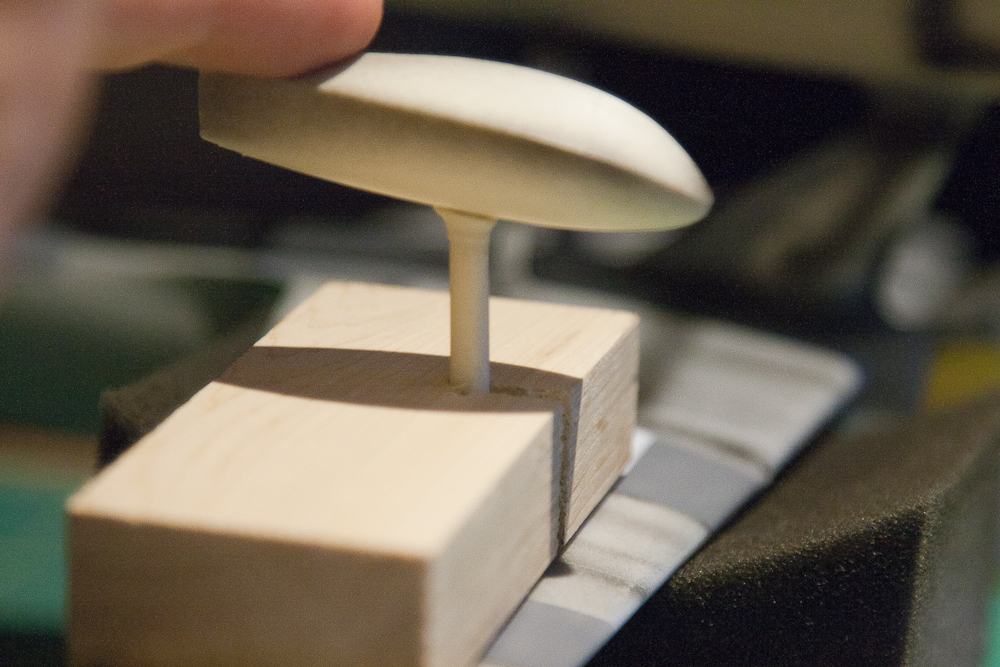
To find the width of the fairing, I used a scribing template. 4mm is too narrow and 4.5mm is perfect! Then I transferred that to a drill bit (because I was too lazy to get my phone to convert to American)


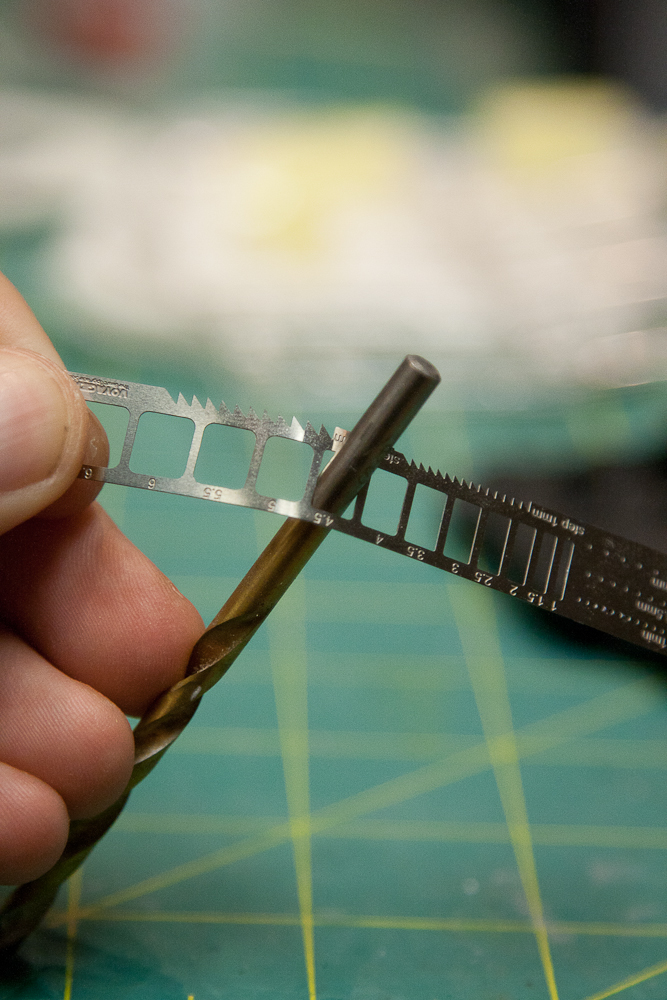
Then I widened the top end of the slot JUST ENOUGH for the strut to sit flat. Drilling down just a little into the slot also provided a pocket to ensure the top of the strut stayed right where I wanted it.


Some tense moments, where the back end went nickel-dime-nickel-dime ensued. These things work in theory, but one tremble of the fingers and I'd have glue all over the bottom of the wing or a broken strut.... I needed to keep moving forward on this build.

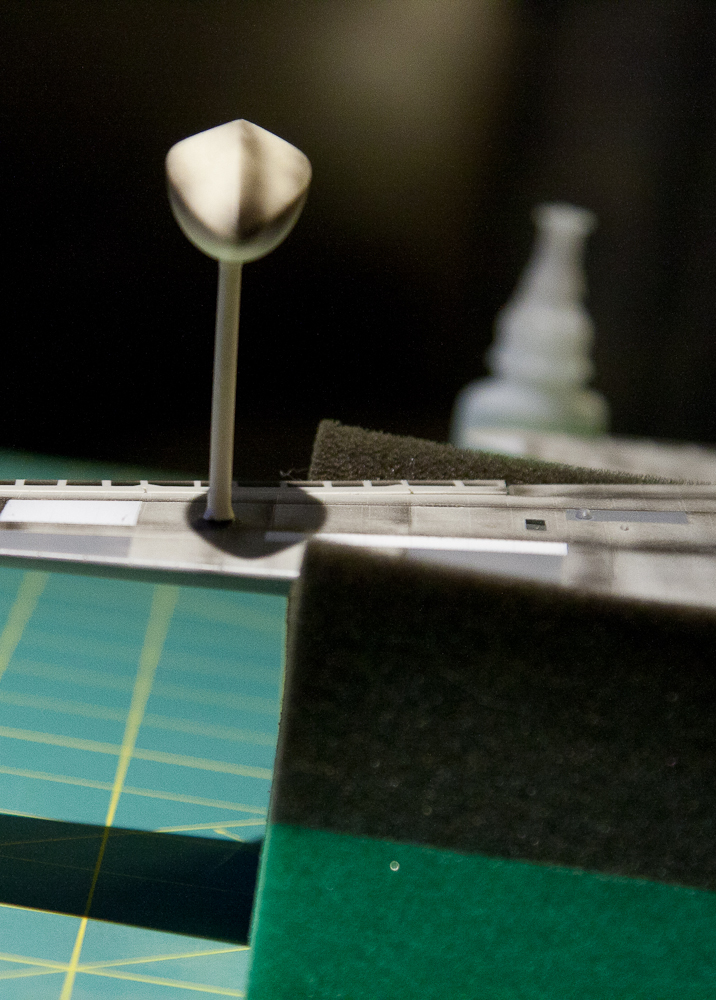
Once the block goes flat against the win, the lateral angle is set at 90 degrees to the bottom of the wing (which, coincidentally is NOT vertical.)


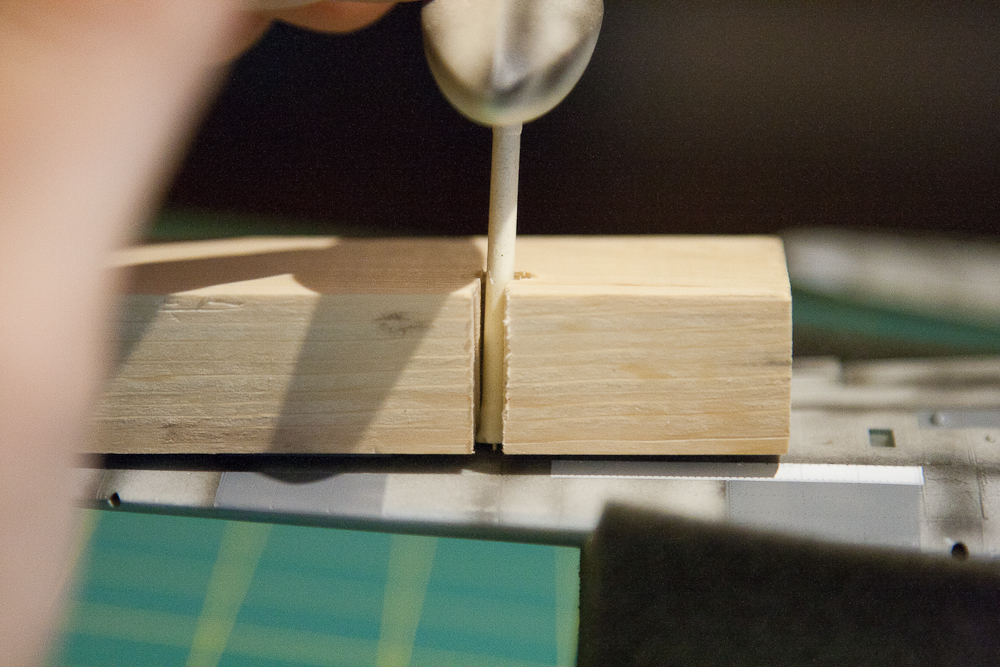
The other side didn't want to lie flat. Another block and some gravity fixed that.


Now to align the strut front to back


Once the glue had set just enough that I didn't need to keep holding the float, I left the plane for an hour. Voila!


Enough jibber jabber. Let's finally get some paint on this bird! (These birds.)

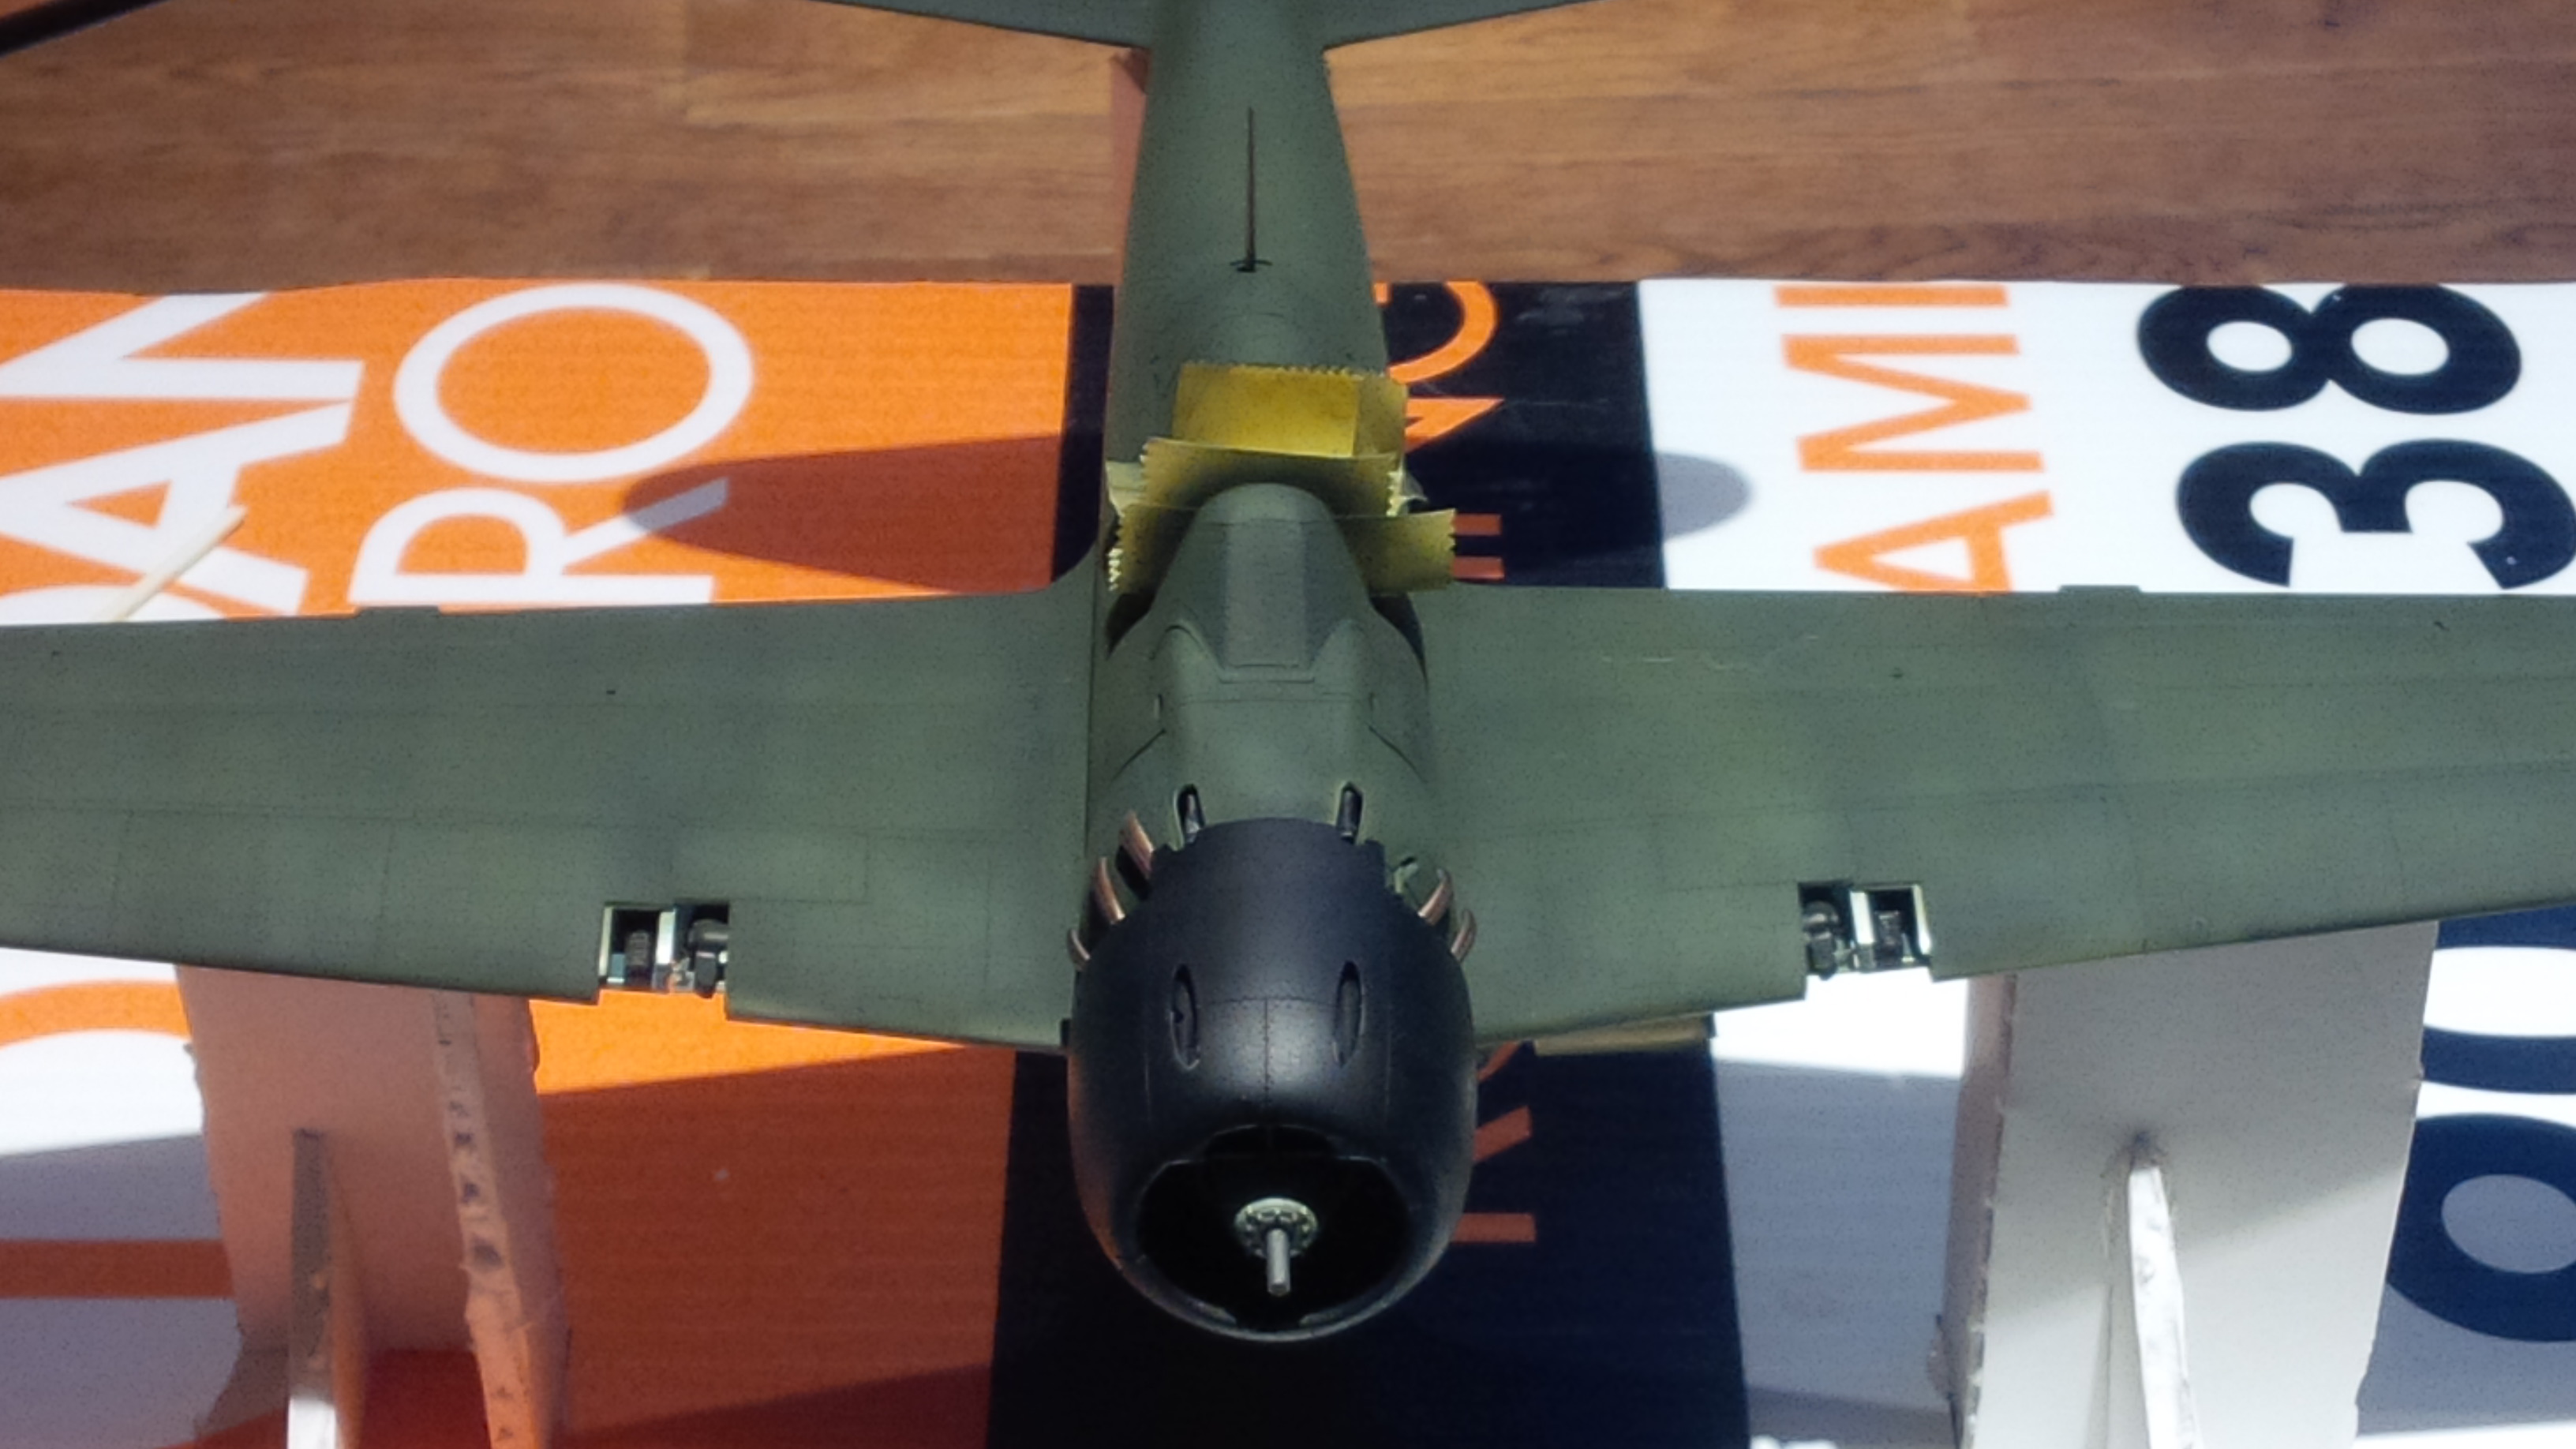
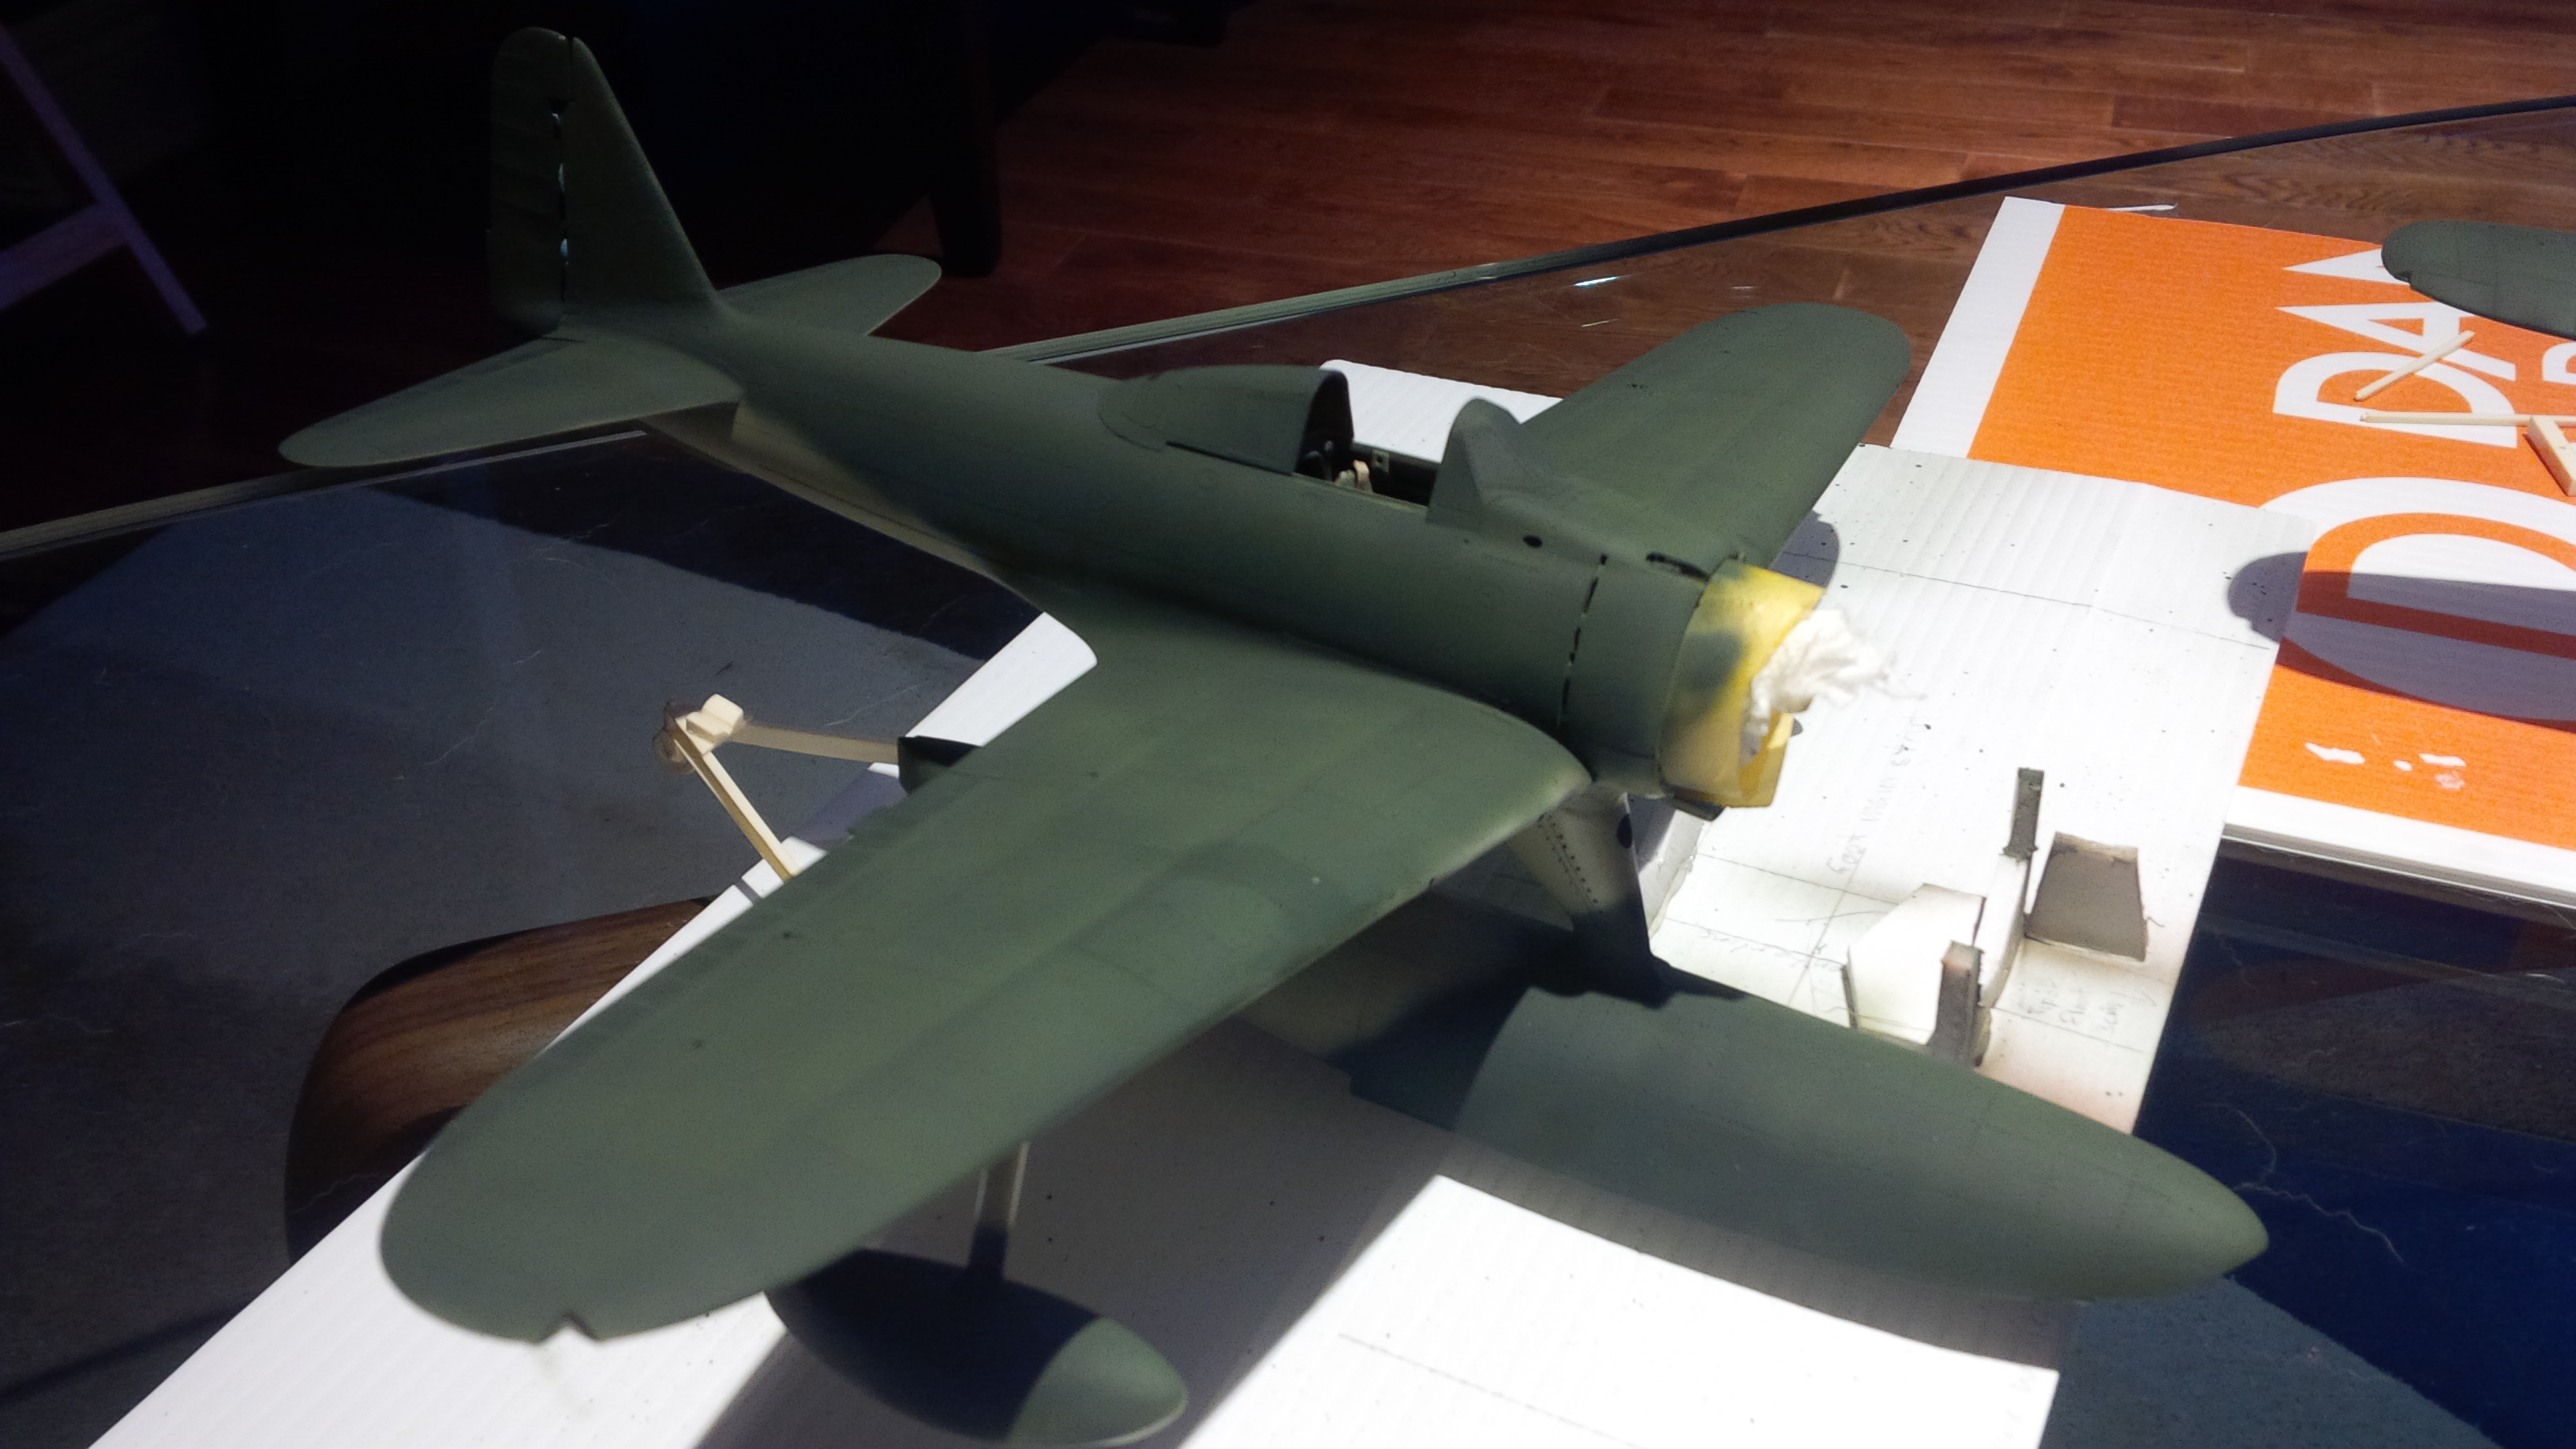
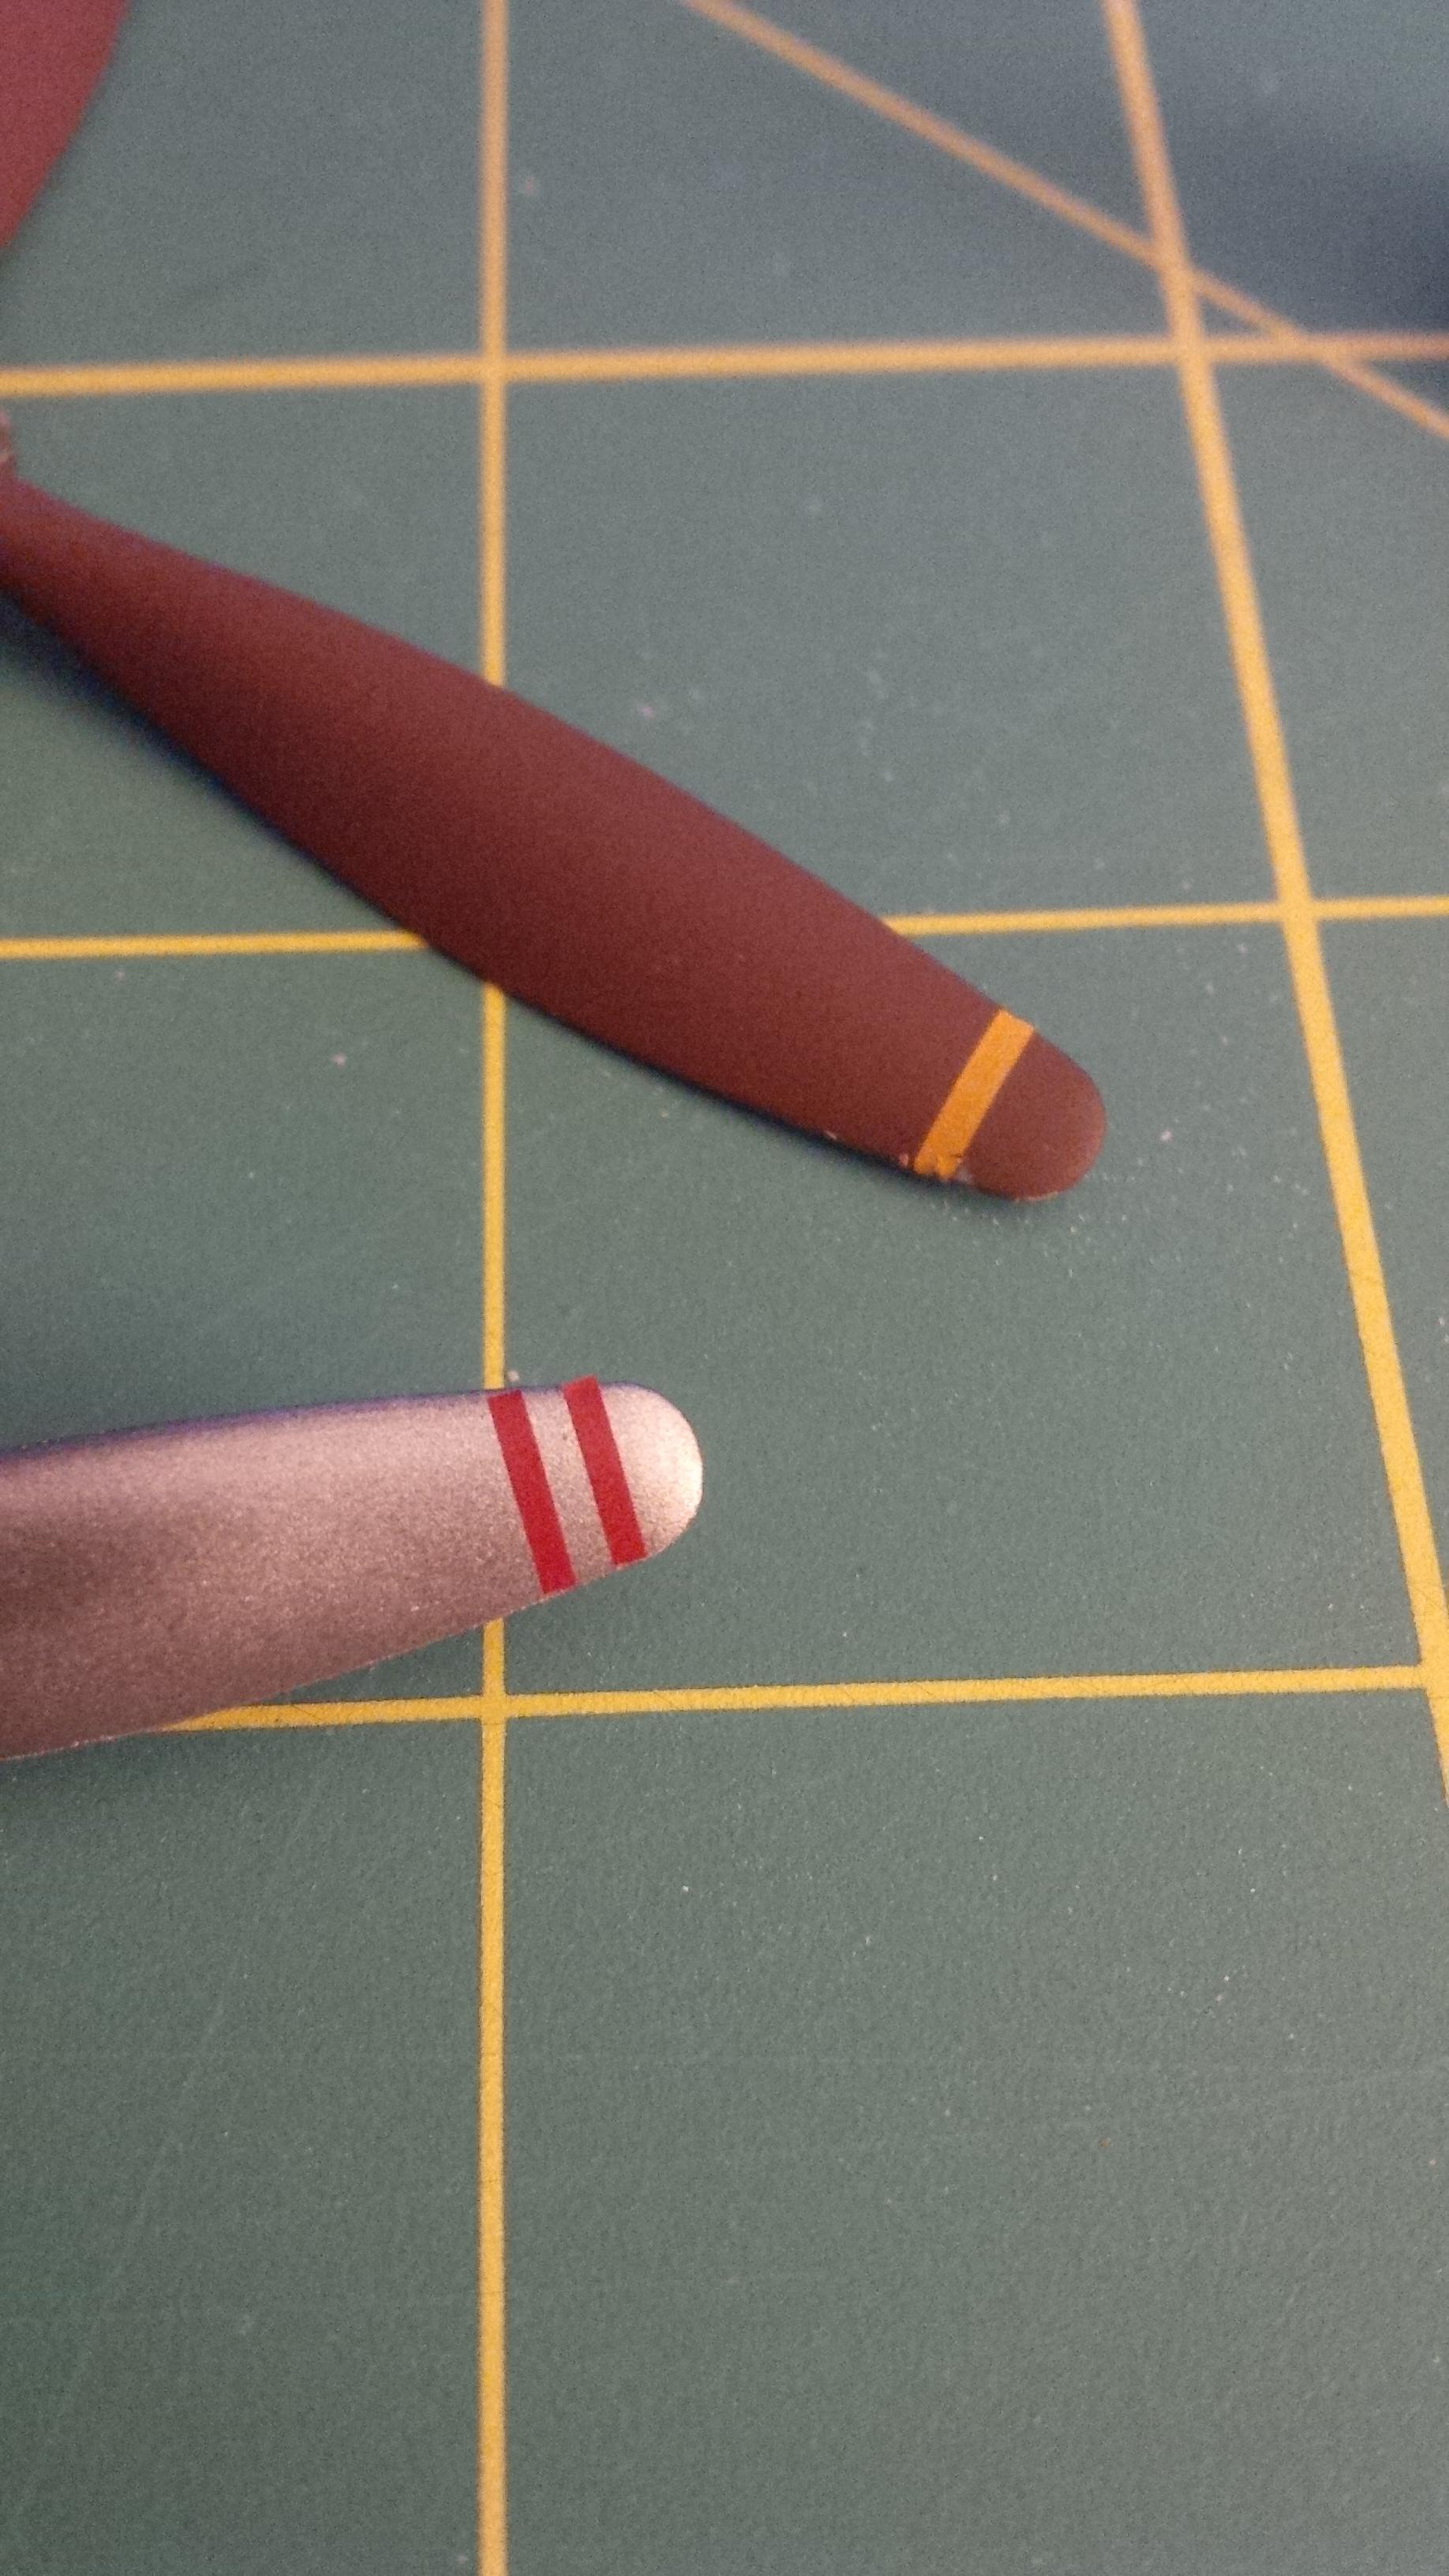
The Rufe will have a little bit of wear in the usual areas. Another new method will be tried. I'll need a metal base, for that I will use the alclad black primer, duraliminuniniminum (because it holds up to masking a lot better than a lot of the other colours). Next I made a colour similar to the red primer used by the Japanese. Red, brown, some orange.... I only applied these colours where I will do some chipping - to keep the pain thin everywhere else.


AMEIRO!


Ruuuuuuuuuuuuuuuuuuuuuuuuuuuuun! This colur is even more contentious than the Aotake laquer applied inside the Zero. The name of the colour literally translates to 'Caramel color', but you'll see plenty of builds where the modeller has painted their Zero a gray or a white.

There is also a clearcoat painted on top of this paint which had a tendency to change colour in much the same way the decal film does on old sheets of decals. This is why the rumours of a mauve Rufe probably exist - a caramel paint, a clearcoat which was no longer clear, the heat of combat and a rising or setting sun can play tricks on anyone's eye.


I mixed my own Ameiro from a combination of Model Master Enamel SAC Bomber Tan, Flat White and a hint of Green Zinc Chromate. I'm very happy with how the colour turned out.
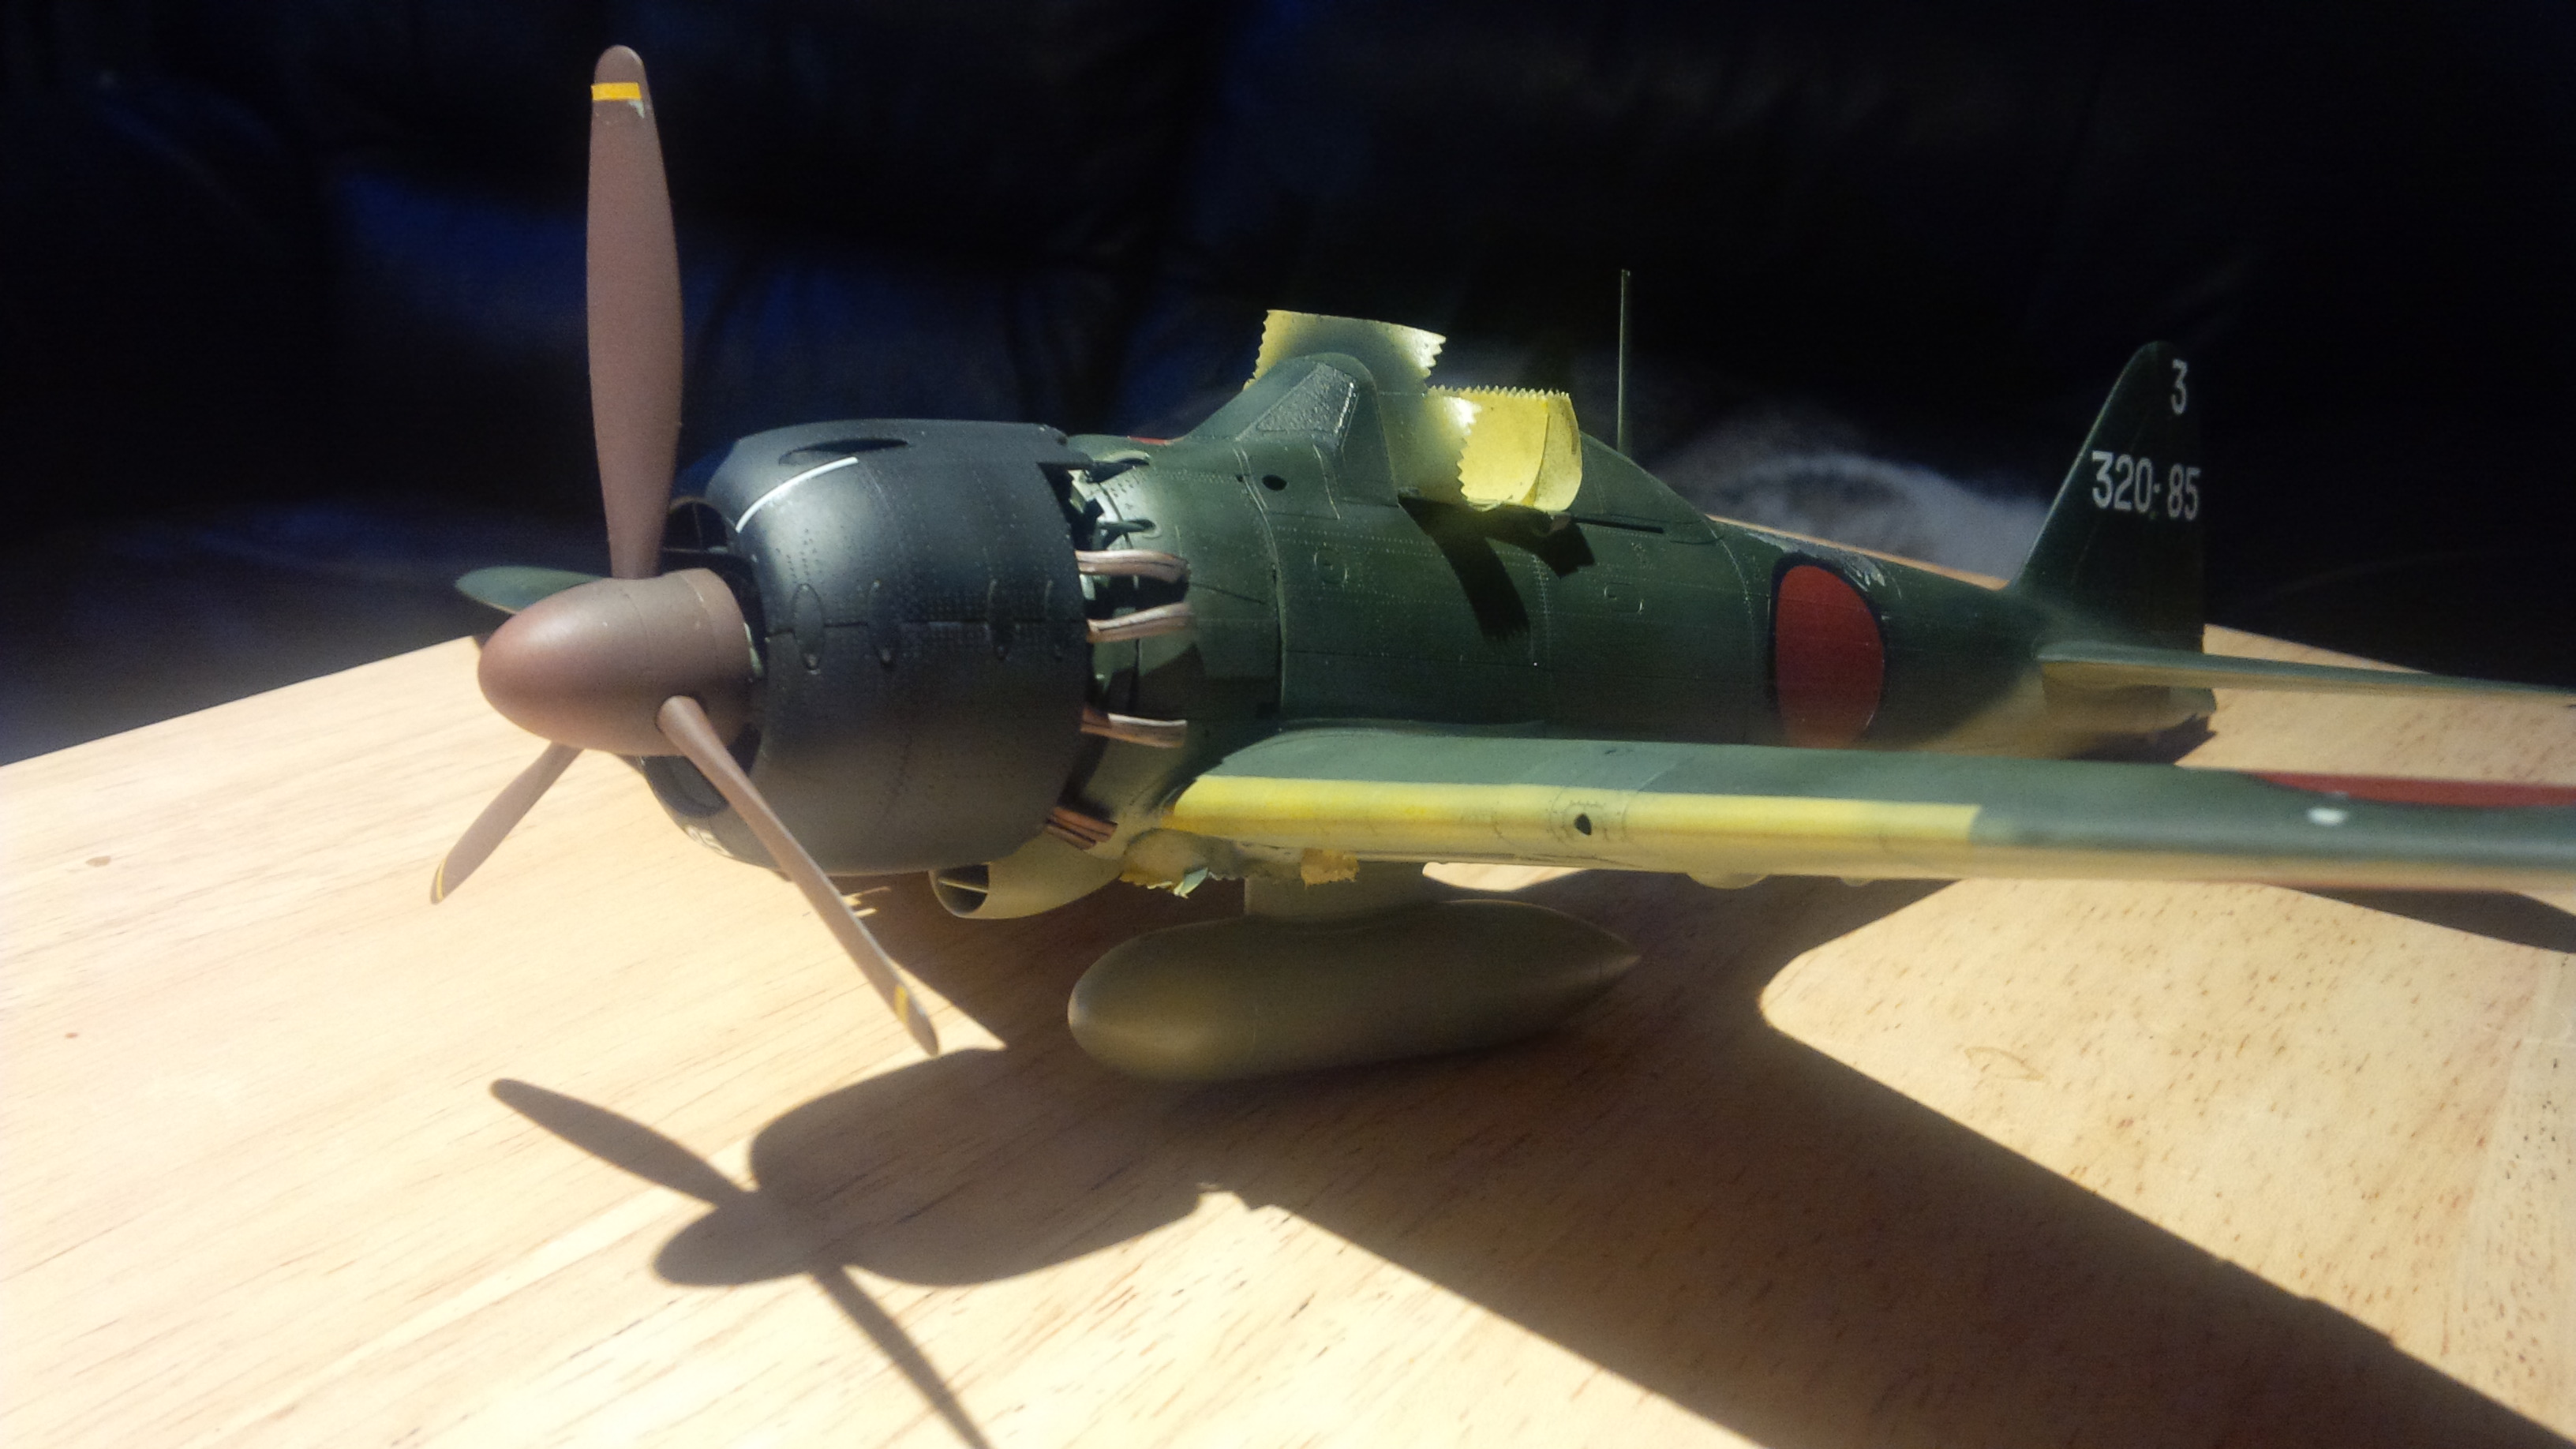
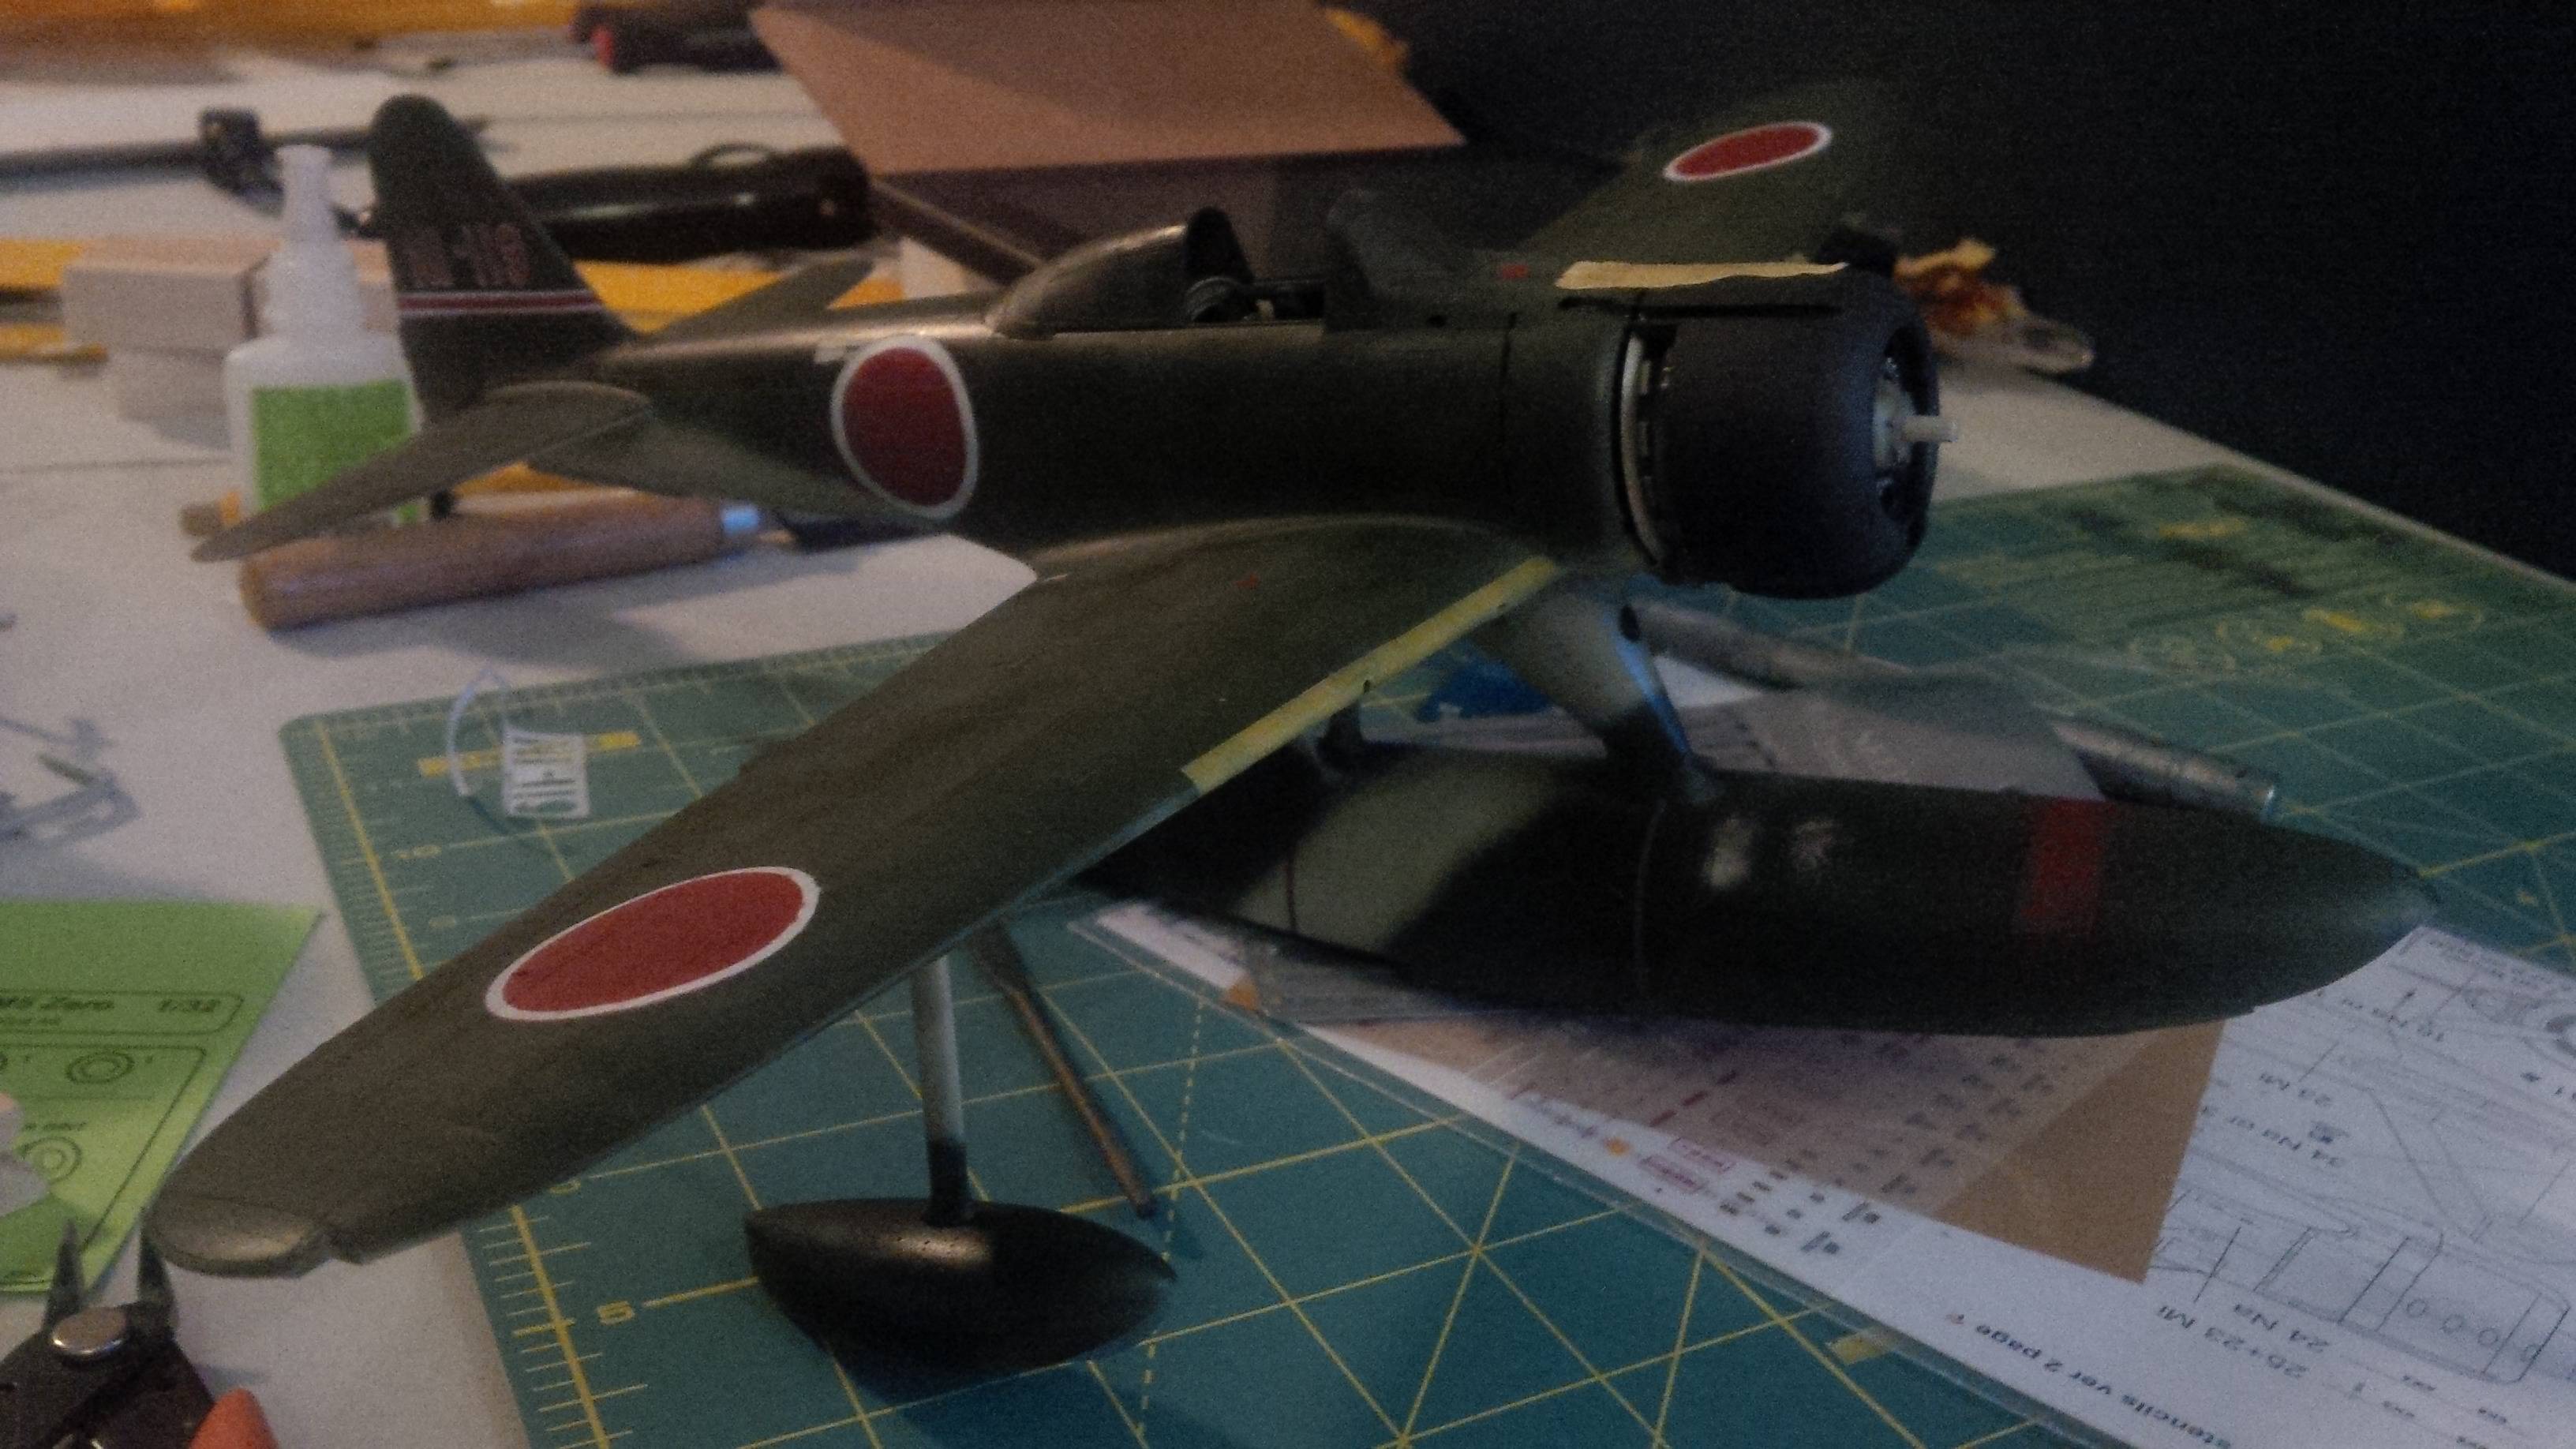
The A6M-5


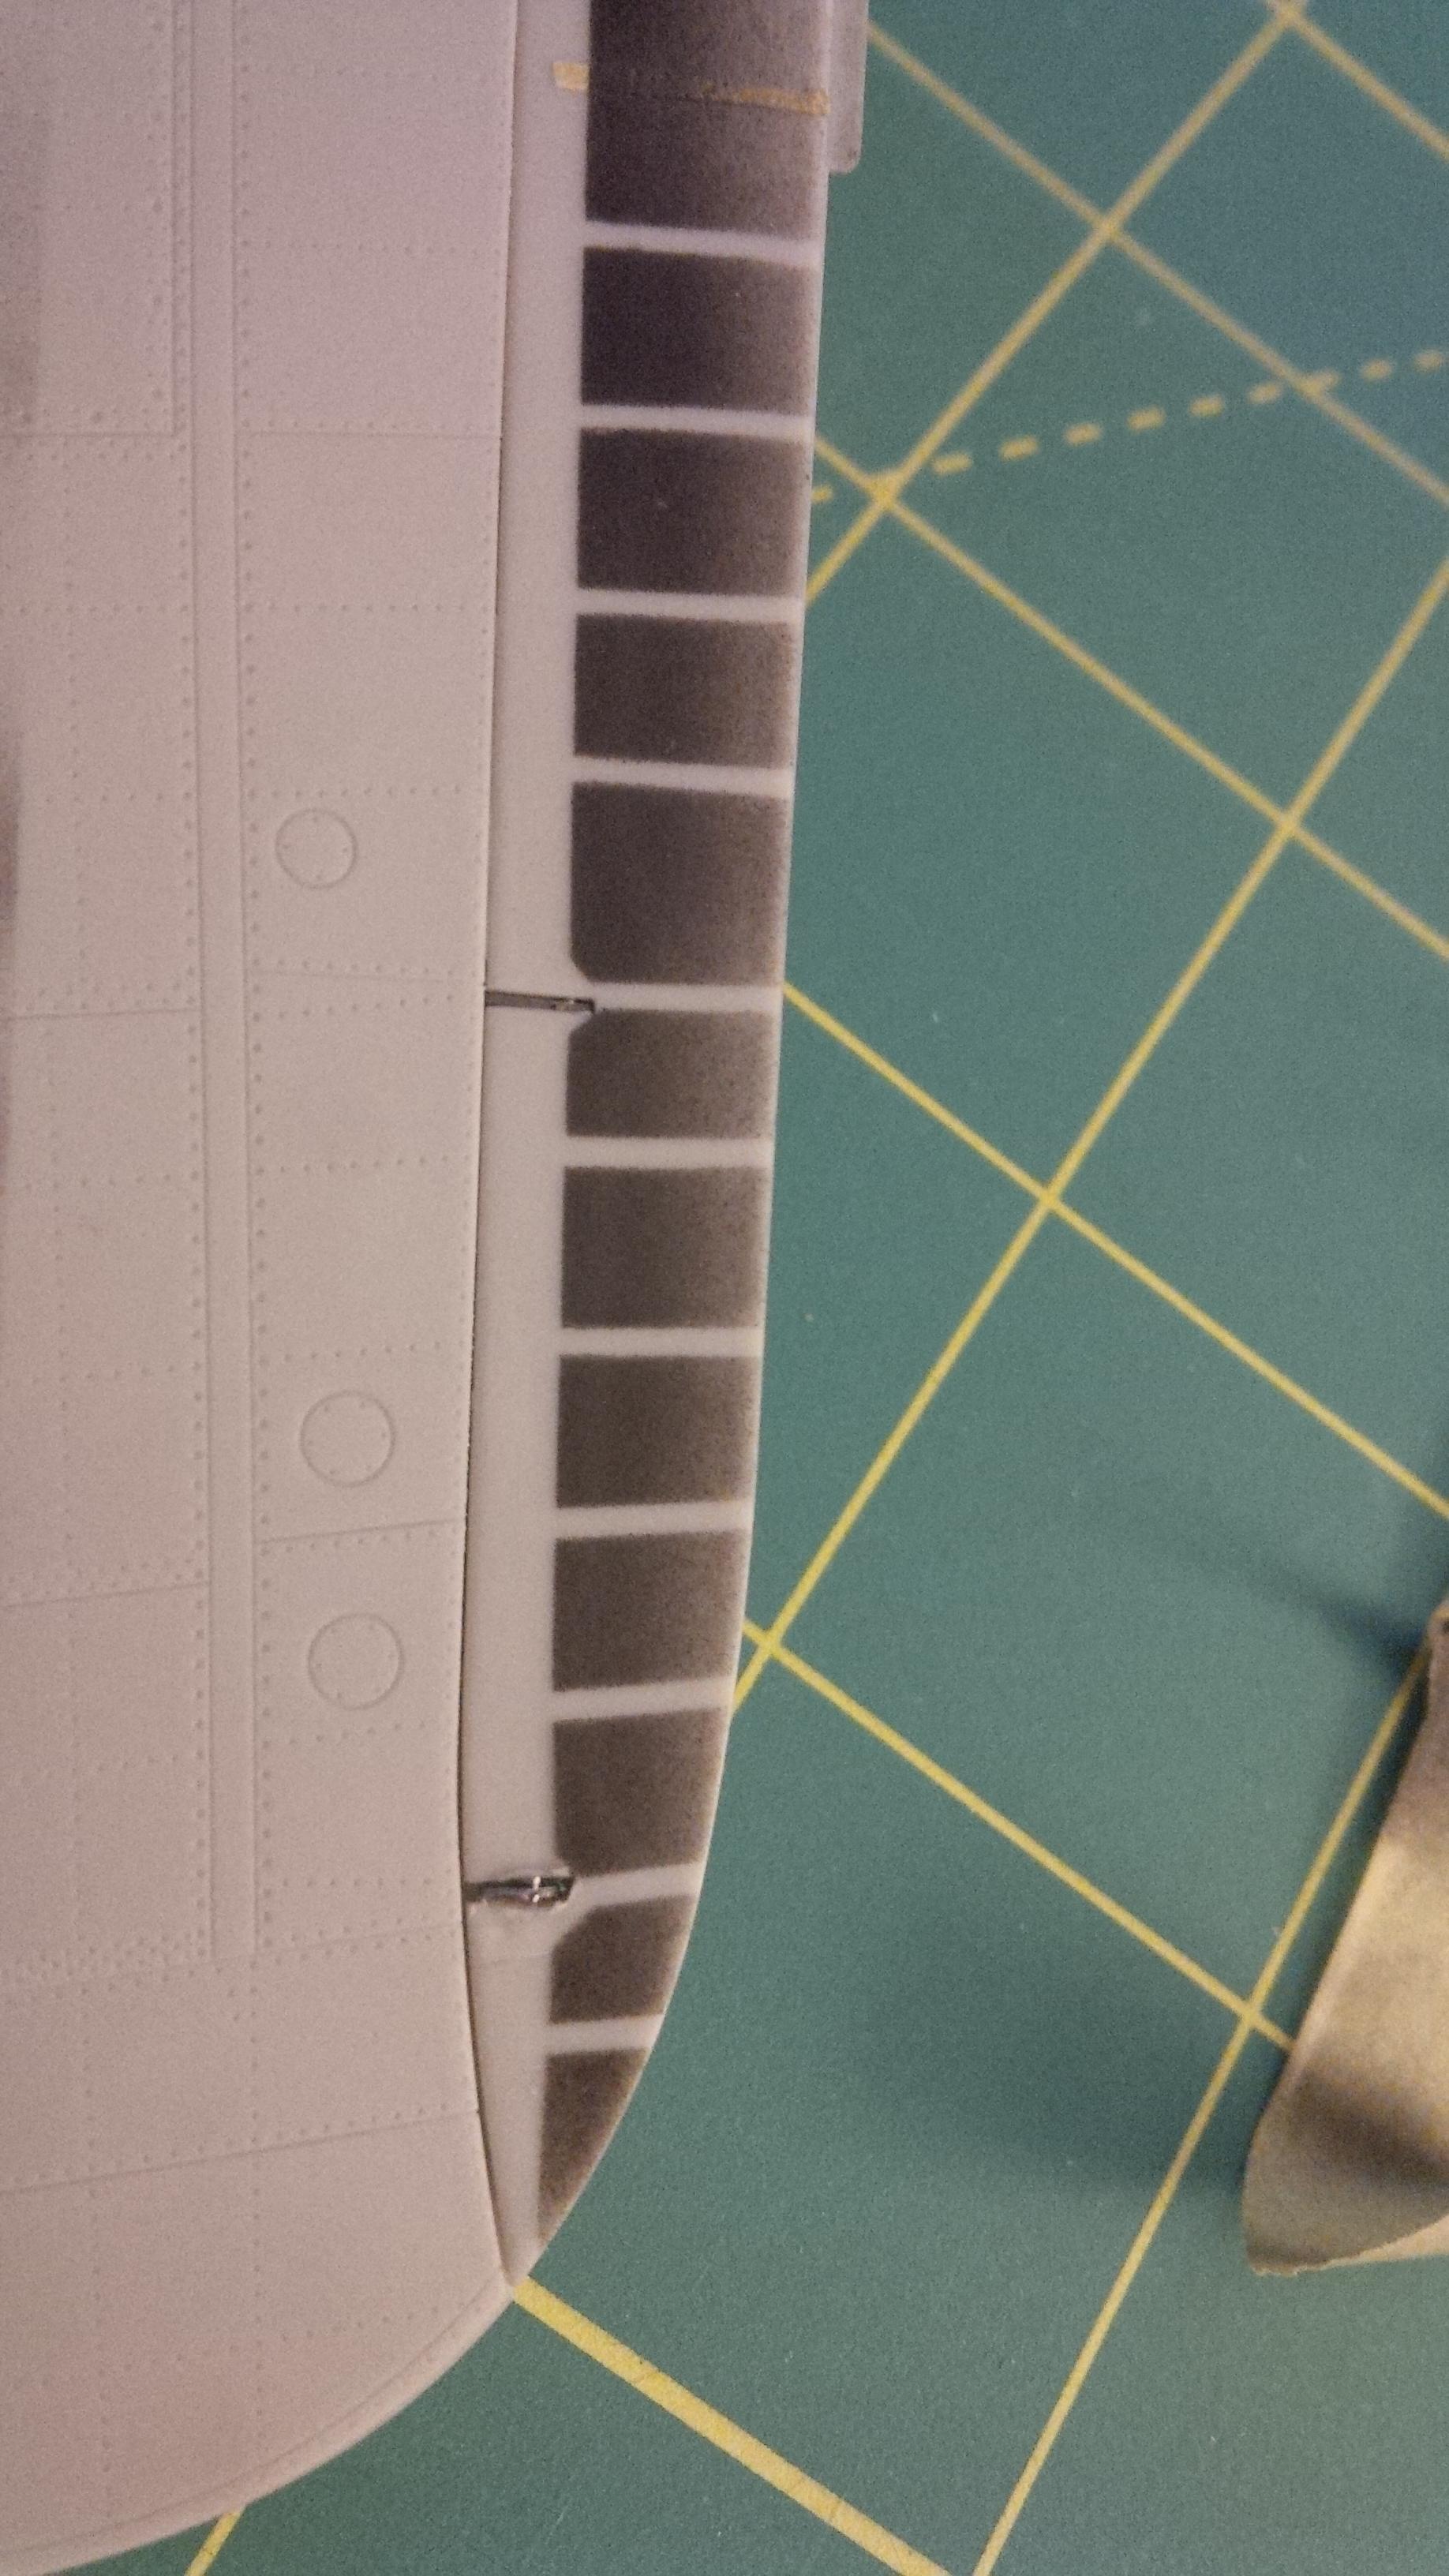
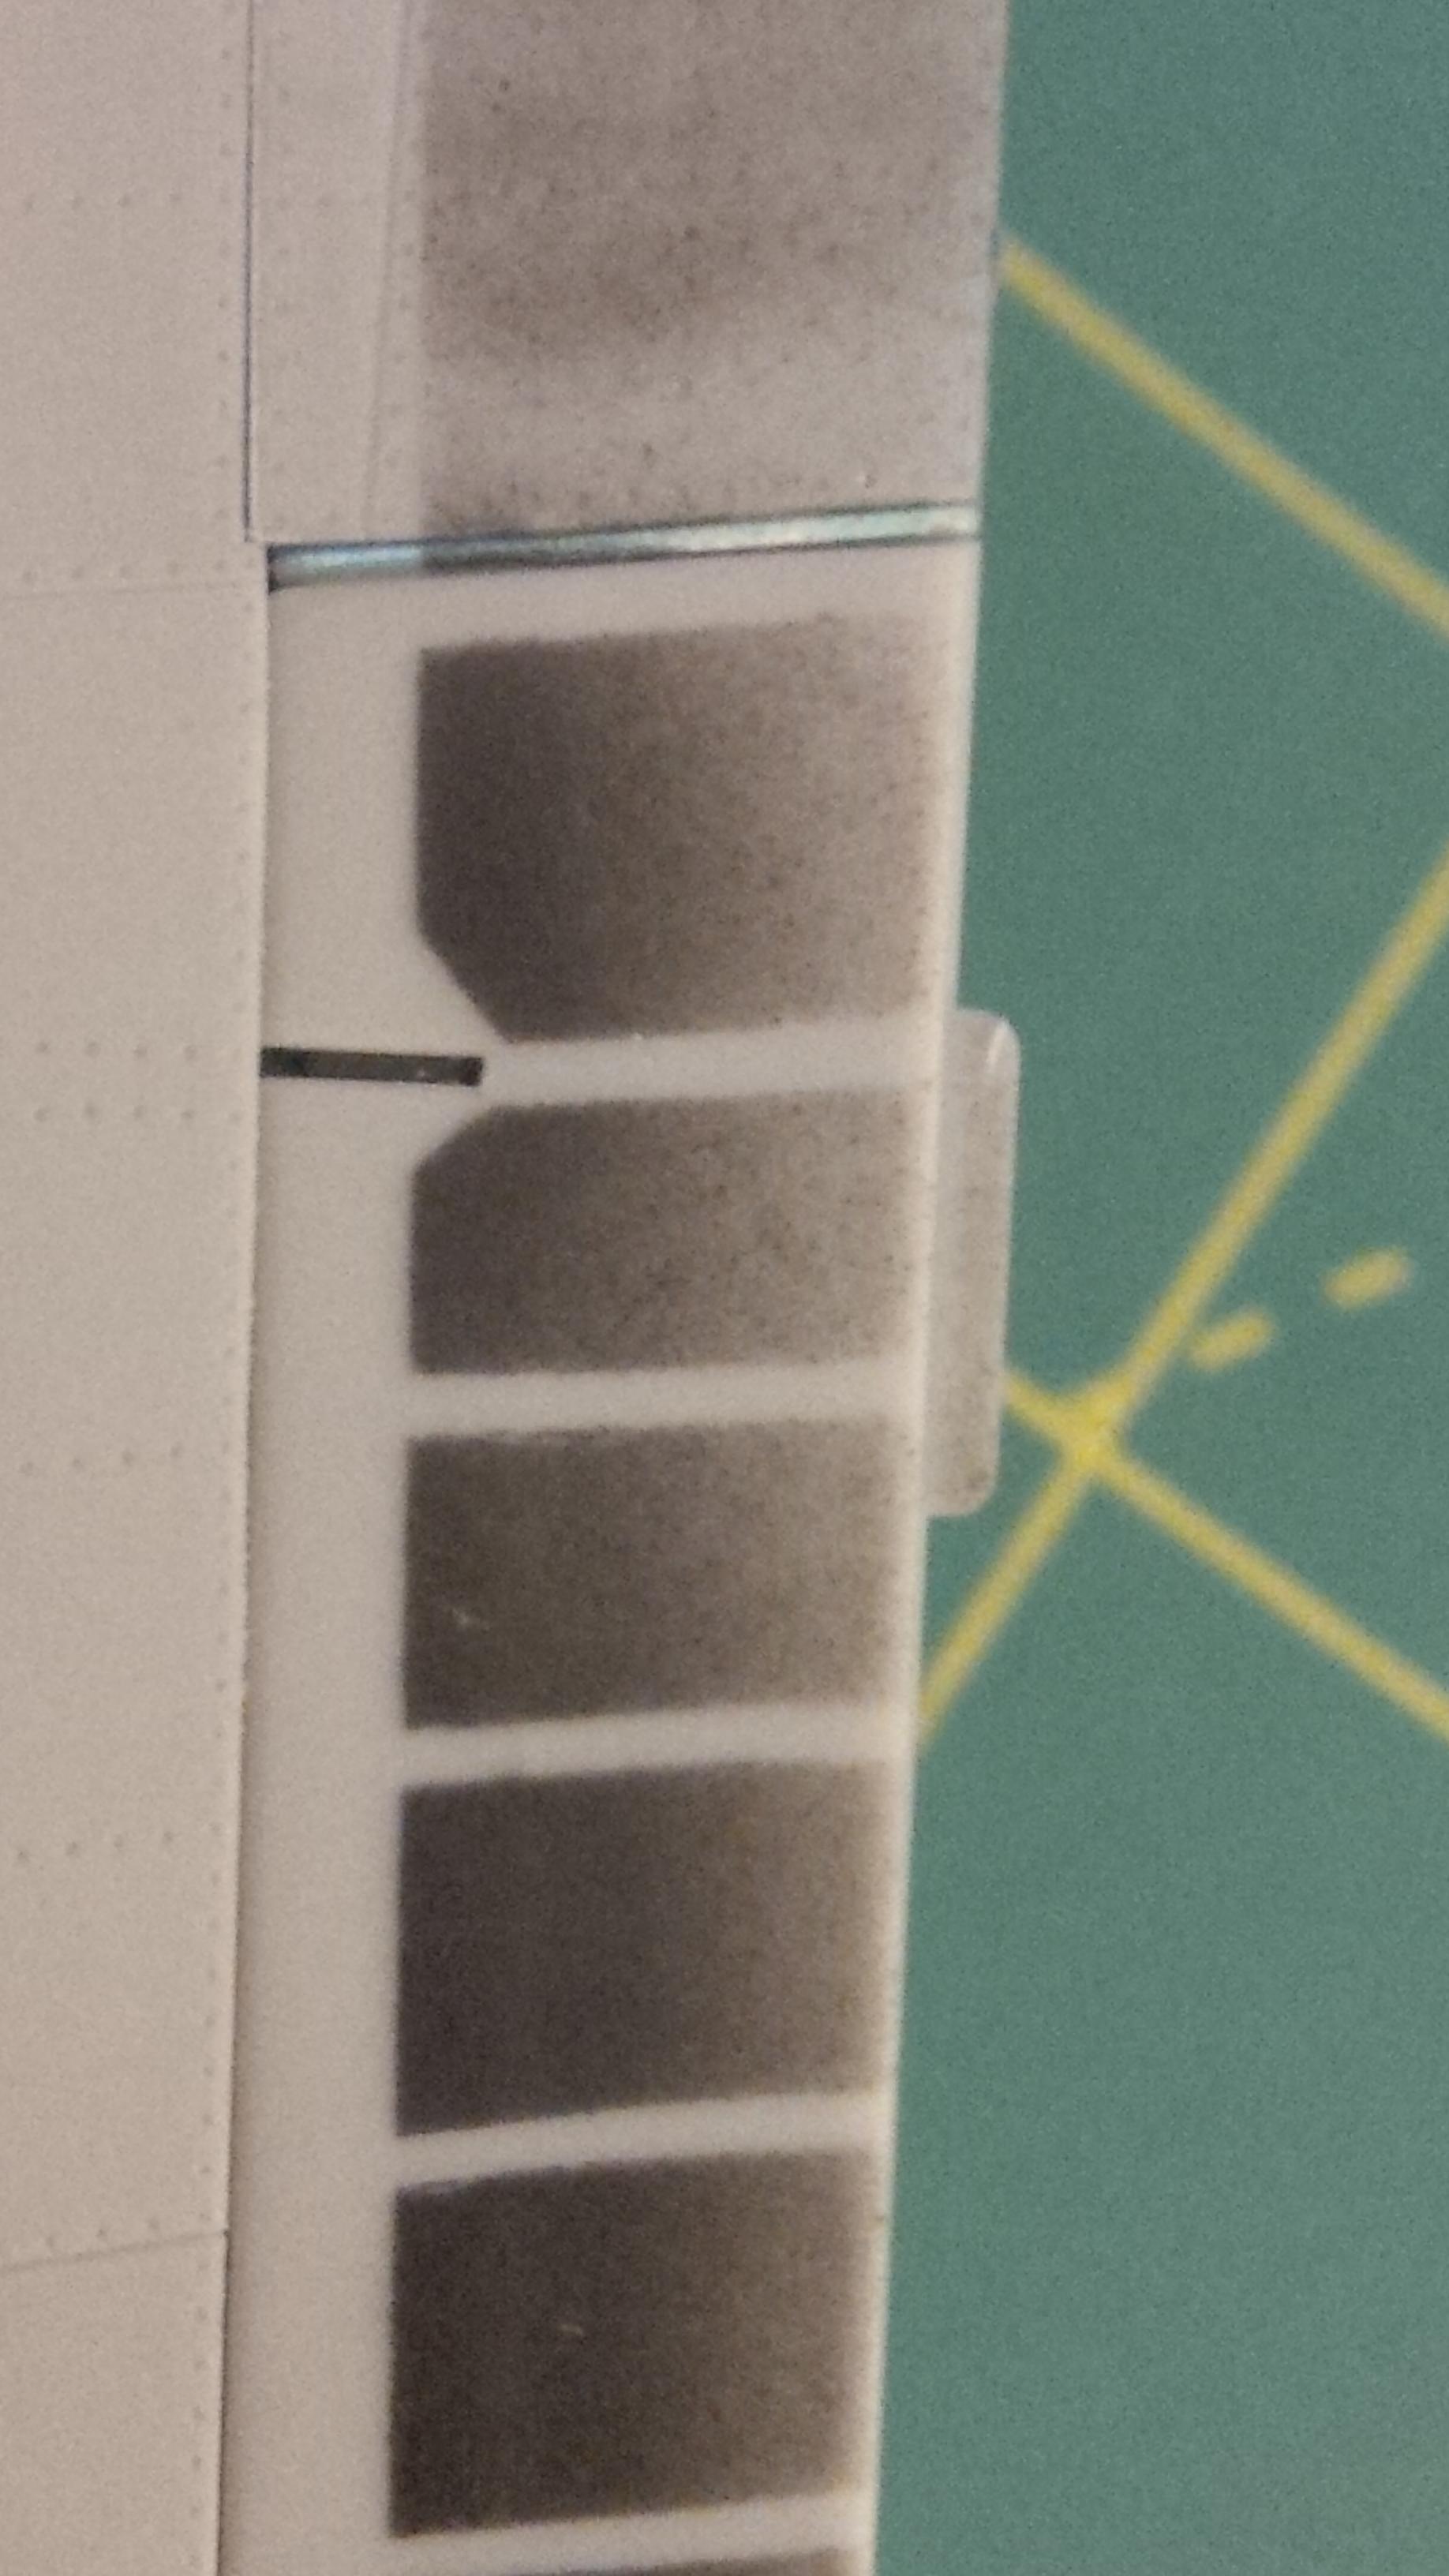
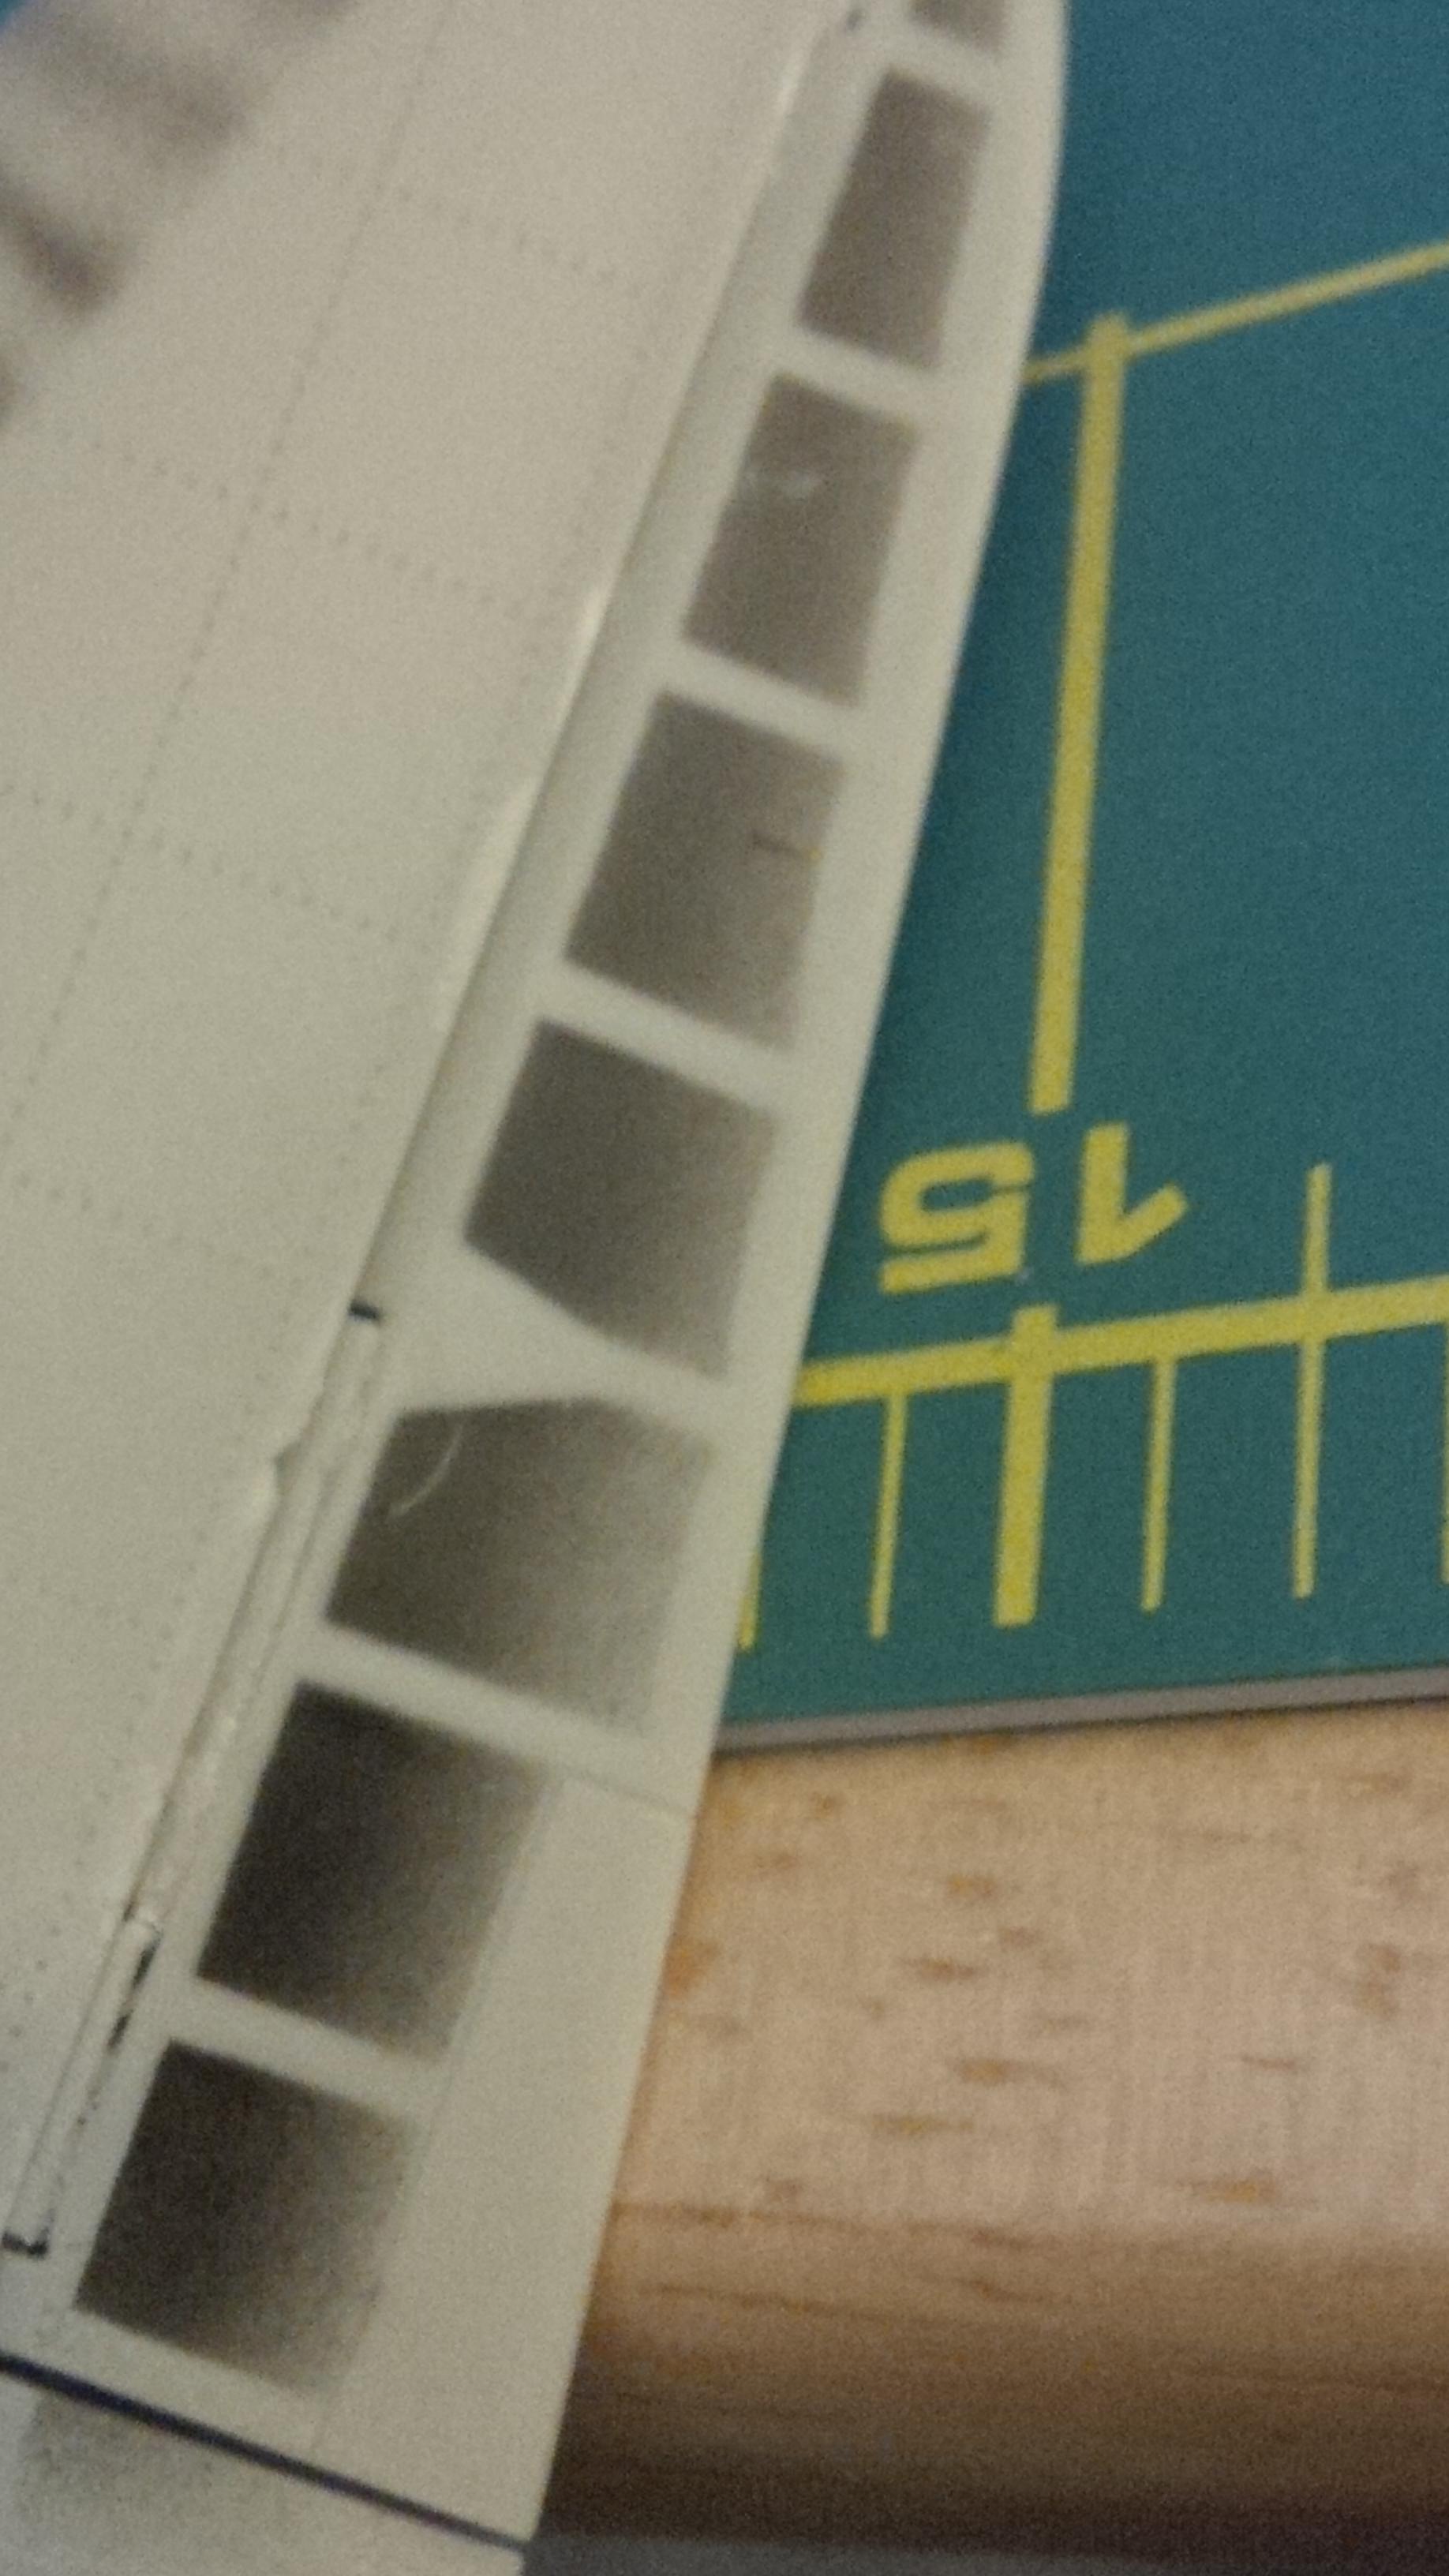
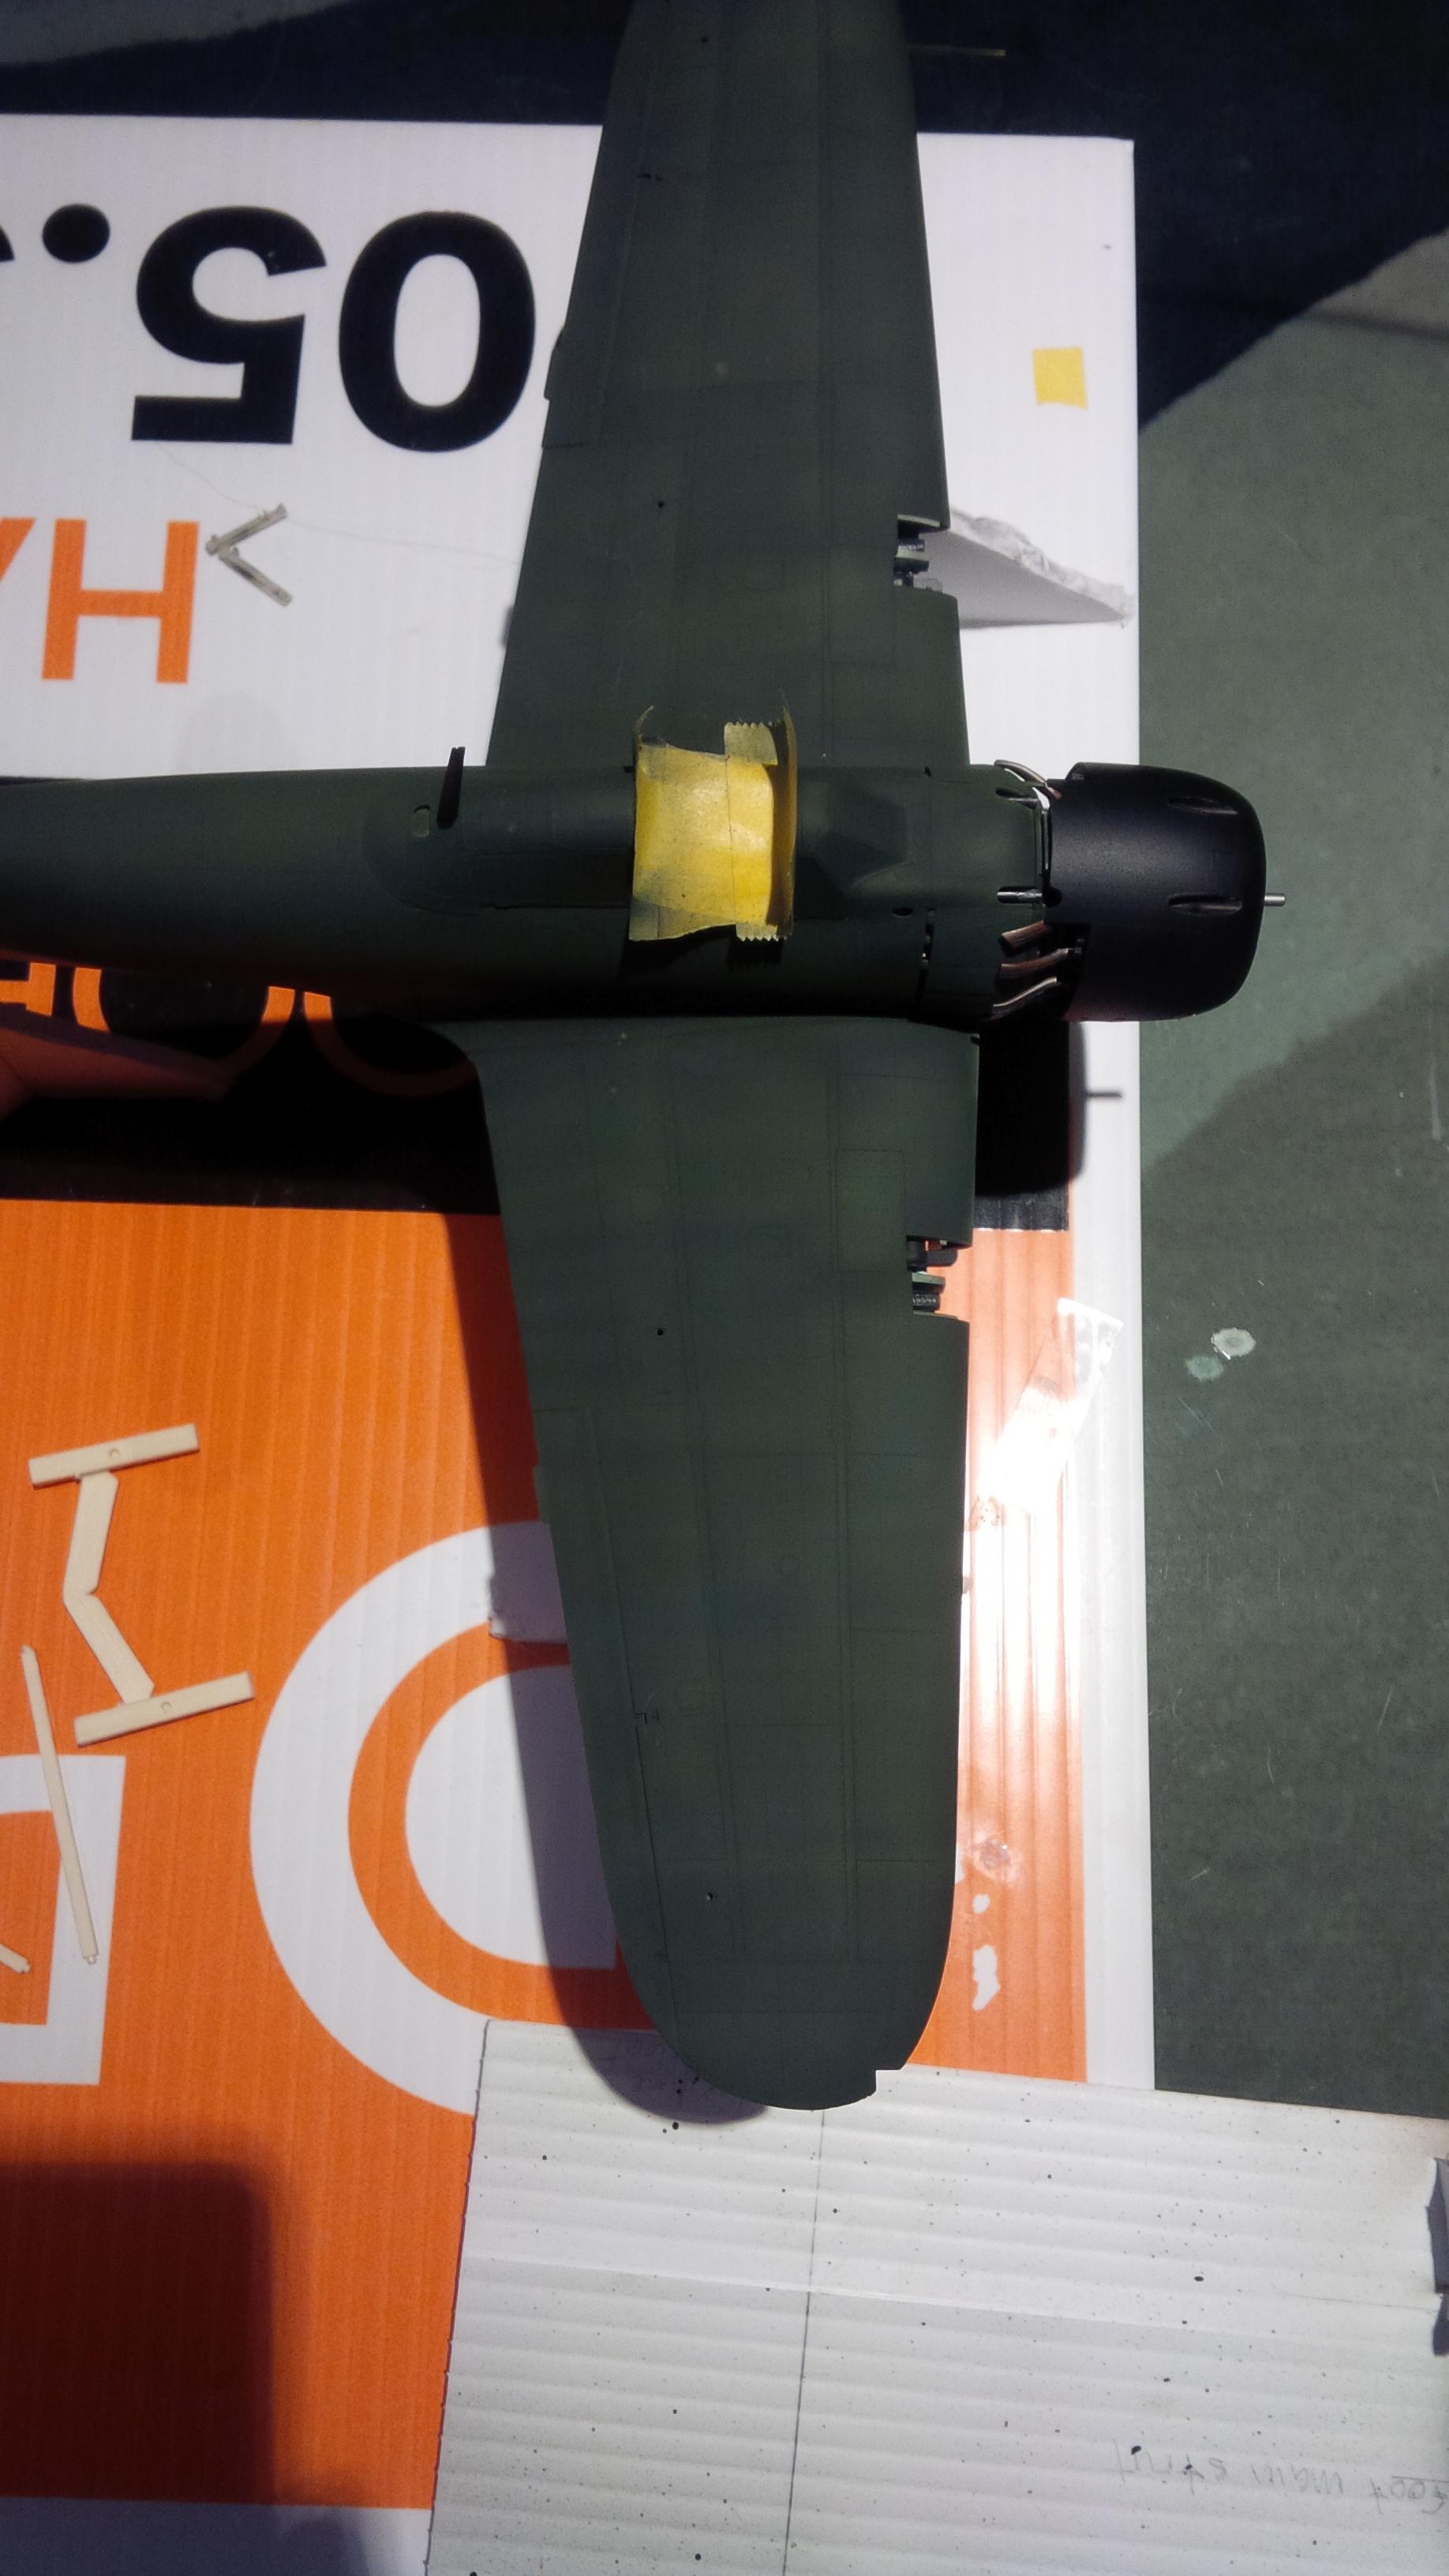
(NOTE! - the preshading on the control surfaces shown earlier. This is one of the new techniques I tried out - I really like it).


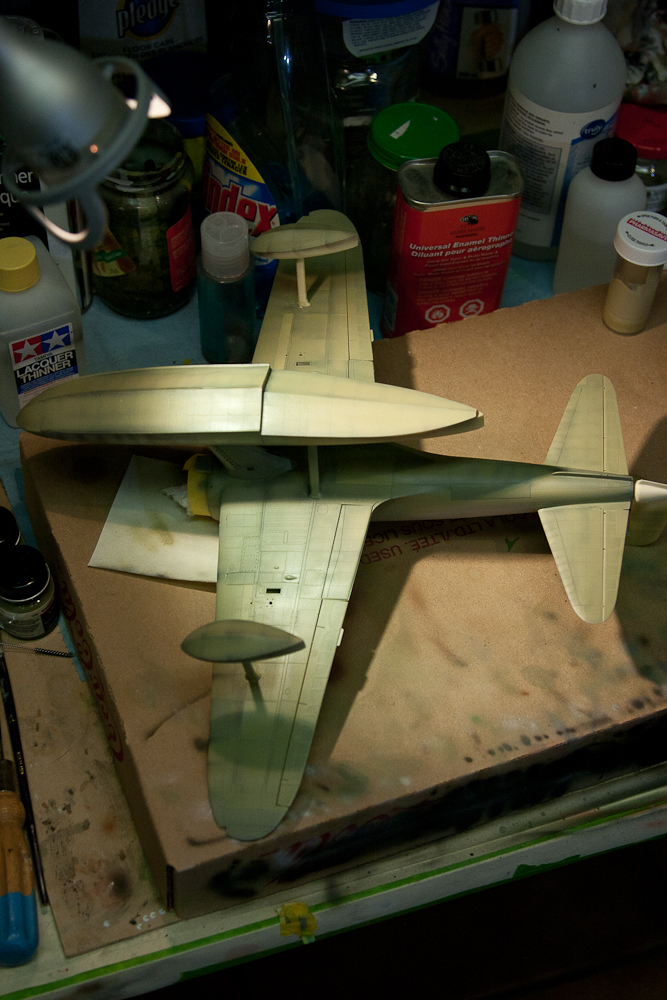
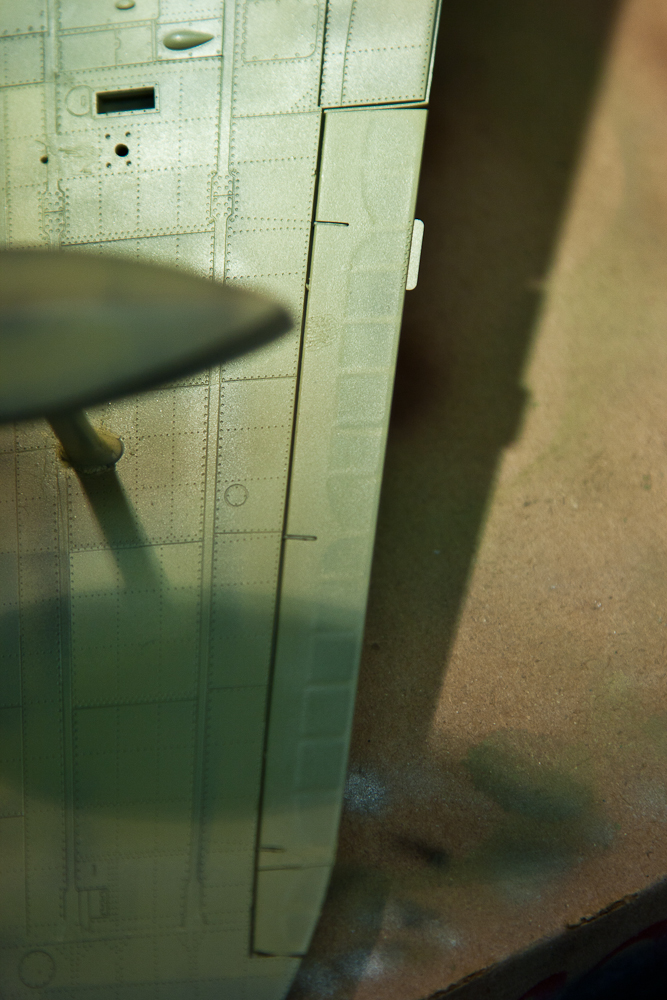
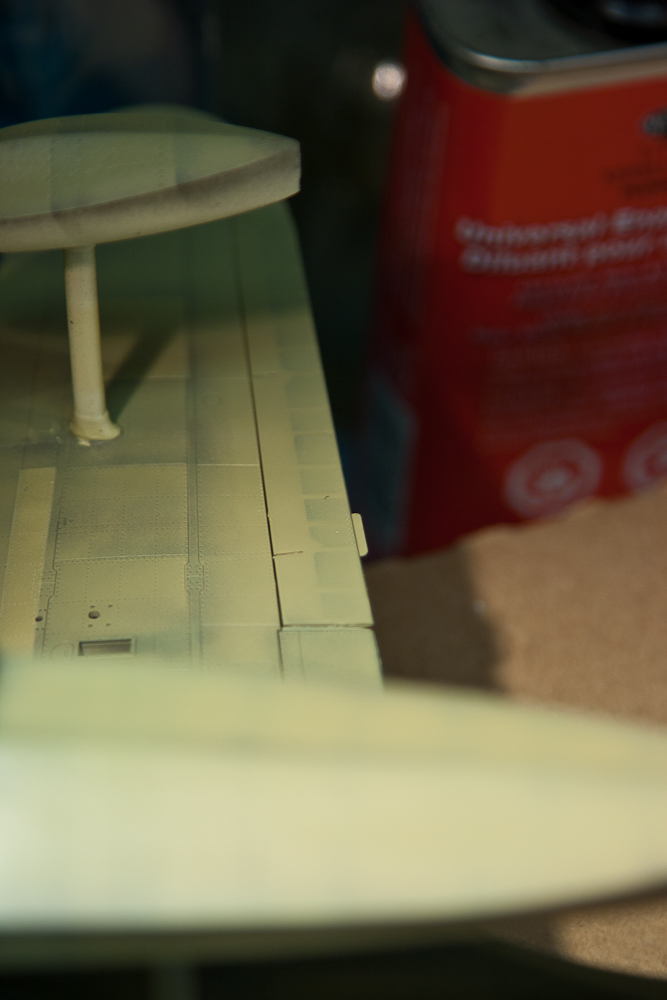
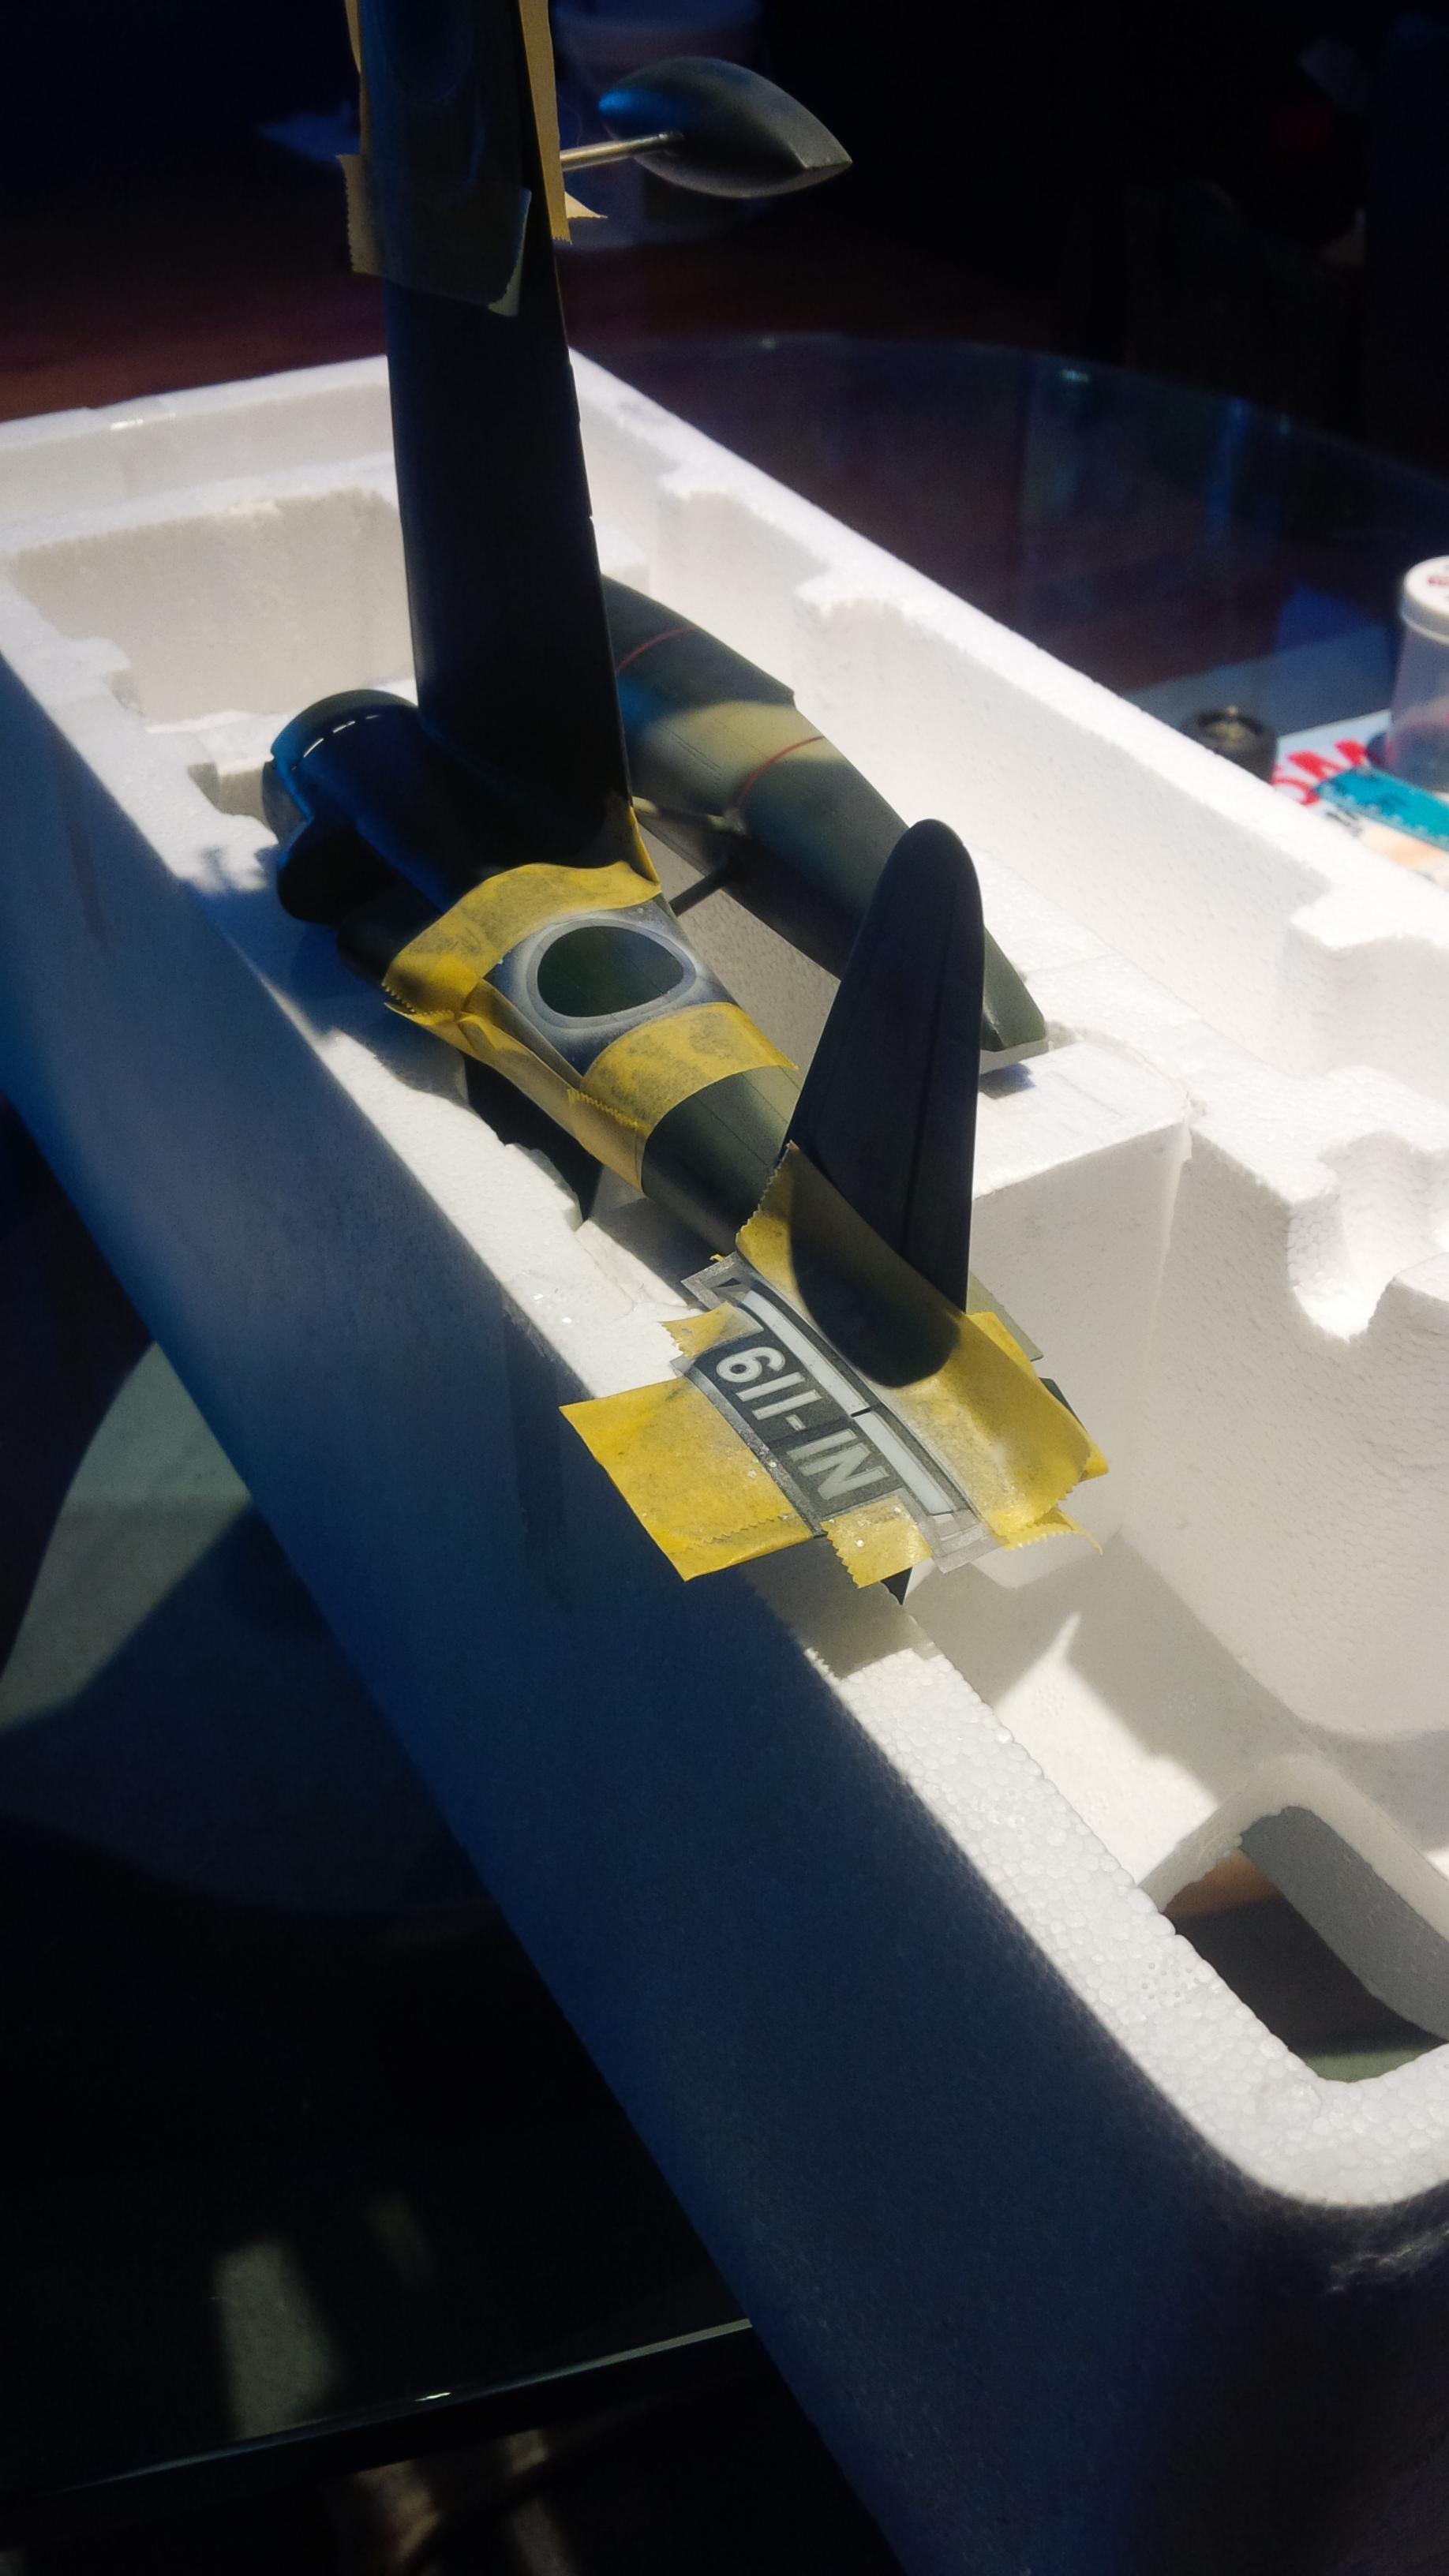
In the photo above you can see the pre-shading on the control surfaces, the panel preshading AND the more traditional line type shading. She looks like a dirty bird without any washes or weathing products already!


Bonus engine shot NOT taken with a cell phone camera!


I apologize for rambling on and the lack of proof-reading, but alas I must run along and spend time with my beautiful wife.


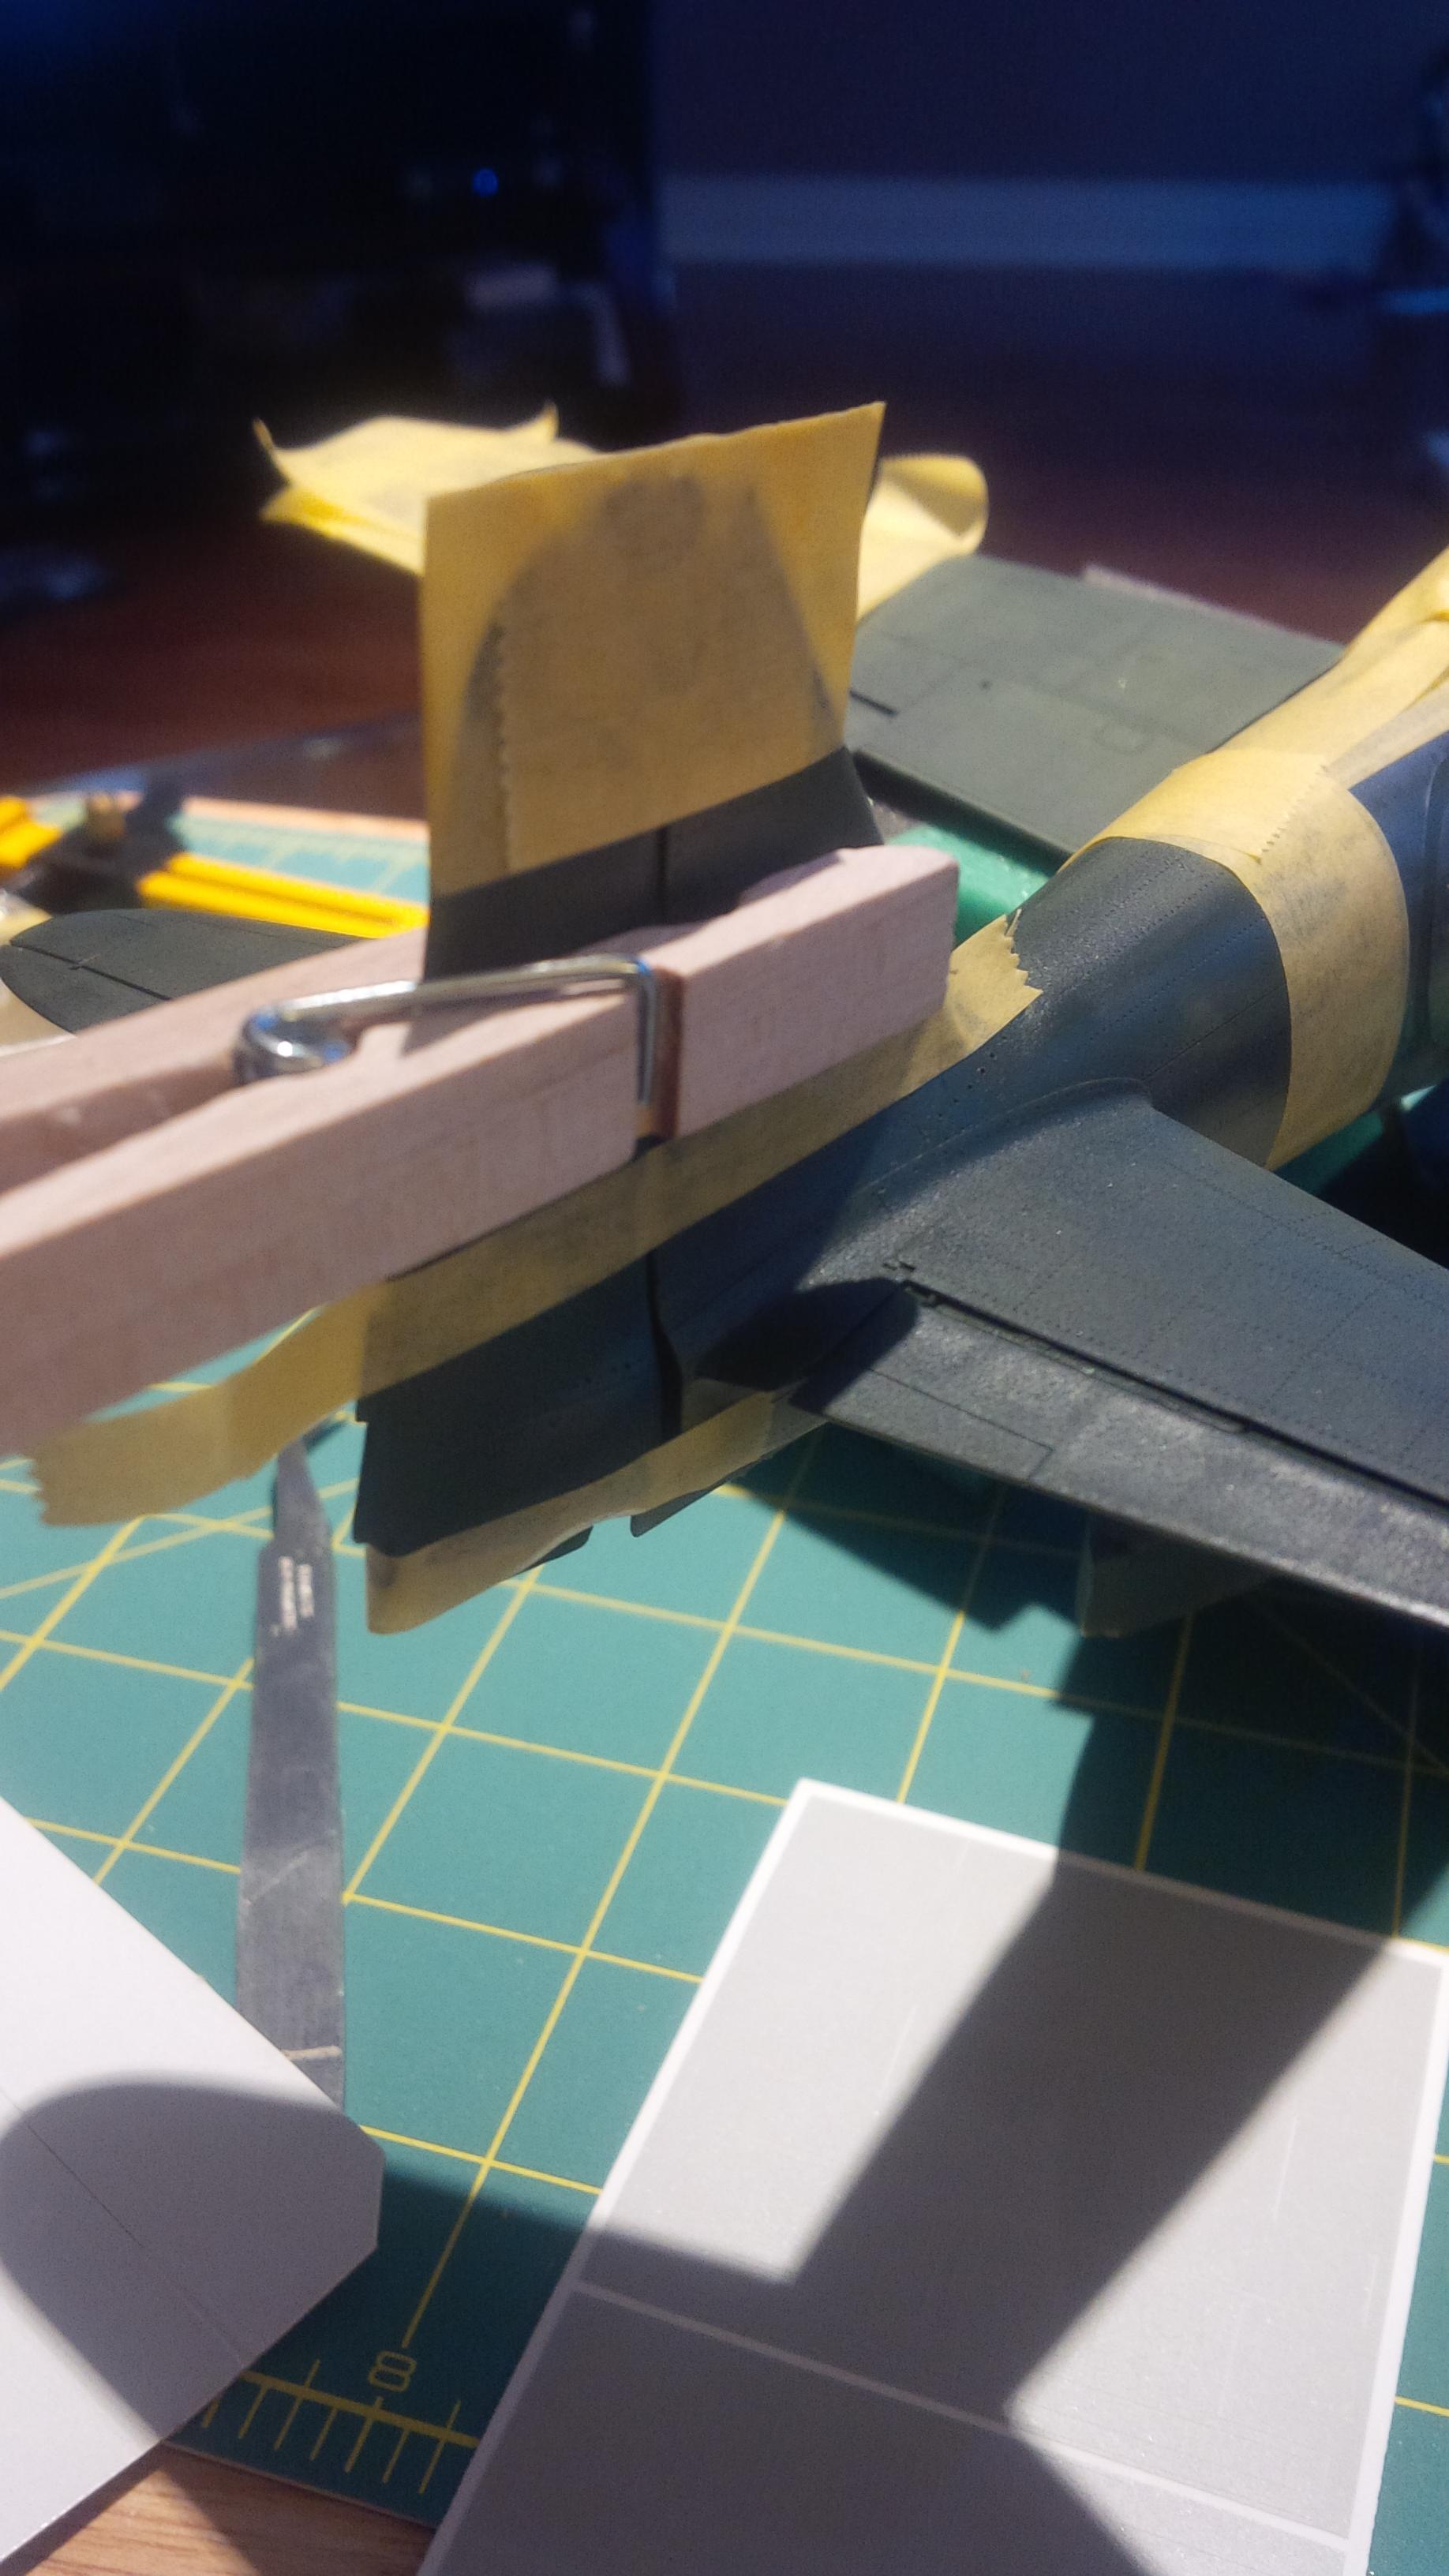
That's all for now folks! On to the dark green, and then the MIRACLE MASKS!!!!!!!!!!!!!!


Matt
GazzaS
#424
_VISITCOMMUNITY
Queensland, Australia
Joined: April 23, 2015
KitMaker: 4,648 posts
AeroScale: 1,938 posts
Posted: Tuesday, October 11, 2016 - 09:45 AM UTC
Matt,
I really dig what you've done to the underside! Can't wait to see that caramel color. Like the engine, too!

Gaz
Scrodes
_VISITCOMMUNITY
Ontario, Canada
Joined: July 22, 2012
KitMaker: 771 posts
AeroScale: 763 posts
Posted: Wednesday, October 12, 2016 - 05:28 AM UTC
Thanks Gaz - the colour you see IS the caramel colour.
GazzaS
#424
_VISITCOMMUNITY
Queensland, Australia
Joined: April 23, 2015
KitMaker: 4,648 posts
AeroScale: 1,938 posts
Posted: Wednesday, October 12, 2016 - 07:12 AM UTC
I figured that. I just meant over the whole plane. I always thought it was orange from old books.
Joel_W
Staff MemberAssociate Editor
AUTOMODELER
_VISITCOMMUNITY
New York, United States
Joined: December 04, 2010
KitMaker: 11,666 posts
AeroScale: 7,410 posts
Posted: Wednesday, October 12, 2016 - 09:31 PM UTC
Matt,
I'm really impressed with your pre-shading technique of the control surfaces, when painted with light color coats will yield a fabric like covered frame to fool ones eye. Sure looks like I'll be borrowing this technique too.

I've used the pinning method mostly for bombs, load stations, and the like. A tight fit even allowed me to interchange loads and stations when and if needed. I even used the pin method to reinforce the landing gear struts on the 1/32 scale F2A-3 Buffalo.

Your alignment tool is simple, yet so effective. I just might give you the nickname of MacGyver .

Joel
Scrodes
_VISITCOMMUNITY
Ontario, Canada
Joined: July 22, 2012
KitMaker: 771 posts
AeroScale: 763 posts
Posted: Friday, October 14, 2016 - 12:19 AM UTC
Yeah Gary - old references on Japanese subjects are some of the worst!

I won't be painting the entire Rufe in Ameiro - just the parts where I'm going to try and wear the paint down a bit. I don't want too many coats of paint on the plane - it would like a desperate 14 year old's makeup;


Quoted Text

Matt,
I'm really impressed with your pre-shading technique of the control surfaces, when painted with light color coats will yield a fabric like covered frame to fool ones eye. Sure looks like I'll be borrowing this technique too.


Your alignment tool is simple, yet so effective. I just might give you the nickname of MacGyver .

Joel


Ha! I've been called worse Joel!

I was really pleased with how the fabric sections turned out too. I'll likely still lighten their colour a bit - clear flat with a single drop of white in it or similar.


The green goes down tonight or tomorrow! This is always my favorite part - adding a second exterior colour!

All the small details are being finished and added in the meantime.


I didn't thin the glass sights - I have never known anyone to notice. These are finished in my usual fashion - Nato Black for scale appearance, drybrushed in a gray (whatever is closest to me), given a light coat of Tamiya Smoke which serves as a wash AND a filter and then flat coated.
Scrodes
_VISITCOMMUNITY
Ontario, Canada
Joined: July 22, 2012
KitMaker: 771 posts
AeroScale: 763 posts
Posted: Sunday, October 16, 2016 - 05:34 AM UTC
A quick 'n easy update. A sneak preview if you will.


I don't remember if I have shown you kind folks the Rufe now that it has its floats on!


This photo is a little washed out, but you can still see the effect of the shading on the ailerons. I wasn't sure if it would work as well with the darker colour:


Post-shading completed as usual. I need to yellow the paint a bit more still - the subsequent clear coats will lessen the effect. I usually stop just before it looks silly.


The final result will be similar to this other build of mine - this one took 1st in scale last year.

http://www.hyperscale.com/2012/galleries/ki8448mo_1.htm
GazzaS
#424
_VISITCOMMUNITY
Queensland, Australia
Joined: April 23, 2015
KitMaker: 4,648 posts
AeroScale: 1,938 posts
Posted: Sunday, October 16, 2016 - 07:32 AM UTC
Matt,
Looks nice! The Zero has such beautiful lines. Always a pleasure to see.

Gaz
GidGar
_VISITCOMMUNITY
Alaska, United States
Joined: August 22, 2005
KitMaker: 47 posts
AeroScale: 19 posts
Posted: Sunday, October 16, 2016 - 12:10 PM UTC
Nice work Matt. The pre-shading effect is very effective. Will have to give it a try on my next project. Thanks for the updates.
Joel_W
Staff MemberAssociate Editor
AUTOMODELER
_VISITCOMMUNITY
New York, United States
Joined: December 04, 2010
KitMaker: 11,666 posts
AeroScale: 7,410 posts
Posted: Sunday, October 16, 2016 - 09:33 PM UTC
Matt,
The paint looks really nicely weathered with the blotchy effect. I gather that you'll be adding another coat or two lightened up with Yellow, especially after seeing that other picture.
Joel
Scrodes
_VISITCOMMUNITY
Ontario, Canada
Joined: July 22, 2012
KitMaker: 771 posts
AeroScale: 763 posts
Posted: Sunday, October 16, 2016 - 09:44 PM UTC
Thanks guys!


Quoted Text

Matt,
The paint looks really nicely weathered with the blotchy effect. I gather that you'll be adding another coat or two lightened up with Yellow, especially after seeing that other picture.
Joel


Yes I will be fading the paint some more. I stopped before I went too far. But in the event that you (being anyone reading) goes too far, you can touch it up with the base colour again, which will add another tone - more depth.


I am off to the bench again!

Getting set up to apply Mal's Miracle Masks. Such a great guy, quality work and he's always happy to help us builders
chukw1
_VISITCOMMUNITY
California, United States
Joined: November 28, 2007
KitMaker: 817 posts
AeroScale: 729 posts
Posted: Sunday, October 16, 2016 - 09:45 PM UTC
Wow- looks great, Matt! You're a dab hand at pre-shading. I'm too heavy-handed at laying down my top colors for that- so it's post-shading for me. Those floats- fantastic!
Scrodes
_VISITCOMMUNITY
Ontario, Canada
Joined: July 22, 2012
KitMaker: 771 posts
AeroScale: 763 posts
Posted: Monday, October 17, 2016 - 01:39 AM UTC

Quoted Text

especially after seeing that other picture.
Joel


Unless by 'that other picture' you mean the photos of the Frank, in which case no - the Frank is a totally different colour. Most Japanese aircraft manufacturers had their own specific colours.
Scrodes
_VISITCOMMUNITY
Ontario, Canada
Joined: July 22, 2012
KitMaker: 771 posts
AeroScale: 763 posts
Posted: Monday, October 17, 2016 - 06:37 AM UTC

Quoted Text

Wow- looks great, Matt! You're a dab hand at pre-shading. I'm too heavy-handed at laying down my top colors for that- so it's post-shading for me. Those floats- fantastic!


Are you looking for another raise?


Don't forget - that the airframe isn't the only thing you can pre or post-shade. I love the range I got on the A6M5 spinner.


NEVER throw away old paint brushes - they make the most useful tools. Shove them into parts like this, or put an alligator clip on the end.


Aluminum prop for the Rufe, brown prop and spinner for the Zeke


Ahhhhh, the joys of using Hobby Decal dry transfers. I really like using them for all of the stencils. Fast, easy, they work well. No water needed and the results are immediately.


The fun continues.
Scrodes
_VISITCOMMUNITY
Ontario, Canada
Joined: July 22, 2012
KitMaker: 771 posts
AeroScale: 763 posts
Posted: Monday, October 31, 2016 - 05:44 AM UTC
Well, we have some progress!


And look at this little guy!


Many, MANY thanks to Mal at Miracle Masks. He made these markings custom from a profile I sent him. I was having a dumb moment and just couldn't understand how the markings for the tail were supposed to be done. He was immeasurable help. He even re-wrote and drew out instructions for me


First though - I needed to tack the rudder in place and straight. I couldn't glue it because the rudder pedals aren't straight so the rudder won't be straight.

I used a clothes peg to keep the rudder straight for masking and painting, and used masking tape to keep the rudder in place.


Sometimes jigs aren't used for alignment so much as they are for handling large assemblies. Attaching the wing floats is coming back to haunt me, but I don't know that this would be any easier with just the main float in place.


The first mask has been applied, painted and removed. You can see the placement box still on the tail. This is the second mask which fits directly in the PB to align the masks. The new mask is a little bit smaller and will leave a white border of 1mm around the letters and stripe.


In the end, I was thrilled with how well this came out. I did touch up the white. Now that I've used Miracle Masks, I will use them as often as I can.


Post touch up on the letters, before the band was fixed.


The Zeke still needs legs. I originally planned on simply displaying the A6M5 on its stand with the wheels up.


The gear does articulate, and I don't consider this a 'toy like feature' as others do, because they look the part and the oleo elbow flexes with the gear. They elbow is made of two pieces and snapped together perfectly. I wish everything was this well made


I realized last week that the kit has rubber main tires. So I ordered a set of resin replacements which just came in. They're nothing pretty, but they're not the cheap rubber ones that never manage to look scale.


I think that's it for now. I have to touch up a bunch of the green paint where it came off. This is not a fault of the miracle masks, but rather the Vallejo gray primer - this seems to be an ongoing issue right now for a lot of people, it's simply coming up no matter how well the surfaces are cleaned.


Antilles
_VISITCOMMUNITY
Nordrhein-Westfalen, Germany
Joined: March 22, 2015
KitMaker: 671 posts
AeroScale: 614 posts
Posted: Monday, October 31, 2016 - 01:31 PM UTC
Matt,
what a great built here. I cannot believe that there is a spring in the landing gear. Is this correct ? Is it a metal one?

Oliver
Joel_W
Staff MemberAssociate Editor
AUTOMODELER
_VISITCOMMUNITY
New York, United States
Joined: December 04, 2010
KitMaker: 11,666 posts
AeroScale: 7,410 posts
Posted: Monday, October 31, 2016 - 09:59 PM UTC
Matt,
Mal's masks and your skills really turned out a 100% perfect lettering job on the rudder/tail assembly.

the landing gear struts are incredible. I'm going to assume that the oleos along with the strings are metal. They look as real as real can get.

Joel
Scrodes
_VISITCOMMUNITY
Ontario, Canada
Joined: July 22, 2012
KitMaker: 771 posts
AeroScale: 763 posts
Posted: Tuesday, November 01, 2016 - 06:06 AM UTC

Quoted Text

Matt,
what a great built here. I cannot believe that there is a spring in the landing gear. Is this correct ? Is it a metal one?

Oliver


Yessir, there is in fact. - and it works very well.


Quoted Text

Matt,
Mal's masks and your skills really turned out a 100% perfect lettering job on the rudder/tail assembly.

the landing gear struts are incredible. I'm going to assume that the oleos along with the strings are metal. They look as real as real can get.

Joel


Thank you as always Joel! I'm glad the tail markings came out as well as they did - it was a key point in my choosing this particular marking.


As for the landing gear, they're actually plastic; they came on a separate sprue, a hard black plastic with pre-chromed oleo struts. Exceptionally well thought out and very very sturdy. I don't even think I painted them except the light dry-brushing to bring out the details.
rochaped
_VISITCOMMUNITY
Lisboa, Portugal
Joined: August 27, 2010
KitMaker: 679 posts
AeroScale: 669 posts
Posted: Tuesday, November 01, 2016 - 05:37 PM UTC
Wonderful work, might probably be two of the finest A6Ms I've contemplated in a long time, whatever scale.

Cheers
Pedro