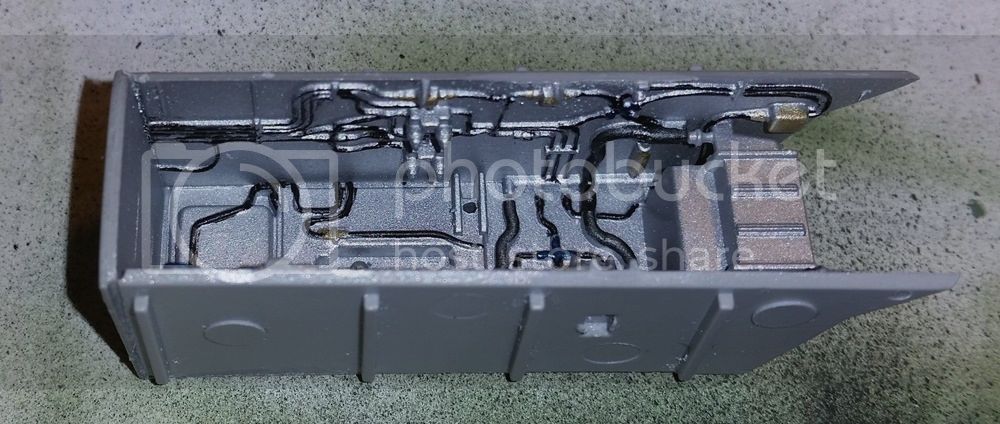
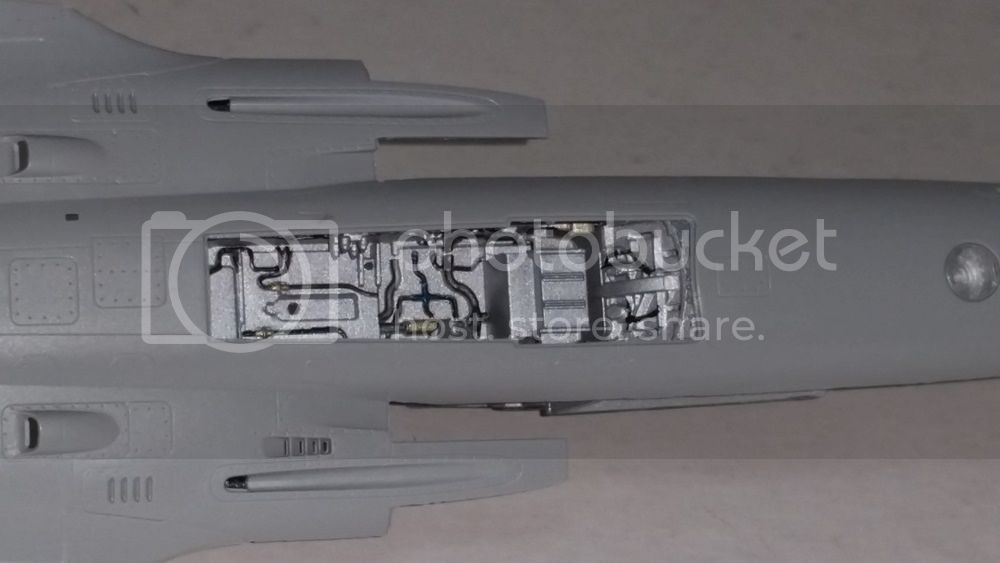
The front wheel bay looks simple to assemble. Italeri noticed this, and I presume thought we would be bored simply sticking plastic together. In response they made it so you can join the sides, front and rear in slightly different ways, none of which seem to fully align the components and moulded details.
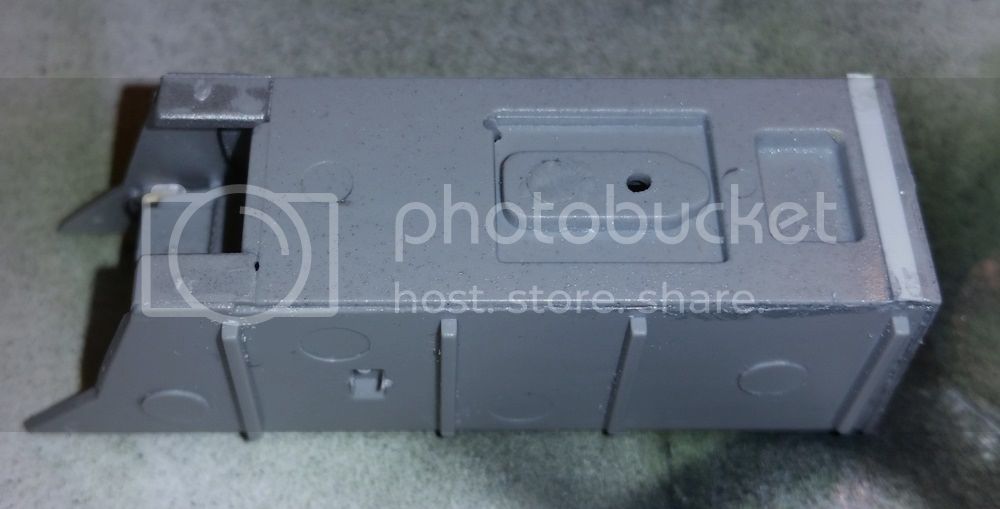
Of course, the problem here is not the model. It is my assumption that they should align at all. How mad was that assumption! That would make things so easy, simple and dull. After half an hour of fiddling and test fitting I discovered that the correct option appears to be as shown in the photo below.
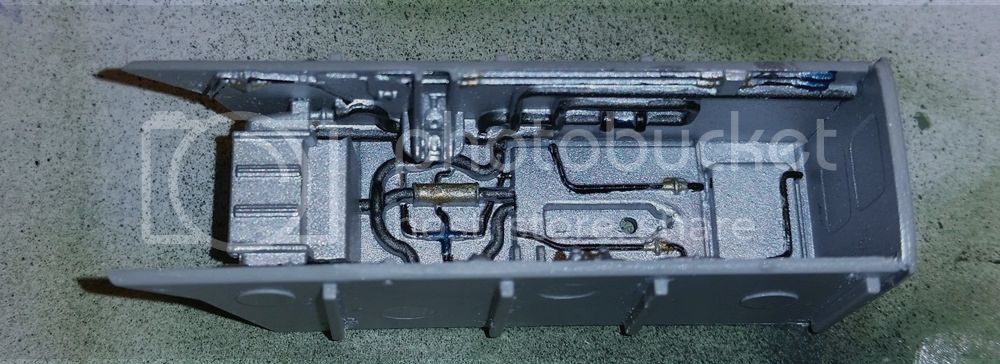
The side parts sit just under the lip at the edge of the top of the wheel bay. This leaves a gap between the rear and top part, and it also leaves moulded hoses in the interior do not meet.
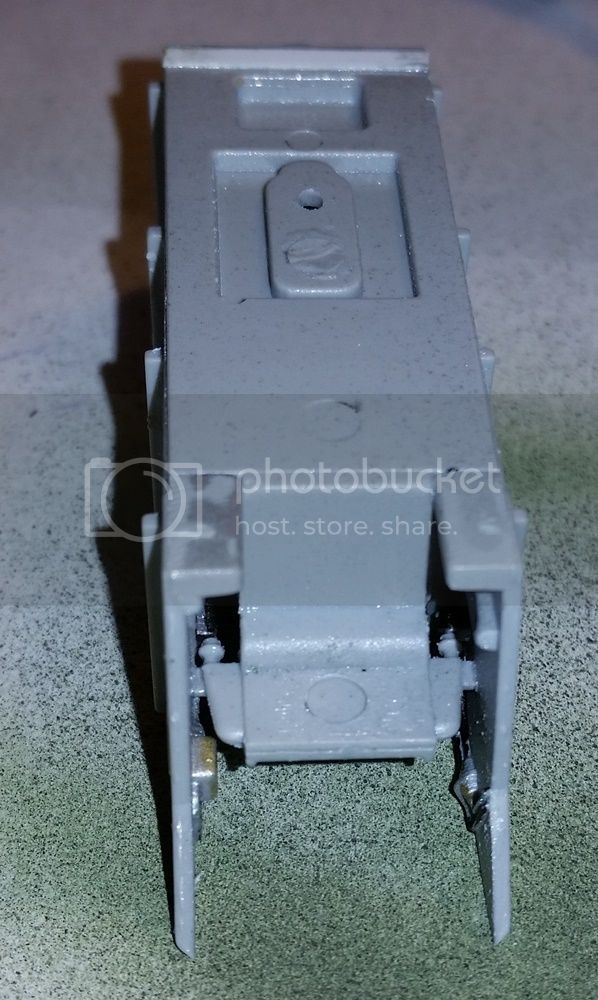
However it does mean that the lower edges sit snuggly inside the guides on the lower fuselage half, and it looks right when viewed from underneath.
As you can see, the parts aren't glued yet. They are held together with tape. I don't fully trust I have this right, so I’m going to work on the cockpit tub which attaches to the front landing gear bay, and then do a second test fit with it in a more complete state.
Wow, all this from one simple illustration in the instructions. Is that what they call value for money?
I wonder how the cockpit tub will fit and if it will in turn fit snuggly to the upper fuselage halves. Shall we take a bet?
Cold War (1950-1974)
Discuss the aircraft modeling subjects during the Cold War period.
Hosted by Tim Hatton
Italeri 1/32 Mirage IIIc
SteveAndrews
England - South East, United Kingdom
Joined: August 16, 2010
KitMaker: 693 posts
AeroScale: 551 posts
Joined: August 16, 2010
KitMaker: 693 posts
AeroScale: 551 posts
Posted: Sunday, January 10, 2016 - 01:12 AM UTC
MichaelSatin
Campaigns Administrator
Colorado, United States
Joined: January 19, 2008
KitMaker: 3,909 posts
AeroScale: 2,904 posts
Joined: January 19, 2008
KitMaker: 3,909 posts
AeroScale: 2,904 posts
Posted: Sunday, January 10, 2016 - 01:43 AM UTC
Steve,
Very nice work so far! I'm afraid that the issue you're experiencing with the nose gear well is not limited to that assembly, I'm finding that most of the model is like that. For what it's worth, here's my gear well:
Note that there was a small gap along the top rear of the well that I patched with a piece of strip. It's hardly noticable from inside.
Here's how the detail lined up:
And here's how it fit in the fuselage bottom:
Not sure how the cockpit will line up witht the fuselage sides yet, that fun is yet to come!
Michael
SteveAndrews
England - South East, United Kingdom
Joined: August 16, 2010
KitMaker: 693 posts
AeroScale: 551 posts
Joined: August 16, 2010
KitMaker: 693 posts
AeroScale: 551 posts
Posted: Sunday, January 10, 2016 - 02:27 AM UTC
Hi Michael
Thanks very much for posting your work. Its sort of a relief to know its not me, and it looks like you've made a good job of the wheel bay. Your plastic card fix is a good one, and I'm going to do something similar. It makes me wonder what's next? Maybe we should form a therapy group.
I must say though, that despite the gripes I am actually enjoying fixing these problems, even if there's a part of me that wants to ask Italeri what they are playing at.
Thanks again for adding to the info, and feel free to keep it up if you want to.
All the best
Steve
Thanks very much for posting your work. Its sort of a relief to know its not me, and it looks like you've made a good job of the wheel bay. Your plastic card fix is a good one, and I'm going to do something similar. It makes me wonder what's next? Maybe we should form a therapy group.
I must say though, that despite the gripes I am actually enjoying fixing these problems, even if there's a part of me that wants to ask Italeri what they are playing at.
Thanks again for adding to the info, and feel free to keep it up if you want to.
All the best
Steve
litespeed
News Reporter
England - North West, United Kingdom
Joined: October 15, 2009
KitMaker: 1,976 posts
AeroScale: 1,789 posts
Joined: October 15, 2009
KitMaker: 1,976 posts
AeroScale: 1,789 posts
Posted: Sunday, January 10, 2016 - 02:43 AM UTC
Quoted Text
However there’s such a large number of variants flown by different air forces, and I'm relying on what I find on the web, so I'm not saying this is definitely right or wrong. It is good enough for me.
Steve many thanks for the excellent images of the cockpit.
You are correct about the variations of the gear that Dassault fitted to their aircraft. They weren't shy in tailoring their aircraft to the requirements of any customers. It made great business sense if you are trying to sell a package like the Mirage III in a very competitive market. If the look of the instrument panel is good enough for you then that's the important thing. Go for it.
Really looking forward to seeing more progress.
tim
Joel_W
Associate Editor
New York, United States
Joined: December 04, 2010
KitMaker: 11,666 posts
AeroScale: 7,410 posts
Joined: December 04, 2010
KitMaker: 11,666 posts
AeroScale: 7,410 posts
Posted: Sunday, January 10, 2016 - 04:27 AM UTC
Well, with two different builds, and the same issue with the front wheel well, one has to really wonder if anyone even bothered to look inside the well to see that the molded plumbing doesn't come close to aligning.
Not sure how either of you will be able to address that issue.
Joel
Not sure how either of you will be able to address that issue.
Joel
MichaelSatin
Campaigns Administrator
Colorado, United States
Joined: January 19, 2008
KitMaker: 3,909 posts
AeroScale: 2,904 posts
Joined: January 19, 2008
KitMaker: 3,909 posts
AeroScale: 2,904 posts
Posted: Sunday, January 10, 2016 - 05:16 AM UTC
Quoted Text
Hi Michael
Thanks very much for posting your work. Its sort of a relief to know its not me, and it looks like you've made a good job of the wheel bay. Your plastic card fix is a good one, and I'm going to do something similar. It makes me wonder what's next? Maybe we should form a therapy group.
I must say though, that despite the gripes I am actually enjoying fixing these problems, even if there's a part of me that wants to ask Italeri what they are playing at.
Thanks again for adding to the info, and feel free to keep it up if you want to.
All the best
Steve
Steve,
You're doing a great job! If you want to see where I'm at with mine, I'm posting progress in the Duel II Campaign thread. Can't wait to move on to the MiG-21!
Michael
SteveAndrews
England - South East, United Kingdom
Joined: August 16, 2010
KitMaker: 693 posts
AeroScale: 551 posts
Joined: August 16, 2010
KitMaker: 693 posts
AeroScale: 551 posts
Posted: Sunday, January 10, 2016 - 05:34 PM UTC
Hi guys
As always thanks for looking in.
Tim, I'm pleased the cockpit dials are not a million miles off, even if they aren't exact. I'm looking for decals to add detail. Do you (or anyone else) know of any? So far I've been directed to a company called Airscale, that provides generic decals. Check out this offering:
http://airscale.co.uk/store.php#!/1-32-scale-Allied-Jets-Cockpit-Decals/p/39195030/category=10110361
Tim, I just left a post on your thread. Impressive progress!
Joel, yes it's problem, but luckily one that won't show too much in the end. I think I'll use a little wire and/or stretched sprue to bridge the gaps, maybe even filler if I can get them small enough. Watch this space. I haven't quite decided yet.
Happy modelling guys.
Steve
SteveAndrews
England - South East, United Kingdom
Joined: August 16, 2010
KitMaker: 693 posts
AeroScale: 551 posts
Joined: August 16, 2010
KitMaker: 693 posts
AeroScale: 551 posts
Posted: Tuesday, January 12, 2016 - 02:19 AM UTC
There’s nothing quite like a jumble of wires to scratch build. They're easy to make and really add depth to surface detail. So, I approached the area forward of the cockpit dials with a sense of anticipation. My references showed some lovely opportunities to make this area pop. I set about drilling holes and adding lead wire, bent brass rod and a couple of items found in the spares box. I also made simple extension to the instrument panel sun shields - the kit item on the left shield is barely there and it looks too thick and not deep enough. However, I got a little way and knew my tube of super glue was FUBAR so, that stopped the fun faster than an arrester hook. My progress is shown below (you can also see two ejector pin marks that needed filling, and one that I think I can get away with as it won't be seen or affect construction).
The pause in adding detail, gave me time to rig up the fuselage. I wanted to bring the halves together to use as a guide when I assemble the cockpit parts. I taped them up with Tamiya masking tape, and put in the forward part that holds the halves in the correct shape. This test fit revealed a fairly good fit, but one that I suspect will not be without its niggles, and will need care to get right. One of the locating pins is broken in my kit, so that might need a fix to help with alignment. For now taped up will do to help minimise problems with getting the assembly of the various cockpit parts right.
"Mieux vaut prévenir que guérir” It is better to prevent than to heal. French saying.
Thanks for looking in.
SteveAndrews
England - South East, United Kingdom
Joined: August 16, 2010
KitMaker: 693 posts
AeroScale: 551 posts
Joined: August 16, 2010
KitMaker: 693 posts
AeroScale: 551 posts
Posted: Thursday, January 14, 2016 - 02:24 AM UTC
Super glue replenished, the rear of the instrument panel is finished off. In keeping with the general approach, wires and struts that look something like the references have been added. I didn't try and replicate them exactly. I went for an impression of the real thing.
The images below show the instrument panel and seat sitting unglued in the cockpit tub. I’ll be painting these parts separately to make it easier to get into all the nooks with the airbrush. Just like the seat the back of the instruments will get a coat of good primer to bind the paint onto the different materials used. By the way, you get a much better bond between the thin metal wires and the plastic part when holes are drilled to insert the ends of the wires into, and that’s the approach I took. I used a pin vice with the appropriate size drill bit so the hole wasn't too big or too small, and where I can I drill quite deep
So far so good. Its almost more fun adding these additions than it is assembling a kit that seems to build itself. I wonder if I’ll still think that at the end?
Posted: Thursday, January 14, 2016 - 04:38 AM UTC
Looks great, Steve! Ok, better than great. But it'd be a devil to paint those details with my hands.
Joel_W
Associate Editor
New York, United States
Joined: December 04, 2010
KitMaker: 11,666 posts
AeroScale: 7,410 posts
Joined: December 04, 2010
KitMaker: 11,666 posts
AeroScale: 7,410 posts
Posted: Thursday, January 14, 2016 - 05:15 AM UTC
Steve,
Your pit is just incredible. Your efforts certainly paid off in spades.
Joel
Your pit is just incredible. Your efforts certainly paid off in spades.
Joel
SteveAndrews
England - South East, United Kingdom
Joined: August 16, 2010
KitMaker: 693 posts
AeroScale: 551 posts
Joined: August 16, 2010
KitMaker: 693 posts
AeroScale: 551 posts
Posted: Thursday, January 14, 2016 - 04:53 PM UTC
Hi Joel, Gary and everyone else looking in.
Guys thanks very much for the encouragement. Its great to read it, and I appreciate your saying so.
Gary, yes I know what you mean about painting. I'll share the pain and the pleasure when I get there.
This whole approach reflects my new mantra 'fewer, bigger, better'. In other words I want to throw my heart and soul into a small number of big kits, and make them to the best of my ability, even if it takes a long time (that includes the blog by the way).
To help keep things manageable, I won't be giving this much attention to areas that can't be seen when the model is in the display cabinet. For example, the landing gear bays will get a few corrections only (grrr those hoses), because my Virgo side just can't live with the thought that they don't join. However, the landing gear itself will get more extras because it can be seen. That's the plan.
By the way, I have a references tip. Try searching for pictures using the national website and language of the operating airforce and/or manufacturer. Google translate can do the translating work for you. It throws up new stuff! I did a search using google.fr for this project and found good new references. Obviously if its English then most of us are OK, and cyrillic or Cantonese might be a bit more challenging. Apologies if this is already standard operating procedure amongst the more experienced out there.
Have a great day.
Steve
redcap
England - East Midlands, United Kingdom
Joined: November 06, 2005
KitMaker: 753 posts
AeroScale: 311 posts
Joined: November 06, 2005
KitMaker: 753 posts
AeroScale: 311 posts
Posted: Saturday, January 16, 2016 - 01:16 AM UTC
Steve,
This is great work and thanks for such an informative build and an early 'heads up' on some problematic areas.
Looking in the box, I am happy with the kit (it knocks the old Revell one into a hat) and the main thing I shall change with aftermarket (EDUARD Brassin I hope) is the wheels which have waaaay too much 'flat' on the bottom IMHO.
Keep up the good work mate!
Gary
DougCohen
Texas, United States
Joined: May 27, 2009
KitMaker: 1,293 posts
AeroScale: 1,072 posts
Joined: May 27, 2009
KitMaker: 1,293 posts
AeroScale: 1,072 posts
Posted: Saturday, January 16, 2016 - 03:12 AM UTC
Steve
I know I am just repeating what everyone else is saying but this is just a cool build very cool, can't wait to see more.
Doug
I know I am just repeating what everyone else is saying but this is just a cool build very cool, can't wait to see more.
Doug
SteveAndrews
England - South East, United Kingdom
Joined: August 16, 2010
KitMaker: 693 posts
AeroScale: 551 posts
Joined: August 16, 2010
KitMaker: 693 posts
AeroScale: 551 posts
Posted: Sunday, January 17, 2016 - 01:18 AM UTC
Hi Gary and Doug
Thanks very much for dropping me a line. I'm pleased to share the fun.
Gary, yes I had a look at the wheels and they do seem a bit flat. Its an area that will be hard to correct through scratch building so I might join you in a little bit of aftermarket or just live with them. I'll see what the options are who I get to that stage.
Right, on we go...
SteveAndrews
England - South East, United Kingdom
Joined: August 16, 2010
KitMaker: 693 posts
AeroScale: 551 posts
Joined: August 16, 2010
KitMaker: 693 posts
AeroScale: 551 posts
Posted: Sunday, January 17, 2016 - 01:29 AM UTC
It seems like every step of this build is going to offer some challenge, and there’s fun to be had in overcoming them. Challenge number one - the front wheel bay hoses that don't join - was dealt with by adding a small piece of stretched sprue to the ends of the offending hoses. I added a little too much and sanded them buck to get a good fit. Easy and satisfying.
The pedals had the now familiar combination of nice and nasty moulding, and they responded well to some careful cleaning up. Left shows before and right shows after.
Challenge number two was the joystick. The moulding is poor and even after careful clean up there wasn't much detail left, so I reached for the stretch sprue again. I made three buttons by cutting a small cross-section of the sprue. I cut several pieces and chose the ones I liked the look of. A dab of Tamiya extra thin glue provided adhesion, and I picked up the small pieces by stabbing them gently with the end of my knife blade. I also added a strip of plastic card to simulate detail.
All that remains now is a final clean up and the cockpit parts are ready for primer. I’m going to paint the front wheel bay parts before assembly too. I find it hard to get good airbrush coverage in deep places. I’ve test fitted those parts and sanded a few areas to ensure a good fit. That’s to keep potentially paint destroying sanding and gluing to a minimum. Here are the cockpit parts ready for paint.
Happy modelling guys
Joel_W
Associate Editor
New York, United States
Joined: December 04, 2010
KitMaker: 11,666 posts
AeroScale: 7,410 posts
Joined: December 04, 2010
KitMaker: 11,666 posts
AeroScale: 7,410 posts
Posted: Sunday, January 17, 2016 - 06:22 AM UTC
Steve,
Your continued attention to detail is really paying off. looking forward to seeing how the pit looks after some paint and weathering .
Joel
Your continued attention to detail is really paying off. looking forward to seeing how the pit looks after some paint and weathering .
Joel
MichaelSatin
Campaigns Administrator
Colorado, United States
Joined: January 19, 2008
KitMaker: 3,909 posts
AeroScale: 2,904 posts
Joined: January 19, 2008
KitMaker: 3,909 posts
AeroScale: 2,904 posts
Posted: Sunday, January 17, 2016 - 10:56 PM UTC
Your excellent work continues Steve!
I'm moving along on mine as well and am in the midst of seam filling (LOTS of it). I'm not faster than you so much as not making the corrections and add ons since I'm reviewing it. I have run into a couple of questions and hope the Mirage experts are reading this:
1. Italeri has the braking parachute housing end as a separate, clear piece. I'm finding it difficult to come up with a clear photo on-line, but I have a feeling that's not supposed to be a light and shouldn't be clear. Anyone have better information?
2. Italeri's instructions also show, on bare metal aircraft, that an underside tail area should be zinc-chromate green and the gun pack area is chromate yellow. I'm pretty sure the green part is correct but have never seen the yellow area before and can't find any photo evidence of that either. Any help here?
Sorry to hijack your thread Steve but I figure the Mirage boffins may be here and you might want an answer to these down the road as well!
Michael
SteveAndrews
England - South East, United Kingdom
Joined: August 16, 2010
KitMaker: 693 posts
AeroScale: 551 posts
Joined: August 16, 2010
KitMaker: 693 posts
AeroScale: 551 posts
Posted: Monday, January 18, 2016 - 12:34 AM UTC
Hi Joel and Michael
Thanks very much. As long as it's fun I'll keep it up! There's a bad joke in there somewhere.
Michael, no problem at all, feel free. Its good to get the people who know helping out, and I'll be interested to see what the answers to those questions are.
You have me flipping through references to see if I can find a picture that helps, but they are inconclusive so far. If I had to take a guess, I'd say you are right, that's not a light, and its definitely not clear. Also I cant see any underside shots that show the chromate colours, but most of my pics are partial side or top shots so definitely not conclusive.
Here's hoping someone has a better answer.
Happy modelling guys
Steve
SteveAndrews
England - South East, United Kingdom
Joined: August 16, 2010
KitMaker: 693 posts
AeroScale: 551 posts
Joined: August 16, 2010
KitMaker: 693 posts
AeroScale: 551 posts
Posted: Monday, January 18, 2016 - 12:38 AM UTC
Paint; the final frontier. These are the voyages of the airbrush Iwata. Her five year mission to boldly spray where no one has sprayed before.
All that nice shiny brass and lead has now disappeared under a layer of Alclad primer. It’s a little sad, as the white plastic card and metallics made the extra details pop. I’ll try and remember that when it comes to painting the actual colours.
Towards the end of priming the seat and console I realised I had the air pressure way too low and got the dreaded sandpaper finish. You can see it a little in the photo, but it was more apparent through my magnifying lenses. Bugger.
I reached for the lacquer thiner, ready to strip the lot and repeat, and then I hesitated. Nope. It’s going to get a lot more paint and most of it will be hand painting, so there’ll be some self-levelling. There will also be a gloss coat before applying washes. I don't need a super smooth finish now. I want it, but I don't need it. I put on my favourite chill out track and reminded myself of my first rule of modelling - if you can’t see it with the naked eye, stop worrying about it. I haven't, but my therapist has a great line in reassurance.
And that chill out track? It’s this…
https://www.youtube.com/watch?v=2eBZqmL8ehg
I’m feeling better now. No, really. I am.
litespeed
News Reporter
England - North West, United Kingdom
Joined: October 15, 2009
KitMaker: 1,976 posts
AeroScale: 1,789 posts
Joined: October 15, 2009
KitMaker: 1,976 posts
AeroScale: 1,789 posts
Posted: Monday, January 18, 2016 - 03:27 AM UTC
The mass of cabling reminds me of the can of worms featured in the music video by Sneaker Pimps
Excellent progress Steve keep up the good work and the entertaining build log.
tim
Excellent progress Steve keep up the good work and the entertaining build log.
tim
Joel_W
Associate Editor
New York, United States
Joined: December 04, 2010
KitMaker: 11,666 posts
AeroScale: 7,410 posts
Joined: December 04, 2010
KitMaker: 11,666 posts
AeroScale: 7,410 posts
Posted: Monday, January 18, 2016 - 05:00 AM UTC
Steve,
the primer coat looks pretty good to me. I've never used the Alcad primer, so I'm just assuming like their black base it's already pre-thinned. I usually AB it around 15 psi or so and get a pretty smooth surface once it dries.
Joel
the primer coat looks pretty good to me. I've never used the Alcad primer, so I'm just assuming like their black base it's already pre-thinned. I usually AB it around 15 psi or so and get a pretty smooth surface once it dries.
Joel
SteveAndrews
England - South East, United Kingdom
Joined: August 16, 2010
KitMaker: 693 posts
AeroScale: 551 posts
Joined: August 16, 2010
KitMaker: 693 posts
AeroScale: 551 posts
Posted: Monday, January 18, 2016 - 04:57 PM UTC
Hi Tim and Joel
Tim, yes you're right! My second hobby is collecting music, so there might be more odd musical connections. Maybe we should start a thread on music to model to?
Joel, thanks very much. I thought I had the AB at around 15psi. That's the Alclad recommended. It was more like 10 when I checked. I enjoy getting a lovely smooth finish and I was annoyed at myself for making a simple mistake, especially after I took real care with the construction. You're right though, its not a disaster, and in the cold light of day it looks fine, so I'll work with it.
As always, thanks both for taking the time.
Have a great day.
Steve
SteveAndrews
England - South East, United Kingdom
Joined: August 16, 2010
KitMaker: 693 posts
AeroScale: 551 posts
Joined: August 16, 2010
KitMaker: 693 posts
AeroScale: 551 posts
Posted: Thursday, January 21, 2016 - 01:24 AM UTC
What do you do when a model goes wrong?
My options include:
1. Consigning it to the bin in a fit of frustration. Splash one Eduard Mig 21, that hit the deck and never recovered.
2. Carefully packing it away in the knowledge that some decades hence the horror might have faded and repair might seem possible. Where are you now, Tasca Sherman?
3. Soldiering on bravely in the sprit of those who crewed the real thing, and had much more to lose than cash and a dented ego. Yes, that means you Dragon Panzer III.
4. Taking it to the bottom of the garden, setting light to it and watching it burn and melt, safe in the knowledge that next week’s pocket money brings another shot at success. R.I.P. the many Airfix kits that I built as a kid. Admittedly, the moulding was so poor that they looked much the same after melting.
Today my preferred option is to carry on, even when the boy in me wants to head to the garden. I have to say its paying off. I admit that the problem with the Mirage wasn't so big, but that sandpaper finish was bugging me. It was polluting my satisfaction. The answer, it turns out, was to get some proper colour down.
I’m one of the people who doesn't like using pure black on models. I’m in the ‘scale colour’ faction. The predominant colour inside the Mirage is black, so I scaled it down to 1/32 and mixed a batch of dark grey. Equipped with that I airbrushed enough of the interior to help construction, but did not paint all of it. I want to build it up and fill and sand any problems before I commit to the full paint job. So I now have some dark grey cockpit parts drying nicely. I’ll give them 24 hours to cure and then return to building.
I love the smell of paint in the morning. It smells like…. victory.
Joel_W
Associate Editor
New York, United States
Joined: December 04, 2010
KitMaker: 11,666 posts
AeroScale: 7,410 posts
Joined: December 04, 2010
KitMaker: 11,666 posts
AeroScale: 7,410 posts
Posted: Thursday, January 21, 2016 - 01:45 AM UTC
Steve,
Back in the 70's when it was my 1st adult trip as a modeler. The kits were relatively cheap, and I was pretty bad. My "bomb" rate was more like 50%. So I was pretty creative with how to bomb each kit. Thank goodness my skills are some what better now, and it's rare I bomb a kit. I think last year I only tossed one kit!
Like you, I rarely use flat black except for highlighting. Instead I prefer Nato Black which is more of a very dark Gray.
Joel