

Hi Joel
Thanks very much. If anyone isn't so happy with their filling and sanding technique then this kit offers lots of opportunity to practice.
The UMP sanding sticks are a joy to use and get a great result. This is the first time I've used them and I wish I'd bought some ages ago. You can buy direct here:
http://www.umpretail.com
Happy modelling.
Steve
Cold War (1950-1974)
Discuss the aircraft modeling subjects during the Cold War period.
Discuss the aircraft modeling subjects during the Cold War period.
Hosted by Tim Hatton
Italeri 1/32 Mirage IIIc

SteveAndrews

Joined: August 16, 2010
KitMaker: 693 posts
AeroScale: 551 posts
Posted: Saturday, April 09, 2016 - 01:34 AM UTC
SteveAndrews
Joined: August 16, 2010
KitMaker: 693 posts
AeroScale: 551 posts
Posted: Saturday, April 09, 2016 - 02:22 AM UTC
Like a lot of jets the Mirage has hoses and tubing running up and down the landing gear legs. I thought a bit about how to represent these, and decided I would use stretched sprue. The hoses run from the wheels (at least a couple are brake hoses) up the gear legs and into the wheel bays. To start with I thought Id just represent the hoses on the legs, but then a different plan occurred to me. I glued the landing gear legs in place, and put the assembly aside to set. Now I can make the hoses run from the bottom of the legs to the wheel bays with no breaks. I haven't yet decided if Ill try and run them into the brake callipers on the wheels. I want to keep the wheels separate for painting, so I might take a short cut and add a representation of the hoses to the wheels without actually connecting them to the landing gear legs. Watch this space to see if thats the final plan.

I realised the landing gear fit is wobbly, and getting the right angle will only be possible once the wings are glued to the fuselage. The angle has to be right to get the weighted flat spots on the tyres to sit level on the ground. Having resigned myself to that I assembled the wings and put them aside to dry thoroughly, being careful not to glue the landing gear legs solid yet . The wings will need some filling and sanding of course.

While the wings were setting I made the wheels and enhanced the tread pattern a bit with a scriber. A little test fit showed they go on nicely. When I reach for the glue I will make sure the weighted flat spot is on the ground, unlike this shot!


Tomorrow the cockpit tub will be airbrushed. I masked off the area around the cockpit just to avoid too much overspray building up in the detail around.

Et voila, a plane is slowly emerging from plastic.
I realised the landing gear fit is wobbly, and getting the right angle will only be possible once the wings are glued to the fuselage. The angle has to be right to get the weighted flat spots on the tyres to sit level on the ground. Having resigned myself to that I assembled the wings and put them aside to dry thoroughly, being careful not to glue the landing gear legs solid yet . The wings will need some filling and sanding of course.
While the wings were setting I made the wheels and enhanced the tread pattern a bit with a scriber. A little test fit showed they go on nicely. When I reach for the glue I will make sure the weighted flat spot is on the ground, unlike this shot!
Tomorrow the cockpit tub will be airbrushed. I masked off the area around the cockpit just to avoid too much overspray building up in the detail around.
Et voila, a plane is slowly emerging from plastic.

GazzaS

#424

Joined: April 23, 2015
KitMaker: 4,648 posts
AeroScale: 1,938 posts

Posted: Saturday, April 09, 2016 - 03:22 AM UTC
Hi Steve,
I like the way you've enhanced the tire detail. I'm still amazed at the lower ends of the gear. It piqued my curiosity so I went looking after some online photos. Seems there are some aftermarket available, though I didn't bother to see what scale they were. I think with a little putty and some careful shaping and sanding you might get away from the shapelessness of the lower gear legs. For a spot like that you'd want some strongly binding putty like Tamiya Green, or dissolved sprue. Milliput or something like it would probably flake off as you worked it and drive you mad.
Heck, there's even some telescoping area down there that might be modelled...it's a great place for a little alfoil.
Cheers,
Gaz
SteveAndrews
Joined: August 16, 2010
KitMaker: 693 posts
AeroScale: 551 posts
Posted: Saturday, April 09, 2016 - 11:38 PM UTC
Hey Gaz
Yup, its great to get stuck in. I've been doing some work on the cockpit (see below) and then I'll return to the landing gear. I'm still in awe of your foil work and a bit scared of it. Having invested in a good deal in metallic paints for this project, I'll probably stick to those, but keep tempting me :-) I think I need a specific project to try it out.
Have a great day.
Steve
SteveAndrews
Joined: August 16, 2010
KitMaker: 693 posts
AeroScale: 551 posts
Posted: Saturday, April 09, 2016 - 11:54 PM UTC
There are times out on my motorbike when I find myself grinning inside my helmet from the pure joy of riding. Today I had a little modelling moment just like that. The cockpit has been airbrushed, first with a base layer of Vallejo Model Air Black, and then with a modulation effect of Vallejo Model Colour Black Grey. Its hard to see in the photos but by concentrating the black grey on the upper parts of the cockpit, the higher areas are highlighted. Next therell be a black oil pin wash and hand painted highlights.


I couldn't resist dropping the ejector seat in place just to see what Im heading towards, and thats where the grin came from. After all the work, Im really pleased with how it is shaping up. Suddenly the flash, airbrushing mistakes and badly moulded parts are lost in what is probably the best cockpit Ive achieved to date. It made my day.

By the way, I noticed this interesting effect as I took the masking tape off. The overspray from painting the cockpit left a tint of colour just beyond where I had masked. This might be a way of adding some variation to the natural metal finish later.

Happy modelling guys.
I couldn't resist dropping the ejector seat in place just to see what Im heading towards, and thats where the grin came from. After all the work, Im really pleased with how it is shaping up. Suddenly the flash, airbrushing mistakes and badly moulded parts are lost in what is probably the best cockpit Ive achieved to date. It made my day.
By the way, I noticed this interesting effect as I took the masking tape off. The overspray from painting the cockpit left a tint of colour just beyond where I had masked. This might be a way of adding some variation to the natural metal finish later.
Happy modelling guys.
Joel_W

Joined: December 04, 2010
KitMaker: 11,666 posts
AeroScale: 7,410 posts
Posted: Sunday, April 10, 2016 - 04:12 AM UTC
Steve,
Looking forward to following your adventure in detailing the struts as I'm doing something rather similar with them on the B-25B build.
Gotta admit that the black/black gray color modulation just adds that little extra. One does really have to look carefully to see it, but once you've added your remarkable seat, it shows up all that much better. And that seat is certainly the "main show" of your cockpit.
Joel

SteveAndrews
Joined: August 16, 2010
KitMaker: 693 posts
AeroScale: 551 posts
Posted: Sunday, April 10, 2016 - 12:23 PM UTC
Good morning Joel
I'm going to drop in on your B25B build and take a look.
Thanks for the continuing inspiration!
All the best
Steve
I'm going to drop in on your B25B build and take a look.
Thanks for the continuing inspiration!
All the best
Steve
GazzaS
#424
Joined: April 23, 2015
KitMaker: 4,648 posts
AeroScale: 1,938 posts
Posted: Sunday, April 10, 2016 - 01:58 PM UTC
Hi Steve,
That cockpit is very impressive! It seems to have depth and texture and great contrasts. Clearly one of the best I can remember seeing.
As for foiling.... I'd like to hear what inspires you. The Cold War saw lots of bare metal. Before that, it was the US and Japan using unpainted aircraft operationally.
....or, you could just do anything in foil just as an artwork. I remember watching Antiques Roadshow where some gentleman was getting a stainless steel scratch built Spitfire model he'd made evaluated. It was quite pretty.
Best wishes,
Gaz
SteveAndrews
Joined: August 16, 2010
KitMaker: 693 posts
AeroScale: 551 posts
Posted: Sunday, April 10, 2016 - 07:28 PM UTC
Hi Gaz
Thanks very much. Without sounding boastful I am pleased with where its headed, and there's still more to do..
So, if you tempted me down the foil route I'd probably experiment with a nice simple 1/48 scale shape. Maybe an English Electric Lightening. It seems like Airfix do a good kit, and its not too expensive so if disaster strikes I wouldn't be crying.
Hang a minute you've got me talking about it already. No fair!
Have a great day.
Steve

KelticKnot

Joined: May 11, 2015
KitMaker: 768 posts
AeroScale: 656 posts
Posted: Sunday, April 10, 2016 - 08:10 PM UTC
Great looking cockpit with the seat in there, the colours appear very natural. 

Joel_W
Joined: December 04, 2010
KitMaker: 11,666 posts
AeroScale: 7,410 posts
Posted: Sunday, April 10, 2016 - 09:50 PM UTC
Steve,
Gary's ventured into a modeling technique that few have tried, and even fewer have succeeded at. As we've seen, it takes a lot of time invested to learn the basics and build upon them.
Most of us use one of the several manufactures Metallic finishing systems. Mine is Alcad II. For me it works well, and affords me all sorts of color variations. But in my case, rarely does the finish looks as realistic as Gary's foil NMF. But on the other hand, while there is some variation as to tone, it's less then what a Alcad system can achieve.
So I think that there is merit to both methods, and certainly disadvantages to both. Time and effort conquering those learning curves and nuances will make a huge difference. I also think it's fair to say that Metalizers are by far the easiest method of the two.
Steve, as a side note my brother, whose a long time member of LSP (PeterPools) is planning on doing the Mirage IIIc as his next build, but in IAF markings, which will require a major conversion to the rear portion of the fuselage. since we follow each others builds via emails and grab photos, it should be rather interesting to say the least. I've already told him about your build, and I'm sure he has stopped by to checkout your progress.
Joel
SteveAndrews
Joined: August 16, 2010
KitMaker: 693 posts
AeroScale: 551 posts
Posted: Monday, April 11, 2016 - 05:38 PM UTC
Hi Joel
Yes for sure, and Gary's work with foil is inspiring. If I try I will start with something simple but its a few builds away yet as have a stash calling to me.
Happy to have your brother looking in and I'll watch out for his build over on LSP. There are already one or two builds there, so hopefully he'll have a good source of reference and advanced warning on the potential pitfalls too.
Have a great day
S
GazzaS
#424
Joined: April 23, 2015
KitMaker: 4,648 posts
AeroScale: 1,938 posts
Posted: Tuesday, April 12, 2016 - 02:28 AM UTC
This isn't the real thing...
It's a model!
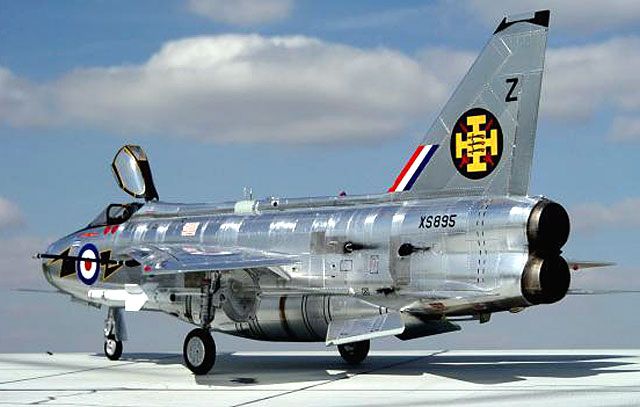
I have more to learn!
The real thing:
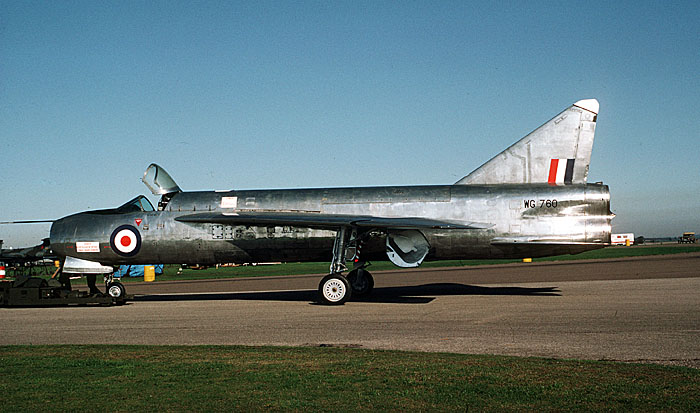
Might ave' to do one meself, someday.
Best wishes,
Gaz
It's a model!
I have more to learn!
The real thing:
Might ave' to do one meself, someday.
Best wishes,
Gaz
SteveAndrews
Joined: August 16, 2010
KitMaker: 693 posts
AeroScale: 551 posts
Posted: Tuesday, April 12, 2016 - 03:21 AM UTC
Wow Gaz. That's a stunning look. Damn it you are luring me to the bright side. My the foil be with you!
SteveAndrews
Joined: August 16, 2010
KitMaker: 693 posts
AeroScale: 551 posts
Posted: Tuesday, April 12, 2016 - 03:45 PM UTC
Hi Paul
Thanks very much. Sorry I missed your message earlier. I hope you enjoy the rest of the build.
All the best
Steve
Thanks very much. Sorry I missed your message earlier. I hope you enjoy the rest of the build.
All the best
Steve
SteveAndrews
Joined: August 16, 2010
KitMaker: 693 posts
AeroScale: 551 posts
Posted: Saturday, April 16, 2016 - 02:40 AM UTC
Back to the landing gear to add the hoses. Ive used a mix of copper wire and stretched sprue with some small squares of plastic sheet to represent the boxes where the pipes change from flexible hose to rigid pipes. This is super fiddly work and a few attempts at each piece were needed before I got something I was happy with.
I used different techniques for each type of material. The copper wire was bent into shape and then cut to length once it had been fitted into one end of the boxes. I drilled holes for the wire and used superglue to keep it in place. One the superglue was dry the other box was attached and then the whole assembly was cemented to the landing gear. The lower tubes made from stretched sprue were bent into shape and then one end was glued in place. I left a good deal of spare at the lower end and bent that into shape once the upper part was fixed and dry. Personally I find these techniques are the path of least resistance when it comes to working with these small and delicate scratch build parts.
The cockpit details have had some highlights and colour added as well. Theres a black oil wash and some scratches, and other general wear and tear to add.
Here it all is in glorious digital technicolour.
GazzaS
#424
Joined: April 23, 2015
KitMaker: 4,648 posts
AeroScale: 1,938 posts
Posted: Saturday, April 16, 2016 - 11:41 AM UTC
Very nice landing gear additions, Steve! You've really turned shapeless junk into nice constructions.
Gaz
Gaz
Joel_W
Joined: December 04, 2010
KitMaker: 11,666 posts
AeroScale: 7,410 posts
Posted: Sunday, April 17, 2016 - 03:45 AM UTC
Steve,
I'll 2nd what Gary said. that strut is really turning into something way better then it was ever intended to be.
Joel
I'll 2nd what Gary said. that strut is really turning into something way better then it was ever intended to be.
Joel
SteveAndrews
Joined: August 16, 2010
KitMaker: 693 posts
AeroScale: 551 posts
Posted: Sunday, April 17, 2016 - 03:37 PM UTC
Hi guys
Thanks very much for the encouragement. It's an odd experience switching from large areas like the fuselage and wings to suddenly putting on the magnifiers and focusing on tiny parts. Its all good fun though and I'm hoping the end result will justify all the hours squinting :-)
Have a great day.
Steve

KeithBurrage

Joined: June 14, 2011
KitMaker: 3 posts
AeroScale: 1 posts
Posted: Sunday, April 17, 2016 - 07:13 PM UTC
While you're doing a great job on this beast Steve, it's a great disappointment to see Italeri still maintaining an impressive level of inconsistency. I noted on both their Hurricane and Wessex HU5 kits in 1/48 I built in the recent past they display a baffling ability to execute some parts with great delicacy of finish and detail whilst others look as though they were moulded in warm custard! I built Airfix's 1/72 offering many decades ago and I suspect you are slowly convincing me to have a go at this one despite it's obvious shortcomings.
Regards
Keith
Regards
Keith
SteveAndrews
Joined: August 16, 2010
KitMaker: 693 posts
AeroScale: 551 posts
Posted: Tuesday, April 19, 2016 - 02:02 AM UTC
Hi Keith
Thanks very much. It really is kit of highs and lows, but there's a lovely model in there somewhere. Just be prepared to put a lot of work in. Maybe old Airfix designers retired to a life in the Italian sun?
Thanks for looking in.
Steve
Thanks very much. It really is kit of highs and lows, but there's a lovely model in there somewhere. Just be prepared to put a lot of work in. Maybe old Airfix designers retired to a life in the Italian sun?
Thanks for looking in.
Steve
SteveAndrews
Joined: August 16, 2010
KitMaker: 693 posts
AeroScale: 551 posts
Posted: Tuesday, April 19, 2016 - 02:17 AM UTC
Frolicking about is the name of the game right now. I'm flitting between building the bits of undercarriage Italeri missed and painting the cockpit. Jumping around a bit keeps me motivated. Well, they say a change is as good as a rest, right?
What I'm trying to do with the cockpit is break up the monotony of all the grey tones. So there's a yellow wash on highlights, a blue wash on recessed areas and a black oil pin wash to highlight the details, as well as a little chipping and some brown oils simulating a bit of collected dust and dirt. Here's the latest, not very expertly photographed progress. Oh by the way I took these shots before the oils were properly dry. That's why you see some areas are matt and some satin.


What I'm trying to do with the cockpit is break up the monotony of all the grey tones. So there's a yellow wash on highlights, a blue wash on recessed areas and a black oil pin wash to highlight the details, as well as a little chipping and some brown oils simulating a bit of collected dust and dirt. Here's the latest, not very expertly photographed progress. Oh by the way I took these shots before the oils were properly dry. That's why you see some areas are matt and some satin.
GazzaS
#424
Joined: April 23, 2015
KitMaker: 4,648 posts
AeroScale: 1,938 posts
Posted: Tuesday, April 19, 2016 - 11:20 AM UTC
Well, Steve, it certainly doesn't look monotonous.
Well done!
Gaz
Btw...if you ever come to Australia lemme know. I have a stash full of cockpits that need building and painting.
Well done!
Gaz
Btw...if you ever come to Australia lemme know. I have a stash full of cockpits that need building and painting.
SteveAndrews
Joined: August 16, 2010
KitMaker: 693 posts
AeroScale: 551 posts
Posted: Tuesday, April 19, 2016 - 03:00 PM UTC
Hey Gaz
Thanks a million.
Funnily enough I lived in Melbourne for a while and had the time of my life. Australia will tempt me back one day, and I would happily paint cockpits while sipping a VB or two.
Have a great day.
S
Thanks a million.
Funnily enough I lived in Melbourne for a while and had the time of my life. Australia will tempt me back one day, and I would happily paint cockpits while sipping a VB or two.
Have a great day.
S
SGTJKJ

#041

Joined: July 20, 2006
KitMaker: 10,069 posts
AeroScale: 3,788 posts

Posted: Tuesday, April 19, 2016 - 04:28 PM UTC
Awesome work on the cockpit and landing gear, Andrew. It really looks awesome with all the details.
Looking forward to see more.
Looking forward to see more.

 |

WEB HOSTING BY


Copyright ©2021 AeroScale and Kitmaker Network, a subsidiary of Silver Star Enterprises
All Rights Reserved. Please read our Conditions of Use and Privacy Policy.
All Rights Reserved. Please read our Conditions of Use and Privacy Policy.